CHEATS CREAM HORN RECIPE FOR KIDS
As some will already know, I had a kids baking section in my old website. Well it takes a lot of time setting up a new website, and even longer still when updating the recipes and photos. But since it’s the summer holidays for schools, it was time to get some of the old recipes back on-line, ready for the kiddies to get baking! My son who was making these recipes, was 12, 13 at the time, and had a bit of a talent for it. These days his talent is in making anything I make disappear in quick time!
CHEATS CREAM HORNS – A RECIPE FOR KIDS
Puff Pastry Cones With A Cream Filling
By Caro


So Koray’s been in the kitchen again, (my 13 year old son in case you didn’t know). He loves pretty much anything sweet so doesn’t need much encouragement to make these things himself and lately I have been creating quick weekend bakes using some shortcuts. One such shortcut used in this recipe, is utilising frozen shop bought puff pastry. Now I am all for making everything from scratch, but puff pastry takes many hours to make and sometimes I have found frozen puff pastry less expensive than buying the butter alone. I also opt for the frozen one as opposed to the chilled one, as it had less preservatives added to it and so nearer to what you would bake at home.


You can fill these horns with anything you like, cream being most common, but some other things you can include are ice-cream sauces, jams/jelly, lemon curd, chocolate spread and fruit. Any combination and in any order. On this occasion he used double (heavy/whipping) cream and whipped it up with a hand mixer. If we had had a can of spray cream, he would have used that and would have actually been easier to fill the horns with.
Another note on the pastry. You can buy in rolls where it’s been rolled out into a rectangle and then rolled up in the box. We had a larger pack that was in a block and so I rolled that out for Koray so that I could keep it in a long rectangular shape as best as possible without having to cut off any excess. So in the end he got 9 full sized horns and one shorter one. But for the pastry weight listed in the ingredients sections, you should get 6 horns.


Finally, we had the metal cones for making these cream horns, (well it was a pack of 6 but for some reason I miss-placed one) so he only baked 5 in the first batch. Now I have checked YouTube and there are lots of videos on how to make your own horn moulds from circles of cardboard covered in tin foil (aluminium foil), of various sizes, so you could even make giant ones if you liked. The metal cones are also widely available on the internet.
So basically, Koray made these himself, with directions from me when he didn’t know what to do next, (oh and I took the tray out of the oven as it flat with only a lip at one side and kind of hard to get out with an oven glove on. Obviously some adult supervision will be required when dealing with a very hot oven and cutting the pastry strips. But the idea is, let them try themselves as much as possible and have fun making something themselves, fill themselves with what they want to taste great too. It will stand them in good stead in life.
**NOTES – important information either in red or bold black lettering.

INGREDIENTS
- Frozen Puff Pastry (at least 375g/13 oz, preferably pre-rolled)
- Butter (2 tbsp, 30g) for greasing
- 1 Egg + splash of milk for egg-wash
- Double/Whipping/Heavy cream or Spray cream
- Jam/Jelly of choice (optional)
- Ice-cream sauces (optional)
- Chocolate Spread (optional)
- Fruits of choice (optional)
- Cake Sprinkles (optional)
- Lemon Curd (optional) – click for my recipe
- **Small amounts needed for these fillings)
EQUIPMENT
- Large baking tray/sheet
- Baking/parchment paper
- Rolling pin
- Horn moulds (see note above)
- Pastry brush (or unused paint brush)
- Knife (see adult about this)
- Ruler
- Timer or phone timer
- Cooling rack (optional)
- Hand/stand whisk (optional)
- Piping bag/food bag OR
- long spoons or butter knife for filling
- OVEN: 210c/190c/400f/Gas mark 6


INSTRUCTIONS
1. Make sure the pastry is defrosted by leaving out or placing in the fridge over-night. If taking from the fridge, let it come to room temperature for about 30 minutes before starting. This will soften the pastry, making it easier to roll out.
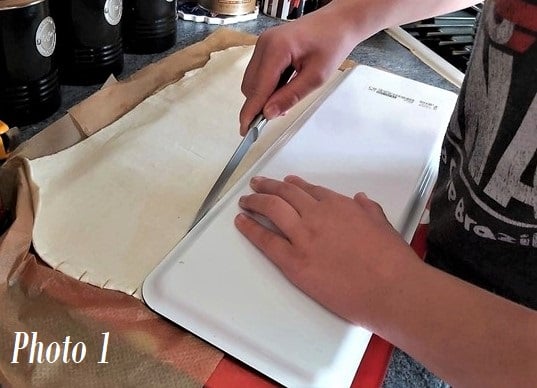
2. Ask an adult to cut a piece of baking/parchment paper for the baking tray/sheet and also one for rolling out the pastry. This one is to be longer than the sheet of pastry you have. Ask an adult to cut the paper to about 50cm ( 20 inches) long. (See Photo 1 below). Place one on the baking sheet/tray and the longer one on the kitchen worktop/counter.

3. Unroll your pastry, place on top of the long piece of paper and take off the paper attached to the back of the pastry.
4. Put a little flour on your hands and rub onto the rolling pin in the middle area. Then roll out the pastry to make the pastry a longer rectangle shape, nearly the length of the long piece of paper it’s on. So only roll out in one direction. You can get an adult to help with this if you want. See Photo 1.
5. Now take a ruler and cut 2.5cm (1 inch) wide strips along the short side of the pastry. You can use the ruler to measure the widths and place a small cut at the beginning and end of the pastry. Then take a ruler or something longer (Koray used a very long tray), and cut a line all the way along. (This is to make extra long thin strips). Get an adult to do this or help you. You can even use a butter knife for this. Cut as many strips you can get out of the pastry. See Photo 1.


6. Once you have cut all the strips, wash your hands and then melt the 2 tbsp butter (30g) in the microwave (try 30 seconds and them mix till melted and all a liquid). Use a pastry brush & brush plenty butter onto the outsides of the cones. Koray did this with two fingers inside the cone to keep it pointing up the way to the ceiling, and used the other hand to brush the butter on. Then sit the cone on the baking tray standing up. Now do the same for the other cones.
7. Heat up the oven to 210c/190c Fan Oven/400f/Gas mark 6 (get an adult to help if you don’t know how or are not allowed to).


8. Wash your hands again and make sure they are really dry. Take one of the cones and sit it next to your pastry strips & keep it standing up with the point at the top. Lift one of the strips of pastry and press it on to the top (pointy part) of the cone and wrap round once and then give a squeeze for it to stick together. (See Photo 2 above). Then keep wrapping the pastry around the cone, working your way down the cone. Over-lapping the pastry a little so there are no gaps until you get to the end of the pastry. (See Photo 3). Don’t make it too loose and don’t go past the bottom of the cone, because that makes it hard to get out later. Press the pastry end to stick it down.
9. Do the same for all the cones and place on the baking tray, standing up.


10. Break 1 egg into a small bowl and add a splash of milk and mix well with a fork (this is called whisking).
11. Hold one of the cones, like before, and brush plenty of the egg wash mixture onto the pastry and then sprinkle sugar all over the pastry. Place laying down on the baking tray (with the end of the pastry strip underneath). Do the same for all the others. See Photo 4.


12. When the oven is ready (the light will go out), place the pastries in the middle shelf of the oven (or get an adult to do this). Bake for about 11 – 15 minutes until all golden and puffed up. Koray baked for 5 minutes with a timer. I took them out to turn the tray and put more egg wash on any areas browning too much). He then baked another 5 minutes and got me to take out again. This time they were golden and I checked the underside and baked them for 2 minutes more. See Photo 5 for how they might look.
13. Get an adult to take the pastries out and leave to cool on the tray for 15 minutes.
14. Gently ease (pull) the cones out of the pastry horns and leave to cool more. See Photo 6 below. If you had more pastry strips than you have cones to use, make some more cream horns like before and bake.


15. Meanwhile, get your cream and fillings ready. Koray used cream that he needed to whisk up – heavy/double cream (we didn’t have a spray one). So he used a hand-held electric mixer. He whisked on high speed for about 3 minutes until it was starting to be thick. Then he added in 2 tbsp icing/powdered sugar and mixed on low at first (or the powder goes everywhere ?) Then mix on high speed for a few more minutes. Test to see if it’s ready by lifting the whisk up and looking at the end of the whisk and if ready the cream will be staying on the whisk and not falling off. See Photo 7. Pointy bits of the cream, are called ‘Peaks’. .


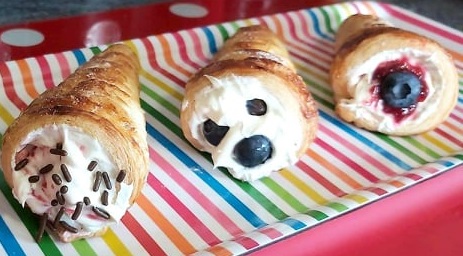
You can pipe the cream into the horns (and maybe get an adult to help with this). Koray didn’t bother as he was too hungry ?. He used a small spoon and then he used the end of one of our long ice-cream spoons to push the cream down nearer the bottom. See Photo 8. (Using a can of spray cream would be easiest for this). Then you can put in some jam/jelly or chocolate spread if you want and followed by some more cream. Koray topped some off with more raspberry jam and a blueberry. I like lemon curd and one with that, cream and blueberries. One of the horns was decorated with cake sprinkles too. But you can use whatever you like or have at home. See photo below.
17. If not all are going to be eaten straight away, and you have filled with cream already, place them on a plate and cover in cling film/plastic wrap and keep in the fridge for up to a day. If you have any that are not filled, keep these in a food bag for a few days.


Here’s also a pic from my friend Diana, who dipped the ends of the baked cones in some melted chocolate. You can even add some sprinkles before the chocolate sets.


Adults – Please see the sharing options or even printing, at the right/bottom of your screen (bottom of your screen for mobiles, and down the right-hand side on computers). You can even pin this to your own Pinterest page. Alternatively, you can download this article, see below. You could also leave some feedback if you like. Click the ‘Download’ button below, to save to your phone or computer.
Follow me on social media:
Thanks for reading
Happy Baking & Making
Happy Tummies & Memories!
Caro xx


Leave some feedback if you like 🙂
Caroline’s Easy Baking Lessons


