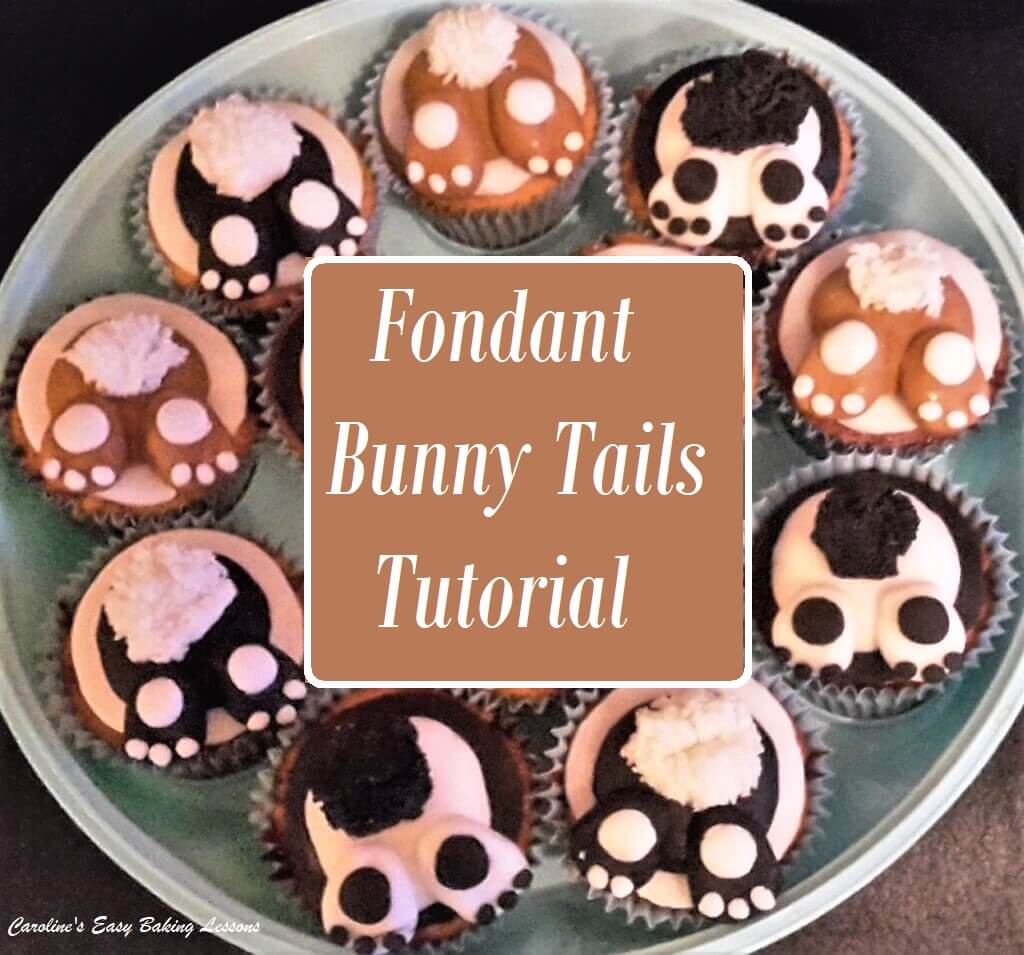
Home Made Fondant Bunny Tail Cupcake Toppers – Photo Tutorial

Home Made Fondant Bunny Tail Cupcake Toppers
Photo Tutorial For Beginners
By Caro
Here's my Home Made Fondant Bunny Tail Cupcake Toppers. A photo tutorial for beginner bakers, or if new to using fondant. Ideal for Easter & Spring baking and easy to make too.


Easy Tutorial With No Moulds Required
I made these bunny ‘bottoms’ a year or 2 ago and only took a few pics but I did write down thorough instructions of what I did. And it was just as well, as when I posted a photo of these cupcakes on Facebook as a cover photo, I was asked for a tutorial on how to make them by hand and with no moulds.
Using my notes and filling in the gap in photos by making some new ones, I was able to produce the instructions below for you to make your own at home.


No Fancy Equipment Required
You don’t need any fancy fondant equipment like moulds. Other than some fondant (& maybe food colouring), everything you need you will have at home. So let me show you just how simple these are to make. Make them any colour combinations you like, for Easter or Spring baking.
Use On Cupcakes Or Cakes
Can be used as cupcake toppers or even on a larger cake. See the photo of my Spring Fondant Cupcake Bouquet, where I formed cupcakes into a bouquet shape, and topped the cupcakes, with different Spring themed fondant toppers, including the bunnies. Go to Spring Cupcake Bouquet Tutorial.
DOWNLOAD the tutorial to save to your phone or computer, by simply clickng the ‘download’ button below.
WHAT YOU NEED
- FONDANT – (or sugar/modelling paste). At least 2 contrasting colours. For example black, brown, white. (You can colour your own if you like)
- ROUND COOKIE CUTTER – (or glass/lid) for making the fondant base to cover the cupcake with. This should be about the same size as the diameter of the top of the cupcake but not bigger. If making these toppers before the cupcakes, measure against the size of the top of the cupcake holes in the cupcake tray. You are looking for about 6cm or 2 + 1/3 ” diameter.
- SILICONE PASTRY/FONDANT MAT – for working with & rolling out fondant (not essential). You can also work on a worktop, pastry board or on baking/parchment paper (paper being a good option).
- ROLLING PIN– (small plastic fondant roller preferably but not essential), for making the bases only (you can also roll between 2 sheets of paper & use a regular pin)
- ADHESIVE – Food Glue or a drop of clear alcohol.
- SMALL PAINT BRUSH – (or smallest end of a wooden bbq stick) for holding the fondant pieces together.
- SIEVE – (any size, or tea strainer) for making the tail. I used a small sieve I have for icing/powdered sugar dusting. Just make sure it’s fine.
- JAM/JELLY OR ICING/FROSTING – for attaching the fondant to the cupcake. Or even chocolate spread.
- ICING/POWDERED SUGAR – For rolling out the fondant and dipping the cutter in, (or use corn flour/starch). Note if you use good baking/parchment paper or fondant mat, this isn’t always needed.
- CUPCAKES – to attach the bunnies to (or indeed use on something else). Go to my Cupake recipes.
DIRECTIONS


1. Using a silicone or fondant rolling mat, roll out the base colour of fondant (will also be the tail and toes colour). The fondant base is what the bunny sits on, and what goes directly on the cupcake. Alternatively, dust icing/powdered sugar on a pastry board or work top/counter to roll out the dough. I often place a piece of baking/parchment paper down first and use that instead. Roll out to about 3mm (1/8″) or what ever thickness you like your fondant. I use a fondant roller, but you can use a regular one and dust with the sugar or roll between two sheets of paper.
2. Dip the cookie cutter or glass in a little of the icing/powdered sugar and proceed to cut out circles of fondant for the number of cupcakes you have. Maybe do a few extra just in case. See Photo 1. Roll up the scraps of fondant and place in a food bag until ready to use next.
Put some baking/parchment paper on a serving tray or something else flat and lift your fondant circles with a palette or butter knife onto it while you make the other parts. See Photo 1.
4. To form the ‘bunny bottoms’ roll a ball of the contrasting colour of fondant, (in this case beige), to approximately 2.5cm/1″ wide. See Photo 2 below.
*TOP TIP – For consistency (if making more than one), make a second for reference for later.
5. Flatten the ball a little as in Photo 2 on your work surface with the roller or a ruler.


6. Now thin the edges of this ‘bottom’ between your fingers, making it wider and to create a bump & make it look a little more rounded. See Photo 2 above for how it should look. *Make a second one for reference and to make sure all the same size.
7. Using a small amount of food glue, water or alcohol, apply to the underside of this ‘bunny bottom’ and place in the centre of one of the fondant circles you already prepared, like in Photo 2 above. Press gently to hold in place.
8. To form the feet, make 2 balls approximately 1.25 cm wide (a 1/2″) and roll one a little to look like in Photo 3 below.


9. Take this long piece and thin the top end by squeezing gently between your thumb and index finger. Use the end of your index finger to rub across this ‘heel edge’ to make it smooth and rounded. You only want this heel area to be a little bit thinner (refer to Photo 3 above).
10. Glue the foot into position with a little glue/water/vodka, applied to the underside of the foot, see Photo 4, for the positioning. Put it on lightly and flatten slightly. Make the second foot as before and apply as before.
11. For the feet/paw pads, make tiny balls (about 5mm or 1/5″). Refer to Photo 4 and the feet you already made to make sure you don’t make it too big. Once happy with the size, make 2 more (one to keep for reference). Glue into position as like the left foot of Photo 4 (right pic) and then flatten a little like the right foot.

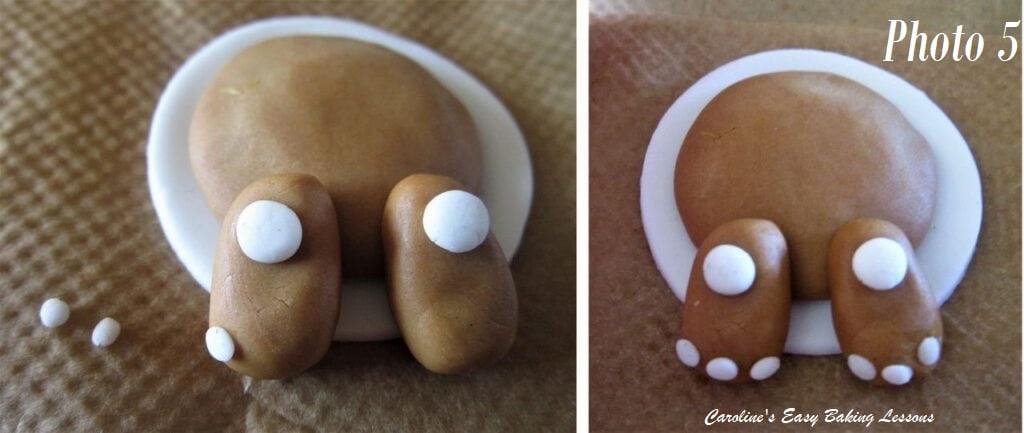
12. To make the toe pads, roll tiny balls 1mm (1/12 in). Make 7 of them so you have one extra for reference. Position on one of the feet to make sure of the size before gluing into position, bearing in mind you will be fitting in 3 of them on each foot. Once applied with a little bit on glue/vodka/water on the foot as in the left of Photo 5, flatten slightly, like in the right pic in Photo 5.
13. To make the tail, using the opposite colour you reserved earlier (in my case white fondant), make a 2.5cm/1″ ball.


14. Hold the sieve or strainer upside down and with the other hand push the ball of fondant up through the sieve. Push until the fondant is right into the sieve and just beginning to come through at the other side. See Photo 6.


15. Now turn the sieve pointing downwards and keep pushing the fondant towards the centre and downwards, (like in Photo 7, left pic). Continue doing this until the length of the fondant tail is about 1″/2.5cm (coming out the other side of the sieve)


15. Dip a little of the food glue/vodka or water, on to the centre of the bunny bottom. Now using a palette knife, gently lift up about half of the tail (see Photo 8). Carefully slide the tail onto the centre of the bunny bottom. See left of Photo 9 below.
16. Now using your paint brush, gently move any of the tail hairs that are not in position. You want a rounded tail shape, so using any of the left over strands of tail hairs to fill it out, by carefully laying on top. Once happy with the formation, press down a little to keep in place, (being carefully not to squash the fondant too much). See right picture in Photo 9 below. Don’t worry about it not being perfect, as that will be more realistic.


17. If not going to position the toppers onto the cakes just now, leave them on the paper for at least 30 minutes and then cover well with cling film/plastic wrap until ready to use.
18. Level the tops of the cupcakes by slicing off the top. Doesn’t need to be perfectly flat, just not too tall and we want them all to be around the same height.
19. Apply some jam/jelly or frosting/icing to the top of the cake. Using a spatula, carefully lift the bunny cake topper and position on top of the cake, smoothing down the edges of the fondant.


20. Repeat for all cupcakes and store in a plastic cake box or airtight container/tin.
21. These fondant toppers can be made days or weeks before hand if wrapped as instructed. Just leave at room temperature and not in direct sunlight or it will fade the colour of the fondant.
**TOP TIP – don’t store or leave the fondant toppers in the fridge, as it will cause condensation and cause them to weep.


Join My Facebook Group
Why not also join my Facebook group – Easy Online Baking Lessons, dedicated to this baking lessons website, as well as providing one-on-one support with myself & my team? Be sure to answer all security questions when requesting to join. Click to join the group.
Please see the sharing options or even printing, at the right/bottom of your screen (bottom of your screen for mobiles, and down the right-hand side on computers). You can even pin this to your own Pinterest page. Alternatively, you can download this article, see below. You could also leave some feedback if you like.
Click the ‘Download‘ button below, to save to your phone or computer.
DIFFICULTY LEVEL: super simple when followed
Follow me on social media:
Thanks for reading
Happy Baking & Making
Happy Tummies & Memories!
Caro xx

Caroline’s Easy Baking Lessons
Caroline’s Easy Baking Lessons


