Easy Chocolate Digestive Biscuits (Classic British Cookie)

Sweet Lesson No.6
Chocolate Digestive Biscuits
By Caro
Chocolate Digestives are a classic British biscuit (or cookie to your bakers in the States/Canada), and I don't think there's anyone who doesn't like them. They come in the plain, oaty form, but the chocolate topped version is the nation's favourite, second only to maybe Jaffa Cakes :) (See my video on how I made a giant jaffa cake).


What Is A Digestive Biscuit?
Now digestives are what we in the UK use for cheesecake bases, and so are often considered to be like Graham Crackers. But they are more wheat & oat based so I thought I would do a recipe and in this case a video tutorial on how to easily make these biscuits. I also added extra oats, and a more unusual ingredient – desiccated coconut (finer than shredded coconut so you might want to process a little when you are doing the oats). This is entirely optional and I in the end liked it on top of the melted chocolate too.
Video Tutorial
I show in the video a few different ways to coat with the chocolate, as well as how to get the ‘score lines’ on top of the chocolate. But sprinkling coconut on top of the chocolate was a much quicker and neater option I found.
Why Are They Called Digestive Biscuits?
This is a question I am asked all the time, so thought a good idea to answer here too. These biscuits were originally developed by 2 Scottish doctors, back in 1839. Being low in sugar, and containing healthy oats, these were designed to aid digestion, hence their name. The chocolate topped version came to existence in 1925, from the McVitie’s factory.


Notes On Ingredients
Chocolate
You can use milk (semi-sweet) chocolate, dark (bitter) chocolate or a combination of both depending on your taste. I used in the video, 100g milk (semi-sweet) & 50g (2 x 25g packs) of dark chocolate with salted caramel. Note this is why my melted chocolate in the video is not smooth.
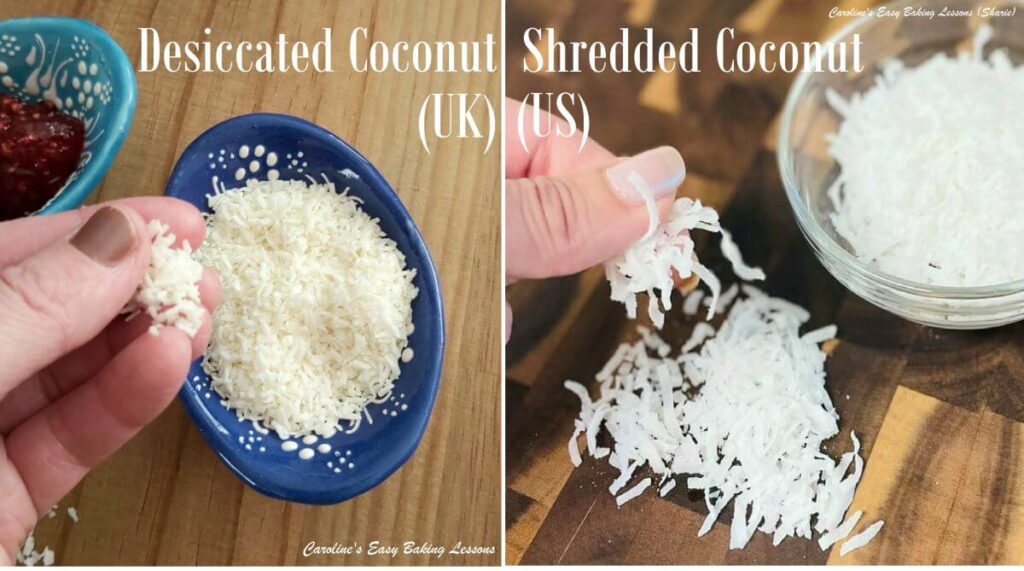
Coconut
I used some desiccated coconut inside and on top of the biscuits, but this is optional. Note that UK desiccated coconut is smaller in size than shredded unsweetened US coconut, so you might want to process this a little, at the same time as doing the oats. See comparison photo below.
Compairing UK & US Coconut


Oats
Oats, are the main ingredient in these biscuits. I just used regular porridge oats (the basic kind with nothing added). If you happen to have fine oats, then this works great, but I just tend to process the oats a little. The US equivalent is Rolled Oats (Old Fashioned).
DOWNLOAD the recipe to save to your phone or computer, by clicking the ‘download’ button below.
Digestive Biscuit Video Tutorial
Watch my video below of how I like to make these iconic biscuits.
So on to my version of Chocolate Coated Digestives.


INGREDIENTS
(Makes approx. 20-24 biscuits)
- 115g Butter (unsalted, cold & cubed about 1cm or 1/3” size)
- (1 stick, or ½ cup, 4 oz)
- 150g Whole-meal or Whole-wheat Flour
- (1 1/3 cup, 5.25 oz)
- 150g Porridge Oats (plain)
- (1 1/3 cup, Rolled Oats/Old Fashioned, 5.25 oz)
- ¼ tsp Bicarbonate Of Soda (Baking Soda)
- ¼ tsp Salt (table salt)
- 38g Light Brown Sugar (3 tbsp, 1.25 oz)
- 29g Desiccated Coconut (1/3 cup or 1 oz)
- **(Process 1/2cup unsweetened shredded coconut)
- For Topping:
- 150g Milk &/Or Dark Chocolate*
- (5.25 oz semi-sweet &/or bitter)
- Some more coconut for topping (optional)


EQUIPMENT
- Scales or measuring cups
- Measuring Spoons
- Chopping board & knife
- Food processor or equivalent for blitzing
- Large mixing bowl
- Mixing spoon
- Small dish/jug for water/milk
- Cling film/plastic wrap
- Baking/Parchment paper
- 2 Baking trays/sheets, lined
- Fork
- Timer or phone timer
- Cooling rack
- Microwave safe bowl
- OR bowl & pan on stove
- Mixing spoon
- Small spoon (optional)
- BBQ skewer


INSTRUCTIONS
1. Cube while weighing or measuring out, the cold butter (about 1/2″ or 1cm cubes) and then pop back in the fridge till ready to use it. You can also now prepare 2 baking trays/sheets with baking/parchment paper (if there’s no lip/edge on these, use a little oil/baking spray under the paper to hold in position, so you don’t lose your cookies!)
2. Measure/weigh out all other ingredients. At this stage you can process the porridge oats (rolled oats). Note that for rolled/porridge oats size, it’s 1 1/3 cup of oats, before processing. If you had fine oats, that would be nearer to 2/3 cup. Or just use a scale and make things much easier. Process the oats a little till the consistency like in Photo 1.


3. Now mix together in a large bowl, all the ‘dry ingredients’ – flour, processed oats, salt & bicarbonate of soda (baking soda).
4. Next, grab that cold cubed butter from the fridge and add to the dry ingredients, before giving the butter a toss in the dry ingredients.
5. The next stage is to ‘cut the butter’ into the dry mixture. This basically just means breaking the butter up into smaller pieces, whilst combining with the other ingredients, till of a ‘breadcrumb’ consistency.
You can use 2 knives to do this, your fingertips, or the food processor. Normally, I use a Pastry Cutter/blender, as it saves my fingers that get sore easily. For pastry and scones I use this inexpensive tool all the time.
In the video, I show you have to use the pastry cutter and your fingertips. But since we used the food processor to blitz the oats, I in the end used that for reducing down to a smaller consistency. See video above and Photo 2 for the consistency you are looking for.


6. Next mix in the light brown sugar and coconut if using. Just note that if using US unsweetened shredded coconut, you might want to add in to the processor in step 5 above, as it is larger in size than our UK desiccated coconut.
7. Finally add in small drops of the water or milk, a ½ tsp or so at a time, and knead into the dough until enough to make the dough come together as one mass. Note you don’t want a sticky dough. See video above for this, or just add in the water gradually and mix in the food processor till it comes away clean from the sides of the processor.
8. Form into a ball and then a flat disc and wrap in cling film/plastic wrap, before placing in the fridge for 30 minutes, or 15 minutes in the freezer. See Photo 3.


9. Cut out some baking/parchment paper and roll out the dough till a 3mm (1/8 “) thickness. If the edges are cracking, it means the dough is a little too dry. So simply, as the cracks appear, dip your fingertips in water, and pat onto the cracks. Then squash the dough and ends together (see video). Only add the tiniest of drops, or you will end up having to chill your dough again.
10. Dip a 6-6.5cm (2 1/3 – 2 ½”) round cutter in a little flour and shake off excess, before pushing down on the rolled out biscuit dough. Give a slight twist and then lift up the cutter with the biscuit, and transfer to the prepared baking tray/sheet. Continue cutting out, re-rolling the scraps, and placing on the trays/sheets, poking the biscuits with a fork twice, and then chilling for 30 minutes, or 15 minutes in the freezer. See Photo 4. This recipe makes about 20 -22 biscuits.
11. Take this opportunity to heat up your oven, depending on how long yours takes to come to temperature. Heat to 190c/170c Fan oven/375f/Gas Mark 5.


12. Place in the oven and bake for 8 – 10 minutes, till ever so slightly coloured, but will be set and the bottom a little bit more of a golden shade. Check them after 7 minutes to be safe. See Photo 5.
13. Leave on the tray/sheet for 2 – 3 minutes, before transferring to the cooling rack, paper and all to cool down completely.
14. If not coating with chocolate now, store the biscuits in a tin or other air-tight container.


15. Melt the chocolate for coating the biscuits. First chop the chocolate into small pieces to speed up the melting process.
16. Next place the chopped chocolate in a microwave-safe bowl and microwave on 30 second bursts, stirring in-between until melted. This may take several minutes, but don’t be tempted to heat for more than 30 seconds at a time, as this can result in burnt and wasted chocolate. Alternatively, place a heat proof bowl over a pan of barely simmering water, and heat till melted. Photo 6 shows the progression of melting the chocolate in the microwave, with mixing in-between. (Note my chocolate is not smooth, as there was salted caramel pieces in it).


17. Place some baking/parchment paper under a cooling rack for catching drips of chocolate. Have a small spoon, some paper towels ready and a bbq skewer too if making lines.
18. Take one of the biscuits and either dip completely into the melted chocolate and give a twist to get chocolate up the sides, or spoon it on. Either way, give the biscuit a little shake to even out the chocolate and coat the sides if you want. See video at beginning of recipe for me doing this. See also Photo 7.


19. To make the lines/scoring, there’s a few different methods I tried. First was to score 2 sets of 3 lines, using a bbq skewer. Best to wait a few seconds before doing the 2nd set. See Photo 8, top row.
20. Second was to press the skewer down onto the wet chocolate and very carefully lift back up. Wait a few seconds before doing the same in the opposite direction.
21. Third method, as suggested by my son, was to use the lines on the cooling rack. Simply place the wet biscuit upside down on the rack, press down very gently and leave no more than 30 seconds. This gave the most faint of lines. See Photo 8, bottom row.


22. I liked wiping the skewer between scoring, for a cleaner finish, and waiting before doing the 2nd set of lines. You can just drag the skewer and do feathering, but it isn’t as defined, depending on the consistency of the chocolate at the time. See Photo 9.
23. In the end, the easiest and best looking (and tasting) method, was to just spoon/dip the biscuit in chocolate and then top with coconut. See Photo 9.
24. Leave to dry on the cooling rack for not too long, or place on top of some baking/parchment paper till set (you can speed this up by placing in the fridge).
25. Once set, enjoy with some tea, coffee or cold milk! Store left-overs in a tin or airtight container and will last for at least 3 days.


Join My Facebook Group
Why not also join my Facebook group – Easy Online Baking Lessons, dedicated to this baking lessons website, as well as providing one-on-one support with myself & my team? Be sure to answer all security questions when requesting to join. Click to join the group.
Share The Love
Please see the sharing options or even printing, at the right/bottom of your screen (bottom of your screen for mobiles, and down the right-hand side on computers). You can even pin this to your own Pinterest page. Alternatively, you can download this article, see below. You could also leave some feedback if you like.
DOWNLOAD the recipe to save to your phone or computer, by clicking the ‘download’ buttin below:
DIFFICULTY LEVEL: beginner, easy
Chocolate Digestive Biscuits
Here’s some tested for me by my friend Diana:


Follow me on social media:
Leave some feedback if you like 🙂


Thanks for reading & watching.
Happy Baking & Making,
Happy Tummies & Memories!
Caro xxx
Chocolate Digestive Biscuits
Caroline’s Easy Baking Lessons


I have made these before. And they were so good. Just about the same as store bought. (I miss having them regularly like I did when I lived in Canada. ) the recipe is easy to follow and pictures are fabulous!