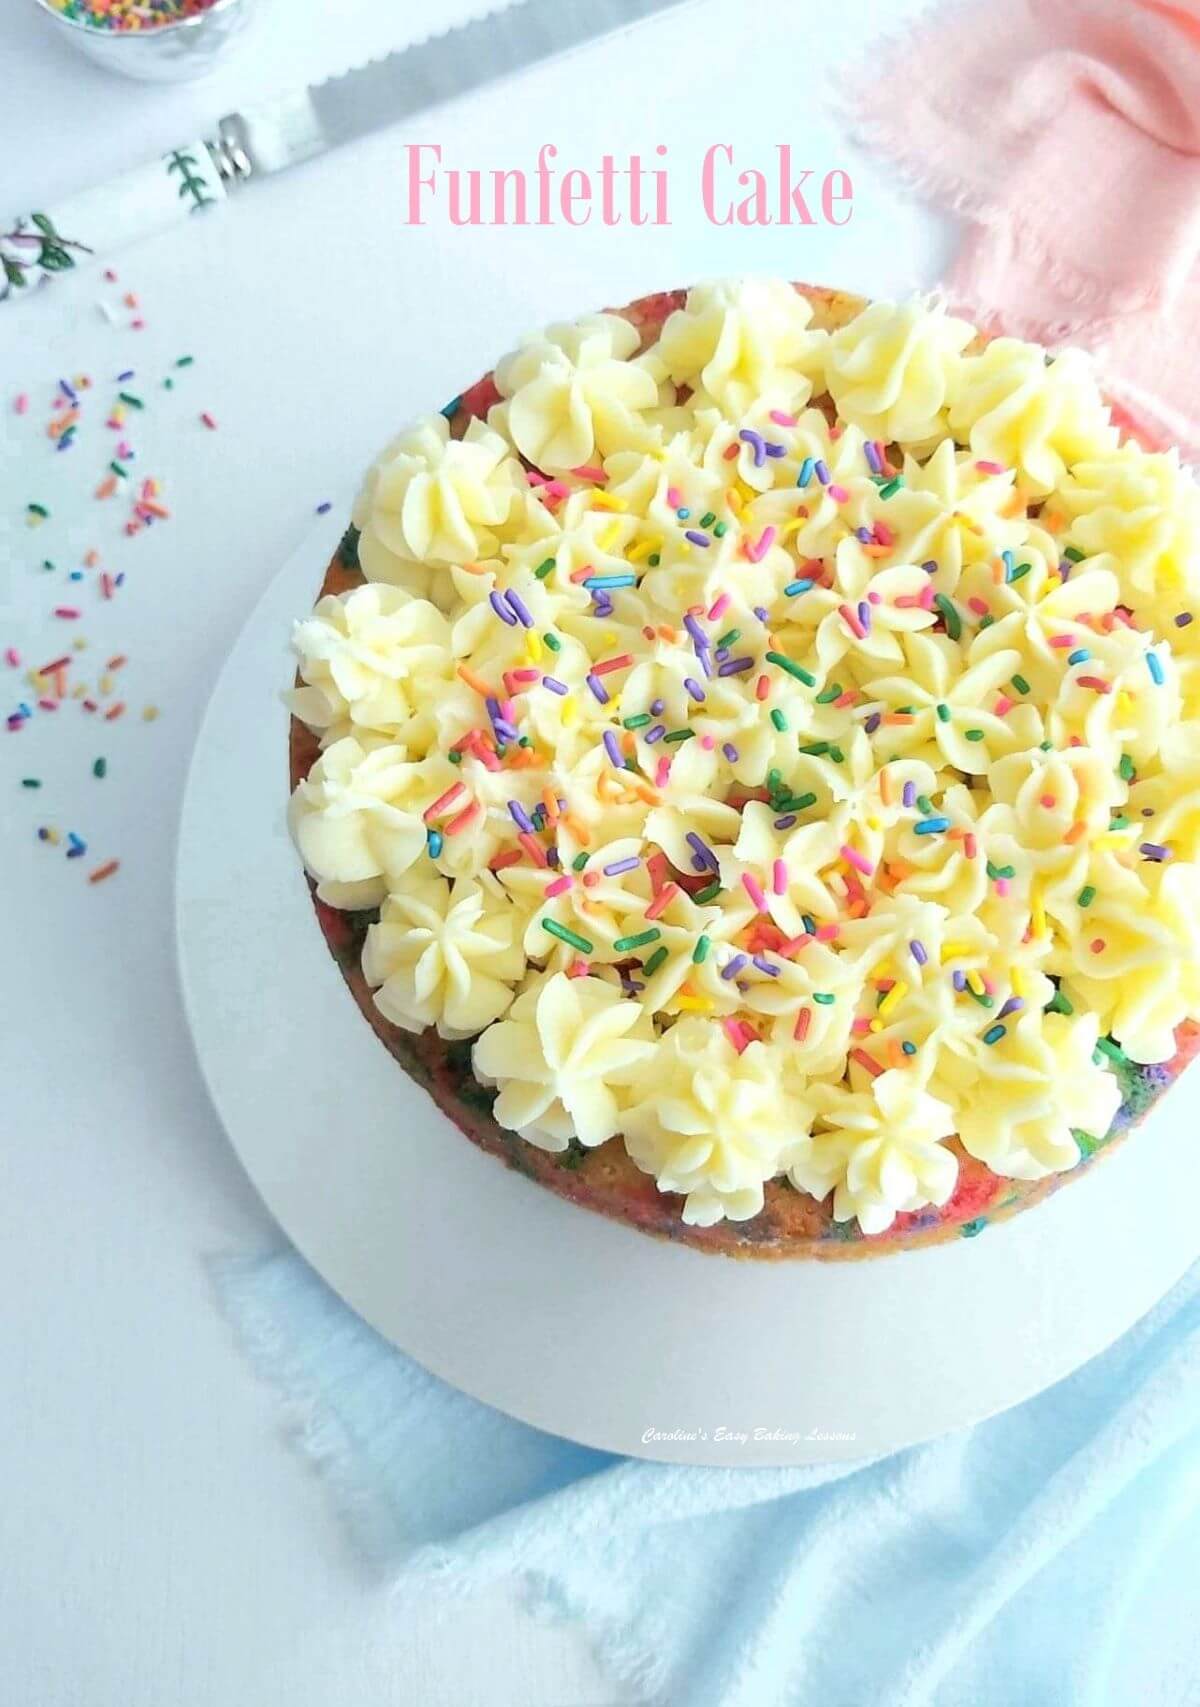
Funfetti Sprinkle Cake For Beginners

This is my beginner recipe for a Funfetti Cake. Learn how to make this sprinkle filled layer cake, filled and topped with a buttercream that is perfect for tall layer cakes. Includes detailed directions, process photos & tips for stacking layer cakes. This simple cake is sure to impress for a birthday, Mother's Day, or any special occasion. It makes a LOT of cake, so perfect for feeding a crowd, and can be made ahead of time.
Funfetti Sprinkle Cake For Beginners
A Recipe Tutorial


Why Use My Recipe?
1. Detailed instructions & process photos (always).
2. Explanation of why things are done.
3. Easy process throughout the recipe.
4. Where to buy bake-safe sprinkles in the UK.
5. Tip to stop buttercream layers from buckling.
6. Tested measurement conversions.
7. Share, save or print via the Recipe Card.


New To Making Buttercream?
For a thorough tutorial, on how to make the simple buttercream used in this funfetti cake, check out my Buttercream Tutorial For Beginners’. *Please note that in the tutorial, a smaller, half-batch is made.
New To Using Piping Bags?
Never used a piping bag/pastry bag before? Don’t know what you need? What the pieces are called? Read my Beginners’ Guide To Piping Bags – assembly & filling lesson, where I go over in detail all you need to know.
Ingredients In Funfetti Cake


Here are the ingredients in this Funfetti Sprinkle Cake (detailed amounts in the recipe card below).
Butter
Unsalted butter is used, and is recommended for all your baking, even if a savoury bake. As well as being able to control your salt intake, salted butter has a lower percentage of fat and higher water content, which can affect some bakes. Make sure to have the butter cubed & softened before starting to bake. Watch the softening butter in 12 minutes hack if you forget or are short on time.
Caster Sugar
The equivalent of UK Caster Sugar, is US Extra/Super Fine Sugar. If you have to use granulated, either process a little to smaller granule size, or mix for a few minutes longer when at the creaming sugar and butter stage. See below my comparison photo of the 3 sugars we have in the UK. Note that US granulated is slightly smaller granule size than our UK granulated. So only process lightly to make fine sugar. (Read more on differences between UK & US ingredients).


Eggs
Medium or Large eggs are used, and the US equivalent is large or extra large. Make sure these eggs are at room temperature before adding, and also just add one egg at a time.
Vanilla Extract
Vanilla extract always tastes so much better than vanilla essence or vanilla ‘flavouring’. But is very expensive, so try making your own homemade vanilla extract. (See photo below). Vanilla paste can also be used on a 1:1 basis.


Self-raising Flour
UK self-raising flour is used, & not to be confused with US Self-rising. For that I recommend adding 1 tsp of baking powder. For Plain or All Purpose flour, add 4¾ tsp Baking Powder when sieving in the flour.
Milk
Used just to thin the cake batter slightly, you could also use water. Any kind of milk is fine and straight from the fridge as it is only a very small amount.


Bake-safe Sprinkles
Bake-safe sprinkles must be used in the batter of this cake. You can use any sprinkles to decorate the top of the assembled cake. In the UK sprinkles are not any good for the oven. They break up and melt in the oven, resulting in all the colours bleeding and mixing together.
So I recommend this particular American brand, (that were recommended to me), and I have tested them, and know they work well. They are ‘Rainbow Sprinkles’ by Leiber’s. I purchased online from Amazon for about £9, and it is bigger bottle, (283g) than our typical sprinkles we can buy, and used less than half. Here is a link to the ones I used – Amazon – Leiber’s Rainbow Sprinkles. See photo.
Icing Sugar
The US & Canadian equivalent of Icing Sugar, is Powdered Sugar. You can also use Confectioners’ sugar, and the only difference with this, is the addition of corn starch (cornflour), that is not in UK icing sugar. Be sure to sieve the sugar, especially if there are any lumps.


Piping Bag & Coupler
A star nozzle and coupler were used on the piping bag, to quickly change between the star nozzle for piping rosettes, and piping buttercream in the centre of the cake. This might seem strange but with stacking the cake layers upside down, with a very slight dome, a thinner layer of spread on buttercream in the centre area, and a border of higher, piped rosettes around the edge, makes the cake layers more level. No need to cut the cake. Slightly less piping & leaves more buttercream for taller rosettes on the top layer of the cake. If you don’t have a coupler, hold back some buttercream to spread on, or pipe a little through the nozzle & spread flat. (See this photo, or Photo 6 in Recipe Card below for reference).


Boxing Up This Big Cake
Please note that if you have to transport this cake, it just fitted into this deep, 12″ (30.5cm) wide box. The box had a height of 6″ (15.2cm) and the cake was on a thick cake board. That coupled with the high height of the cake, I was worried, few days before putting it together, that the box would be too small. I had to impulse buy box risers as I could not get a replacement, extra deep box in time.
So I did detailed calculations of the heights of everything – the cake board, box depth, and the height of the 3 cake sponges I had already made. With this in mind, I didn’t make the piped buttercream in-between the cake layers, too tall. Being the mathematician that I am, I worked out (with drawings no less), of the maximum height I could make the cake, to still fit nicely in the closed cake box, without messing up the buttercream on top.


As you can see from the photo collage above, of the cake box, I just made it, by about 1cm (1/3″). I also used the flat-pack cake box, in the flat position to get this big heavy cake in the box, without any accidents. And then just folded it up around the cake and I was extra cautious, by holding the sides in place with paperclips. I also placed some paper in the bottom of the box to make doubly sure the cake board did not move. This cake was going in my husband’s car for a 15 minute drive, without me there to hold the cake! But it made it there in one piece (oh I also placed in the fridge, with the lid off, until ready to go on its journey).
Note – the assembled cake, on a extra thick cake board (9mm, less than 1/3″), measures about 14cm (5 1/2″).
DIFFICULTY LEVEL: beginner, slightly harder, several components


Recipe Card
Funfetti Sprinkle Cake For Beginners

Equipment
- Scales or measuring cups
- Large mixing bowl
- Measuring Spoons
- Hand/stand mixer
- Sieve
- Spatula or Wooden Spoon
- 2 or 3 8" (20cm) Cake Tins
- Lining Paste (Homemade Lining Paste/Cake Goop, for greasing, Frylight cooking spray, or Butter & flour. See notes)
- Baking/pachment paper
- Timer
- Cooling rack
- Medium mixing bowl
- Piping bag, coupler & closed star-tip nozzle (coupler optional)
Ingredients
Cake Batter:
- 400 grams Butter – unsalted, cubed & softened (14 oz, 1¾ cup)
- 400 grams Caster Sugar (14 oz, 1¾ cup + 2 tbsp, Extra/Super Fine Sugar. See notes*)
- 6 Eggs, medium to Large (Large or Extra Large US)
- 1¾ tsp Vanilla Extract (Homemade Vanilla Extract recipe)
- 400 grams Flour, Self-raising (14 oz, 3¼ level cups, OR Plain/All Purpose Flour plus 4¾ tsp Baking Powder – please check notes*)
- 1½ tbsp Milk (or water)
- 126 grams Leiber's Rainbow Sprinkles (4½ oz, ¾ cup – well packed, must be bake-safe, see notes*)
Buttercream:
- 300 grams Butter – unsalted, cubed & soft (10½ oz, 1⅓ cup)
- 600 grams Icing Sugar, sieved (21 oz, 4¾ cups Powdered/Confectioners' Sugar)
- 1 tsp Vanilla Extract (optional, try Homemade Vanilla Extract)
Decoration:
- Rainbow Sprinkles (these ones do not need to be bake-safe)
Oven: 170c°/150c° Fan Oven/Gas Mark 3 to 4/340f°
Instructions
To Make The Cake Layers
- Begin by softening your butter to be ready for using. I like to soften butter by cutting into small cubes, (about 1cm, ⅓″), since a smaller size has a smaller surface area, that softens & comes to room temperature quicker. If you forget or are short on time, try a hack I tried for softening butter in about 12 minutes. Make sure your eggs are also at room temperature.
- When the butter is soft enough, cream together with the sugar, for a few minutes until soft & spreadable and paler in colour. For a stand-mixer, use the k-paddle for this. (If using granulated sugar as an alternative, you will need to beat longer). Next beat in the eggs, one at a time, followed by the Vanilla Extract, just until incorporated.


- Sieve the flour (and baking powder if using Plain/All Purpose flour), over the wet ingredients, before starting to mix in by hand. Add in the milk & then use your hand/stand-mixer to mix all together, just until all combined and no flour is visible (make sure to check the bottom of the bowl, and scrape down the sides of the bowl if needed). Don't be tempted to over-mix. Then fold in the oven-safe sprinkles by hand (see notes), in increments of 3, to ensure an even distribution and for your cake to rise nicely. Pre-heat the oven to: 170c°/150c° Fan Oven/Gas Mark 3 to 4/340f°.


- You can of course prepare your cake pans/tins before making the cake batter, but I prefer to do this when the oven is heating. If your oven takes longer than 7 or 8 minutes to come to temperature, turn on sooner. You want to grease and paper line 2 or 3 8" (20cm) cake pans. I used Homemade Cake Lining Paste. This is also called Cake Gloop & works really well on bundt pans. Brush on a good layer, with upward strokes, up the sides of the pan. (See Photo 2 above). Alternatively another good option is Frylight cooking spray, that is like cake release spray, but less expensive. Failing that, butter and flour bottom and sides of the pan. Be sure to also paper line the bottoms of the tins with baking/parchment paper. See how to cut parchment for round cake tins, and use less paper. Then divide the batter into 3 – each cake layer will weigh 538g/19 oz. I only had 2 same sized pans so weighed to be exact.
- Tap the tins on the counter/worktop before popping in the oven to bake for about 28-35 minutes, until golden on top & starting to come away from the sides of the tin. Check they are fully cooked by inserting a cocktail stick in the centre of the cake, which should come out clean of crumbs. If not, continue cooking for a couple more minutes and check again until done.


- Place the cake pans on a cooling rack for about 5 minutes, before attempting to turn out. Place a clean folded tea-towel on top of the cooling rack (or some paper), and turn the cake pans over to release the cake. It should come out easily, but if not just run a knife around the edges of the cake and try again. Leave upside down on the rack. If re-using one of the cake pans for the 3rd cake layer, wipe clean with paper towel/kitchen paper and grease & line, before adding in the remaining third of cake batter. Pop in the oven and cook as before. (This single cake might bake a little quicker).
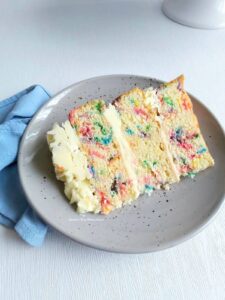
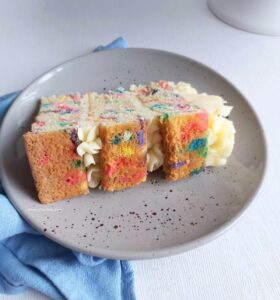
- Meanwhile carefully start to remove the paper from the cooling cakes. If it doesn't want to come easily, leave to cool more. Once all cake layers are cool you can put the cake together, or well wrap each layer with cling film/plastic wrap until ready to use. I like to stack the cakes on top of each other and wrap again. This gives a nice flatter cake (see Photo 5 below). You can make the cake layers up to 3 days before if well wrapped and left in room temperature.


To Make The Buttercream
- Beat the softened cubed butter with a hand/stand-mixer (k-paddle of a stand-mixer), until no longer in small cubes, and easy to spread. Gradually add in the icing/powdered sugar, (use a splash guard or clean towel on top) and starting on the lowest speed, beat until a nice smooth buttercream. If needed you can add a few ½ tsp milk if too thick, but this is a slightly thicker buttercream that stands up well for a 3 layer cake. See photo 4 and check my Buttercream for Beginners tutorial if you need to.


- Finally add in the Vanilla Extract and your buttercream is ready to use right away. Keep well-covered in a bowl at room temperature or store in the fridge until ready to use (this can be up to 1 month1 and 2 to 3 months in the freezer2. See my buttercream tutorial for more information).

To Assemble The Cake
- To assemble the cake, I always do this on the cake board or on the plate I want to serve on. (Charger plates are good for this). This saves trying to transfer it. Just cut a couple of pieces of baking/parchment paper and hold in place on top of the plate/board, apart and held in place with a tiny bit of buttercream. See Photo 5. Begin with your first layer of cake, with the bottom flat side of the cake pointing upwards. Any crack(s) in the cake when moving, just fill with some buttercream like in Photo 6 below.


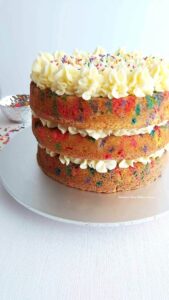
- Next have your piping bag filled with the prepared buttercream and fitted with a large close tipped star nozzle (see my beginners' guide for assembling and filling a piping bag tutorial). Pipe large rosettes in a border along the edge of the cake and spread a thinner layer of the buttercream in the centre. (See Photo 6). Now place the cake in the fridge for 30 – 45 minutes for the buttercream rosettes to firm up. This stops the cake layers buckling as you add more layers, and keeps better definition of the piped buttercream too.


- Now gently place the second cake layer on top, again with the flat bottom side up. Repeat with another layer of buttercream and piped rosettes, before popping back in the fridge again, for another 30 minutes to set. (See Photo 7).


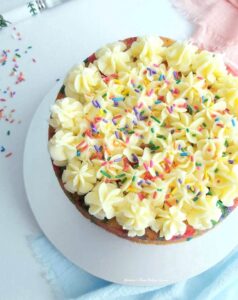
- Place the third cake layer on top and begin by piping slightly taller rosettes, around the outside edge of this top cake layer. (See Photo 8). Then fill the centre with rosettes about the same height as you piped in-between the cake layers.


- Finally, sprinkle on some of the remaining sprinkles on top of the piped buttercream, (these ones don't have to be bake-safe sprinkles), before placing in the fridge for at least 45 minutes to set. See Photo 9 &10.


Serving & Storing
- Once firm, the cake will slice nicely, and serve a lot of people as it is a big cake! Store somewhere cool or in the fridge if needed. Will be fine sitting out, as long as not too hot. Store in a cake box or loosely covered container (avoid covering tightly with cling film/ plastic wrap, especially if in fridge, as it can cause condensation. Will last at last 3 days and can be frozen for up to 3 months in the freezer3 (It is recommended to wrap really well in slices – see Freezeit.co.uk for more information on freezing frosted cake).


Notes

 Sprinkles – bake-safe sprinkles must be used for this cake. Any sprinkles not in the cake batter, do not need to be bake-safe. Here in the UK our sprinkles are not for the oven, and so break up and melt when in the oven, causing all the colouring to bleed and mix together. For that reason I recommend these ones that were recommended, and I have tested them, and they work really well. I purchased from Amazon for about £9, and it is larger bottle than the typical sprinkles we have, and used less than half. Look them up in Amazon – Leiber’s Rainbow Sprinkles. See before recipe for more information.
Vanilla Extract – Vanilla extract is always better than essence or flavouring, but very expensive, so try making Homemade Vanilla Extract.
Sprinkles – bake-safe sprinkles must be used for this cake. Any sprinkles not in the cake batter, do not need to be bake-safe. Here in the UK our sprinkles are not for the oven, and so break up and melt when in the oven, causing all the colouring to bleed and mix together. For that reason I recommend these ones that were recommended, and I have tested them, and they work really well. I purchased from Amazon for about £9, and it is larger bottle than the typical sprinkles we have, and used less than half. Look them up in Amazon – Leiber’s Rainbow Sprinkles. See before recipe for more information.
Vanilla Extract – Vanilla extract is always better than essence or flavouring, but very expensive, so try making Homemade Vanilla Extract.

 Buttercream – the buttercream for this recipe is a firmer one, with slightly different proportion of butter to sugar, that works well for piping in-between tall layer cakes. See my Buttercream Tutorial for beginners.
Piping Bag & Coupler – a star nozzle and coupler was used on the piping bag, to quickly change between the star nozzle for piping rosettes, and piping buttercream in the centre of the cake. This might seem strange but with stacking the cake layers upside down, with a very slight dome, a thinner layer of spread on buttercream in the centre area, and a border of higher, piped rosettes around the edge, makes the cake layers more level. So no need to try and cut the cake. Means slightly less piping, & leaves more butter for taller rosettes on the final top layer of cake. If you don’t have a coupler, either hold back some buttercream to spread on, or pipe a little through the nozzle & then spread flat. (See Photo 6 for reference). See lesson link below for more on the star nozzle used.
How To Assemble & Fill A Piping Bag
Buttercream – the buttercream for this recipe is a firmer one, with slightly different proportion of butter to sugar, that works well for piping in-between tall layer cakes. See my Buttercream Tutorial for beginners.
Piping Bag & Coupler – a star nozzle and coupler was used on the piping bag, to quickly change between the star nozzle for piping rosettes, and piping buttercream in the centre of the cake. This might seem strange but with stacking the cake layers upside down, with a very slight dome, a thinner layer of spread on buttercream in the centre area, and a border of higher, piped rosettes around the edge, makes the cake layers more level. So no need to try and cut the cake. Means slightly less piping, & leaves more butter for taller rosettes on the final top layer of cake. If you don’t have a coupler, either hold back some buttercream to spread on, or pipe a little through the nozzle & then spread flat. (See Photo 6 for reference). See lesson link below for more on the star nozzle used.
How To Assemble & Fill A Piping Bag

 Buttercream Top Tip – always chill after piping a buttercream filling, (for 30 – 45 minutes), before putting the 2nd layer on cake on top. This helps keep the shape and definition of the piped buttercream, and stops it buckling too much from the weight of the cake.
Cake Tins/Pans – I used 2 8″/20cm cake tins/pans, to make 3 layers. 3 tins would have been better. If you don’t have 8″ tins, and want to make in a small sizes or bigger sized tins, check out my articles on reducing a cake recipe, or increasing a recipe , that both include all my calculations you need, as well as worked examples.
Buttercream Top Tip – always chill after piping a buttercream filling, (for 30 – 45 minutes), before putting the 2nd layer on cake on top. This helps keep the shape and definition of the piped buttercream, and stops it buckling too much from the weight of the cake.
Cake Tins/Pans – I used 2 8″/20cm cake tins/pans, to make 3 layers. 3 tins would have been better. If you don’t have 8″ tins, and want to make in a small sizes or bigger sized tins, check out my articles on reducing a cake recipe, or increasing a recipe , that both include all my calculations you need, as well as worked examples.

 For more on different ingredient names, check my Differences Between UK & US Baking Ingredients article.
Or need help with accurate measurement conversions? Try my hand measured & recipe tested Baking Measurement Conversion Tables.
For more on different ingredient names, check my Differences Between UK & US Baking Ingredients article.
Or need help with accurate measurement conversions? Try my hand measured & recipe tested Baking Measurement Conversion Tables.

 Easter & Spring Baking Page
Mother’s Day Recipes Page
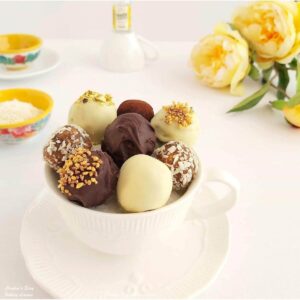
No-bake Tropical Cake Truffles
Easter & Spring Baking Page
Mother’s Day Recipes Page
No-bake Tropical Cake Truffles

 Servings – Approximately 24 portions to this tall cake.
References:
1 Chelsweets @ https://chelsweets.com/
2,3 Freezeit.co.uk @ https://www.freezeit.co.uk/can-you-freeze-buttercream/ & also their page – https://www.freezeit.co.uk/can-you-freeze-birthday-cake/
Servings – Approximately 24 portions to this tall cake.
References:
1 Chelsweets @ https://chelsweets.com/
2,3 Freezeit.co.uk @ https://www.freezeit.co.uk/can-you-freeze-buttercream/ & also their page – https://www.freezeit.co.uk/can-you-freeze-birthday-cake/Additional second and third sources were used to confirm information supplied by the 2 websites named above, as well as information collated from other bakers.


Join My Facebook Group
Why not also join my Facebook group Easy Online Baking Lessons – Easy Online Baking Lessons, dedicated to this baking lessons website, as well as providing one-on-one support with myself & my team? Be sure to answer all security questions when requesting to join. Click to join the Facebook group.
Subscribe For More Recipes
Want more great recipes, tips, baking information and newsletters? Then please consider subscribing by adding your email address below. Be sure to check for a confirmation email & respond back, so you can follow me & receive your free emails. Your personal information will not be shared with a third party.
Share The Love
Please see the sharing options or even printing, at the right/bottom of your screen (bottom of your screen for mobiles, and down the right-hand side on computers). You can even pin this to your own Pinterest page. Alternatively, you can save, print or share this recipe, via the Recipe Card. You could also leave some feedback if you like (at very bottom of the page).
Follow me on social media:
Happy Learning & Baking!
Caro x

Funfetti Sprinkle Cake For Beginners
Search For Something You Fancy!
Caroline’s Easy Baking Lessons


This looks so pretty! Never made a cake with sprinkles in the batter before. And so glad you linked to the best brand to use. Love the buttercream piping too. Going to save this as the go-to birthday cake.