Salted Caramel Sauce – Caramel Making 101

Salted Caramel Sauce
Caramel Making 101
All You Need To Know For Success
By Caro
Not only learn how to easily make Salted Caramel Sauce, but all the tips for successful caramel making - EVERYTIME, with my Caramel Making 101!
Jump to Recipe
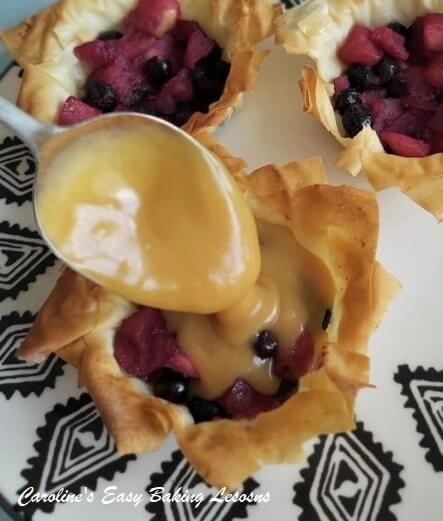
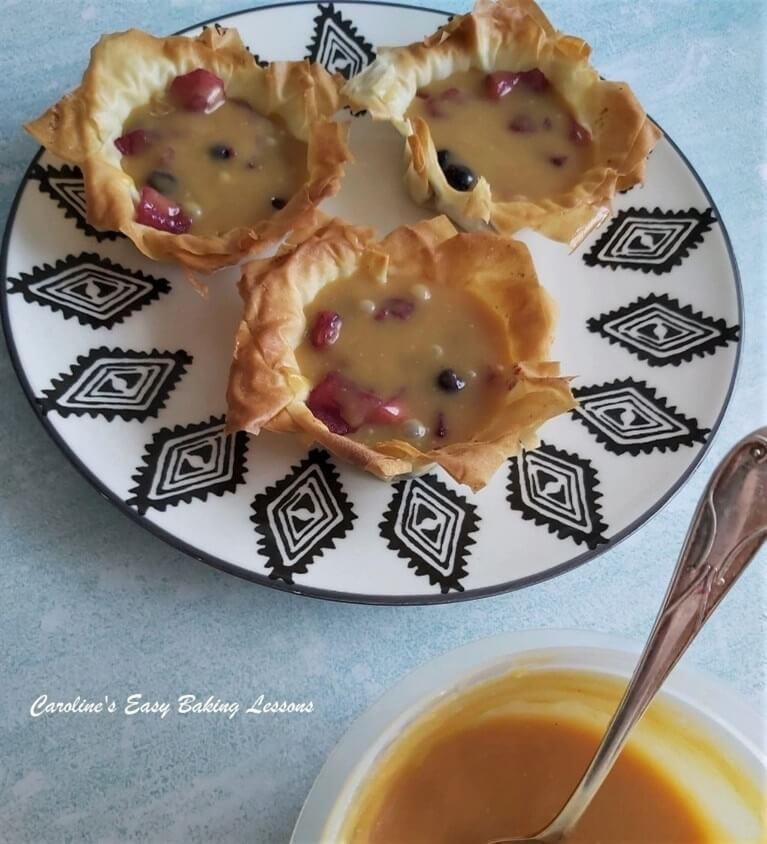
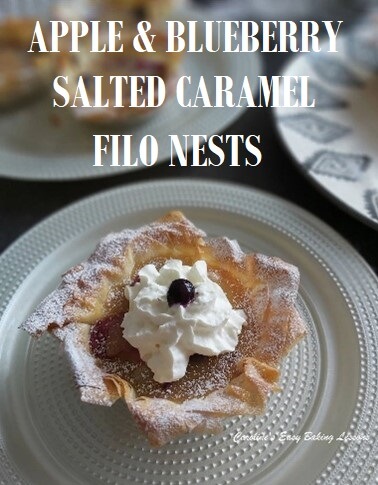
Yummy caramel taken to the next level with the addition of salt! Salted caramel flavouring is a craze for a good reason – it pairs perfectly. Try my recipe to serve with my popular carrot cake recipe, or add to my part-wholemeal chocolate chip banana bread muffins (see photo above & below).
Tips For Success In Caramel Making
Many find making caramel scary. Not just because of working with the scalding hot sugar, but because it can be easy to fail. However, if you stick to my tips you should be able to make it quite easily and safely, every time!
Jump to VideoRead my Caramel Making Tutorial OR
Jump to Recipe

Why Use This Recipe?


Comprehensive Caramel Tutorial
My recipe is easy, with through instructions & explanations to help understand and retain the information better. No fancy jargon, just what you need to know to succeed.
I give you tips to avoid any possible problems that could occur.
I also provide some know-how for what to do if problems arise.
This recipe uses a sugar/candy thermometer, but I also want you to learn how to tell when it’s ready, by sight and smell.
Knowing how the caramelization process works, also will help cook to the perfect time.
Caramel Sauce Tutorial

What Is Caramelization?
Caramelization is the heating of sugar to a very high temperature. Caramelization of regular granulated sugar sets in when it reaches a temperature of 160°C (320°F). At which point there will be a lovely sweet honey like smell. Chemical reactions result in larger molecules forming which in turn have a brown/caramel colour. Reaching this temperature initiates the reaction and very quickly deeper amber like colours of caramelization develop. When colouring, the caramel flavour we know and love is developing too. Whilst removing from the heat and cooling down quickly, stops it further caramelizing, the colour will still deepen and darken just through residual heat. This is why it is key to always remove from the heat just before it looks ready.

What Is The Maillard Reaction?
An alternative process for caramelization is Maillard Reaction. With that, protein is added to the sugar to initiate the reaction, in the form of milk, cream or butter. This browning of the sugar initiates at a lower temperature than that of regular caramelization (like this recipe), and so is often used in recipe books.
What Problems Can Occur?
Like many things in baking, problems can occur. But if you know what kind of issues might arise, you will be better prepared. There are 2 common problems people have when making caramel:

Possible Problem No.1
Crystallisation

This is when the sugar molecules want to go back to their former state of crystal structure and is know as crystallisation.  It will ruin a smooth caramel so should be avoided.  Caramelization as opposed to Maillard's Reaction, is less likely to become crystallized since the sugar is allowed to dissolve first.  That said, it can still happen.  And it is more likely to happen close to the caramelization stage, when moisture has evaporated.   And when crystallisation  begins, it can spread quite rapidly across the pot and ruin the smooth texture of the caramel.     (*Note tips 2 - 4 below all address preventing or treating crystallisation.)


Possible Problem No.2
Burning & Making A Bitter Tasting Caramel

Caramelizing the sugar too far, to too deep a colour will burn the sugar and produce a bitter taste.  Some people like a slightly bitter taste and so the shade of caramel sauces will differ quite a lot if you were to go search on Google.  But there's a fine line between slightly bitter and burnt.  So better to air on the side of caution.
TIPS FOR  SUCCESSFUL CARAMEL SAUCE

1. Heavy bottomed pan
2. Add lemon juice or corn syrup
3. Do NOT stir the sugar
4. Have everything prepared & ready
5. Have water & a brush ready
6. Don't go anywhere
7. Watch the caramelization process
8. Timing is important
9. The fridge is your friend


Tips For Successful Caramel Sauce
1. Use a heavy bottomed pan and I have never had success with a non-stick pan.
2. Use lemon juice (or corn syrup – not available in the UK), to help reduce crystallisation .
3. Do NOT STIR the mixture at all. This agitation can cause crystalization or make it spread. Occasionally you can shake the pan.


4. Have a dish of cold water and a long handled brush ready for if you see any dry patches or crystallisation occurring up the sides of the pan. When you see any, immediately brush away with water. This will stop the crystalised sugar spreading across the mixture by adding moisture.
5. Have all the ingredients & everything ready near you, before you even start – things happen very quickly in this process. Having the water and brush ready to prevent crystallization , and the cold cream and butter ready to add to the caramel, stops it caramelising any further & causing a bitterness.


6. Don’t go anywhere when making caramel – stay right there and monitor the process to familiarise yourself.
7. Often it can be hard to see the true depth of the amber colour of the caramel because of the top layer of bubbles. So when the caramelization begins, it’s good to see how some of the syrup looks on a spoon, and compare as it becomes more caramelised.


8. Remove just before the colour get’s to where you want as it will darken quite quickly even once off the heat. Caramelizing too much burns the caramel and produces a bitter taste.
9. Depending on what consistency you want your caramel, is determined by how much butter and cream are added at the end, as well as how long you chill it. With time off the heat, it will begin to set up a bit from a liquid state. Chilling will produce a thicker sauce with much more body to it.


Summary Of Caramel Process
The full recipe card is below of the process, but in essence, you are dissolving the sugar, letting it boil, then caramelizing and removing from the heat, before adding in the flavouring, cream & butter. It is then left to cool and thicken.
How Much Caramel Sauce Does It Make?
This recipe will make approximately 2.5 cups, 575ml, 19.5 fl oz worth of caramel sauce.


How To store The Caramel Sauce?
The caramel is best stored in an airtight container like a glass jar or bottle and in the fridge.
How Long Does Caramel Sauce Last?
The caramel sauce can safely last about 3 weeks in the fridge if stored correctly.


How Safe Is The Caramel Sauce on Baked Goods?
Home-made caramel sauce is safe at room temperature on cakes etc for up to three days. Provided the environment isn’t too warm.
Can Caramel Sauce Be Frozen?
Yes, home-made salted caramel sauce can be safely frozen, in an airtight container, for up to 3 months.


My Caramel Sauce Is Too Thick For Pouring
After chilling, for at least a day, the caramel sauce will thicken, solidify and you will not be able to pour it out. Therefore storing in a wide-necked jar is ideal. You can spoon out the amount of caramel you want and heat on the stove or in the microwave.
Can I Double The Recipe?
I would not recommend doubling the recipe as problems can occur with the caramelization. It is already a large amount. You can reduce by half or make 75% worth by adjusting the ingredient quantities appropriately.
Now on to the recipe……
RECIPE CARD FOR SALTED CARAMEL SAUCE
EASY SALTED CARAMEL SAUCE – Caramel SOS

Equipment
- Large heavy bottomed pot (not non-stick)
- Brush/pastry brush
- Small dish with cold water
- Sugar/Candy Thermometer (optional)
- Digital scales or measuring cups
- Small measuring jug
- Measuring Spoons
- Medium sized bowl for cooling sauce
- Wooden spoon
- Clean & dry glass jar
Ingredients
- 350 grams Granulated Sugar (12¼ oz, 1¾ cups)
- 80 ml Water (2¾ fl oz, ⅓ cup, 4½ tbsp)
- 30 ml Lemon Juice (2 tbsp)
- 53 grams Butter, unsalted (2 oz, 3½ tbsp, small cubes *)
- 284 ml Double Cream (9½ fl oz, 1 cup + 3 tbsp Heavy/Whipping Cream)
- 1-2 tsp Salt (optional, add to own taste)
Instructions
- Begin by adding the sugar to a heavy bottomed pot that is not non-stick. Then add in the water & do not be tempted to mix. This is key to caramel making.
- Next add in the lemon and again no mixing.
- Turn on the heat to med-high setting and then add a sugar/candy thermometer if using.
- Let the sugar come to a boil with no mixing at all. You can occassionaly shake the pan a little, just to make sure the sugar is evenly spread on the bottom of the pan
- Here are the stages that the sugar mixture goes through. The sugar will start to get moist and then begin to bubble gently around the edges.
- If there are some clumps of sugar in the centre of the pan – you can shake the pan a little (see video).
- Next it will start boiling all over the surface: it will be gentle at first, with steam & you will be able to hear it. Note the colour at this point – dip a small spoon in and it will be a clear colour.
- Let the sugar mixture rapidly boil. Keep it boiling & it will start to smell, kind of like honey. Colouring will be starting & the bubbles will be wider and have a burst-like appearance.
- Keep watching & when you notice it starts to colour, check with a spoon for comparison.


- Let it colour at bit more -I like to aim for almost coming to a medium amber colour. Remember it will colour & caramelize more once off the heat so you want to take off just before it’s ready. If using a sugar/candy thermometer, the temperature will be about 172°c/341°f (after it get’s to 160°c/320°f keep a very close eye and be ready to remove).
- Turn off the heat and remove from the stove. Immediately and very carefully, add in the vanilla. It will be starting to stop bubbling and the colour will be easier to see now.
- The mixture is still cooking, so quickly and carefully (will be extremely hot), add in the butter & cream & mix through till the butter is melted.


- Transfer to a bowl (I use a glass bowl) to allow the caramel sauce to cool and start setting. Leave to cool for about 15 mins before adding in salt to your own taste (start with ½ tsp).
- Chill with cling film/plastic wrap on top till cooled down and thickened. Or when almost cooled you can transfer to a clean & dry jar/bottle.
- You can use at any stage you like, depending on the consistency you are looking for. See my video for how it is after 30 minutes of chilling. No longer a thin liquid, but still an easily poured sauce. Overnight, it has set up nice and thick.
- Store in the jar/bottle in the fridge for up to 3 weeks. It will solidify in the refrigerator over time, so if too thick, spoon some out and heat up to thin, either in a microwave (for 10 second bursts), or on a stove top.


- Caramel is safe at room temperature on cakes etc for up to three days. You can also freeze homemade caramel for up to 3 months.


Video
Notes

 Carrot Cake Recipes
Easter & Spring Baking Recipes
Ingredient Conversions Table
Carrot Cake Recipes
Easter & Spring Baking Recipes
Ingredient Conversions Table


SIGN UP FOR MY NEWSLETTER – I would love it so much if you could sign up for my newsletter. I will send out monthly emails, showing the latest recipes and articles, and latest info. Being a site without ads, building a following, is even more important and will keep it up and running and for free to everyone. Occasionally there will be the odd seasonal emails, but is really a means of reaching you, if you are not already in one of the Facebook groups I admin. Please note too, that these email addresses are not shared or sold onto another party. Thanks so much Caro xxx


Please see the sharing options or even printing, at the right/bottom of your screen (bottom of your screen for mobiles, and down the right-hand side on computers). You can even pin this to your own Pinterest page. Alternatively, you can print wiht/without the photos, the Recipe Card above. You could also leave some feedback if you like.
Here’s links to some of the recipes featured on the page – Apple Cinnamon Bundt Cake (Diana’s pics), and Apple Blueberry Salted Caramel Filo Nests.
Or click to watch the Wholemeal Bananabread Muffins video.
Love caramel? Why not try Buttered Brazel Nuts, with a butterscotch coating?
DIFFICULTY LEVEL: Easy with guidance


Follow me on social media:
Thanks for reading
Happy Baking & Making
Happy Tummies & Memories!
Caro xx


Leave some feedback if you like 🙂
Caroline’s Easy Baking Lessons


Have never been able to make a decent caramel sauce but following these instructions I can now. I love the fact that you can leave it in the fridge for 3 weeks but my family love it on ice cream so it never lasts that long🤣