St Patrick’s Day ‘Pot Of Gold’ Cupcakes

St Patrick’s Day ‘Pot Of Gold’ Cupcakes
By Caro
Here is a super simple recipe for St. Patrick's Day - 'Pot Of Gold' Cupcakes. These are so simple to make and are lemon blueberry cupcakes, with a special 'Pot Of Gold' scene as a topping.
My Inspirations
I saw this idea for cupcakes on Pinterest & kind of ran with it as they say. I didn’t use fondant on the cupcakes, (which is really unusual for me). The pot for the ‘pot of gold’ were originally on Pinterest, constructed using chocolate Rolos, but I couldn’t get them at the time, so used these chewy sweets called Midget Gems. I also improvised with the ‘gold’ & used sprinkles I had, well not exactly sprinkles, more like very small nuggets. They came from Aldi and actually tasted better than most. I also decided to pipe grass (as I luckily had that piping nozzle) & opted for making the grass a mint green shade instead of darker green. The rainbow is a sour sweet (candy) & you can buy them in most places. I recommend however, to try to get as solid ones as possible. Mine were very pliable & not so good. Recommendations on what to do with that further down in the tutorial. For the cupcakes I made lemon drizzle with blueberries and also a lemon buttercream to top.
Notes On The Ingredients

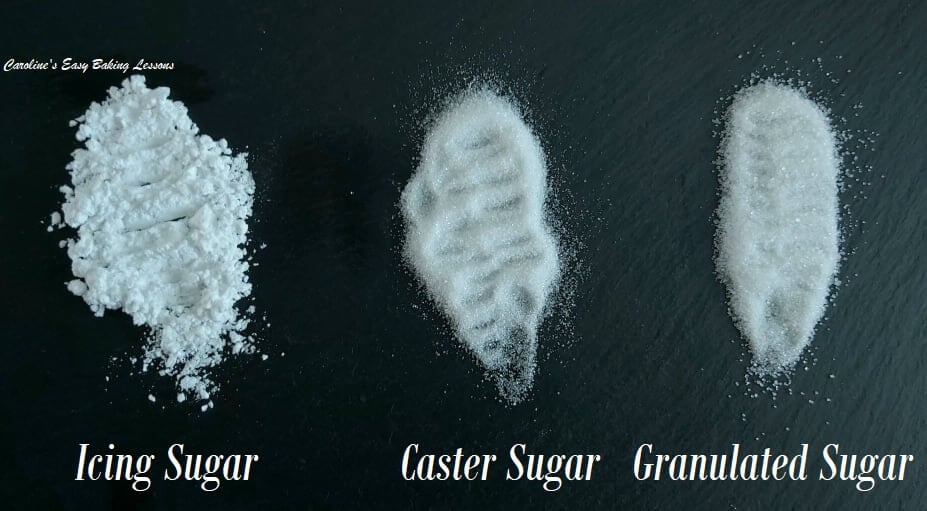
Caster Sugar
The equivalent of Caster Sugar in the US/Canada is extra/super fine sugar.
Make Your Own Caster Sugar
You can make your own by grinding regular granulated sugar a little bit or processing them lightly. Do not go as fine as a powder, keep it as small granules. Note that US granulated sugar granule size is slightly smaller than the UK equivalent.
See the photo above for UK sugars. UK Icing/powdered sugar (Left), Caster Sugar (middle) & UK Granulated (Right). But for making the drizzle in this recipe you can use either caster (extra/super fine) or granulated since it’s going to be cooked down.

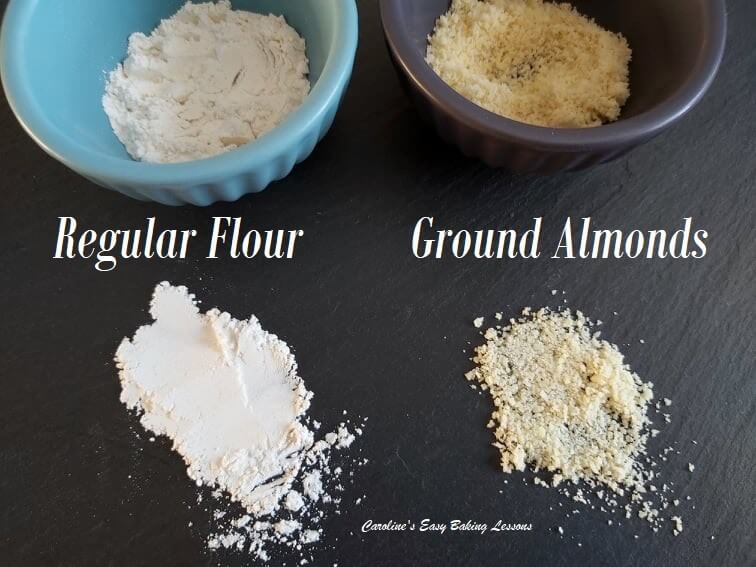
Ground Almonds
There’s also ground almonds in the recipe, well a small proportion in the cake. Ground Almonds is not an exact match to Almond flour. See photo here of my ground almonds, which is nearer to Fine Almond Meal.
Can You Use Almond Flour?
Now I am often asked about substituting almond flour in recipes, but on the most part, too fine an almond flour will not give the same desired effect that the ground almonds provides. Ground almonds are used to give structure and some moisture to the bake. It often appears in my cakes that might be extra tall or need to be strong to support lots of fondant toppers for example. If you happen to have almond flour that is more course and not too fine or powdery, it will be fine to use.
I also have another article for your reference – Difference Between UK & US Common Baking Ingredients, that lists a lot of questions you might have.
Make Your Own Ground Almonds
You can also choose to grind your own almonds (skin on), and you basically bash them first and then process a little. There’s YouTube videos on this.
INGREDIENTS
For 12 Cupcakes
- 250g Self-raising Flour (8.75 oz)
- (OR 2 cups All Purpose/Plain + 3tsp baking powder + ½ tsp salt)
- 2 tsp Baking Powder
- 250g Butter, softened & cubed
- (8.85 oz, 1 + 1/8 cup)
- 250g Caster Sugar
- (8.85 oz, 1 + 1/8 cup Super/extra Fine Sugar*)
- 50g Ground Almonds
- (1.75 oz, ½ cup Fine Almond Meal*)
- 4 Eggs (med – large)
- 4 Lemons, zest only
- 100ml Hot water (up to 7 tbsp, 3.25 fl oz)
- 150- 190g Blueberries (5.25 – 6.75 oz, 3/4 – 1 cup)
For Lemon Drizzle
- 10 tbsp Lemon juice (3 or 4 lemons, depending on size, 150ml, 5 fl oz, 2/3 cup)
- (from the lemons above)
- 8 tbsp Caster Sugar or Granulated
- (112g, 4 oz, rounded 1/2c, Super/ extra fine sugar or Granulated)
For ‘Grass’ Buttercream
- 135g Unsalted Butter, unsalted, cubed & softened
- (2/3 cup or 4 3/4 oz)
- 173g Icing Sugar, sieved
- (6 oz, 1 1/3 cup confectioners’ sugar, sieved)
- 1/2 – 3/4 tsp Lemon or Orange extract (to taste)


EQUIPMENT
For Decorating The Cupcakes
- Decorations
- Rainbow coloured sweets/candy strips
- Rolos or sweets/candy shaped like a ‘pot’
- Gold sprinkles, nuggets or larger sugar crystals
- Food glue or water
- More sprinkles or edible glitter (optional)
- Scales or measuring cups
- Large mixing bowl or stand mixer bowl
- Sieve
- Measuring spoons
- Hand/Stand mixer
- Wooden spoon
- Small measuring jug
- Cupcake Cases
- Cupcake baking Tray
- Cocktail stick/Tooth Pick
- Timer or Phone Timer
- Cooling rack
- Juicer (optional)
- Sharp Knife
- Medium pot
- Stove top
- Wooden spoon
- Piping bag and grass nozzle (optional)
- Extra small paint brush
- OVEN:180/160c fan oven/350f/Gas Mark 4
INSTRUCTIONS


1. Weigh out the butter, while cubing it & leave out on the worktop to soften & come to room temperature. I cut in 1cm (1/3″) cubes as smaller surface area comes to room temperature quicker. See Photo 1,left pic. If you forget to take the butter out, try this hack I reviewed to soften butter in about 12 minutes.
2. Once the butter is softened, weigh and add in the sugar. Now mix on medium to high speed with a hand or stand mixer until paler, soft and fluffy. This is known as ‘the creaming method’. It is important for incorporating air into the batter and getting a good rise in the cakes.


3. Now beat in the eggs, one at a time, mixing well in-between each addition.
4. Mix in the vanilla just till incorporated. See Photo 2, left pic.
5. Next sieve in the flour and baking powder and then the ground almond without the sieve. See Photo 2.
6. Heat up the oven to 180/160c fan oven/350f/Gas Mark 4.


7. Mix the dry ingredients in, with the use of the mixer, only until all is incorporated, and no more white is visible. See Photo 3, left pic. See my video on how little mixing is required
8. Next add some of the hot water and mix enough in until you get a soft dropping consistency. Not watery and not too thick. Thin enough to pour off a spoon and back into the mixture.
9. Now add in the blueberries (you can dust these in some flour if you like to reduce the amount that sink to the bottom). See Photo 3, right pic.


10. Using a plastic or rubber spatula, gently fold in the fruit and zest, till evenly distributed. Not using the mixer at this stage, is more gentle on the fruit, as well as keeping more air in the batter. See Photo 4, left pic.
11. Line your cupcake baking trays with 12 cases.
12. Scoop the batter evenly into the cases. I like to use an ice-cream scoop to get about the same amount, filling with one scoop at a time. Then I go round again with the left over batter until all used up. You are looking to fill about ¾ of the way up. See Photo 4.


13. Once all filled, bump the trays gently on the worktop/counter twice, (helps to level off, as well as expel any trapped air). Place in the centre of the oven and cook until golden on top. See Photo 5. (Make the drizzle at this stage – step 15). Mine took about 17 minutes to bake fully, and I rotated and turned the tray during baking. You can test the cakes are done by inserting a wooden cocktail stick/toothpick into the centre of the largest cake. If the stick comes out clean with no crumbs, then the cake is fully cooked. (Try to avoid the blueberries). If not done, cook for 2 more minutes and check again till done.
14. Leave in the baking tray for the next stage.


15. While the cupcakes are cooking, make the lemon drizzle syrup. Firstly zest the lemons. Cut your lemons & squeeze out the juice by hand, or with a juicer. You will need 3 or 4 lemons, depending on the size of them. Don’t bin old hard lemons. Simply pierce the skin in a few place & place in a bowl in the microwave for 30 seconds. It will be much easier to juice now and the flavour will be stronger.
16. Measure out the sugar & lemon juice into a medium pan & put onto the stove on med-high heat mixing occasionally, until the sugar dissolves. (**You can use caster sugar or granulated for this stage as you are melting the sugar).
17. Once dissolved, on high heat, let the mixture come to a boil and let it boil for a few minutes (keep the wooden spoon in the pan and it should reduce the likelihood of the mixture boiling over).


18. Reduce the heat to medium & leave till thickened. Mix occasionally during this process. To test if it’s ready, give a mix with the wooden spoon, then lift it up, turn it over and rest it across the pot. Now with your finger or something similar shaped (be careful as the mixture is super hot), drag a line through the syrup on the back of the spoon. If it is now a syrup there will be a clear line made. See Photo 6 above. If not the case, continue to let it simmer and check every 5 minutes like before. Leave to cool down, during which time the drizzle syrup will thicken more.
19. 5 minutes after the cakes are out of the oven, using a cocktail stick, make lots of holes all over the tops of the cupcakes. Pay particular attention to the outer edges that are usually more crisp in texture. Go in deep but not too much to pierce the bottom of the cake.
20. Pour, spoon or brush the syrup drizzle on top of the cupcakes. Leave 5 minutes and repeat. You can do this several times until all the drizzle is used up. See Photo 7.
Making The Buttercream
1. Cut your butter into cubes (about 1cm or 1/3″ size, see Photo 1) while you are weighing or measuring it out. When the butter is ready, beat with your hand/stand mixer for a few seconds, before sieving in your icing/confections’ sugar.
2. On the lowest setting of the mixer, start to mix in the sugar. Keep going and the texture will completely change. The pics in Photo 8 show the stages of the mixing and the transformation into a soft smooth luscious mixture. Once happy with the consistency, add in your orange or lemon flavouring to taste.


3. To colour the buttercream, I use a wooden cocktail stick and scrape a little of the colouring onto the ends of the beaters and then mix it through the buttercream. (See Photo 8 above).Then wait 1 minute for the colour to fully develop, before gradually adding in anymore colouring if required (in tiny amounts). Most people use gel colouring but I use a paste now, by Sugarflair.
4. To fill the piping bag, I attach the nozzle and place the bag inside a tall glass (with the nozzle pointing upwards). Then fold the top end of the bag down and over the edge of the glass and open up with your hands. See Photo 9. Now spoon and scrape in the buttercream. Once ready, twist the top of the bag and squeeze the buttercream to near the end of the nozzle. You are ready to go.


ASSEMBLING THE CUPCAKES
1. Once the cupcakes have had their soaking of lemon drizzle and the buttercream is ready, it’s time to pipe the ‘grass’. Have all the components ready at this stage and laid out.
2. To pipe the grass, squeeze while the nozzle is touching the top of the cake and let the buttercream come out. Keep squeezing till you get the length you want and then pull back & up as you stop squeezing. Pulling back like this will make the buttercream stay upright. See Photo 10.
3. I preferred to start piping at the outer edge and then work from the one side to the other. See Photo 10.


4.Continue to pipe the grass until all the cupcake is covered. Repeat with all the other 11 cupcakes. See Photo 11.
5. To make the rainbow, I bent the sweety/candy strip in half (as they were very soft) and used some buttercream to join it. Then left to set. Repeat for as many of these that you want to make.


6. To make the ‘pots of gold’. Brush food glue or water, onto the top of the sweetie, then dip this end into the golden sprinkles/nuggets. See Photo 12.
7.Turn upwards and add more sprinkles if needed. Repeat with some more if desired. See Photo 12.


8. To assemble, bend the ‘rainbow’ and place into the buttercream ‘grass’. (See Photo 13). The buttercream should keep the ends in position. Then place the ‘pot of gold’ off to one side of the ‘rainbow’. Add some food glitter is desired. Repeat for more cupcakes.
9. Alternatively, add or position some Easter/Spring themed or coloured sprinkles on top of your buttercream ‘grass’ and dust with some food glitter.
Please see the sharing options or even printing, at the right/bottom of your screen (bottom of your screen for mobiles, and down the right-hand side on computers). You can even pin this to your own Pinterest page. Alternatively, you can download this article, see below. You could also leave some feedback if you like.
Click the ‘Download’ button below, to save to your phone or computer.
DIFFICULTY LEVEL: easy, beginner


Follow me on social media:
Thanks for reading
Happy Baking & Making
Happy Tummies & Memories!
Caro xx


Caroline’s Easy Baking Lessons


