Summer Berry Griestorte

Summer Berry Griestorte
A Light Cream Filled Genoise Layer Cake
By Caro


This Summer Berry Griestorte, is a light cream filled Genoise layer cake, packed with beautiful berries. Includes tips for a successful Genoise.


Now for many bakers, when they hear Genoise cake mentioned, shy away from trying it. For some it can result in a very thin rubbery cake, but with my help, I think you will achieve a very nice & light cake, that pairs beautifully with whipped cream and fresh fruit. On the old website I had a Pineapple Griestorte, but to utilize the beautiful fruits in season just now, I decided to make one with summer berries – and the Summer erry Griestorte was born. I have actually included 2 variations of this basic recipe, for you, depending on your needs. But both make a great tasting cake, and with very little ingredients.


What Is A Summer Berry Griestorte?
Which leads me nicely onto what’s in a Summer Berry Griestorte. Well ‘torte’ by definition, is a multi layered cake, that can filled with cream, jam, etc. This Griestorte, is essentially made using a Geniose sponge, and that is only made up of eggs, sugar, vanilla & a little semolina. There is no butter, oil, flour or raising agent. The leavening is provided by separating the eggs, and whisking till you have incorporated lots of air into what, when combined will be your cake batter, with just the inclusion of semolina.


I like to use whipped cream with this type of cake, because of it’s bare ingredients, it doesn’t produce the neatest of edges to the cake (but this is quite normal). So you can go to town, filling and covering the cake all over with cream. You don’t need to be an expert at decorating either. Like the pineapple one, you can push chopped nuts up the sides of the cream covered cake. (Apologies for the poor quality of photograph of the pineapple one, it’s an old pic).
Or in my 2 variations here, you can cover with slices of fruit. I have coloured the cream a baby pink – in one cake I added a little raspberry jam and in the other I just added a tiny drop of pink food colouring. But you can easily just leave white. You could also flavour it if you like. We like our cream plain, but you can use vanilla, lemon extract, orange extract, zest etc.


2 Styles Of Summerberry Griestorte
Just a note on the photos of different Summerberry Griestorte cakes. I have provided the ingredient quantities below, for making 2 different sizes of cake. The 3 egg recipe can be used for a 2 layer 8″ (20cm) cake, or a deep 2 layer 6″ (15cm). Whereas the 6 egg recipe, produces a deep 2 layer 8″ (20cm) cake. And that is the cake, with lots of mixed berries on it, sides and on top.
A NOTE ON INGREDIENTS


CASTER SUGAR
The equivalent is known as ‘Extra Fine or Super fine sugar’ in the US. Here is a photo of one brand that is available in the states. The bottle however is for tea or coffee, so isn’t in a very big bottle, (only 340g/12 oz). Berry Sugar, Fruit Sugar, Baker’s Sugar can all be used as a substitute too. You can also make your own from granulated sugar. Please note though that that US regular (granulated) sugar is finer than our UK granulated.
Just be careful, as grinding in a processor too much may produce too fine a sugar, (similar to powder and be icing/powdered sugar) and possibly ruin your machine. So I would advise caution with it. Some people have also been known to use coffee bean grinders. A good tip with making your own is to crush in small batches and weigh or measure it as you go along until you get the quantity you need. Alternatively, make up a jar of your own caster sugar and use when needed. Be sure to store in an airtight container.


WHY USE CASTER SUGAR?
Well I am often asked this question, if granulated can just be used and the answer is that for some bakes, yes you can. However, there are a few points to note. Unless if the sugar is being melted, to say make a drizzle, then the caster sugar is there not only providing a function of sweetness and moisture, but also to create friction when you are creaming with the butter. This process of rubbing, with the small sugar crystals, creates friction, which in turn produces air pockets, which gives a nice rise and light texture to cakes.
In meringues and macarons, I would always advise on using fine sugar, again because of the reactions that are occurring. For most cakes for example, they will still bake off nice, but they will not be exactly as intended by the recipe developer. And this is something to bear in mind. See here my photo of the 3 main sugars we use in baking here in the UK.


SEMOLINA
Often in recipes as fine or course. Fine semolina is a bit more coarse than semolina flour, but still very fine. See photo opposite comparing semolina to regular four. Still fine, but has a course texture if you run it through your fingers and is pale beige/yellow in colour. Used in cakes and also on top of breads or rolls. For this cake, you can use fine or coarse, it’s up to you. Both give a slight different texture feel to the sponge, and obviously the coarse one more so.
If you have to you could use regular flour, and I would advise that over semolina flour which is a different thing. Note that semolina can be found in bigger supermarkets, and in foreign food stores/aisles and also online. It can be used in a lot of baked goods and I have a Turkish cake, Revani also know as Sambali, coming up that uses it. See my photo of the semolina compared to regular wheat flour. For more on this and other ingredients, see my article Differences Between UK & US Common Baking Ingredients.
INGREDIENTS
INGREDIENTS TO MAKE A SHALLOW 2 LAYER, 8″ (20cm) CAKE, OR DEEP 2 LAYER 6″ (15cm)
- 3 medium Eggs, separated
- (Large US)
- 125g Caster Sugar
- (4.5 oz, 2/3 cup Extra/Super Fine Sugar)*
- 1 1/2 tsp Vanilla Extract
- 75g Semolina (Fine or coarse)*
- (2.5 oz)
INGREDIENTS TO MAKE A DEEP 2 LAYER 8″ (20cm) CAKE
- 6 Medium Eggs, separated
- (Large US)
- 250g Caster Sugar
- (9 oz, 1 1/3 cup Extra/Super Fine Sugar)*
- 3 tsp Vanilla Extract
- 150g Semolina (Fine or coarse)*
- (5 oz )
OVEN: 180oc/160oc Fan Oven/350of/Gas Mark 4
FILLING & DECORATION
- 280ml Double Cream
- (9.5 fl oz, 1 1/6 Cup)
- Fruits of choice – I used about 400g Strawberries (14 oz ), 100g Blueberries (4 oz), 150g (6 oz) Raspberries and had plenty left over for also serving with a slice of the cake. Also note you won’t need all the cream, but is nice to have a little left over, for serving too if requested.


EQUIPMENT
- Measuring scales or cups
- Measuring spoons
- 2 bowls for splitting eggs
- Med-Large bowl for batter
- Medium bowl
- Electric whisk/mixer
- Cake tins (2 x 8″, or 2 x 6″)
- Baking/parchment paper
- Lining Paste (or butter/cake release spray)
- Pastry brush
- Timer
- Cooling Rack
- Clean Tea-towel
- Chopping board
- Knife for fruit
- Bowl for cream
- ‘Red’ jam or pink food colouring
Summer Berry Griestorte
INSTRUCTIONS
1.Begin by making sure your mixing bowl for the egg whites is very clean and grease free. Here’s a video of me rubbing lemon juice onto the bowl and beaters. This is because any tiny bits of grease, can result in the whites not whipping up correctly. So good tip if you sometimes have meringues that don’t work out.
2. Whisk the egg whites, in a medium bowl, till soft-medium peaks form (see my Whisking Egg Whites video). See Photo 1 below. Another good tip for getting the batter etc off your beaters, is to very gently and slowly have the hand mixer on, and lift up from the bottom of the bowl, but keeping it still shielded by the bowl, and the mixture should mostly come off. See this old video. It is also what I am doing half way through the tip video above.


3. Heat your oven to: 180oc/160oc Fan Oven/350of/Gas Mark 4, (or sooner if your oven takes a longer time to heat up)
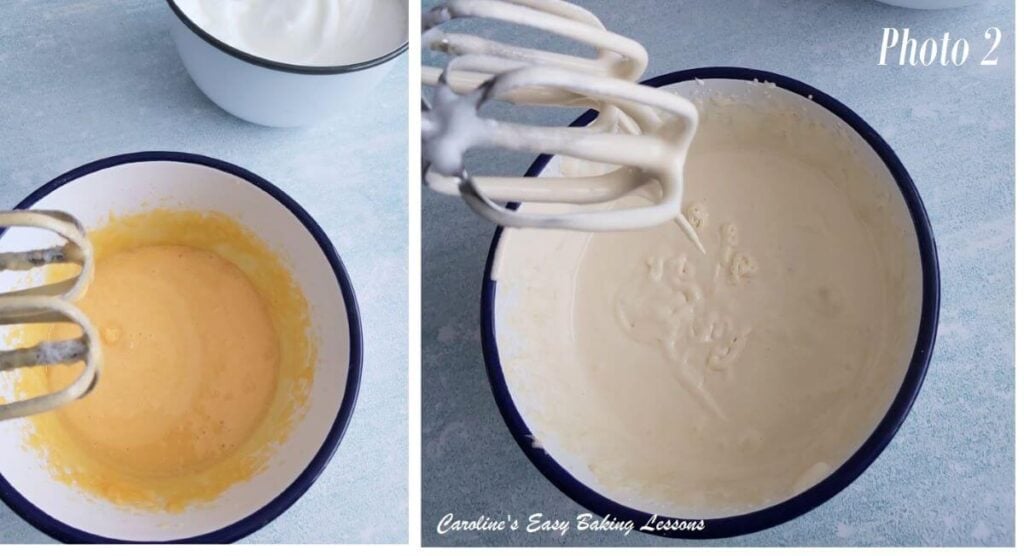
4. Now take the larger bowl, add in the egg yolks and beat (no need to wash the beaters), until the egg is broken up. Note the colour at this point (see photo 2 below), a solid orange colour. Now add in all the sugar and whisk on medium to hight speed till thick, creamy, increased in volume and a lot paler in colour. To test if ready, do the ‘ribbon test’ or trail test’. For more on that you can read my article, or watch the video opposite.
You basically lift some of the mixture and let it fall back into the bowl. And you want a trail or impression to be left on the surface of the batter, that does not immediately sink. See Photo 2.


5. Now add in the vanilla and 1/3 of the egg whites you whisked. Gently introduce the whites by ‘folding’ with a rubber or silicone spatula. (I find metal knocks out all that air we just whisked into the batter). Think of the spatula as your pen and the batter the paper and fold in, in a motion as if you were writing a number 8. You don’t need to fully incorporate it, as you will be adding more. Now add another 1/3 like before and repeat, before finally adding in the last 1/3 of whites.
6. Once all incorporated and one homogenous colour, now fold in the semolina, in 2 batches, carefully folding like before. When doing so, be sure to scrape the bottom of the bowl while doing so, so that you don’t leave any semolina unmixed. See Photo 4 below.


Greasing & Lining The Cake Pan
7. Now time to grease and line your cake pans. I like to use cake lining paste for most greasing. Click to see cake lining paste recipe, or to watch a quick video of making lining paste . You can also use cake release spray, or butter and flour if you want. Just be sure to also paper line the bottom of the pan. Do not do without any paper, as it will stick. Here’s photos on how to cut a paper circle that will fit your tin. (See Photo 5 and then Photo 6 below).
**See also my recent lesson on cutting paper for round pans and dishes to get a more accurate fit. Or, view the video below


8. Gently scoop and divide the batter into the two tins. To get even layers you can weigh in the tins or use scoops to get an even amount in both tins. Note though that this kind of cake, will not rise as much as normal flour cakes.
9. Unlike my other cake and cupcake recipe, do not tap the tins on the counter/worktop or you will lose air you just incorporated.


10. Bake in the centre of the pre-heated oven till risen slightly, golden on top and shrinking a little from the sides. For the shallow cake in the 8″ tins, using 3 eggs, this will take between 15-20 minutes. For the deeper cakes (3 egg/ 6″, or 6 egg/ 8″), it can take between 25-30 minutes. Inserting a wooden cocktail stick in the centre, should come out clean of crumbs when ready. See Photo 7.
11. Leave the cakes in the tins, on top of a cooling rack for about 10 minutes. Then place a clean folded tea-towel on top of the cooling rack. Run a palette knife round the edges of the cake to release from the tin. And now turn over and out onto the tea-towel. Leave to cool for another 10 -15 minutes before trying to carefully peel back the paper. Then leave to cool completely. See Photo 7.


12. Once the cake is cooling, you can make the cream. Place the cream in a medium bowl,(or stand mixer) and whisk on medium to high speed until thick, creamy, and with peaks. See Photo 8.
13. Now at this stage you can add some jam like raspberry, strawberry or cherry, to give the cream a pink colour or just add a tiny drop of pink or red food colouring, and mix through. You can also at this stage add a little vanilla or a tbsp or 2 of icing/powdered sugar. I like without vanilla or sugar, but if you want the cream to be a little thicker and firmer, adding the sugar helps. See Photo 9 below.
14. Now either place the bowl, covered in the fridge or you can put in a piping bag if you want to pipe the cream. Leave in the fridge till ready to use.


SIGN UP FOR MY NEWSLETTER – I would love it so much if you could sign up for my newsletter. I will send out monthly emails, showing the latest recipes and articles, and latest info. Being a site without ads, building a following, is even more important and will keep it up and running and for free to everyone. Occasionally there will be the odd seasonal emails, but is really a means of reaching you, if you are not already in one of the Facebook groups I admin. Please note too, that these email addresses are not shared or sold onto another party. Thanks so much Caro xxx


15. Once the cake is cooled, cut your fruit. For the strawberries, I grouped like sized ones together. They weren’t all the same size, so I used that as a ‘big, smaller, big, smaller’ pattern on the smaller cake I made. Just slice down the way, and get 4 slices of different sizes. I kept the end pieces for chopping and using in the filling. For the blueberries and raspberries, I just cut in half and likewise kept any smaller bits for the filling. See Photo 10.
16. Once ready to assemble, cut 4 squares of baking/parchment paper to place under the first layer of sponge, on top of a charger plate/large serving plate/cake stand. This saves on mess and you can decorate on the serving plate with no need to transfer it. See Photo 11 below.


17. Spread some of the cream on to the first layer of cake, going right to the edges. You can add a nice thick layer if you like. Then place on top the small chopped pieces of fruit you held back. Be sure to cover all the cake and not have too big a size pieces. See Photo 11 above.
18. Now place the 2nd layer of cake on top and very gently squeeze together. See Photo 11 above.
19. Now take some of the cream on a palette knife and start by spreading some on to the top of the cake. Give it a nice a coating and go right to the edges. Doesn’t need to be too neat if covering. Then start adding a little of the cream to the sides of the cake, applying by holding the palette knife vertically and spreading the cream horizontally across the cake layers. Then work your way round, adding more, until covered. You can add some more cream then if you like all over, of hold back for serving with slices of the cake. See Photo 12.


20. Next take your fruit pieces and go wild! As I said, I used 2 different sizes of strawberry slices, and just pressed onto the sides of the smaller cake. Then I topped with a few fruits to the top. (See Photo 13). The deeper cake, had slices of strawberry, raspberry and blueberry, randomly placed around the sides of the cake, sliced strawberry around the top and some fruits in the centre, finished off with some edible lustre dust. . (See Photo 14 below).
21. Once happy, place in the fridge for a few hours to firm up. leave at least one hour. Don’t cover the cake or it will sweat. If in a hurry, and you want nice cut slices, you can place in a freezer for at least 30 minutes if you have space.


22. Once ready to serve, use a large sharp knife and have paper towel or clean cloth to wipe the knife in-between slices.
23. Serve on its own or with more fruit and cream. Enjoy!
24. Any left overs can be stored in a fridge, very loosely covered and will last a couple of days.
Join My Facebook Group
Why not also join my Facebook group – Easy Online Baking Lessons, dedicated to this baking lessons website, as well as providing one-on-one support with myself & my team? Be sure to answer all security questions when requesting to join. Click to join the group.


Please see the sharing options or even printing, at the right/bottom of your screen (bottom of your screen for mobiles, and down the right-hand side on computers). You can even pin this to your own Pinterest page. Alternatively, you can download this article, see below. You could also leave some feedback if you like.
Click the ‘Download’ button below, to save to your phone or computer.
DIFFICULTY LEVEL: beginner, with guidance


Follow me on social media:
Thanks for reading
Happy Baking & Making
Happy Tummies & Memories!
Caro xx
Summer Berry Griestorte Cake


Swipe left/right or click the arrows/dots to move through the slideshow below


Leave some feedback if you like 🙂
Caroline’s Easy Baking Lessons


Such a beautiful but simple cake, perfect for summer and even for the Coronation this weekend. I will recommending this one – thank you!