Sweet Shortcrust (Pie) Pastry – Pastry 101

Learn not only how to make Sweet Shortcrust Pastry for your pie crust, but all the tips you need to know for success in pastry making.
Sweet Shortcrust Pastry
Pastry 101
(Pie Crust)


What’s In This Lesson?
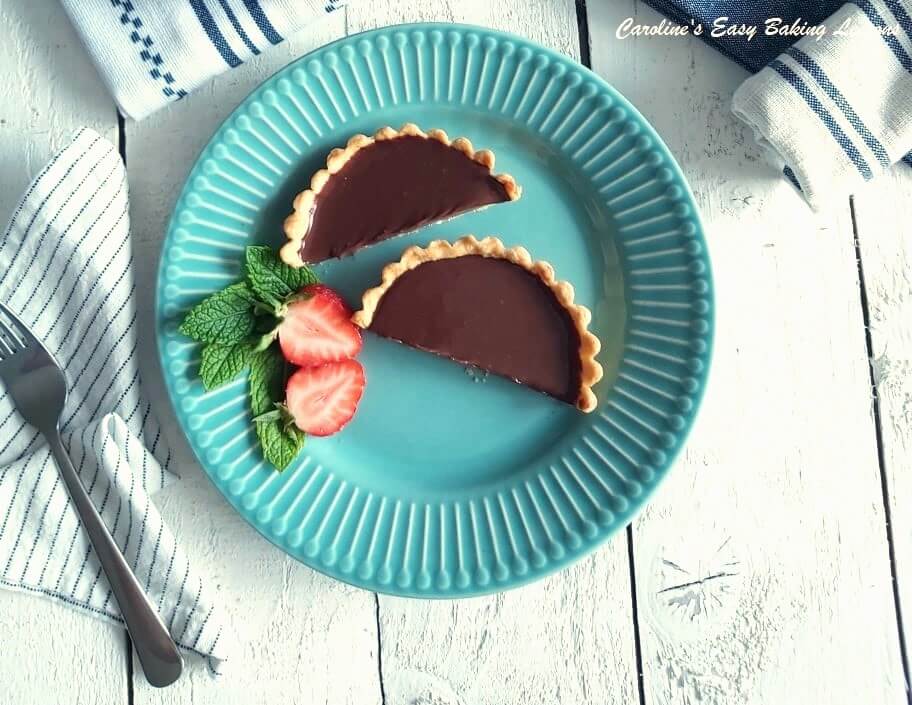
In this lesson you will learn how to make simple sweet shortcrust pastry. This will facilitate you to move on to making a sweet pie, and the suggested recipe to try is my Individual Chocolate Tarts (see photo below).
Furthermore, you will learn right from the start, the basics of pastry making, as well as lots of helpful tips to take forward on future pastry recipes. Think of it as one-stop shop for your pastry questions.

What Is Sweet Shortcrust Pastry?
Shortcrust pastry is otherwise known as Pie Pastry, or Pie crust pastry. This sweet version is very versatile and hense can be used for so many desserts, & indeed not just pies. This is the most straight forward of the types of pastry to make and it is also the quickest. For our American and Canadian readers, it’s similar but not identical to Pâte sablée or Pâte sucrée. These are both classic French versions of a sweet shortcrust pastry.


Why Different Types Of Sweet Pastry?
The different proportions of the ingredients in the pastry dough, basically produce a difference in the texture and flake of the pastry. In short, different ones are better for a specific filling. This recipe here for sweet shortcrust pastry is great for things like mini mince pies and has more of a buttery, soft and crumbly texture.


Firstly Some Background On Sweet Shortcrust Pastry
For this pastry, I have altered the recipe slightly from my savoury recipe, by using a little less fat & adding an egg, as well as obviously including sugar (in the form of icing/powdered sugar) and omitting the salt.
Common Sweet Shortcrust Recipes
A lot of recipes for sweet shortcrust pastry, call for a 50% butter to 50% lard ratio for the fat content in their shortcrust or pie pastry. But, for a vegetarian or slightly healthier option, I use 100% butter. Some older recipes use a percentage of margarine, but it depends on what type of flake or crumble you want in your pastry as well as how buttery you want it to taste.
In some versions you will also find a difference in the proportion of fat to flour content. This recipe version is nearer to a Pate Sucreé pastry, and has a slightly lower proportion of fat to flour, and is is enriched by adding egg.
IMPORTANT PASTRY INFORMATION & TIPS


Over-working The Dough
Too much handling or kneading of the dough, will produce a tough pastry that is less enjoyable. This is a result of working the gluten & causes the gluten stands to elongate & end in a bake that is not light & crumbly. You want the pastry to be soft, buttery & flaky.
Don’t Use Cold Butter Straight From The fridge
You weigh/measure & cube it & then place in the fridge until 30 minutes before you intend to use it. This is to soften it only a little & just enough for you to be able to work it in with the flour.


Always Chill The Prepared Pastry Dough
After you have prepared the pastry dough, you should always place in the fridge for at least 30 minutes (depending on the particular recipe). This is extremely important. During which time it relaxes the gluten that you have worked up whilst preparing & handling the dough. You will also do the same after you have rolled out & formed the dough into a pie crust. Consequently, it will also firm the dough, making it easier to roll out.
‘Blind Bake’ The Crust
This is when you line the crust with paper & baking beans & bake for a short time, with no filling. Other terms you might hear it known by, are pre-bake or par-bake. All meaning the same thing, it ensures you don’t have the dreaded ‘soggy bottom’ to the end baked pie. (Also be sure to ‘dock’ the base of the crust first – just piercing holes in the bottom of the pastry with a fork, so that steam releases when baking). This is especially important if using a very wet filling.


Next Steps
I will be writing a more in-depth article on Pastry, including the different types & handy hints and tips, but for the moment this sweet shortcrust pastry recipe will be enough to get you going.
How Much Pastry Does This Make?
This recipe makes enough pastry dough for a round 16cm (6 inch) pie crust, 12 mince pie cases or 24 mini mince pies (both have pastry cut outs on top) – go to my Mini Mincemeat Pies recipe.
Sweet Lessons Students
If you are completing this recipe as part of the Sweet Lessons Course, please REMEMBER to read the recipe through well before attempting it in case you need to do anything in advance.
Sweet Shortcrust Pastry
EQUIPMENT
- Scales or Measuring Cups
- Sieve
- Large spoon
- Knife
- Measuring spoons
- Small jug or dish (for water)
- Cling film/plastic wrap
- Dinner plate


INGREDIENTS
- 175g Plain Flour
- (6 oz, 1 ¼ Cup + 1 tbsp All Purpose)
- 75g Butter, cubed (cold, see note above)
- (2½ oz or ⅔ stick)
- 20g Icing Sugar, sieved
- (3 Tbsp Powdered sugar, sieved)
- 1 Medium Egg, beaten (Large US)
- Ice Cold Water


Instructions
1. Weigh out the butter while cubing to rough squares about 1cm (⅓”) into a bowl and then return to the fridge. (I always recommend cubing butter small for any recipe, but in this case, it’s to make working the butter into the flour easier. Remove the butter from the fridge, 30 mins before starting the recipe. This ensures the butter is soft enough to handle, but still cold. During which time you could gather the other ingredients.
2. Place a large bowl onto the scales, set to zero (TARE) & weigh in the flour.
3. Add or measure in the sugar, (3 Tbsp) & give it all a good mix through.


4. Next add in the butter and take a knife to ‘cut the butter in’. This just means using your knife to cut the pieces of cold butter into smaller pieces as quickly as you can. Rotating the bowl around whilst doing this is good. So, cut the butter in until it looks fairly evenly blended. It doesn’t need to be exact. (See Photo 1).
You can rub the butter into the flour using your fingertips. Picking up some of the flour and butter between your finger tips and squashing it together so that the butter takes on some of the flour. Continue to do this until you have a crumbly mixture with only a few odd lumps. This can be done quickly in a food processor but isn’t as gentle and can produce a tough pastry for beginner bakers.


Pastry Cutter/Pastry Blender
If your hands/finger get tired or sore easily, buy a Pastry Cutter/Pastry Blender (see Photo 1 above).
You can get these online inexpensively. You use this by pushing down on the cutter into the mixture and perform a squashing motion: push down and squash while rotating the cutter left and right. Keep rotating like this and the butter will become fully incorporated with the flour. Just periodically, clear the blender of any blocked butter pieces.


6. Now to add in the beaten egg and mix altogether. You can do this by hand or by machine. Mix until it starts to come together. By hand, knead in the dough or use a processor. The dough is ready once it comes clean away from the sides of the bowl. (See Photo 3). If it’s still a little dry add a drop of cold water and mix again. You might need a tiny bit more water or none at all. Just be sure to make sure the dough is nice and smooth and not dry. Test the dough by taking a piece and squeezing it together with your fingers. It should come together nicely.
7. Form the dough into a ball, then flatten into a disc, (to make rolling out later on a lot easier). See Photo 4.


8. Wrap in cling film/plastic wrap, place on a flat dinner plate and put in the fridge for 30 mins to chill.
The pastry will always roll easier when chilled and gives a chance for the gluten in the pastry to relax & be less of a tough bake. So during this time, take this opportunity and do the same yourself!
Not Going To Use Now?
If not going to use after 30 mins, then remember to take out of the fridge at least 15 mins before wanting to use it, so that it isn’t too hard to roll. Will be fine in the fridge for 2 days, well wrapped.


Can You Free The Pastry Dough?
You can of course freeze the pastry now, by simply popping the wrapped dough into a food bag and remembering to label it with a date and that it’s sweet shortcrust pastry. You can do the same with any left-over pastry. Simply keep a labelled food bag in the freezer and add to it whenever you have scraps. Defrost at room temperature.


What’s next? What To Make?
This is how to prepare sweet shortcrust pastry and is ready for rolling out for the recipe you want to use. So read the next lesson for how to make Easy Mini Mince Pies in time for Xmas. Why not make as gifts and make up food baskets? Or try my Rhubarb Pie With A Twist recipe, that includes a video tutotial.
If you have not made meringue before, why not try my Luscious lemony Lemon Meringue Pie? – go to Lemon Meringue Pie recipe (see photo below).
Can also be used for making Individual Chocolate Tarts (see photo below), or fill them with Pastry Cream.


SIGN UP FOR MY NEWSLETTER – I would love it so much if you could sign up for my newsletter. I will send out monthly emails, showing the latest recipes and articles, and latest info. Being a free site, building a following, is even more important and will keep it up and running and for free to everyone. Occasionally there will be the odd seasonal emails, but is really a means of reaching you, if you are not already in one of the Facebook groups I admin. Please note too, that these email addresses are not shared or sold onto another party. Thanks so much Caro xxx


Use my sweet shortcrust pastry dough to make these Individual Chocolate Tarts (See photo).
Share The Love
Finally, please see the sharing options or even printing, at the right/bottom of your screen (bottom of your screen for mobiles, and down the right-hand side on computers). You can even pin this to your own Pinterest page. Alternatively, you can download this article, see below. You could also leave some feedback if you like.
Click the ‘Download’ button below, to save to your phone or computer.
DIFFICULTY LEVEL: beginner to intermediate, easy with guidance
Follow me on social media:
Thanks for reading
Happy Baking & Making
Happy Tummies & Memories!
Caro xx


Leave some feedback if you like 🙂
Caroline’s Easy Baking Lessons


