Traditional British Christmas Cake – Part 2

Traditional British Christmas Cake
Bake-together Part 2
Baking The Christmas Cake
Part 2 of the Traditional British Christmas Cake Bake-together is baking the Christmas cake. In Part 1 you soaked the dried fruit in alcohol or fruit juice & now is time to use in baking the cake. So read on for all you need to know, for a perfect Christmas fruit cake.
Overall Process For Making A British Christmas Cake
Ok bakers, so this is Part 2 of the recipe for a Traditional British Christmas Cake. As mentioned in Part 1, this cake is very dissimilar to US fruit cake. So go ahead and have a try this year. **Check the main Christmas Cake Bake-along Page for all links in the series.


The preparation begins in October with soaking of the dried fruit for a week (usually in alcohol but can be make non-alcoholic with orange juice. I made some last year, and they were really nice, especially with some orange and lemon zest in the batter) – that is Part 1 of this Traditional Christmas Cake series.
Once the fruit has been soaked you then use it in the cake batter and bake the cake on a low heat for a longer time. The Christmas Cake is then ‘fed’ with more alcohol or juice every week or two up to December. From that point you can decorate, typically with marzipan and then either fondant or Royal icing on top.


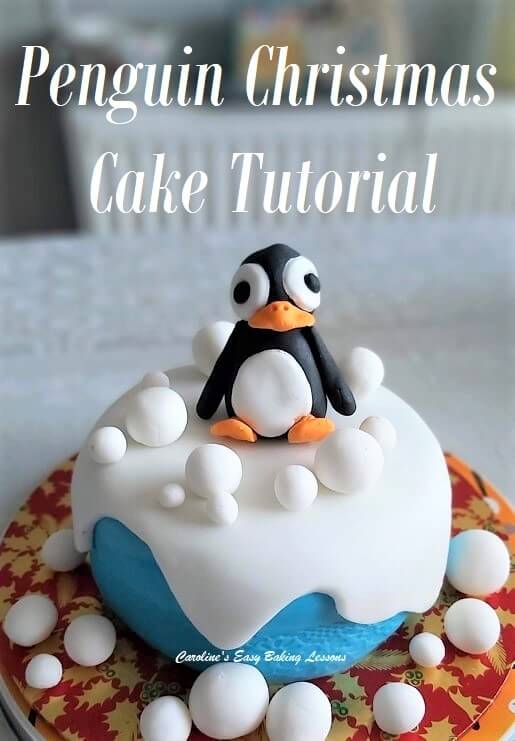
The fun part is the decorating as you can make it your own, personalize and try new things. When it comes to that part, I will include photo tutorials (perhaps videos) of various easy and more difficult ways to decorate your Traditional British Christmas Cakes. (See the easy Fondant Penguin Tutorial below, & Part 6 Fondant Topper ideas).

A Note On Ingredients
Here are the ingredients for making the Christmas cake, (labelled photo below):
- Butter, unsalted
- Sugar, Caster (Super/Extra Fine)
- Flour (Self-raising or Plain/A.P.)
- Mixed Spice (Pumpkin Spice)
- Ground Almonds (Almond Meal)
- Eggs
- Milk (Brandy or Orange Juice)
- Mixed Dried Fruit*
- Alcohol, spirit -Brandy, Rum etc*
*The mixed fruit is pre-soaked in alcohol, which can be substituted with orange juice for alcohol-free version.


Mixed dried Fruits
I know that in the states and Canada, some things are not as easy to come by as in the UK. Examples being the citrus peel and Glacé cherries. Maraschino cherries can also be used and for the citrus peel, that’s similar to candied citrus. There are recipes on the internet to make your own, which of course you can try, or add another dried fruit, such as cranberries. I am told Amazon are selling the candied peal in the states.
Flour
The recipe for the cake also uses self-raising flour (not to be confused with US Self-rising, which has slightly less baking powder in it). But I have included how much baking powder to add if using plain or All Purposes flour instead and tested it out successfully.


Caster Sugar
There is also caster sugar used, (nearest alternative being Extra/Super Fine sugar), but because the cake is baked for a long time on a lower heat, granulated sugar can also just as easily be used. (See photo of the 3 British sugars most used in baking). If you want to learn more about different ingredients/names, read my article Differences Between UK & US Baking Ingredients


Ground Almonds
Also there are ground almonds in this Traditional Christmas Cake. By that we mean almond meal, not Almond Flour. (See photo comparing ground almonds to regular flour). Almond flour is finer, but if you have to use it, this can be used too. Just know that the texture will not be quite the same as the Christmas Cake should be. Ground Almonds are there for moisture, but also for structure in the bake. Lastly, Mixed Spice is very similar to US/Canadian Pumpkin Spice.


SIZE OF CAKE TIN
The original Christmas Cake recipe is for – a 8″ (19cm) Square or 9″ (23cm) Round deep tin, (at least 3″, so about 7.5cm). Now below I have included a table to tell you how much batter you need if using a smaller tin, or a number of mini tins. I also have an article to help you know how to reduce the recipe. Reducing a recipe to fit a smaller tin size article also gives worked examples. I also have one for increasing a recipe. That article will also help you with trickier things like cups and tsp conversions.
(In the photos are 8″ (20cm), 6″ (15cm), & 4″ (10cm) springform tins, as well as larger glass ramekins, about 3″ (7.5cm) wide.)


MORE EXPERIANCED BAKERS
For more experienced bakers, I have also included an abbreviated version of the recipe, known as a Recipe Card. The Recipe card will also list the equipment and full ingredient details. You can skip or jump to this via the button below.
Jump to RecipeThe Recipe Instructions
**Recipe by Be-Ro, with my additions/tested conversions and some more detailed instructions. Ingredient amounts & conversions, as well as an equipment list, can be found on the Recipe Card below.
Jump to Recipe

1. Begin by preparing the mixed fruit you pre-soaked for about 7 days. (See Part 1 -Soaking The Fruit recipe for details on how to do this. Each part of the bake-along links can be found on the Traditional Bake-along Page).
2. Place the fruit in a sieve, over a medium-large bowl, and allow all of the liquid to drain out of the fruit. Leave it at least 10 minutes while you prepare for baking the Christmas cake.
3. While the fruit is draining, sieve the flour, spice (& baking powder if using Plain/A.P. flour). Then add in the ground almonds (almond meal) and mix together.


4. Cream the butter and sugar together in a large mixing bowl or stand-mixer. Make sure your butter is soft and you can squeeze between your fingers easily. Small cubes with a smaller surface area will soften quicker. (See photo collage 2). Or try a hack I reviewed in a video, for Softening Butter In About 12 Minutes if you forget or are short on time. Beat the butter & sugar together until soft, fluffy and paler in colour.
5. Next, stir in some of the flour-mixture (the dry ingredients) and mix together. Beat the eggs with either the milk, brandy or orange juice, before adding about half to the sugar/butter mixture. Mix together, alternating till all of the dry ingredients & egg mixture is added. See Photos 2 & 3 below.


6. Lastly add the drained pre-soaked fruit. (I like to fold it in gently in increments to get a more even distribution, as well as not knocking the air out. See Photo 3).
**Do not use any of the drained liquid from the fruit, in your cake batter, & do not use for ‘feeding’ the cake.**
7. Heat the oven to: 140 – 150°c/ 120 – 130°c Fan Oven / 275-300°f / Gas Mark 1 – 2. These are specific temperatures taken from the Be-Ro recipe book. I baked mine at 120°c on fan assisted oven.


8. While the oven is heating, prepare the cake tin(s). Grease and line the bottom of the tin(s). Go to my article on how to line round, square or rectangular tins. For round tins, see my article on how to cut a perfect sized circle of paper for the bottom of the tin. (or watch the video).
Use left-over paper from cutting paper circles, as strips to line up the insides of the tin too. (See Photo 4). They don’t need to be one continuous piece, so saving left-over pieces is ideal. Just hold in position with some baking spray, butter or lining paste.(cake goop). See also the Christmas Cake video above for how the square & rectangular tins are lined.


**Try to use brown coloured paper & not too thin a paper, or the cake will brown too much -you could try an extra layer of paper.
9. Next you want 2 layers of paper to be wrapped around the outside of the cake tin, and to be about 2″ (5cm) higher than the top of the cake tin. See Photo 5. I folded the paper over to get a double layer & then wrapped it around the tin – this was the hard part, but held in place with pegs/clips.
From there, tie butchers string around the tin tightly, twice & then remove the pegs. Trim the tops of the paper if more than 2″/5cm above the top of the cake tin, or if baking several cakes on more than one level. All this paper is to protect the outside of the cake drying & cooking too much while in the oven for a long time. See Photo 5. More pics of mini cake tins at the bottom of the instructions.


**Money Saving Tip – You can also save by using newspaper to wrap around the outsides of the cake tin, as seen in Photos 5 & 6.
10. Spoon the batter into the cake tin(s) & bake till cooked through and a nice deep golden colour. (See Photo 7 below). The original old Be-Ro recipes quoted 4 – 5 hours. However, in more modern ovens the time is more like 3 – 4 hours.
**After about 1 hour & once the batter on top has set, cover the top of the cake with a disc or 2 of paper. (See Photo 6, where the tall paper around the sides, keeps the top paper in place).


11. Check the cake(s) are ready by inserting a wooden cocktail stick in the centre – trying to avoid fruit if possible. If clean of crumbs & no wet batter, it is ready. **Smaller tins will take a shorter time to bake. Please see tables below with my estimated bake times.
12. Leave the cake to cool in the tin, over a cooling rack, for about 10 – 15 minutes.
13. Cut the ties & remove the outer paper. Don’t bin the wrapping paper, as you can use for wrapping up the cakes. Release the cakes out onto a cooling rack. See Photo 7.


14. Whilst still a little warm, poke some holes in the top of the cake & spoon over a couple of tbsp of alcohol or some orange juice. For mini cakes, about 1 tbsp would be enough. Leave to cool down completely. See Photo 8.
**Top Tip – For flat topped cakes & easier decorating with no trimming required, use the bottom of the cakes as the top side.


15. Once completely cooled, wrap in paper & hold in place with tin foil/aluminium foil, plastic wrap/cling film, or even some newspaper in place of the baking/parchment paper. You can also wrap a tea-towel on top if you like, like Christine does. See Photo 9. **Never wrap directly in foil as it will affect the taste of the cake.
16. Store in a cool dark place until December.
DIFFICULTY LEVEL: Easy, Beginner


NEXT STAGE OF THE CHRISTMAS CAKE
Regularly ‘feed’ the cake by spooning and spreading on more alcohol every week or 2 until December, when ready to decorate it. This is an important stage to keep infusing the cake and combined with the alcohol and sugar in the fruit, the cake is preserved for a long time. Just keep away from heat and light, no need for placing in the fridge.
In the Bake Off group, I will post part 3- Feeding The Cake, to remind you about the ‘feeding’.


CAKES WITH FRUIT JUICE & NO ALCOHOL
For Christmas cakes with only fruit juice, it’s best to only feed the cake up to week 3, and then wrap really well with 2 layers of new paper and freeze till 2 days before decorating in December. Otherwise the fruit will start to ferment and we don’t want a wasted cake.
During the 3 weeks, you should store somewhere cool & dark or place in the fridge.
When feeding, replace the paper if in any way soggy to prevent mould forming & wrap again in 2 layers of paper, then foil & cling film/plastic wrap, wrapping really well like before.


Defrosting Frozen Christmas Cake
Leave out frozen Christmas cake to defrost at room temperature, decorate when fully thawed & dry, & discard all wrapping.
Storing Alcohol-free Cake
After defrosting the alcohol-free cake, you should store in an airtight container or tin. Then decorate with the marzipan and fondant/Royal icing, that will preserve the cake. See Part 4 for Covering The Christmas Cake..
Alternatively, for this alcohol-free cake, you could make 2 to 3 weeks before decorating in December & not need to freeze the cake after feeding.


BAKING MINI/COMBINATION OF SMALL SIZED CHRISTMAS CAKES
When testing the recipe over the last few years, I worked out how much batter the original recipe makes, in order to know how much batter is required for different sizes or shapes of cake tins.
I have made: 8″ square tin , a 2lb loaf tin (for cake slices), 6″ round tin, 4″ (10cm) deep round tins, mini loaf tins, 6 in large muffin tray/sheet & ramekins.
Photo 12 shows lovely mini muffin sized Christmas cakes baked & decorated by Anita J, from the Bake Off group. Ideal for holiday gifting!


**Top Tip – This batter is fine to prepare and store in the fridge while some are baking, if you don’t have enough tins. Alternatively, you can reduce the recipe down using my table below. Just simply use a calculator/phone calculator to multiply the ingredient quantity by the number listed in the tables below.
Photo 13 shows one of the cakes baked in a ramekin, and fits nicely into 8oz cake cups. (These were from TK Maxx, similar to TJ Maxx, and for cakes bigger than muffins). Ideal for someone who does not like fondant. You could cover just the top with marzipan and fondant/Royal icing. Note however, that these will not last as long, so best prepared like this, same day as gifting.
LINING & COVERING SMALLER TINS FOR CHRISTMAS CAKES
Double paper lining is not so easy to do when using small tins. But this is how I do it. Using pegs to hold paper in place before tying with string helped. Or some big metal bulldog clips would be good.


USING Large MUFFIN TINS FOR CHRISTMAS CAKES
To protect the outsides of the muffin tin, I used paper and foil around the sides.
1. Cut long strips of baking/parchment paper, long enough to go round the widest diameter of the muffin holes, then cover with a wider sheet of tin foil (aluminium foil). (See Photo 14).
2. Flip the muffin tray over, place a disc of 2 pieces of foil on top & then wrap the foil strip around the outside of the muffin hole. Scrunch or fold the foil to keep in the shape. Repeat for the other 5, then place a baking tray/sheet on top & flip the whole thing over. (See photo 15 below)


I also covered the tops of the cakes by placing a large baking sheet on the shelf, just above the cakes to stop them browning too much. The muffin tray was also placed on top of a lined baking sheet to keep the foil strips from falling off. See Photo 15.
For lining the insides of the large 6-hole muffin tin, there are 2 different methods. 3 paper muffin case offers protection, but using Nancy’s lining paste (cake goop) with a circle of baking/parchment paper on the bottom also works. (See Photo 15).
Alternatively, you can protect the sides of the cakes, by using a deep dish near the size of the muffin tray & place inside.


Christmas Cake batter in ramekins is good too. See Photo 15 above. All the dimensions of the tins, etc used are given below in the table. As well as the oven timings and quantity of batter needed.
Once baked, these small Christmas Cakes didn’t have any doming, so no need to trim. Be sure not to overfill – fill them about 85-90% of the way up.
USING DIFFERENT SIZED/SHAPES TIN


How To Use The Tables
Here is an example of using the tables above. Say you want to use the 2lb loaf tin, where the table instructs to “..multiply by 0.65”. This just means, multiply every ingredient amount by 0.65. Example being 226g x 0.65 = 147g (ie. 147g flour). For how to do with cups and tsp, see my Recipe Reduction Calculator where I explained more in-depth, how to calculate these, other examples and also a quick video.
I hope all this helps you make a Christmas Cake in nearly any cake size or shape you want. A little second note too, say you used the above loaf tin, but wanted to make some mini ones with left over batter from making same quantity as the original recipe. Then just check the table for what other tins use 35% or less batter (ie. 100% – 65% = 35% left over).
2020 BAKE-TOGETHER EXAMPLES
Here are just some examples of the first Christmas Cakes baked by some of our members in the Facebook group GBBO Fans. I think they did great! (You can see more, in the main bake-together page).


I look forward to seeing your Traditional British Christmas Cakes when they are baked. Please remember to also post on the Bake-together post in the Facebook GBBO Fans group (found in the Featured section), or even contact me via the website contact form. Tag me on social media too if you like (see links below).
Look out for Part 3 in The Facebook group, when I will periodically remind you to feed your cakes up till December. In the meantime, here’s the Christmas Cake Feeding Video. Then there’s Part 4 – Covering A Traditional Christmas Cake For decorating ideas and the rest of the bake-together series go to Traditional Christmas Cake Bake-together page.
Recipe Card
Traditional British Christmas Cake – Bake-together

Equipment
- 9" (23cm) Round Deep Tin (at least 3"/7½cm deep)
- OR 8" (20cm) Square Deep Tin (at least 3"/7½cm deep)
- *** Alternative Tin shapes/sizes (see notes)
- Digital scales or measuring cups
- Measuring Spoons
- Stand-mixer or Hand-mixer
- Large mixing bowl
- Sieve
- Baking/parchment paper
- Butchers' String
- Cake Release Spray (Cooking spray, Lining Paste/Cake Goop, or butter to grease)
- Scissors
- Pegs or Metal bull-dog clips (optional)
- Wooden Cocktail stick
- Cooling rack
- Tin Foil (Aluminium foil, or newspaper & cling film/plastic wrap)
Ingredients
- 340 grams Self-Raising Flour (12 oz, 2¾ cup) OR Plain/All Purpose Flour PLUS 4⅛ tsp baking Powder)
- 1 tsp Mixed Spice (Alternative is Pumpkin Spice)
- 113 grams Ground Almonds (4 oz, 1¼ level cups. Almond Meal alternative, not Almond Flour. See notes)
- 226 grams Butter, unsalted & softened (8 oz, 1 cup, 2 sticks)
- 226 grams Caster Sugar (8 oz, 1⅛ cup Extra/Super Fine Sugar, OR Granulated Sugar)
- 4 Eggs, (Medium to large) (US Large to Extra Large eggs)
- 120 ml Milk (or ½ milk & ½ Brandy/Orange Juice) (4 fl oz, 8 tbsp, or ½ cup)
- 900 grams Pre-soaked Mixed Dried Fruit (32 oz dried fruit, pre-soaked in alcohol or fruit juice, see notes*)
- 2 tbsp Alcohol or Orange Juice (same kind as used for soaking fruit, for 1st 'feed' DO NOT use the drained liquid).
Instructions
SOAKING THE FRUIT
- See Part 1 of the Traditional Christmas Cake recipe for the fruit soaking details, & soak for 7 to 10 days. Spirits such as Brandy, Rum, Vodka, Whisky can be used, or orange juice as an alcohol-free alternative.
PREPARE THE CAKE BATTER
- Drain all the liquid from your pre-soaked mixed dried fruit, by leaving over a sieve for at least 10 minutes. (**Do not use in cake batter, or feeding the cake).
- Meanwhile, 'cream' the softened butter and sugar together, until soft, fluffy and paler in colour. Whisk the eggs with milk/juice or alcohol in a separate bowl. In another bowl, mix all dry ingredients together.
- Add some of the flour mixture, then some of the egg/milk mixture into the creamed sugar & butter, alternating till all is added. Mix through in-between each addition.
- Lastly add the pre-soaked & drained fruit – fold in increments for even distribution.
- Heat the oven to 275-300°f (Gas Mark 1 – 2/140°c – 150°c/ 120°c – 130°c Fan Oven.
PREPARE THE CAKE TINS
- For round tins, cut a circle of paper for the bottom of the tin. Also strips to line insides of the tin too, (no need for one continuous piece & you can use left over pieces). Hold in position with some baking spray, butter or lining paste.
- Wrap 2 layers of paper around the outside of the cake tin, about 2" (5cm) higher than the top of the tin. Hold in place with butcher's string.
BAKE THE CAKE
- Spoon batter into cake tin & bake 3 – 4 hours. Cover the tops of the cakes with paper after about 1 hour, once batter on top is set. Wooden cocktail stick will come out clean of crumbs when ready.
- Cool in the tin, on top of a cooling rack. Whilst still a little warm, poke some holes in the top of the cake and spoon over 2 tbsp of alcohol or orange juice.
- Cut the string & remove the outer paper. (Keep the paper). Release the cake onto a cooling rack. Peel back the paper & leave to cool completely.
STORING
- When completely cooled, wrap in paper, hold in place with tin foil/aluminium foil or cling film/plastic wrap. Never wrap directly in foil as it will affect the taste of the cake. Store in a cool dark place until December.
'FEEDING' THE CAKE
- Regularly 'feed' the cake by spooning & spreading on 2 tbsp alcohol/orange juice every 7 to 10 days, until December, when ready to decorate it. Just keep away from heat and light. Go to Feeding A Christmas Cake video.
- For cakes with only fruit juice, best to only feed the cake up to week 3, and then wrap really well with 2 layers of new paper & freeze till 2 days before decorating in December. Otherwise fruit will start to ferment. During the 3 weeks, you should store somewhere cool & dark or place in the fridge. When feeding, replace paper if soggy to prevent mould forming & wrap again in 2 layers of paper. Leave out to defrost at room temperature, decorate when fully thawed & dry. Store in an airtight container or tin. Decorate as instructed
Video
Notes

Nutrition: I am not a qualified nutritionist, so all values are estimates, based on ingredients listed & calculated via FitnessPal.com. Information based on serving of 1 slice (undecorated), assuming 18 equal-sized pieces are cut. If more or less slices are cut, these value will change. Paste recipe link into website/app MyFitnesPal.com to see these values, & log them for future use if tracking your food.


SIGN UP FOR MY NEWSLETTER – I would love it so much if you could sign up for my newsletter. I will send out monthly emails, showing the latest recipes and articles, and latest info. Being a free site, building a following, is even more important and will keep it up and running and for free to everyone. Occasionally there will be the odd seasonal emails, but is really a means of reaching you, if you are not already in one of the Facebook groups I admin. Please note too, that these email addresses are not shared or sold onto another party. Thanks so much Caro xxx
Follow me on social media:
Thanks for reading
Happy Baking & Making
Happy Tummies & Memories!
Caro xx


This is the best recipe for a Christmas Cake. The step-by-step instructions are so well written plus the addition of pictures too which is always so helpful. I like the way you have made different sizes which has given me an idea this year to make some and gift to people. It’s so nice to be able to give homemade bakes at Christmas especially with everything being so expensive. Also l’m going to make non-alcoholic ones too. Thanks for sharing.
I have used this same recipe since 2020 too when you did the first bake-together in group. It really is a lovely cake and I made ones without the alcohol – used orange juice and pineapple juice. Turned out great. I put in freezer as you suggested but last year I made the non-alcoholic ones nearer to Christmas. Thanks again.