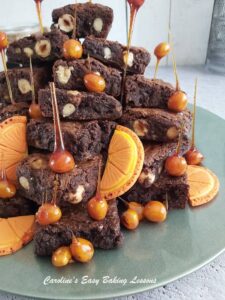
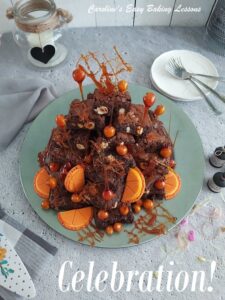
Chocolate Orange Brownie Tower With Hazelnut Spikes

Using my new Chocolate Orange Brownie recipe, as well as my Browned Butter Hazelnut Brownies, I created the 'Chocolate Orange Brownie Tower'. This is the ultimate celebration cake involving a 'brownie stack', that anyone can make.
Equipment
- Scales or measuring cups
- Measuring Spoons
- Small Cooking Pot
- Wooden spoon
- Microwave safe bowl to hold chocolate
- Microwave or use stove top for melting
- Spoons (several)
- Mixing bowl
- Sieve
- Stand/Hand-held Mixer
- Plastic/silicone baking spatula
- Baking tin (approximately 23 x 23 cm (9" square). Don’t use too small a dish or it will take too long to cook. You want a dish where the sum of the length + width is about & not to exceed 46 cm (18") or they will be too thin).
- Spray, lining paste or butter for greasing
- Baking/parchment paper
- Scissors & pen/pencil (optional)
- Timer
- Wooden Cocktail stick
- Cooling rack
- Wooden BBQ skewers
- Heavy bottomed pot (not non-stick)
Ingredients
For The Orange Brownies
- 185 grams Butter (unsalted & cubed – 1 stick + ⅓ cup or 6.5 oz. )
- 185 grams Milk chocolate (6.5 oz semi-sweet)
- 200 grams Granulated sugar (1 cup, 7 oz)
- 75 grams Light Brown Sugar (⅓ cup, 2½ oz OR 275g/9¾ oz/1⅓ cup Golden Granulated Sugar)
- 3 Medium Eggs (US Large)
- 85 grams Plain Flour (⅔ cup, 3 oz All Purpose Flour)
- 40 grams Cocoa Powder (⅓ cup, 1½ oz)
- 100 grams Mini Chocolate Orange & Fudge Pieces (From Aldi's baking range, see before Recipe Card. Alternatively 3½ oz Orange Chocolate or plain/bitter chocolate & increase Orange extract by 1 tsp)
- 1 tbsp Orange Extract (I use Morrison's & Sainsbury's Sicilian Orange Extract. If not using orange chocolate, increase extract to 4 tsp).
For The Caramel Decorations
- 350 grams Granulated Sugar
- 80 ml Cold Water
- 30 ml Lemon Juice
- 1 Packet Hazelnuts, whole (at least 24 hazelnuts would do, or any other similar shaped nut)
For Browned Butter Hazelnut Brownies
- See recipe for ingredient list (See Notes for recipe link)
Instructions
Prepare The Ingredients & Tin
- Break up the 185g/6½ oz milk/semi-sweet chocolate & microwave in 30 second bursts, stirring well in-between each, until fully melted. Leave to cool while you gather the other ingredients. Alternatively, melt in a bowl over a pan of barely simmering water.
- Weigh out the flour & cocoa through a sieve into another bowl (not the main mixing bowl).

- Grease the baking tin & place baking paper/parchment inside it. See Photo 1 above for how to cut your paper to fit. I usually hold in position with baking spray or Cake Lining Paste. This time I used Frylight Oil spray (see notes).

- Next whisk the eggs & sugar with a hand/stand mixer for approximately 4 – 5 mins, on medium to high speed. It must become thick & creamy, paler in colour & increased in volume. This is the key to these gooey brownies. See from Photo 2 above how thick it is, and it will leave a trail that doesn't immediately vanish. You can also see my quick video on Whisking Eggs & Sugar To The Ribbon Stage.

- Gently fold in the cooled butter, melted chocolate & Orange Extract, with a plastic/silicone baking spatula & do so in the shape of a number 8. Think of your spatula as a pen & the mixture your paper. Mixing too vigorously will undo all the whisking from earlier. Mix just until all mixed in and no more. Then See photo 3 above.

- Next re-sieve the flour & cocoa mixture, into the batter. Mix it in again like before until no flour is visible, scraping down the sides too. Fold in the Mini Chocolate Orange Fudge pieces, (or roughly chop chocolate, see notes & before recipe). See Photo 4 above.

- Pour the brownie batter into the prepared pan & level off if required. See Photo 5 above. Leave to sit so that it will form a crust later. (Leave at least 10 mins). Heat up the oven to: 180°c/160°c Fan oven/350°f/Gas mark 4 while the brownie sits.


Bake The Brownies
- Bake for about 18 – 25 minutes, turning the tray if needed, after half-way through. The top will have formed the crust, (see photo 6 below). Testing with a wooden cocktail stick, the outer edges produce a clean stick, whilst the centre is a little moist with just a few crumbs. This is what we want.

- Leave the brownies to sit to cool down in the tin for 5 minutes. Then transfer via the paper, to the cooling rack to cool down completely before cutting into 16 squares. See tips in notes for cutting. For making the tower, I prefer to leave out at room temperature, still in the tin, overnight with cling film/plastic wrap on top about 1 hour later. **Note I used 2 batches of brownies for the Brownie Tower.

To Make The Hazelnut Spikes
- Carefully place a wooden BBQ stick into the side of a hazelnut. It needs to be far enough in so that the nut doesn't fall off, but not too far that it breaks the nut.
- Prepare an area to work at, line with lots of baking/parchment paper as the caramel is very sticky. Also the hazelnut spikes need to hang off the end of a table or counter/worktop. So you will need paper on the floor too, to catch the excess, that you can still use. As well as something like books or pegs/clips to hold the bbq stick down & from rolling.
- Also prepare your stove & have your ingredients ready, as well as a small dish of water & a small brush. This is for in case you see any crystals on the sides of the pan. If you do, simply brush some cold water on the sides to stop the crystallization spreading into the caramel. Also have a trivet ready at the other work area for placing your pot of hot caramel down.
- Begin by adding the sugar to a heavy bottomed pot that is not non-stick. Then add in the water & do not be tempted to mix. This is key to caramel making. Next add in the lemon & again no mixing. Turn on the heat to med-high setting & then add a sugar/candy thermometer if using.
- Let the sugar come to a boil with no mixing at all. You can occasionally shake the pan a little, just to make sure the sugar is evenly spread on the bottom of the pan

- Here are the stages that the sugar mixture goes through. The sugar will start to get moist and then begin to bubble gently around the edges. If there are some clumps of sugar in the centre of the pan – you can shake the pan a little (see video & Photo 7).
- Next it will start boiling all over the surface: it will be gentle at first, with steam & you will be able to hear it. Note the colour at this point – dip a small spoon in and it will be a clear colour.
- Let the sugar mixture rapidly boil. Keep it boiling & it will start to smell, kind of like honey. Colouring will be starting & the bubbles will be wider & have a burst-like appearance. Keep watching & when you notice it starts to colour, check with a spoon for comparison.
- Let it colour at bit more -I like to aim for almost coming to a medium amber colour. See Photo 8. Remember it will colour & caramelize more once off the heat so you want to take off just before it’s ready. If using a sugar/candy thermometer, the temperature will be about 172°c/341°f (after it get’s to 160°c/320°f keep a very close eye and be ready to remove). Turn off the heat & remove from the stove.

- Working quickly, dip the hazelnuts that are on a bbq stick, into the caramel to coat completely. Then move to the area you have prepared to hang them & hold in place with a book for example. Let the caramel drip down & set in a 'spike' shape. See Photo 9 below. You can also use a spoon to help, but the caramel will harden on this. Be very careful with the dipping as the caramel is very hot, & also the hazelnuts sometime fall off the stick.

- Dip as many. hazelnuts as you can and whenever the caramel is hardening & making it too difficult to dip, pop back on the stove top & heat gently till ready for dipping. If using a spoon, warm this in the pot too, & any hardened caramel on the spoon will slide off.
- With left-over caramel, do any shapes or designs you like, on top of some baking/parchment paper. See Photo 10 below. Once done, steep the pot, with some boiling water and this will help cleaning up later.

- Once the hazelnut spikes are set, I stand the bbq sticks up in an extra large jug till ready to use. You can cut off the ends to whatever length you want. There will be extra fine strands of caramel formed on the paper you had on the floor. These can be scrunched together and used too.


Construct The Brownie Stack/Tower
- For the Brownie Tower in the photos, I used 2 batches of brownies, (32 squares, minus a few the boys pinched) and did one batch in this orange version and one batch in the Browned Butter Hazelnut Brownie. But the original Chocolate Brownie recipe would be good too.
- Pick a suitable large plate, cake stand or cake board & basically just place the brownie squares down & stack on top of each other, working your way up, and using less on each row, as you progress upwards. Keep the best ones for the front & top, and turn around or upside down, if it makes it more level, for easier stacking. The good thing is, it doesn't need to be perfect, and you can start over again if not happy. You could also use cocktail stick if needed, but just be careful not to break the brownies.

- Carefully remove the bbq sticks from the hazelnut spikes, one at a time, & position on random levels of the brownie tower. You can also turn the hazelnut spike upside down & insert into a brownie, to hold in position.
- I also used some designs I made on paper, and just broke them up by hand & positioned one on the top of the tower. (See Photo 10 above and Photo 13). The extra fine strands of caramel, I also scrunshed up and placed on the tower.

- As time is pushing on, I can't do a step by step tutorial on the process for making the fondant oranges. But below is a collage of the process, which really isn't that hard to make.


Video
Notes
Caramel making video
Go to the recipe for the Browned Butter Hazelnut Brownies
Go to the recipe for original Proper Gooey Brownies.
More chocolate recipes
 For more on caramel making & problem solving, go to my Caramel Sauce Recipe.
*Type of chocolate can be adjusted to taste, just note however, that these brownies are very rich, so both chocolate being dark/bitter chocolate would maybe be too much. Also if using half dark/bitter chocolate, there is no need for higher cocoa content chocolate.
*Can be made gluten free, see main recipe post.
*Don’t skip the 5 minute mixing of the eggs and sugar stage, as this is key for gooey brownies.
For more on caramel making & problem solving, go to my Caramel Sauce Recipe.
*Type of chocolate can be adjusted to taste, just note however, that these brownies are very rich, so both chocolate being dark/bitter chocolate would maybe be too much. Also if using half dark/bitter chocolate, there is no need for higher cocoa content chocolate.
*Can be made gluten free, see main recipe post.
*Don’t skip the 5 minute mixing of the eggs and sugar stage, as this is key for gooey brownies.
 *Brownies can be cut easier if left overnight at room temperature to cool. Alternatively, place the brownies, still in the tin, into the fridge to speed up cooling, about 15 minutes after coming out of the oven. Once cooled completely, remove with the paper & cut with a warm sharp knife and wipe it in-between each cut.
For more on caramel making & problem solving, go to my Caramel Sauce Recipe.
*Type of chocolate can be adjusted to taste, just note however, that these brownies are very rich, so both chocolate being dark/bitter chocolate would maybe be too much. Also if using half dark/bitter chocolate, there is no need for higher cocoa content chocolate.
*Can be made gluten free, see main recipe post.
*Don’t skip the 5 minute mixing of the eggs and sugar stage, as this is key for gooey brownies.
*Brownies can be cut easier if left overnight at room temperature to cool. Alternatively, place the brownies, still in the tin, into the fridge to speed up cooling, about 15 minutes after coming out of the oven. Once cooled completely, remove with the paper & cut with a warm sharp knife and wipe it in-between each cut.