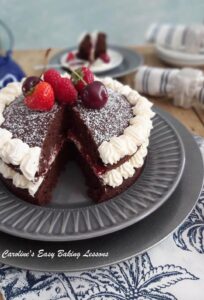
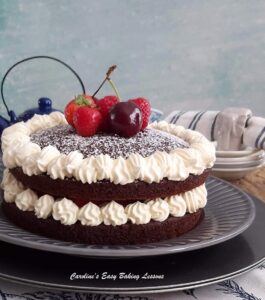
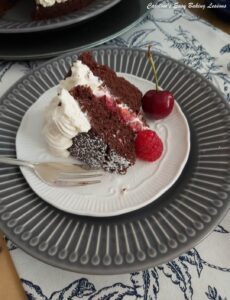
Egg & Butter-free Chocolate Layer Cake

This is such a super simple & quick recipe & one you can whip up with whatever you have in the cupboard or fridge. Very versatile, it can be used in different ways & made Vegan. dairy-free, egg-free & lactose free. A great base chocolate layer cake, sandwich with cream, jam & fresh fruit - or whatever you like!
Equipment
- Scales or measuring cups
- Measuring Spoons
- Small Jug (optional)
- Large mixing bowl
- Stand or Hand Mixer (optional)
- Mixing spoon(s)
- Sieve
- 7 or 8" (17¾-20cm) Round Cake Tin x 2
- Baking/parchment paper
- Wooden Cocktail stick
- Timer or Phone Timer
- Cooling rack
- Clean Tea-towel
- Piping bag or piping syringe & nozzle (optional)
- Palette knife, or butter knife
- Knife & chopping board (optional, for fruit)
- Home-made Cake Lining Paste (or Cake Release, Oil Spray or Butter & Flour etc for greasing)
Ingredients
FOR THE CAKE BATTER
- 209 grams Self-raising Flour (7¼ oz, 1⅔ cups - alternatively All Purpose or Plain Flour plus 1 tsp Bicarbonate of Soda/Baking Soda plus 1¼ tsp Vinegar *see note below)
- 200 grams Sugar (half granulated & half light brown) (7 oz, 1cup/1 packed cup)* see below for variations
- 31 grams Cocoa Powder (1 oz, 1/4 cup)
- ½ tsp Salt
- 1 tsp Espresso Powder (For Instant coffee granules use 1½ tsp, or decaf.)
- 240 ml Milk (8 fl oz, 1 cup - Any milk, lactose/dairy free or vegan alternative. See notes below)
- 80 ml Vegetable Oil (2¾ fl oz, ⅓ cup - any neutral oil)
- 1½ tsp Vanilla Extract (Or Vanilla bean paste. See notes for how to make Vanilla Extract)
FOR THE FILLING
- 1 - 2 tbsp Icing Sugar, sieved (Powdered Sugar, optional & to taste)
- 1 tsp Vanilla Extract (Or Vanilla Bean Paste - optional)
- 270 ml Double Cream (9 fl oz, 1 cup Heavy or Whipping Cream - before whipping)
- 5-6 tbsp Jam/Jelly/Preserve - raspberry or cherry are good (Any flavour is fine)
- Fresh berries (for filling or on top/to serve with - optional)
Instructions
PREPARE CUPCAKE BATTER
- Weigh or measure out the flour, while sieving into the large mixing bowl.
- Next spoon or weigh in the sugars, salt & espresso coffee powder & mix everything together till evenly distributed. (If using Plain/All Purpose flour, also add bicarbonate of soda/baking soda too).
- Using a hand/stand mixer or even just a spatula or wooden spoon, add in the vegetable oil & Vanilla Extract. (If using Plain/All Purpose flour, also add the vinegar). Add in the milk in 2 or 3 increments, mixing on the lowest setting, before increasing and mixing till all combined. If mixing by hand, ensure you mix & beat well. See Photo 1 below.

- Pre-heat your oven to: 180c/160c Fan oven/350f/Gas mark 4 (or earlier if your oven takes a longer time to heat up).
- Next line the 2 cake tins - grease & also line the base of the tins with paper. I use Home-made Cake Lining Paste (like cake release spray) as it works great and can be used even on bundt pans. Brush on to the bottom and apply upward strokes up the sides too. To cut out a paper circle to fit your tin perfectly, and quickly, use my folding and cutting method to cut paper to fit any round tin. See Photo 2 below.

- Next divide the batter equally between the 2 cake tins. You could weigh the batter to make it equal, or just use an ice-cream scoop to evenly divide it up. Give the cake tins a few taps on the counter/worktop to expel any trapped air before placing in the centre of the oven.


BAKE THE CAKES
- Bake for about 20– 25 minutes till done. Mine take 21 -23 minutes & I turn the direction of the tins after about the half way point, for an even bake. (So about the 12, 13 minute mark). Once well risen, start testing with a wooden cocktail stick, around about the 19 minute mark. You want the stick, when inserted in the centre of the cake, to come out completely clean of crumbs or batter. If not ready, bake a further 1 minute or 2 and check again. It will also be coming away from the side of the tin when ready. See Photo 3 below.

- Remove from the oven & place the tins on top of a cooling rack for about 5 minutes. After that point, place a folded clean tea-towel on top of the cooling rack. Run a palette knife around the edges of the cake if need be, before turning the tins upside down, and on to the tea-towel & rack. See Photo 3 above. Using the tea-towel, means the rack doesn't leave lines on the top of the cakes. Then lift the cake tins off. Leave another 5 minutes before trying to peal back the paper (very slowly). Try an edge first, and leave to cool longer if not coming off easily. Then leave to cool completely.

PREPARING THE FILLING
- While the cakes are baking or cooling, prepare the whipped cream and fresh fruit.
- Whisk the cream in a medium to large bowl, with a hand/stand mixer on low speed to begin with (about 30 seconds) and then continue mixing on high till the cream is very thick and has peaks. How long this takes depends on the power of your machine, but stop and check how it's doing every so often, by lifting up the beater(s) and seeing how the cream falls. See Photo 4 for an idea of how it should look. Be careful not to over-whip or you will see the cream change to more of a cream colour and go lumpy (going too far, you actually are making butter). You can of course whip by hand, but will take longer and a lot of elbow-power. If using a stand-mixer, be sure to use the whisk attachment and not the mixing/'k' paddle.

- Once the cream is thickened, you can add a few tbsps of icing/powdered sugar and a little vanilla if you like. We prefer the cream without Vanilla and is entirely optional. As for the sugar, I don't often use it. It's added purely for a thickening purpose and to help the cream set a little easier for when you are adding the top layer of the cake. But I also have a tip below for that too. Add 1 or 2 tbsps of the icing/powdered sugar and taste after the first tbsp. I prefer the cream not to be as sweet, so don't add too much.
- Place the cream in the fridge while you prepare fruit if using. Slice some of the fruit if you would like as a layer between the 2 cakes. Or you can cut into small pieces, which ever you would prefer.
- While the cakes are baking or cooling, prepare the whipped cream and fresh fruit.

CONSTRUCTING THE CAKE
- You can either apply the whipped cream with a piping bag or spread on. If using a jam/preserve that is in any way runny, you want a 'dam' or ring of cream on the edge of the first layer of cake, so that the jam doesn't run off. Piping this on is easiest, but it is possible to do with 2 small spoons. It can also serve to hold the fruit on the cake too. See Photo 5 below.

- You can spread on some jam if using and then add more cream on top if you like, before adding on the sliced fruit. This recipe will make enough cream filling for the centre and also extra for the top of the cake, or for serving with slices. See Photo 6.

- Top TipFor the piped cream filling to not all squash out immediately on placing the top layer of cake on, here's my top tip. After finishing adding the fillings, place this bottom layer into the fridge or even freezer for the cream to set up a little. (Fridge 20-30 mins, freezer 10-15 mins). This means when you come to place the 2nd cake layer on top, the definition of the piped cream will still be seen and not immediately buckle from the weight of the 2nd layer.
- Once ready, simply but very carefully, lift the 2nd cake and turn it over with the rounded side facing upwards, and place on top of the first prepared layer. Don't attempt to flatten it down.


FINISHING TOUCHES
- Sieve over some icing/powdered sugar on the top of the cake for simple decoration. (See Photo 7 above). You can also add a few pieces of whole fruit. Alternatively, you can also pipe some more cream as a border on the top of the cake too. In my photo, I piped evenly all the way around with an open-star nozzle and then filled the tiny gaps with a 'pipe-&-pull' motion to create more texture.
Storage & Freezing
- Keep somewhere cool but no need for a fridge unless a hot environment. Will last 2 - 3 days.

- Can be frozen, but best un-decorated. Cool completely before wraping each sponge in cling film/plastic wrap really well and then some foil and a marked & dated food baggie. Can be frozen for up to 3 months and defrosted at room temperature.

Notes
- Choice Of Flour - you can use Self-raising (UK), or Plain/A.P. flour for these cupcakes. Just note from the ingredients & directions, that if using Plain/A.P. flour, you also need to add the Bicarb/Baking Soda & Vinegar. For using self-rising (US) flour, you can add 1/4 tsp Bicarb/Baking Soda & 1/2 tsp vinegar.
- Choice of Sugars - you can also use a combination of light brown, dark brown and granulated for these cupcakes. All work well, just use what you have to the combined final total weight/volume of 200g/7oz/1 cup.
- Choice of Milk - you don't need to use cow's/dairy milk. Almond & coconut milk have both been tested as well as lactose free milk.
- Vanilla Extract - make your own Vanilla Extract at home
- Cream Substitutes - cream is option, but you can also use alternatives like whipped Aquafaba.
- Buttercream alternative, you can also fill with buttercream using Vegan Butter or Vegetable Shortening.
- All measurement conversions hand tested by myself as Google is inconsistent & often inaccurate. Click to go to my Handy Table Of Common Baking Ingredient Conversions.
- For anything else, please see beginning of recipe blog.
- See below recipe as Cardamom Cupcakes with Espresso Buttercream

- This recipe is for using 2 x 7 or 8" (17¾-20cm) cake pans, but if you want to use one deeper pan, just note that the bake time will be longer. If you want to make the layer cake in smaller sized cake pans, use my How To Reduce A Recipe article with the ratios calculated for you. And same goes if you want to use a bigger diameter pan, check out the How To Increase A Recipe