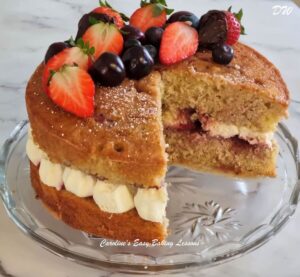
Raspberry Swirl Victoria Sandwich Cake

Try my British Classic - Victoria Sandwich Cake, but with a raspberry twist! Not only is there raspberry jam accompanying the cream filling of this layer cake, but it's also streaked through the cake batter. Resulting in a pleasant twist to this light and airy popular British bake.
Equipment
- 7" or 8” (17½-20cm) Cake Tin x 2 (Also known as Sandwich tins. See notes for bigger/smaller tin sizes)
- Baking/parchment paper
- Baking spray, lining paste, or butter to grease (see note in instructions, or make Lining Paste)
- Scales or measuring cups
- Measuring Spoons
- Hand or Stand Mixer (or a wooden spoon)
- Sieve
- Large Metal spoon
- Small bowl for jam/jelly swirl
- Timer or Phone Timer
- Cocktail sticks
- Cooling rack
- Baking Palette knife or butter knife
- Clean Soft Tea-towel (optional)
- Small measuring jug (optional)
- Bowl for whipping cream
- Small sieve (optional)
- Piping bag & nozzle (optional, or food bag)
Ingredients
- 225 grams Butter (8 oz, 1 cup/ 2 sticks, unsalted, soft & cubed)
- 225 grams Castor Sugar (8 oz, 1 cup of super/extra fine sugar, Domino’s etc. *See note above)
- 4 Eggs, medium - large (US Large - XLarge eggs)
- 225 grams Self-raising Flour (8 oz, 1¾ cups Self-rising Flour + 1 tsp Baking Powder) OR 1¾ cups Plain/All Purpose Flour + 4tsp Baking Powder)
- 1 tsp Vanilla Extract (read about Homemade Vanilla Extract)
- 1 tbsp Milk
- 8 tbsp Raspberry jam/jelly/preserve (or any flavour)
For Filling & Topping
- 180+ ml Double Cream (Minimum 6 fl oz, ¾ cup Heavy/Whipping cream up to 9½ fl oz, 1⅛ cup if using on top too)
- Raspberry Jam/jelly (or own choice, sour/black cherry is nice too)
- Few Tbsp Icing/Powdered sugar
- Strawberries or other berries (optional)
- Sprinkles & coloured lustre dust (optional)
- OVEN: 180c/160c Fan Oven/350f/Gas Mark 4
Instructions
- Cube and weigh out your butter and leave to soften. A smaller surface area will soften quicker and be easier to mix with. See Photo 1 below. I like to cut them about 1cm, ⅓″ size. If you are in a hurry, or forget to take it out on time, here’s a hack I tried. Soften Butter In About 12 Minutes.

- Weigh out and add the sugar to the soft butter and mix by machine or hand for a few minutes until very creamy, smooth and soft and also paler in colour. This is known as ‘creaming the butter & sugar’ together. See Photo 1 above for how it should look or check out the video. It is the best method for incorporating air into the batter to produce a light airy cake.
- Next add in the eggs one at a time, with the mixer on low to medium speed, just briefly until mixed through, also known as ‘amalgamated’ or you might hear or read the word ‘emulsified’. (See Photo 2 below). To emulsify means to combine two liquids that normally do not combine so easily, such as vinegar & oil. So at this stage of the recipe, we are trying to emulsify the egg with the butter. As a result, sometimes the eggs may make the batter look a little curdled or split. If this happens just add 2 dessert spoons of your flour while mixing in the eggs. But don’t worry about it, it will bake out fine. You don’t even need to add the flour like that, as you will be adding in soon.

- For even more height in the sponge, you can whisk the eggs first since this activates the protein in the egg, and protein provides structure. Now mix in the vanilla extract just till combined. See Photo 2 above.

- Now sieve in the flour (and baking powder is using plain/A.P. flour), on top of the batter. You can also sieve & mix into a separate bowl & then re-sieve into the batter if you like. See Photo 3 above. Proceed to mix on low to start, and add in th emilk. Then mix on medium speed until all incorporated into a smooth thick batter. Only mix until no flour is seen, as you don’t want to over-mix it and knock out the air you incorporated. If you can hold the sieve higher up from the bowl, this too will incorporate more air into the batter. Sieving twice gets even more air into the batter too. See Photo 4 below.

- Heat up the oven to 180c/160c Fan oven/350f/Gas Mark 4.
- Now in a small bowl add about 1 tsp water to the jam/jelly and mix to combine. Just enough to thin slightly, but will depend on how thick and jelly-like your jam is. See the video for the consistency.

- Oil or grease your baking tins well, paying particular attention to the sides. Place a circular piece of baking/parchment paper on the bottom of the tin. I recommend this greasing/lining paste recipe by Great British Bake Off winner Nancy Birtwhistle. Alternatively, you can use a Quick Release of Cooking/Baking spray (such as FryLight spray). Use pre-cut or make your own paper circles to line the bottom. Cut paper the width of the tin & then keep folding in half, till you get a pointed cone shape. Then line up with the centre point of the tin and cut off the excess. Then simply unfold and if too big, fold again & trim off slightly. Then just position in place. See Photo 5 above & Photo 6 below. Or watch my video on how to fold paper circles to fit a cake tin.

- Add about 7 individual teaspoons of the jam to the top of the batter, as per the first row of pics in Photo 7 below. Then use a baking spatula to gently lift the batter from the bottom of the bowl, and fold over the top of the jam. No beating of the batter, but rather a gentle folding over motion. Then add in 3 or 4 more drops of the jam to the batter and fold in gently again. It is ok to have some streaks of the jam through the batter as well as some larger areas of jam. Just don't thoroughly mix the jam through. See Photo 7 below. (Note you should have a little of the jam left over).

- Now spoon the batter evenly between the two tins and smooth out. Using a small spoon, drop spoonful’s of the reserved jam/jelly over the top of the cake batter. See video or Photo 8 below. You can use a cocktail stick/tooth pick to make gentle swirls in the top of the batter if you like. Tap the tins a few times on the counter/worktop to expel any trapped air.

- Place the 2 tins in the middle shelf of the oven and bake for about 20 – 25 minutes. If your oven doesn't bake evenly, you can turn the turns, after the half-way mark (and they won't deflate). So wait till at least 13 minutes. Start to check if the cake is done from about the 19 minute mark. They should be a golden colour, but you want to make sure they are fully cooked, so using a clean cocktail stick/tooth pick, pierce the stick into the centre of the cake (not into the jam/jelly). If it comes out clean, then the cake is ready. If not, place back in the oven for a two more minutes and check again until done. The cake will be springy to touch and coming away from the sides of the tin. See Photo 9 below. Leave to cool in the tins, on a cooling rack for at least 15 minutes.

- Run a palette knife or butter knife around the edges of the cake tin – it may stick where there is jam/jelly. Place a folded clean tea-towel on the cooling rack and turn the tin over and let the cake fall onto the towel. Might need a few taps. Leave for at least 10 minutes before you try to carefully peel the paper off the cakes. If it isn’t coming off easily, leave it to cool more. See Photo 10 below.

- TOP TIP – Placing cakes on the tea towel means there are no rack marks left on the cake. If you intend to decorate on top, this is not important. But if going for the classic look for a Victoria Sandwich cake, you don’t really want lines showing on top. And leaving to cool upside down also results in less of a dome. If you want you can instead turn the cakes out onto a plate, remove the paper and then place the other way up on the cooling rack. Just be careful as the more you turn them at this fragile stage, the more likely a break is (especially with jam in it).


Decorate The Cake
- While the cakes are cooling, using a hand or stand mixer, whip up the cream until very thick & stands tall with stiff peaks. See Photo 12 below. Watch my little whipping cream video if you aren’t sure how it should be done. Be sure not to over-whisk as you can end up making butter! It will start to separate and be a yellow/cream colour if so. You can add a little vanilla and icing/powdered sugar to the cream if you like at this stage but is optional & added to taste.

- Once the cakes are cooled, place the layer of sponge you want to be on the bottom, onto a cake stand or nice large plate. If this base layer of cake is domed (rounded) too much, with a serrated bread knife, carefully slice off the excess. It doesn’t need to be completely level, just flat. And only slice off if really too rounded that it won’t sit right with 2 layers on. And have a taste test – Baker’s Bonus!

- Using a baking palette knife or butter knife, spread a generous layer of jam/jelly on top. See Photo 13 above. Start in the middle and spread outwards until you get an even layer. If there are crumbs in the middle of the cake from cutting, don’t worry, just layer some more jam/jelly on top. **Note that if your jam is quite thin and runny, pipe a border of cream first to stop it running off the cake. Photo 13 above shows adding a border using a knife & small spoon. Photo 14 below shows it piped.

- Here's a few pics of different ways to fill the fill the cake. You can spread or pipe the cream on, but piping will give a neater finish. If you like lots of cream, you can have cream on top of the fruit too. See Photo 15 below.

- TOP TIP FOR PHOTO READY CAKE – for the cream to hold it’s shape better once the top layer is on, and not buckle from the weight, pop the cream topped bottom layer in the fridge for 15-20 mins (8mins in the freezer) first. Then place the 2nd layer on top after the cream has had a little time to firm up (flat side down). Don't be tempted to push down or squeeze the cake. See Photo 16 below for referance. Chilling also helps with cleaner slices, so you can even chill again after decorating.

- You can leave it like this, or dust with sieved icing/powdered sugar as is the classic way. Alternatively, you can pipe more of the cream to the top of the cake, and decorate with more fresh berries. And even some lustre dust if you like some sparkle! See photo below.

- Serve straight away or store in a cake stand preferably somewhere not warm and eat withing 2 days. Just like before, you can chill the cake shortly before slicing it to get nicely cut slices, that are Facebook & Instagram ready!

- Top Tip – you can also store in large, deep airtight container. Just place it on the under side of the lid and stored with the box upside down so it’s easy to get out later.


Video
Notes
Want to use a bigger or smaller cake tin?
How to increase a recipe for a bigger tin size
How to reduce a recipe for a smaller tin size
Extremely Curdled Batter - if extremely curdled looking, you might want to make sure next time that your ingredients are all at room temperature. If they are not, it makes producing a smooth emulsion even more difficult. So make sure your butter is soft, but also that the eggs are at the same kind of temperature. Same goes for any liquid you might add.
 For more tips for troubleshooting any problems you might have with cakes that don't rise enough, see before the Recipe Card. Or check my lesson on Over-mixing & Dense Cakes.
Also see before the recipe for ingredient information.
For more tips for troubleshooting any problems you might have with cakes that don't rise enough, see before the Recipe Card. Or check my lesson on Over-mixing & Dense Cakes.
Also see before the recipe for ingredient information.
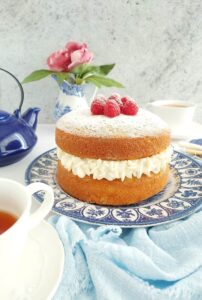 Classic vanilla version of Victoria Sandwich cake above.
See my Chocolate Victoria Sandwich recipe.
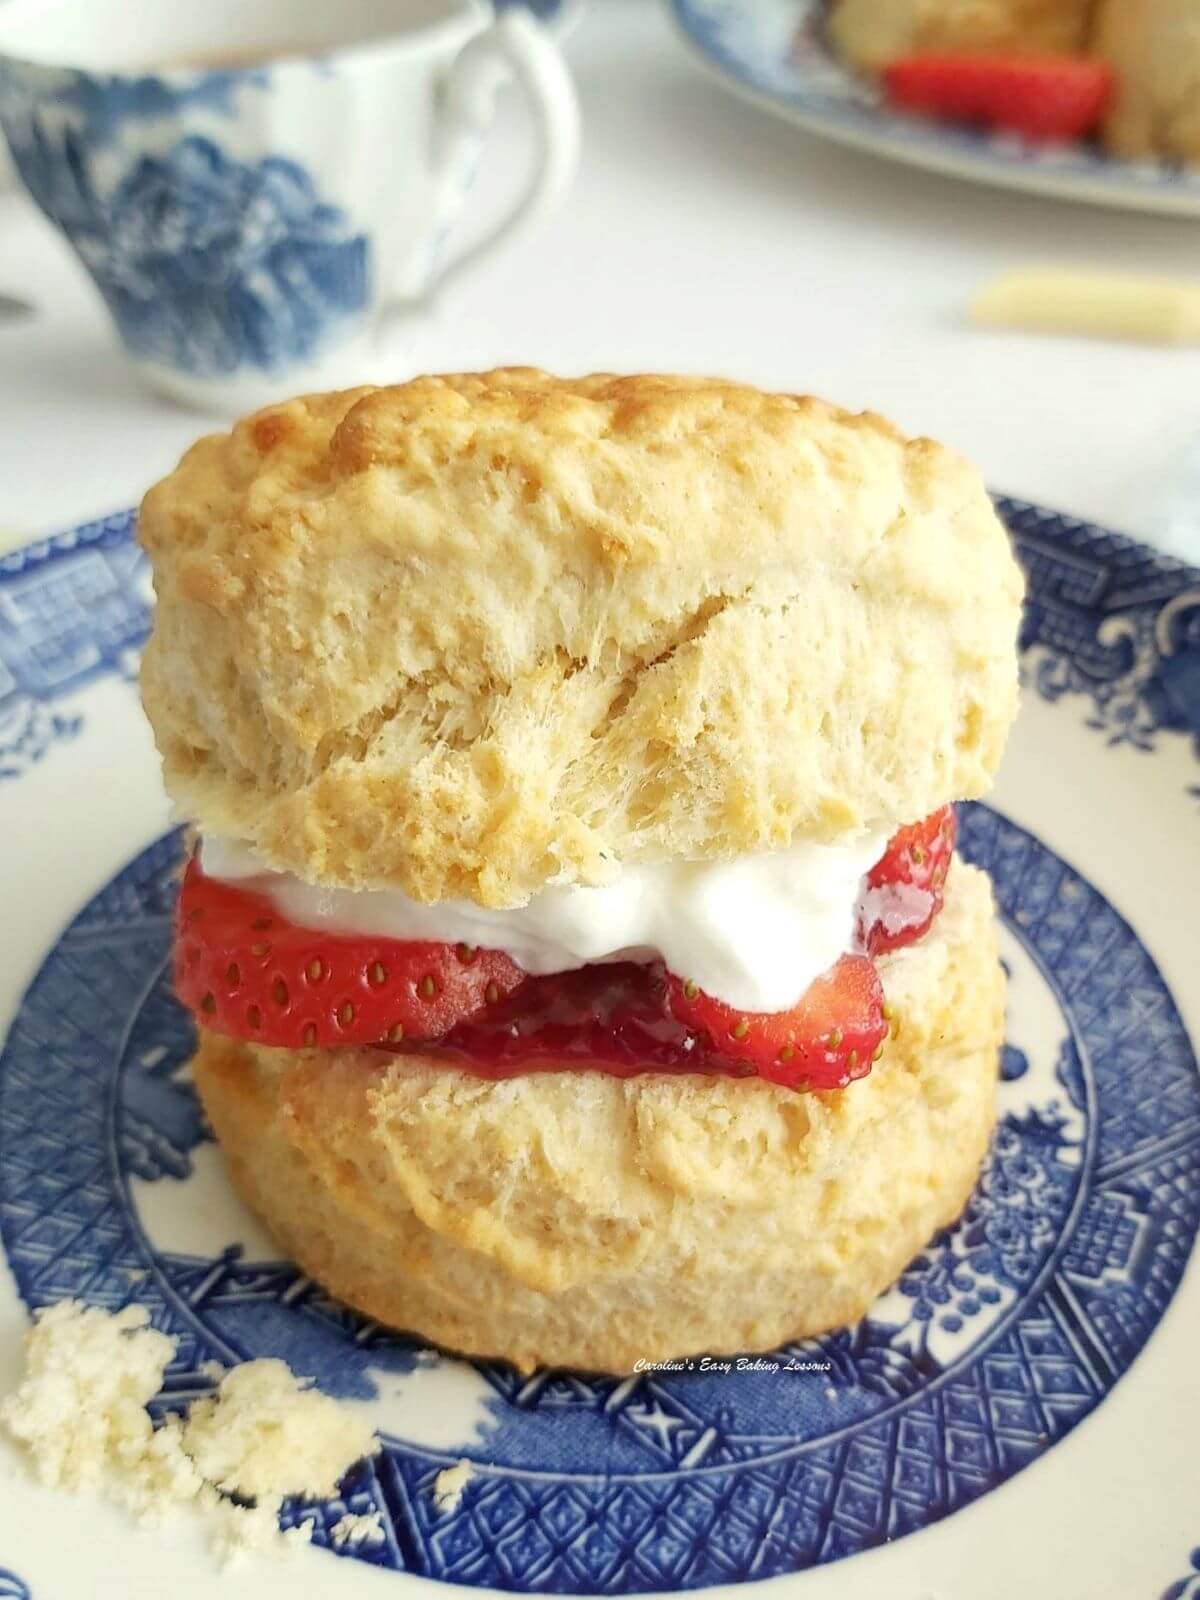
Or why not try my popular British Scones Tutorial, with almost real-time video? Or even check out my Tea Party & Coronation Ideas Page.
Classic vanilla version of Victoria Sandwich cake above.
See my Chocolate Victoria Sandwich recipe.
Or why not try my popular British Scones Tutorial, with almost real-time video? Or even check out my Tea Party & Coronation Ideas Page.
For more tips for troubleshooting any problems you might have with cakes that don't rise enough, see before the Recipe Card. Or check my lesson on Over-mixing & Dense Cakes.
Also see before the recipe for ingredient information.
Classic vanilla version of Victoria Sandwich cake above.
See my Chocolate Victoria Sandwich recipe.
Or why not try my popular British Scones Tutorial, with almost real-time video? Or even check out my Tea Party & Coronation Ideas Page.