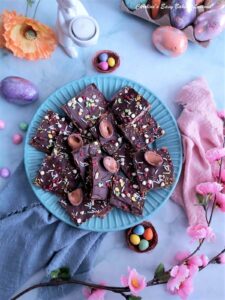
Easter Praline Crackle

Easter Praline Crackle is my easy and quick recipe, for a Spring version of Praline Crackle. Known as Christmas Crack in the US, I want to make this popular in the UK too. It's so simple to make, tastes great and you can add any sprinkles or extra toppings you like.
Equipment
- Measuring Spoons
- Scales or measuring cups
- Chopping Board
- Bowl for melting chocolate
- Medium sized cooking pot
- Baking spatula or wooden spoon
- Baking tray/sheet (25x37cm/9¾ x 14½", or a Jelly Roll/Swiss Roll Pan. Needs to be at least 2cm/¾" deep. See notes.)
- Baking or Cooking Spray for greasing (Frylight Spray, Cake release spray etc)
- Baking/parchment paper
- Tin Foil (aluminium foil)
Ingredients
- 220 grams Dark Brown Sugar (7¾ oz, 1 packed cup + 1 tbsp)
- 225 grams Butter, unsalted & cubed (7¾ oz, 1 cup, 2 sticks, see notes)
- ¼ tsp Salt
- 1 tsp Vanilla Extract (click for home made Vanilla Extract recipe)
- 250 grams Chocolate (mixture of Milk & Dark) (9 oz, semi-sweet & bitter/dark chocolate, combination of.)
- Packet of Crackers (Square or round, enough to cover your baking sheet/tray - see notes)
For The Topping (optional)
- Sprinkles (seasonal, or colour themed - optional)
- Small Easter eggs, marshmallows etc
Instructions
Preparation
- Begin by gathering all your ingredients in place (Mise en place). I usually try to recommend using the minimum number of bowls possible, but for this recipe, we have to be quick or problems can occur.
- This includes any sprinkles, mini eggs etc you want to use on the top. Have your chocolate broken up into pieces in a microwave safe bowl, with a spoon for mixing. Alternatively you can melt the chocolate on the hob on a bowl over a pan of barely simmering water (make sure the bowl doesn't touch the water). Have everything ready for melting when time comes.
- Before preparing the baking tin/pan, you want to gather your crackers and see how many you need and how you will position them. If you have all square ones, this won't take much or matter as much, but if using round ones, it's best to have an idea how you lay them out and break up pieces ready for filling gaps. Also, if it turns out you don't have enough crackers to fill the chosen baking tray/sheet, you can then use a slightly smaller one. If only slightly smaller, you can still keep the ingredients as they are.
- Heat your oven to: 180°c/160°c Fan Oven/360°f/Gas Mark 4, and try and time it so that it comes to temperature by the time you have taken the sugar/butter off the heat.

- Prepare the cake tin/pan by firstly greasing well, including up the shallow sides/edges. I use Frylight cooking spray, but Cake Release Spray, or even melted butter will work too. (See Photo 1 above). Then cover the entire tin/pan with tin foil/aluminium foil. Be sure to go all the way up the edges, folding the foil down over the outside. Push into position neatly. If your foil is not big enough, you can use 2 pieces - one horizontally and one vertically, ensuring all is covered. Follow that with more greasing like before. Then cut out a piece of baking/parchment paper to fit the bottom of the tin/pan. Place on top of the greased foil and follow that with more greasing. (See Photo 1 above). This ensures no paper or foil sticks to your praline, easy removal, as well as not ruining your baking tray/sheet. Place to the side.

Prepare The Praline
- Place the dark brown sugar and butter into a medium sized saucepan and place on the hob on a low-medium heat setting. See Photo 2 below. Allow the mixture to melt and break down, mixing occasionaly.

- Meanwhile, position your crackers in position on the prepared baking tray/sheet as planned. See Photo 3 below.
- Go back to the stove and let the sugar/butter mixture come to a boil and leave to cook down and thicken a little, for about 5 or 6 minutes. (See Photo 4 below)


Construct The Praline Crackle
- Immediately add the hot sugar/butter mixture (praline) to the prepared crackers. Pour over and spread out, covering all the crackers and allowing it to fall into any gaps. If the mixture has been left to cool too long this can be difficult. In which case, best to pop back on a low heat till it thins and slacken enough to be pourable. See Photo 4 above.

- Pop the cracker/praline layer into the heated oven and bake for 5 minutes.
- If using the microwave to melt your chocolate, you can do so while the praline was cooking on the stove top, or when in the oven. Microwave in 30 second bursts, mixing in-between each burst (no more than 30 seconds or you run the risk of burning and ruining the chocolate). Once melted, have ready to go. If using the stove top to melt the chocolate, do so at step 2 of Preparation. See Photo 5.


Topping The Praline Crackle
- After 5 minutes in the oven, the sugar/butter mixture, will be bubbling and very hot, so be careful. Remove from the oven and immediately pour/spoon the melted chocolate on top of the hot crackers. See Photos 6 & 7 below. Keep a little chocolate back, and proceed to spread the chocolate all over the praline layer into an even layer. Use the reserved small amount, to fill in any gaps.

- As soon as applying the chocolate layer, add any sprinkles, mini eggs etc that you would like to add as decoration now. The chocolate will set quite quickly, so you want to get them on quick to adhere better. You can leave as is with no sprinkles (I love that way), or divide it up and have a few different toppings, separate from each other. See Photo 7.


Chilling, Setting & Serving
- Place the Spring Praline Crackle in the fridge or somewhere cold, for about 1 hour minimum. The chocolate will set quick, but the praline takes longer. You can leave overnight if you like. After the one hour, turn the baking tray/sheet out onto a piece of baking/parchment paper, or clean worktop/counter. Greasing the tin before adding the foil, should mean it pops out easily.

- Remove the foil, and then carefully peel off the baking/parchment paper from the bottom of the praline crackle. See Photo 8 above. Clean your hands (it gets messy), and then add a new sheet of paper to the bottom of the baking tin/sheet, before flipping the praline crackle, back into the tin. Pop back in the fridge for 30 minutes.

- Prepare an area that you can chop or break the praline crackle up on, or use a large enough chopping board. Then remove from the fridge and lift out. See Photo 9 above. If you want to just break it up by hand, you could just leave in the tin. I prefer to cut it into triangles, and get more pieces, making it ideal for sharing or gifting. Simply cut it into 6 strips width-wise, and then into 4 in the opposite direction, to make 24 squares. From there I just cut each square in half into a triangle, making 48 pieces. Don't worry if some break and don't all look the same. This is the idea, and where the crackle (crack) comes into the name. The idea originally was to just 'crack it into pieces', random shaped pieces. And they are now ready to enjoy!


Storing Spring Praline Crackle
- The praline crackle can be stored in the fridge or somewhere cold to keep the chocolate from softening too much. I prefer not to have any I am going to eat, being stored in the fridge as I prefer it a little softer. Just don't have anywhere particularly warm.

- Spring Praline crackle, stored in an airtight container in the fridge, can last up to 2 weeks. I gift the praline in little cellophane food bags, in with my food hampers for the holidays. Praline Crackle is often in my Christmas baked gifts, but you can give out any time of the year. Here is an example of an Easter gift hamper. I would just finish it off with gift tags on the home made foods, wrap it all in cellophane, and tie with a pretty bow. Be sure to write on the food gift tags, what each thing is, if there are any nuts etc in it, and how to store, **Just keep away from moisture that can soften the crackers. **


Video
Notes
What Kind Of Crackers To Use?
You can use any kind of cracker is available to you, round or square. You just need enough to fill the baking tray/sheet & can break up the pieces to fill in gaps. For more on quantity needed, see before recipe card.
Kind Of Chocolate To Use
Better to use bars of chocolate than chocolate chips. You don’t need to buy special baking chocolate, tempered chocolate, or even high cocoa content chocolate. See before the recipe for more on this.
 Size Of Baking Tray/Sheet
A Jelly Roll Pan (Swiss Roll) can be used & usually is about 15.5 x 10.5" by 1" deep (39 x 26.5 cm by 2.5cm deep). A recommend a depth of no less than 3/4" or 2cm. My cookie tray/sheet measures 25 x 37cm (9.75" x 14.5"). For smaller trays, see below.
Size Of Baking Tray/Sheet
A Jelly Roll Pan (Swiss Roll) can be used & usually is about 15.5 x 10.5" by 1" deep (39 x 26.5 cm by 2.5cm deep). A recommend a depth of no less than 3/4" or 2cm. My cookie tray/sheet measures 25 x 37cm (9.75" x 14.5"). For smaller trays, see below.
 Trouble Shooting Praline Crackle Problems
Being quick & having everything ready, can avoid possible problems. For more tips for avoiding problems with your Easter Praline Crackle, (such as layers separating), see my Trouble shooting section before the recipe card.
Customize Your Toppings
Use Easter/Spring sprinkles, a certain colour scheme, anything you like. Other examples are mini marshmallows, chopped nuts, dried fruit etc.
Trouble Shooting Praline Crackle Problems
Being quick & having everything ready, can avoid possible problems. For more tips for avoiding problems with your Easter Praline Crackle, (such as layers separating), see my Trouble shooting section before the recipe card.
Customize Your Toppings
Use Easter/Spring sprinkles, a certain colour scheme, anything you like. Other examples are mini marshmallows, chopped nuts, dried fruit etc.
 Make In A Smaller Tin/Make More
You can make 2 trays, where the trays are slightly smaller. For that I increased the recipe by 1.5. The size of the baking trays/sheets were - 25x37cm (9.75x14.5"). Below I have listed the ingredient quantities for making 2 trays. So if you only want to make one smaller tray, just divide in 2.
330g (11.5 oz, 1 2/3 cups) Dark Brown Sugar, 338g (11.5 oz, 1.5 cups) Butter, 3/8 tsp Salt, 1.5 tsp Vanilla Extract, 500g (17.5 oz) Milk & Dark Chocolate (Semi-sweet & Bitter).
Go to Easter & Spring Baking Page
Make In A Smaller Tin/Make More
You can make 2 trays, where the trays are slightly smaller. For that I increased the recipe by 1.5. The size of the baking trays/sheets were - 25x37cm (9.75x14.5"). Below I have listed the ingredient quantities for making 2 trays. So if you only want to make one smaller tray, just divide in 2.
330g (11.5 oz, 1 2/3 cups) Dark Brown Sugar, 338g (11.5 oz, 1.5 cups) Butter, 3/8 tsp Salt, 1.5 tsp Vanilla Extract, 500g (17.5 oz) Milk & Dark Chocolate (Semi-sweet & Bitter).
Go to Easter & Spring Baking Page
 Easter Chocolate Filled Vanilla Sandwich Cookies
Size Of Baking Tray/Sheet
A Jelly Roll Pan (Swiss Roll) can be used & usually is about 15.5 x 10.5" by 1" deep (39 x 26.5 cm by 2.5cm deep). A recommend a depth of no less than 3/4" or 2cm. My cookie tray/sheet measures 25 x 37cm (9.75" x 14.5"). For smaller trays, see below.
Trouble Shooting Praline Crackle Problems
Being quick & having everything ready, can avoid possible problems. For more tips for avoiding problems with your Easter Praline Crackle, (such as layers separating), see my Trouble shooting section before the recipe card.
Customize Your Toppings
Use Easter/Spring sprinkles, a certain colour scheme, anything you like. Other examples are mini marshmallows, chopped nuts, dried fruit etc.
Make In A Smaller Tin/Make More
You can make 2 trays, where the trays are slightly smaller. For that I increased the recipe by 1.5. The size of the baking trays/sheets were - 25x37cm (9.75x14.5"). Below I have listed the ingredient quantities for making 2 trays. So if you only want to make one smaller tray, just divide in 2.
330g (11.5 oz, 1 2/3 cups) Dark Brown Sugar, 338g (11.5 oz, 1.5 cups) Butter, 3/8 tsp Salt, 1.5 tsp Vanilla Extract, 500g (17.5 oz) Milk & Dark Chocolate (Semi-sweet & Bitter).
Go to Easter & Spring Baking Page
Easter Chocolate Filled Vanilla Sandwich Cookies