Easy Safer Microwave Chocolate Fudge

Easy & Safer Microwave Chocolate Fudge is my simple & less dangerous way to make fudge. Not just any microwave fudge recipe, but cooked long enough to simulate making fudge on the stove top. Perfect for food gifting, you can add dried fruit, nuts, sprinkles or candy. Make it a handmade gift this holiday season. **Photos & notes can be toggled on/off when printing.
Equipment
- Scales or measuring cups
- Measuring Spoons (tsp & tbsp)
- Medium to Large plastic bowl (microwave safe)
- Spoons
- Microwave
- Small sieve (or fine tea strainer)
- Baking spray or Cake Release Spray (I recommend Frylight cooking spray)
- Cling Film (plastic wrap/Saran wrap)
- Square/Rectangular plastic tubs, food containers, metal tin/baking tins, or sweet/chocolate molds (see notes on silicone molds)
Ingredients
- 200 grams Dark/Plain Chocolate (Bitter chocolate, 7 oz)*
- 200 grams Milk Chocolate (Semi-sweet chocolate, 7 oz)*
- 25 grams Butter, cubed (unsalted, 2 level tbsp, 0.8 oz)
- 1 Tin Sweetened Condensed Milk (397g/14 fl oz or 1+ ⅓ cup)
- 2 tsp Icing Sugar, sieved (Powdered sugar)
Flavours & Extra Decorations
- 2 tsp Orange extract (optional - alternative peppermint extract)**
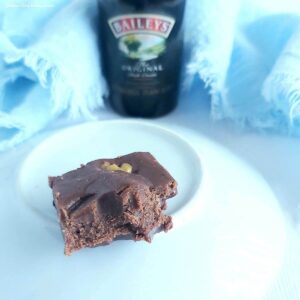
- 1-1½ tsp Bailey’s Irish Cream (alternative brandy, rum - optional)**
- Nuts of choice (chopped & optional – pecans, walnuts, pistachios etc.)
- Dried cranberries, raisins etc (optional)***
- Chocolate or Cookies, chopped (Maltesers, Toffifee, Oreos as examples used)
- Sprinkles – coloured themes, seasons, etc. (coloured, themes, seasons, etc.)
- ** Quantities for flavourings per ⅓ batch only
- *** handful of nuts &/or fruits per ⅓ batch
Instructions
- Begin by oiling/greasing the dishes you are going to use, all ready for using immediately, when the fudge is cooked. (photos before the recipe card for ways to grease silicone and metal tins). You can also use some cling film/plastic wrap on top of the greased dishes, such as for metal tins.
- Break up the chocolate & into a large microwave-safe bowl before popping in the microwave for 1 minute (at the most). (See notes on bowls to use). Mix the chocolate around (even if it doesn't look like it's melting), & microwave for 30 seconds.
- Mix again & in doing so the heat of the bowl & movement will result in more melting of the chocolate. If all melted proceed to the next step. Depending on the power of your microwave, the time taken to completely melt will vary. If needed, continue cooking for 30 second bursts, mixing well in-between each time, until completely melted. Never go any higher than 30 seconds for melting chocolate in the microwave or you can ‘burn’ the chocolate and made it hard. (For 400g/14 oz of chocolate, 60 seconds at the beginning is fine).

- Immediately add the cubed butter, mixing well until all melted & combined. See Photo 1 above.
- Then add in the tin of condensed milk, mixing through before popping back in the microwave & cooking for another 30 secs.
- Mix this fudge mixture really well, & microwave again for a further 30 seconds. The mixture will be starting to thicken after each 30 seconds.

- Continue mixing & cooking for 30 second bursts until the mixture starts to come together & is coming away & stopping sticking to the sides of the bowl (this happens with a plastic bowl). See Photo 2 above, for how the mixture will look. (And Photo 3 below). It should be extremely hot at this point, and almost bubbling. If you want to be super precise, you are looking for a temperature of at least 105 °c (220 °f for microwave fudge). **Click Photo 2 and then pinch to zoom in
- Add in the sieved icing/powdered sugar & mix until all combined.

- If adding nuts etc, do so right now. For this batch in the photos, I split into 3. A third was plain fudge flavour, a third had orange extract added, and the final third had Bailey's added to it. Some I added cranberries or chopped walnuts to the fudge mixture. See Photo 3 above.
- And some I topped with nuts, chopped cookies and chocolates (Malteseres/Malt balls and Toffifee). **If dividing the mixture up, I recommend to place the ones you are not working on yet, back into the warm microwave to sit.)

- Once you have added your extra flavours or fruits/nuts, spoon into the prepared tin/dish, and using clean hands (or gloves is handy), press the fudge mixture into place. Smooth down as best you can and be sure to push into the sides of the dish. I was using a larger metal tin than normal, and had made a divider card, which was also handy to straighten the edges of the fudge mixture. (see Photo 4 above where it is dividing the tin). At this stage you want to also add any more nuts or cookie pieces etc, into the top-most part of the fudge. Then grab your 2nd portion of the fudge mixture and repeat till all fudge has been placed in the dishes for setting. You will notice that as time goes on, it will be beginning to get firmer.

- Cover with a lid or cling film/plastic wrap and refrigerate for at least 3 hours. The fudge will look set before this but leaving as long as possible makes removal & cutting much easier.
- Once set, turn out onto a chopping board, tap until the fudge comes out. Cut with a sharp knife into whatever sizes you like. Run a butter knife all around the sides if removal isn’t easy. Using cling film/plastic wrap is usually much easier. See Photo 5 above.


Storing
- Best kept in the fridge or somewhere cold & wrapped or in an airtight container & can last for weeks.
Video
Notes
Recipe card can be printed with/without the process photos or notes
Recipe Yeild – about 100 small pieces can me made from this recipe, with dimensions of about 2cm by 2.5cm (0.7 x 1″). However, in these photos, I cut the larger squares, over 2.5cm/1″ & made heart shape dones. So got about 60 pieces this time.
1 Serving - 6 pieces of smaller pieces (3 of the larger).
 Chocolate - no need for expensive high cocoa content chocolate or couverture chocolate. I used Lidl’s basic milk & dark (bitter) chocolate, that was 39p for a 100g bar, as at December 2022.
Type Of Bowl To Cook In - medium to large microwave-save plastic bowl, or glass Pyrex bowl.
Chocolate - no need for expensive high cocoa content chocolate or couverture chocolate. I used Lidl’s basic milk & dark (bitter) chocolate, that was 39p for a 100g bar, as at December 2022.
Type Of Bowl To Cook In - medium to large microwave-save plastic bowl, or glass Pyrex bowl.
 Dishes For Setting -square or rectangular containers, metal cake/chocolate tins, or food storage/Tupperware, can be used. Dishes with straight sides/edges, will give neater looking fudge pieces.
Cutting Tips -chilling long enough & using a sharp knife will make cleaner cuts.
Dishes For Setting -square or rectangular containers, metal cake/chocolate tins, or food storage/Tupperware, can be used. Dishes with straight sides/edges, will give neater looking fudge pieces.
Cutting Tips -chilling long enough & using a sharp knife will make cleaner cuts.
 Removing From The Dish -make sure to oil/grease the dish before putting the fudge mixture in, to aid removal. (I recommend Frylight cooking spray for the greasing). Also using cling film/plastic wrap on top of the greasing, works best.
Tips For Silicone Molds - don't over-grease & push fudge tight into mold to stop air pockets forming.
Removing From The Dish -make sure to oil/grease the dish before putting the fudge mixture in, to aid removal. (I recommend Frylight cooking spray for the greasing). Also using cling film/plastic wrap on top of the greasing, works best.
Tips For Silicone Molds - don't over-grease & push fudge tight into mold to stop air pockets forming.
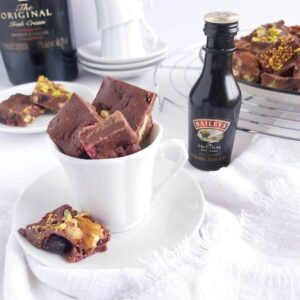 Different Flavours - this batch was made with 1 tin/can of sweetened condensed milk, & I made 3 different flavours out of it: plain chocolate, chocolate orange & Bailey's Irish Cream.
**So please note quantities of orange extract & Bailey's are per 1/3 of a batch.
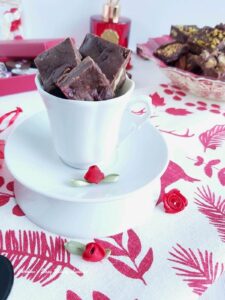
Adding Extras - I added died cranberries & chopped walnuts to the fudge before placing in the tin. And taste great. You can also add more nuts like pecans, & chopped pistachios to the top of the fudge. Leave plain on the top, or add some sprinkles or halved mini chocolate Easter eggs, and theme your fudge for the holidays.
Different Flavours - this batch was made with 1 tin/can of sweetened condensed milk, & I made 3 different flavours out of it: plain chocolate, chocolate orange & Bailey's Irish Cream.
**So please note quantities of orange extract & Bailey's are per 1/3 of a batch.
Adding Extras - I added died cranberries & chopped walnuts to the fudge before placing in the tin. And taste great. You can also add more nuts like pecans, & chopped pistachios to the top of the fudge. Leave plain on the top, or add some sprinkles or halved mini chocolate Easter eggs, and theme your fudge for the holidays.
 Gifting Tip - tag your fudge & write that it should be kept in the fridge/somewhere cold, to keep firm & last longer.
Tropical Cake Truffles From left-overs
Gifting Tip - tag your fudge & write that it should be kept in the fridge/somewhere cold, to keep firm & last longer.
Tropical Cake Truffles From left-overs
 More Easy Food Gift Recipes
Christmas Recipes Page
More Easy Food Gift Recipes
Christmas Recipes Page
Chocolate - no need for expensive high cocoa content chocolate or couverture chocolate. I used Lidl’s basic milk & dark (bitter) chocolate, that was 39p for a 100g bar, as at December 2022.
Type Of Bowl To Cook In - medium to large microwave-save plastic bowl, or glass Pyrex bowl.
Dishes For Setting -square or rectangular containers, metal cake/chocolate tins, or food storage/Tupperware, can be used. Dishes with straight sides/edges, will give neater looking fudge pieces.
Cutting Tips -chilling long enough & using a sharp knife will make cleaner cuts.
Removing From The Dish -make sure to oil/grease the dish before putting the fudge mixture in, to aid removal. (I recommend Frylight cooking spray for the greasing). Also using cling film/plastic wrap on top of the greasing, works best.
Tips For Silicone Molds - don't over-grease & push fudge tight into mold to stop air pockets forming.
Different Flavours - this batch was made with 1 tin/can of sweetened condensed milk, & I made 3 different flavours out of it: plain chocolate, chocolate orange & Bailey's Irish Cream.
**So please note quantities of orange extract & Bailey's are per 1/3 of a batch.
Adding Extras - I added died cranberries & chopped walnuts to the fudge before placing in the tin. And taste great. You can also add more nuts like pecans, & chopped pistachios to the top of the fudge. Leave plain on the top, or add some sprinkles or halved mini chocolate Easter eggs, and theme your fudge for the holidays.
Gifting Tip - tag your fudge & write that it should be kept in the fridge/somewhere cold, to keep firm & last longer.
Tropical Cake Truffles From left-overs
More Easy Food Gift Recipes
Christmas Recipes Page
**Nutritional Values - I am not a qualified nutrionist and these values are approximate and will vary from brand to brand of ingredients. All values based on a serving of 6 pieces, assuming 120 pieces produced per recipe & sourced from Soupersage.com. See recipe Yeild above for sizings.
Nutrition Facts
Easy Safer Microwave Chocolate Fudge
Serving Size
6 Pieces
Amount per Serving
Calories
190
% Daily Value*
Fat
11
g
17
%
Saturated Fat
6.8
g
43
%
Polyunsaturated Fat
0.4
g
Monounsaturated Fat
3.1
g
Cholesterol
12
mg
4
%
Sodium
44
mg
2
%
Potassium
194
mg
6
%
Carbohydrates
20
g
7
%
Fiber
2
g
8
%
Sugar
16
g
18
%
Protein
3.8
g
8
%
Vitamin A
0.72
IU
0
%
Vitamin C
0.5
mg
1
%
Calcium
86
mg
9
%
Iron
2
mg
11
%
* Percent Daily Values are based on a 2000 calorie diet.