Chocolate Victoria Sandwich Cake

The classic British sponge cake, but a chocolate version and still packed with jam and fresh whipped cream. This one is made with cherry jam so could be a great Black Forest Gateau. Learn with my thorough instructions and step-by-step photos to be the best baker you can be! Or for an abbreviated version, see the Recipe Card you can easily print off.
Equipment
- 2 7 or 8 ” (17.5-20cm) Cake Sandwich tins
- Baking/parchment paper
- Baking spray, lining paste, or butter to grease (see note in instructions)
- Scales or measuring cups
- Measuring Spoons
- Hand or Stand Mixer (or a wooden spoon)
- Sieve
- Large Metal spoon
- Small bowl for jam/jelly swirl
- Cocktail sticks
- Baking Palette knife or butter knife
- Small measuring jug (optional)
- Bowl for whipping cream
- Icing/Powdered sugar
- Small sieve (optional) or tea strainer
- Timer or Phone Timer
- Clean Soft Tea-towel
- Cooling rack
- Piping bag & nozzle (optional)
Ingredients
- 225 g Butter, unsalted, soft & cubed (8 oz, 1 cup/ 2 sticks)
- 225 g Castor Sugar (8 oz, 1 cup of super/extra fine sugar, Domino’s etc.) *See note above
- 4 Eggs (medium) US size Large
- ½ tsp Vanilla Extract (To make your own, see instructions)
- 175 g Self-raising Flour (6 oz, 1 & 1/3c Self-rising Flour OR 1 & 1/3 cups All Purpose/Cake/Plain Flour plus 3 ⅛ tsp baking powder)
- 50 g Cocoa Powder (Level 1/2 cup, 1.75 oz)
- 2 tsp Coffee Granules Or Espresso powder
- 1 tbsp Milk (or little more)
- 270 ml Double/Heavy/Whipping Cream (9 fl oz about 1 cup)
- 1 tbsp Icing/Powdered Sugar (Or little more for topping cake)
- 200 g Cherry Jam/Jelly (or less) (Or any favourite flavour, upto 7 oz, ½-¾cup)
Instructions
- Cube & weigh/measure out your butter & leave to soften.
- Measure & add the sugar to the soft butter & mix by machine or hand for a 3-5 minutes until very creamy, smooth & also paler in colour.
- Add in the eggs one at a time with the mixer on low to medium speed, just briefly until mixed through. Sometimes the eggs may make the batter look a little curdled or split. If this happens just add 2 dessert spoons of the flour while mixing in the eggs. **Try to make sure that your ingredients are all at room temperature. Now mix in the vanilla extract just till combined.
- While measuring out, sieve the flour (& baking powder if using plain/A.P. flour), cocoa & coffee into a separate bowl. Then sieve again over the cake mixture & mix on low, then medium speed until all incorporated into a smooth thick batter. Only mix until no flour is seen. Finally add in the milk and mix through.
- Heat up the oven to: 170°c/150°c Fan oven/325°f/Gas Mark 3
- Oil or grease your baking tins well, paying particular attention to the sides. Place a circular piece of baking/parchment paper on the bottom of the tin. I recommend this greasing/lining paste recipe.
- Now spoon the batter evenly between the two tins & smooth out, leaving a little dip in the middle, so the cakes don’t dome too much and bake in the middle evenly.
- Place the 2 tins in the middle shelf of the oven and bake for about 25 - 30 minutes.They should be a golden colour, coming away from th sides of the tin & a wooden cocktail stick should come out clean of crumbs.
- Leave to cool in the tins, on a cooling rack for at least 15 minutes.
- Run a palette knife around the edges of the cake tin. Place a folded clean tea-towel on the cooling rack & turn the tin over onto the tea-towel. Leave for at least 10 minutes before you try to carefully peel the paper off the cakes.
- Using a hand or stand mixer, whip up the cream until very thick & stands tall with stiff peaks.
- Place the layer of sponge you want to be on the bottom, onto a cake stand or nice large plate, (flat side of cake at the bottom). Spread a generous layer of jam/jelly on top. Start in the middle and spread outwards until you get an even layer. **Note, if your jam is quite thin & runny, pipe a border of cream first to stop it running off the cake. Leave as is, or pipe more cream on top of the jam. Carefully place the second layer of cake on top, with the flat side down.
- Sieve a generous dusting of icing/powdered sugar all over the cake. Serve straight away or store in a cake stand preferably somewhere not warm and eat withing 2 days.
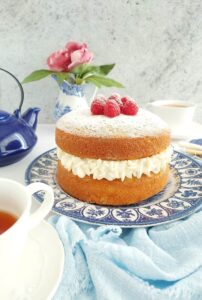
- For a more modern version, you can pipe cream on top of the cake too, and add fruit of your choice.
Notes
***TOP TIP FOR PHOTO READY CAKE – for the cream to hold it’s shape better once the top layer is on, place the cream topped bottom layer in the fridge for 15 mins (10mins in the freezer) before placing the 2nd layer on top. Work quickly and it also helps with clean cuts.
For more thorough instructions, process photos & important recipe & ingredient information, please see the full recipe above this recipe card.
Classic Victoria Sandwich Cake For Beginners
 More Cake recipes
More Cake recipes