Chocolate Victoria Sandwich Cake

The classic British sponge cake, but a chocolate version and still packed with jam and fresh whipped cream. This one is made with cherry jam so could be a great Black Forest Gateau. Learn with my thorough instructions and step-by-step photos to be the best baker you can be! Or for an abbreviated version, see the Recipe Card you can easily print off.
Equipment
- 2 7 or 8 ” (17.5-20cm) Cake Sandwich tins
- Baking/parchment paper
- Baking spray, lining paste, or butter to grease (see note in instructions)
- Scales or measuring cups
- Measuring Spoons
- Hand or Stand Mixer (or a wooden spoon)
- Sieve
- Large Metal spoon
- Small bowl for jam/jelly swirl
- Cocktail sticks
- Baking Palette knife or butter knife
- Small measuring jug (optional)
- Bowl for whipping cream
- Icing/Powdered sugar
- Small sieve (optional) or tea strainer
- Timer or Phone Timer
- Clean Soft Tea-towel
- Cooling rack
- Piping bag & nozzle (optional)
Ingredients
For The Cake:
- 225 grams Unsalted Butter (8 oz, 1 cup/ 2 sticks, softened & cubed)
- 225 grams Castor Sugar (8 oz, 1 cup of Super/Extra Fine sugar, Domino’s etc.) *
- 4 Eggs (Medium, US size Large- extra large)
- 175 grams Self-raising Flour (6 oz, 1⅓ cup Plain/All Purpose Flour plus 3 ⅛ tsp baking powder*)
- 50 grams Cocoa Powder (Level ½cup, 1¾ oz)
- 2½ tsp Chai Latte powder (Or 1 tsp coffee granules/espresso powder)
- ¾ tsp Coffee granules/espresso powder *
- 2½ tbsp Hot/Boiled Water
For The Filling:
- 270 ml Double/Heavy/Whipping Cream (9 fl oz, about 1 cup*)
- 1 tbsp Icing/Powdered Sugar (plus for dusting)
- 200 g Cherry Jam/preserve (up to 7 oz, ½-¾ cup, homemade or shop bought)
For Homemade Jam:
- 80 grams Sugar (2¾ oz, ½ cup),
- 1 tbsp Water
- 200 grams Cherries (7 oz, Fresh, frozen or canned)
- ½ Lemon
- 2 tsp Cornflour (Corn Starch)
* denotes -see notes
Instructions
Prepare The Jam
- Make the jam before the cake, ahead of time or use shop-bought. Wash the cherries in water & vinegar first. Then add the 80 grams Sugar & 1 tbsp water to a cooking pot on high, & allow the sugar to dissolve.
- Add the 200 grams Cherries and ½ Lemon in wedges, & let come to a boil for 5 minutes. Reserve 2 tbsp of the liquid and place 2 tsp Cornflour in a small bowl. Add 2 tbsp water and mix before adding the reserve cherry liquid. Add back to the pot, reduce to medium heat & boil for 10 minutes. Reduce to low and simmer for about 10 minutes till thickened. Leave to cool before using or place in a clean or sterilised jar in the fridge.
Prepare The Cake
- Cube & weigh/measure out your 225 grams Unsalted Butter & leave to soften. Cubing small to about 1cm (⅓") gives a smaller surface area that softens quicker.
- Add the 225 grams Castor Sugar to the softened butter & beat together, (with a hand-mixer or stand-mixer), 'creaming' for about 3-5 minutes until very creamy, smooth & also paler in colour. Add in the 4 Eggs one at a time with the mixer on low to medium speed, mixing in-between each addition.
- Sieve over the 175 grams Self-raising Flour (& 3⅛ tsp baking powder if using plain/A.P. flour) & the 50 grams Cocoa Powder. Mix briefly by hand and leave to the side.
- Heat up the oven to: 170°c/150°c Fan oven/325°f/Gas Mark 3. Add 2½ tbsp Hot/Boiled Water to the bowl of 2½ tsp Chai Latte powder & ¾ tsp Coffee granules/espresso powder & mix till dissolved. (*Use a total of 1¾ tsp coffee if not using Chai Latte powder). Add the coffee mixture to the cake batter and mix just until everything is combined and no dry flour/cocoa patches remain. *Do not over-mix*.
- Grease your cake tins well, on the bottom & up the sides. Place a circular piece of baking/parchment paper on the bottom of the tin. I recommend using Frylight cooking spray or homemade greasing/lining paste recipe.
- Spoon the cake batter evenly between the two tins & smooth out best you can. Place the 2 tins in the middle shelf of the oven and bake for about 20 - 25 minutes. A wooden cocktail stick should come out clean of crumbs & the cakes be coming away from sides of the tin.
- Leave to cool in the tins, on a cooling rack for 10 minutes, before releasing from the tins, removing the paper and leaving to cool for at least 15 minutes.
Prepare The Cream
- Using a hand-mixer or stand-mixer, whip up the 270 ml Double/Heavy/Whipping Cream until very thick & stands tall with stiff peaks. Add in the 1 tbsp Icing/Powdered Sugar and mix till combined.
- Add the whipped cream to a piping bag fitted with a nozzle (I used a Wilton 2D, closed star tipped nozzle), use without a nozzle or even use a food bag. Alternatively you can just spread the cream on the cake.
Assembling The Cake
- Once the cake is cooled, place the flattest layer of sponge on a cake stand or large plate, flat side up. Add a little cream to the centre-most area of the cake, and spread thin. Then pipe a border of cream around the edge of the cake. Carefully spoon the 200 g Cherry Jam/preserve into the centre of the cake. If your jam is not thick, this barrier of cream stops it sliding off. (Use however much jam you need & see notes for making your own jam). Make the pipe cream rosettes taller to make this filling layer as even and flat as possible. Place in the fridge for 30 minutes (15 minutes freezer) and this helps the 2nd cake layer from sliding off and squashing the cream..
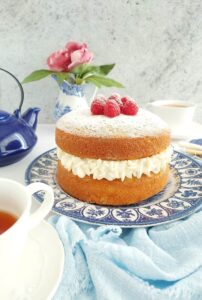
- Carefully place the 2nd cake layer on top and then place back in the fridge for 20 minutes (freezer 10 minutes). This helps everything settle and allow for easier cutting of slices. Before serving, sieve over a generous dusting of icing/powdered sugar.
- For a more modern version, or for a special occasion, you can pipe cream on top of the cake too, and add fresh fruit too such as cherries or berries.
Serving & Storing
- Serve with your favourite tea & enjoy with more cream on the side as there will be plenty left-over.
- Cut preferably while chilled but leave a little before serving. Should not be stored in the fridge for long periods as it will dry out and lose its light airy texture. You can however, cut the slices when chilled, position back together & store at room temperature or a cool place, covered with a cake dome or in a cake tin, for up to 7 days1. Note any fresh fruit used will make the cake soggy so best to add before serving.
- Victoria Sandwich Cake can be frozen for up to 3 months2. if frozen without the jam & cream. Defrost overnight in the fridge. See step-by-step instructions before this recipe card for details.
Video
Notes
Sugar - British baking uses Caster Sugar & equivalent to Extra/Super Fine sugar. Make your own Caster sugar (extra/super fine sugar) by blitzing in a food processor or Nutribullet. See information before Recipe card for reference photo.
Flour - UK Self-raising Flour used, but you can use Plain (All Purpose) Flour & add the amount of baking powder listed. No need for baking powder if using Self-raising flour.
Coffee - no taste of coffee, but enhances chocolate flavour. Try using a combination of Chai Latte and regular coffee or just increase the coffee amount.
Homemade Jam - you can use my Plum Orange Jam recipe.
 Cream - I whipped a full 270ml tub of cream and only used about half for piping. So nutritional values below are based on using half the amount listed.
Recipe Yield - 8" (20cm), 2 layer cake. For different sized tin, see detailed recipe.
Oven, Fan Oven Or Air Fryer - cake tested in oven, fan oven & front opening larger air fryer. All temperature settings & conversions are listed in the recipe instructions, for your convenience, and are standard with all my recipes.
***TOP TIP FOR PHOTO READY CAKE – for the cream to hold its shape better once the top layer is on, place the cream topped bottom layer in the fridge as directed in the recipe, before adding the 2nd layer on top. Chill again after assembling & cut all the slices when chilled as long-term storing in the fridge affects the texture & dryness of the cake. Cut slices with the knife vertical, parallel to the height of the cake edge and the cream will not completely squash.
Cream - I whipped a full 270ml tub of cream and only used about half for piping. So nutritional values below are based on using half the amount listed.
Recipe Yield - 8" (20cm), 2 layer cake. For different sized tin, see detailed recipe.
Oven, Fan Oven Or Air Fryer - cake tested in oven, fan oven & front opening larger air fryer. All temperature settings & conversions are listed in the recipe instructions, for your convenience, and are standard with all my recipes.
***TOP TIP FOR PHOTO READY CAKE – for the cream to hold its shape better once the top layer is on, place the cream topped bottom layer in the fridge as directed in the recipe, before adding the 2nd layer on top. Chill again after assembling & cut all the slices when chilled as long-term storing in the fridge affects the texture & dryness of the cake. Cut slices with the knife vertical, parallel to the height of the cake edge and the cream will not completely squash.
 Classic Victoria Sandwich Cake For Beginners
For more thorough instructions, process photos & important recipe & ingredient information, please see the full recipe above this recipe card.
More Cake recipes
Classic Victoria Sandwich Cake For Beginners
For more thorough instructions, process photos & important recipe & ingredient information, please see the full recipe above this recipe card.
More Cake recipes
 Recipe Serving - one serving is 1 slice, as made above, with a yield of 10 slices, where only half the whipped cream was used to pipe in the middle.
Nutritional Information - I am not a qualified nutritionist & all values are approximate. Based on a yield of 10 slices, where one serving is one slice. Assumes ingredients used as listed, with only half the cream needed to be piped in-between the layers. Spread the cream and the nutritional values will decrease. Cut smaller or bigger slices & these values will change. All values from website MyFitnessPal.com.
Cream - I whipped a full 270ml tub of cream and only used about half for piping. So nutritional values below are based on using half the amount listed.
Recipe Yield - 8" (20cm), 2 layer cake. For different sized tin, see detailed recipe.
Oven, Fan Oven Or Air Fryer - cake tested in oven, fan oven & front opening larger air fryer. All temperature settings & conversions are listed in the recipe instructions, for your convenience, and are standard with all my recipes.
***TOP TIP FOR PHOTO READY CAKE – for the cream to hold its shape better once the top layer is on, place the cream topped bottom layer in the fridge as directed in the recipe, before adding the 2nd layer on top. Chill again after assembling & cut all the slices when chilled as long-term storing in the fridge affects the texture & dryness of the cake. Cut slices with the knife vertical, parallel to the height of the cake edge and the cream will not completely squash.
Classic Victoria Sandwich Cake For Beginners
For more thorough instructions, process photos & important recipe & ingredient information, please see the full recipe above this recipe card.
More Cake recipes
Recipe Serving - one serving is 1 slice, as made above, with a yield of 10 slices, where only half the whipped cream was used to pipe in the middle.
Nutritional Information - I am not a qualified nutritionist & all values are approximate. Based on a yield of 10 slices, where one serving is one slice. Assumes ingredients used as listed, with only half the cream needed to be piped in-between the layers. Spread the cream and the nutritional values will decrease. Cut smaller or bigger slices & these values will change. All values from website MyFitnessPal.com.
Nutrition Facts
Chocolate Victoria Sandwich Cake
Serving Size
1 slice
Amount per Serving
Calories
463
% Daily Value*
Fat
27
g
42
%
Saturated Fat
17
g
106
%
Polyunsaturated Fat
1
g
Monounsaturated Fat
6
g
Cholesterol
121
mg
40
%
Sodium
235
mg
10
%
Potassium
185
mg
5
%
Carbohydrates
53
g
18
%
Fiber
3
g
13
%
Sugar
34
g
38
%
Protein
6
g
12
%
* Percent Daily Values are based on a 2000 calorie diet.