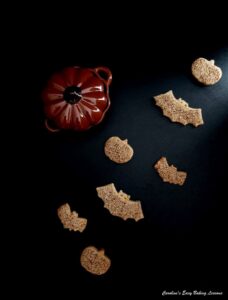
HALLOWEEN SAVOURY BAT COOKIES - Scary Savoury Snacks

This is my Halloween bat themed version, of Turkish savoury biscuits (Tuzlu Kurabiye, it literally translates as salty biscuit). I have made them bat shaped for Halloween & they are perfect for pairing with your favourite cheese or dip. They are very moreish…. so you won’t be disappointed!
Equipment
- Scales or measuring cups
- Measuring Spoons
- Large mixing bowl
- Large spoon
- Small measuring jug
- 2 Small Bowls (to separate eggs)
- Stand or Hand Mixer (not essential)
- Baking trays/sheets (2-3 large)
- Baking/parchment paper
- Cookie Cutters (Bats or other Halloween or Autumn/Fall shapes)
- Pastry Brush (or Small Paint/Artist brush)
- Palette knife, or butter knife
- Cooling rack
- Timer or Phone Timer
Ingredients
For The Cookie Dough
- 125 grams Butter, unsalted, cubed & softened a little. (1 stick + 2 tsp, 4½oz)*
- 120 ml Oil (4 fl oz, ½ cup, Vegetable oil or other neutral oil)
- 1 ½ tbsp Cider Vinegar (Apple Cider Vinegar or Vinegar)
- 1 tsp Salt
- 10 grams Bicarbonate of Soda 2 scant tsps- below level, of Baking Soda)
- 1 Egg Yolk (keep white for glazing on top)
- 3 tsp Icing Sugar (powdered sugar)
- 312 grams Plain Flour (approximately) (2½ cups All Purpose Flour, 11oz approximately)
For The Topping
- 1 Egg white (from above with a splash of milk or cream)
- Seeds of choice (optional) (sesame seeds, Poppy seeds, pumpkin, sunflower, Nigella seeds, Chai seeds, Flax Seed, etc.)
* See notes & before Recipe Card, for alternative ingredients
Instructions
Before Baking
- Start by cubing the butter while measuring it out, & leave to soften & come to room temperature. But if you forget, or are short on time, why not try this hack I reviewed? Go to How To Soften Butter In About 12 minutes Video.
- Prepare your baking sheets/trays by lining with baking/parchment paper.
Prepare The Biscuit/Cookie Dough
- When the butter is ready, (see video on how to test if butter is ready for baking), beat a little with a hand/stand mixer until soft & spreadable. Then add in the icing/powdered sugar & salt, before beating again just until incorporated. (See Photo 1 below). Next mix in the egg yolk & oil.

- Add the bicarbonate of soda (baking soda) to the vinegar in a small bowl, but not too small as the mixture will react and fizz. Be ready to quickly add this to the main mixing bowl & give it all a mix through. See Photo 1 above.

- Next add in the flour very gradually until you get a very thick & smooth dough coming together. I add in about 125g (1 cup) of flour at a time. You might need more or less. Different types of flour, where & how it’s milled, result in a variation in how much liquid it will absorb. Therefore there can be no exact amount of flour to add with lots of recipes. To tell if it’s the correct consistency, roll a smooth ball of the dough & flatten it with your hand. If you can do that without it falling apart or sticking to your hand, it is ready. You can also swap over to a wooden spoon/spatula or use your hands, towards the end of bringing the dough together (and save on it all being on your mixer). See Photo 2 above.
- Now cut out 2 extra large pieces of baking/parchment paper (approximately 40cm/15.5″ long). Give the dough a quick 5 second knead & form into a ball. Half the dough, flatten both into a disc & pop one half into the fridge in some paper. See Photo 3 below.

- Place one half of dough, in the centre of the 2 large sheets of baking/parchment paper. Roll out the dough until you get a thickness of at least 5 or 6mm (⅕-¼"). (*That is the height of a £1 coin plus a 1p). Pop the rolled out dough (with the bottom paper), onto a tray in your fridge & make sure it is completely flat. Then chill the dough for 30 - 45 minutes**, while you do the same for the second half of the dough. (Be sure to take a note of when you place the first rolled out dough into the fridge). See Photo 3 above.


Cut Out The Cookies
- When 30 minutes is up, you can start to cut out the cookies. Begin by dipping the bat cutter in a small bowl of flour, shake the excess & cut out as many cookies as you can. (Or use several different cutters). See Photo 4 below. Lift gently with a palette knife or butter knife, & place on the prepared baking tray/sheet & leave a little gap in-between each.

- Once the first tray/sheet is filled, place in the fridge, roll up the scraps & also place in the fridge, while you continue to cut more from the second half of the rolled dough. Take a note of the time you placed the first prepared tray in the fridge as you will be chilling for another 1 hour (or freeze for 20 - 30 minutes. See notes below). See Photo 5 below.

- Heat up the oven to 180°c/160°c fan oven/350°f/Gas Mark 4 to coincide with the end of the chilling time for the first batch of bat cookies. Just before the oven is ready, you can add some details to your bats, like eyes. Then get your egg white mixed with a splash of milk, & very delicately, brush generously onto the tops of the cookies. And finally, sprinkle or place seeds on top if desired. (See Photos 5 & 6).


Bake The Bat Cookies
- Place the first batch in the oven, for about 14-16 mins, until turning golden on top & around the edges. You want the cookies to be set, but just a little soft in the middle. (Note if your cookies are thinner than mine, you might need a bit less time). Just remember, that the cookies will continue to bake out of the oven, from residual heat coming from the baking sheet/tray. While the first batch are cooking, you can add details, egg wash & seeds to your second batch & pop back in the fridge till ready to bake. (See Photo 7 below).

- Remove the baked cookies from the oven & leave to cool on the tray/sheet for 5 mins. Meanwhile you can put the other uncooked cookies in to be baked. Then transfer very carefully to a cooling rack by using the baking/parchment paper. They are a very soft textured biscuit/cookie, so be very careful not to drop them. Leave to cool & then enjoy!

Storage & Serving
- Store in an air-tight container. I recommend cake tins for all baked goods. These will actually stay fresh tasting for about a week. Keep the used baking/parchment paper in the tin too - this has always helped me store my bakes longer.

- Eat as they are, with some of your favourite cheeses, or dip in hummus (caramelised onion is a favourite!). For the dark & moody bat photos, I quickly put together a suitably Halloween coloured dip, just from some mayonnaise, ketchup & Sriracha sauce.

Notes
* My original recipe used margarine or Baking Spread, but required at least 3 hours (or overnight), chilling of the rolled-out dough. So bear that in mind if not using butter. (See before recipe for more details & other ingredient substitutions).
** Chilling Times - note if when chilling the rolled-out dough, it is still too soft to cut out, pop back in the fridge or freezer. You can also instead freeze for about 20 minutes. Just don't freeze too long or cutting out will crack the dough.
 Makes at least 4 dozen depending on size & shape of cutter used.
My larger bat cookie cutter was - 11cm x 5cm (4⅓ ” x 2″) at it widest length and width.
Cheese version of savoury biscuits/cookies
Makes at least 4 dozen depending on size & shape of cutter used.
My larger bat cookie cutter was - 11cm x 5cm (4⅓ ” x 2″) at it widest length and width.
Cheese version of savoury biscuits/cookies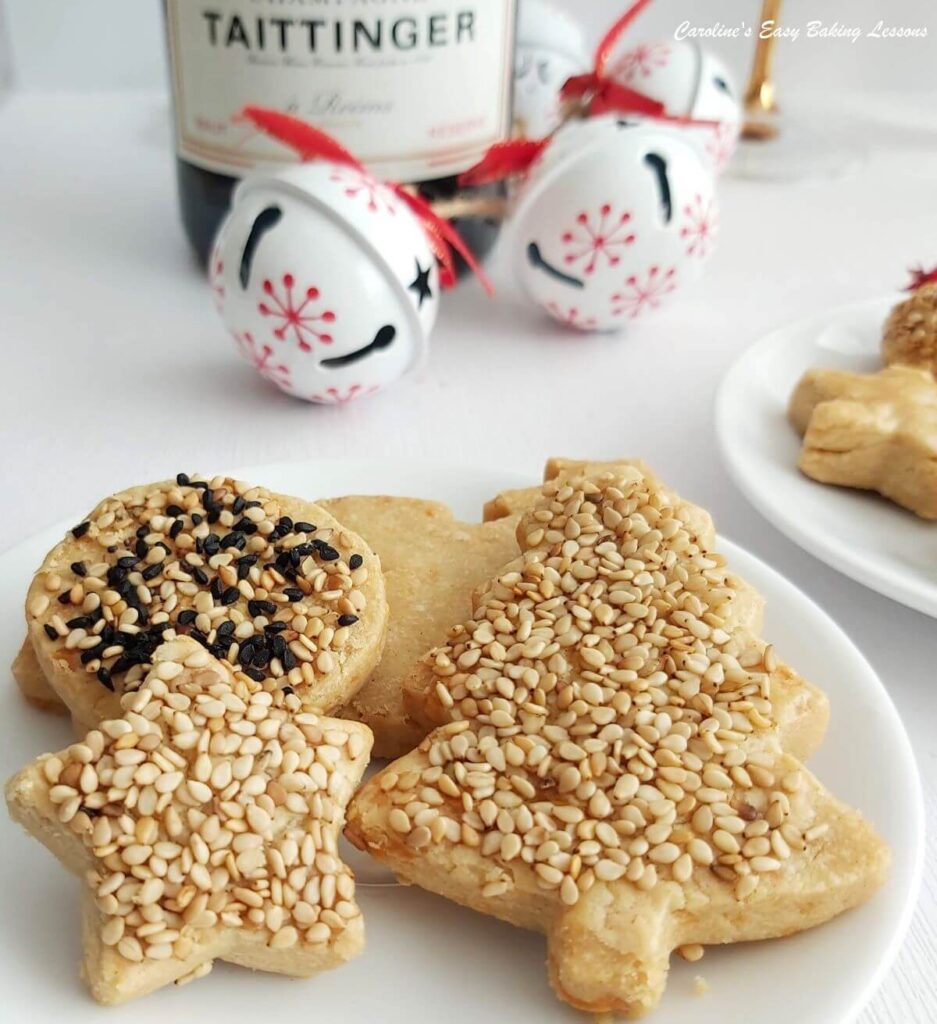 If making different sized savoury cookies, be sure to keep similar sized ones on the same baking sheets/trays so that they cook at the same rate.
For more details & photos, please see top of post, before this Recipe Card.
Differences Between UK & US Baking Ingredients
If making different sized savoury cookies, be sure to keep similar sized ones on the same baking sheets/trays so that they cook at the same rate.
For more details & photos, please see top of post, before this Recipe Card.
Differences Between UK & US Baking Ingredients
 Note all measurements have been hand tested by myself during recipe development. You might find my table of conversions of common baking ingredients handy -
Conversion Of UK & US Common Baking Ingredients
More Halloween, Autumn & Fall Recipes
Note all measurements have been hand tested by myself during recipe development. You might find my table of conversions of common baking ingredients handy -
Conversion Of UK & US Common Baking Ingredients
More Halloween, Autumn & Fall Recipes
Makes at least 4 dozen depending on size & shape of cutter used.
My larger bat cookie cutter was - 11cm x 5cm (4⅓ ” x 2″) at it widest length and width.
Cheese version of savoury biscuits/cookies
If making different sized savoury cookies, be sure to keep similar sized ones on the same baking sheets/trays so that they cook at the same rate.
For more details & photos, please see top of post, before this Recipe Card.
Differences Between UK & US Baking Ingredients
Note all measurements have been hand tested by myself during recipe development. You might find my table of conversions of common baking ingredients handy -
Conversion Of UK & US Common Baking Ingredients
More Halloween, Autumn & Fall Recipes