Pink Royal Icing Christmas Trees

Pink Royal icing Christmas tree toppers to decorate your Christmas cake this year. Something a little different, easy to make & edible too!
Equipment
- Scales or measuring cups
- Baking/parchment paper
- Hand Mixer or Stand Mixer
- Mixing bowl (with lid would be great)
- Measuring Spoon (or small jug)
- Wooden Cocktail stick
- Cling Film (Plastic Wrap)
- Palette Knife (off-set) (Butter knife or piping bag & nozzle)
- Small Fine Sieve (or fine tea strainer, optional - for icing)
Ingredients
For The Tree/Cone Shape:
- 130 grams Marzipan (4½ oz, approximate, other alternatives*)
For The Pink Icing:
- 66 grams Royal Icing powder* (2⅓ oz, ½ cup - other alternatives in notes)
- 12 ml Water (2½ tsp, ½ fl oz, approximate)
- Red or Pink Food Colouring (Sugarflair Christmas Red paste recommended*)
For The Decoration (optional):
- 1 tbsp Icing Sugar (Powdered Sugar)
- Stars sprinkles etc.
Instructions
Prepare The Cone Bases:
- Knead the marzipan (almond paste) or fondant, into a ball shape, then a sausage shape, to the height you want your tree to be.
- Hold vertically, allowing one end to touch the worktop/counter & rotate right & left to flatten this end.
- Roll the opposite end between your fingertips & thin to a pointed top. Place on a small square of baking/parchment paper & repeat, making more trees of varying heights.
- Leave all the marzipan cones shapes for at least 30 minutes before coating. (**Can be left 1 or 2 days, just don't put in the fridge).
- Alternatively, use polystyrene cones, or even foil moulded into a cone shape & covered with cling film/plastic wrap.
Prepare The Royal Icing:
- Prepare the Royal Icing now or ahead of time. For Royal Icing powder that only requires water, very gradually add the water & whisk for 4 minutes until soft peaks are formed and the mixture is glossy. To make your own Royal icing from icing/powdered sugar, see Global Bakes' Royal icing Video.
- As soon as prepared, cover the surface in cling film/plastic wrap, then either with a lid or plate on top or a 2nd layer of cling film/plastic wrap as it can dry out and go hard very quickly.
- You can use the icing to cover your cake, or colour it pink now, by gradually adding a very small amount of red or pink food colouring, till you achieve the desired colour & shade. Sugarflair Christmas Red colouring paste, is recommended, in a very small amount).
Ice The Bases:
- Use a palette knife, butter knife or piping bag to cover the cone shape, by starting at the bottom & spreading the icing on, in an upward motion to the top of the 'tree'. Use the paper to slowly rotate the cone around, & apply the icing till fully covered.
- Leave the sugar trees like this, or use the palette knife to dab against the wet icing, pulling back swiftly, to make little peaks to represent 'branches' of your trees. (See video or step-by-step instruction photos before this Recipe card.) Repeat randomly around the tree till happy with the design.
- Do the same for the rest of the trees & leave to set & harden at room temperature. (No need to cover). Sprinkles or a star can also be added before the trees are allowed to set.
Finishing Touches & Assembly:
- When ready to add your trees to the cake, gently remove the square of paper from the bottom of the tree. Dust the tops of the trees with sieved icing/powdered sugar before or after adding to the cake, to represent snow. Alternatively, brush or spray on some lustre dust.
Storing & After Care:
- The Royal icing trees will be good left on the cake, uncovered & at room temperature. For hygiene or transporting purposes, you can loosely cover but don't store in the fridge or in an air-tight container.
- The trees can be eaten or saved as keepsakes, in a cardboard box or display box, for months if not years. Just keep away from direct sunlight as it can fade the colouring.
Video
Notes
The Base - cone base made using marzipan (almond paste - mine was well out of date so ideal to use up ). Other options - fondant icing, polystyrene cones or even foil, moulded to shape & covered in cling film/plastic wrap.
Royal Icing - you can use a box of Royal icing powder, ready-made Royal icing or make your own use icing/powdered sugar. (Link in instructions).
Homemade Royal Icing - make 1/2 cup (66g), with 1/2c (66g) Icing/Powder sugar, 2.5 tsp (12ml) water & 1 tsp meringue powder.
Food Colouring - colour the trees any colour or shade you like. I recommend Sugarflair colouring paste over a liquid or gel. I used Christmas Red colour. For these 2d Piped Royal icing trees below, I used Sugarflair's Holly Green paste. (Go to Quicker Christmas Fruit Cake recipe).
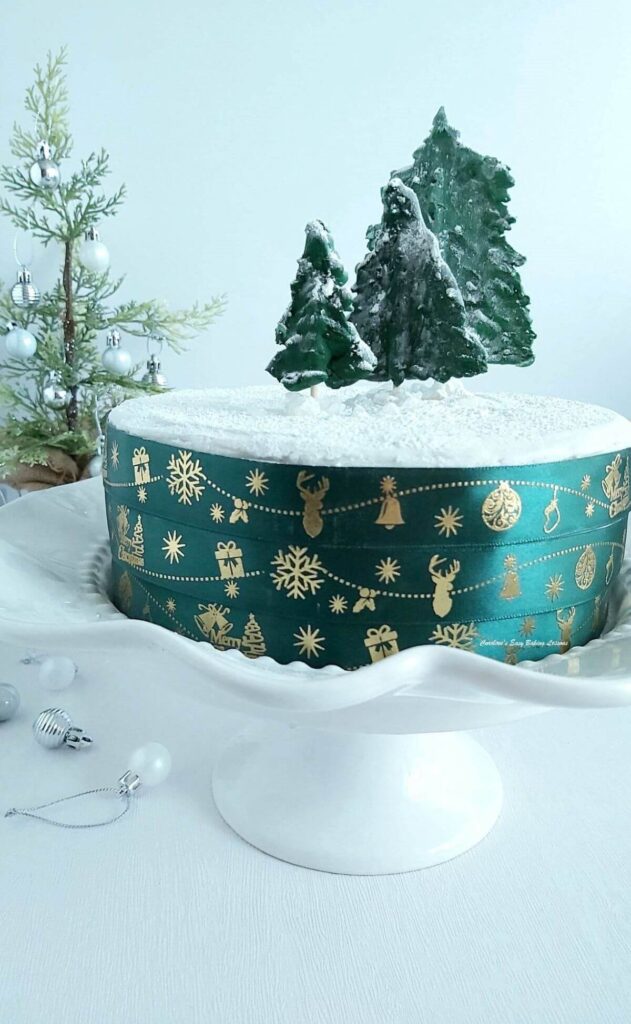 Recipe Yield - makes enough for 6 trees: 2 sets of 3 with 2 small, 2 medium and 2 large. Small, when iced, were about 2.5-3.5cm (1-1.3") at the base & 4cm (1.5") high. Medium 3.75cm (1.5") base & 5cm (2") high. Large 3.75cm (1.5") base & up to 7cm (2.75") high. Recipe can be reduced or increased, but always recommend making plenty of spares.
Icing A Cake & Making Trees - 500g (17.5 oz, 1lb) box of Silver Spoon Royal icing Powder is enough for up to 2 layers on a deep 6" (15.25cm) round cake, plus up to 12 trees of varying heights.
Make Ahead - make same day as using on your cake or make ahead, even up to months before. Can also be preserved for keepsakes.
Ideas For Using The Trees - Christmas cake decoration, cupcake toppers, in a gingerbread house/scene, Christmas activity or Christmas crafting party.
Recipe Yield - makes enough for 6 trees: 2 sets of 3 with 2 small, 2 medium and 2 large. Small, when iced, were about 2.5-3.5cm (1-1.3") at the base & 4cm (1.5") high. Medium 3.75cm (1.5") base & 5cm (2") high. Large 3.75cm (1.5") base & up to 7cm (2.75") high. Recipe can be reduced or increased, but always recommend making plenty of spares.
Icing A Cake & Making Trees - 500g (17.5 oz, 1lb) box of Silver Spoon Royal icing Powder is enough for up to 2 layers on a deep 6" (15.25cm) round cake, plus up to 12 trees of varying heights.
Make Ahead - make same day as using on your cake or make ahead, even up to months before. Can also be preserved for keepsakes.
Ideas For Using The Trees - Christmas cake decoration, cupcake toppers, in a gingerbread house/scene, Christmas activity or Christmas crafting party.