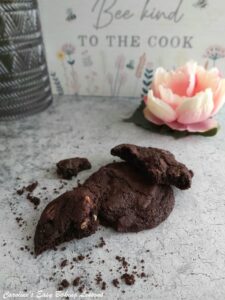
Easy Chocolate Cookies

Soft & chunky, or thin & crispy - you decide. Super simple recipe, even beginners can make them. Add anything you like & even decorate for an season or theme.
Equipment
- Scales or measuring cups
- Measuring Spoons
- Stand or hand-held mixer (or by hand with a mixing bowl)
- Other mixing bowl for dry ingredients
- Baking sheets/trays x 2 or 3
- Baking paper/parchment
- Cooling rack
- Timer or Phone Timer
- Sprinkles of choice (optional)
- Glaze for adding sprinkles (60g/½ cup/2 oz Icing/Powdered Sugar for about 8 cookies, double if decorating 16 or times 3 if you want to decorate all 24)
Ingredients
- 170 grams Butter, unsalted, softened & cubed. (¾ cup, 6 oz)
- 200 grams Light Brown Sugar (1 packed cup, 7 oz)
- 50 grams Granulated Sugar (¼ cup, 1¾ oz)
- 2 Eggs, medium to large (US large to XLarge)
- ½ tsp Vanilla Extract (Click blue link for how to make home-made Vanilla)
- 200 grams Plain Flour (1 ⅔ cups, 7 oz All Purpose Flour)
- 1 tsp Bicarbonate Of Soda (Baking Soda)
- 2 tsp Cornflour (Corn Starch)
- 60 grams Cocoa Powder (½ cup, 2 oz)
- 130 grams Chocolate Chips, Espresso Chocolate Chips, Nuts, M&Ms etc. (Use any you like or combination of, to total 4½ oz. )
Instructions
Prepare The Cookies Dough
- Begin by cubing your butter & letting it soften & come to room temperature. Cubing roughly to about 1cm (less than ½”) cubes as a smaller surface area will soften faster. See Photo 1. If you forget to take the butter out to soften, here’s a hack I reviewed to soften butter in about 10 minutes.

- Once softened enough (see my video of how to check if the butter is soft enough), combine the butter & sugars in a large bowl and mix briefly by hand just to let the butter take on the sugars. Then on low speed (or by hand) mix for about 30 seconds, before increasing the speed to medium & beat until lighter and spreadable (approx. 2- 3 minutes depending on the power of your hand/stand-mixer.) See video.

- Add in the eggs and mix just until incorporated, followed by the Vanilla Extract (Click to learn how to make your own Home Made Vanilla Extract). See Photo 2 above.
- In a separate bowl, add the flour, salt, Bicarbonate Of Soda (Baking Soda) & cocoa powder & mix together to combine. With the mixer on low, slowly sprinkle in the dry ingredients until it forms a relatively thick, stiff dough. (You can use a splash guard or tea-towel on top if needed). Note it will be quite a thick stiff dough, so you can even use your hands or a spatula once nearly all coming together. Be sure to scrape the sides of the bowl and check there is not flour at the bottom of the bowl. See Photo 3 below.

- Finally fold in the chocolate chips and/or nuts that you have chosen. You can divide the cookie dough in half and do 2 different kinds. I did one half with milk/semi-sweet chocolate chips (60g/2 oz), and the other half with chopped pecans (40g/1½ oz) and Nestle Espresso Chocolate Chips (40g/1½ oz). See Photo 4 below.

- Line the baking sheets/trays with baking/parchment paper. If it's a tray with no lips, I hold the paper in place with some baking spray. I have learned the hard way, that without it, the paper & dough or baked cookies can fall off and we don't want that!
- Using a tbsp and small spoon, scoop out cookie dough and place on the prepared baking tray/sheet. I used a tbsp and a small spoon to release onto the paper. You could also use a small scoop. I did about a rounded tbsp worth and got 25 cookies from the batch. Remember to leave plenty space in-between to allow the cookies to spread. (at least 1½" /4cm). See Photo 5 below.

- Once you have filled your first baking tray/sheet, turn the oven on to heat up: 180°c/160°c Fan Oven/350°f/Gas Mark 4. Place the first tray in the fridge, & then carry on scooping more cookies and placing in the fridge while the oven heats.


Bake The Cookies
- Once the oven is ready, bake the first and second tray of cookies you prepared, for about 10 - 12 minutes. Bake until the cookies look let at the edges but still soft in the centre. You won't be able to move them yet. See Photo 6.

- Place on top of a cooling rack for 2 minutes, and place the next tray of cookies waiting to be baked, into the oven.
- After 2 minutes, remove the cookies, paper and all, and allow to cool down on the cooling rack alone. As soon as cooled down, place in a cake tin for them to keep soft. Food bags or plastic tubs, can make cookies hard.
- If wanting to decorate, you can do so same day or day after, just make sure to store correctly.


Decorate The Cookies
- Just make up the glaze by adding water to sieved icing/powdered sugar, very gradually in small drops till smooth and thick but pourable consistency. Place in a piping bag (or small food bag if only using a little amount - snip a tiny hole at the end or add a very small tipped piping nozzle before adding the glaze).
- Have your chosen sprinkles ready and use place the cookies you want to decorate, onto some of the already used baking/parchment paper from baking the cookies.
- Twist the piping bag or and hold above the cookie (at least 2"/5cm) and let a fine drizzle of glaze land on the cookie as you move across, letting it make lines on the cookies. I added about 3 or 4 diagonal lines to the top left corner of the cookies.

- Only pipe one at a time and immediately add your sprinkles on adding the glaze. if the cookies are flat enough, you can turn over and dip in the sprinkles. If using nuts and the cookies are more chunky, you need to either sprinkle by hand or pour on top of where the glaze lines are. I tend to add more than I think I need to get a good coverage. Then lift the cookie onto it's sides, tapping it on the table for the excess to fall off. Then just place on some more paper and let set. Repeat with the rest, glazing and decorating one at a time. See Photo 8 above.
- Another idea is to add small candies, or mini chocolate eggs immediately after baking. I added some small ones that were in a sprinkle set. When the cookies are still soft, you can add some to the top. These tend to be candies that you are unable to add to the batter as they would melt on baking. See Photo 9.


Storage
- Once set, store in a cake tin, with paper in-between the layers and they will last past 3 days. Would be perfect for ice-cream sandwich cookies, if you bake for 2 more minutes.


Video
Notes
Add any chocolate chips or nuts you like. Just add up to the weight in the ingredients list. Listed in grams and ounces as cup measurements depend on which you choose and what size they are, if chopped etc.
 Try making your own Home Made Vanilla Extract). It is so good and works out less expensive in the long run.
Decorate some, none or all of the cookies. It's up to you. I have listed the amounts glaze needed for 8, 16 and 24 cookies.
Try making your own Home Made Vanilla Extract). It is so good and works out less expensive in the long run.
Decorate some, none or all of the cookies. It's up to you. I have listed the amounts glaze needed for 8, 16 and 24 cookies.
 Use for any time of the year as a quick sweet fix, or add seasonal sprinkles for a touch of colour and texture.
Refer to video for more information.
Go to Valentine's Day Recipes
Go to Christmas Recipes
More Cookie & Biscuits
Use for any time of the year as a quick sweet fix, or add seasonal sprinkles for a touch of colour and texture.
Refer to video for more information.
Go to Valentine's Day Recipes
Go to Christmas Recipes
More Cookie & Biscuits
Try making your own Home Made Vanilla Extract). It is so good and works out less expensive in the long run.
Decorate some, none or all of the cookies. It's up to you. I have listed the amounts glaze needed for 8, 16 and 24 cookies.
Use for any time of the year as a quick sweet fix, or add seasonal sprinkles for a touch of colour and texture.
Refer to video for more information.
Go to Valentine's Day Recipes
Go to Christmas Recipes
More Cookie & Biscuits