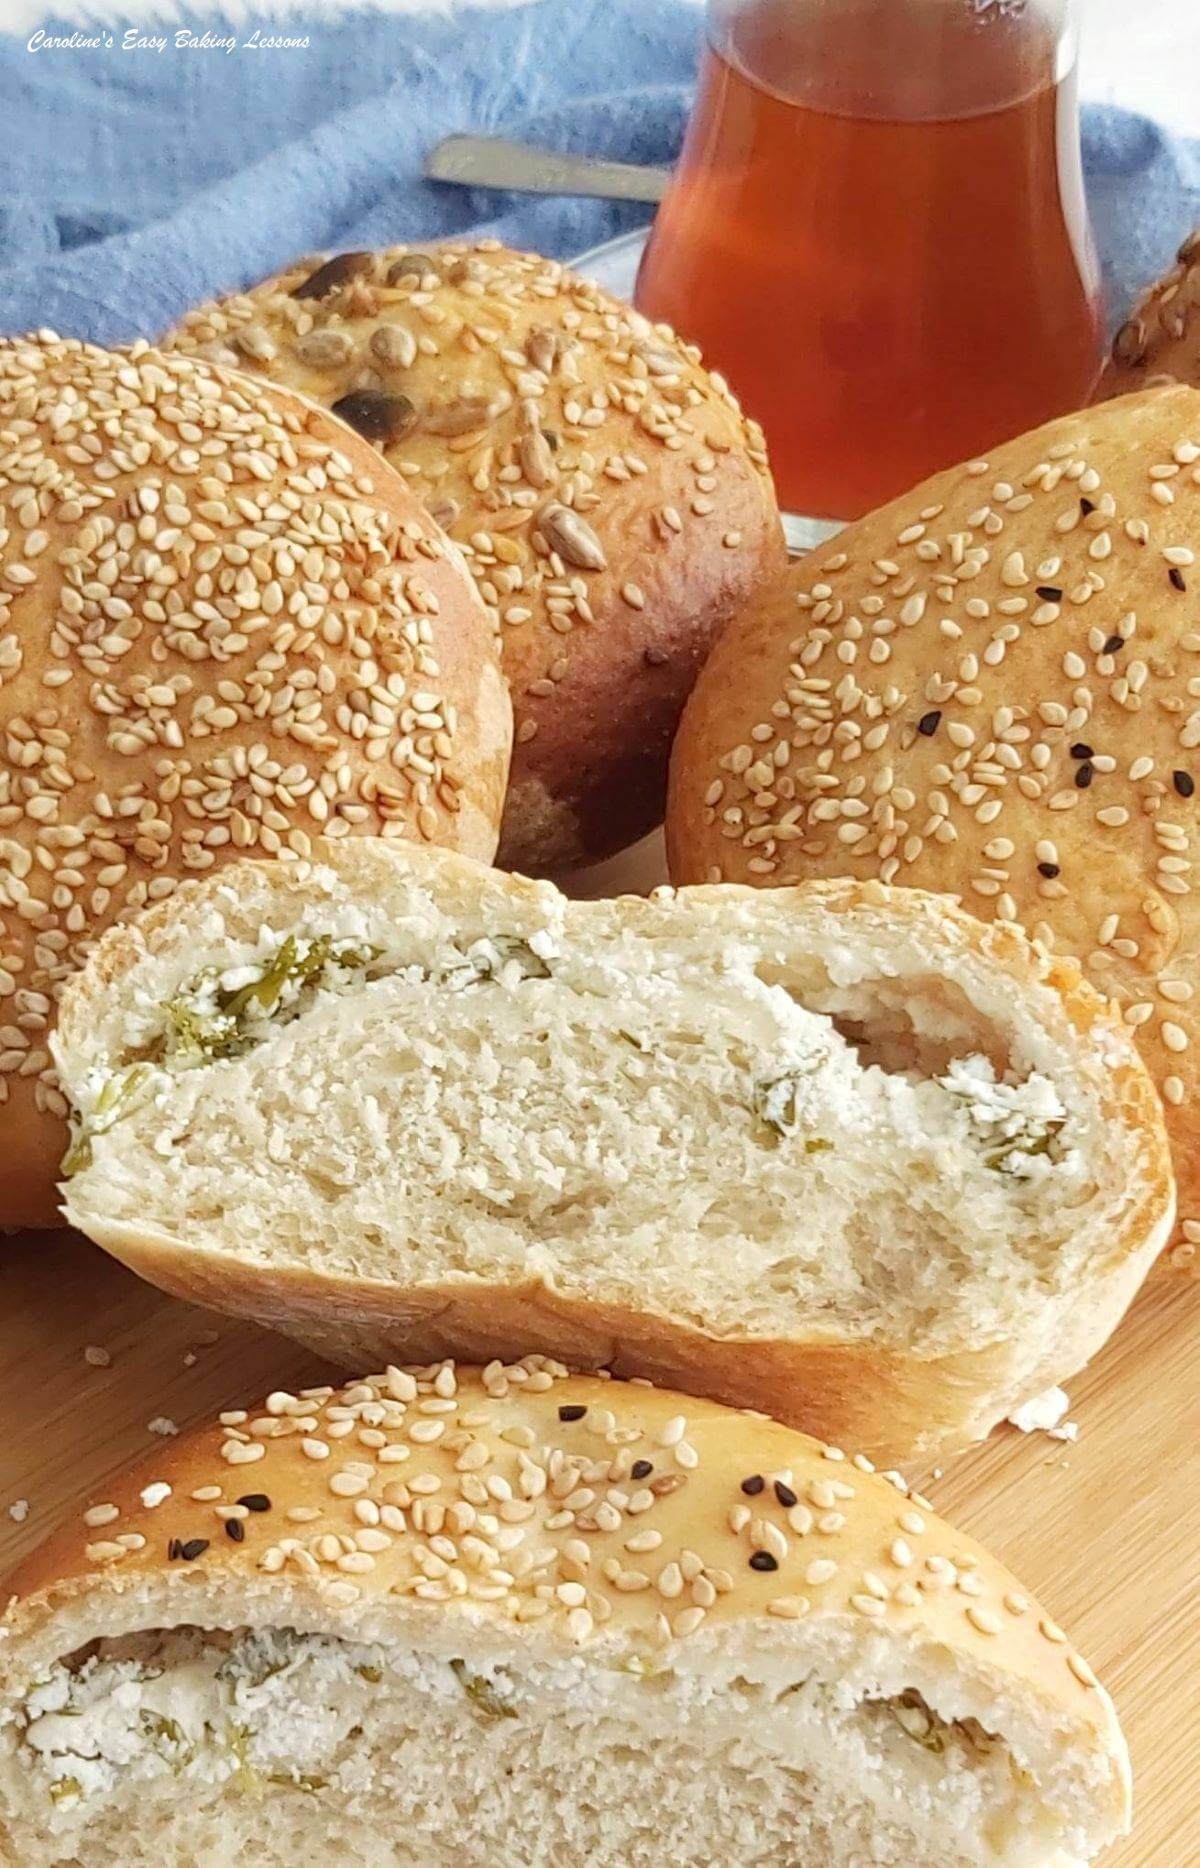
Quicker Turkish Cheese Filled Rolls (Poğaça)

Poğaça are Turkish cheese filled rolls. This is my English version of this popular bake, still yeast-based, but using a slightly different technique to speed up the process & be ready in 2 hours. Classically filled with Turkish white cheese (peynir - similar to feta) and flat leaf parsley (maydanoz), I also make my Scottish version, filled with Scottish extra mature cheddar cheese and onion.
Equipment
- Stand Mixer with dough hook (optional)
- Scales of measuring cups
- Small measuring jug
- Pastry Brush (or unused small artist/paint brush)
- Small bowl for egg wash
- 2 Baking trays/sheets
- Baking/parchment paper
- Tea-Towel
- Timer or Phone Timer
- Cooling rack
Ingredients
For The Dough
- 283 grams Plain or Strong Bread Flour – [F1] (10 oz, 2¼ cups All Purpose or Bread Flour - see notes on [F1]*
- 16 grams Dried Yeast - Instant/Active etc. (½ oz, 5 ⅛ tsp Instant/Fast Acting/Rapid or 5¾ tsp Active Dry Yeast, see notes)
- 2½ tsps Salt
- 2 tbsp Sugar
- 2 tsp Garlic or onion powder or granules (optional)
- 415 ml Tepid Water (14 fl oz, 1¾ cups, see recipe instructions on temperature*)
- 2 Egg White, medium - Large (Large - XLarge US eggs)
- 4 tsp Olive Oil or E.V.O. Oil
- 142 grams Plain or Strong bread Flour– [F2] (5 oz, 1 cup + 2 tbsp All Purpose or Bread Flour - see notes on [F2])*
- 215-283 grams Plain or Strong bread Flour – [F3] (7½ oz, 1¾ cup up to 10 oz, 2¼ cups All Purpose or Bread Flour) - see notes on [F3])*
For The Filling
- 246 grams Turkish Peynir (Çökelek Peynir, Lor Peyniri, ‘Böreklik’ or ‘Kahvaltilik’ etc or Feta cheese) (8½ oz,1⅔ cup for a batch of 12, for less see notes)
- 18 grams Flat Leaf Parsley (⅔ oz for a batch of 12, for less see notes)
- OR Spinach (54g, 2 oz for a batch of 12, for less see notes)
- OR Extra/Mature Cheddar Cheese, grated (360g/12⅔ oz/3 cups shredded for a batch of 12, for less see notes. Add chopped onion to taste if you like)
For The Topping
- 1 Egg yolk & splash of milk for egg wash (save other egg yolk for something else, or freeze for another time)
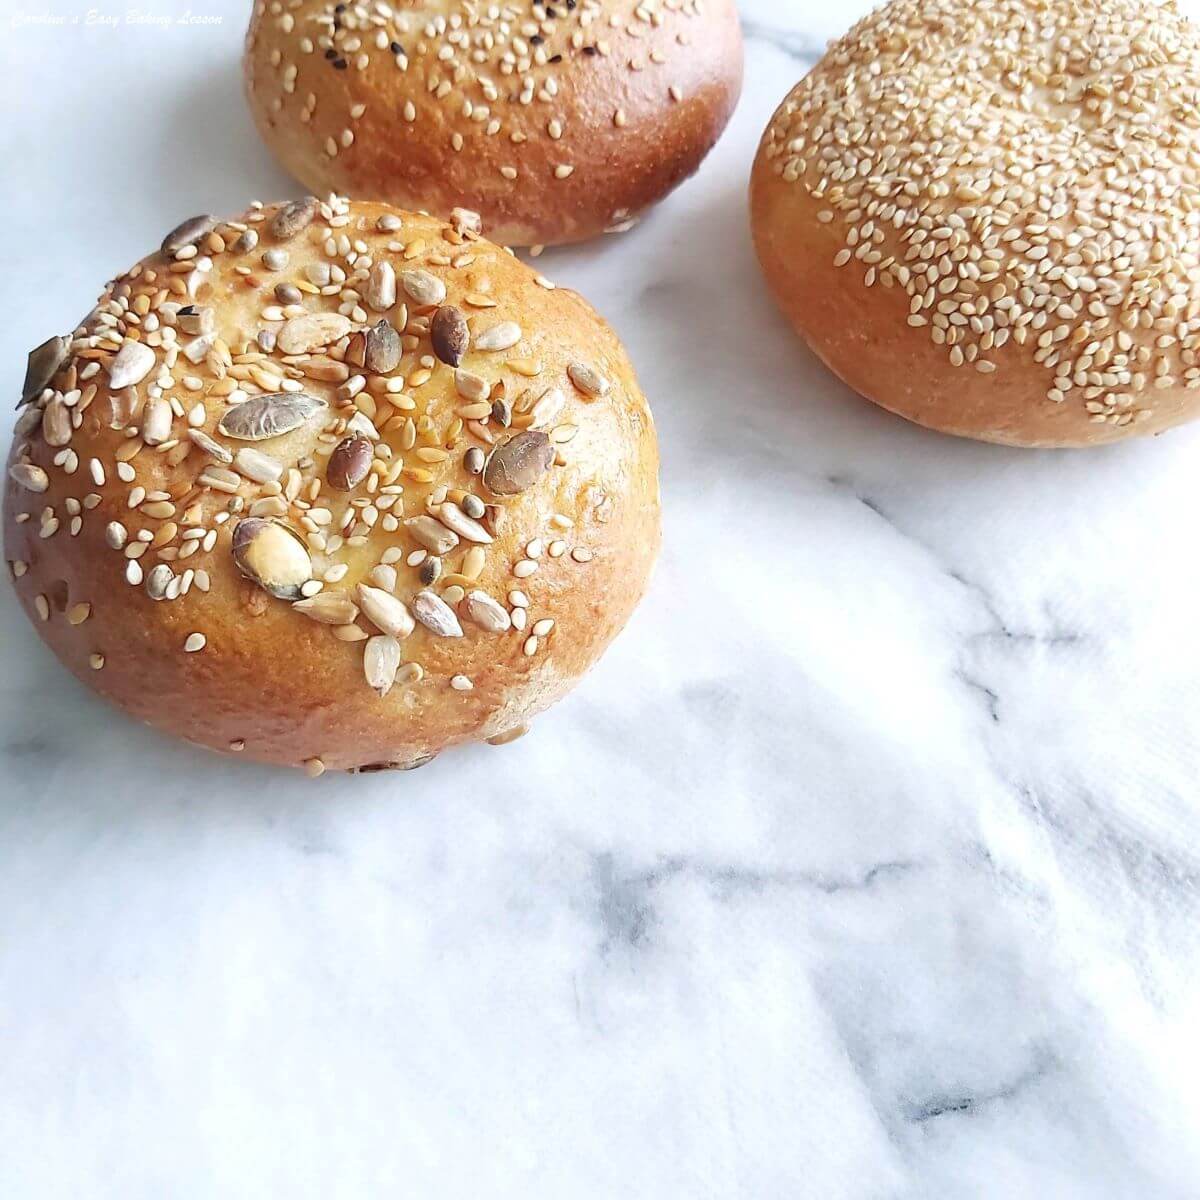
- Sesame seeds &/or Nigella Seeds - çörek otu (optional) - or any seeds you like.
Instructions
Prepare The Dough
- Start by measuring/weighing all the ingredients. Very important to have the 3 flour amounts in separate bowls. (Referred to in the recipe as F1, F2 & F3). You can have [F1] flour in your stand mixer bowl.
- Microwave the water in a microwave-safe jug for about 30-45 seconds, until only slightly warm, and tepid. If you want to measure first time with a thermometer, you are looking for a range between 120-130°f or 49-54°c. Alternatively (and even in subsequent recipes), test with a clean finger for slightly above tepid. You could also use some boiled water in your jug, and top off with cold water to the right amount and then test with your finger or thermometer. Once at the right temperature, add the egg white & oil & mix together.
- Add the yeast to the [F1] flour in the main mixing bowl, & mix, before adding in the salt. Mix again, add the sugar and garlic or onion powder/granules if using and mix together. (See Photo 1 collage below).
- Add the tepid liquid mixture to the dry ingredients in your mixing bowl, and briefly mix by hand before using the 'k' paddle/mixer paddle attachment on your stand-mixer (not the kneading hook yet). On low to medium speed, mix for exactly 2 minutes (be sure to time this).

- Now add your smaller bowl of flour [F2], and mix again for exactly 2 minutes. Then add half of your last flour [F3], and let the mixer work the flour in for a few seconds, before gradually adding in more flour, a little at a time. Be sure to scrape down any flour that may be sticking to the sides of the bowl. You want the dough to start to come together in a rough 'ball', and be slightly sticky to touch. You might not need all the flour, or need a bit more. (See Photo 1 collage above).
- Next put the dough hook on the stand mixer & use a scraper to get the dough off the paddle. Knead on medium speed for exactly 4 minutes. Then scrape the dough off the hook, and use the scraper and tilting the bowl, to help you turn the dough over. This ensures the dough gets an even knead, as dough does tend to like to stick to the bottom when kneading. Knead again for another 4 minutes. Alternatively, you can knead by hand on a lightly floured surface for about 10 minutes till smoother & less sticky. (You can see the quicker dough technique in the video below of Turkish Pide).

1st Prove
- Feel the dough to know how well-kneaded dough feels like in case you have to do by hand another time. You will also see how stretchy it is, when you lift the dough hook up. (See Photo 1 above). Now place a clean tea-towel on top of the mixing bowl & leave somewhere warm & draft free for 15 minutes. See Photo 2 below.


Prepare Baking Trays/sheets
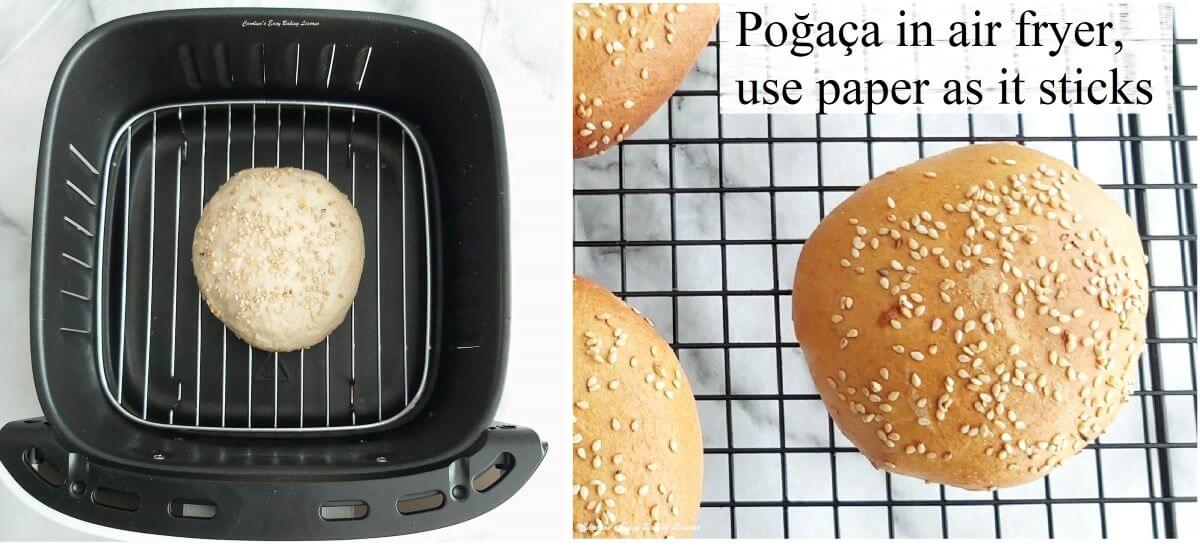
- Take this time to prepare baking trays with baking/parchment paper. Do not bake these without paper as they will stick. I have tested in air fryer, and you need to place on a little paper there too. Just have higher up, so that the paper is not on the base of the air fryer, allowing air/heat to get to the bottom of the bake.
Preparing The Filling(s)
- While the dough is proving, have your filling(s) ready to go. Be sure to have washed, pat dried and lightly chopped the flat leaf parsley, or spinach if using. I often use scissors for this as it is quicker and remove any long hard stems. Make sure your Turkish cheese or Feta is well drained as any excess moisture and the rolls will leak out the filling more. Use a fork to mash/break up the cheese, & then add the parsley or spinach and mix together. How much you use is up to you. Turkish recipes will generally use a high proportion of parsley to cheese. You can also add some onion to your mature cheddar cheese if you like. (See Photo 3 below). Have your egg whites, a brush and any seeds you want to use, ready too.


Shaping The Poğaça Rolls
- Prepare an area to work on. I use paper to turn the dough out onto, and to divide the dough up. A second piece of paper I dust with flour and use to place the divided dough while I work on one at a time. Even in a short time, the dough will have increased in size - see comparison Photo 4 below.

- Your next step is to 'knock the dough back'. See Photo 5 below, where I have used my knuckles to punch the dough, all over the surface, making it deflate. This helps the yeast to activate again on the second prove and on baking. Not doing this, can be a possible reason for rolls/breads that don't rise enough once baked.

- Release the dough onto the floured paper, using your hands or a scraper to help you. Sprinkle some flour on top of the dough and on your hands, before forming into a ball or rectangular shape, so you can cut in half as evenly as possible. Place one half of the dough back in the bowl, and form the second half of dough into a ball then flatten by hand into a circle. Use a floured knife and divide the dough into 6 pieces like a pizza. (See Photo 6 below). Place these on the second piece of floured paper, and repeat with the rest of the dough till you have 12 pieces. If you want to weigh 12 pieces of dough instead, you are looking for a weight of about 102g/3½ oz each).

- Take one ball of dough and place on the floured paper, and open out the dough simply by patting it flat with your hand, until about hand width (in my case about 5”/13cm- see Photo 7 below). Then, thin the edges of the dough with your fingertip. (We will join these edges so want thinner than the dough in the centre. See Photo 7).

- Add a heaped tbsp worth of white cheese mixture to the centre of the dough. For cheddar cheese I found squeezing the grated/shredded cheese & onion together by hand, and forming into an oval shape keeps it in the centre better (photo in the notes section). Next take 2 opposite ends of the dough and fold together, pinching them closed. Repeat until all 'ends' have been pulled and closed together. (See Photos 8 & 9 below). The dough will be soft making squeezing/pinching it together easier.

- Next, turn the roll over, place on one palm and use the opposite hand to 'cup' the ball of dough. Then move this cupped hand in circular motions, rolling the ball of dough. This will help flatten the bottom together a bit more, as well as rounding the roll, making it less flat looking. You can also try doing this on a very lightly floured surface. See Photo 9 below.

- Place the rolled pogaca on the prepared baking pan/tray before brushing with the egg-wash (the left-over egg yolks and milk). Be sure to brush all the way down the sides of the roll, before adding any seeds on top. Repeat with the rest of your 11 balls of dough, placing on the prepared baking sheets/trays, leaving at least 1"/2.5cm gap in-between each roll. See Photo 10 with different ways to top.


Second Prove
- Leave the prepared rolls in the same warm, draught-free place, for 30- 45 minutes, to prove for a second time, and puff up & expand a little. See Photo 11 below.
- Heat up the oven to – 220°c/200°c Fan Oven/425°f/Gas Mark 7, to coincide with when the proving time is up. If doing a smaller batch and using the air fryer, I set to 200°c/400°f for most of the bake.


Bake The Poğaça Rolls
- Pop in the oven to bake, no more than 2 baking trays/sheets at a time, for about 14 - 16 minutes, until well rise and a deep golden colour. I like to check, rotate and swap the 2 baking trays/sheets about 2 or 3 times during baking, (with 2 trays, after 6 minutes. This will ensure an even bake. Continue baking until fully cooked on top, and then turn the rolls over and let the bottom bake for 2 or 3 minutes to get some colour. For the air fryer, I baked at 200°c/400°f for 14 minutes, and then turned over to finish baking the underside for 2 more minutes, @180°c/350°f.

- Leave to cool on the trays on top of a cooling rack for 5 minutes, before transferring just the rolls and paper onto the cooling rack. You can place more unbaked rolls into the oven at this point too. Leave the rolls to cool enough to be able to handle.


Serving & Storage
- Eat warm or at room temperature. Store any leftovers in sealed food bags, or even brown paper bags. I prefer not to store homemade bread in the fridge, as it can make it go off quicker. You can reheat just a little in an oven or air fryer @160°c/140°c Fan Oven/325°f/Gas Mark 3 for just a few minutes, but not too long to dry them out.


Video
Notes
FLOUR - [F1], [F2] & [F3] - Make sure you divide your flour into the 3 batches as per the ingredient list and add as directed. This will ensure a successful rise & quicker process time. You can watch an almost real-time video of the mixing process in my Quicker Dinner Rolls Video, or in my video for Pide - Turkish Pizza recipe.
Plain/A.P. flour or Strong/Bread flour can be used. I have also used 50% wholemeal/wheat flour with this quicker bread technique - see my Quicker Yeast Bread & Roll Recipes (including Pizza) Or check out my 90 Minute Bigger Burger Buns recipe. 2 hour Turkish Ramazan Pidesi (Ramadan Bread) photographed below. (You can see the quicker dough technique in the video of Turkish Pide). More Turkish recipes, like Lahmacun - Turkish Meat Flatbread (no-bake) can be found on the Turkish recipes page.
 INGREDIENT AMOUNTS FOR DIFFERENT FILLINGS
If you want to make a mixed batch of fillings, here are the amounts you would need for 4, 6, 8 or 12 rolls:
INGREDIENT AMOUNTS FOR DIFFERENT FILLINGS
If you want to make a mixed batch of fillings, here are the amounts you would need for 4, 6, 8 or 12 rolls:

 If you want to use fresh yeast, see my Yeast Conversion tables.
Air Fryer Poğaça
The Poğaça rolls should be baked on small pieces of baking/parchment paper or the rolls will get stuck on the rack. Allow the air to circulate properly for an even bake. Prove on the paper to avoid having to handle and deflating the roll.
If you want to use fresh yeast, see my Yeast Conversion tables.
Air Fryer Poğaça
The Poğaça rolls should be baked on small pieces of baking/parchment paper or the rolls will get stuck on the rack. Allow the air to circulate properly for an even bake. Prove on the paper to avoid having to handle and deflating the roll.
 Go to my Bread & Roll recipes
See my Quick Guide For Beginners Working With Yeast Dough article if new to using yeast.
Go to my Bread & Roll recipes
See my Quick Guide For Beginners Working With Yeast Dough article if new to using yeast.
Plain/A.P. flour or Strong/Bread flour can be used. I have also used 50% wholemeal/wheat flour with this quicker bread technique - see my Quicker Yeast Bread & Roll Recipes (including Pizza) Or check out my 90 Minute Bigger Burger Buns recipe. 2 hour Turkish Ramazan Pidesi (Ramadan Bread) photographed below. (You can see the quicker dough technique in the video of Turkish Pide). More Turkish recipes, like Lahmacun - Turkish Meat Flatbread (no-bake) can be found on the Turkish recipes page.
INGREDIENT AMOUNTS FOR DIFFERENT FILLINGS
If you want to make a mixed batch of fillings, here are the amounts you would need for 4, 6, 8 or 12 rolls:
INGREDIENT SUBSTITUTES
Turkish White Cheese (Peynir) can be substituted with Feta, or Feta-style cheese, or even Cheddar (Scottish extra mature cheddar being my favourite). Spinach can also be used instead of flat leaf parsley. See information before Recipe Card for more on types of Turkish cheese and where to buy.
TIPS
Rinse the soft white cheese and drain really well. Leave to drain further while preparing the dough. Excess moisture will cause the filling to seep out when baking. If using 50% wholemeal/wholewheat flour, I recommend you increase the liquid content by about 11%. See information before the Recipe Card, for how to pronounce these Turkish names/words, where to buy ingredients and more.
If you want to use fresh yeast, see my Yeast Conversion tables.
Air Fryer Poğaça
The Poğaça rolls should be baked on small pieces of baking/parchment paper or the rolls will get stuck on the rack. Allow the air to circulate properly for an even bake. Prove on the paper to avoid having to handle and deflating the roll.
Go to my Bread & Roll recipes
See my Quick Guide For Beginners Working With Yeast Dough article if new to using yeast.
**Original recipe published 28/10/2019, new structure & photos April 2023.
***I am not a qualified nutritionist, and all nutritional values are based on 1 roll, from a 12 batch above, with Feta or Feta-style cheese. Values from Whisk.com and Aldi's Greek Feta & Feta Salad nutritional information.
https://easyonlinebakinglessons.comNutrition Facts
Quicker Turkish Cheese Filled Rolls (Poğaça)
Serving Size
1 Roll
Amount per Serving
Calories
328
% Daily Value*
Fat
7.68
g
12
%
Sodium
990
mg
43
%
Carbohydrates
42.8
g
14
%
Sugar
2.53
g
3
%
Protein
10.6
g
21
%
* Percent Daily Values are based on a 2000 calorie diet.