Turkish Ramadan Bread – Ramazan Pidesi In 2 hours

Turkish Ramadan Bread, or Ramazan Pidesi is a special bread from Turkey, pronounced 'Ra-ma-zan Pee-de-see' & is often made during Ramadan, the Muslim holy month of fasting from dawn till dusk. Use my quicker method to have the bread ready in 2 hours.
Turkish Ramadan Bread – Ramazan Pidesi
Special Ramadan Bread In 2 Hours
*Original recipe posted 23/04/19, updated photos & sturcture 11/3/24


**Select to jump to section
All About Ramazan Pidesi

What Is Ramazan Pidesi?
Ramazan Pidesi is a special bread from Turkey. But can be found in lots of other countries too, with slight variations.
How To Pronounce Ramazan Pidesi?
Pronounced ‘Ra-ma-zan Pee-de-see’, this special Turkish bread (Pide), is often made during Ramadan.


When Is Ramazan Pidesi Made?
Turkish Ramadan bread is made during Ramadan. This is the time in Muslim culture, where fasting is carried out (no eating or drinking between sunrise and sundown) and lasts 30 days.
However, in Turkey, bread of some description is eaten with every meal. So there is no reason why you can’t have this bread, anytime of the year.


What Is Ramazan Pidesi Like?
Not quite a flatbread as such, this yeasted dough, still produces an airy texture. The only difference being, is that the dough is spread out quite wide, in a circle (about 25cm/10″ wide) and allowed to prove again.
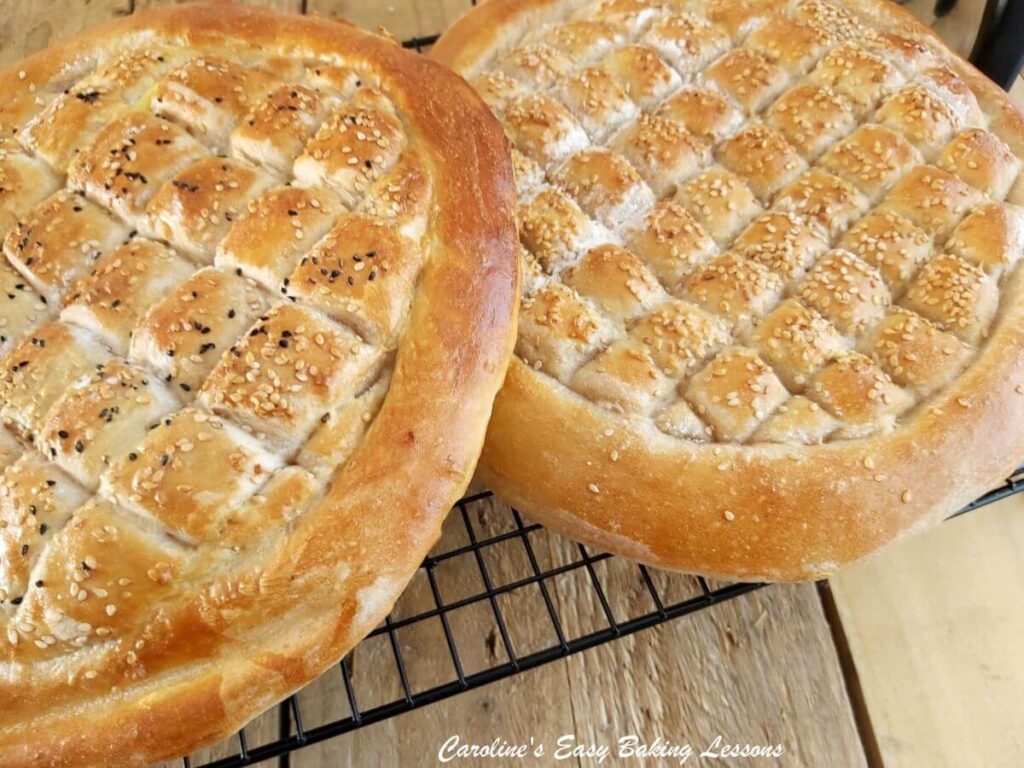
But this bread always, has a characteristic pattern to it. A rim to the edge of the bread, and a diamond pattern in the centre, made in a deep manner, that results in the bread having a ‘pillowy’ look to the surface. Crazy I know, but these visual cues, let your bellies have a glimpse of what’s to come :). So unlike most flatbreads, this produces a very open texture crumb. Soft and springy, is a good way to describe the texture, but with a little chew to the crust.


And the bread is simply finished off with sesame seeds and some çörek otu – this is simply Nigella Seeds. I am not a fan of them, so usually make one bread with just sesame, and the second with both seeds.
Just a note too, to mention to readers who don’t know, my husband is from Turkey & we have been married 25 years. When I started learning to bake, I also learned how to make Turkish recipes, to go with the Turkish meals I often make. I don’t have lots of recipes on this new site yet, but I did on the old platform. You would not believe how much time & effort goes into getting quality recipes online. You really need to be a ‘Jack Of All Trades’!
So with that said, rest assured that my recipes are all authentic to Turkey. So be careful of recipes by the big recipe sites, claiming to be traditional as they often are not. Rant over 🙂


Turkish Bakes
Check out my Turkish Savoury Biscuits (Tuzlu Kurabiye) recipe or 2 hour Bagels that you can make bigger & thinner to make Gevrek/Simit. Another popular Turkish bake is Poĝaça – cheese filled rolls. Or no-bake Lahmacun – Turkish Meat Flatbread (yeast-free). Lots more just waiting to come back online.
Please also be aware that no-knead recipes, are not as traditional in Turkish culture, as in other countries. As I mentioned above describing the texture of this special bread, while it is technically a flatbread, it does still require sufficient kneading and manipulation, to produce a very soft, pillowy textured bread.


You can see by my photos, the crumb texture is open, with some random larger air pockets. Not kneading (or manipulating the dough), will produce a more close texture. Whilst there is nothing wrong with that, it is not Ramazan Pidesi. See my photo below of the bread sliced horizontally, showing the texture at a different angle.
So be careful when searching the internet, for an authentic recipe. I have noticed that only a very few of the recipe sites are actually showing you the inside of the breads and their texture. Check out my new video too, where you can see me handling the bread, and tearing it apart.
Recommendations On Kneading
I know kneading can be hard – I can not knead for longer than a few minutes by hand. The majority of my recipes, I call for kneading for about 8 minutes, by machine, and so by hand, if done correctly, would take about 10 minutes.


So if you want to work with yeast often, I advise on purchasing a stand mixer that is powerful enough to knead well for you.
Don’t Use A Hand-mixer
Some hand-held machines have dough hooks, but the motor is usually not sufficient to knead long enough without ruining the machine. I recommend Kenwood (I have a Chef Pro Plus). My Kenwood is really heavy and a work horse. It has 3 times the motor power of the same priced KitchenAid that was available here in the UK at the time.


The Special Technique
Now you can of course make this bread using the traditional yeast dough making method. But since discovering a method, by Jessica Gavin (from her book – ‘Easy Culinary Science For Better Cooking’, 2018) to make Quicker Soft Italian Breadsticks, I have since converted a lot of my go-to yeast recipes to this quicker method. (Check out my Quicker Yeast recipes).
What Is The Quicker Method?
Whilst the quicker method takes a little longer to form the initial dough, proving times are significantly reduced, resulting in the overall start to finish time being shorter. Some recipes can be reduced by 1/3 to 1/2 that of conventional methods. And once you have used a few times, it’s really easy to remember too.


Why Does It Work?
The process basically gives optimal conditions for the yeast to thrive and get to work if you like. An analogy would be, create the best and most comfortable conditions/environment for your workers, and they will work harder and more efficiently (in theory). But don’t think that the reduced time impairs the bake in terms of taste, structure or appearance.
Produces Perfect Bakes
Some people say that quicker methods don’t allow flavour development, but the only way for true flavour development to occur, is by proving the dough overnight in the fridge. A slow, cold prove, allows this to happen more easily, as the process is slowed down.
Ingredients & Substitutions


What are the ingredients for Ramazan Pidesi? What do you need to make this bread? Just very basic ingredients.
- Flour (Plain, All Purpose or Bread Flour)
- Yeast
- Salt
- Sugar
- Garlic/Onion Powder/Granules
- Tepid Water
- Extra Virgin Olive Oil
- Eggs
- Sesame or Nigella Seeds (çörek otu – optional)
** Plese note, all equipment & ingredient amounts (grams, pounces & cups), are listed in the Recipe Card below).
Jump to Recipe

So no special ingredients are required for the dough, just the inclusion of egg whites. I made these breads with white Plain (All Purpose) flour, as there is no need to use Bread Flour (Strong Flour). If that’s the only flour you have, it’s fine to use this too.
Seeds Or No Seeds?
You can top the breads with sesame seeds &/or Nigella Seeds (çörek otu). Or no seeds at all.
Now note the flour is separated into 3 amounts, as they need added in a specific way, and are referred to as [F1], [F2] & [F3]. This method works really well, and once you have done a few times, you really don’t need to refer to the recipe. And it’s the same process for the making the dough, in all the Quicker Yeast recipes of mine. So stick with the recipe and you will achieve the same result.


How To Serve Ramazan Pidesi
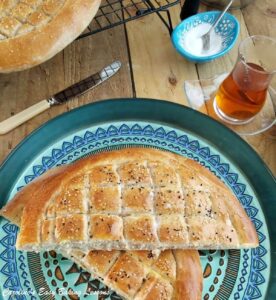
As mentioned, it is very rare for Turkish meals to be missing bread as an accompaniment. They love bread and have a great respect for it. This Ramazan Pidesi can be enjoyed like most bread, with cheese (in this case Turkish Peynir –pay-near, a soft white cheese similar to Feta). Olives and slices of fresh tomato or cucumber. See photo below of the bread sliced across and made into a sandwich.
Another popular way to serve bread in Turkey, is with meals such as Kuru Fasulye (coo-roo fa-sool-ye). This is essentially beans in a tomato based sauce (sometimes cooked with meat or left vegetarian). I make from cans/tins of beans (either haricot or cannellini – sometimes called Navy beans). In the photograph, is Haricot, which are what is used for tins of baked beans). You can also use dried beans, soaked overnight before cooking. I also like to make with Butterbeans, or Chick Peas, those are nice too and a great vegetarian meal. I will do a recipe on it soon, but basically it’s cooked in a tomato or pepper paste based sauce, and served with rice. Plenty of liquid to dip that bread in.


Recipe Yield
This recipe makes 2 breads, but in the photos, I actually made 4. However, in the new video, I am making 2 breads. (Each flatbread is about 25cm/10″ wide).
Almost Real-time Video (2020) Using Quicker Technique
I am not going to keep you much longer from the recipe, but just have a look at the video below, that was used for a Facebook group bake-along, where my 2 Hour Tear-and-share Dinner Rolls recipe was used, to introduce beginners to bread making. It’s an almost real-time tutorial just so you can see even better how this process works. Watch it one time, and then you will have the hang of it 🙂
New Process Video
New video on making the Ramazan Pidesi being made – after the Recipe Card. Or click below:
Jump to Video
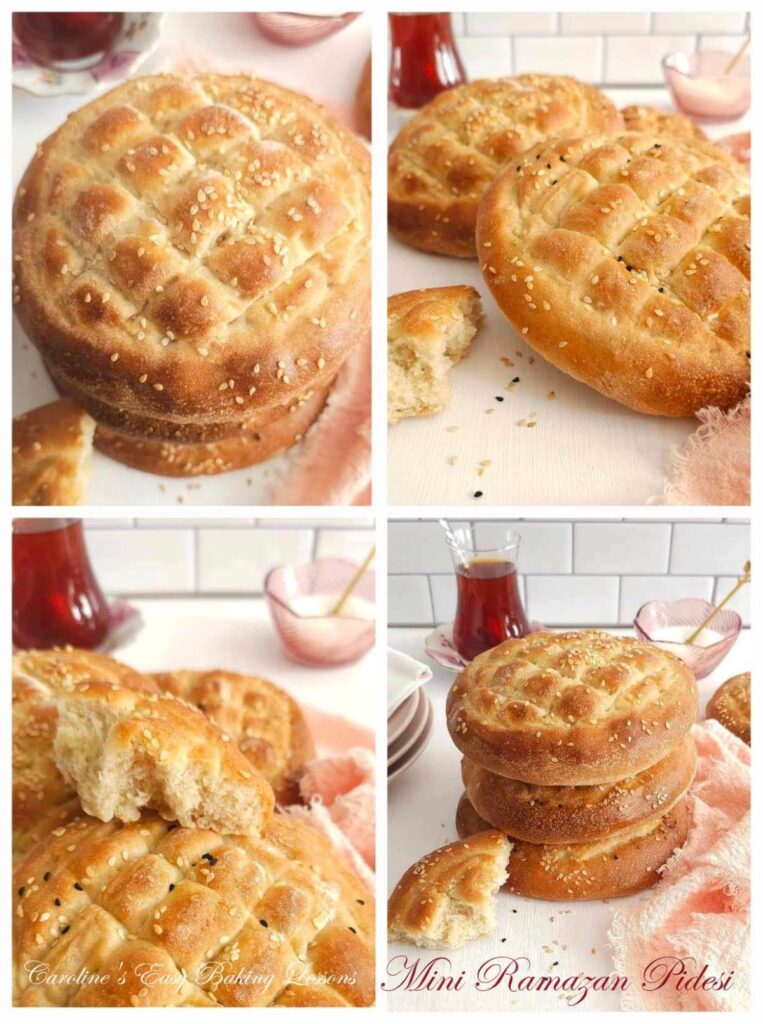
Mini Turkish Ramadan Breads
Why not try the recipe for 6 individual Ramazan Pidesi? Have your own Turkish bread, but still a fair size. Great used for big burger buns or use for a toastie.
Simply divide the dough into 6 pieces for 6 mini breads (approximately 170g each). Make as before, just spread out to a diameter of about 4-5″ (10-12.5cm) wide, (making sure to remember to still make them thick), & make the pattern gaps slightly smaller.
Bake the individual Ramadan breads as before, only start checking them after 12 minutes. (Note if you make them the same thickness as regular 10″ wide Pide, the baking times will be the same.)
**Tip – Only depth of the bake will decrease or increase bake times.
DOWNLOAD the recipe in full, all details all photos, to save to your phone or computer. Simply click the ‘download’ button below.


This 2020 video is from making quicker dinner rolls. For a 2022 video of making the Ramazan Pide, click below:
Experienced bakers or those familiar with making bread, can skip to the Recipe Card at the end, for an abbreviated version of the recipe instructions. Note you can share, save or print the Recipe Card, with or without the photos. Just click below:


Step-By-Instructions
Preparing The Dough
1. Have the 3 amounts of flours weighed or measured out in separate bowls – you can use the stand mixer bowl for the first flour, [F1]. Place the oil and water into a microwave safe bowl or jug and heat for 30 – 45 seconds until just a little warm (120-130f, 49-54c). Alternatively use some hot water and cold water and check the temperature once mixed. It should be just above tepid.
2. Mix the salt into the first flour, [F1] and give it a good mix through. This is because yeast should never let yeast come into direct contact with salt or it will reduce the power of the yeast. This way the salt is coated in flour.
3. Add in the yeast, sugar and onion or garlic powder (if using) and mix through, one at a time. Once the water and oil is warmed, add this as well as the egg whites to this dry mixture. Using the paddle (or ‘k’ hook) on the mixer, mix for 2 minutes. Be sure to time this.


4. Now add in the smaller bowl of flour [F2], and mix for 2 minutes with a timer. (See Photo 1 above). The mixing in this recipe is very important so be sure to time it.
5. Slowly add in the flour from [F3]. You might not need it all, but you want a dough that starts to come together as a very rough ball around the paddle. So mix for 10 seconds after each addition of flour and wait to see the ‘ball’ of dough. Note that the dough will be a bit sticky.
6. Now put the dough hook onto the stand mixer (use a scraper to get the dough off the paddle), and knead on medium speed for 4 minutes. See Photo 1 above.
7. Using a rubber or silicone slim spatula, scrape the dough off the bowl from down the sides. Then tilt the bowl and put on it’s side, so you can see the bottom. Continue scraping the dough out towards the top of the bowl. Now wash and then put oil (or spray oil) onto your dominant hand and ease the dough out and turn it over so that the bottom of the dough is now at the top end of the bowl.


Alternatively, flick the dough over with a silicone spatula (that’s what I do). Place the bowl back on the mixer and continue kneading for another 4 minutes. The dough does tend to stick at the bottom when kneading, and this is another reason why we turned it during kneading. Once the total kneading time is up, the dough will be forming a ball and cleaning the sides of the bowl. Have a feel of the dough to know how well kneaded dough feels. Will be nice and soft compared to before and less sticky now.
Note also how stretchy it is when you lifted the dough hook up. Scrape any dough from the hook and into the bowl. Now place a towel on top of the bowl and leave somewhere warm and draft free for 15 minutes. (Note that dough with whole-wheat/meal flour will not feel quite as soft as white flour). See Photo 2 above..


**See Photo 3 above of before and after just 15 minutes proving time.
8. Well flour some baking/parchment paper or worktop/counter and your rolling pin. See Photo 4 below. Release the dough from the bowl like before, (without oiled hands this time) and tipping, scrapping out onto the worktop. Sprinkle on some more flour on top of it. Knead the flour into the dough for a few seconds, adding small amounts of flour if needed for it to be manageable. Now form the dough into a nice tight ball, flatten it and then cut in half (flour the blade of your knife if needed).


Prepare The Baking Trays/Sheets
9. Prepare the baking trays with baking/parchment paper, or even silicone mats. (**Tip – do this during the 15 minute prove). Do not bake these without paper as they will stick. To cut to the shape and size of a round tray, see Photo 5, (fold the paper that is tray width in half as in 2nd photo, then fold again and then fold at a diagonal to form a triangle.
Then fold again to make a skinny dart. Place the point of the dart at the centre most part of the tray, and then see where at the opposite end, how much excess to cut off. Then simply unfold, and check the sizing, folding up and trimming off again if needed. You are looking for trays/sheets that will take a 25cm/10″ circle.


Shaping The Breads
10. Roll the pieces of dough into a nice tight and smooth ball using your hands. Then place in the centre, on top of the paper lined pizza tray, and flatten out into a circle. Now process to spread out the dough more, with your palm and fingers, until you fill the 25cm/10″ round tray. See Photo 7 below.


11. If you don’t have pizza trays, then roll out with a floured rolling pin, into a circle approximately 25cm (10 inches) wide. Keep turning the dough when rolling it out to get as near to a round shape as you can. Sometimes you can turn the dough over too. Only add a little flour to the work surface & to the rolling pin. Adding too much flour, especially after kneading and rising, produces a very dense and tough bake. Then simply transfer to your prepared baking sheets/trays.
See the process in the new video:


Creating The Pattern
12. To make the pattern on the dough, using a small sharp knife, make an indent into the dough to create a round boarder, like in Photo 8. You can use the end of a small spoon if it has a straight edge. Leave at least 1 inch/2.5cm gap from the edge of the dough. Then make long vertical lines, no more than 1″ /2.5cm gap in-between them. Then turn the tray 90 degrees and make lines again so that you have created diamonds (or squares depending on what way you look at them). See Photo 9 below.


13. Now very carefully and gently, brush egg-wash (the yolk mixed with a splash of milk), on top of the bread, along the rim and on top of all the diamonds you created. Then sprinkle on some Nigella seeds &/or sesame seeds, or leave plain if you prefer. Just don’t skip the egg-wash, as this gives your bread and rolls a great colour and also translates as flavour. See Photo 10.


Second Prove
14. Repeat for the 2nd bread, and leave both in the same warm, draught free place for 30 – 45 minutes to prove and puff up a little.
15. Heat up the oven to –220c/200c Fan Oven/425f/Gas Mark 7.
16. Just before placing in the oven, go over the cuts again you made on the bread, as they will be less defined now with proving. Just be very careful not to deflate the dough. Regular dipping of the knife in flour will make this easier. See Photo 11.


And Bake!
17. Bake in the centre area of the oven, for between 14 – 18 minutes, till nice and golden, risen and the underside looks cooked all the way through to the centre. You can even bake the bread, on the last few minutes, upside down just to finish off the centre of the bottom of the bread. See Photo 12 below. My first two baked off at 15 minutes and the 2nd 2 at 16 minutes.
18. Leave the breads on the trays, on top of cooling racks to for about 10 minutes, before moving, paper and all, onto the racks. Cut for serving, or do as the Turks do, and just tear apart, and eat with your meal. I have also tested it, and you can slice it horizontally, and make a nice sandwich from it. Even put in a sandwich toaster machine. Either way, enjoy your bake.
19. Store any left overs in sealed food bags, or even brown paper bags. I prefer not to store homemade bread in the fridge, as it can make it go off quicker.


Afiyet Olsun!
Enjoy Your Meal/Food (Literally may it be good health to you, pronounced ah-fee-yet ol-soon)
DIFFICULTY LEVEL: easy, with guidance
Join My Facebook Group
Why not also join my Easy Online Baking Lessons Facebook group – Easy Online Baking Lessons, dedicated to this baking lessons website, as well as providing one-on-one support with myself & my team? Be sure to answer all security questions when requesting to join. Click to join the Facebook group.


Share The Love
Please see the sharing options or even printing, at the right/bottom of your screen (bottom of your screen for mobiles, and down the right-hand side on computers). You can even pin this to your own Pinterest page. Alternatively, you can download this article, see below. You could also leave some feedback if you like.
Click the ‘Download’ button below, to save to your phone or computer.


More Turkish Recipes
Another popular Turkish bake is Poĝaça – cheese filled rolls. Try my 2 hour recipe for this yeast-based roll. Or popular, no-bake recipe Lahmacun – spicy meat flatbread.


Turkish Ramadan Bread – Ramazan Pidesi In 2hrs

Equipment
- Stand Mixer with dough hook (optional)
- Scales of measuring cups
- Small measuring jug
- Pastry Brush (or small artist/paint brush)
- Small bowl for egg wash
- Baking/parchment paper
- 2 Baking sheet/trays (or pizza trays)
- Tea-Towel
- Small Knife or spoon with a straight edged end
- Timer or Phone Timer
- Cooling rack
Ingredients
For The Dough
- 200 grams Plain or Strong Bread Flour – [F1] (7 oz, 1 ⅔ cups All Purpose or Bread Flour) - [F1]*
- 1 tsps Salt
- 2 tsp Garlic or Onion powder or granules (optional)
- 1 tsp Sugar
- 7 grams Yeast, Instant/Active (1 packet/2¼ tsp Instant or 2½ tsp Active)
- 400 ml Tepid Water (13½ fl oz, 1 ⅔ cups, see recipe instructions on temperature*)
- 1 Egg White, medium - Large (Large - XLarge US eggs)
- 1 tbsp Olive Oil or E.V.O. Oil
- 100 grams Plain or Strong bread Flour– [F2] (3½ oz, ¾ cup All Purpose or Bread Flour) - [F2]*
- 325 grams Plain or Strong bread Flour – [F3] (Up to 11½ oz, 2⅔ cups All Purpose or Bread Flour) - [F3]*
For The Topping
- Egg yolk & splash of milk for egg wash
- Sesame seeds &/or Nigella Seeds - çörek otu (optional)
Instructions
Prepare The Dough
- Begin by measuring out all the ingredients. It is very important to have the 3 flour amounts in separate bowls. You can have [F1] flour in your stand mixer bowl.
- Have the water in a microwave safe jug & heat for about 30 – 45 seconds until just a little warm (120-130°f, 49-54°c). Alternatively test with a clean finger for just above tepid. You could use hot & cold water mixed together in a jug to get tepid temperature. But if unsure, best to use a thermometer first time making. Once at the right temperature, add in the egg white & oil & mix together.
- While the water is heating, add the yeast to the [F1] flour in the main mixing bowl, & mix well. Then add in the salt & then the sugar & mix well between each addition. Add in the onion/garlic powder if using. See Photo 2 below.
- Add the liquid mixture to the flour mixture & mix a little by hand before starting the stand mixer, with the 'k' paddle/mixer paddle attached (not the kneading hook yet). Mix for 2 minutes, on medium speed with a timer. The timings are important in this recipe.
- Next add in the 2nd bowl of flour - [F2], (the smaller one) & let the mixer mix the flour in for another 2 minutes.
- Now add in half of the third flour bowl - [F3] & let the mixer incorporate the flour on low - medium speed. Then slowly add in the rest of [F3] flour. You might not need it all, (or a little more – sometimes I have needed an extra ¾ cup or 90g), but you want a dough that starts to come together as a very rough ball around the paddle. Mix for 10 seconds after each addition of flour & wait to see the ‘ball’ of dough. Note that the dough will be a bit sticky.
- Next put the dough hook onto the stand mixer (use a scraper to get the dough off the paddle), & knead on medium speed for 4 minutes.
- Scrape the dough off the hook & from down the sides of the bowl. Turn the dough over, using the scraper & let the mixer continue kneading for another 4 minutes. The dough does tend to stick at the bottom when kneading, & this is another reason why we turned it during kneading. (Do not be tempted to add more flour). Alternatively, knead by hand on a very lightly floured surface for about 10 minutes till smooth & a little less sticky.
Prove The Dough
- Have a feel of the dough to know how well kneaded dough feels. Note also how stretchy it is when you lifted the dough hook up. Place a clean tea-towel on top of the bowl & leave somewhere warm & draft free for 15 minutes.
Prepare The Baking Trays/Sheets
- Take this time to prepare the baking trays with baking/parchment paper. Do not bake these without paper as they will stick. I use 2 pizza baking trays as they are the right size 25cm/10”) and I prepare each bread on the actual paper lined tray, rather than moving them over after preparing them.
- It’s so simple to cut baking/parchment paper to fit any round cake tin or pizza tray. Follow the pics in Photo 5 in the step-by-step process (before this Recipe Card), of folding & trimming the paper, to get the perfect fit. Alternatively watch the video, or follow the detailed instructions in the main part of the recipe, before this Recipe card.
Shaping The Breads
- Flour some baking/parchment paper or worktop/counter. Release the dough from the bowl, sprinkle on some more flour on top of it or onto your hands. Form the dough into a ball or rectangle, of even shape, so you can cut in half (flour the blade of your knife if needed).
- Roll the pieces of dough into 2 balls and place one in a lightly floured bowl while you work on the other. Place the ball of dough in the centre, on top of the paper lined pizza tray, and flatten out into a circle. Now proceed to spread out the dough more, with your palm & fingers, until you fill the 25cm/10″ round tray. If you don’t have pizza trays, you can flatten by hand , roll out with a floured rolling pin, into a circle approximately 25cm (10") wide, on a paper-lined cookie tray/sheet.
Creating The Pattern
- To make the pattern on the dough, using a small sharp knife, make an indent into the dough to create a round border. Leave at least 1”/2.5cm gap from the edge. Make long vertical lines, with about 1″ /2.5cm gap in-between. Turn 90 degrees & repeat the lines making a diamond pattern.
- Gently, brush egg-wash (yolk mixed with a splash of milk), on the bread. Then sprinkle on some Nigella seeds &/or sesame seeds, or leave plain if you prefer. See Photo 10 below.
Second Prove
- Repeat for the 2nd bread & leave both in the same warm, draught free place for 30 – 45 minutes to prove and puff up a little.
- Heat up the oven to – 220c/200c Fan Oven/425f/Gas Mark 7.
- Before placing in the oven, go over the cuts again you made on the bread, as they will be less defined now with proving. Just be very careful not to deflate the dough. Tip – Regular dipping of the knife in flour will make this easier, see video.
Bake The Breads
- Bake in the centre of the oven, for between 14– 18 minutes,till nice and golden, risen and the underside looks cooked all the way through to the centre.
- Leave the breads on the trays, on top of cooling racks for about 5 -10 minutes, before removing the trays & paper and leaving to cool down. Cut or just tear apart, and eat with your meal. (Turkish way is with meals such as Beans & Rice - Kuru Fasulye (coo-roo fa-sool-ye) More on that in the main recipe post).
Storage
- Store any left-overs in sealed food bags, or even brown paper bags. I prefer not to store homemade bread in the fridge, as it can make it go off quicker.


Video
Notes

 Active or Fast Acting dried yeast can be used for this recipe & I have used both. But if you want to be exact with the amounts, or to use fresh yeast, see my Yeast Conversion tables. Also read before the recipe for more on the types/different names of the yeast.
TIPS
For making lines in the dough easier (in particular after proving), dip knife often, in flour.
When preparing the first bread, if your environment is too warm, (causing the 2nd ball of dough to prove too quickly), place this 2nd ball of dough in the fridge or somewhere cool until ready to shape it.
Active or Fast Acting dried yeast can be used for this recipe & I have used both. But if you want to be exact with the amounts, or to use fresh yeast, see my Yeast Conversion tables. Also read before the recipe for more on the types/different names of the yeast.
TIPS
For making lines in the dough easier (in particular after proving), dip knife often, in flour.
When preparing the first bread, if your environment is too warm, (causing the 2nd ball of dough to prove too quickly), place this 2nd ball of dough in the fridge or somewhere cool until ready to shape it.

 Go to my Bread & Roll recipes.
Another popular Turkish recipe is Poĝaça - cheese filled rolls or the yeast-free Poğaça. Try my 2 hour, yeast-based recipe. Or no-bake, yeast-free Lahmacun - Turkish Meat Flatbread.
Go to my Bread & Roll recipes.
Another popular Turkish recipe is Poĝaça - cheese filled rolls or the yeast-free Poğaça. Try my 2 hour, yeast-based recipe. Or no-bake, yeast-free Lahmacun - Turkish Meat Flatbread.
 Try Mini Ramadan Bread (see collage above) – simply divide the dough into 6 pieces for individual Ramazan Pidesi. About 170g each and 4-5”/10-12.5cm wide, & start checking after 12 minutes of baking.

Nutritional information -I am not a qualified nutritionist, and all nutritional values are based on a serving of ¼ of one bread, made from a 2 bread batch as per the recipe above. Values from Whisk.com. Caroline's Easy Baking Lessons 2022 https://easyonlinebakinglessons.com
Readers’ Bakes & Feedback


The reader photos look absolutely amazing & I am very proud!!! Here are the Facebook posts & feedback/comments I received about my Pide recipe. (Some names & profile photos have been removed for privacy purposes).


Very honoured for Sally to not only make several of my recipes, but give such positive and amazing feedback. You can find Sally on either of her blogs – Bewitching Kitchen or For The Love Of Cookies Or, at her day job as Biochemist & Research Professor at Kansas State University, or hanging with her fellow contestants on The Great American Baking Show (2019, Season 5)! In our Bake Off group, Sally is our Macaron & Cookie Queen & so much more!
If you make my recipe, please comment and leave a recipe and post rating at the very bottom of the page. Send me some pics and feedback via the contact page, or tag me on social media (links below). Can’t wait to see your bakes!
Follow me on social media:
Happy Learning & Baking!
Caro x


Subscribe For More Recipes
Want more great recipes, tips, baking information and newsletters? Then please consider subscribing by adding your email address below. Be sure to check for a confirmation email & respond back, so you can follow me & receive your free emails. Your personal information will not be shared with a third party.


Turkish Ramadan Bread – Ramazan Pidesi In 2 hours
Search For Something You Fancy!
Caroline’s Easy Baking Lessons


Mr ‘Easy Online Baking Lessons’ here.
Yes, the lucky one that never has to bake (for obvious reasons) but gets to test each and every one of the recipes you see here (except the ones that include cream in it but she still finds a way to make cream-free version, just for me).
My thanks go to my other half for accommodating and baking the Pide for me when fasting during Ramadan. Not only this recipe but many others from Borek to Pogaca to Pide.
Mr ‘CEBL’ (Caroline’s Easy Baking Lessons), thank you so much for your feedback. Better late than never 🙂
What a great recipe. It’s so easy and the instructions are step by step which helps so much plus it tastes delicious 😋
Another great quicker bread recipe, and lots of info on what we are eating. Thank you for another lovely recipe. Made today and everyone enjoyed.