Easter Devil’s Food Bundt Cake

Easter Devil's Food bundt cake is my special but easy to make Easter/Spring cake. Based on Devil's Food cake, this bundt cake is perfect for a make-ahead Easter dessert!
Easter Devil’s Food Bundt Cake
**Original recipe 30/03/2022, updated images 24/03/2026

***click to jump to section***

What Is A Devil’s Food Bundt Cake?
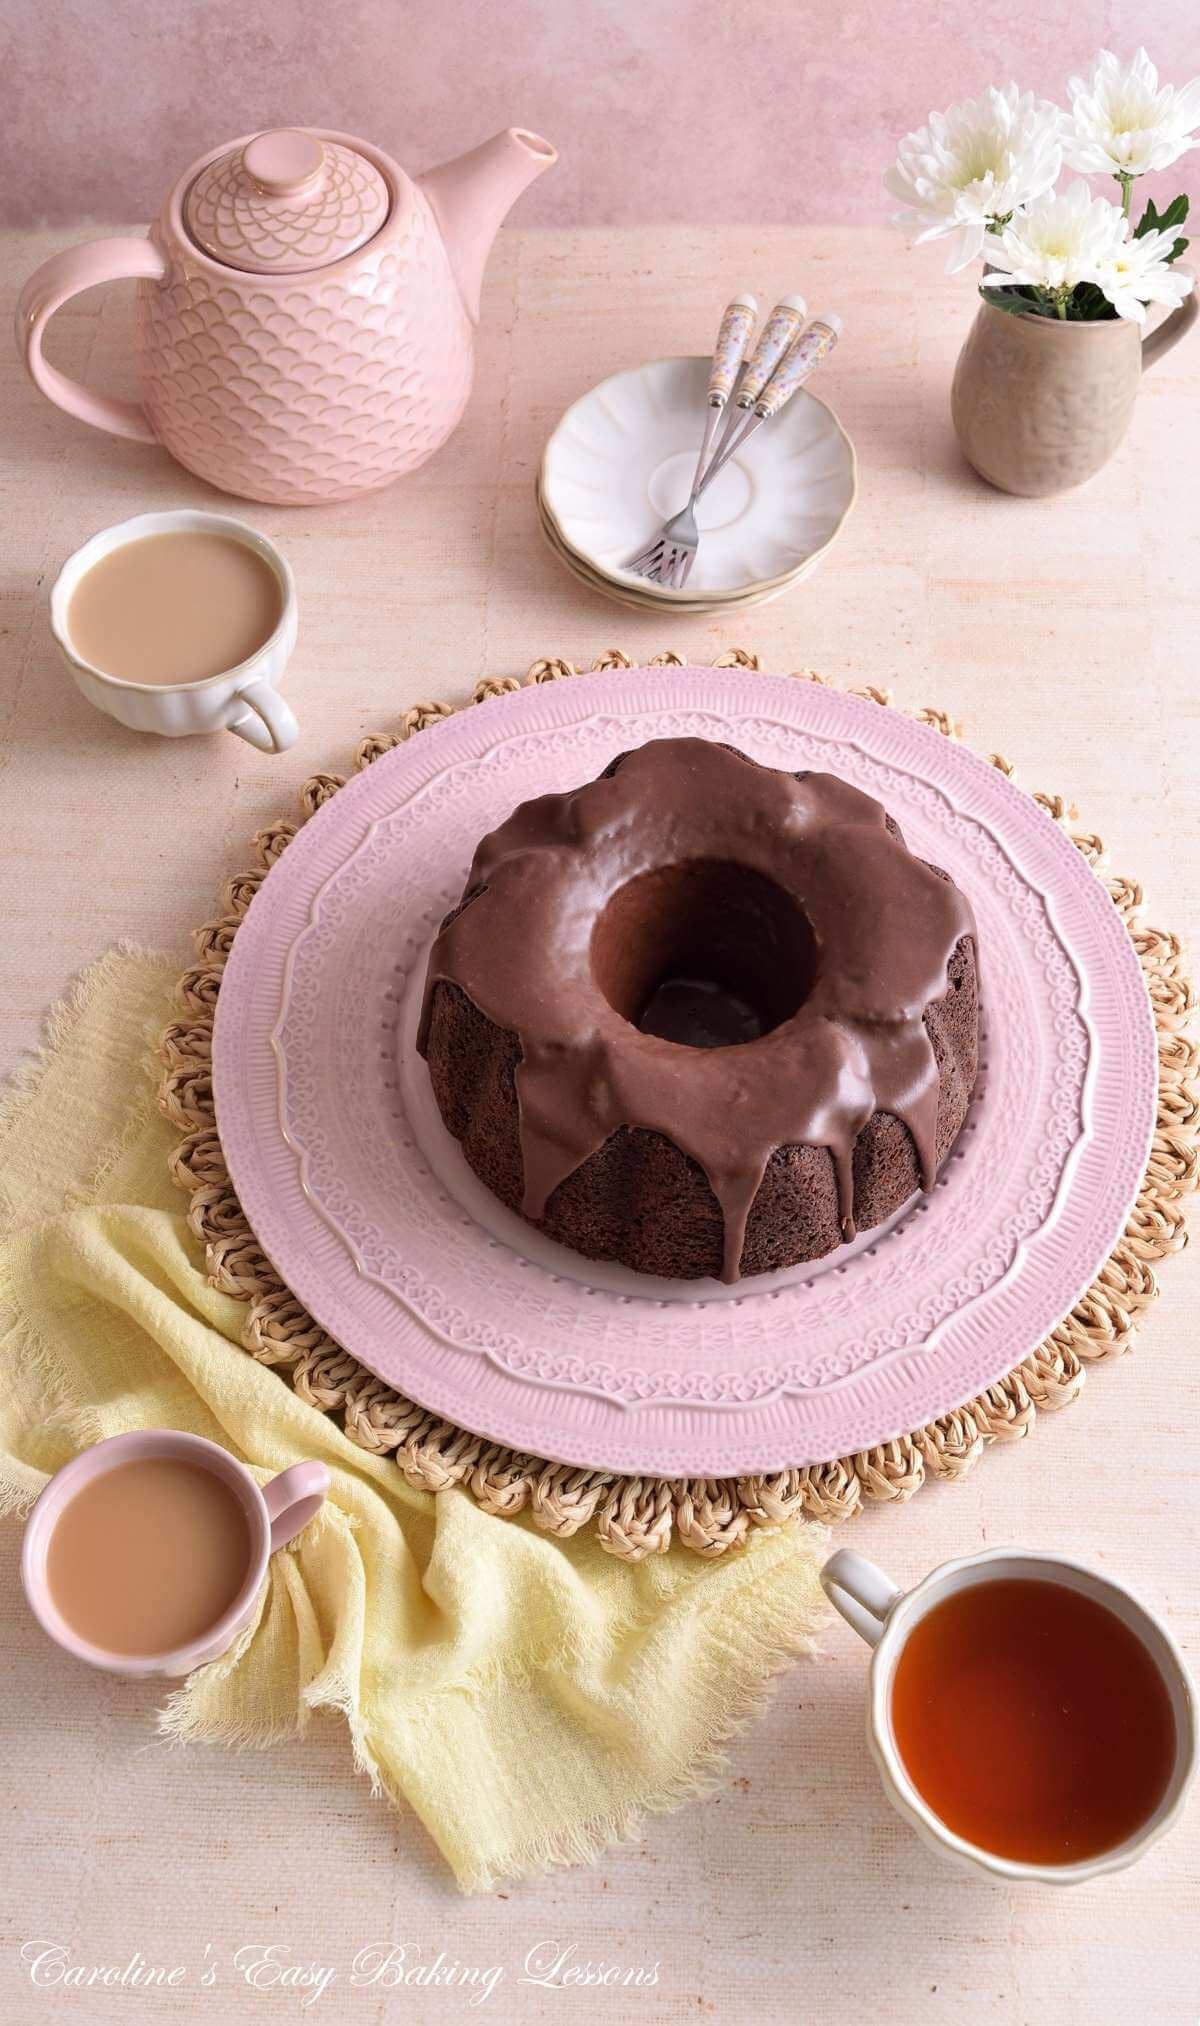
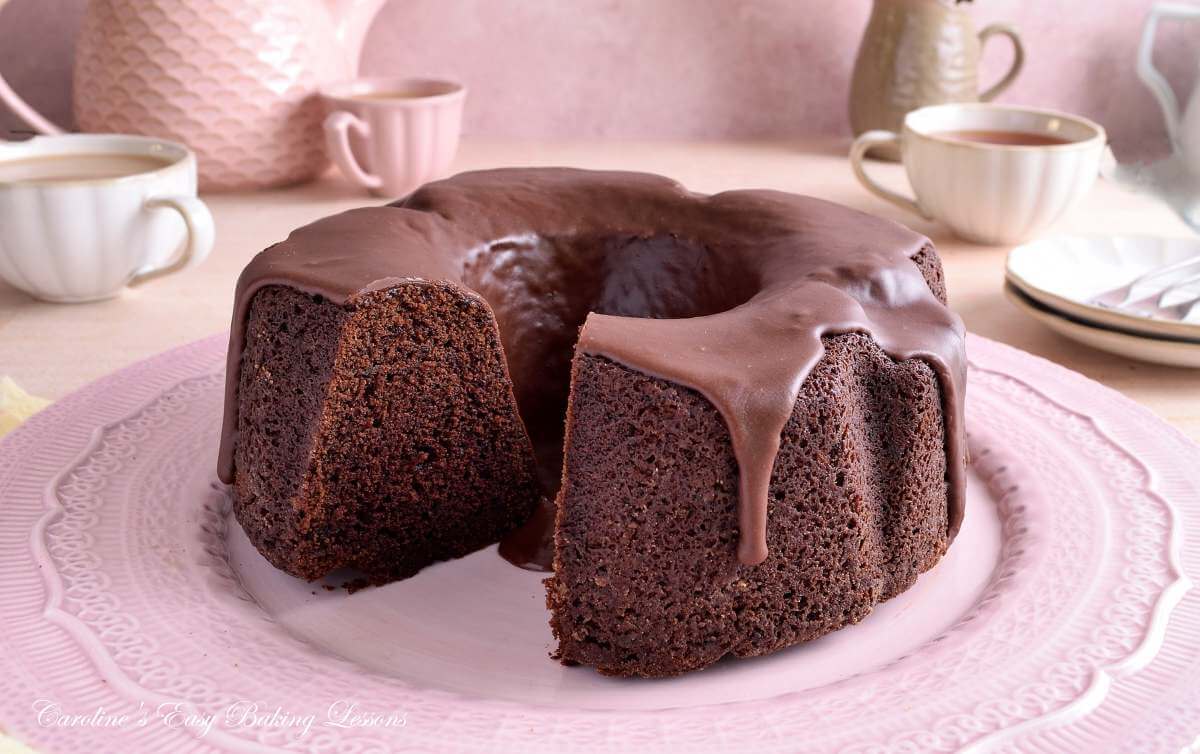
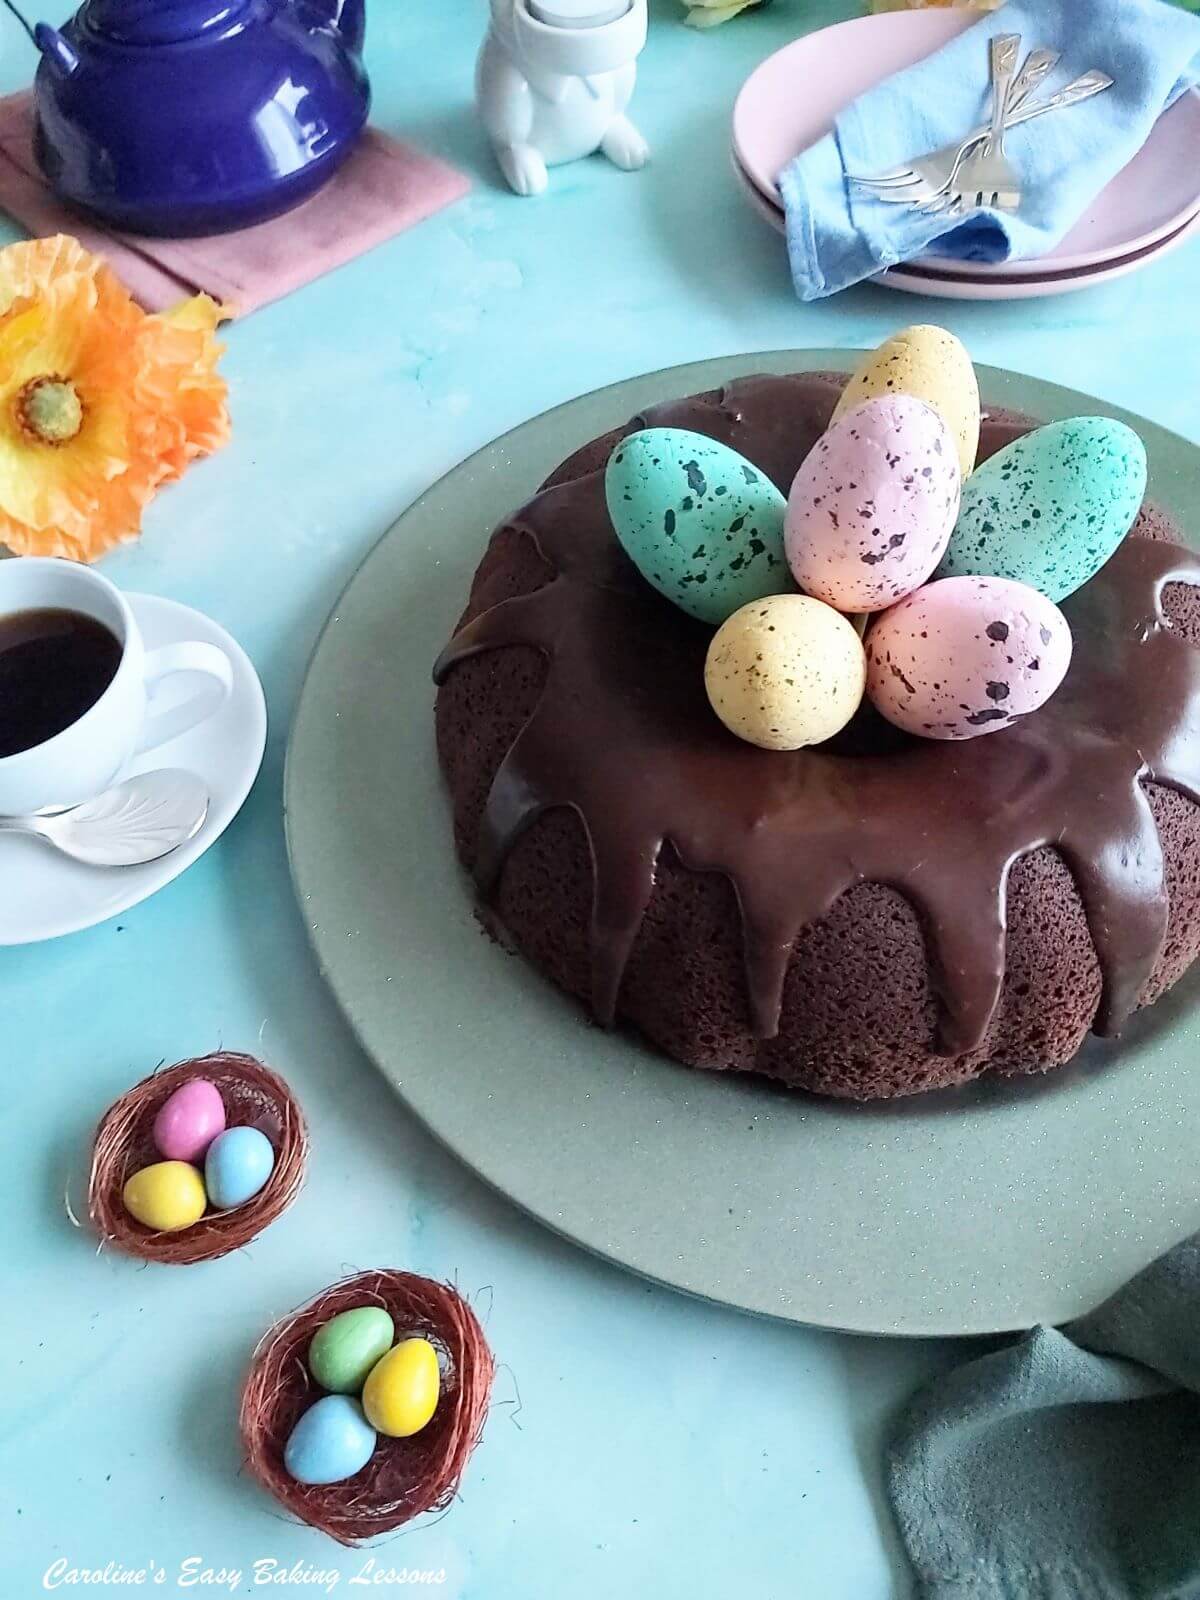
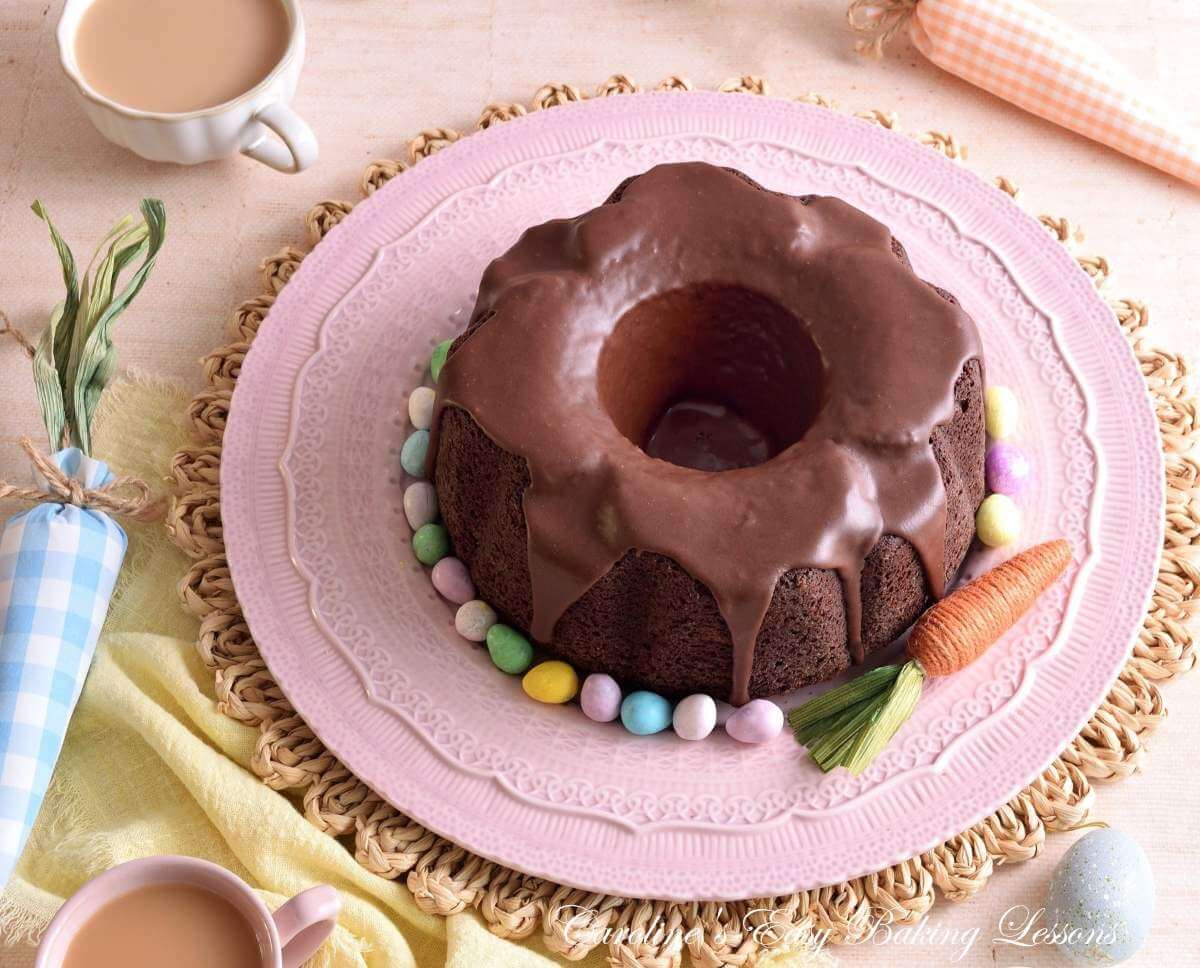
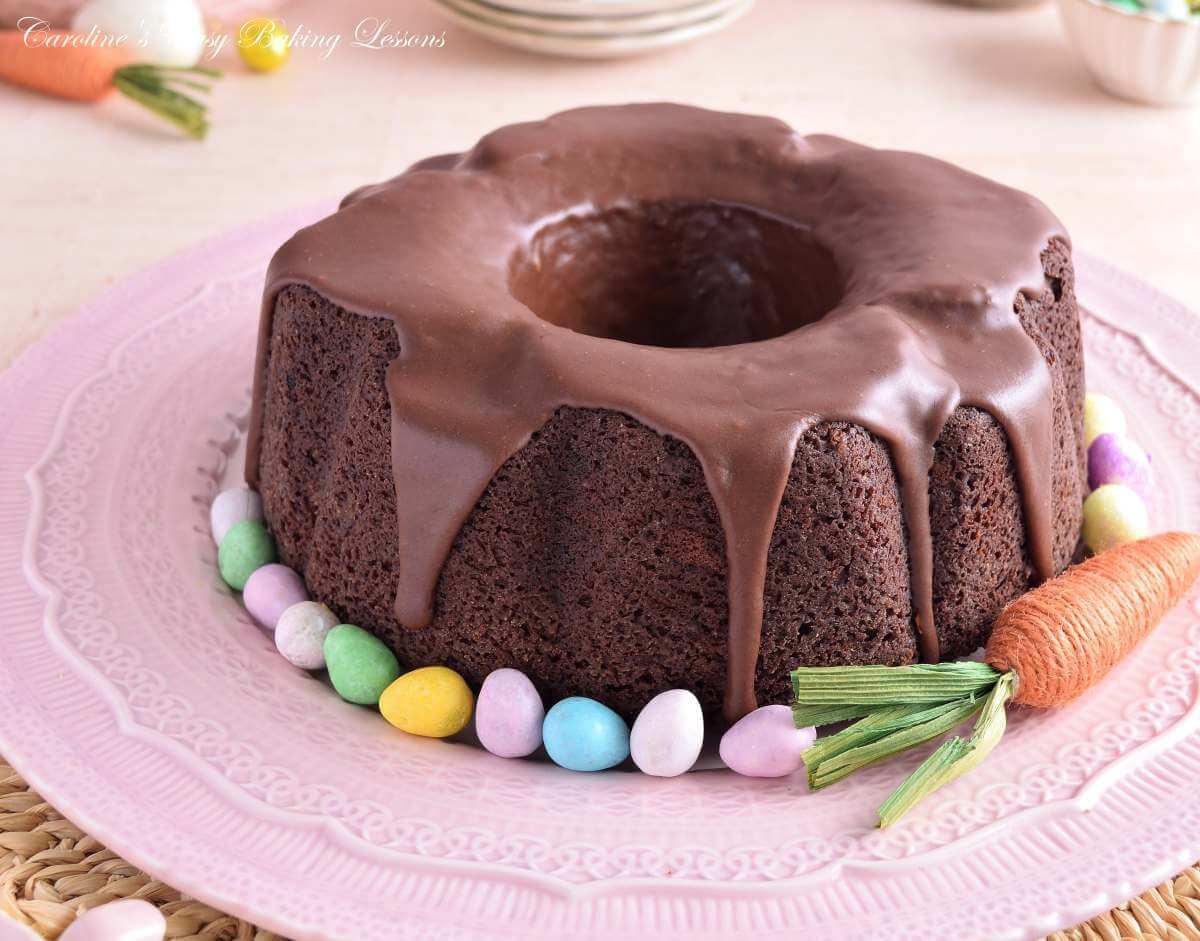
This Devil’s Food bundt cake is my Easter take on Devil’s Food Cake, and baked in a standard bundt tin.
Simply decorated with a fudgy and easy to make chocolate glaze.
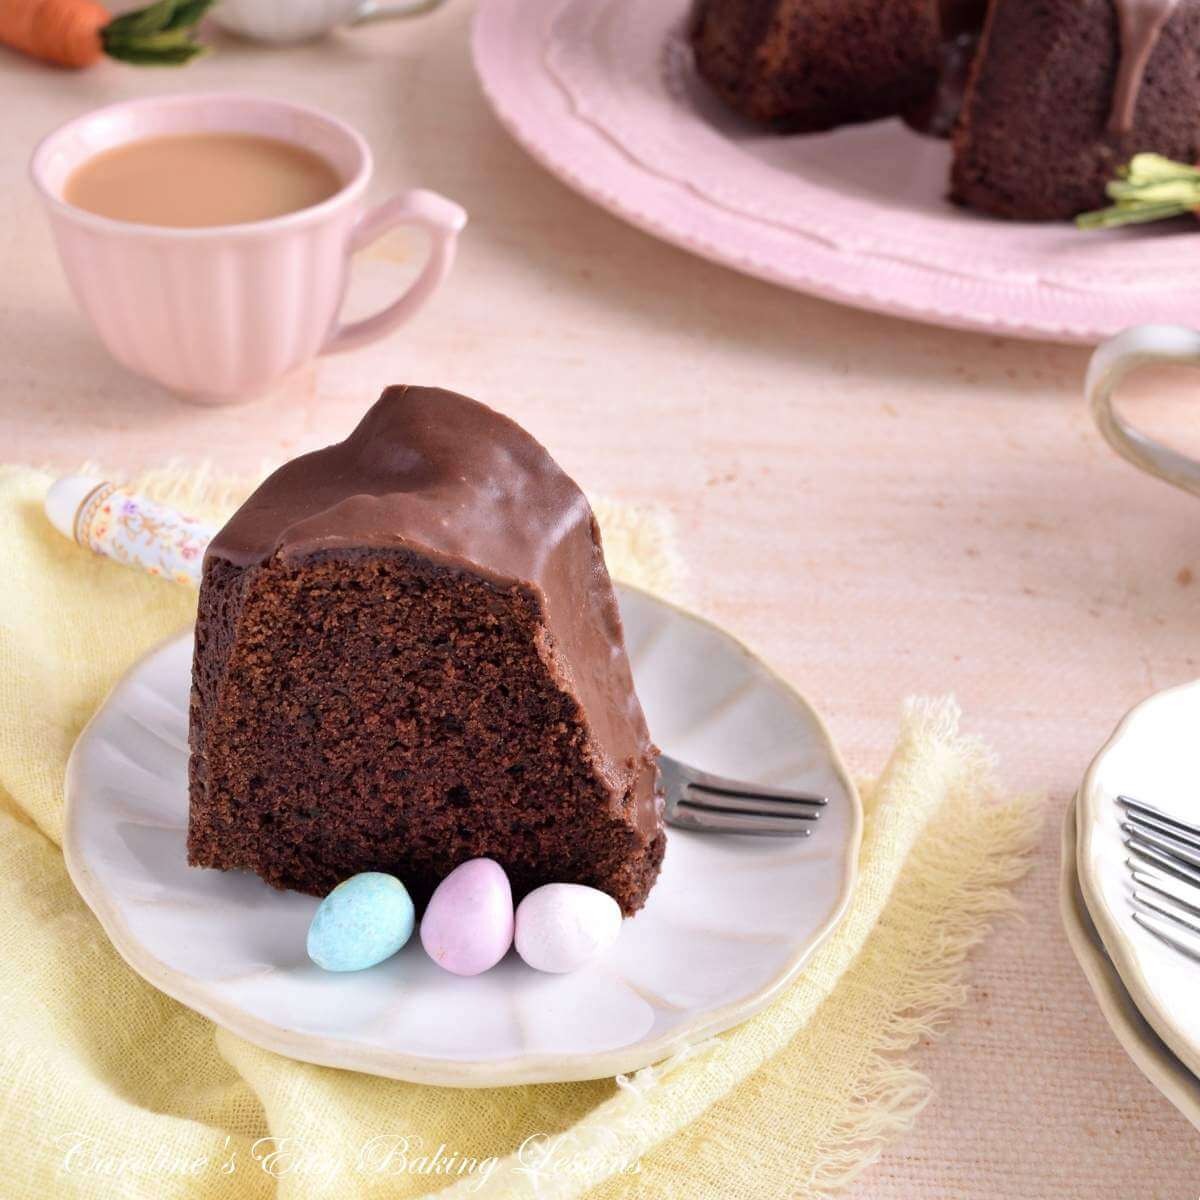
The chocolate cake is finished off with mini chocolate eggs (and some faux eggs too). Making it a really simple but tasty cake for Easter or Spring baking.
“What Is Devil’s Food Cake?“
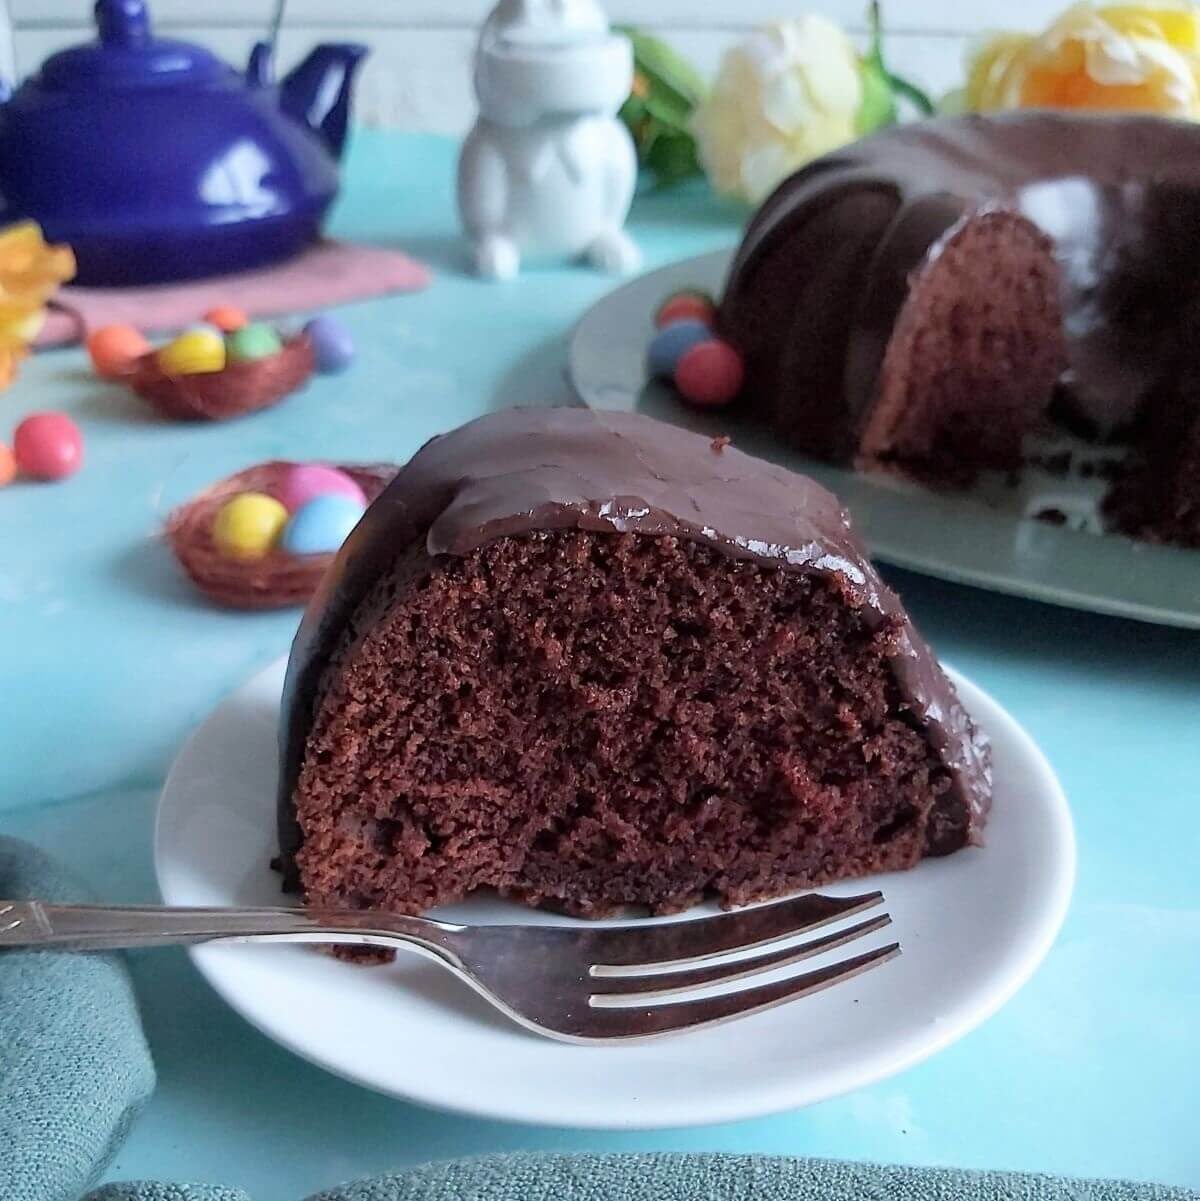
Devil’s Food Cake is a moist, rich chocolate cake, with a slightly airy texture compared to regular chocolate and was developed in America in the late 19th century, as a decadent version of Angel Food Cake.


Why Make This Chocolate Bundt Cake?
- Quick & easy to make
- Beginner bake
- No special ingredients or equipment needed
- Minimal & simple decoration
- Tastes great
- Amazing with ice-cream or heated up
- Perfect make-ahead dessert
- Great for gifting or potlucks
- Easily customizable for any season, holiday or occassion
- Step-by-step instructions
- Video tutorial

Ingredients & Alternatives
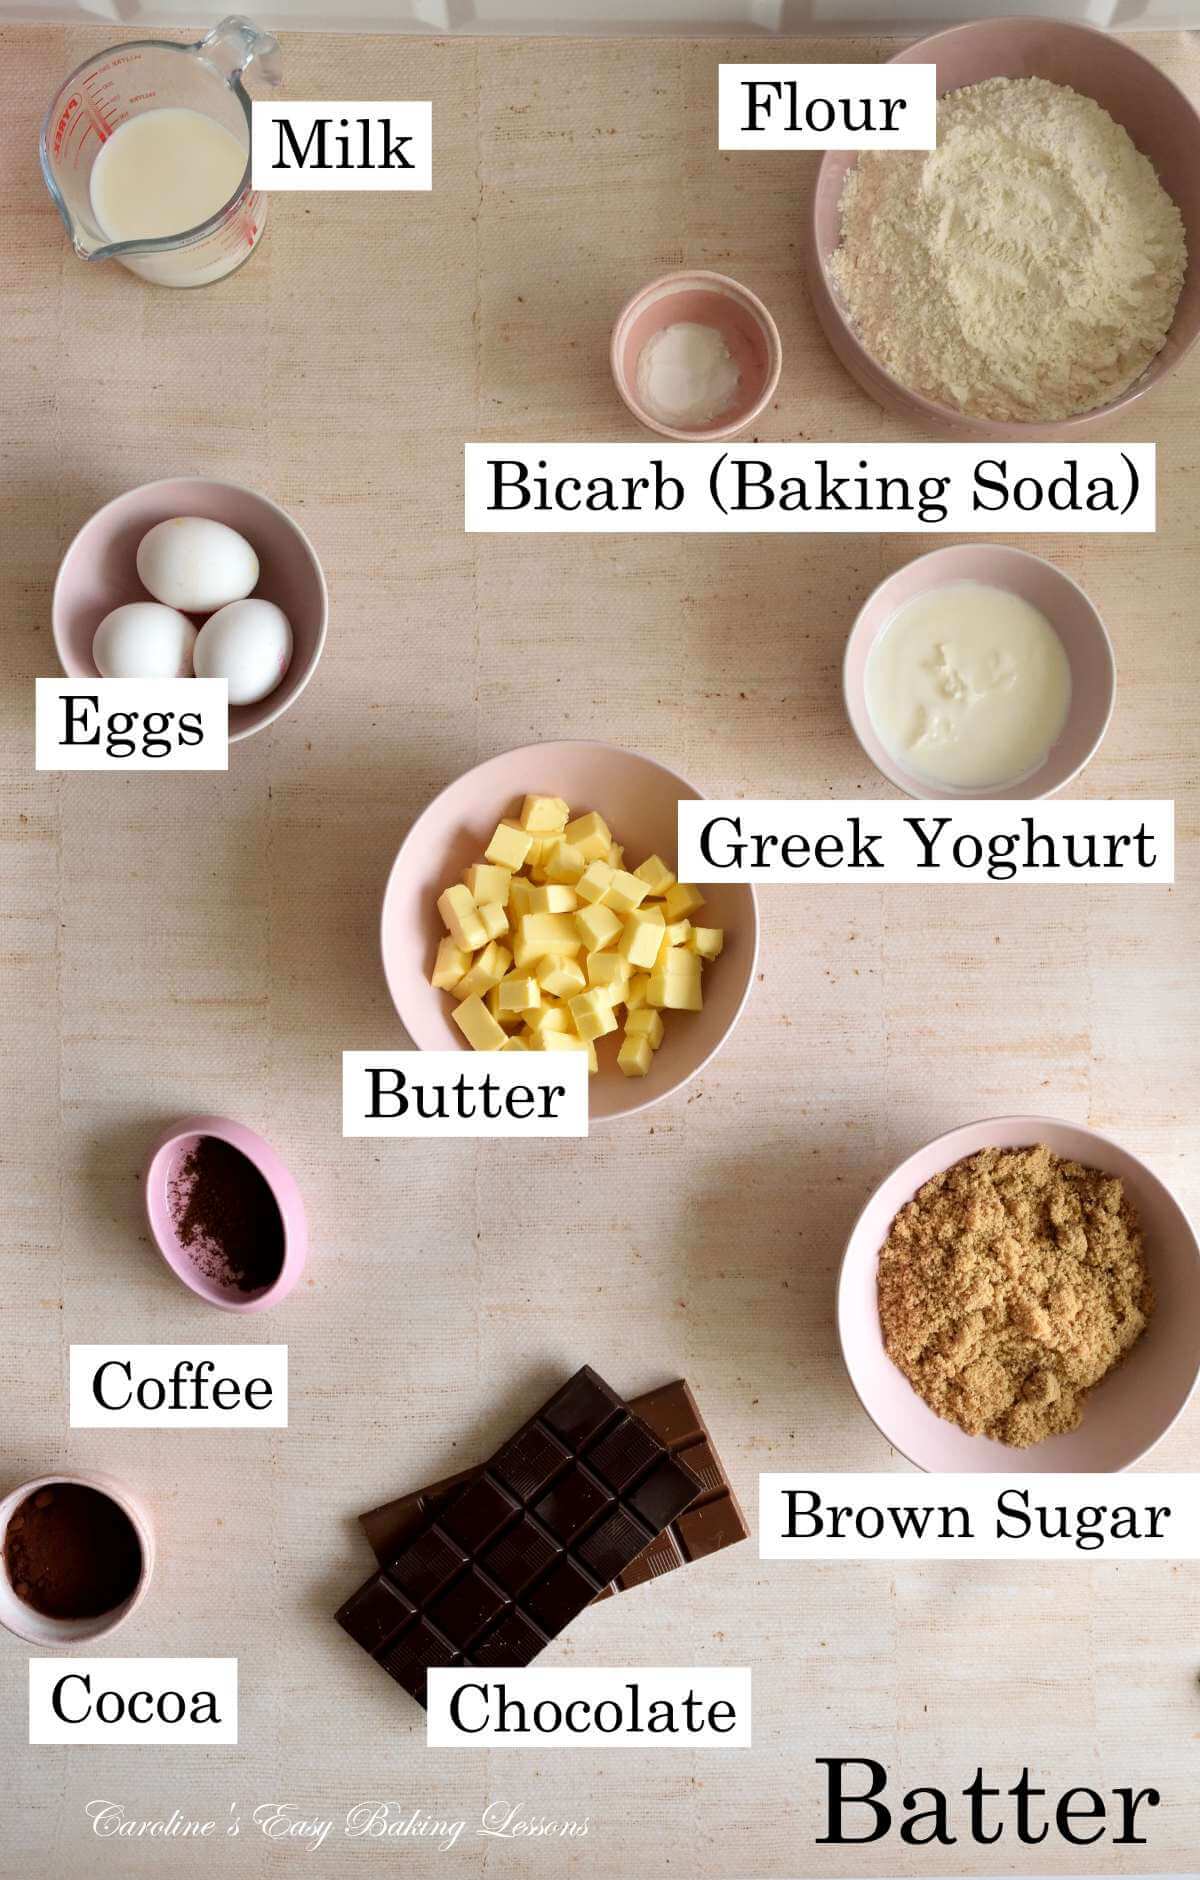
My Easter Devil’s Food bundt cake is made from the following basic ingredients:
For The Cake Batter:
- Unsalted Butter*
- Light Brown Sugar*
- Eggs*
- Greek Yoghurt*
- Milk
- Flour
- Bicarbonate Of Soda*
- Chocolate*
- Cocoa Powder
- Coffee Granules*
*see notes below

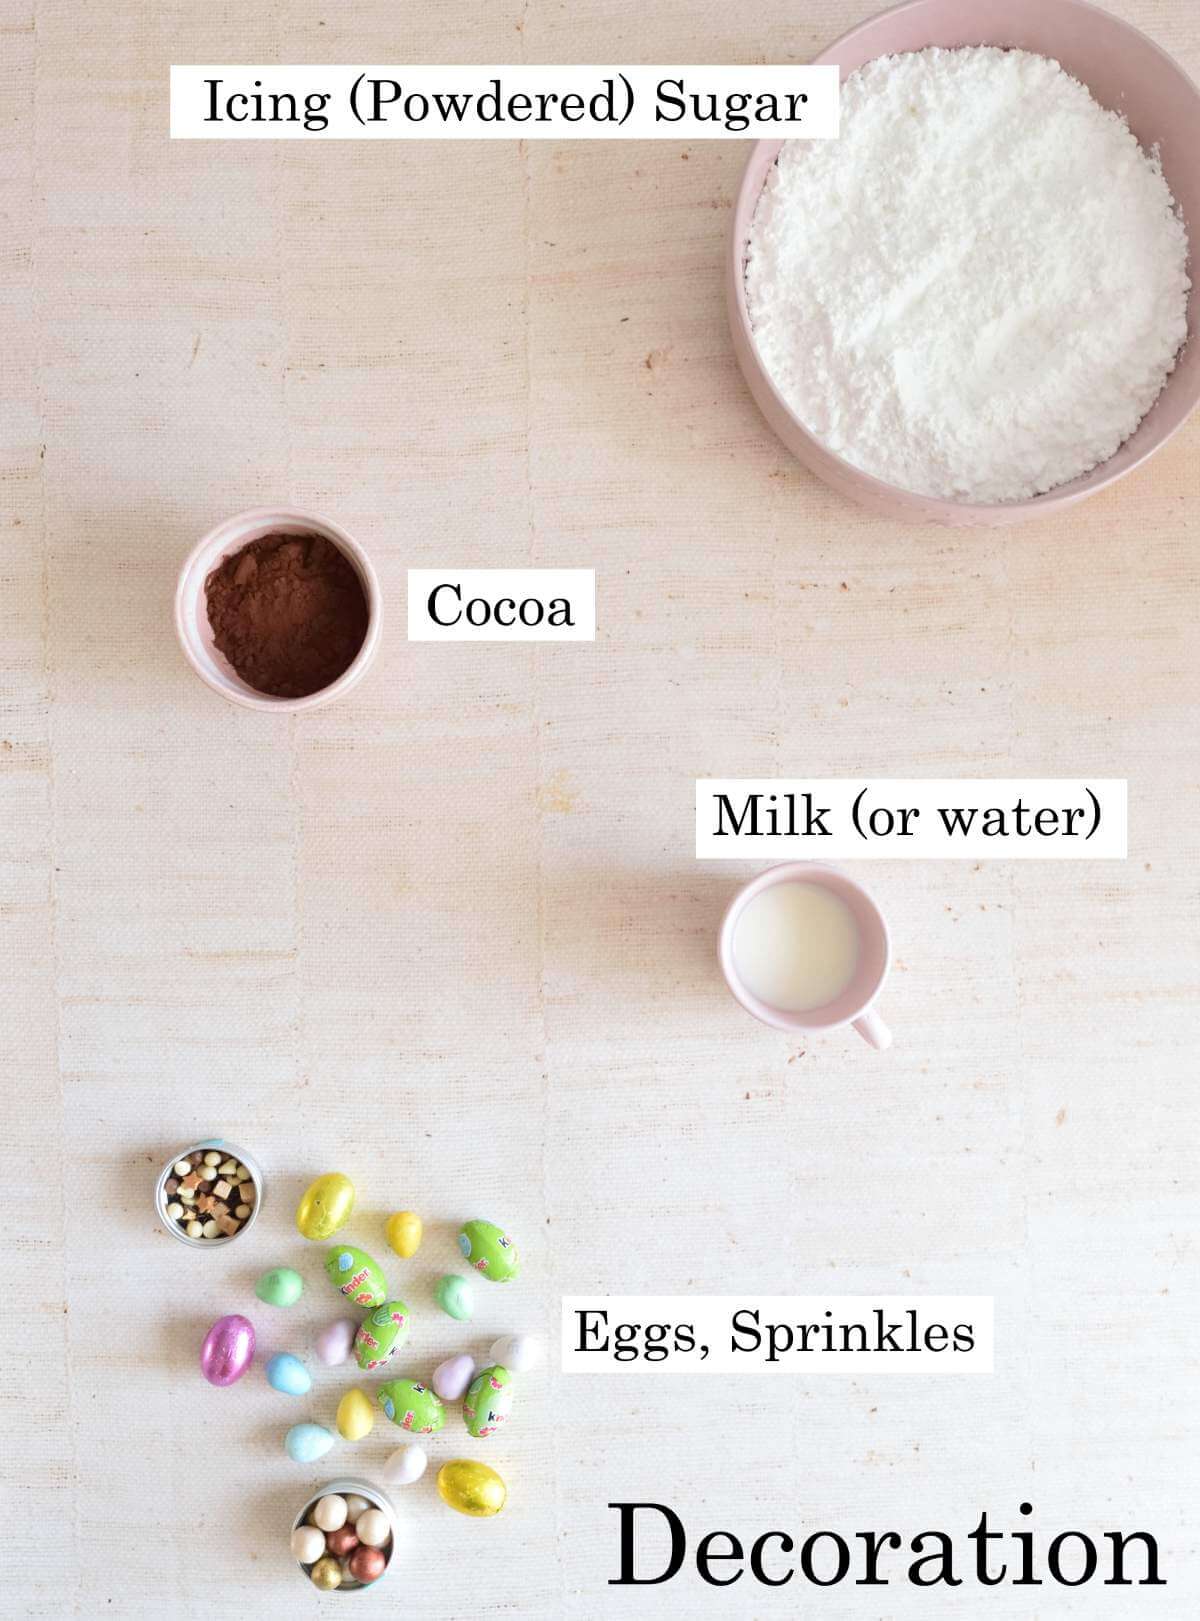
For The Glaze:
- Icing/ Powdered Sugar
- Cocoa Powder
- Milk
To Decorate (optional):
- Mini chocolate eggs
- Small/medium faux eggs
- Sprinkles*
*see notes below

Unsalted Butter
Unsalted butter is always recommended for best and most consistent results. Salted butter has a higher water content and the amount of salt varies from brand to brand. Which in turn reduces the fat content and so can affect the bakes. Since Covid, many US companies seem to be increasing water content, and is probably the reason why so many people are wondering why their cookies are suddenly spreading.
I always cube my butter, in small rough cubes about 1cm (1/3”). This smaller surface area makes the butter soften and come to room temperature quicker.


Eggs
Medium to large UK sized eggs are used, which is about large to extra-large in US.
***Also, make sure the eggs are at room temperature too before using.
Light brown Sugar
I use light brown sugar for this devil’s Food cake, but you can substitute this with 50/50 mix of granulated sugar and dark brown sugar.

Greek Yoghurt
An important ingredient for this Devil’s Food cake, is Greek Yoghurt. But you can use any thick-set natural yoghurt. Even the low-fat Greek Yoghurt will work. Other alternatives are creme fraiche or sour cream.
Coffee
Instant coffee granules, or even espresso powder is used, not for a coffee flavour, but rather, it accentuates the chocolate flavour of the cake. Often you will see it paired with cocoa powder. Decaffeinated coffee can also be used.

Bicarbonate of Soda
This is just the British name for baking soda. Sometimes it is written as Bicarb, or Sodium Bicarbonate.
Milk
Use any kind of milk, any fat content, even lactose-free. Don’t skip this in the cake batter. but for the chocolate glaze, you can use water instead of milk here.
Chocolate
Melted chocolate is used in the cake batter for extra chocolatey goodness! I don’t use expensive baking chocolate or coverture chocolate. I always use Aldi or Lidl’s basic (lowest priced) chocolate. The dark chocolate (Plain/bitter), helps get a higher cocoa content and can be combined with Milk Chocolate (semi-sweet).


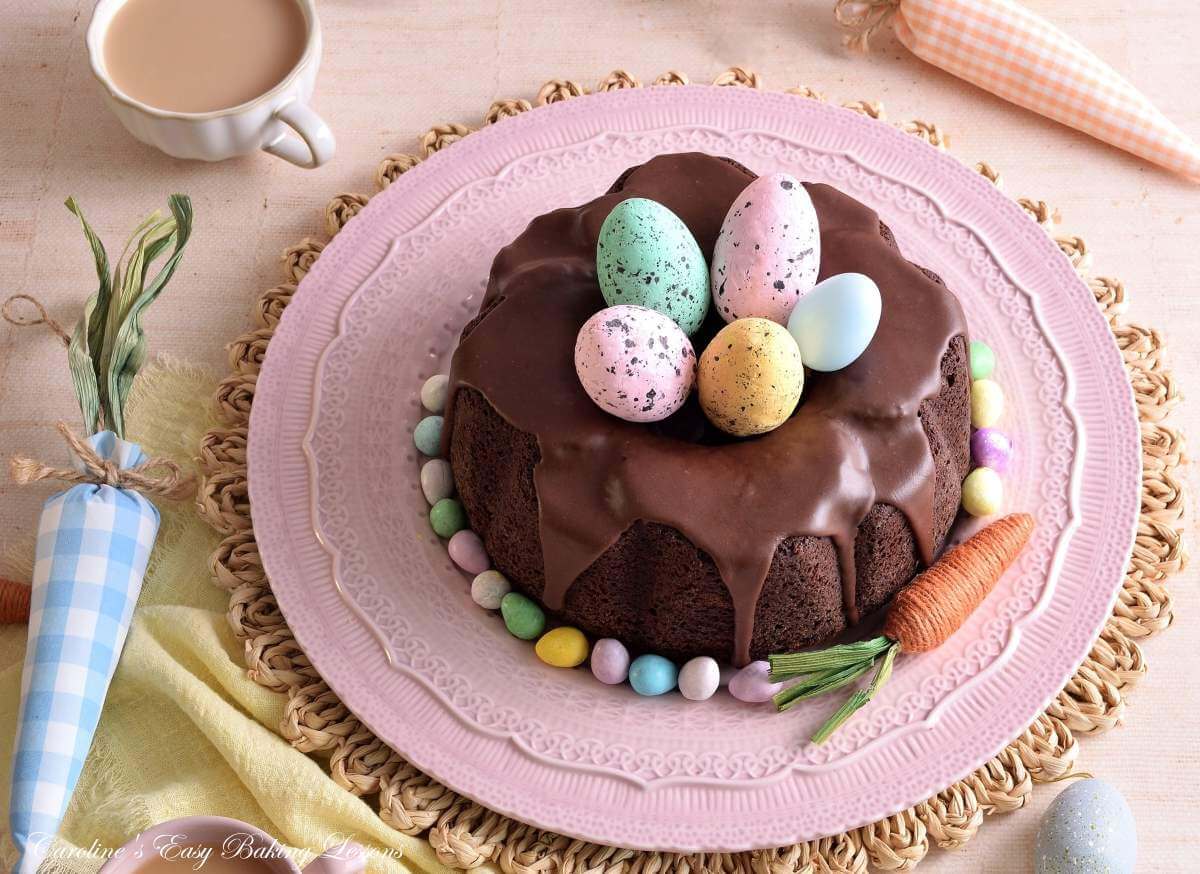
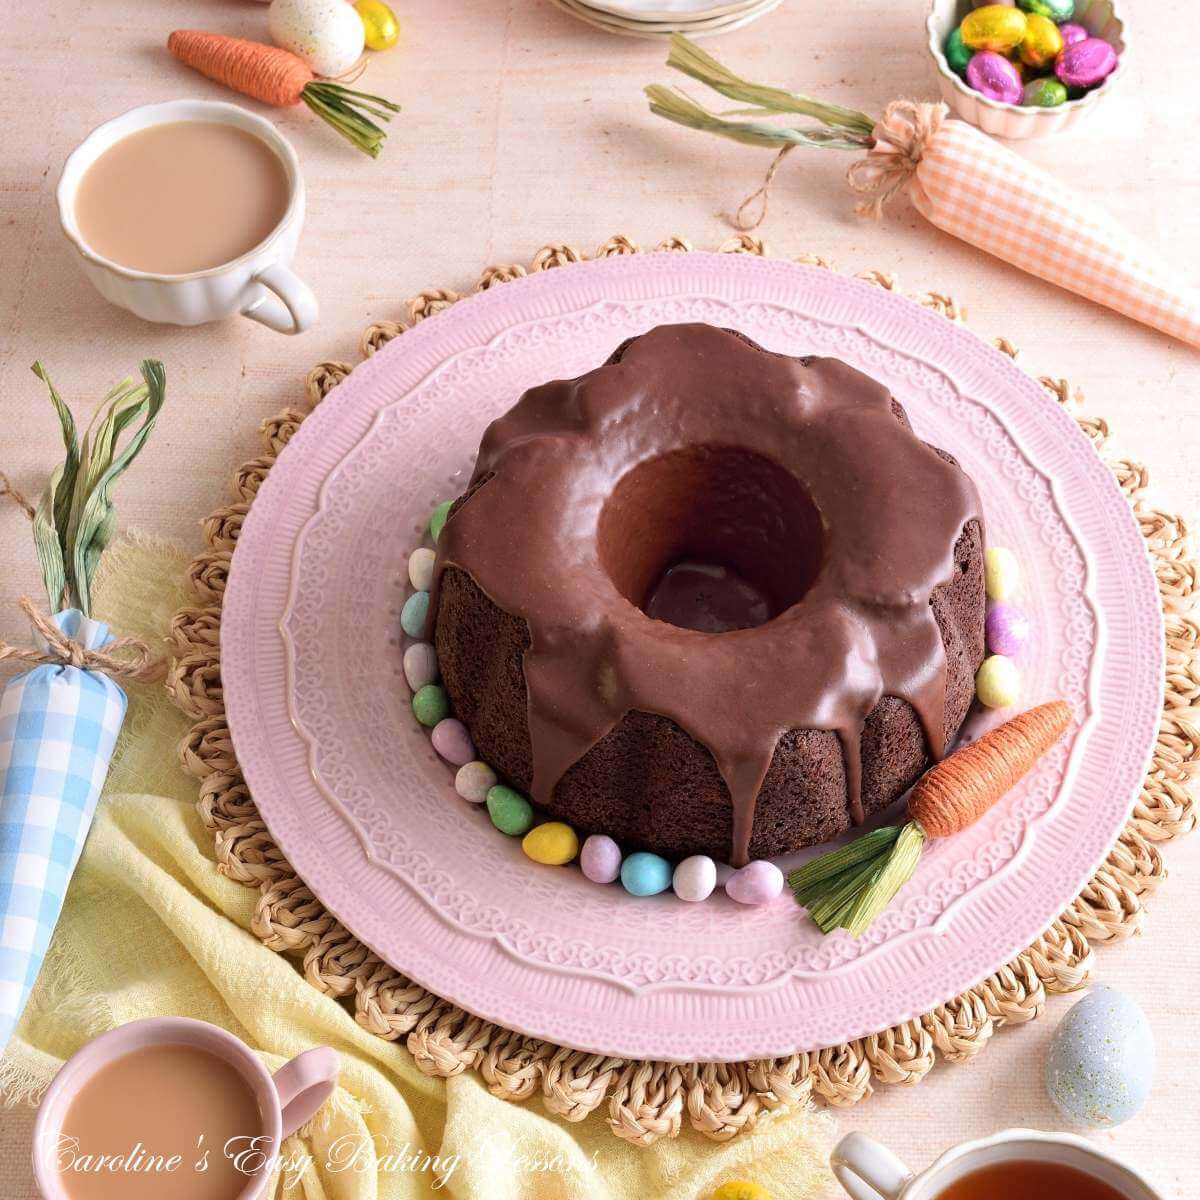
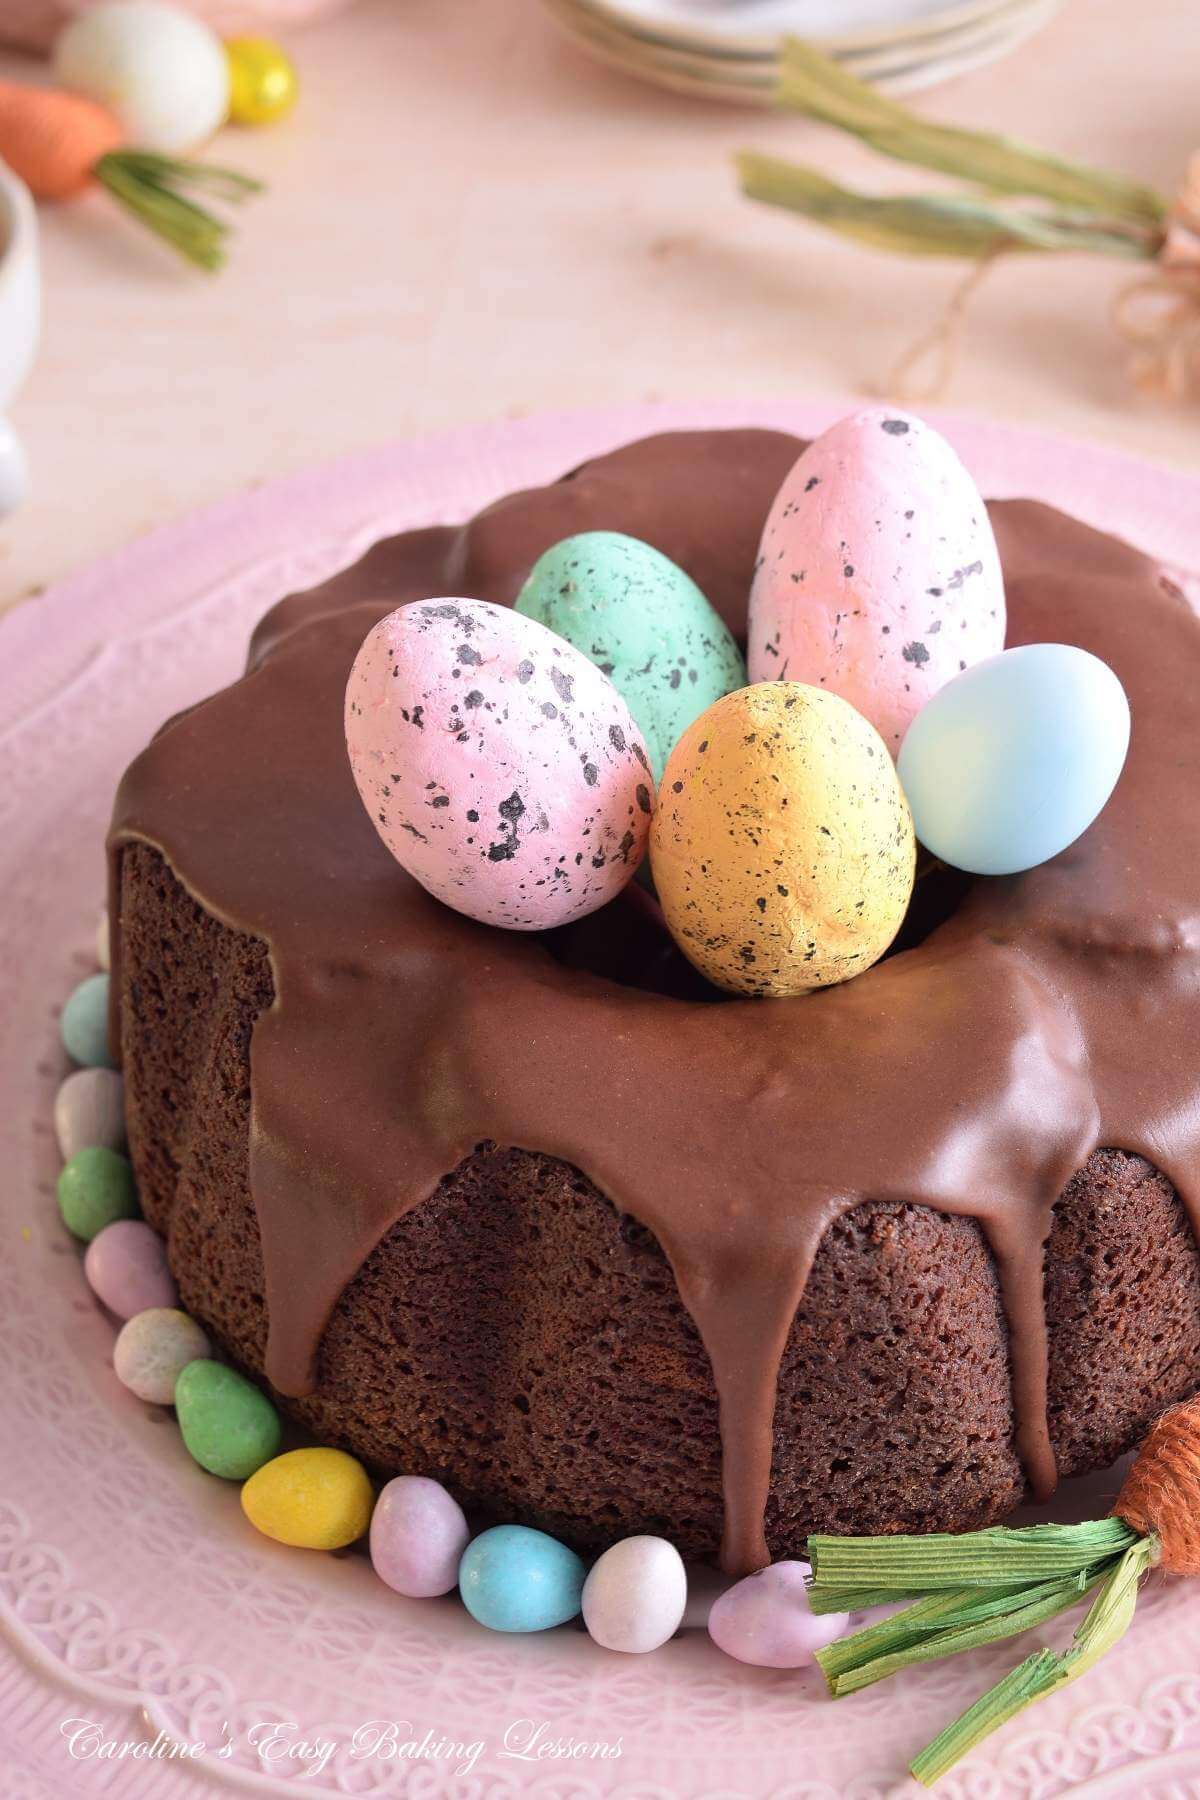
Decoration
My Easter version of Devil’s Food Cake is decorated either with some faux medium-large Easter eggs. Added in the centre of the cake once the glaze is set.
In the original recipe, these were on long wooden sticks that I had to cut to fit the cake nicely. And were purchased in the UK in Poundland. (See the image here).
The 2026 version I used a combination of these eggs plus some medium-sized plastic eggs. These are really easy to find in the lead up to Easter and inexpensive too. You might even have some already.
**Just note, that any on sticks or wires, give a good clean and once dry, wrap in either foil or cling film (plastic wrap).

I also added some mini eggs at the bottom of the cake this time. These were M&M version of the Cadbury’s Mini Eggs. You could also fill the centre with mini eggs too! Which reminds me – I think I did a piñata mini egg-stuffed cake once!
Sprinkles would also be nice on top of the chocolate glaze before it sets. Not needed but for a professional finish as the glaze is very forgiving. Make nice and thick and it’s easy to manipulate, settles flat and shiny too.
Recipe Yield
This recipe makes a standard sized bundt cake, and can easily serve 12 slices if not more.

Equipment
No special equipment required for making this bundt cake. You do need a bundt tin or tube pan.
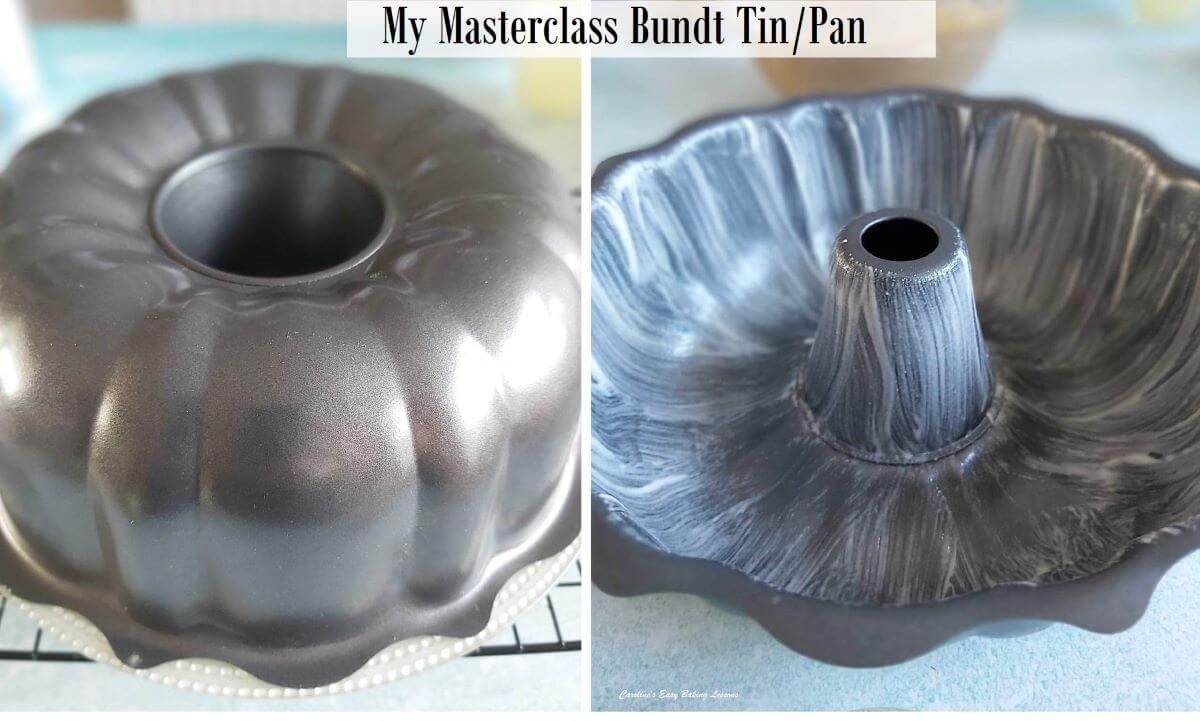
I have made in 2 different widths of bundt pan. I will add photos here of the 2 tins for you to see. The original recipe was using a Masterclass 25.5cm/10″, fluted pan. (27cm/10.6″ including the lip). As shown in the photo here.

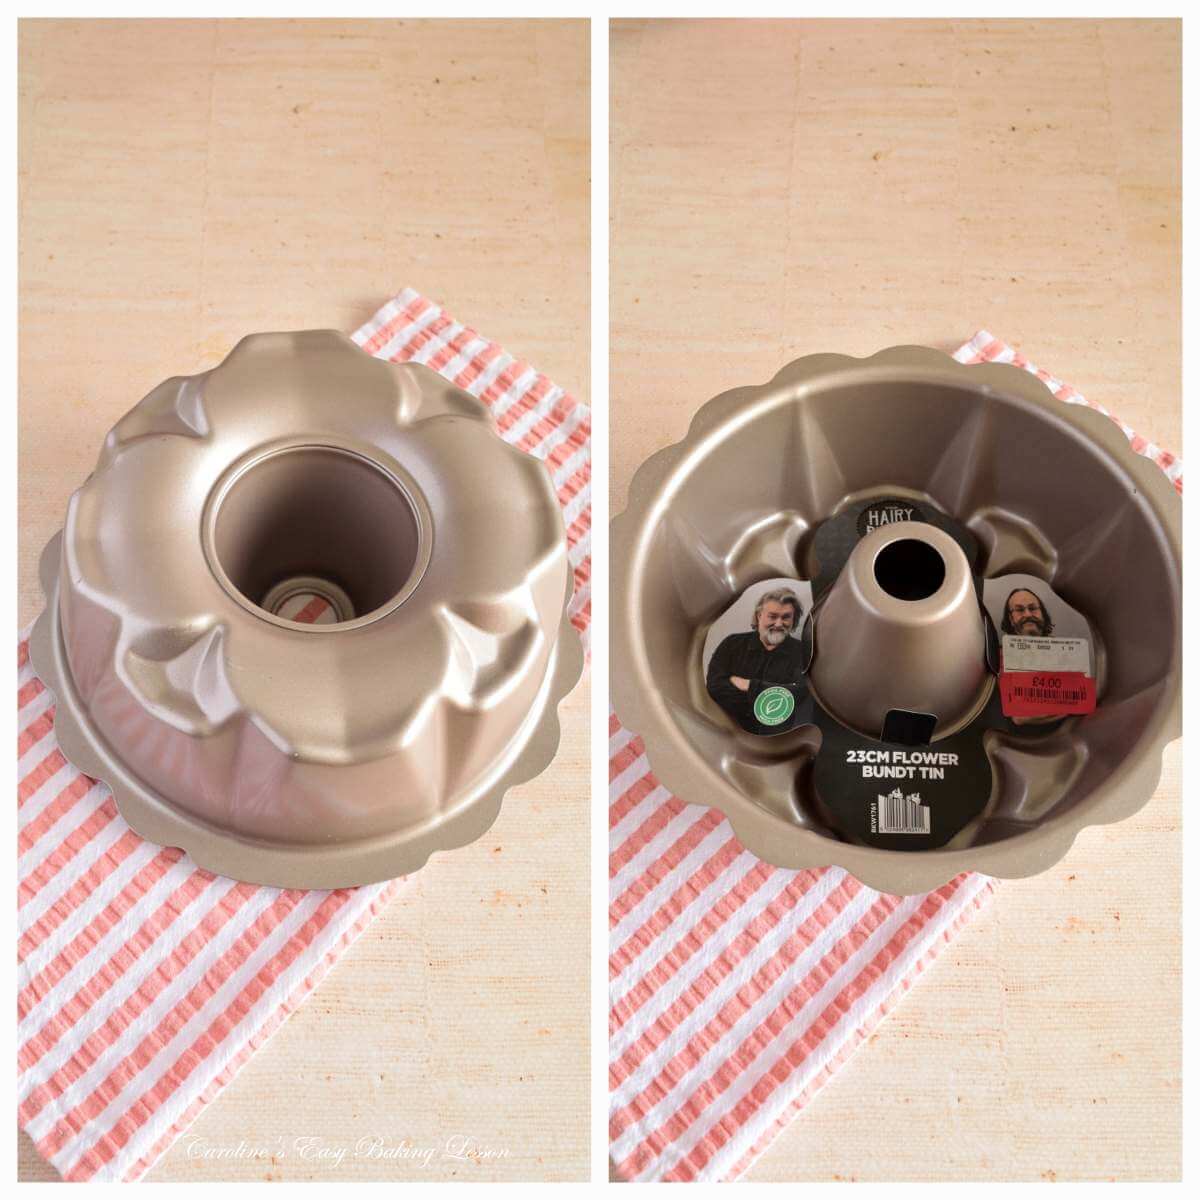
However, for this photo update, I used a new tin by The Hairy Bikers, that I got in TK Maxx on sale for £4! It has a lovely ‘flower’ shape to the top. It is not as wide as the Masterclass pan, @ 23cm (9″), and they both are about 8cm/3″ deep.
.Point to note too, that the Masterclass one, the cake only rises to about 3/4 of the way once baked. So the batter was perfect for this 23cm wide tin.
Masterclass has a baking capacity of 10-12 cups and the Hairy Bikers one is nearer to 10 cups.
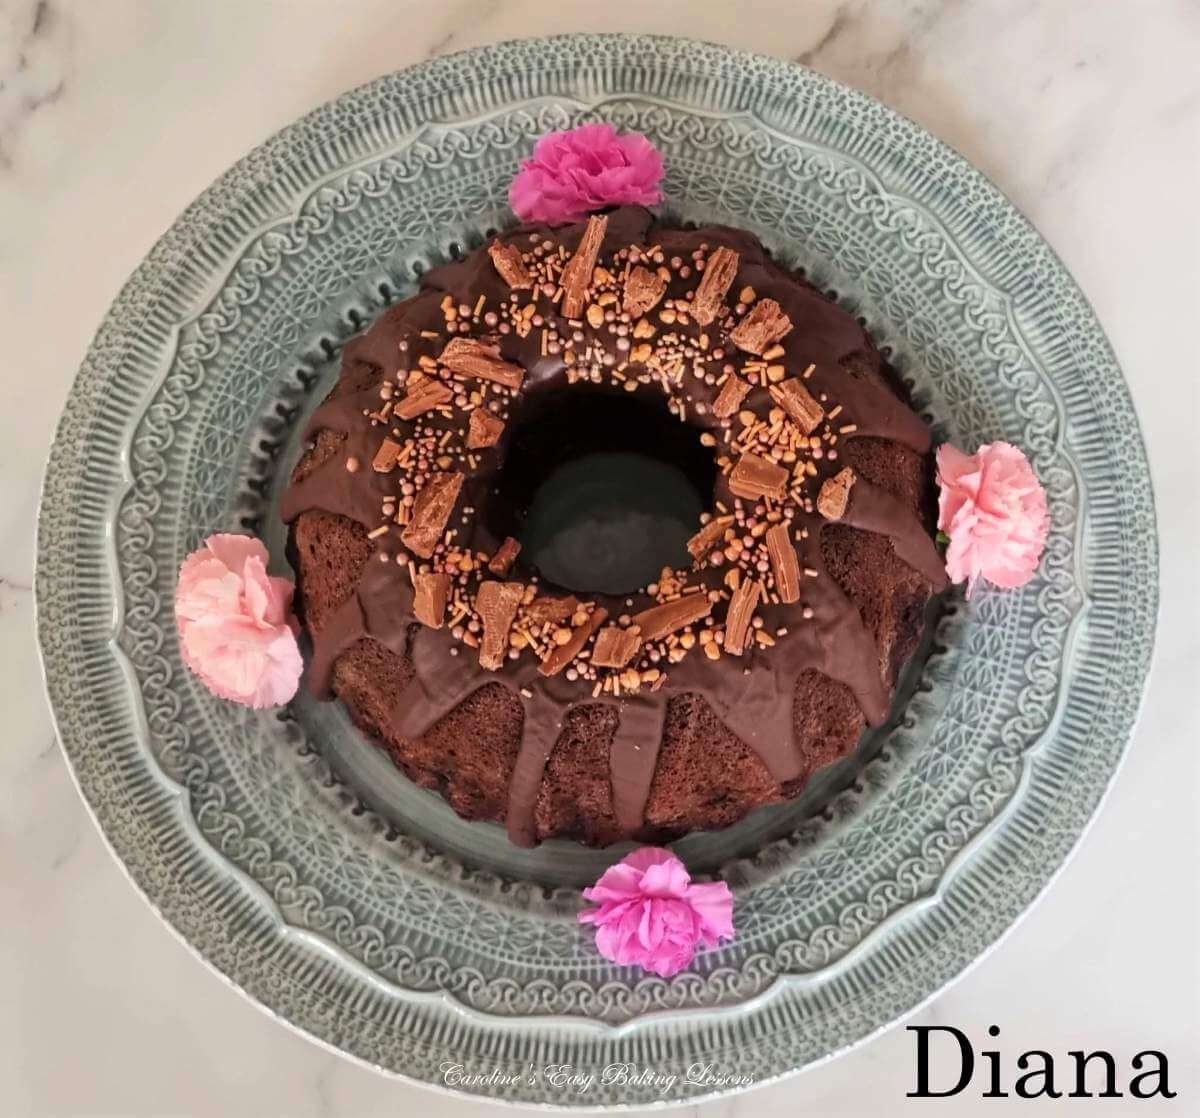
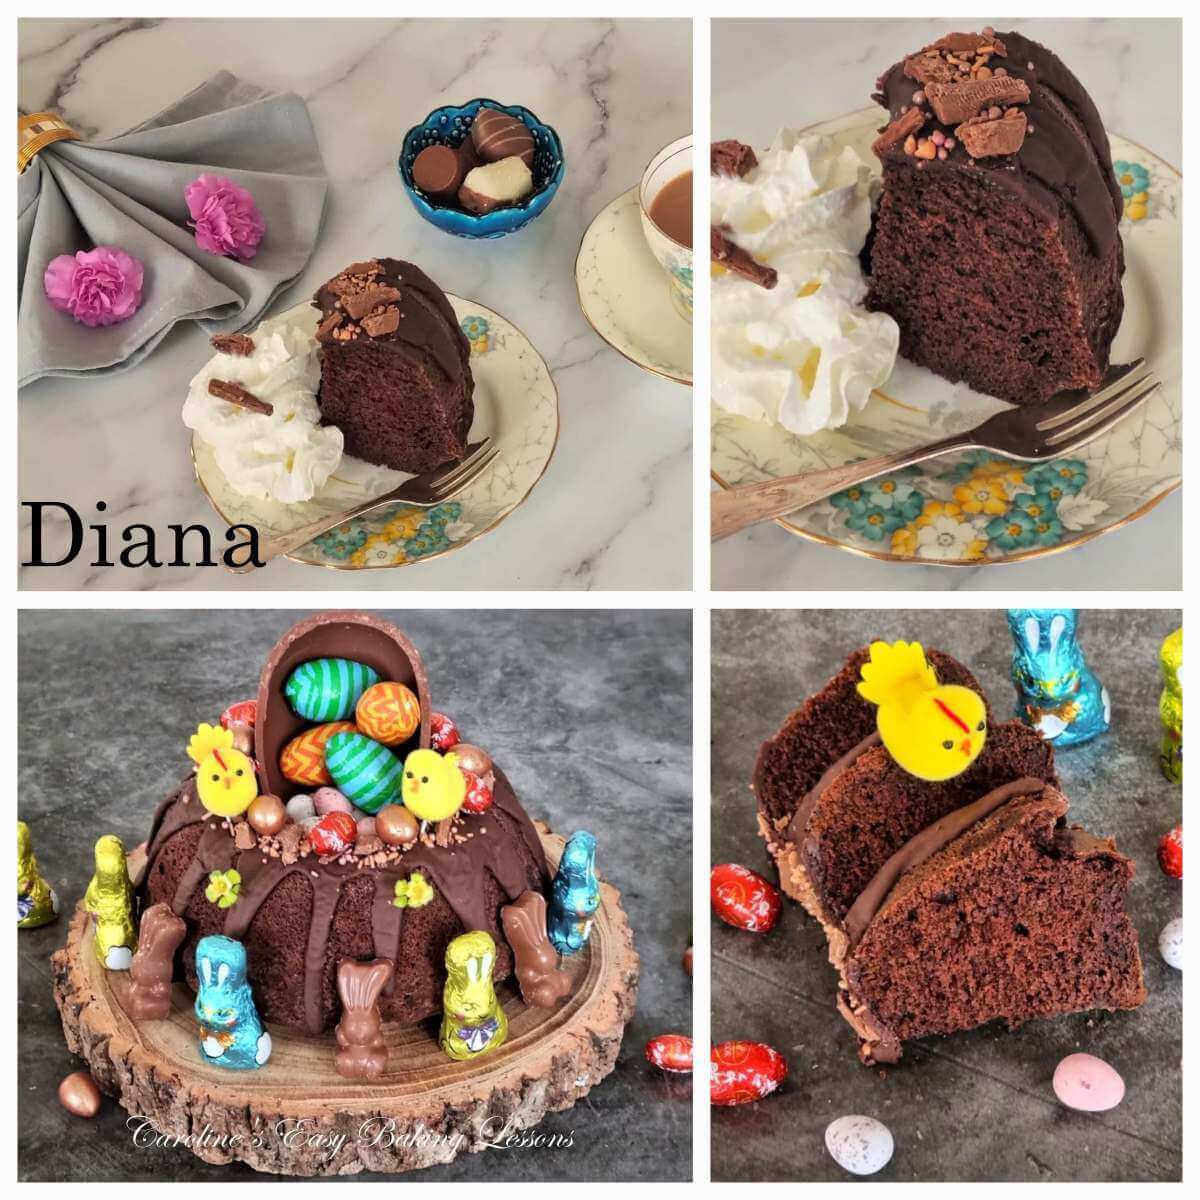
Reader’s Photos
Here are some images by Diana, of this Easter version of Devil’s Food cake, from back in 2022/23. I think she did a great job, (reallly loving the gold sprinkles and flaked chocolate on top). And I heard the cake went down well with the family!.


Step-By-Step Instructions
Prepare The Cake Batter

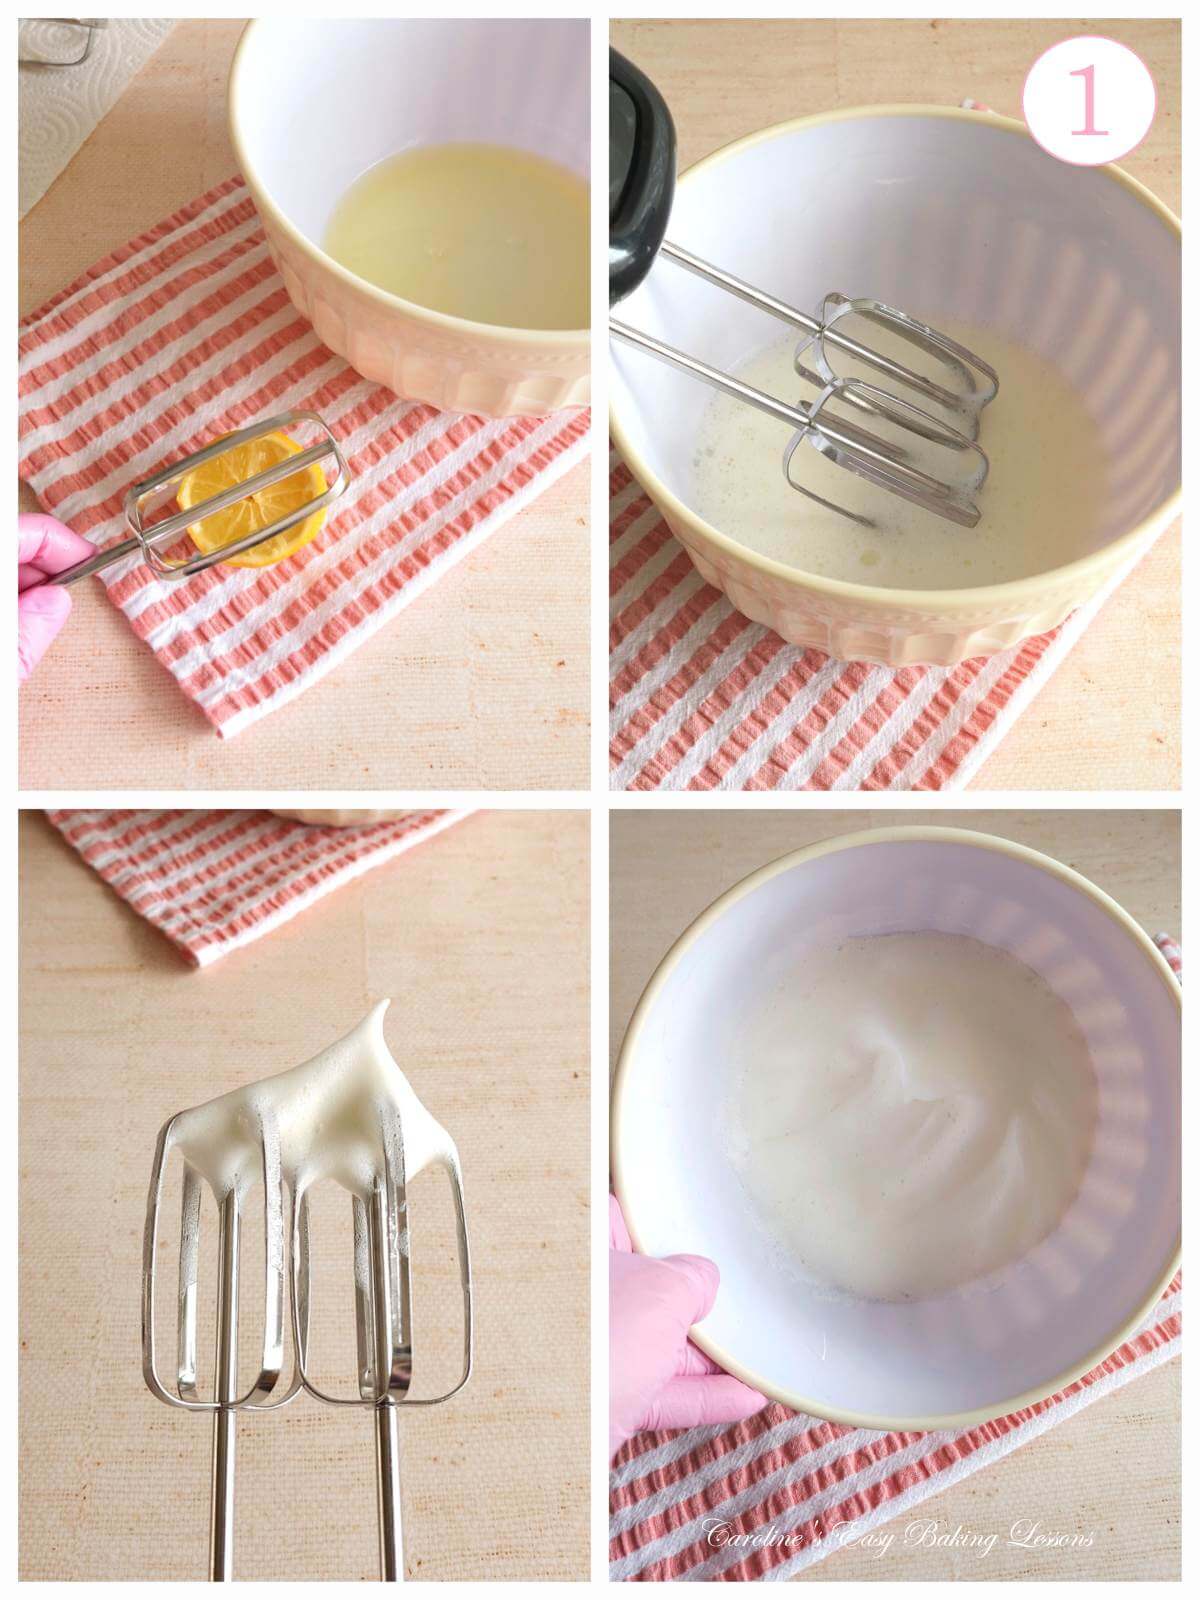
1.Providing you are not too slow (and taking so many images and video shots), it’s easier to start with whisking the egg whites. The beaters need to be clean to do this. Whereas, whisking the other ingredients, is ok to use the used beaters. So begin by separating your eggs very carefully and ensuring no yolks get into the whites. (Whites in the yolk is fine).
2.Make sure the bowl and beaters are really clean and then rub half a lemon on both, and this ensures the whites will beat properly.
3.Beat on high until white, foamy, and medium-stiff peaks are formed. Observe them on the end of the beater or if you can turn the bowl upside-down.
See Photo collage 1 & video for reference.

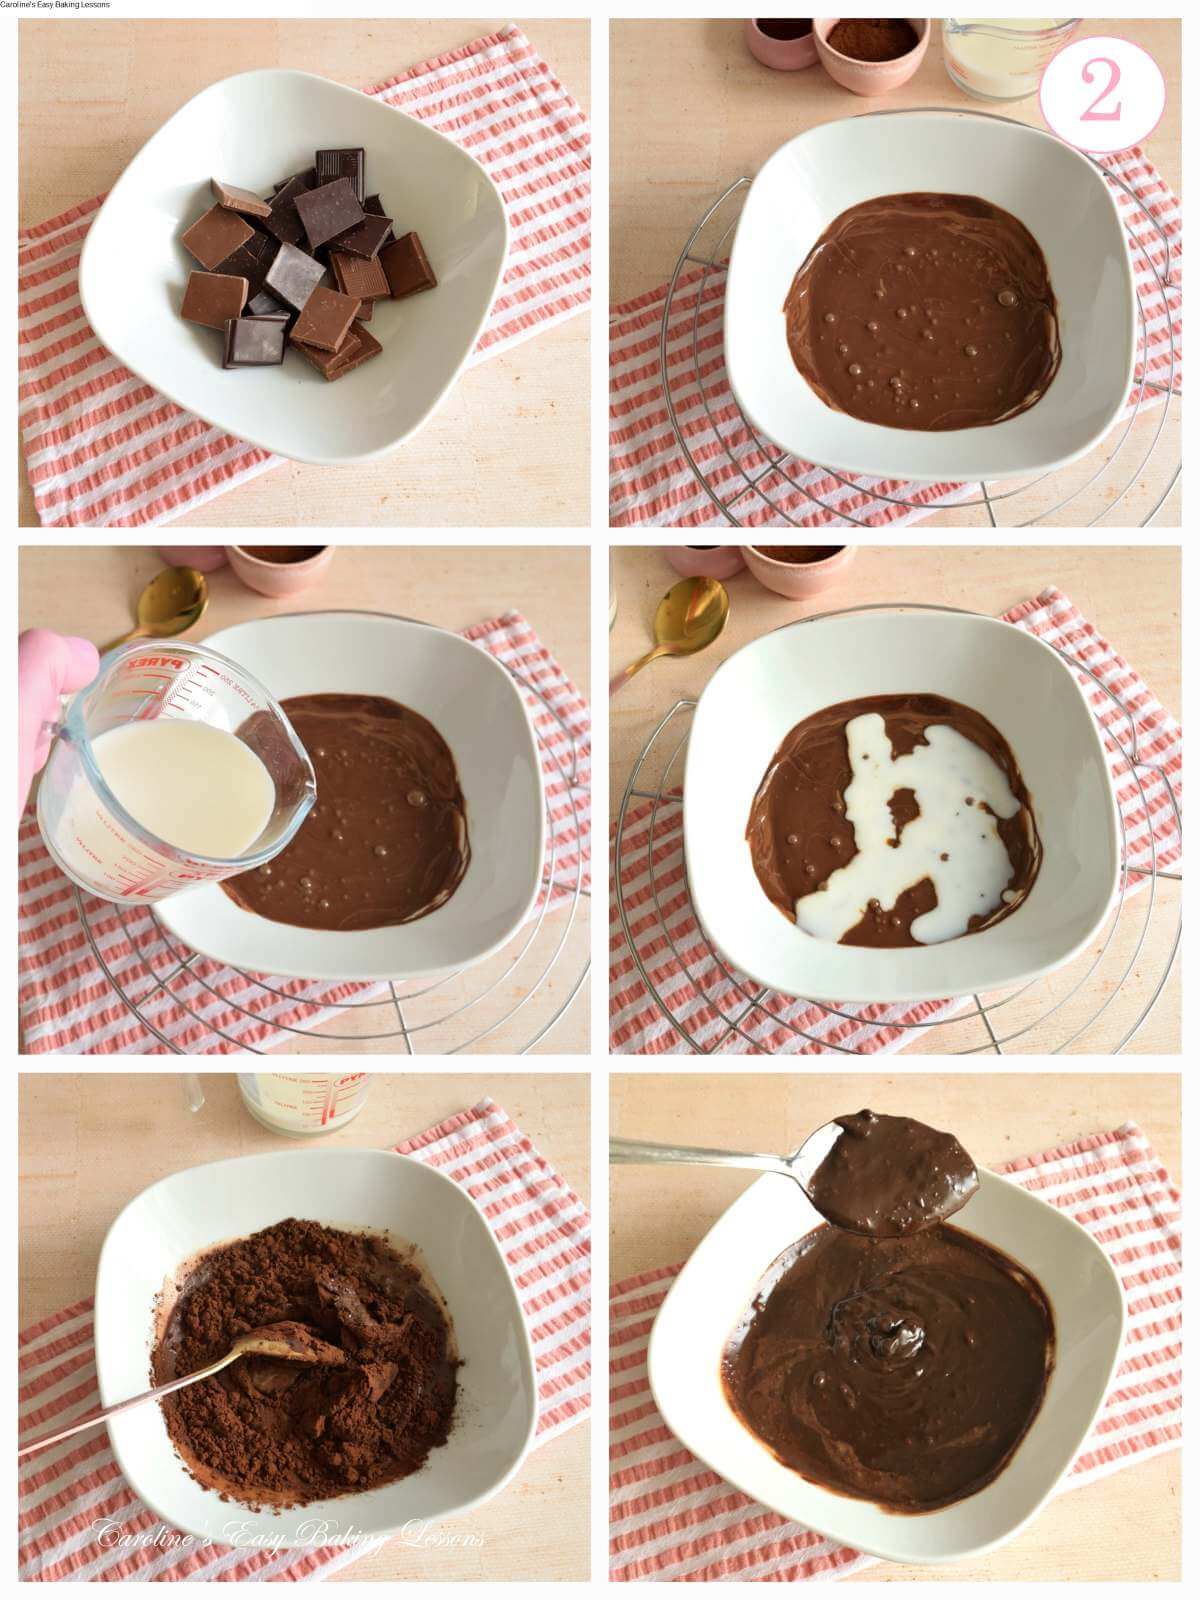
4. Leave the whisked whites to the side and break up the chocolate into a microwave-safe bowl. Melt in 30 second burst at the most. Any more than 30 seconds and you run the risk of burning the chocolate. Just mix in-between each 30 second burst, until all melted. Leave to the side for a few minutes.
5. Gradually alternate adding in the milk, coffee and the cocoa powder to the melted chocolate. **Top Tip – use a bigger bowl as this is messy business and cocoa I always, get everywhere!
6. Don’t worry if there are still lumps in it once all added in. Just mix until relatively smooth. It will combine further once added in with the other ingredients. See Photo collage 2.
7.Put your oven on to pre-heat to:170°c/150°c Fan Oven/325°c/Gas Mark 3.

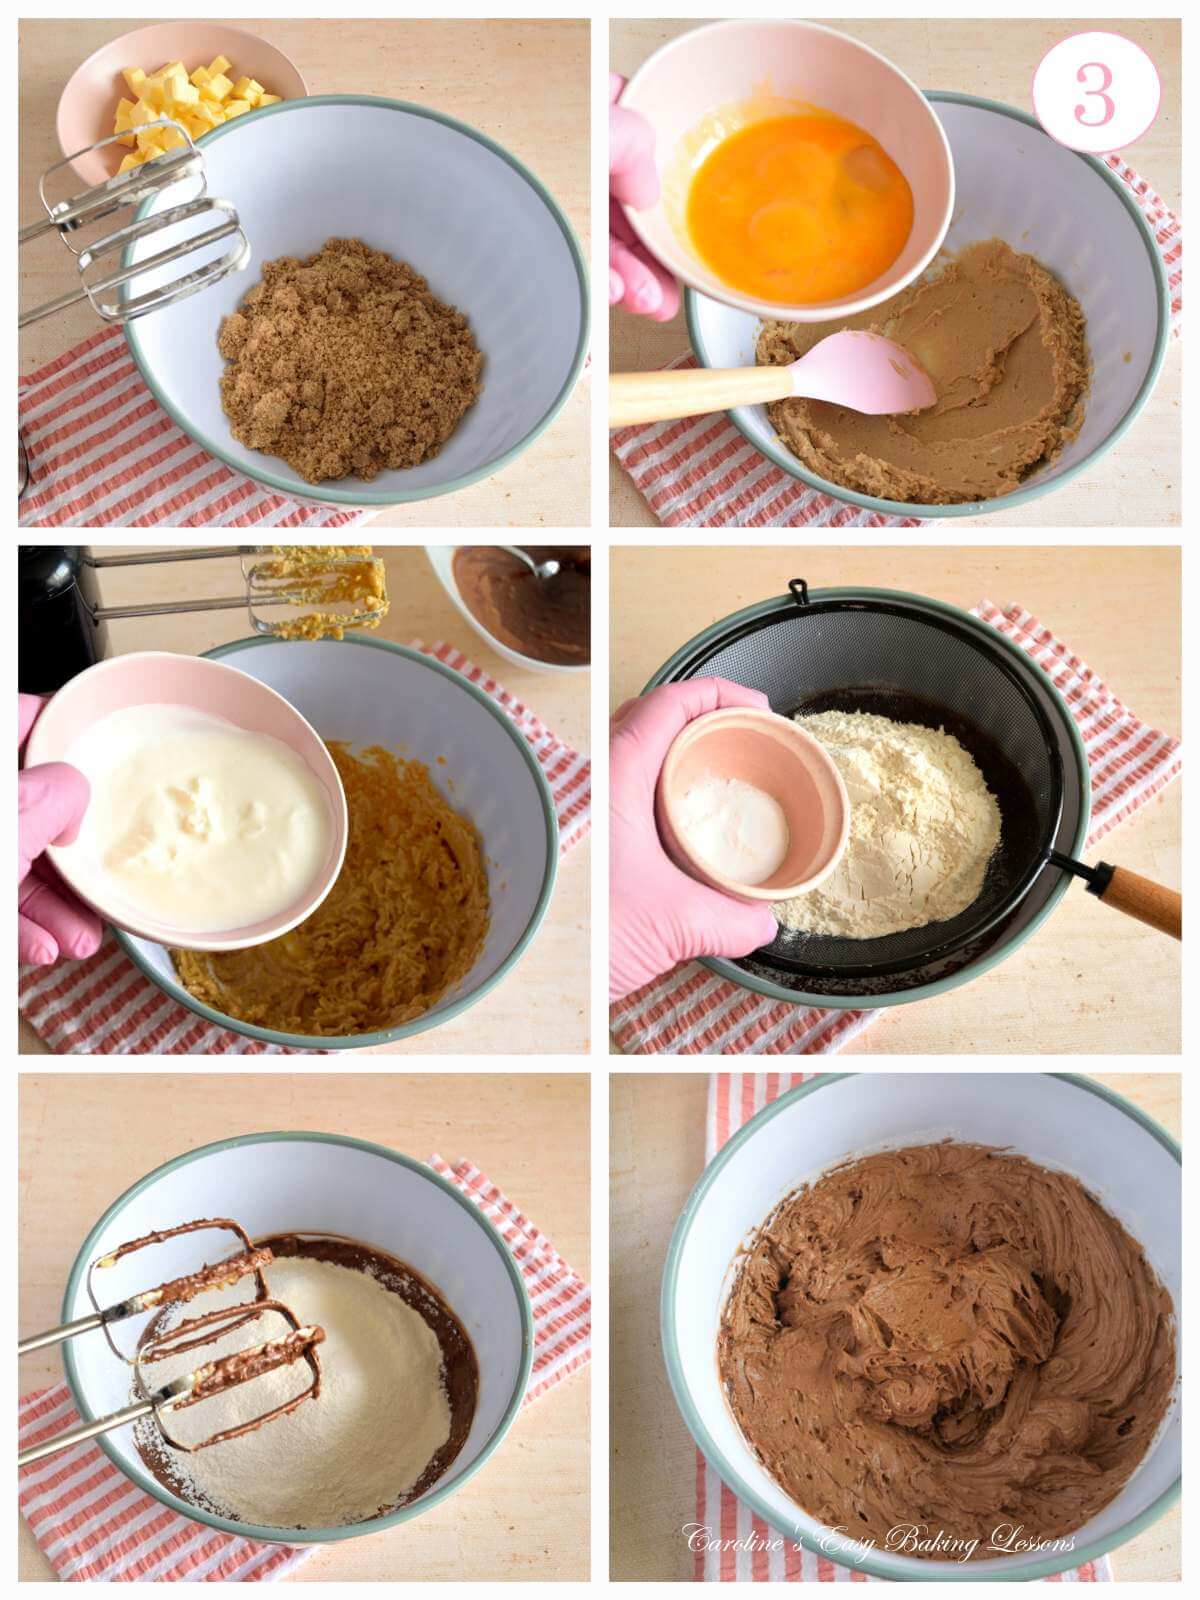
8. Grab the main mixing bowl (or bowl for a stand-mixer), and add in the light brown sugar & softened cubes of butter. (You want to be able to squash the cube of butter really easily with your thumb).
9.Beat the butter & sugar until combined and spreadable. Don’t worry about over-beating.
10.Add the egg yolks and beat till combined. Don’t worry if it doesn’t look smooth.
11.Add in the Greek yoghurt & mix through before adding in the melted chocolate mixture & beating to combine.
12.Sieve over the flour and bicarb (baking soda). Sieve as high as possible to incorporate more air into the batter. Then on low-speed mix just till combined.

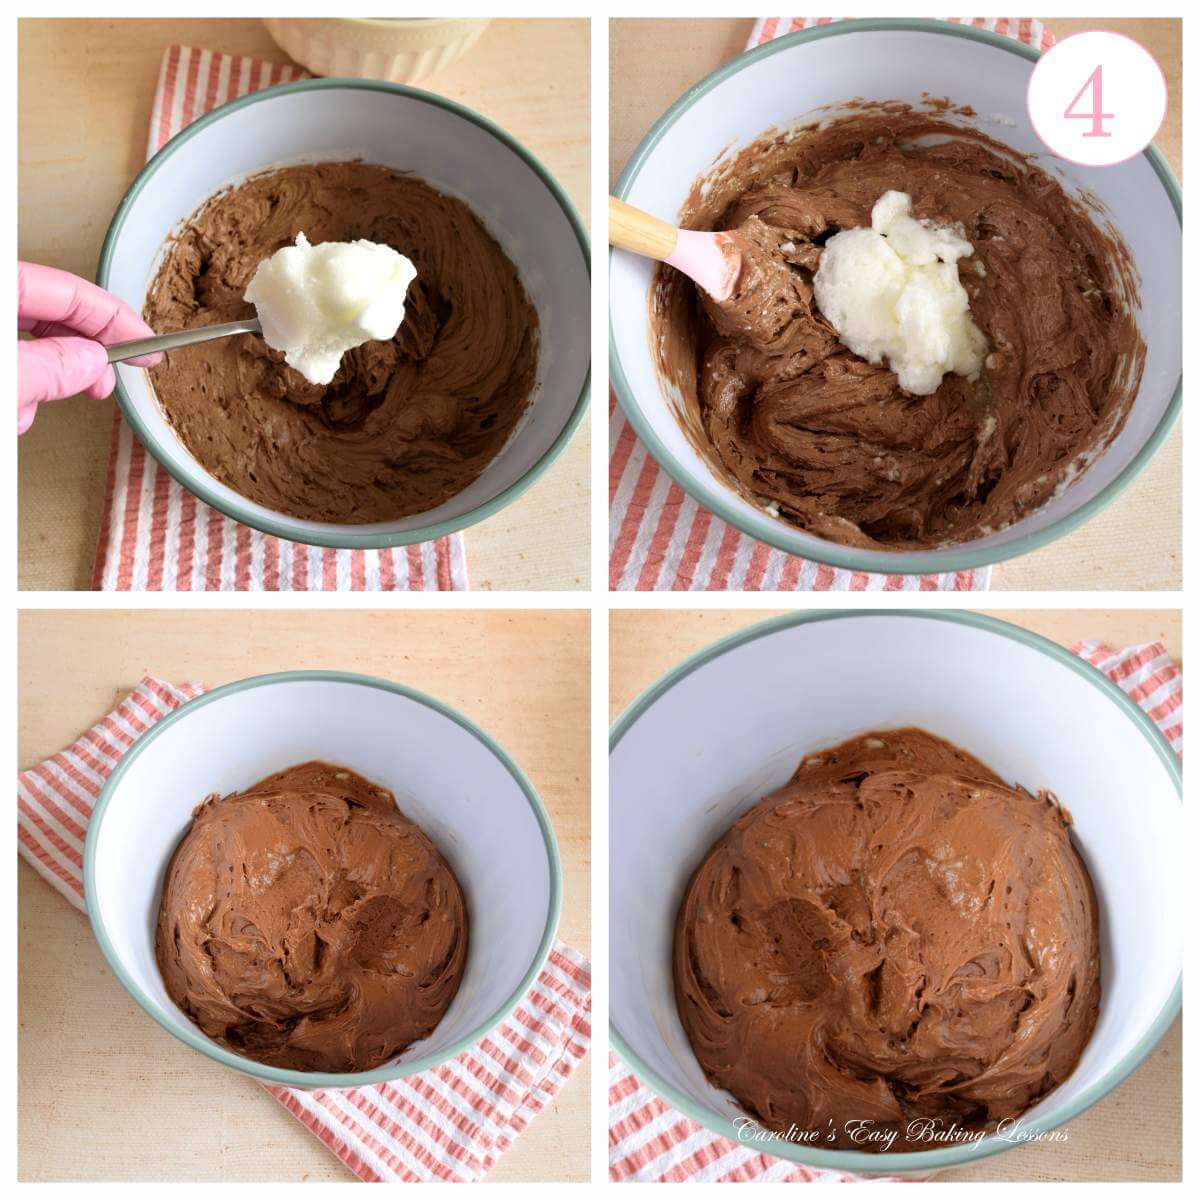
13. Now grab the whisked egg whites and add in 1/3. Use a plastic or silicone spatula (not metal), to ‘fold’ the whites in the batter. Do this very gently like you are ‘writing’ a number ‘8’ in the batter. Where the spatula is your ‘pencil’ and the batter the paper. See the video for how to do this as is important for not knocking out all the air you worked into the egg whites. **Note, you can just fold in about 80% of the way, as when you start adding the rest, the batter will start to loosen and be easier to do.
14. Add in one more 1/3 of the whites and fold in like before. Then repeat with the remaining whites until no more white is visible. It will be a very thick batter. See Photo collage 4.
Preparing The Bundt Tin

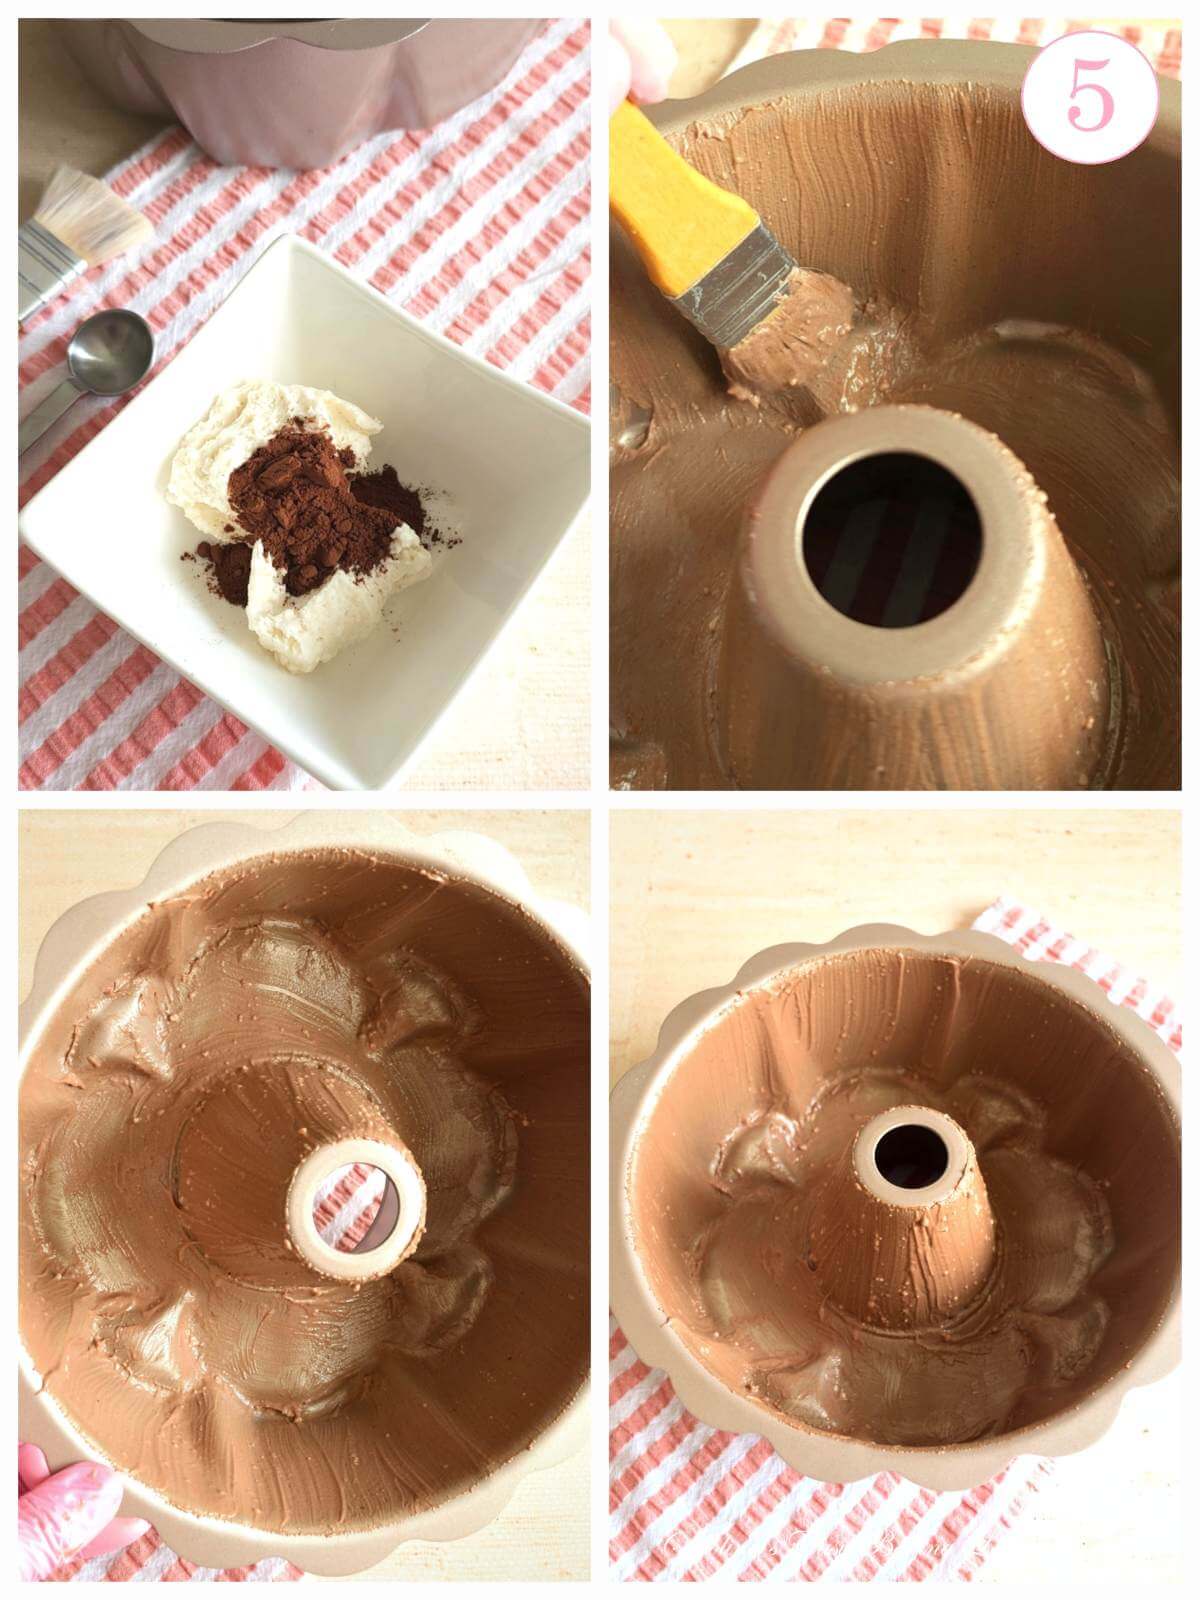
1.Greasing the bundt tin is very very important. I always recommend making your own lining paste (also known as Cake Goop). It is great for greasing in baking and cooking. And the absolute best for bundts. See how to make lining paste/Cake Goop. Alternatively you can use a lot of cake release spray or butter & flour.
2.To use the lining paste, decant 2-3 tbsp of the paste into a small dish and add in 1/2 tsp of cocoa powder. I make the paste beige for darker cakes like chocolate or carrot cake. Mix in the cocoa powder really well.
3.Start on the bottom of the bundt tin and brush on the paste. Then work on the sides, by brushing in upward strokes. Continue working your way around until all areas covered. Then reapply a second coat. You can’t ever add too much. See Photo collage 5.


Baking The Cake
1.Spoon the thick cake batter into the prepared bundt tin and level out as best you can. Tap the tin a few times on the worktop/counter, before popping into the centre of the pre-heated oven (or large open-front air fryer) to bake.
2.Bake the cake for 40-55 minutes until risen, and a cocktail sick inserted near the centre will come out clean of crumbs.
**Note the wider masterclass tin, with shallower layer of batter will bake a little quicker than a not as wide, but deeper cake. So continue baking before checking again.

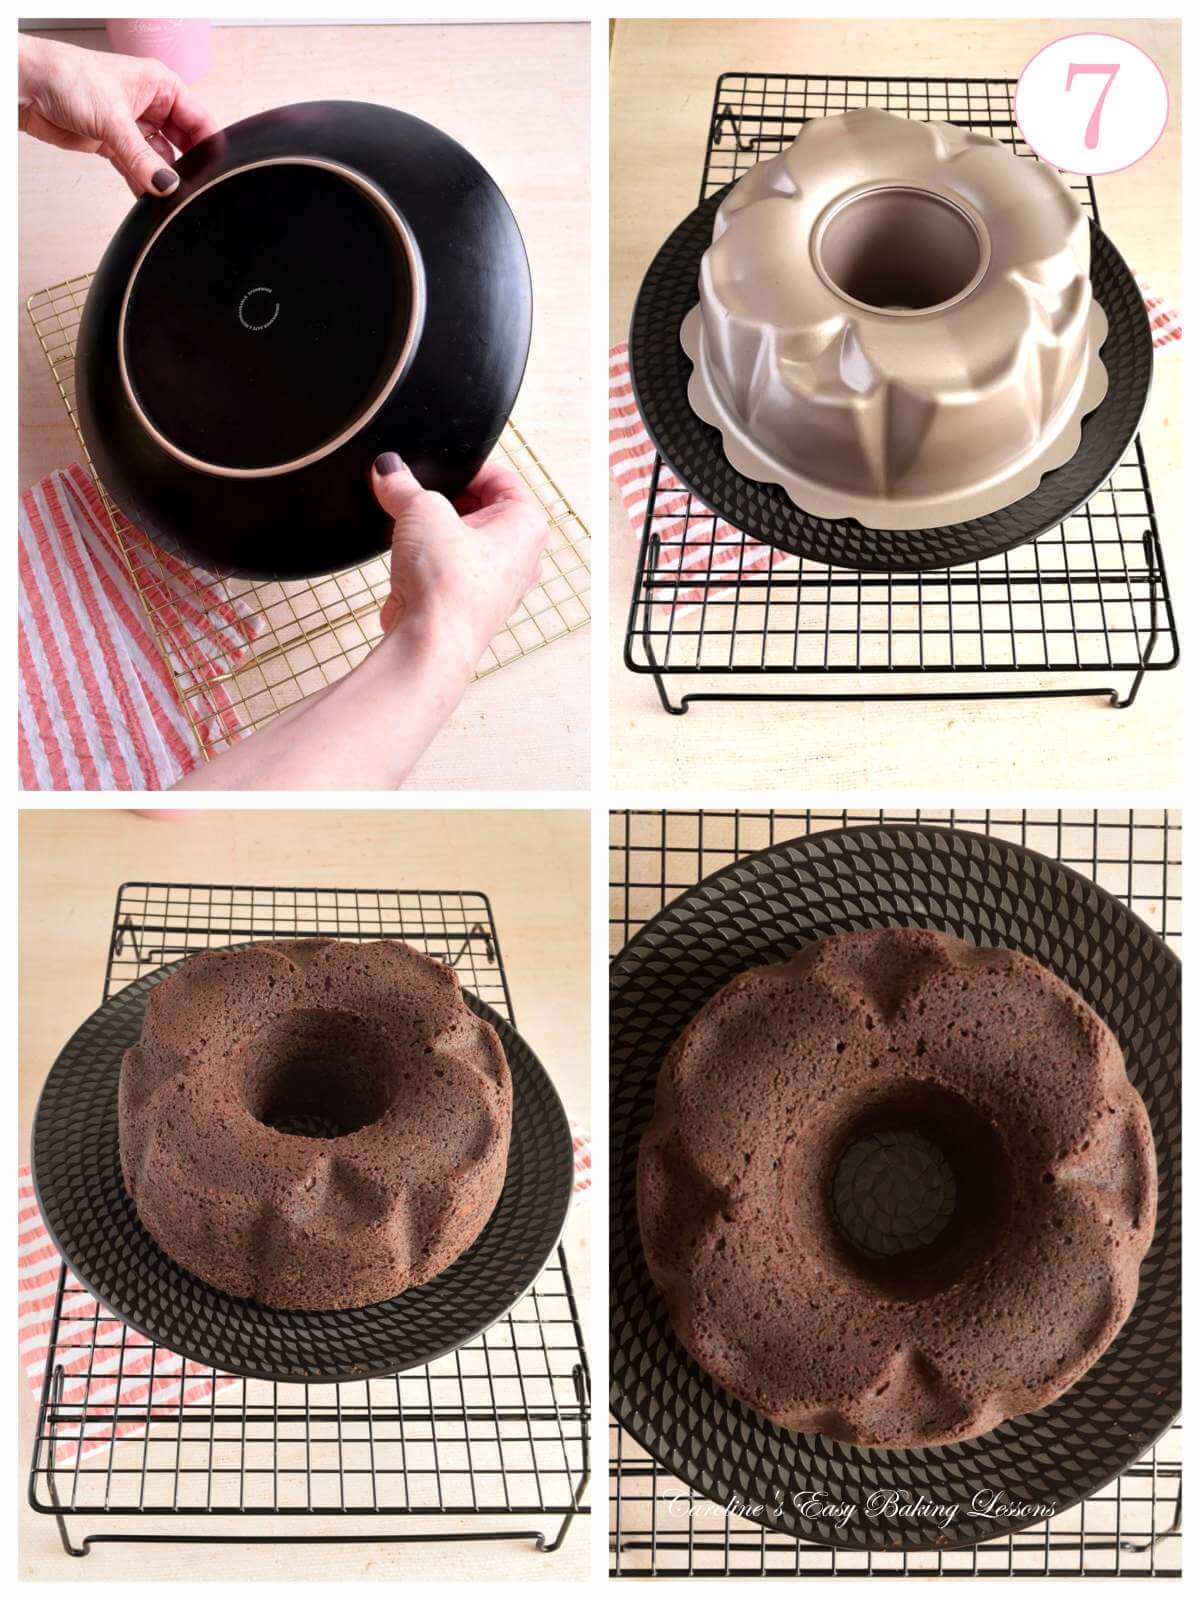
3. Leave the cake in the tin, and on top of a cooling rack, for 30 minutes. Do not try and turn out before that 30 minutes is up.
4.After the 30 mins, run a silicone or rubber palette knife around the edge of the cake if any looks to be sticking. Then place a large plate or cake stand on top.
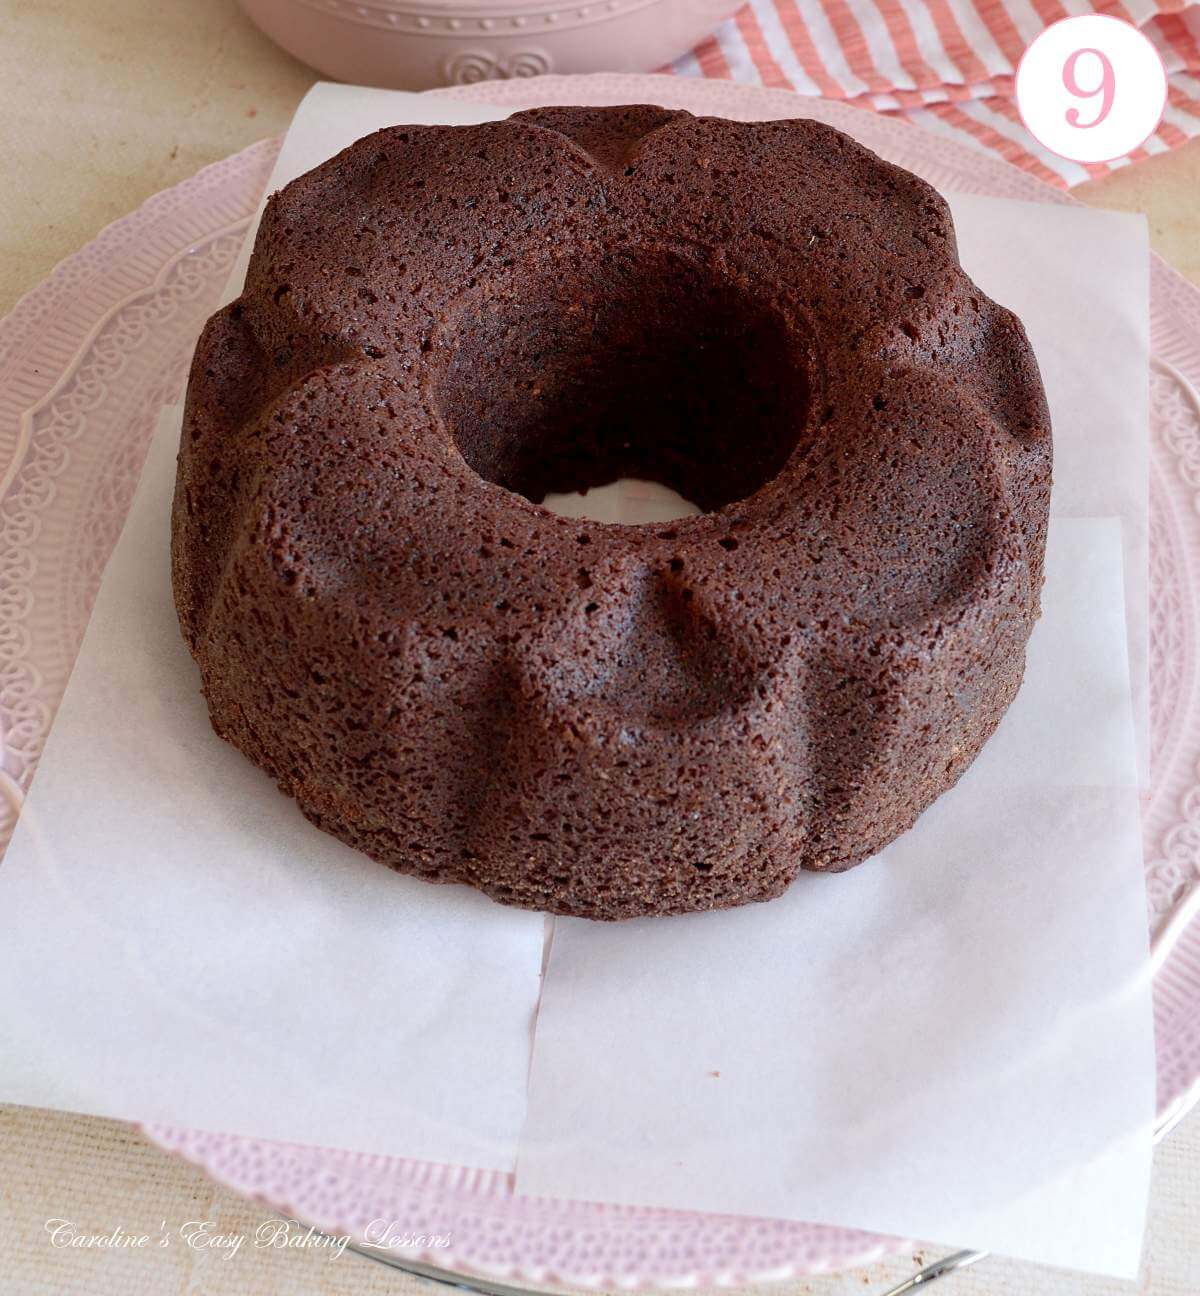
5.Hold everything together and flip over, placing the plate onto the cooling rack. Tap the cake tin and it should lift off easily. Leave to cool for at least 30 minutes before adding the glaze.
**You can leave to cool longer and glaze up to 3 days later. Wrap well in cling film (plastic wrap) after fully cooled and left at room temperature.
The glaze should not be made too far ahead of time. So best once the cake is out of the cake tin.

Preparing The Chocolate Glaze
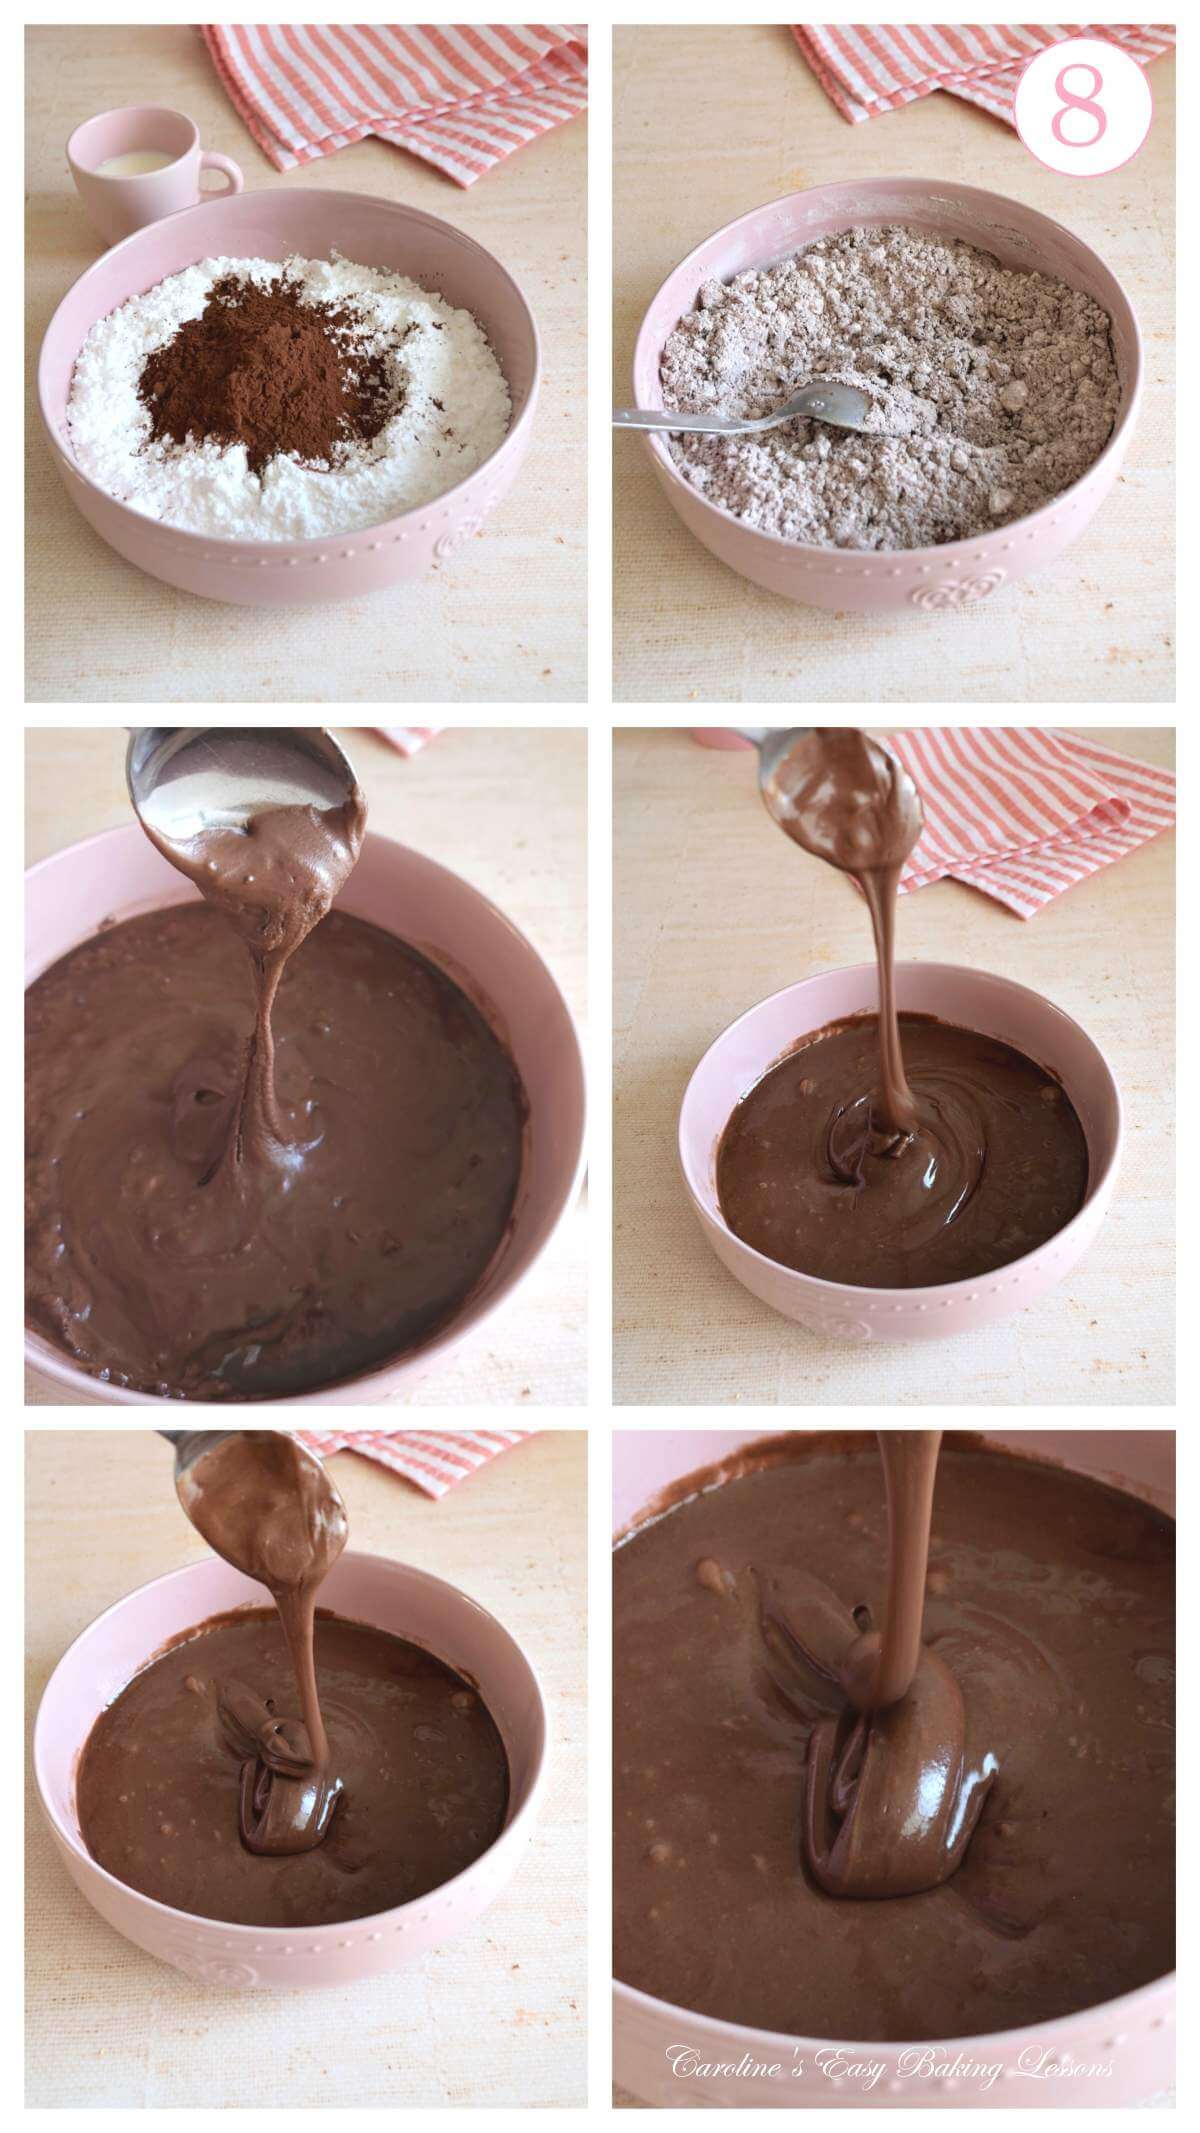
1.Sieve your icing/powdered sugar into a bowl larger than you would normally use as the sugar and cocoa gets everywhere. Then add in the cocoa powder and very carefully mix till combined.
2. Add in 1 tsp of the milk (or water),and mix until you have a very thick dark brown paste. Push down well on the sugar with the back of spoon and make the sugar take on as much liquid as possible before adding in anymore.
3.Once you have a very thick stiff paste, start using 1/2 then 1/4 tsp of liquid at a time until you have a smooth thick but pourable glaze. You can see different thicknesses of glaze in my Glaze/Icing 101 video. but you want a thick glaze that will very slowly drip off a spoon. This is what I call a controlled glaze. You can make it work for you, easily manipulating it to go where you want and not have unsightly pools of glaze on the cake stand.
See Photo collage 8, the last 3 images.

4.To keep the plate tidy too, I like to cut a sheet of baking paper and cut into 4 pieces, that I slip under the cake.
5.Take a spoons worth of this thick chocolate glaze, and add to the topmost part of the cake and spread across. Work across the top of the cake. And then add a little to nearer the edge and let a little drip down one of the groves. It should be very thick and so easily manipulated to where you want with a small spoon or even cocktail stick.
**Watch the video for step-by-step of this stage.

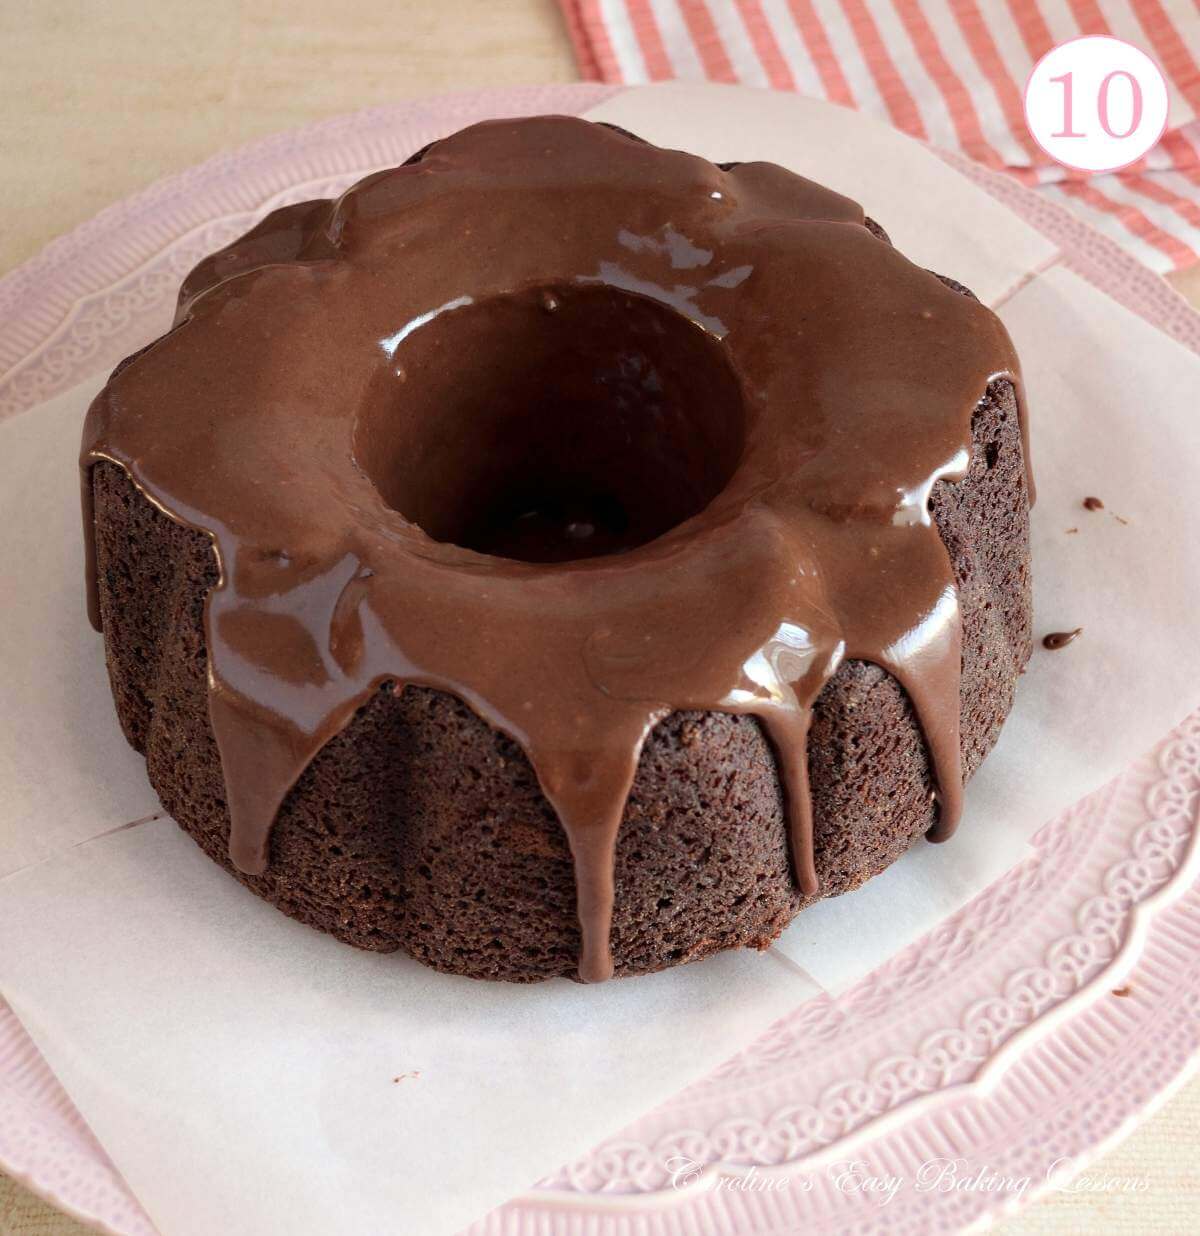
6.Work your way around the cake, spread some on the inner hole of the cake, and a second layer on top of the cake. There is enough glaze for 2 layers on top and down the groves.
Like in photo 10 here.
But if you want to cover all the cake or extra for serving alongside the cake –Double the amount of glaze. The smaller amount of glaze is really good when serving alongside ice-cream or cream.

7. Leave the glaze to set (even if looking a bit lumpy, it will be fine and settle out flat and shiny), for at least 30 minutes. Don’t put in the fridge as it can cause condensation. You can add some sprinkles before it sets too if you with or even crushed nuts.
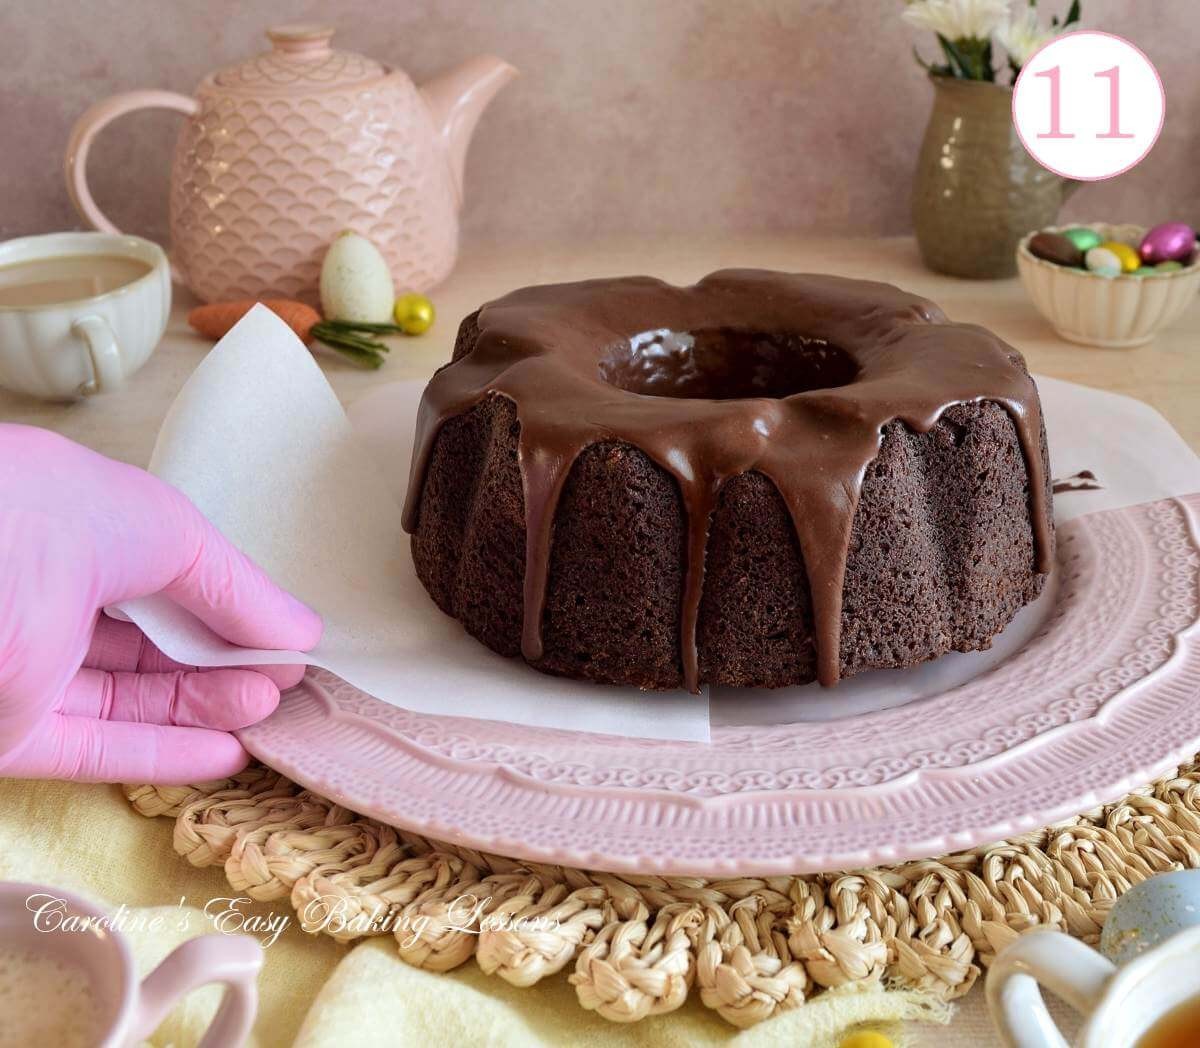
8. Once set you can very carefully press one hand on the side of the cake (where there is no glaze). And pull one piece of paper out at a time.

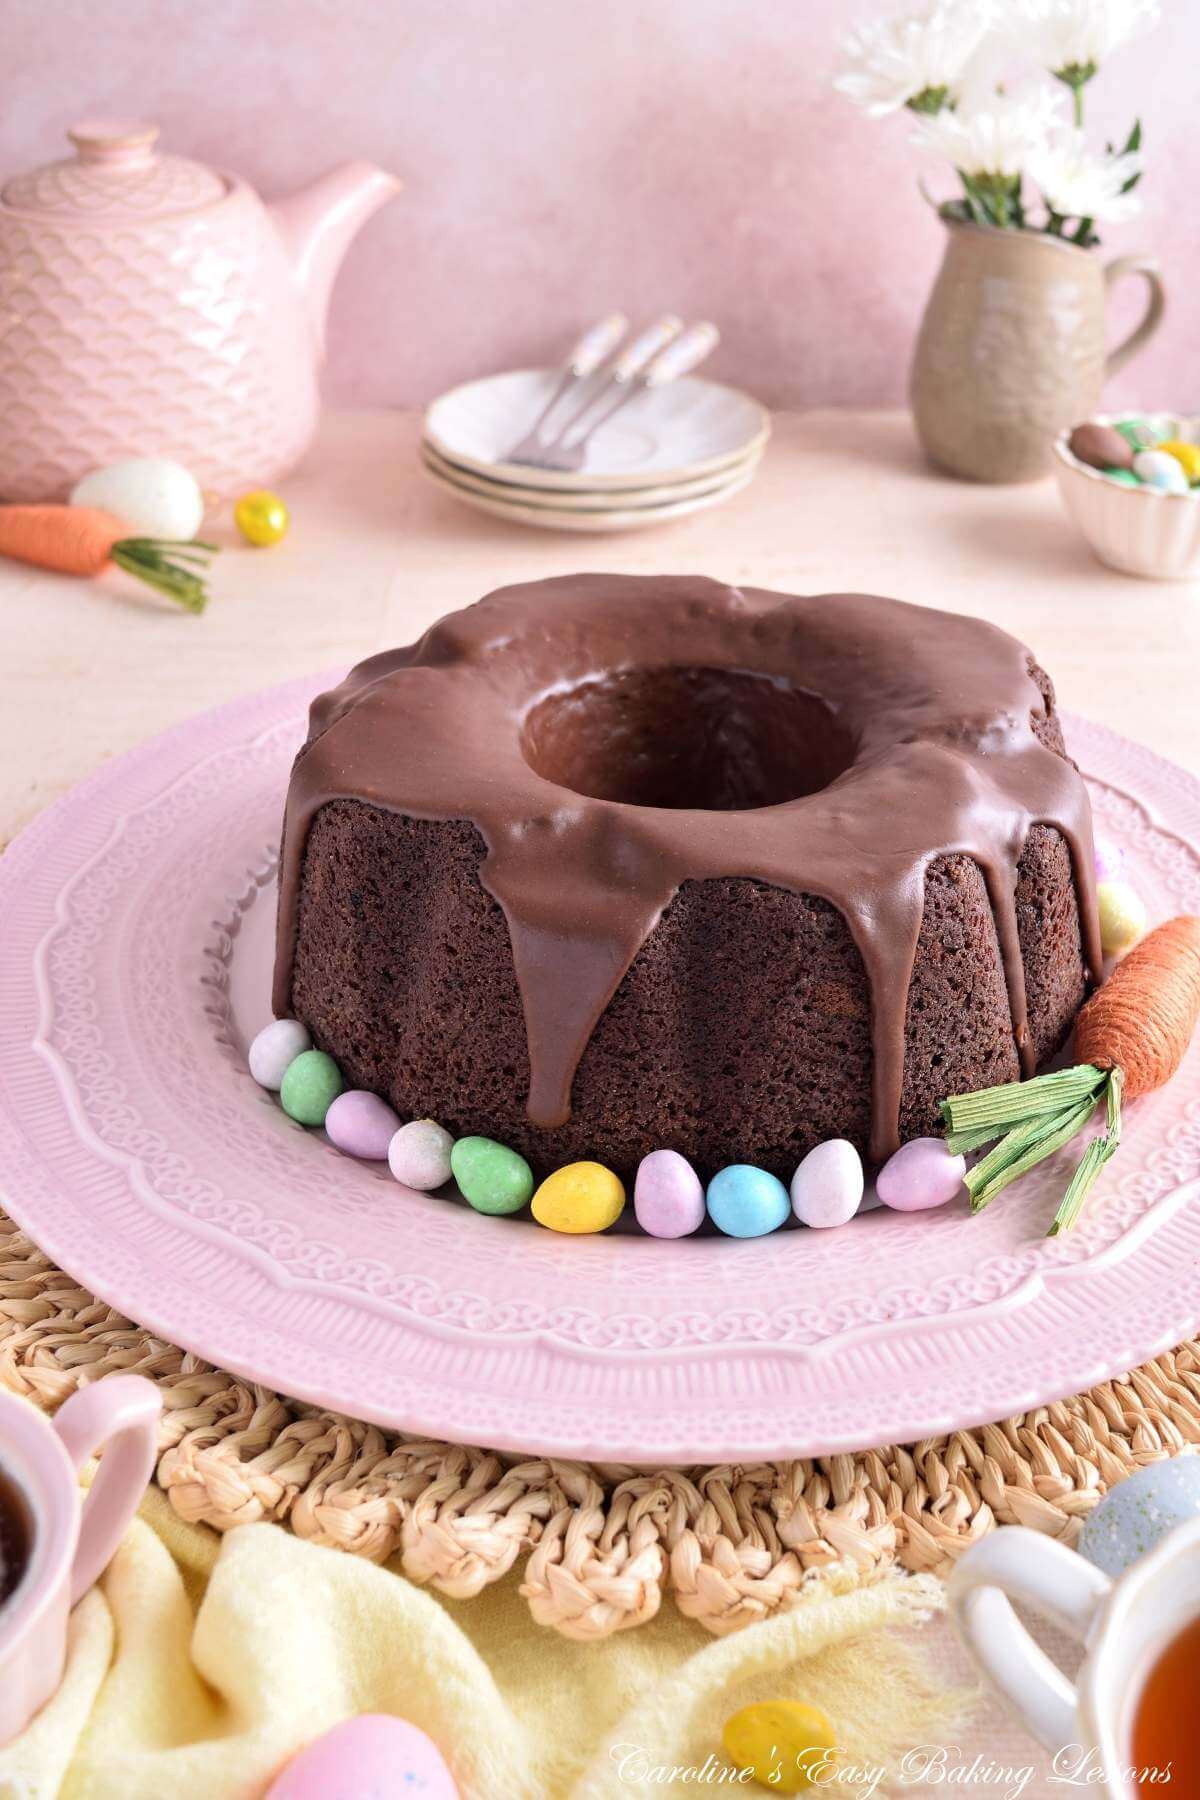

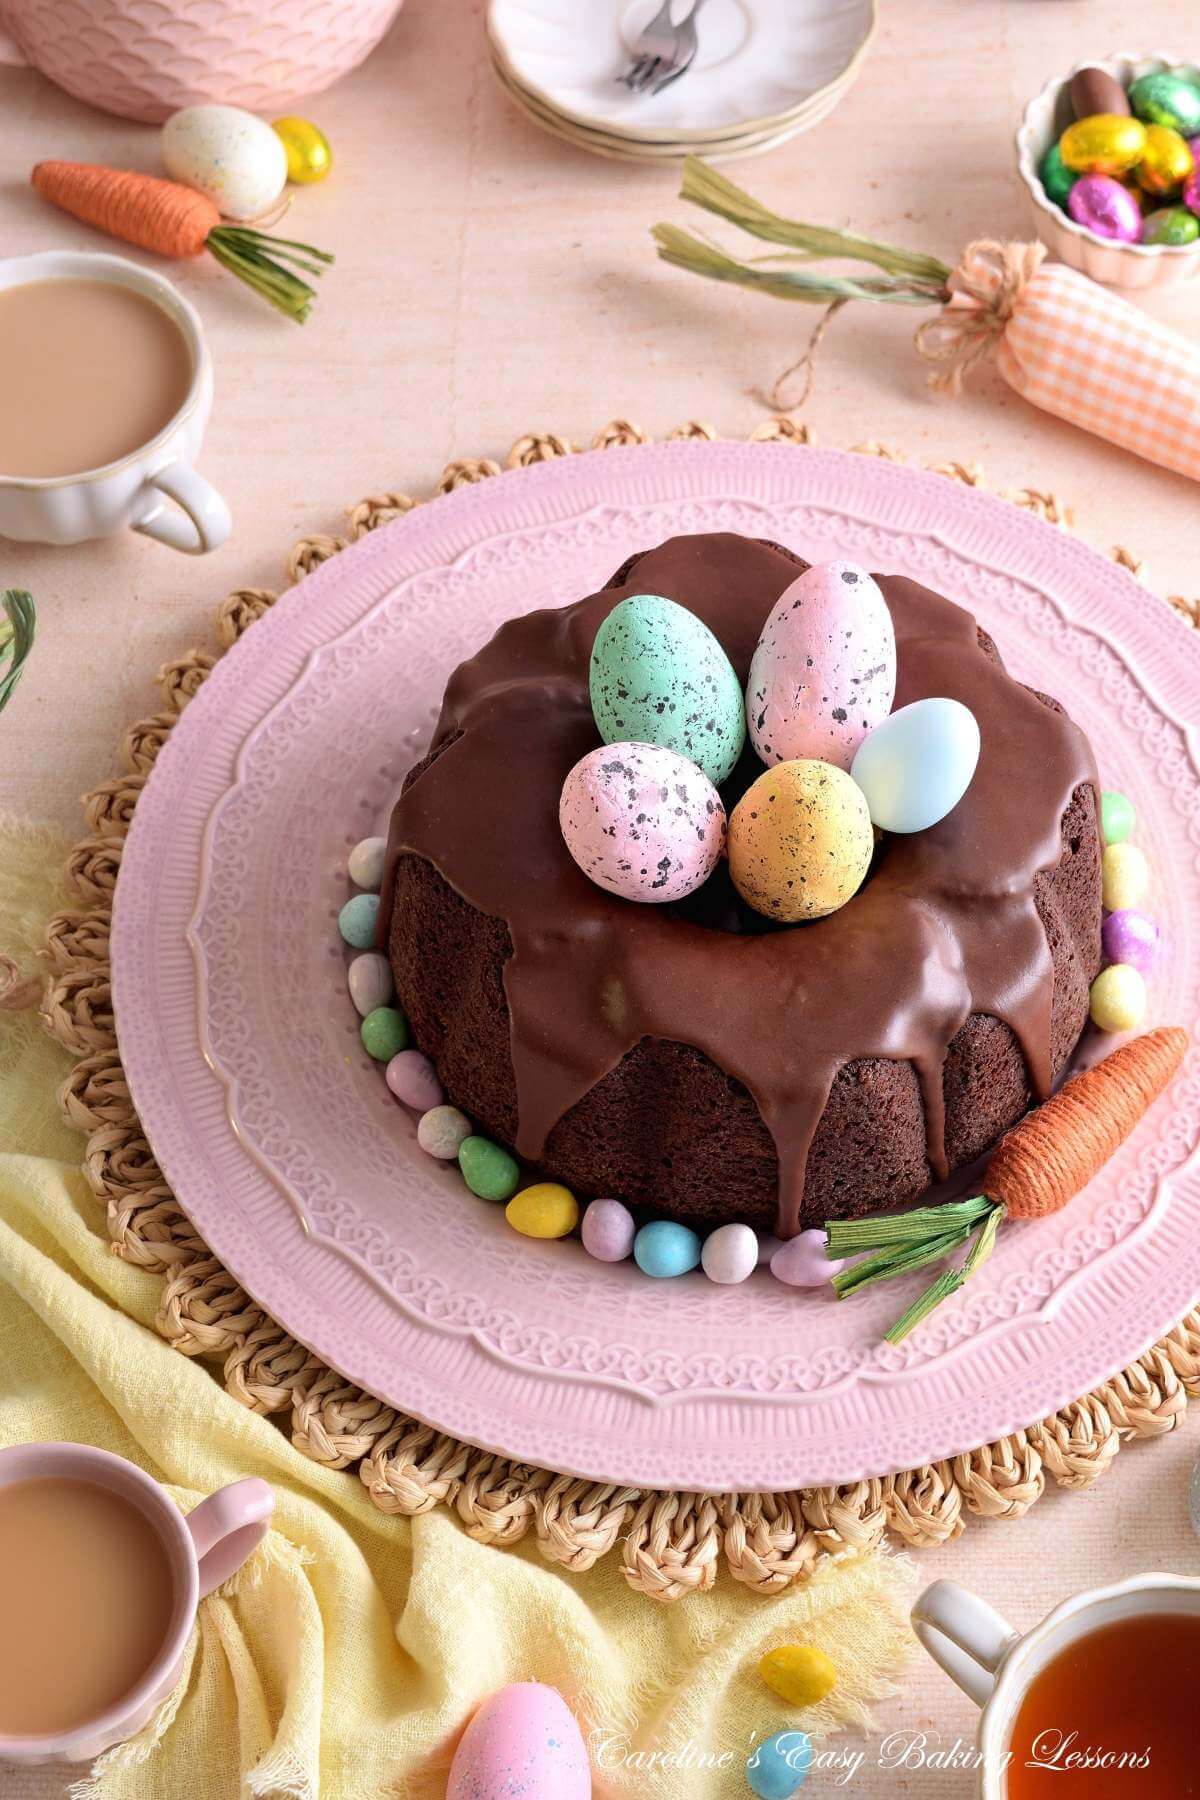


9. When ready to serve you can also add some faux Easter eggs into the centre of the cake. And/or some mini eggs around the base of the cake.
Serving
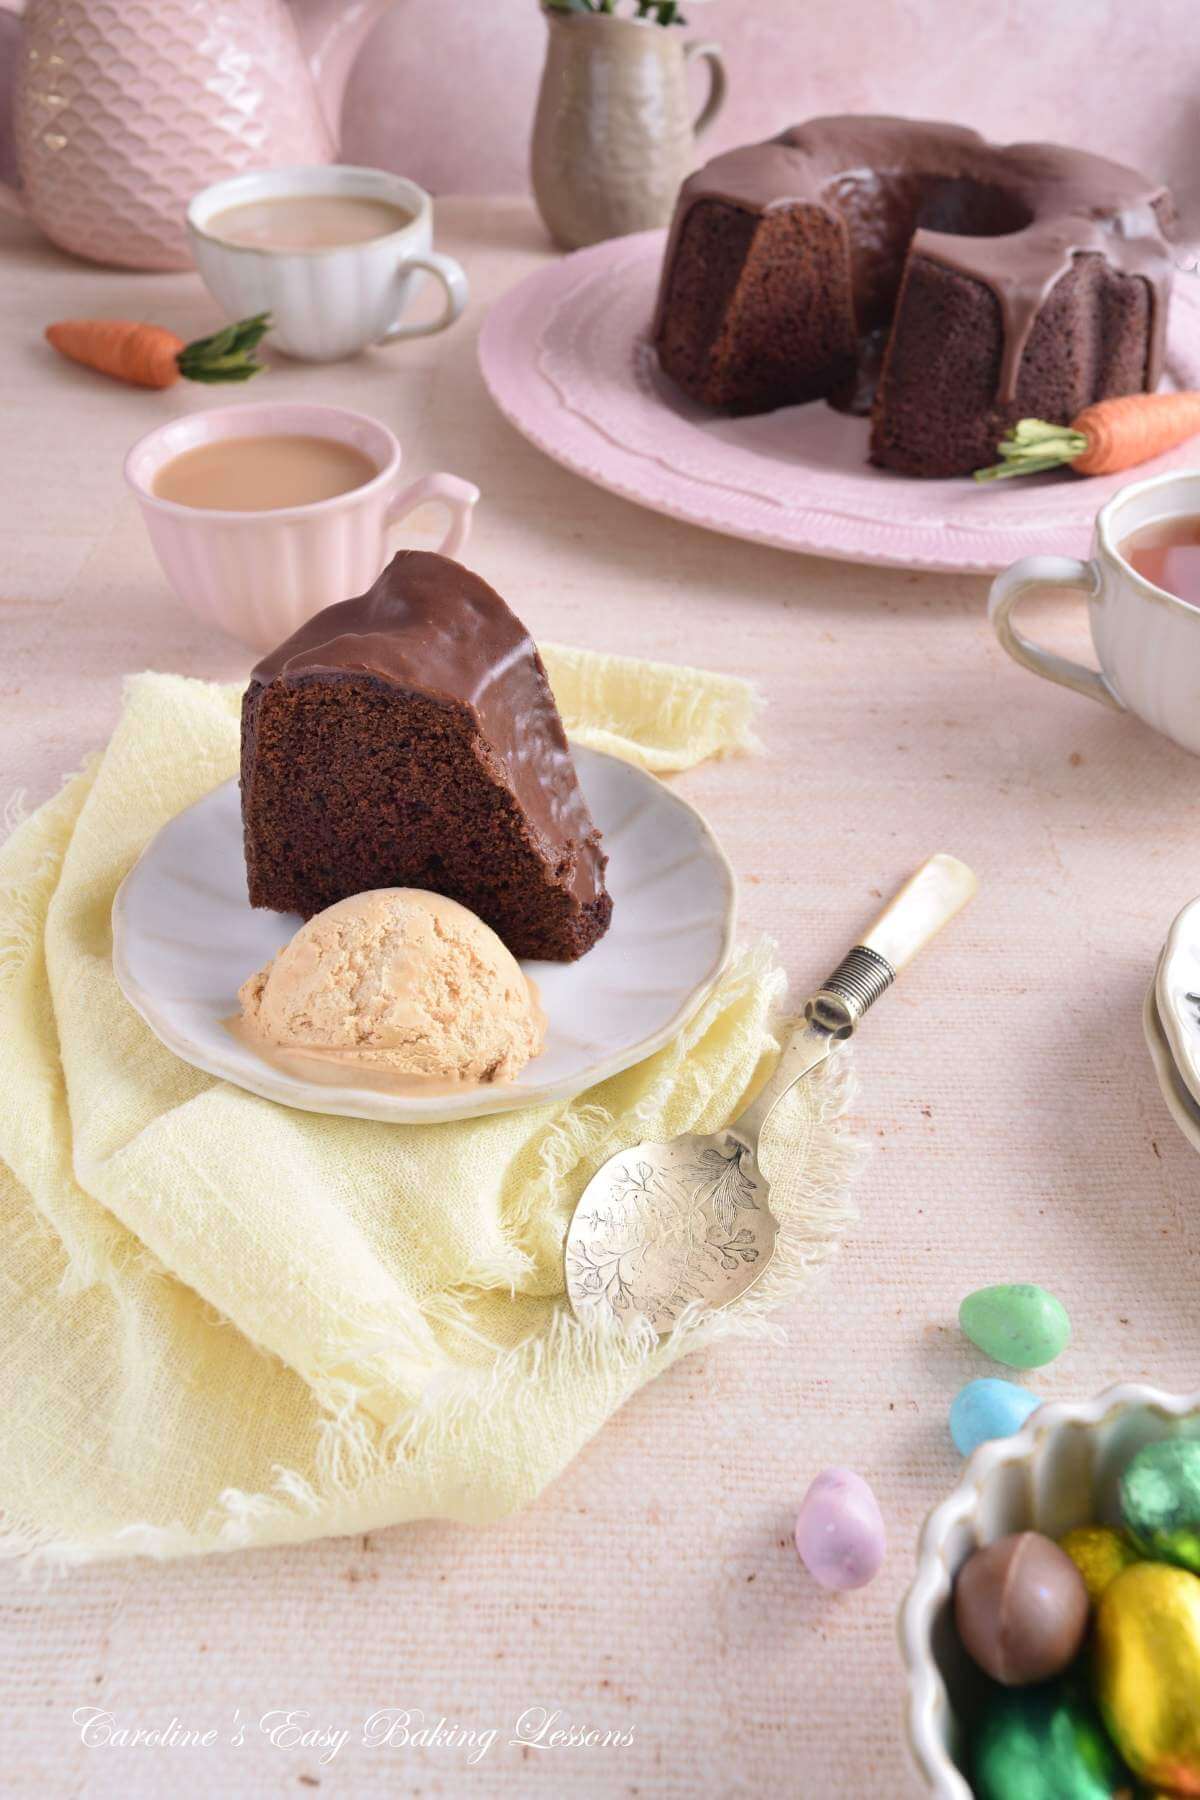
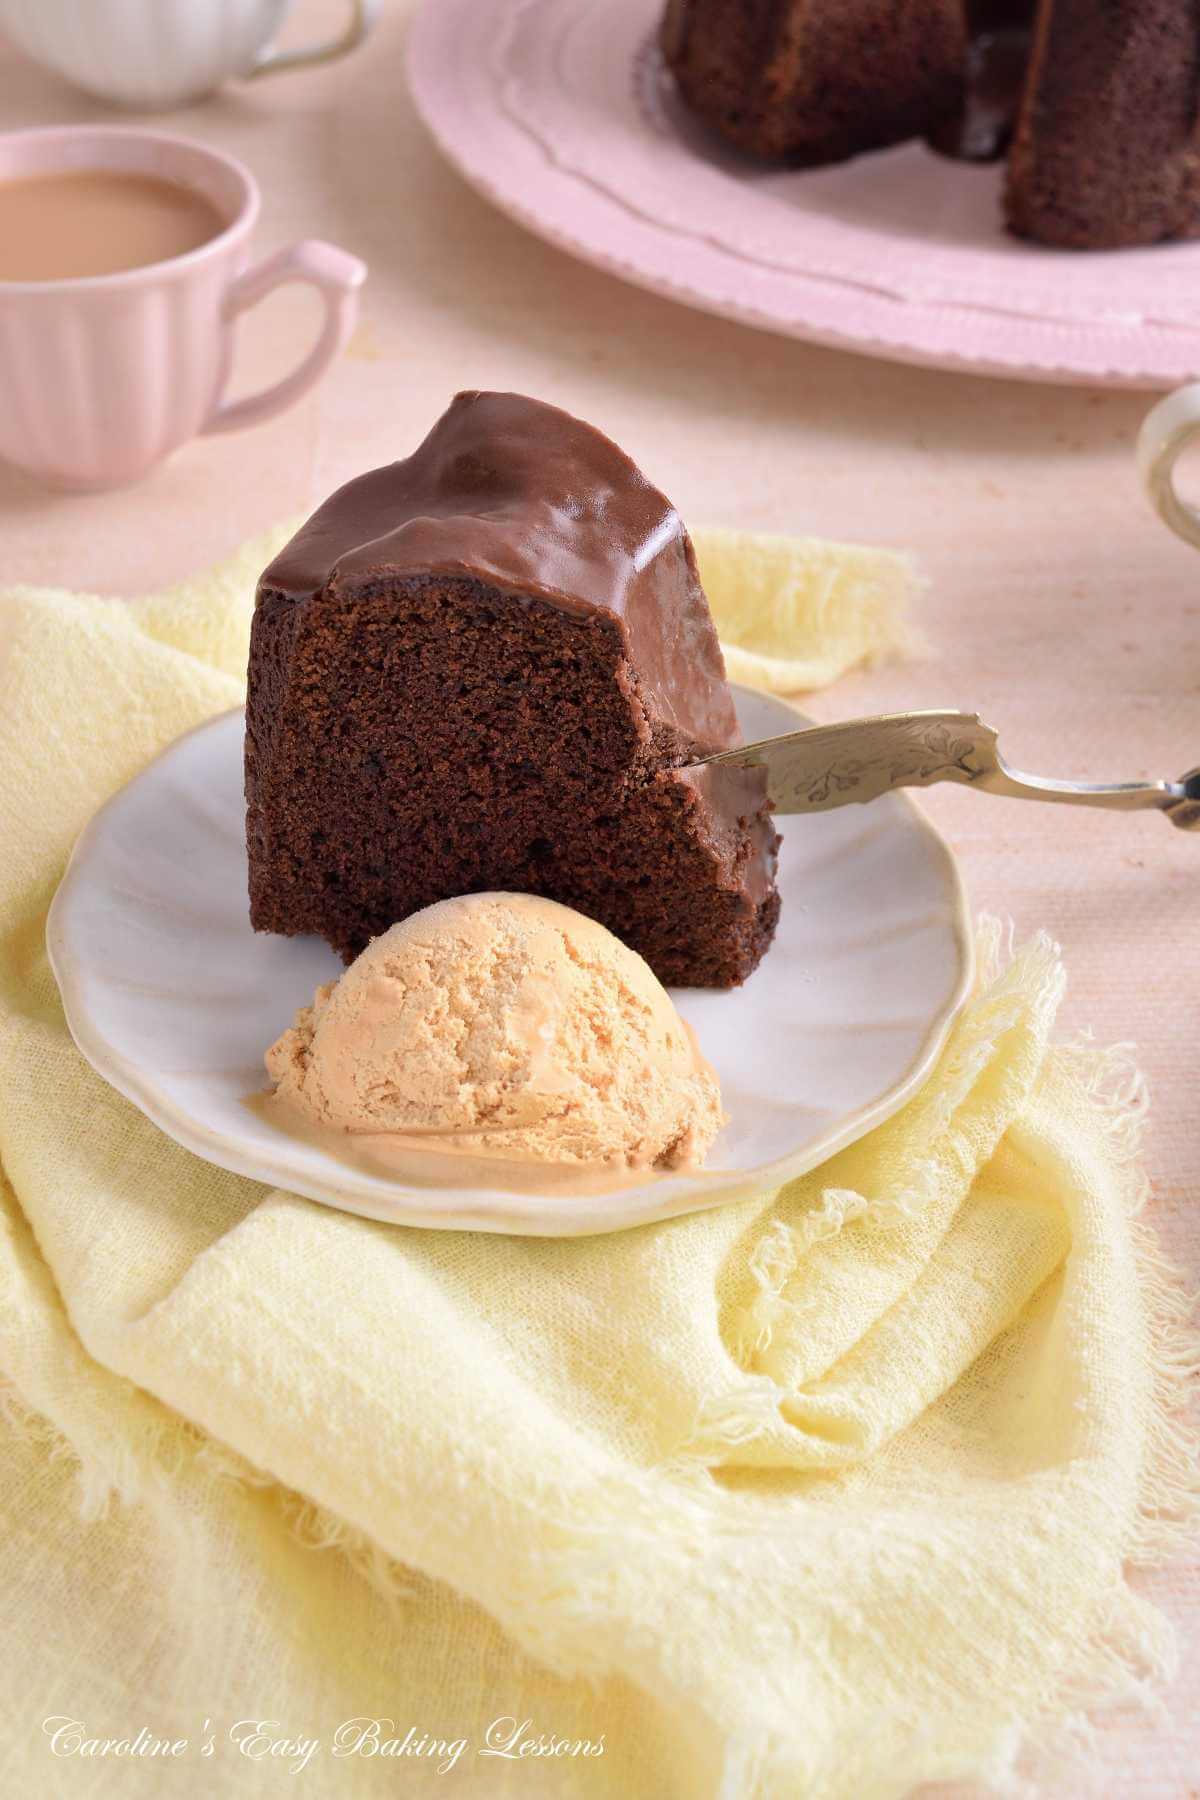
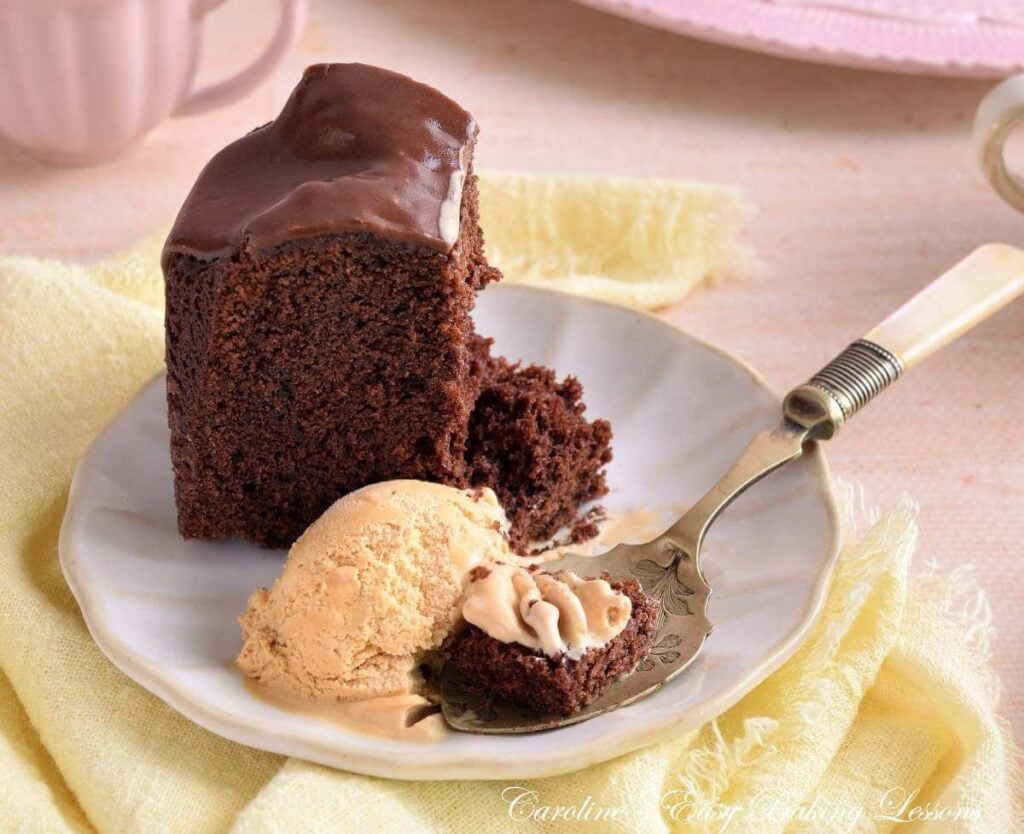
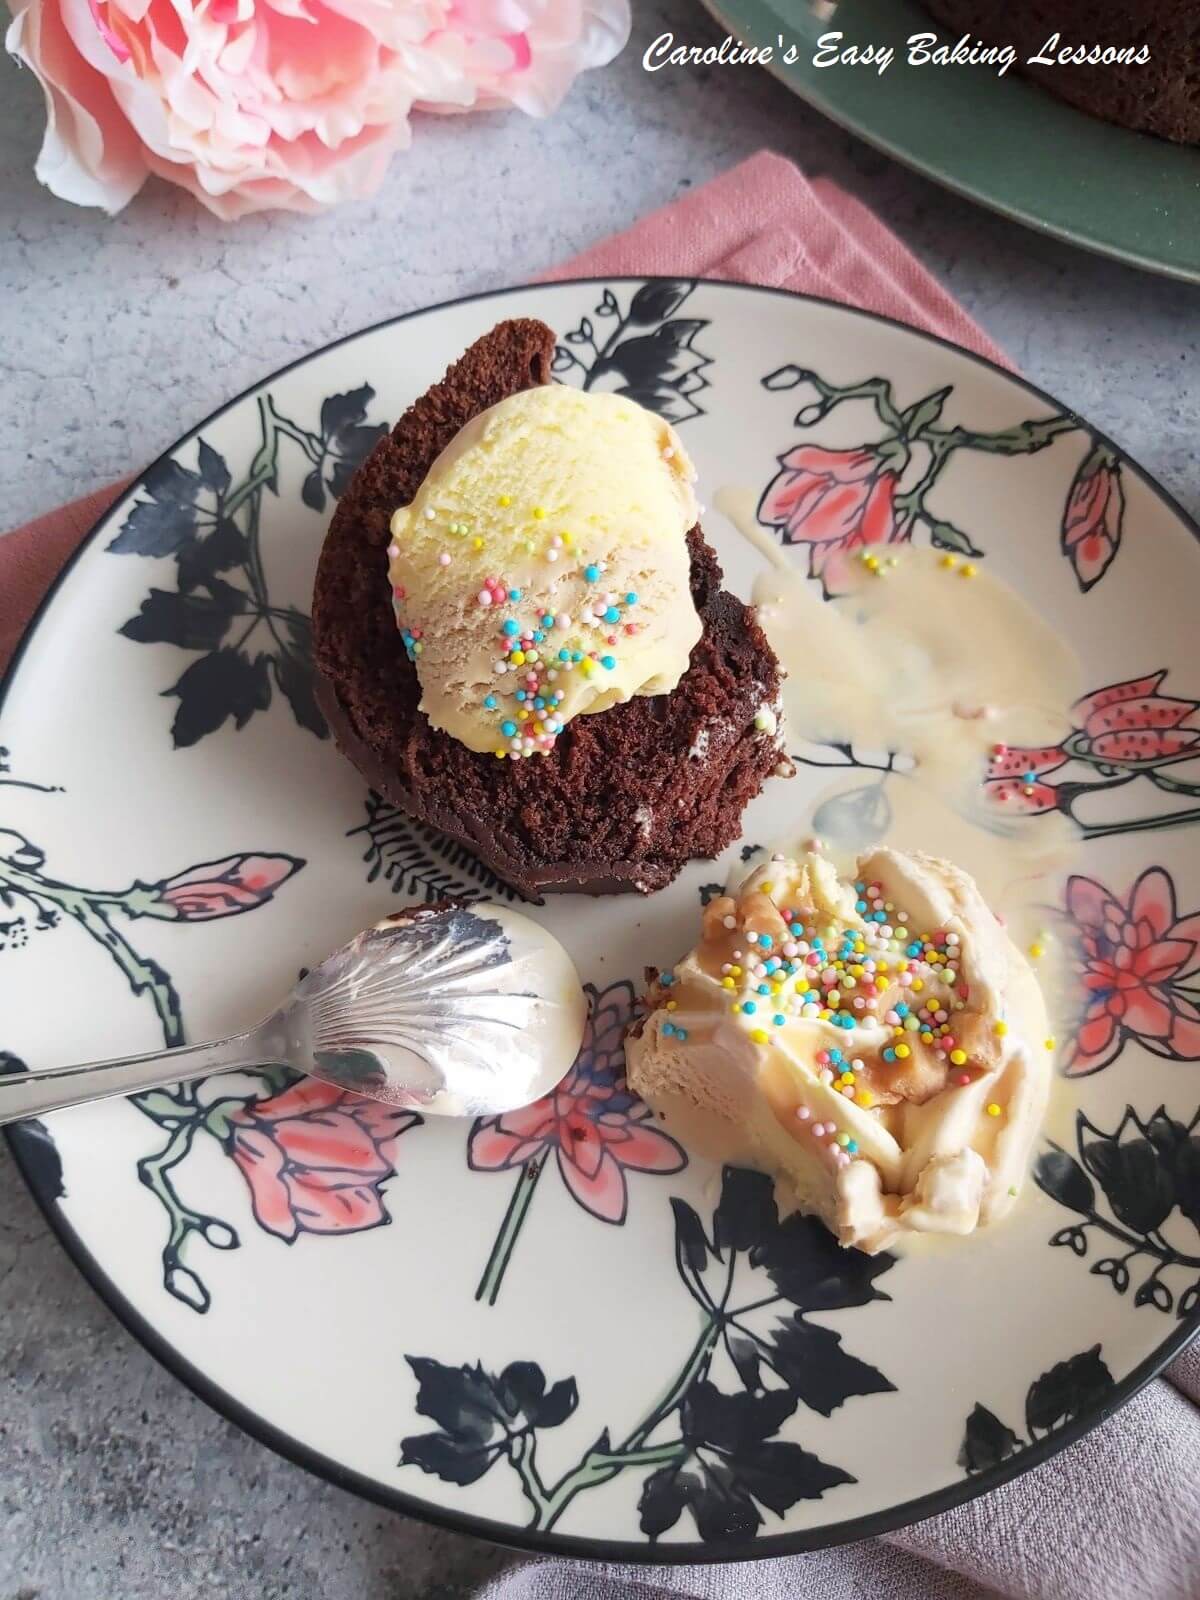
1.Serve the cake by cutting into slices, with a yield of at least 12. And along-side some whipped cream or ice-cream. Carte D’or salted caramel ice-cream goes really well with this Devil’s Food cake.

2.You can also serve the cake a little warm, by warming a slice in the microwave for about 10-20 seconds at the most. The glaze will melt a little too, but as it is quite chocolate fudgy, it will become like a thick chocolate sauce.
3.Store the cake wrapped well in cling film/plastic wrap. You can also store under a cake dome or in an air-tight container. Leave out at room temperature and will be fine for up to 5 days.

4.Unglazed chocolate bundt can be frozen, whole or in slices. Wrap in paper, then well in cling film/plastic wrap or foil and then in a labelled food bag or air-tight container. And placed at the back of the freezer, for up to 3 months.
Defrost out at room temperature, and heat even just for 5-10 seconds once defrosted.
DIFFICULTY LEVEL: easy, beginner


Recipe Card
Easter Devil’s Food Bundt Cake

Equipment
- Scales or measuring cups
- Measuring Spoons
- Mixing bowls
- Hand/stand mixer
- Spatula or Wooden Spoon
- Bundt pan/Ring Cake Tin (23-25cm/9-10" diameter and 8cm(3") deep – see notes)
- Lining Paste or equivalent for greasing (Cake release spray, butter & cocoa, or make your own Lining Paste)
- Timer
- Cooling rack
- Baking/parchment paper
Ingredients
For The Cake Batter:
- 140 grams Plain Chocolate (5 oz, Bitter/dark chocolate, or combination – see ingredient notes)
- 100 ml Milk (3¼ fl oz, ⅔ cup, any kind of milk)
- 2 tbsp Cocoa Powder
- 156 grams Butter (5½ oz, ⅔ Cup, unsalted & cubed)
- 140 grams Light Brown Sugar (5 oz, ¾ cup – packed)
- 3 Medium Eggs ( medium to large in UK, US – large to XLarge, room temperature & separated)
- 4 tbsp Greek Yoghurt (Low/Full Fat, see alternatives in Ingredient Notes)
- 200 grams Plain Flour (7 oz, 1⅔ cups, All Purpose. flour)
- 1 tsp Bicarbonate Of Soda (Baking Soda)
- 1 tsp Coffee Granules (instant granules, or ¾ tsp Espresso powder)
For The Glaze:
- 125 grams Icing Sugar (4½ oz, 1 cup Powdered Sugar, sieved)
- 1 tbsp Cocoa Powder
- 2 tbsp Milk (Approximate, may need little less/more, will be added gradually or use water)
For Decoration:
- Mini chocolate eggs
- Medium-large faux eggs
- Nuts, sprinkles etc
Instructions
- Weigh out the 156 grams Butter, while cubing it & leave out on the worktop/counter to soften & come to room temperature. I like to cut into rough squares, about 1¼cm (½″) size as smaller surface area comes to room temperature quicker.
To Make The Cake Batter
- Separate the 3 Medium Eggs, being careful not to get any yolks in the whites. Clean your mixing bowl and beaters really well, then rub half a lemon in the bowl and on the beaters. This helps the egg whites beat better.
- Beat the egg whites till they increase in volume, stiff or firm peaks are formed.
- Next break up the 140 grams Plain Chocolate into pieces, before melting in the microwave, in 30 second bursts. Do not heat any longer than 30 seconds or you run the risk of burning and ruining your chocolate. Mix in-between each 30 second burst. Alternatively, you can melt the chocolate in a bowl on top of a pan with barely simmering water.
- Leave to the side for a minute or two, then gradually add in your 100 ml Milk, 1 tsp Coffee Granules and then the 2 tbsp Cocoa Powder in a large bowl! Whisking together until relatively smooth (don’t worry if a bit lumpy).
- Pre-heat your oven to: 170°c/150°c Fan Oven/325°c/Gas Mark 3.
- Add the softened 156 grams Butter & 140 grams Light Brown Sugar to a different mixing bowl & beat till creamed together & spreadable. (You can use the same beaters from whisking the egg whites).
- Then beat in the egg yolks, 4 tbsp Greek Yoghurt and melted chocolate mixture, mixing well in-between each addition & beat for 1 minute.
- Sieve over the 200 grams Plain Flour and 1 tsp Bicarbonate Of Soda (Baking Soda), and fold in gently by hand. Fold like the spatula is your pen and the batter your paper, as if you were writing a number '8'. TOP TIP – A rubber or silicone spatula is advised, rather than something metal.
- Finally, fold the whisked egg whites into the prepared cake batter. Do in increments of 3. Folding in a ⅓ of the whites to begin with, will be a little easier, and loosen the batter a little, making the next 2 additions easier to incorporate. This stops knocking out the air that is in the whisked egg whites. Fold only until no more white is visible and be sure to check the bottom of the bowl.
Baking the cake:
- Prepare your bundt pan by greasing really well. You can use softened butter and cocoa. cake release spray, or use what I find extremely good for bundt pans –lining paste/cake goop. This is homemade, and less expensive than cake release spray. For darker cakes I decant 2 tbsp of the lining paste and mix in ½ tsp of cocoa powder to make a beige paste.
- Apply to the bottom of the bundt tin first, then on the sides, by brushing in upward strokes. Once applied, add a second layer.
- Next gently spoon the batter into the prepared bundt pan. Then even out gently and give the pan a few gentle taps on the counter/worktop, before popping in the centre of the oven.
- Bake the bundt cake for about 40-55 minutes until well risen, starting to come away from the sides of the pan, and a wooden cocktail stick, comes out clean of crumbs.
- Leave to cool in the bundt pan, on top of a cooling rack for 30 minutes. Don’t try to turn out before that.
- Run a plastic or silicone spatula around the sides of the cake if any is sticking. Then place a cake stand or large serving plate on top of the cake. Hold everything together and flip everything over. Put back on the cooling rack, tap the tin and lift off. It should come off easily with some lining paste residue on the tin. Leave the cake to cool on the plate, on top of the cooling rack for at least 30 minutes.
Prepare The Glaze/Icing
- Don’t make the glaze too far ahead as it will thicken. To make simply add the sieved 125 grams Icing Sugar (powdered sugar) and 1 tbsp Cocoa Powder to a mixing bowl and mix together. Again in a larger bowl to stop as much mess.
- Gradually start to add the milk 1 tsp to start until you have a very thick dark paste. Then usea ¼ or even 1/8 tsp to add in more milk until a thick smooth, but pourable glaze. You want it to run slowly off the end of a spoon. (See video).
Decorate The Cake
- You can place 4 pieces of baking/parchment paper under the cake to save some mess.
- Start by spooning on one spoon of glaze on the top of the cake and manipulate into the groves on the top of the cake. Then add little amounts to where the groves of the side of the cake start, and encourage the glaze down.
- Once all done, apply a second layer. If you want to cover all of the cake, double the glaze amount. Leave to set (or add some sprinkles or nuts now too).
- Remove the paper from under the cake if you used it. Then add in some mini chocolate eggs around the bottom of the cake. Or larger faux eggs into the centre of the cake.
Serving & Storing:
- Simply slice and enjoy! You will get at least 12 slices out of this cake (depending on how thick you cut the slices of course). Amazing served with some ice-cream (Salted caramel is the best!). Or whipped cream.
- Store leftovers on a cake stand with dome, for up to 5 days. Alternatively, store in a cake tin, but just don’t put in the fridge.
- You can freeze the cooled cake, as a whole or in slices and decorate when you areready to eat. Wrap in paper, then well in cling film/plastic wrap or foil and then in a labelled food bag or air-tightcontainer. And placed at the back of the freezer, for up to 3 months. Defrost out at room temperature, and heat even just for 5-10 seconds once defrosted.
Video
Notes

 Light Brown sugar is used, but you could substitute with 50/50 mix of dark brown suagr and granulated, or even coconut sugar.
Recipe Yield – at least 12 slices.
Light Brown sugar is used, but you could substitute with 50/50 mix of dark brown suagr and granulated, or even coconut sugar.
Recipe Yield – at least 12 slices.

 Bundt Tin/Pan – I used a Masterclass 25cm fluted ring cake pan. 25cm (under 10”) wide, inner tube approx. 5cm (2”) & depth of tin 8cm (3”). The cake when baked, does not fill the entire tin. So based on the volume I have measured to fill the tin, I would suggest even using an equivalent tin of 10 cup volume. Updated images of 2026, I used a 23cm (9″) wide bundt tin and was the best capacity. (See notes before step-by-step instructions).

 See more easy cake recipes
See more Easter Bakes
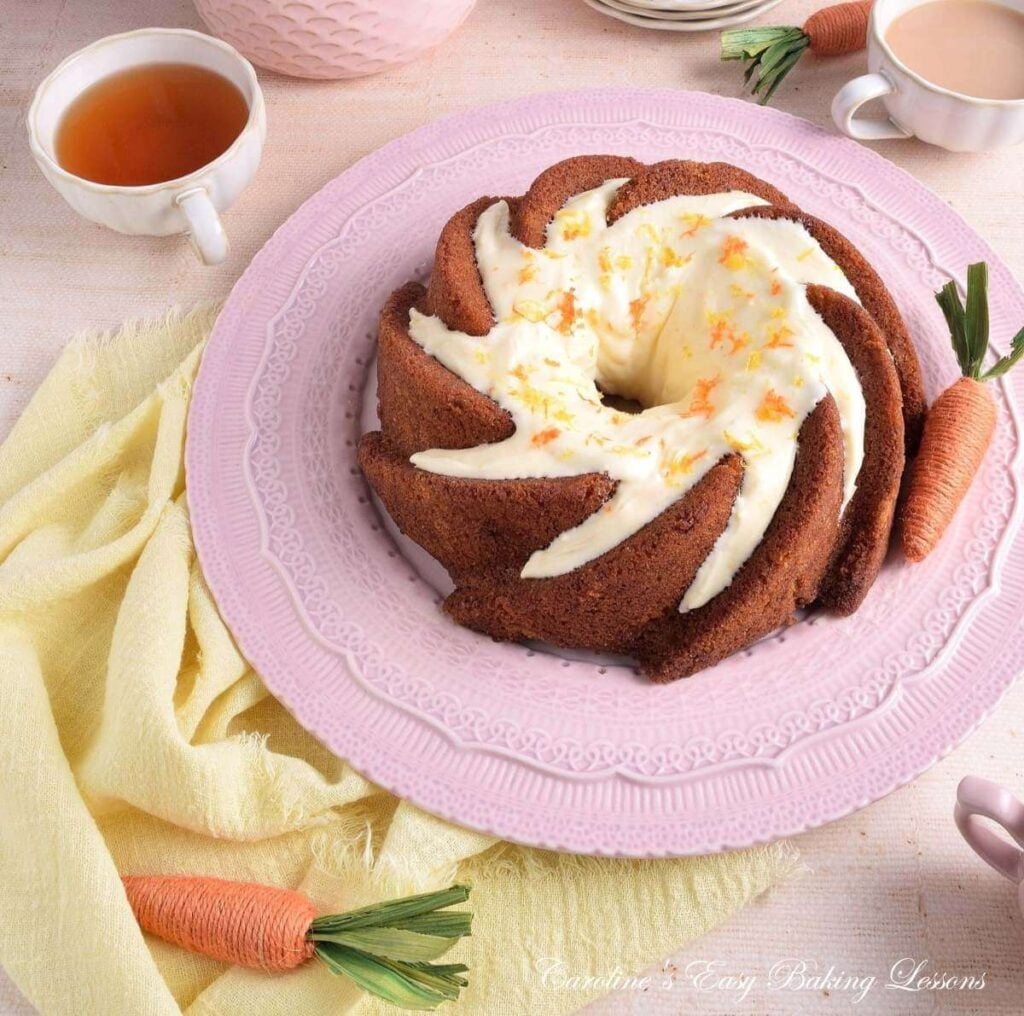
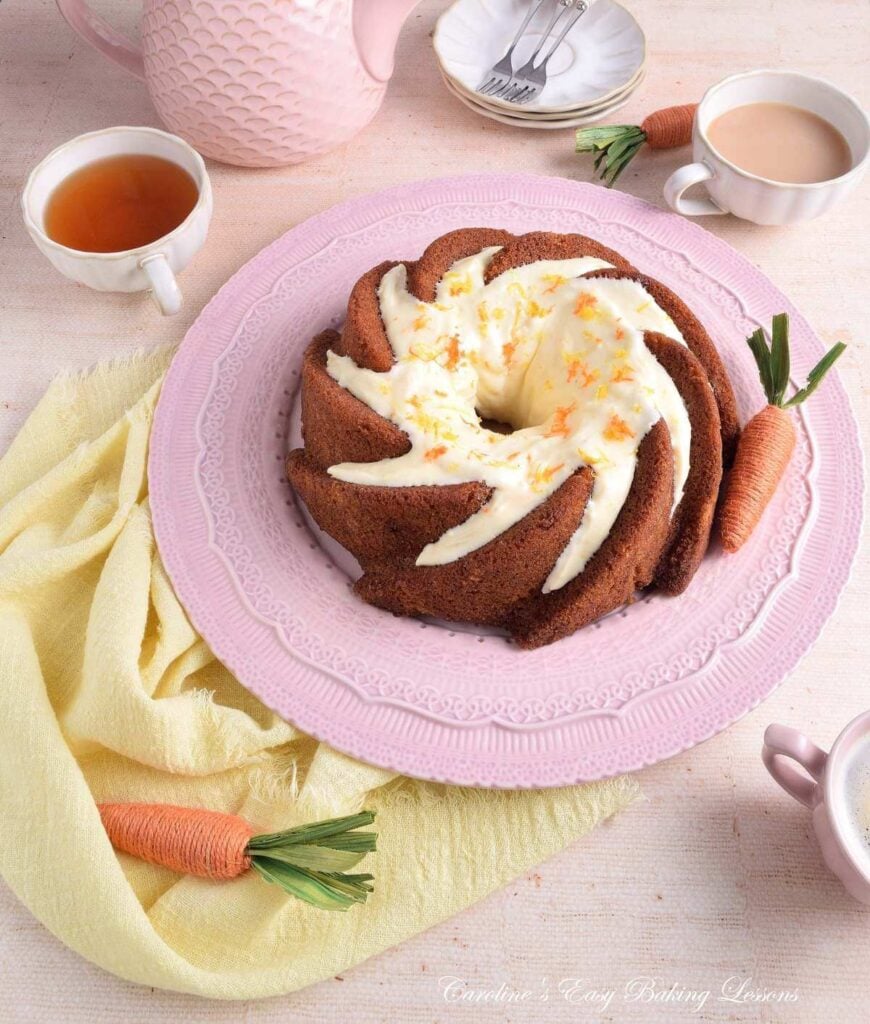
Gluten-free Carrot Bundt cake below.
See more easy cake recipes
See more Easter Bakes
Gluten-free Carrot Bundt cake below.

Nutritional Values – I am not a qualified nutritionist and all values are approximate. Based on 1 serving, (from a yield of 12 slices), with no mini eggs or extras and all glaze used. Make bigger or smaller slices and these values will change. Note, the 23cm (9″) tin, 14 slices were cut and served with 1 scoop of ice-cream. All values calculated via MyFitnessPal.com
Check out some other bundt cake recipes by clicking on the images below, or go to the Cake Page. See more in the Easter/Spring baking page.


Subscribe For More Recipes


Join My Facebook Group
Why not also join my – Facebook group Easy Online Baking Lessons, dedicated to this baking lessons website, as well as providing one-on-one support with myself & my team? Be sure to answer all security questions when requesting to join.
Follow me on social media:
Happy Learning & Baking!
Caro x


Easter Devil’s Food Bundt Cake
Search For Something You Fancy!
Caroline’s Easy Baking Lessons


This is a great recipe. So easy to make. I use it all year round but at Easter it’s lovely with all the eggs added for decorations. The grandchildren love it and the icing is yummy!
This really is such an easy cake to make, and this icing is just amazing and almost chocolate fudge like
This cake looks amazing! The eggs on top look just like the proper Cadburys min eggs, which are my absolute fav!
Absolutely loved this recipe. Not going to lie…I didn’t make it in Easter! Haha
I made it yesterday when my kids came over…they love making cakes and they loved eating and making this one. Thabkyou for the recipe xx