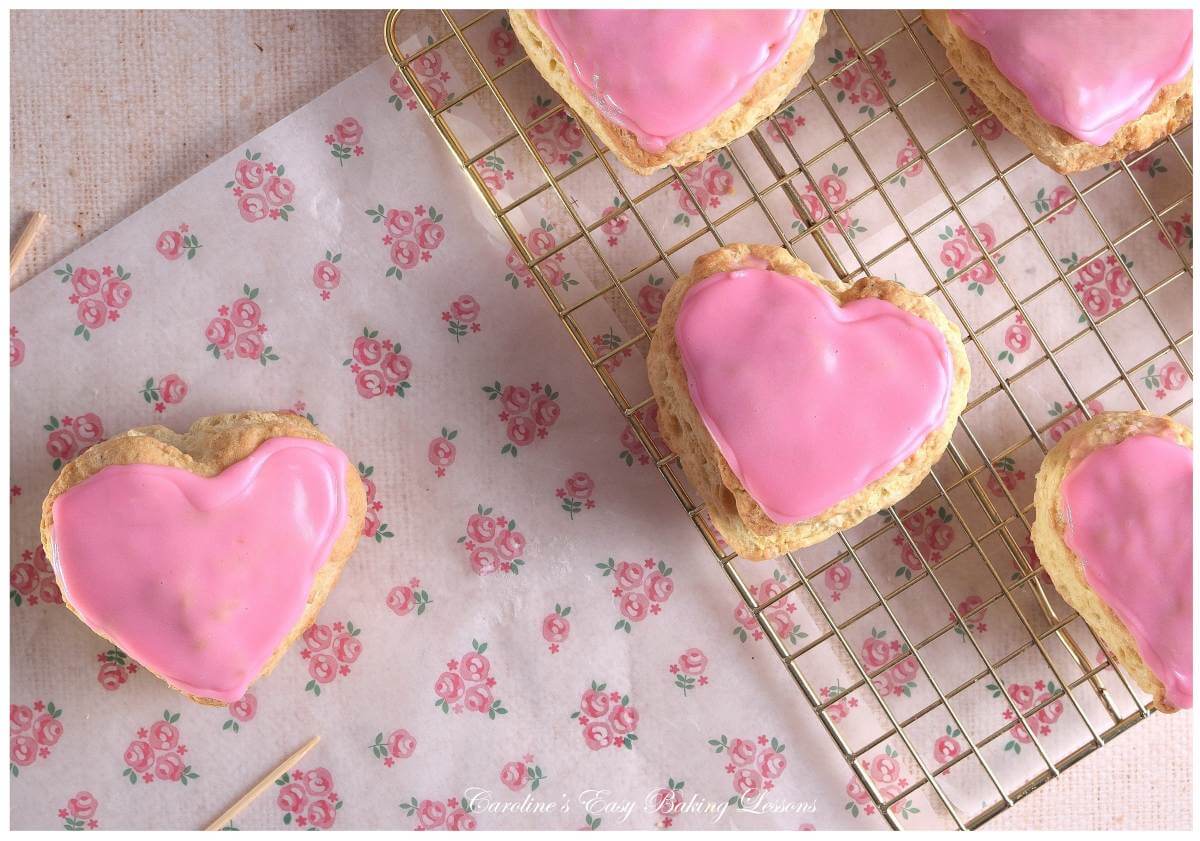
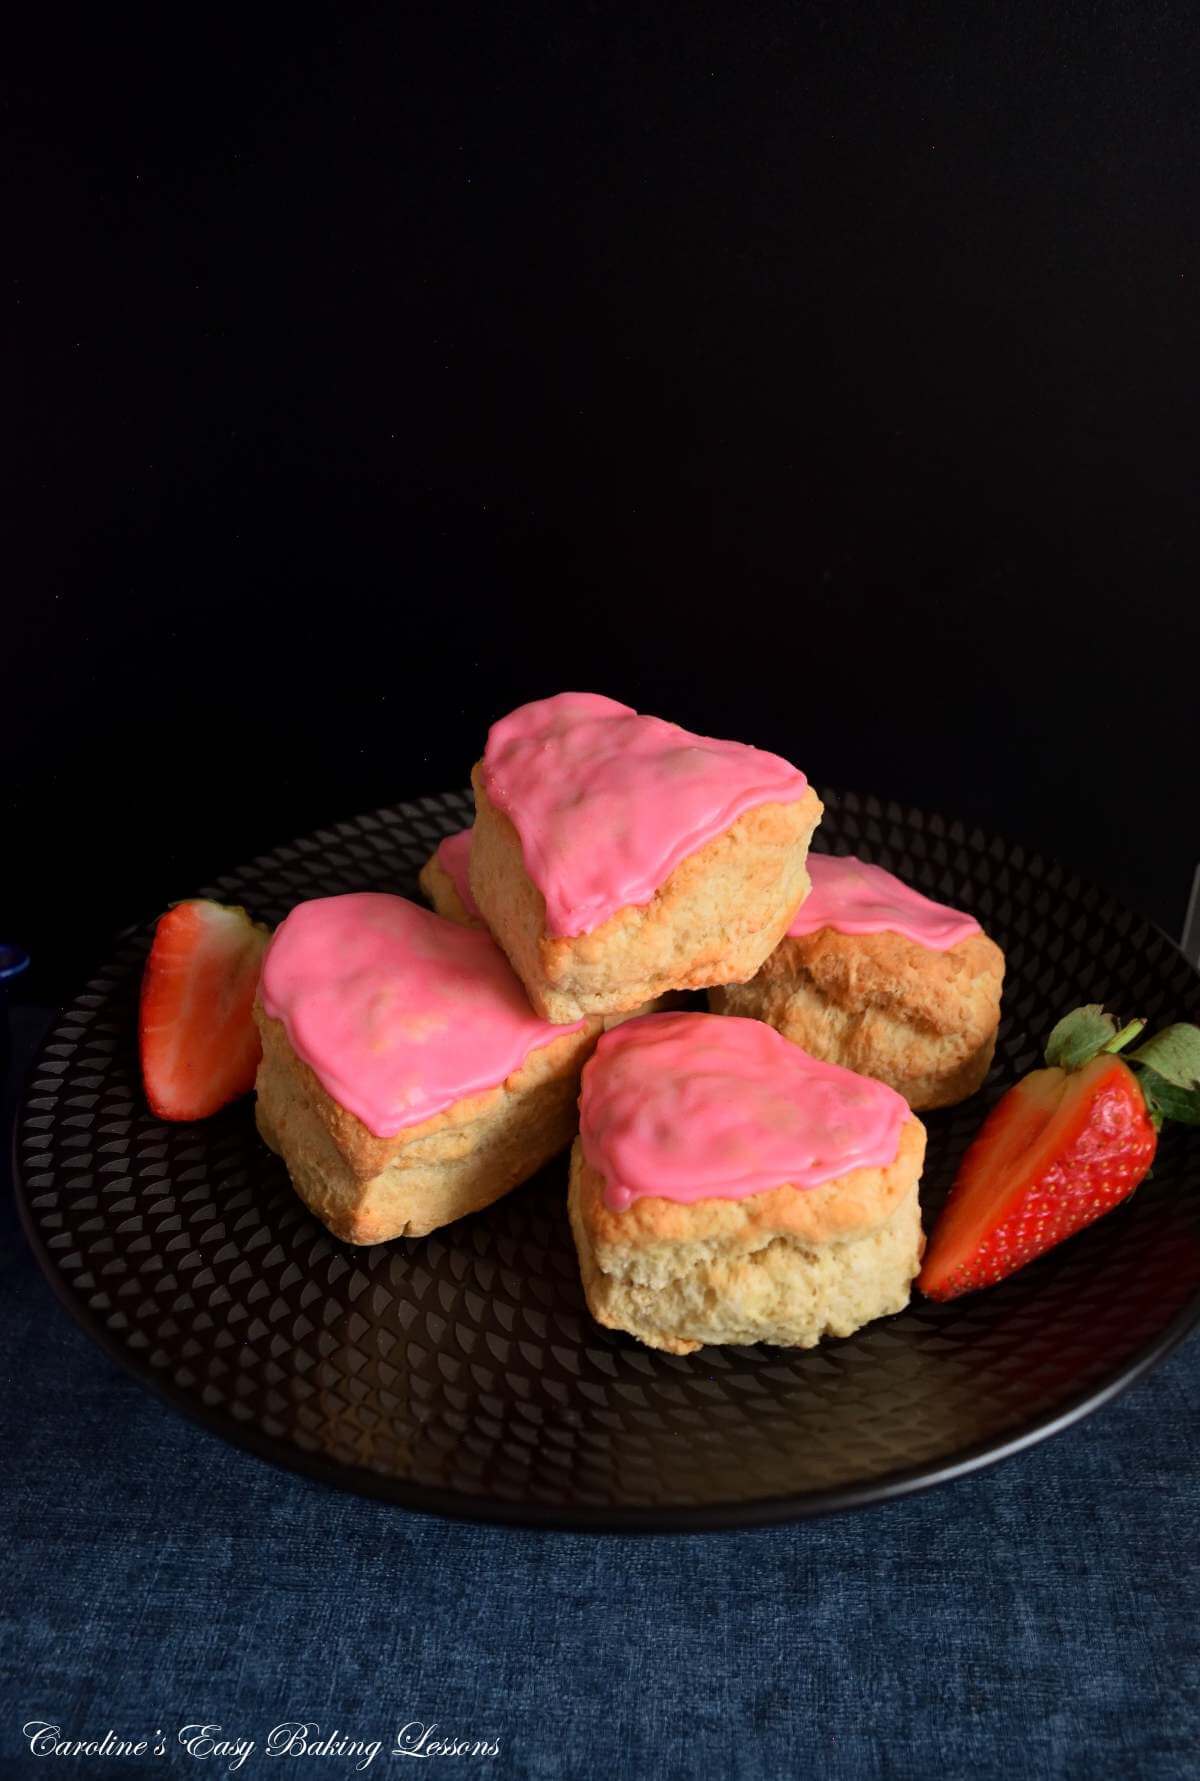
Air Fryer Pink Heart British Scones

Air fryer pink heart British scones are a cute take on my British scones tutorial. Large pink glazed heart-shaped scones, for a perfect Valentine's or Mother's day treat. Let me show you how...
Air Fryer Pink Heart British Scones
Step-by-step tutorial
**As an affiliate for The Craft Company, should you buy via my personal link, I will receive a small commission, at no cost to you.**

***click to jump to section


What Are These Air Fryer Pink Heart Scones
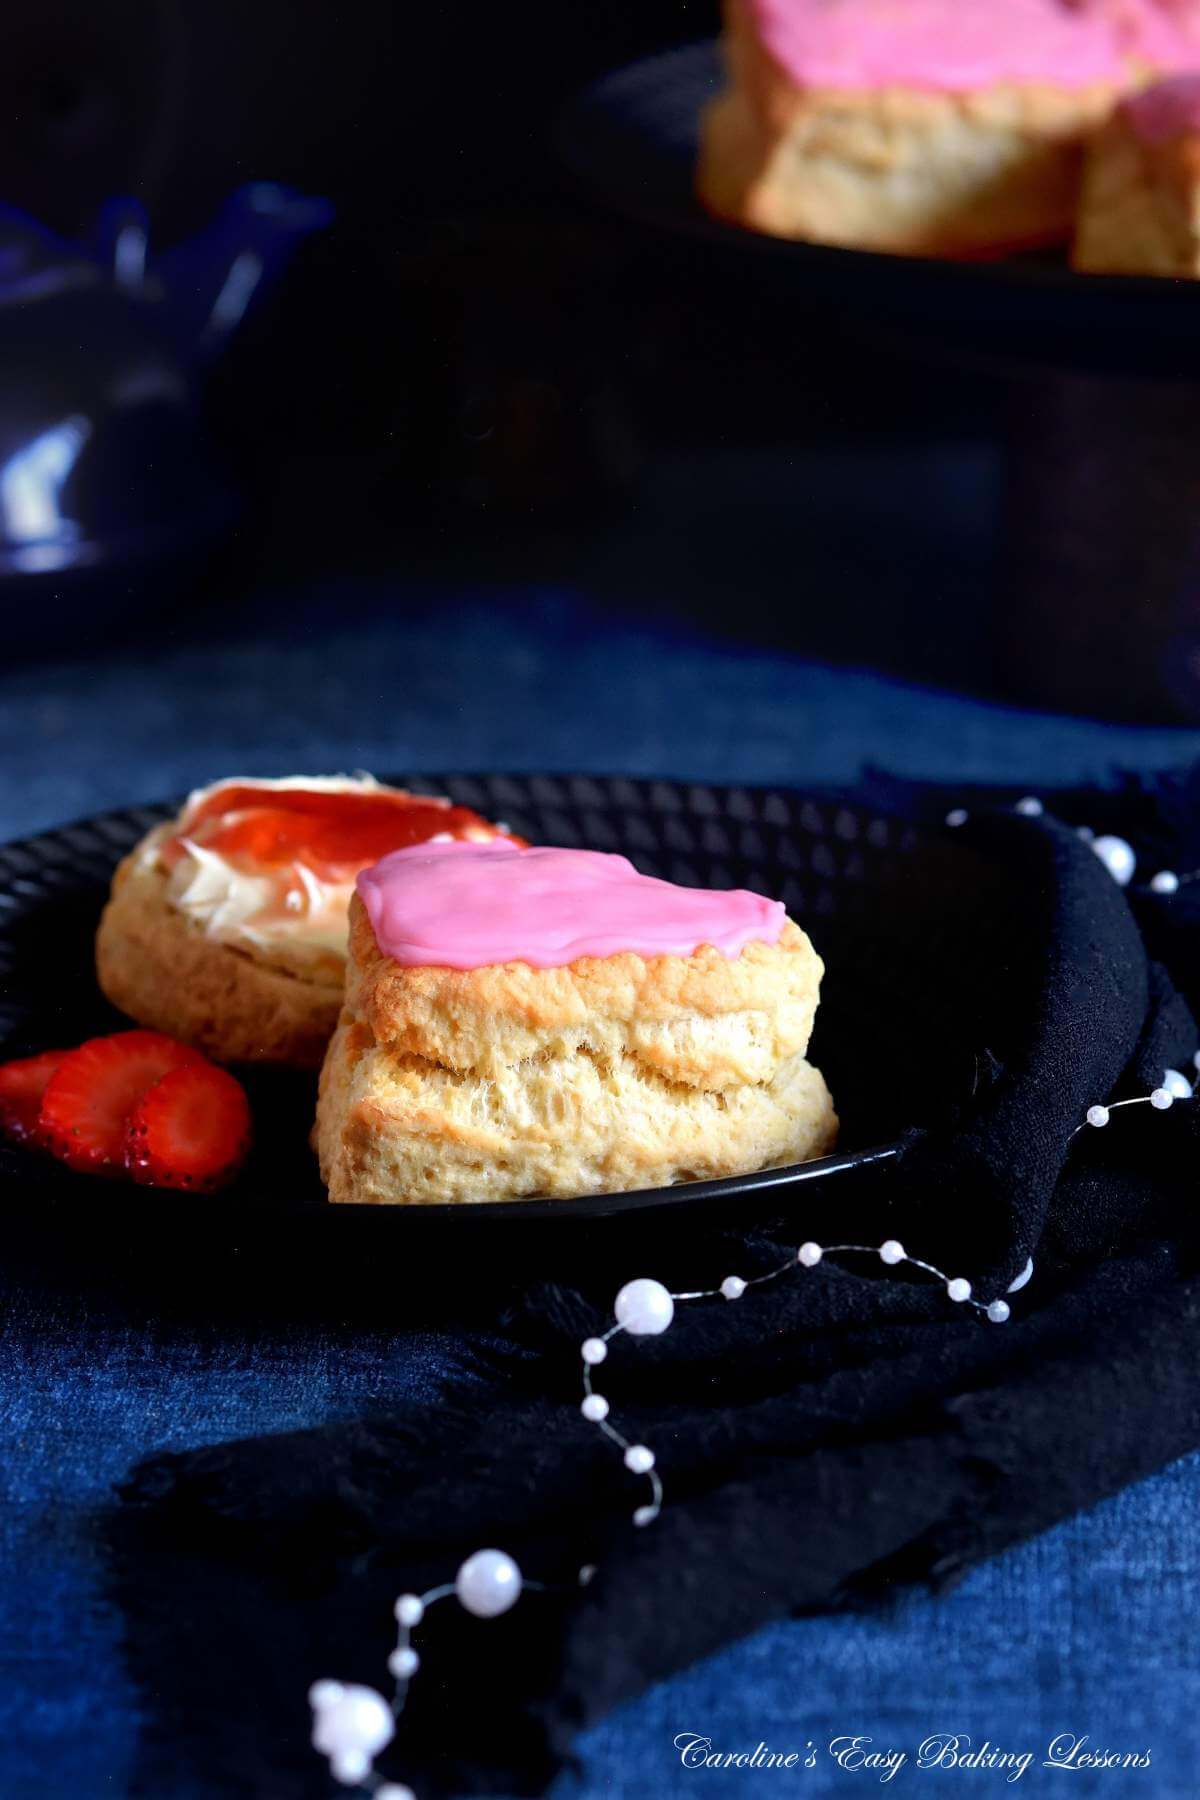
These pink scones are my Valentine’s day or even birthday or Mother’s day version, of my classic British scones. Made bigger, using a heart-shaped cutter, topped with a pink glaze and baked in the air fryer!
Check out my original air fryer scones tutorial.


Why Use This Recipe?
A few reasons why to use my recipe:
- Quick & easy recipe
- Make in the oven or air fryer (any size)
- Energy & money-saving method
- Taste great!
- Full step-by-step instructions
- Video tutorial
- Heart-shaped for Valentine’s, Mother’s Day or a birthday
- Enjoy with your favourite fillings
- Reliable recipe from experience
- Tested worldwide!

2 Big Reasons To Use My Recipe
If you know my recipe tutorials, I write thorough step-by-step recipes and include helpful photos and videos for you to succeed in your baking. I am Scottish & I live in Britain, with a true knowledge of how our scones should taste & look.
After a lot of time practicing & tweaking my scone recipe, I developed the perfect recipe tutorial.
With British scones, the key is WHAT NOT TO DO!! Not doing certain things (including things that might be your first instinct to do), will help achieve the classic rise & split structure of these scones. They should never be flat & always rise well.
(Photo here of my Mango cranberry air fryer scones.)
But you don’t need to take my word for it about my recipe and tutorial. My theories around creating the perfect scone, were tested worldwide back in 2020.


We had a global bake-along weekend, involving many bakers in my Facebook group Great British Bake Off Fans, where we all used my recipe to make the scones. Many had either never tried scones or always failed in the past. During this fun activity, over 1000 scones were made that weekend. The results were great. The recipe was tested using American All Purpose flour, gluten-free flour, lactose-free milk and even using goats butter, all with success.
You can see just some of the bakers’ scones in the photo collage here. Click to join the Facebook baking group.
So today, I am writing up the gluten-free version, rather than just adding annotations to my regular scones recipe.


Ingredient Notes
My recipe for air fryer heart scones is made up of the following basic ingredients:
- Unsalted butter
- Caster Sugar*
- Plain (A.P.) Flour*
- Baking Powder
- Milk
- Eggs
To Decorate:
- Icing (Powdered) Sugar
- Water or milk
- Pink or Red food colouring
*denotes see notes below


Flour
Plain (All Purpose) flour was used in the recipe development, as well as UK Self-raising flour (not to be confused with US Self-rising).
You can use either flour, just add the corresponding baking powder amount as listed in the Recipe Card.

Gluten-free flour also worsk for all my scones recipes, with the addition of Xanthan Gum. (See my Gluten-free Air Fryer British Scones recipe for more details).
Baking Powder
Baking powder is very important for a good rise in British scones. And there are 2 differnet amounts depending on which flour type you use. For Plain (A.P. flour), it is 2.5 tbsp of baking powder, and only 2 tsp for the UK Self-raising flour). **Yes – correct amounts.


Unsalted Butter
Unsalted butter should always be used in sweet or savoury baking for best results.
It’s not only about controlling the salt levels. Salted butter has a higher water content (and subsequently lower fat percentage). This amount of water content can vary from brand to brand and lead to inconsistent results.
European butter is often better just because of a higher fat content. And fat works so much better in bakes than water. Since Covid, US manufacturers in particular, seem to be adding more water and the result is people’s recipes that they have been making for many years, suddenly failing. I bet you know someone who’s cookies are suddenly spreading. This is most likely due to higher water content and lower fat. So a very good reason to buy unsalted or make your own.


With Double Cream (Whipping/Heavy Cream), that is about to expire or on sale, you can make your own butter and get the bonus of buttermilk too. Read how to make buttermilk & butter at home, and just freeze the butter.
Milk
Milk is important for moisture, protein, fat & adding flavour to your scones. You cna use any milk, any fat content. The only difference with the likes of lactose-free milk or goats’ milk, is that the colour of the top of the scones might be a little paler. But that can also come down to how orange the yolks of your eggs are too. You can even use buttermilk from making your own butter.


Eggs
Eggs should not be omitted when making scones. They help with the rise of scones and are a high source of protein. They don’t only provide moisture for binding, they provide fat and protein. The protein is activated when you whisk the eggs and this is a building block for the structure of the scones. It provides strength and is also used as an egg-wash on top of the scones.
Top Tips – always whisk the eggs well and make sure to use them at room temperature for best results.


Caster Sugar
Many British recipes use Caster Sugar and the US equivalent is just Extra/Super Fine Sugar.
The granules are finer than regular granulated sugar & granulated sugar should not be substituted. This small amount of sugar is not there for sweetness but rather helping with structure, enhancing texture & crumb, as welling help preserve the scones.
You can just process a small amount of granulated sugar. Just don’t go as fine as a powder. See my comparison image of UK caster & Granulated sugars.


Equipment
You don’t need lots of equipment to make scones. A pastry cutter (also called a pastry blender) can be used for making the scones if your hands get tired/sore easily. (See photo). But 2 butter knives, or even your fingertips can be used instead.
Some people use a food processor, but I do not recommend it, as the best results for scones come from little and gentle handling.
**Ignore the round cookie cutter – this is what normal scones should be made with.

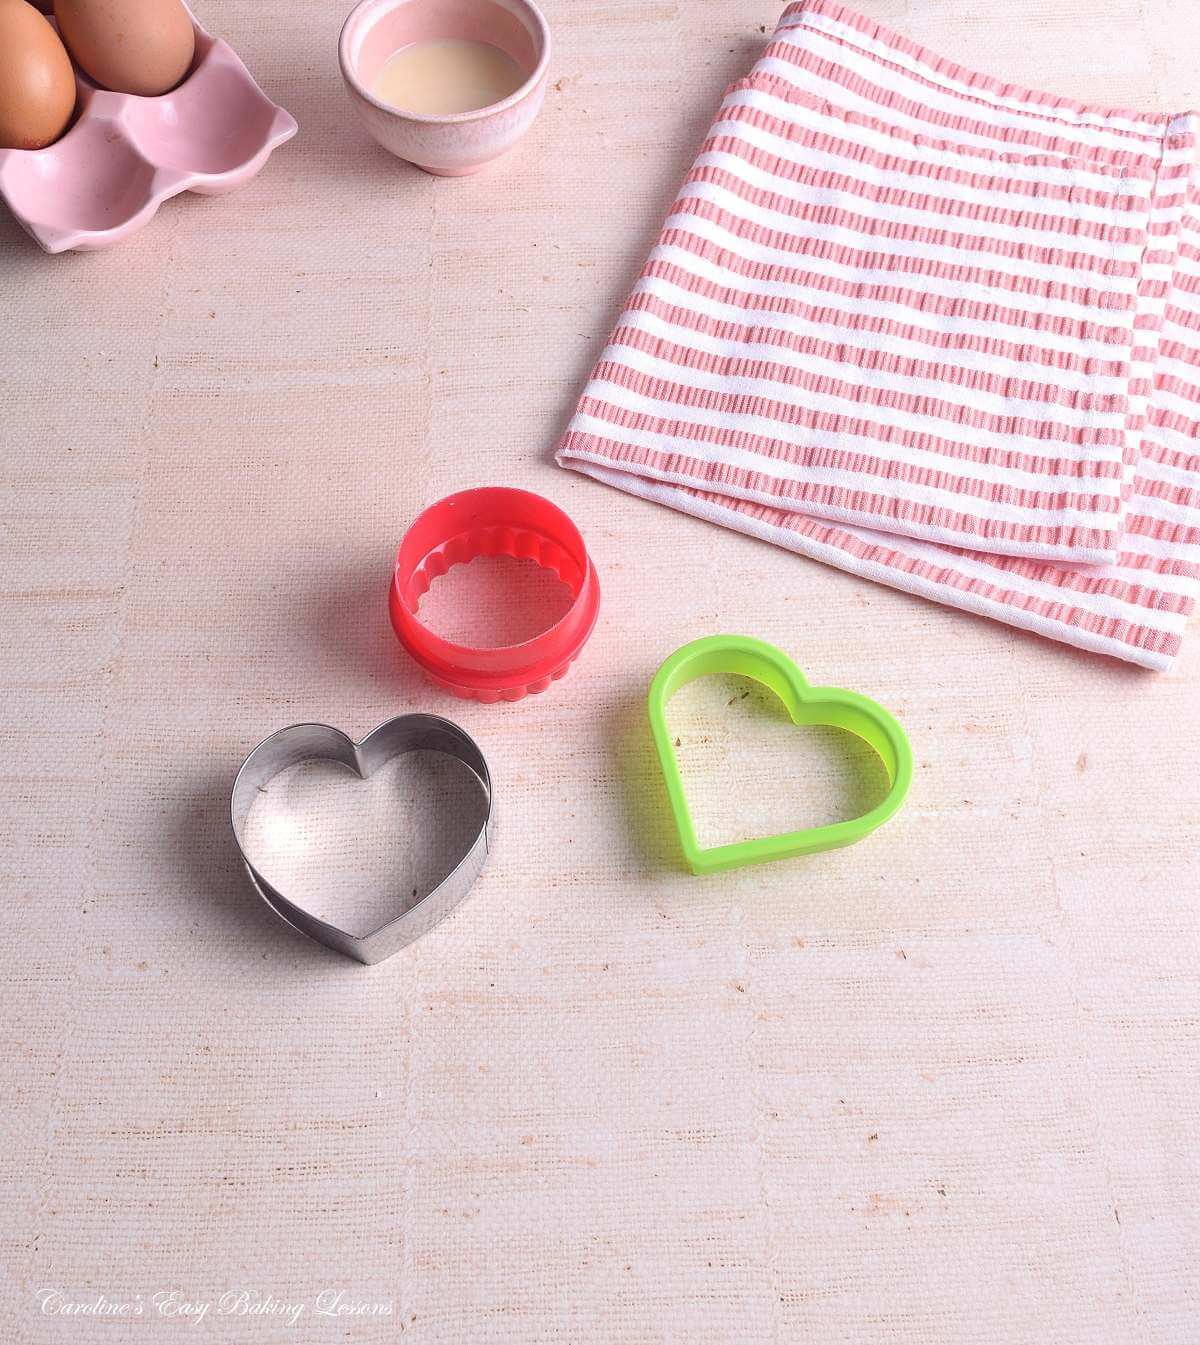
In this case we are going to use a heart-shaped cookie cutter. A cutter bigger than the normal round cutter, as you can see from the image here.
I had a metal and plastic heart cutter, but about the same size.
These were 84mm (3 1/16″) at their widest. If you use a cutter that is smaller, just note the bake time might be a little quicker.
Food Colouring – I always use and recommend, using Sugarflair food colouring. They are paste colours so even better than gel. Very concentrated so always wait and let it develop before adding anymore. Use with gloves, and on the end of a cocktail stick. I used Christmas Red.


Full disclosure, I am an affiliate for The Craft Company. And they sell so many things to use in your baking, including a wide range of the Sugarflair colourings. Should you purchase via my link below, I will receive a small commission, at no cost to you.


Air fryer Or Oven
My scone recipes can be baked all at the same time in a regular oven. My British scones recipe was developed for air fryer use back in 2022. Testing involved using a small 3.5 litre capacity (about 3.7 quarts) basket air fryer. (Shown here in the photo collage, where I was working out how many scones I can bake at one time).
Subsequent tests have also yielded positive results from open front, larger air fryers. The only difference being, basket air fryers, usually require turning over part-way through baking.


See me testing regular scones in British brand Cello’s double air fryer by using my scones recipe. (The mint green air fryer in this photo).
One test in the small basket air fryer drawer and one in the open front oven. Or jump to reading the air fryer review by clicking on the air fryer image.
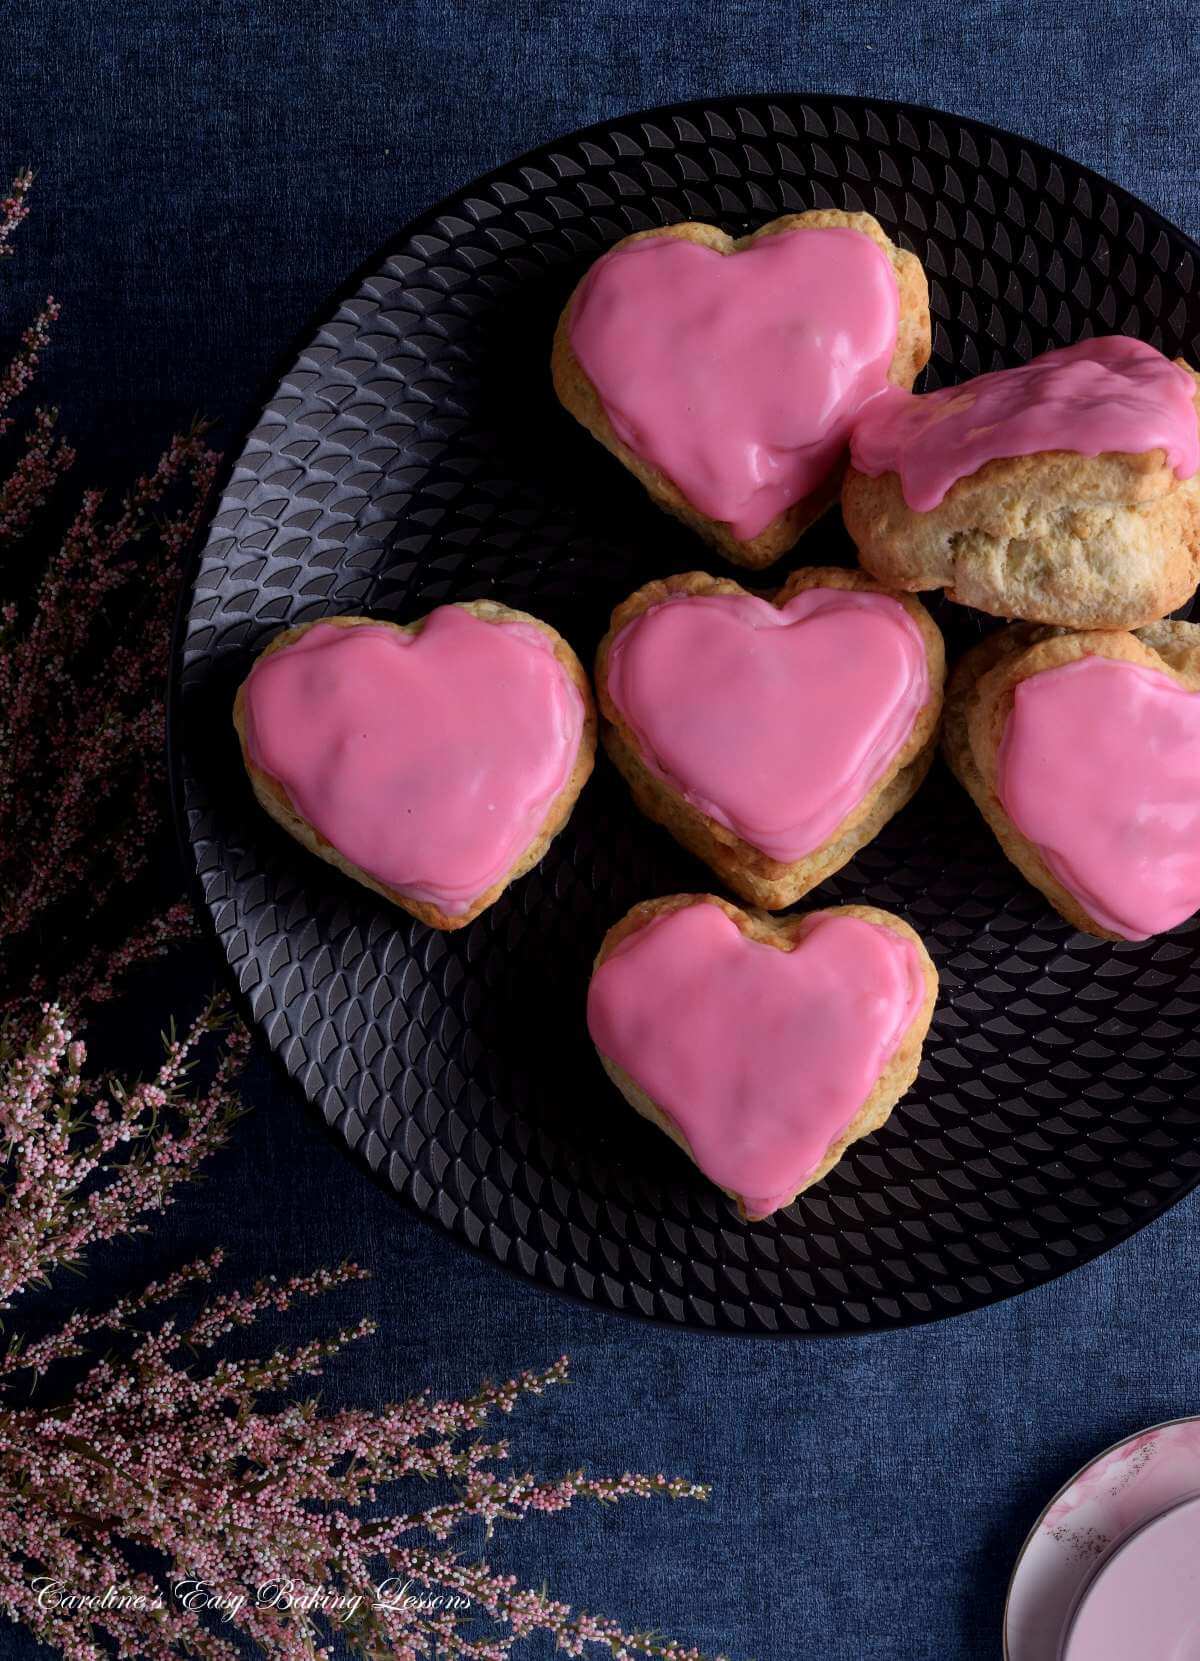
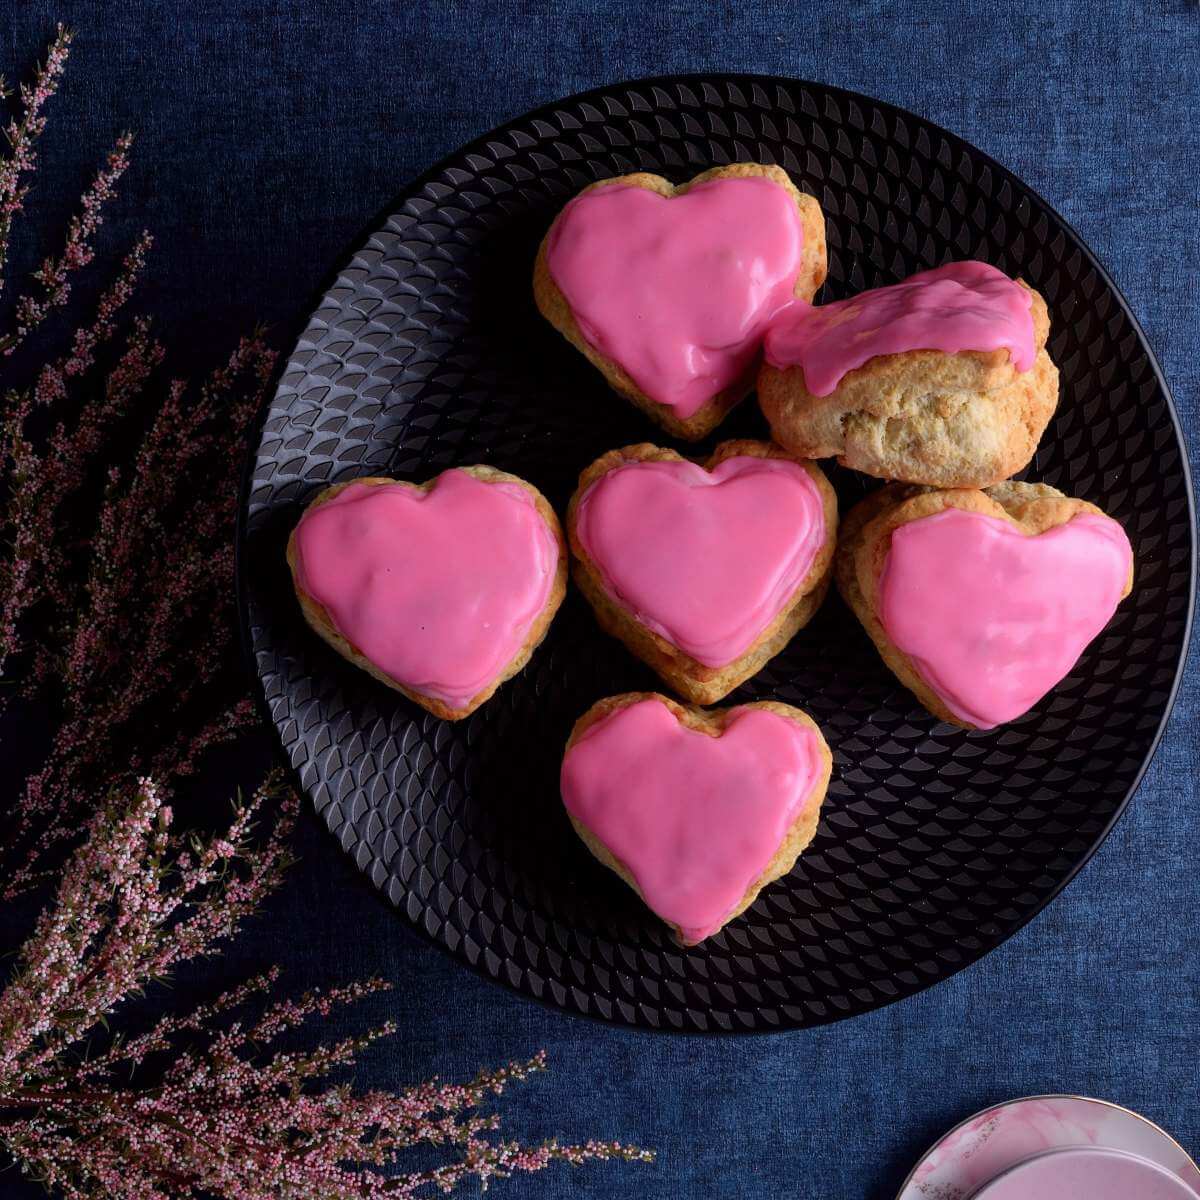
Recipe Yield
This recipe makes 7 very big heart-shaped scones, if you use a heart cutter about 84mm (3 1/16″) at it’s widest. Use a bigger or smaller cookie cutter, and the yield will vary.

Top Tips For Scones
I always advise the following things NOT TO DO:
- DO NOT use a food processor
- DO NOT roll out the dough
- DO NOT pat out thinner than 1″ (2.5cm) deep.
- DO NOT twist the cutter – it impedes the rise of the scone.
- DO NOT touch the sides of the scones
- DO NOT let the egg-wash drip down the sides
- DO NOT be rough with the dough – light hands
- DO NOT use cold butter straight from the fridge
All of these actions can impede the rise that you are aiming for in these British scones.
You can read more about these scone tips on my original British Scones tutorial, or watch the full-length Scone video on YouTube used during the group bakealong.
Step-by-Step Instructions
*** Start first by checking how many of the scones you will be able to fit in your own air fryer. Use the heart-shaped cookie cutter to work this out. I can fit 3 – 4 of these large scones in my small basket air fryer.


Prepare The Dough
1.Roughly cube the butter in small pieces about 1 cm, ⅓” size and the smaller surface area means the butter will soften quicker. (See Photo 1). However, there is no need for fridge cold butter for scones.
2.Add the flour & baking powder to a medium-large mixing bowl. **For Plain (All Purpose) flour, add the 2 amounts of baking powder – so 7.5 tsp (2.5 tbsp) . Yes this amount is correct! For the UK Self-raising flour, add just the 2 level tsp of baking powder.
3. Roughly mix together, before adding in the softened cubes of butter.

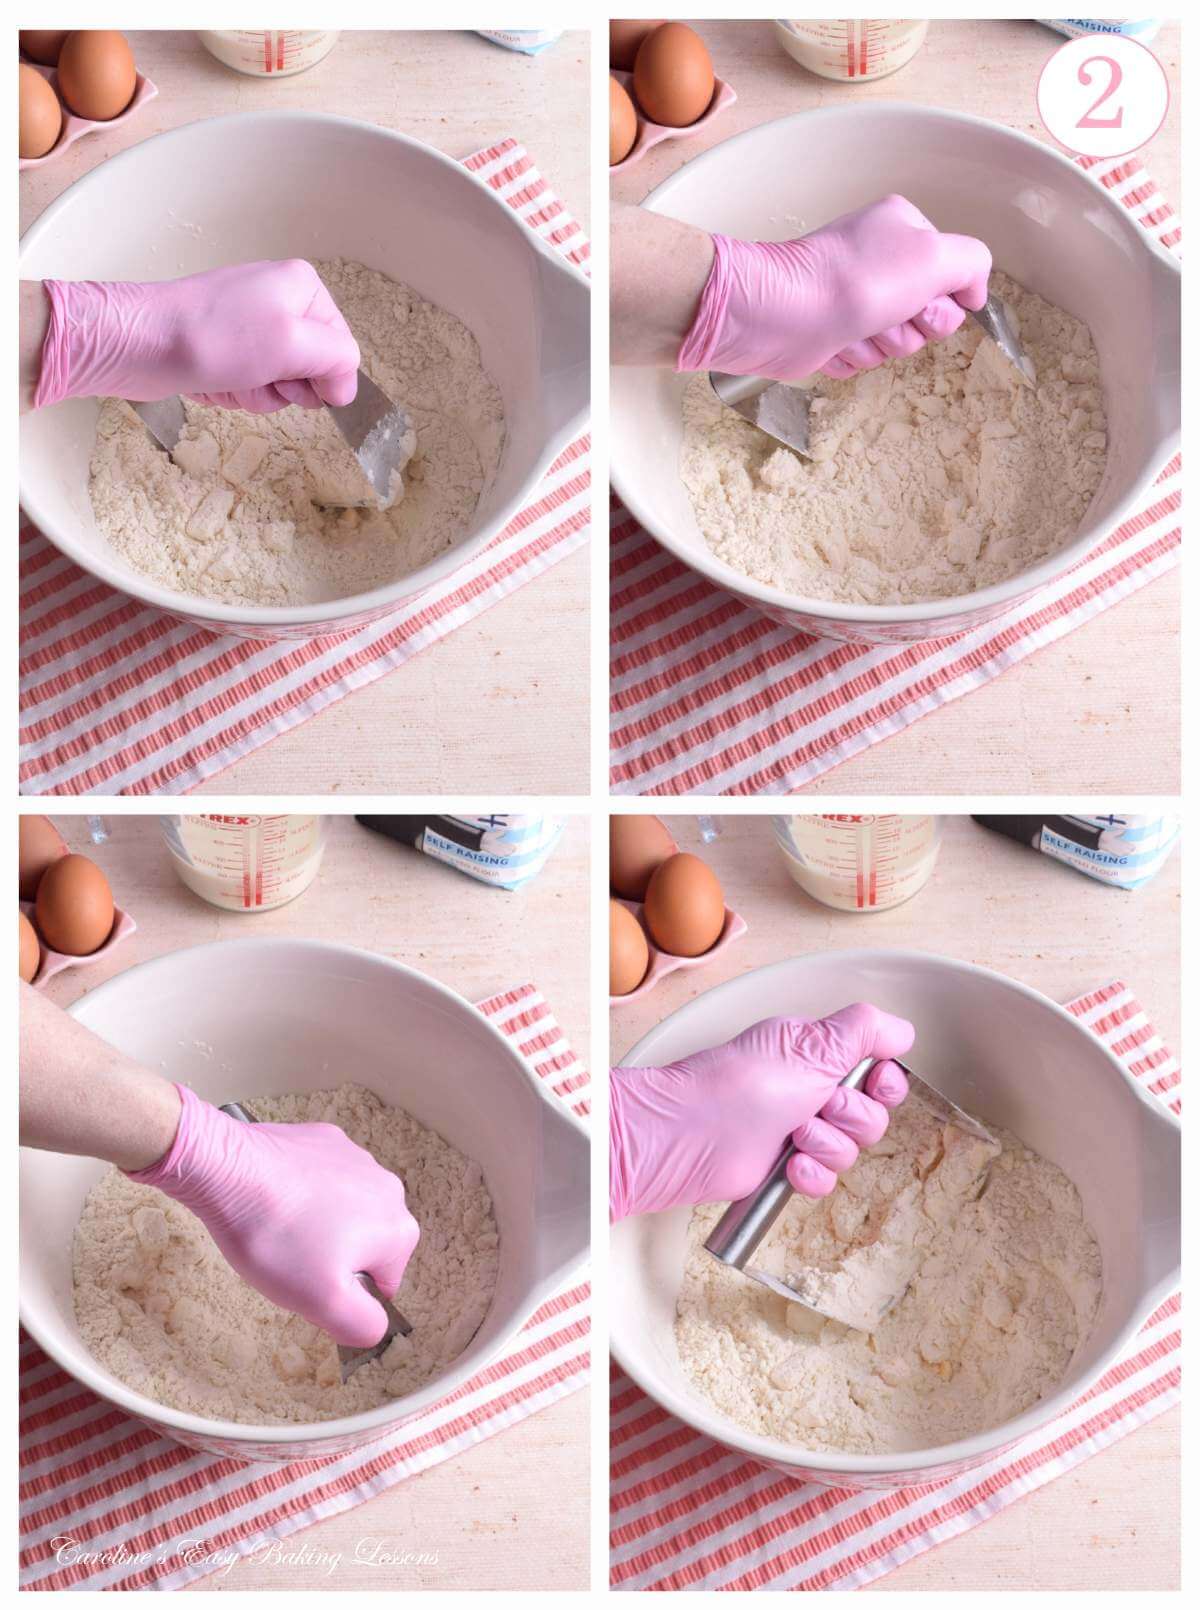
4.Mix to coat the butter cubes in flour & then ‘cut in’ or ‘rub in’. This just means working the mixture till you have smaller pieces of flour coated butter. Aiming for a consistency like rough large breadcrumbs.
5.There are a few options to do this. Use a pastry cutter (pastry blender), as seen in Photo collage 2. I like to use this as my hands get sore quickly. Push down on the mixture with the pastry cutter, making contact with the bottom of the bowl. Rotate the blender left & right.
6. Lift the pastry cutter and repeat this process, working your way across the mixture, unblocking the cutter when needed.


7. Alternatively, use 2 butter knives or your hands to ‘cut in’ the butter.
To use your hands, lift up the mixture with your fingers and rub your thumbs across the tips of your fingers, Repeat lifting and rubbing the mixture (‘rubbing in’), till the right consistency.
I like to use the pastry cutter for about 30-45 seconds and then use my fingers for about 15 seconds. So it doesn’t take long. Watch the video below to see this down.
DO NOT USE A FOOD PROCESSOR – absolutely no need.

8.Add the Caster Sugar to the mixture, mix through and make a well in the centre before leaving to the side.
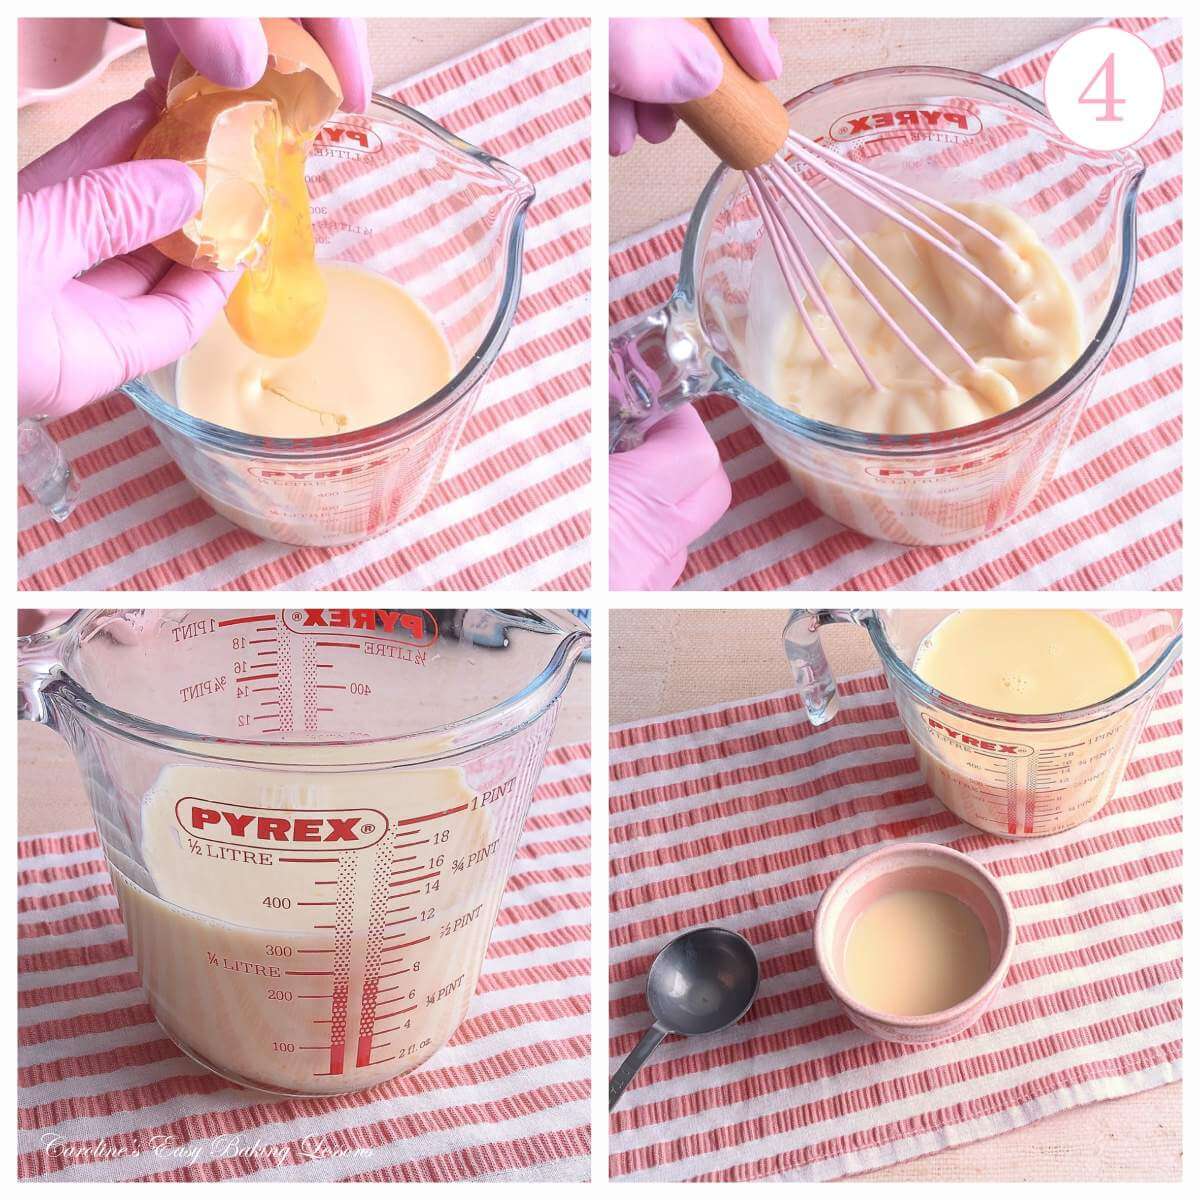
9.Break the 2 eggs into a jug and whisk well. (This activates the protein by waking it up and helps with structure of the scones).
10.Now add the milk, till you get to the 300ml (10 fl oz) or 1 1/2 cups level & whisk again to combine well.
11.Reserve 2 tbsp of the egg/milk mixture, into a small dish for egg-wash.


12.Add in half of the liquid to the well in the mixing bowl and use a large spoon or spatula to work in the liquid.
13. Very gradually add in more liquid, but only after you have really pushed down on the mixture, letting it take on as much of the liquid as possible. You might not need all the liquid, so check regularly for any dry or wet patches. You want the dough to be just a little bit sticky.
14.When the dough starts to come together, use your hands to very briefly knead the dough into a smooth dough.


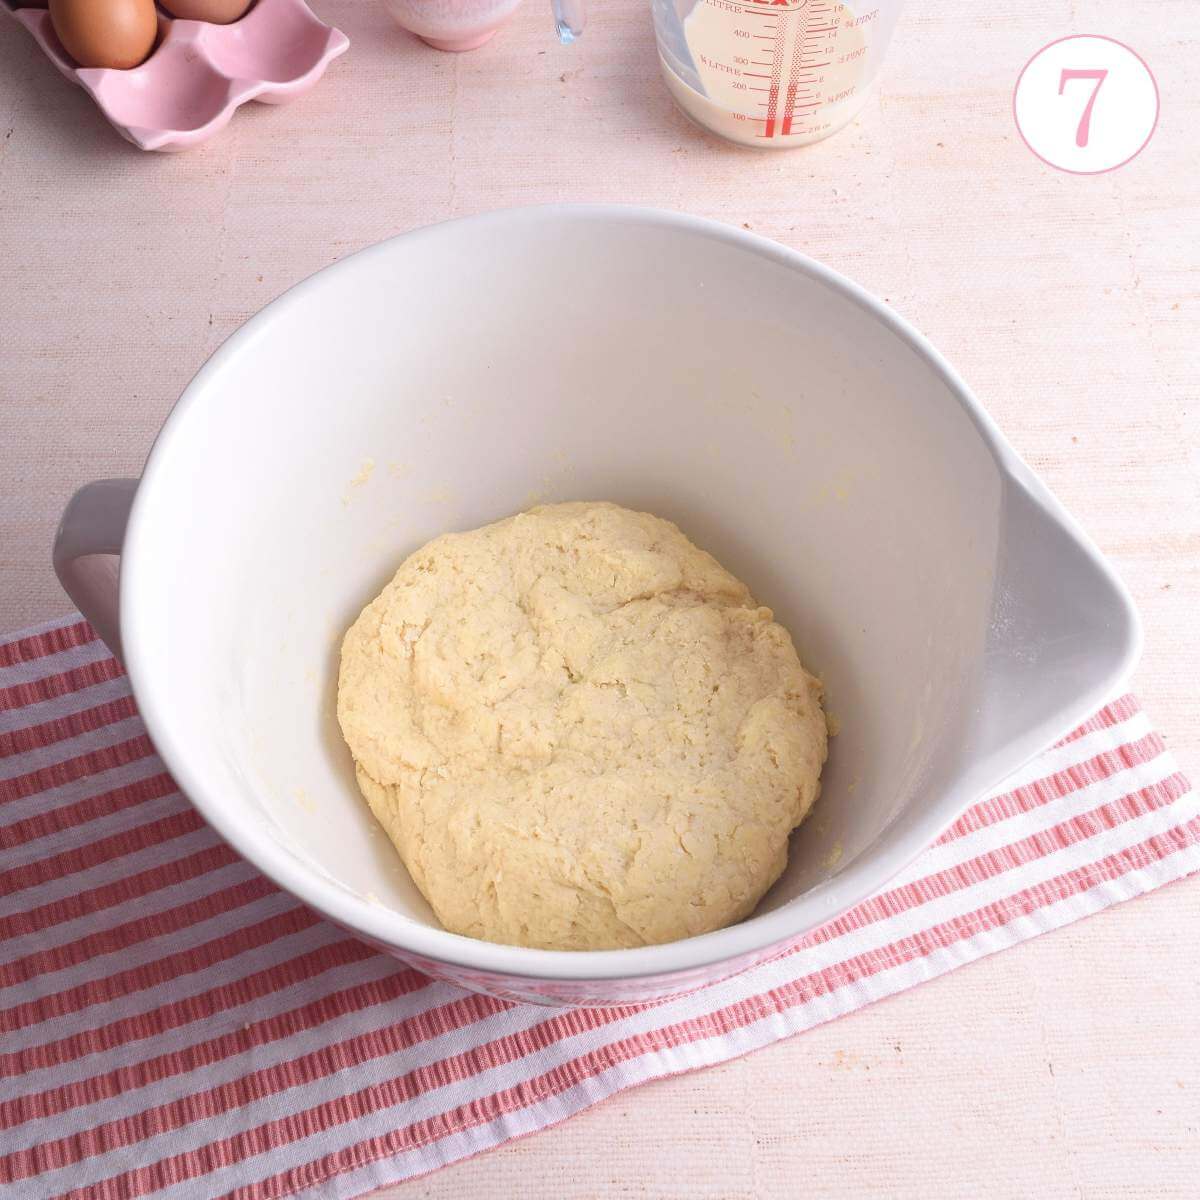

15. Now form the dough into a ball then flatten into disc shape.
16. Lightly flour some baking/parchment paper or work area, then place the disc of dough down on it.
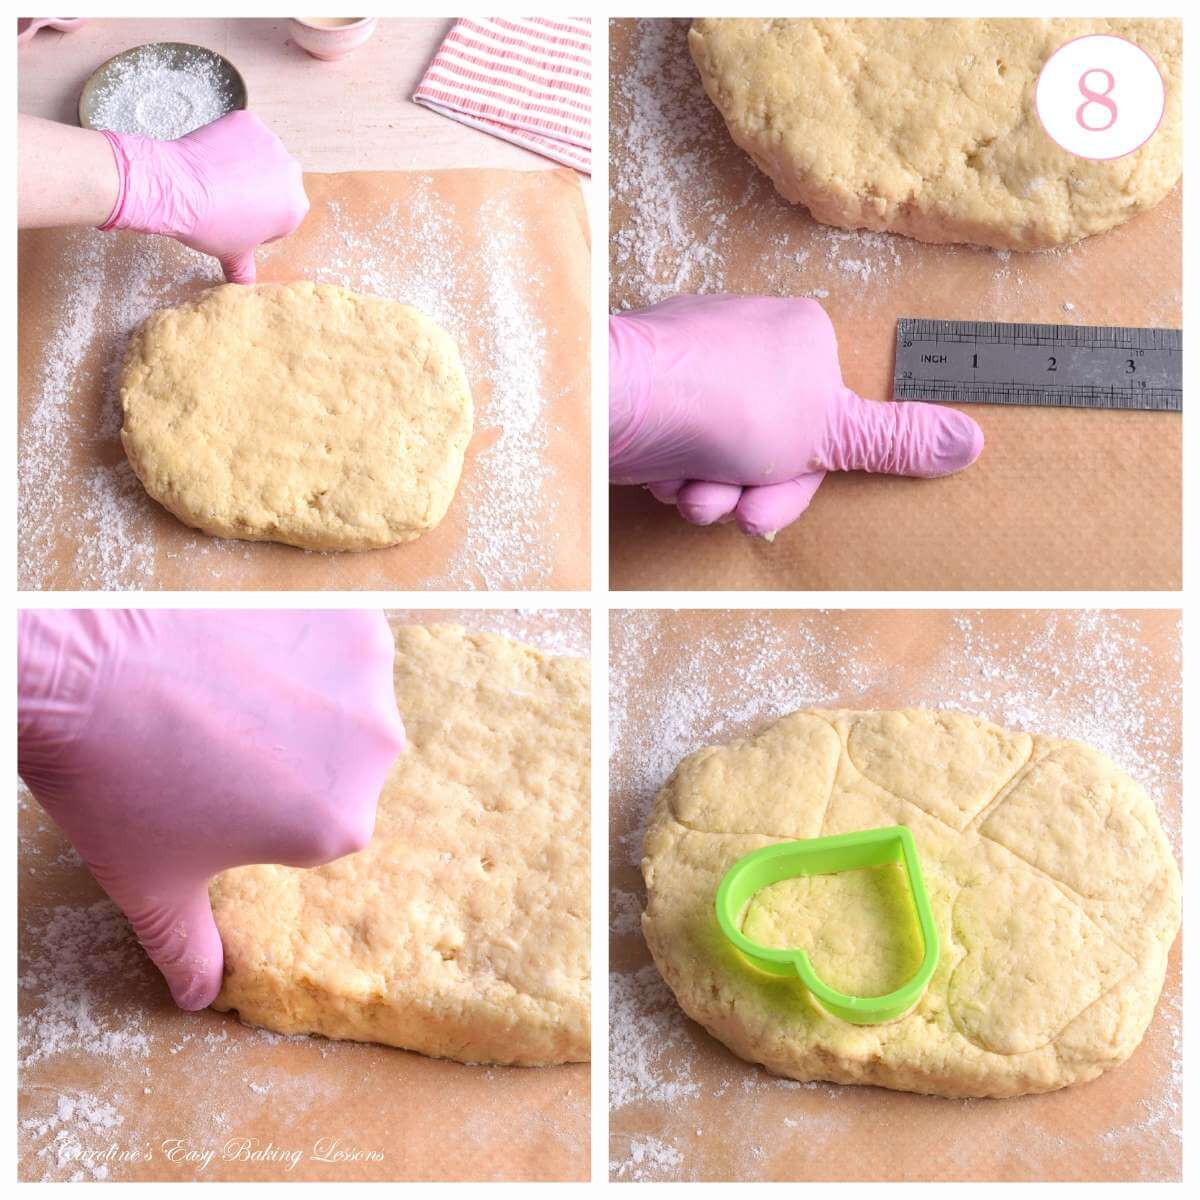
17. Pat out the dough with your hands. DO NOT USE A ROLLING PIN. Gentle handling of the dough is the key to a great rise in the scones. Work in the centre and work your way out. You want a thickness of at least 1″ (2.5cm). Don’t go any thinner or you won’t get the rise. The end of my thumb is about 1″ and I use for reference. (See Photo collage 8).


Cutting Out The Scones
1. Use the heart cutter and see how many scones you can get from the first go. You want the highest number possible. Aim for 5 scones.
**The more scones you can get from the first round the better.
2.If using a regular oven or larger open-front air fryer, paper line 1 or 2 baking trays/baking sheets. Otherwise, have a sheet of paper ready for the scones.


3.Dip the heart-shaped cookie cutter in flour & gently mark on top of the dough, to get as many hearts as possible. For this, I rotated the direction of the heart, every second one, to get 5 scones from this first round.
4.Once you have where you want to cut out sorted, push down on the cutter & DO NOT TO TWIST THE CUTTER. This impedes the rise of the scones.
5. Carefully transfer the scones to the paper or tray, & try not to touch the sides.
**If the scone doesn’t lift up, just leave to the end.
6.Cut the rest out & then pull back the excess dough and transfer the scones.

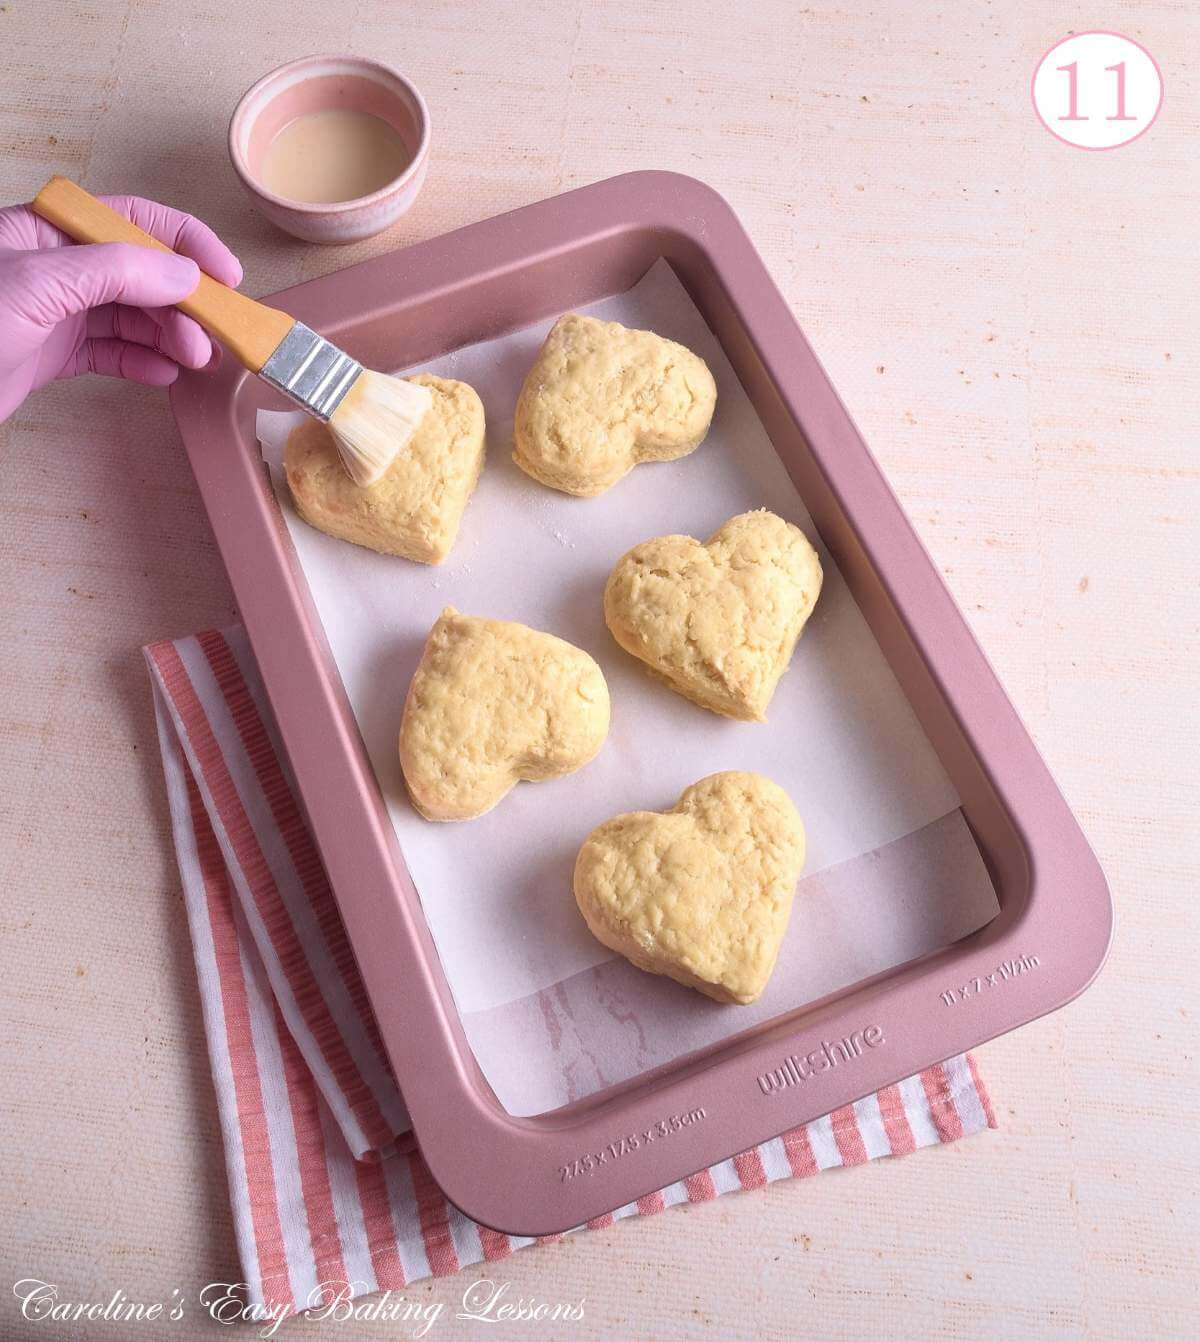
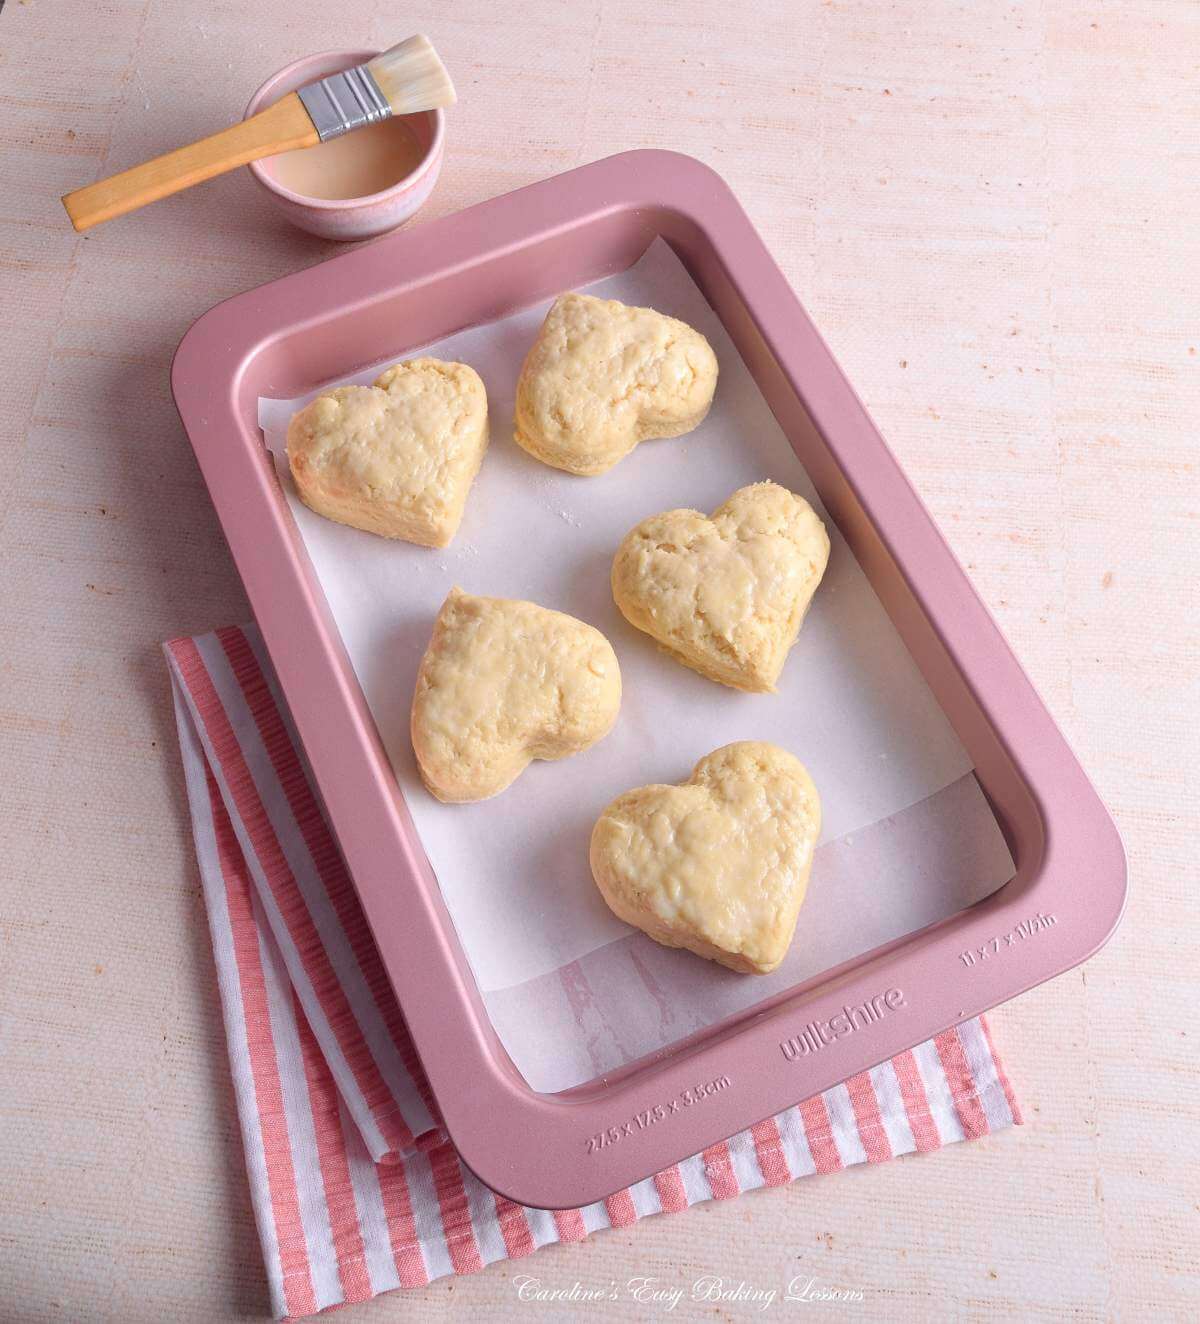
7.Very carefully and gently, use the reserved egg/milk mixture as an egg wash on the top of the scones. We don’t want any drips down the sides as it impedes the rise of the scone.
TOP TIP – tap excess egg wash off the brush, then start brushing from the centre, & gently working outwards.
8. If using a small basket air fryer, please use the rack it came with. Only paper-line with enough paper to go under the scones. You don’t want any excess paper, that can be a fire hazard. Use baking/parchment paper that is suitable for high temperatures & always weigh it down, (in this case with the scones).
DON’T BAKE DIRECT WITHOUT PAPER. And DO NOT LET PAPER MOVE OR FLY ABOUT IN THE AIR FRYER.


*Above is an image of the cheese scones, before baking in a small basket air fryer, on it’s rack.

Baking The Scones
1.Bake the heart scones at 200°c/180°c fan/400°F (Gas Mark 6), for regular oven. Pre-heat your air fryer if it requires it. For newer air fryers, or powerful ones, I always recommend using the lower temperature of fan oven. (180°c fan, 360-375°F). Use your judgement for your air fryer, or test with the first scone.
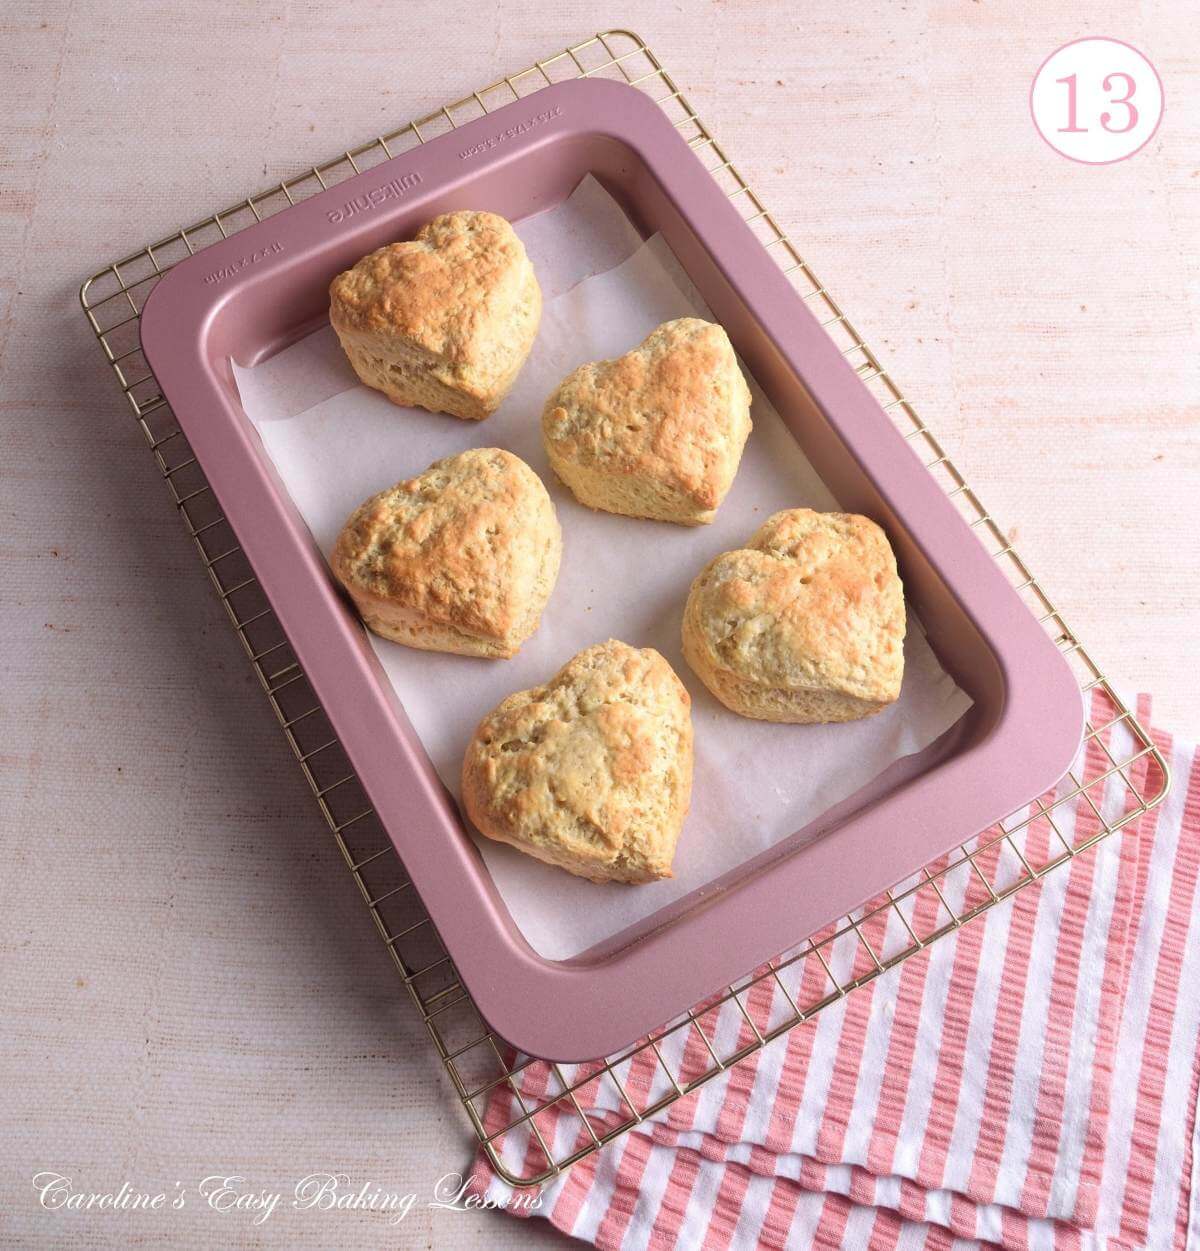
2.The basket air fryer scones should be baked for 10 -13 minutes (till risen & golden on top), and then turned off, egg-wash applied if any left & baked for another 5 minutes till golden.

**Sign up to my newsletter to get your own free copy of my oven temperature conversions table, that also includes air fryer temperatures. See the sign-up form below, just after the Recipe Card.
3. When using a larger open-front air fryer or regular oven, no need to turn the scones over. Just bake for 15-18 minutes until well risen and golden on top and on the bottom.
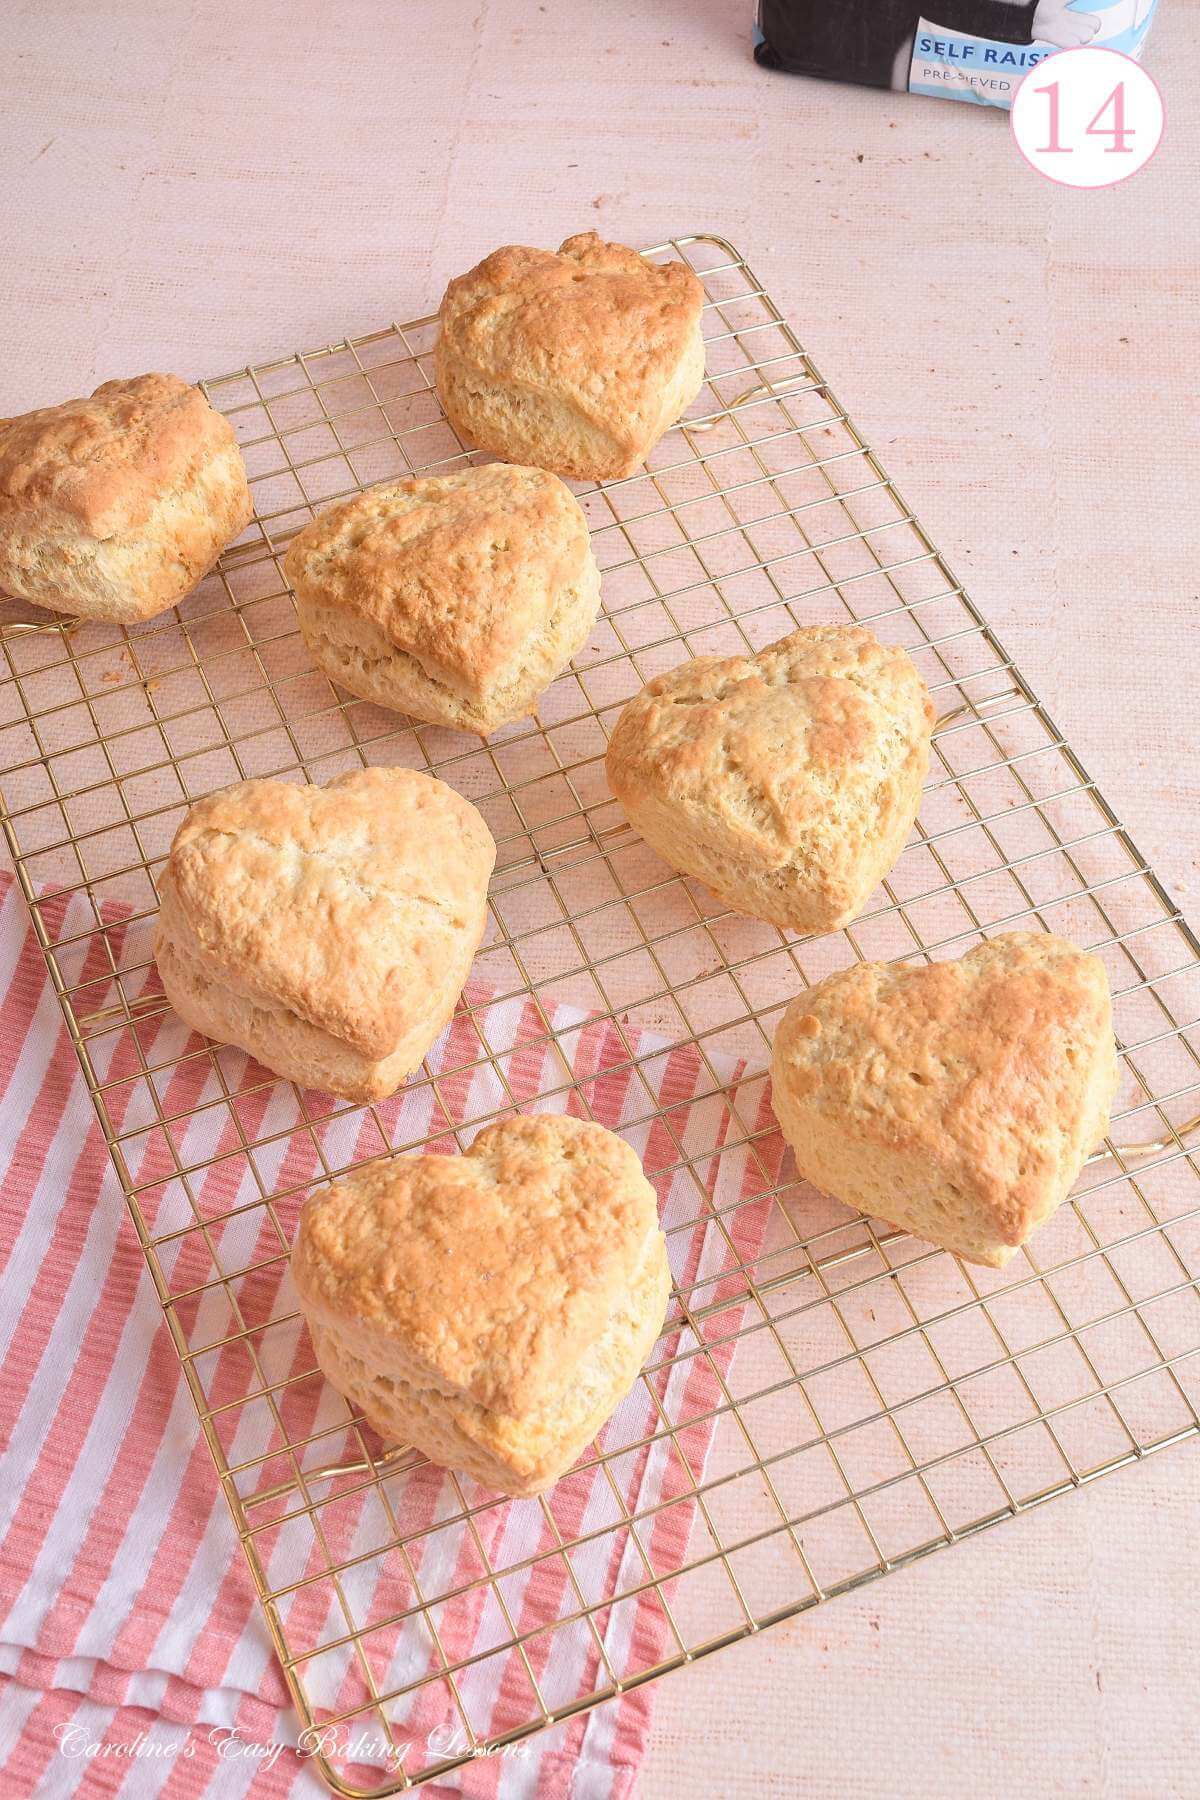
4.Once baked, transfer to a cooling rack to cool.
5.While the scones are baking, carefully bring the excess dough together with as little handling as possible. This handling creates less ‘perfect looking’ scones. Which is why the first batch cut out rise the best.
6. Pat out the dough to at least 1″ (2.5cm) like before & cut out more scones, egg-wash & leave till ready to bake.


Make The Pink Glaze
1.Sieve the icing sugar (powdered sugar) into a small bowl & add 1 tsp of milk or water.
2.Mix well before adding more liquid, 1/2 tsp at a time until you have a very thick stiff paste. (See Photo collage 16 below).
**Top tip – push down with the back of your spoon, and make the sugar take on as much liquid as possible.
3.Very gradually now add more liquid, in 1/4 tsp at a time till you have an extra thick but pourable glaze.


(See the images or check out my Glaze 101 tutorial for different glaze consistencies. Or check out the icing/glaze video.
4.Now add a very small amount of red or pink food colouring. I use & recommend Sugarflair paste colourings. More concentrated than a gel. I used a tiny amount on the end of a cocktail stick. (See Photo collage 16). Then mixed in and waited for it to develop for 20 seconds until I got the shade I wanted. For gel colouring, I would say add a tiny drop at a time.
5.Cover with cling film/plastic wrap till ready to use (will be fine left out for up to 3 days).


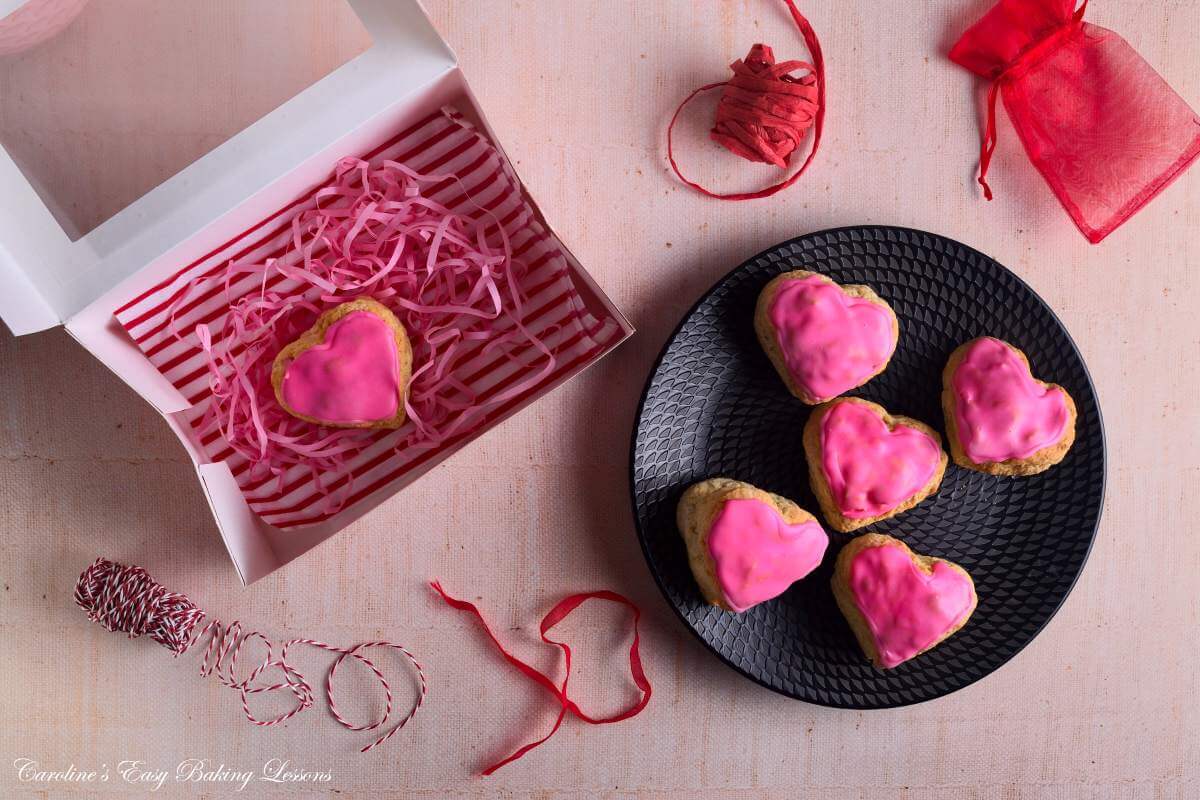
Decorating The Scones
1.Once the scones are cooled you can decorate the tops. Use a very small round nozzle in a piping bag, or a very fine end on a piping syringe, and fill with the glaze. **Add a spoon or 2 first to see if the thickness is ok to pipe. But don’t make too thin.
2.Carefully pipe a heart shape on top of the scone, making sure to leave a little gap at the end. Repeat with all scones and then leave for the piped border to set. Leave for at least 15 minutes.)
3.Once the glaze is dry to touch, thin the remaining glaze just a little. Then add to the piping bag.
4. Start to fill in the centre with the glaze, starting at the outer edge and encourage the glaze across, before adding anymore. Alternatively, you can spread across with a spoon or butter knife.

A small cocktail stick or scribe tool for cookies is great for working the glaze into where you want. (See photo collage 17 above, image 4)
5. Repeat with the rest of the scones and leave to set. If too thin a layer and not a solid pink, you can add a 2nd layer but will take longer to set.
***Top tip – these scones are bumpy by nature, so to stop the glaze dripping (make sure not too thin), use something to prop up & make the scone flat.


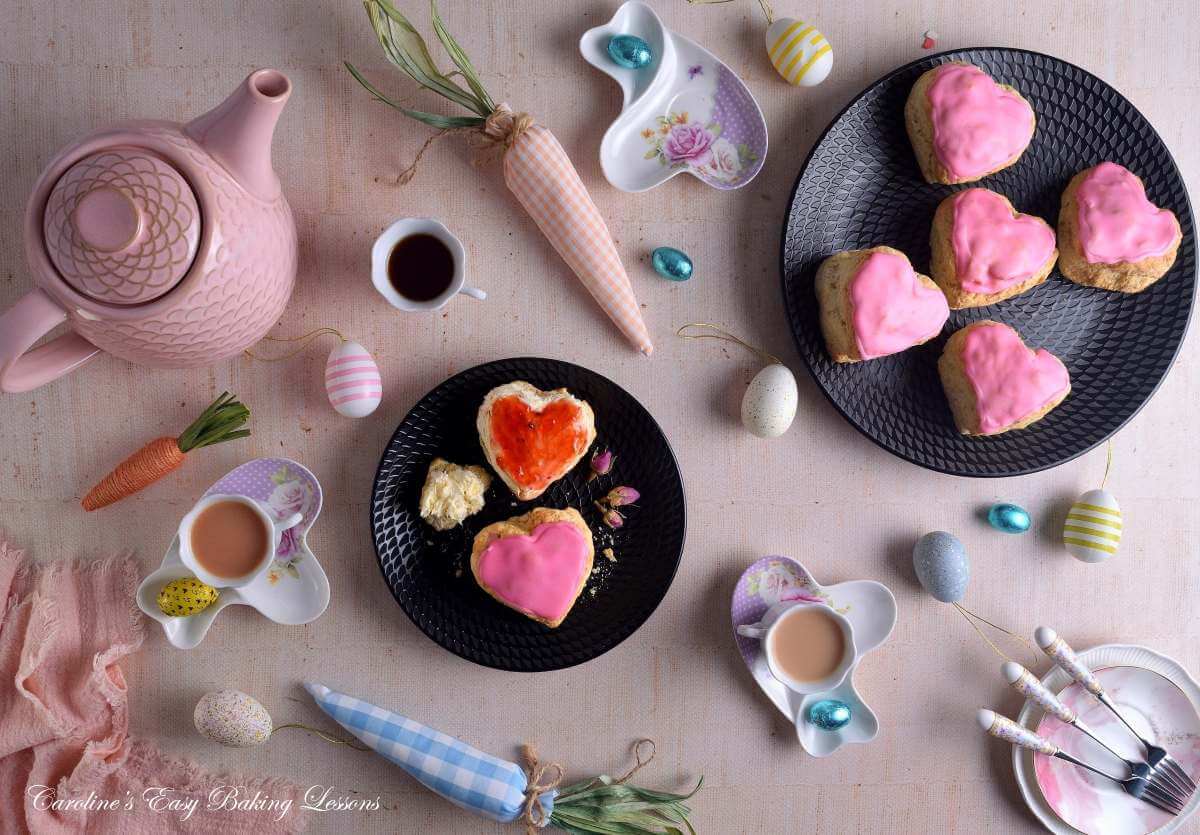
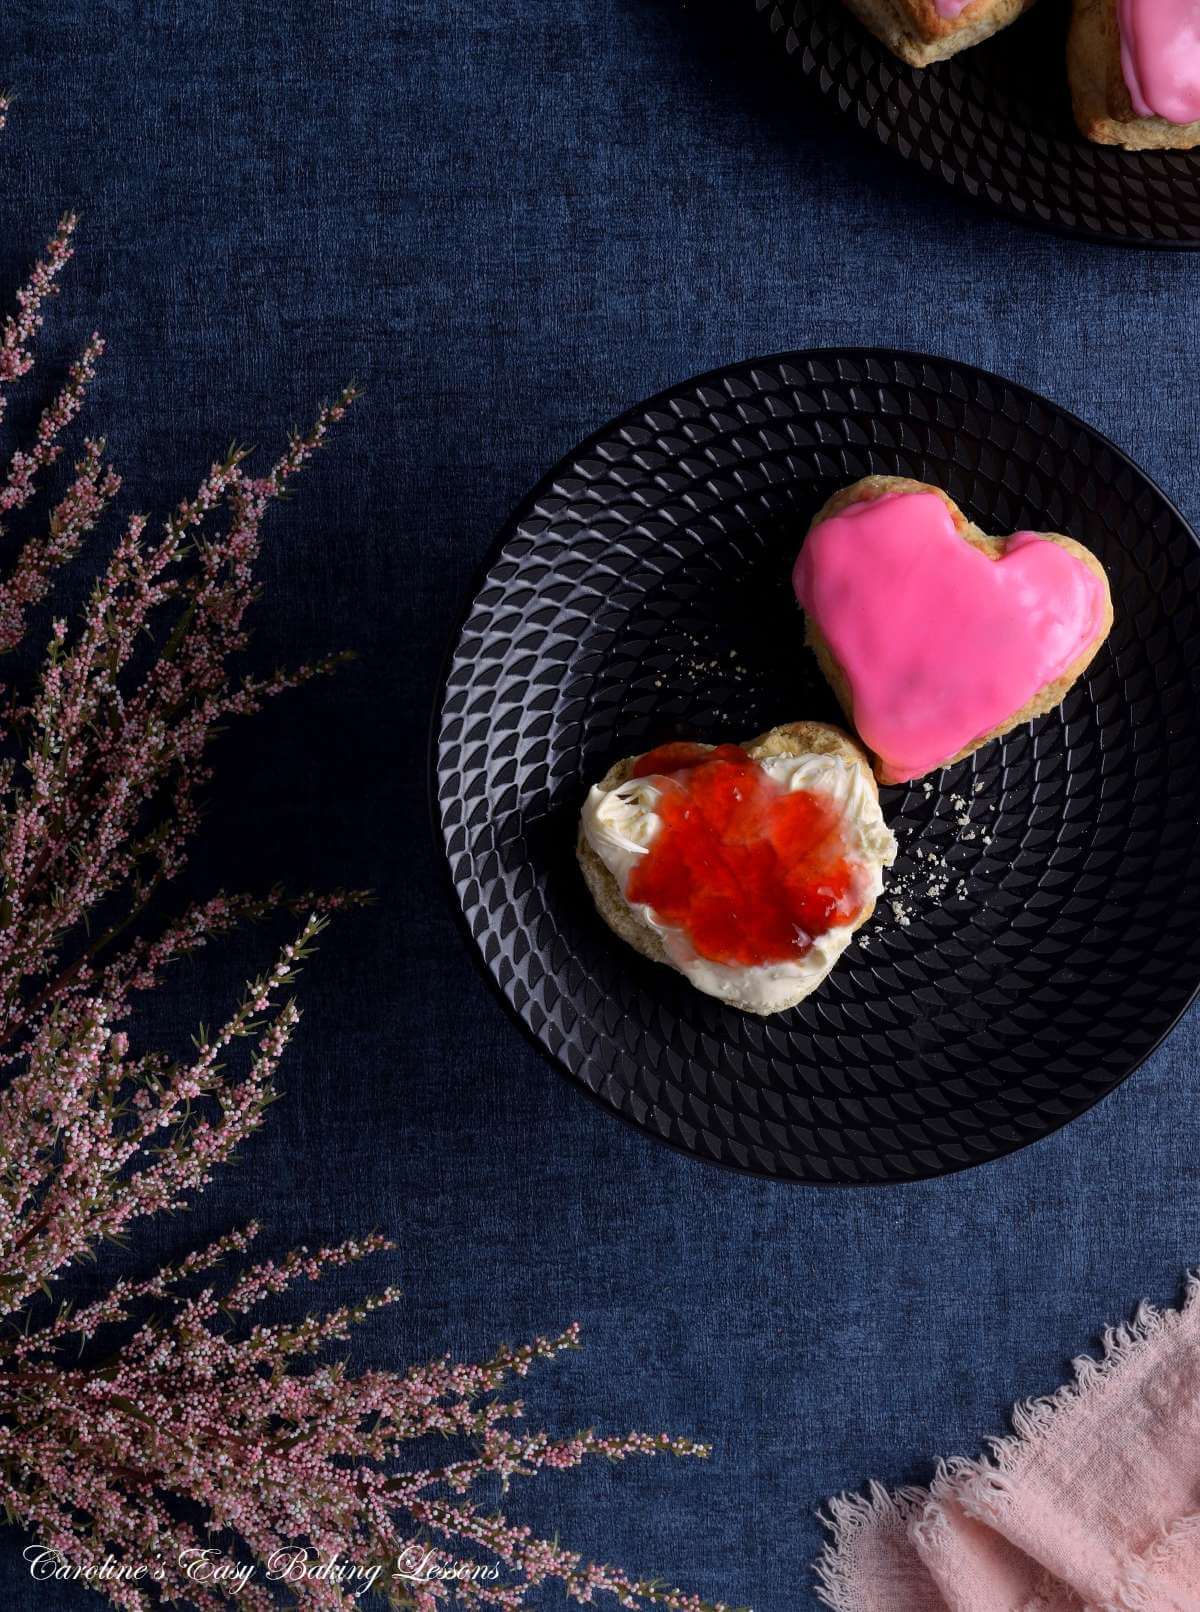
Serving & Storing
1.Serve the scones cut in half and topped with butter, whipped cream, jam, curd and fresh berries if you like. Check out myjams & curds page
2.Store the cooled scones in a metal cake or cookie tin, at room temperature and they will be fine for up to 7 days. DO NOT STORE IN THE FRIDGE. The glaze will start to fade over time. But there will be some left-over to re-apply if needed.

3.For regular scones, warming halved scones in the microwave for 20-30 seconds is great. But this will soften the glaze. You could heat the bottom half for 10-15 seconds and then close together.
4.Unglazed scones freeze really well. Just wrap each in paper and then cling film/plastic wrap or foil, followed by a labelled bag or air-tight container. (This ensures no freezer burn or freezer taste!). Freeze for up to 3 months1 and defrost just sitting on the worktop (counter) for a few hours.


DIFFICULTY LEVEL: Beginner, not too hard
Click an image below to jump to the other scone recipes, or go to the scones page.


Recipe Card
Air Fryer Big Heart Scones

Equipment
- Scales or measuring cups
- Measuring Spoons
- Mixing spoon
- Jug
- Large mixing bowl
- Pastry Cutter/Pastry Blender (optional – or 2 butter knives, or use fingers)
- Whisk or fork
- Baking/parchment paper (make sure good for hot temperatures)
- Heart-shaped Cookie Cutter (84mm (3 1/16″) at its wides)
- Small bowl/dish (for egg-wash)
- Pastry Brush (or clean artist brush)
- Air Fryer (or regular oven)
- Cooling rack
- Piping bag or syringe with small nozzle (Or use a small food bag*)
Ingredients
Dry Ingredients:
- 450 grams Plain Flour (15¾ oz, 3⅔ cups All Purpose Flour)*
- 7½ tsp Baking Powder (level tsp, (or 2½ tbsp) Yes, correct amount – only use 2 tsp for UK Self-raising flour)*
Wet Ingredients:
- 50 grams Caster Sugar (1¾ oz, level ¼ cup Extra/Super Fine Sugar)*
- 75 grams Unsalted Butter (cubed small & a little softened, 2½ oz or level ⅔ stick or ⅓ cup)*
- 2 Eggs (Medium to large, US – Large or Extra Large)*
- 240 ml Milk (1 cup, 8 fl oz – approx., or Buttermilk)*
Pink Glaze:
- 125 grams Icing Sugar (4½ oz, 1 cup, Powdered sugar)
- 3 tbsp Water (45ml or milk, not exact)*
- Red Food colouring (or Pink colouring, very small amount*)
- * Denotes -see notes
Instructions
- Before starting, if using a small basket-style air fryer, see how many scones can fit in your own air fryer, using the cutter you have. For the basket air-fryer I can bake 3-4 at a time. Whereas in my larger open-front air fryer, I can bake all 7 at one time.
Prepare The Dough:
- Cut the 75 grams Unsalted Butter into small cubes about 1 cm, ⅓” in size, to not only work into the dough better, but for quicker softening. **Please note, no requirement to use fridge-cold butter for scones. We just want to soften a little to make easier to work with.
- Add the 450 grams Plain Flour, and 7½ tsp Baking Powder to a mixing bowl. This is 2½ tbsp & correct amount. (For UK self-raising flour, only add 2 level tsp of baking powder).
- Briefly mix to coat, then use a pastry cutter (pastry blender), 2 butter knives or your fingers to 'cut in' or 'rub in' the butter. (For a detailed look at this process, see the step-by-step instructions). Aim for roughly large breadcrumb consistency. **DO NOT USE A FOOD PROCESSOR.
- Now add in the 50 grams Caster Sugar & then make a well in the middle. Place to the side.
- Crack the 2 Eggs into a jug, whisk really well, and top up with milk, to the 300ml (10 fl oz) or 1 1/2 cups level. Whisk once more & reserve 2 tbsp for later.
- Add in half of the milk/egg mixture to the dry ingredients and start to work in. Very gradually add small amounts of the liquid until the dough starts to come together. You might need a little more or not use all. Use your hands to briefly knead together into a ball then a disc, that is just a little bit sticky.
- Flour baking/parchment paper or a work area, & place the disc of dough down in the centre. Use your hands to pat out the dough to a circle or oval shape, with a thickness of at least 1” (2.5cm). Use your heart cutter to try and get 5 scones from this round. **The more you get from the first round, the more perfect shape they will be. DO NOT USE A ROLLING PIN.
Cutting Out The Scones:
- Paper-line a baking tray/baking sheet if using a larger open-front air fryer or regular oven. Otherwise, have a sheet of baking paper ready for when the scones are cut out.
- Dip the cutter in a little flour and gently mark on the top of the dough, to see where you can best fit 5 scones. TOP TIP – for heart-shaped cutter, rotate the cutter every second cutter for them to fit in better. (See step-by-step instructions photos).
- Now push down on the cutter, MAKING SURE NOT TO TWIST IT! Cut them all out & transfer to the paper, trying to NOT TOUCH THE SIDES. If the scone doesn't lift up, just wait to the end and pull back the excess dough.
- Very carefully brush the egg/milk mixture you reserved earlier, onto the top of the scones. DON'T LET ANY DRIP DOWN THE SIDES. So tap your brush, then brush from the centre and work your way out.
- For small basket air fryers, use the rack that comes with it and paper-line with just enough paper to go under the scones. DO NOT HAVE EXCESS PAPER AS IT IS A FIRE HAZARD IN AIR FRYERS. You can’t bake without paper but. Always make sure any paper is weighed down and suitable for high temperatures.
Baking The Scones:
- For basket air fryer, carefully transfer the scones with a palette knife or spatula, onto the paper in the basket. You can egg-wash once in the air fryer if you like.
- Bake at a temperature of 200°c/180°c fan/400°F (Gas Mark 6), for regular oven. Pre-heat your air fryer if it requires it. For newer air fryers, or powerful ones, I recommend using the lower temperature of fan oven. (180°c fan, 360-375°F). Use your judgement for your own air fryer, or test with the first scones.
- Basket air fryer scones, bake for 10 – 13 minutes till golden and risen. Then turn the scones over and brush on any remaining egg-wash before baking for another 5 minutes. For larger air fryers or regular oven, the turning over is not required and so bake for about 15 – 18 minutes. Leave on a rack to cool.
- Meanwhile you can bring the scraps of dough together, as gently & carefully as possible and cut out more scones. Egg-wash as before and bake just the same.
Pink Glaze:
- Sieve your 125 grams Icing Sugar (powdered sugar), into a small bowl (about cereal size), before very gradually adding in water or milk until you get a thick paste-like mixture.
- Now add a tiny amount of red or pink food colouring (Sugarflair paste colouring is great, and I used only a small amount on a cocktail stick. And left to develop before adding anymore). Once you have the shade you want, gradually in more drops or water till you get a thick but pourable consistency. (***See my Glaze 101 Tutorial, or glaze/icing video.)
Decorate The Scones:
- Once the scones are cooled, add about 4 tbsp of the glaze to a piping bag fitted with an extra fine nozzle, (or a small syringe). Pipe a heart shape on the top of the scones, being careful to leave a little gap along the edge. Repeat for all scones and leave to set for at least 10 minutes.
- Once set, thin the remaining glaze ever so slightly to make spreading easy. Then either carefully spread on top, within the heart-shaped border with a small spoon. or you can pipe it on with a large nozzle. Alternatively, use a food bag and cut a small hole off the end. TOP TIP – add a small amount and spread into the shape, working your way across the scone. Leave to set.
Serving & Storing:
- Serve the scones by cutting in half and adding butter, whipped cream and/or jam/curd to each half. Add some seasonal berries too if you like.
- Store cooled scones in a metal cookie or cake tin, with the same baking/parchment paper, at room temperature and they will be fine for up to 7 days. DO NOT STORE IN THE FRIDGE.
- Normally I recommend warming scones in the microwave, when cut in half, for 30 seoconds max. But for this the glaze will melt a little.
- Unglazed scones freeze really well. Wrap individually in paper, cling film/plastic wrap or foil on top and then into a labelled food bag or air-tight container. This helps prevent freezer burn. Freeze for up to 3 months1 and defrost on the worktop (counter) for a few hours.
Notes

 Sugar: UK Caster Sugar used, which is US Extra/Super Fine sugar. Or lightly process some granulated sugar.
Eggs: UK medium to large, so large to extra large US eggs & at room temperature.
Sugar: UK Caster Sugar used, which is US Extra/Super Fine sugar. Or lightly process some granulated sugar.
Eggs: UK medium to large, so large to extra large US eggs & at room temperature.

 **Please see the detailed ingredient section before this Recipe Card for more on the ingredients, equipment & tips.
Equipment: Used a large heart-shape cookie cutter, with widest point being about 84mm (3 1/16″).
**Please see the detailed ingredient section before this Recipe Card for more on the ingredients, equipment & tips.
Equipment: Used a large heart-shape cookie cutter, with widest point being about 84mm (3 1/16″).

 Yield: using recommended cookie cutter size and thickness of dough, the recipe makes 7 large heart shaped scones.
More scone recipes: check out the other scone recipes or see the images below. (Including Gluten-free British Scones)
Yield: using recommended cookie cutter size and thickness of dough, the recipe makes 7 large heart shaped scones.
More scone recipes: check out the other scone recipes or see the images below. (Including Gluten-free British Scones)

 Go to Valentine’s Day recipes page, or Mother’s Day recipes page.
Reference: 1 – freezing scones information from FreezeIt.co.uk.
Go to Valentine’s Day recipes page, or Mother’s Day recipes page.
Reference: 1 – freezing scones information from FreezeIt.co.uk.
Nutritional Information: I am not a qualified nutritionist and all values are approximate. 1 serving is based on using all ingredients and with a yield of 7 large scones, where one scones is 1 serving. 1 scones but not including any toppings. Make bigger or smaller scones, and these values will change. (**please note all th eglaze/icing is included, but that is a double layer. Use less glaze and the values will reduce). All values calculated via MyFitnessPal.com.


Click an image below to jump to the other scone recipes, or go to the scones page.
Subscribe For More Recipes
Want more great recipes, tips, baking information & newsletters? Then please consider subscribing by adding your email address below. Be sure to check for a confirmation email & respond back, so you can follow me & receive your free emails. Your personal information will not be shared with a third party. PLUS: a FREE oven & air fryer temperature conversions table as a thankyou!
Join My Facebook Group
Why not also join my – Facebook group Easy Online Baking Lessons, dedicated to this baking lessons website, as well as providing one-on-one support with myself & my team? Be sure to answer all security questions when requesting to join.
Follow me on social media:
Happy Learning & Baking!
Caro x

Gluten Free Air Fryer British Scones
Search For Something You Fancy!
Caroline’s Easy Baking Lessons
References:
- reezing scones information: from FreezeIt.co.uk-freezing scones ↩︎


