Air Fryer Gluten-free Victoria Sandwich Bundt!

Introducing my new recipe, air fryer gluten-free Victoria Sandwich bundt cake! Much loved classic British layer cake Victoria Sandwich, gluten-free, baked in a bundt tin, in an air fyer & layered just just like the original!
Air Fryer Gluten-free Victoria Sandwich Bundt!
Part of my Baking On A Budget Series


***click to jump to section***

What Is this Victoria Sandwich Bundt Cake?
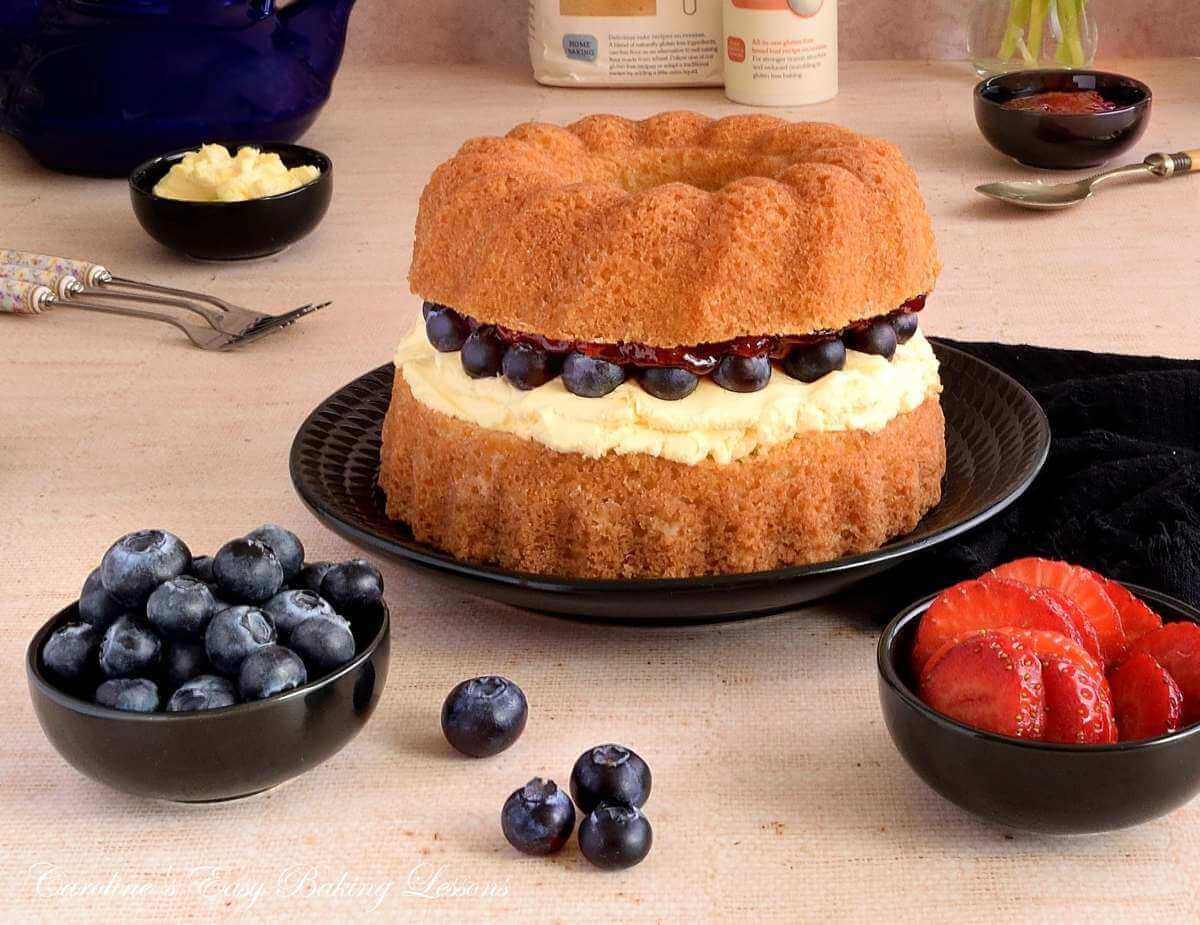
This gluten-free cake is based on British classic layer cake, Victoria Sandwich Cake. Made using gluten-free flour, the cake is instead baked in a bundt tin, using a small basket air fryer!
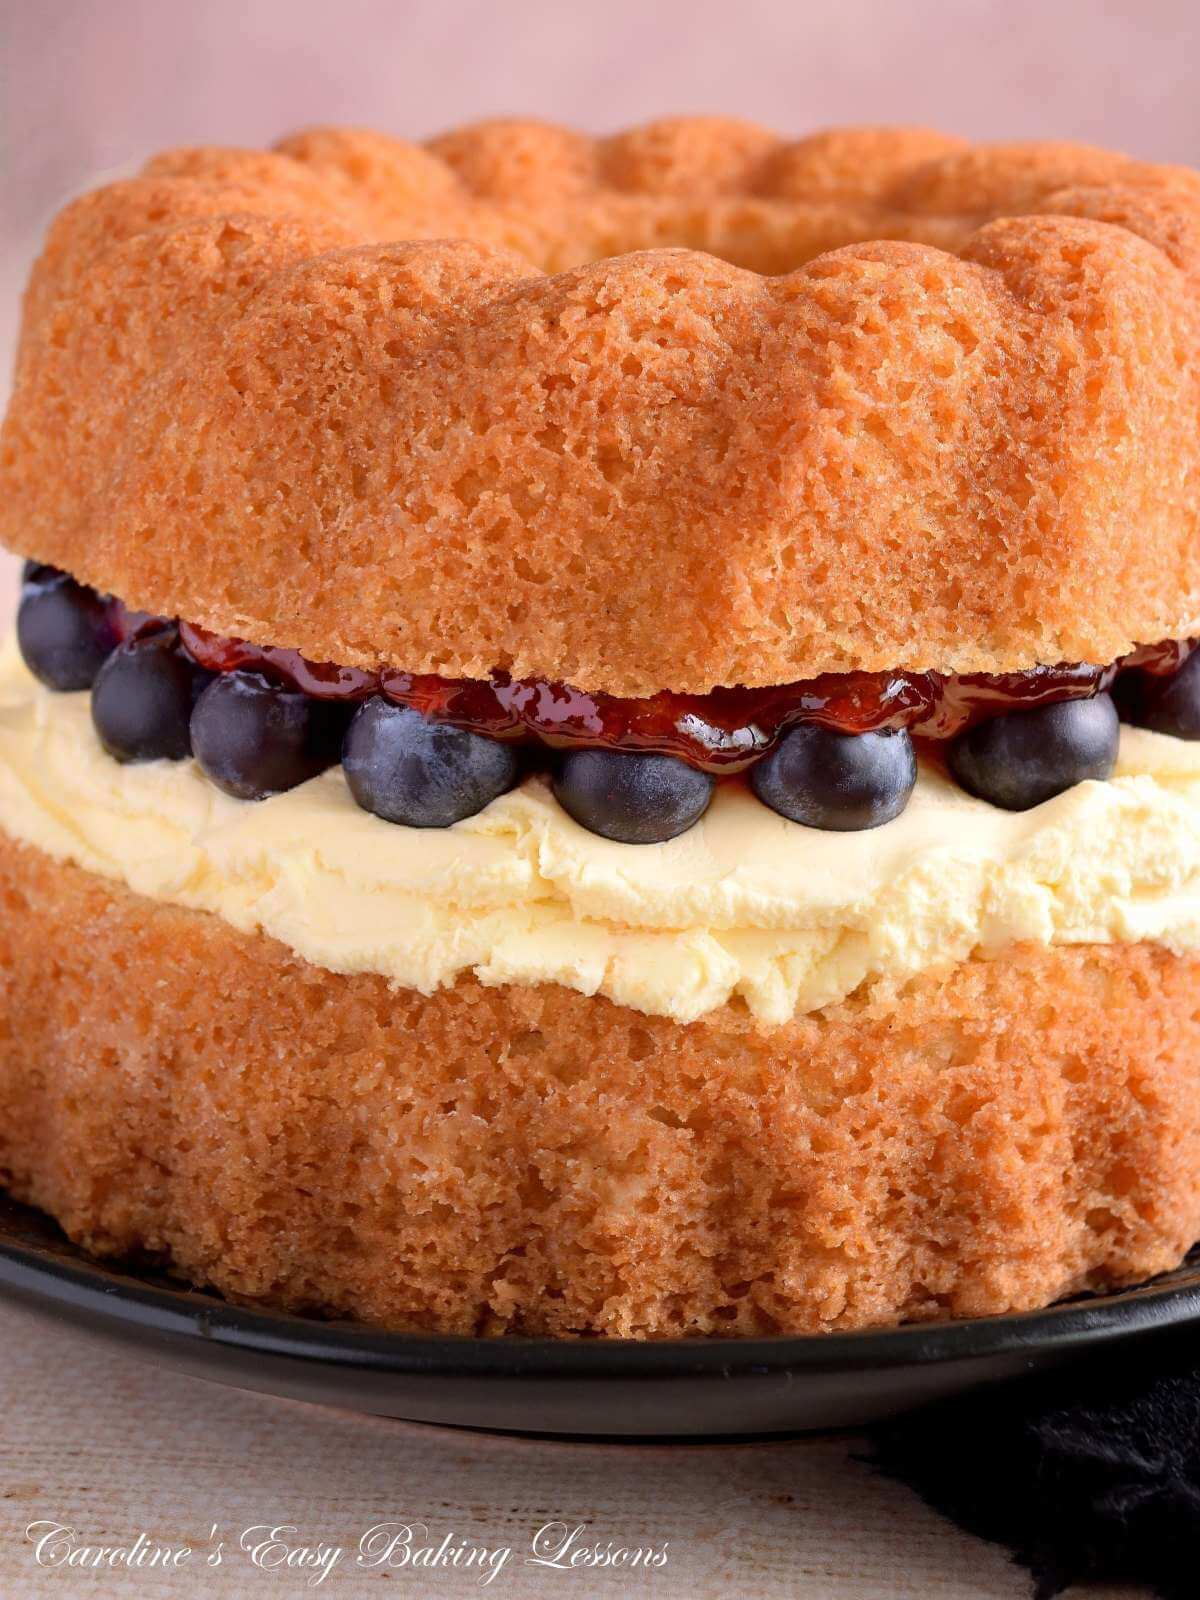
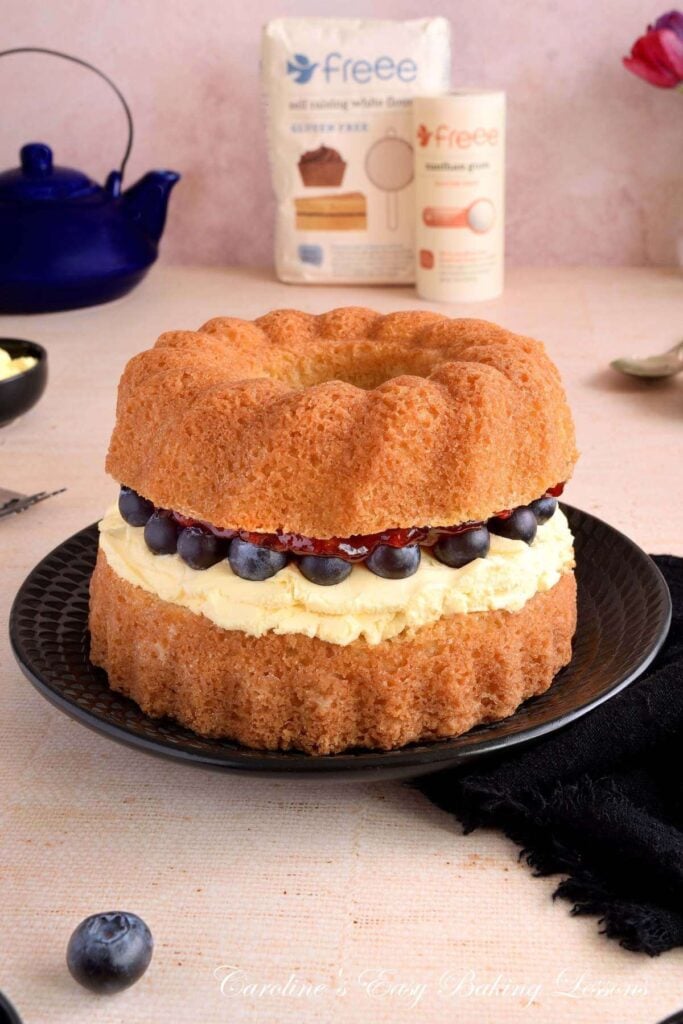
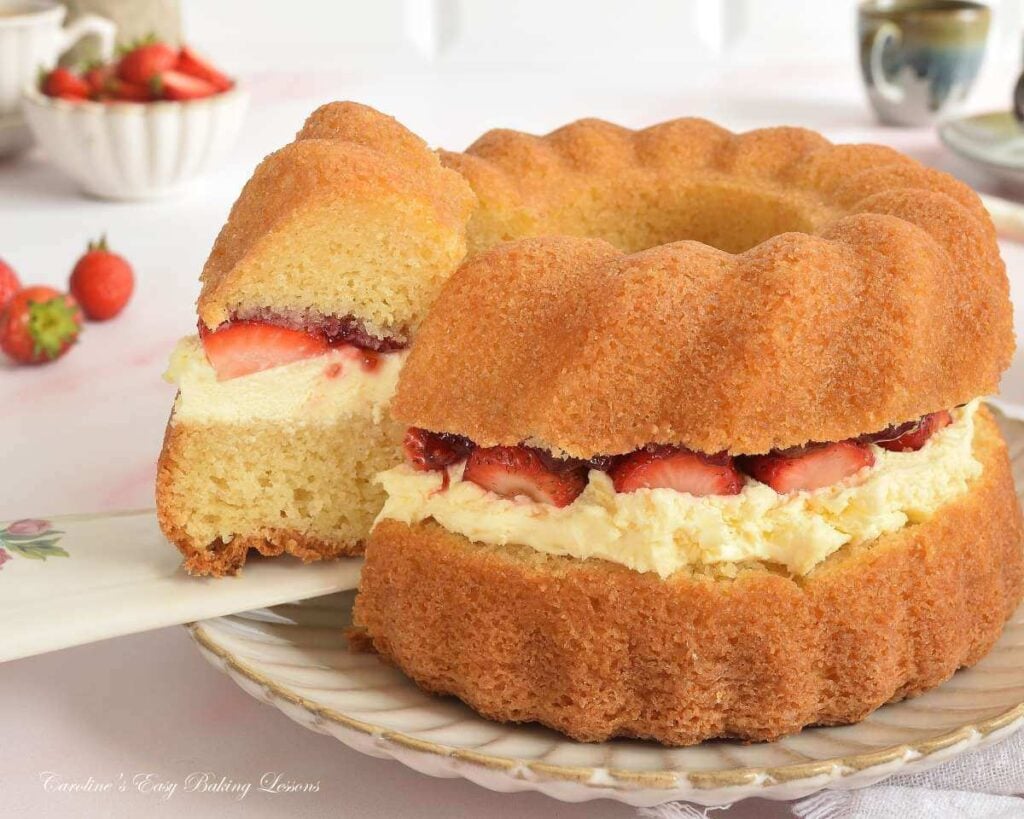
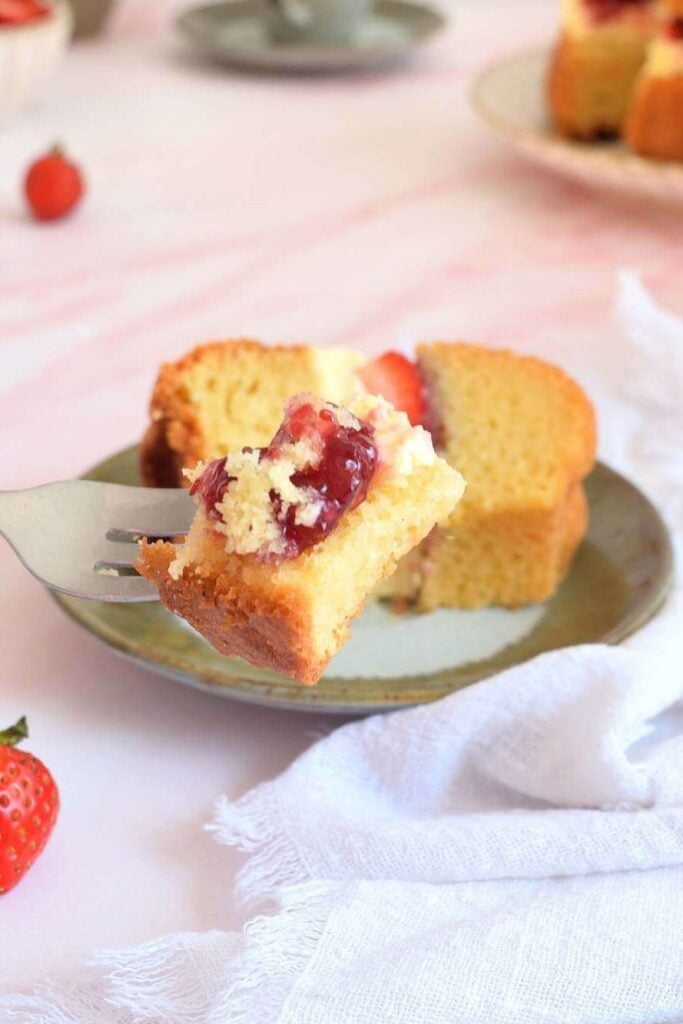
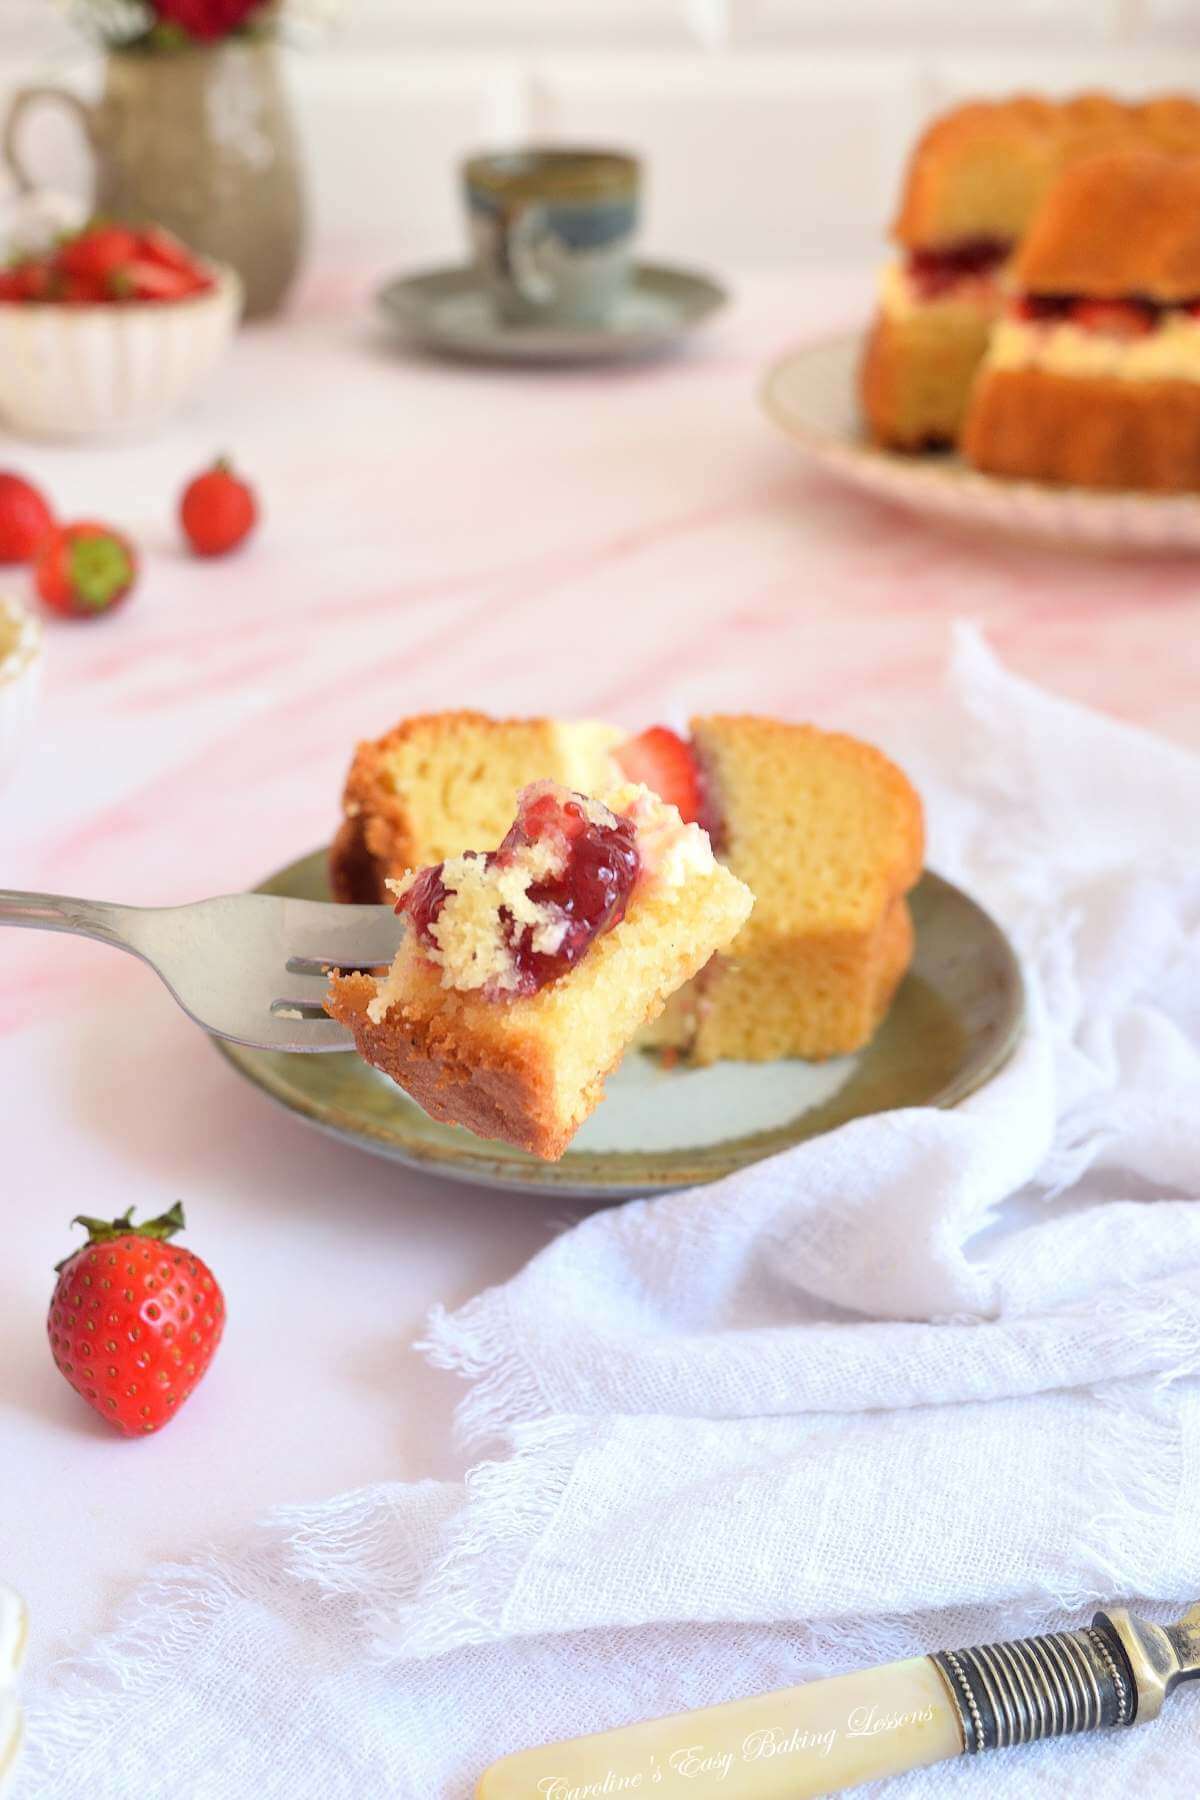
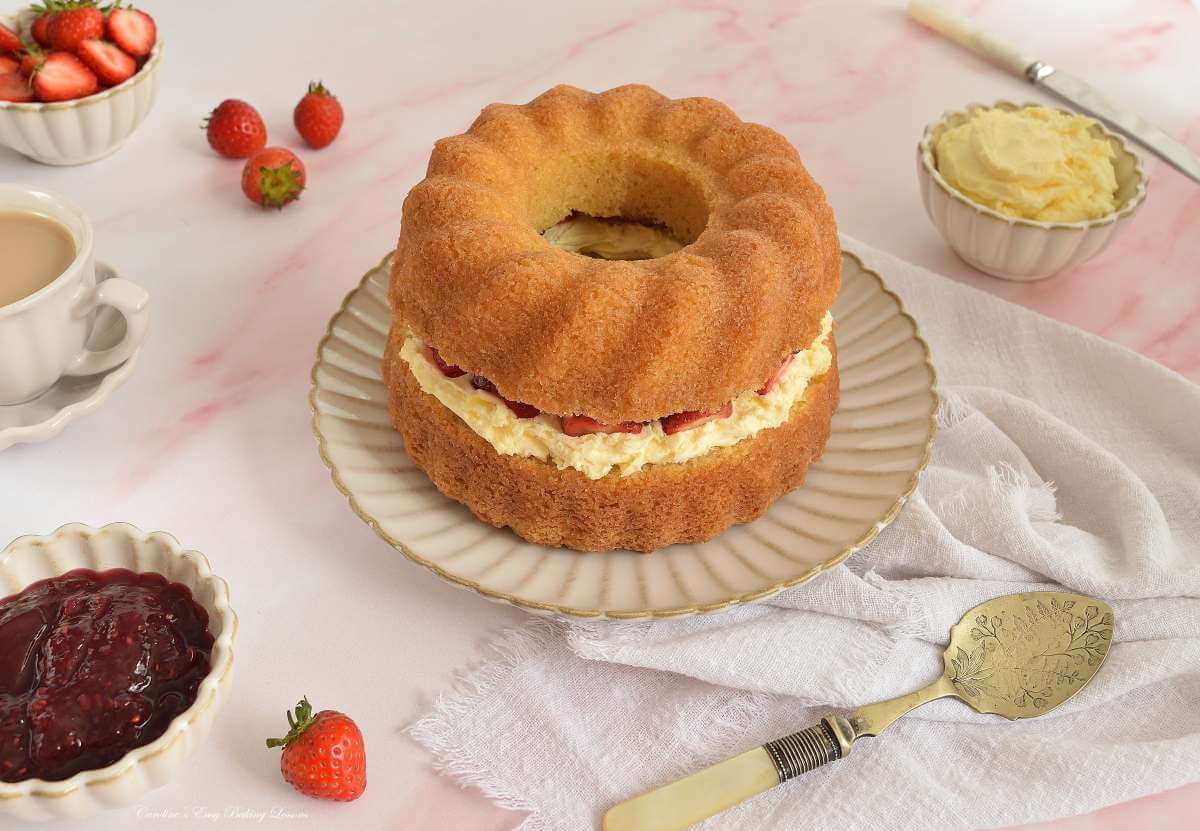
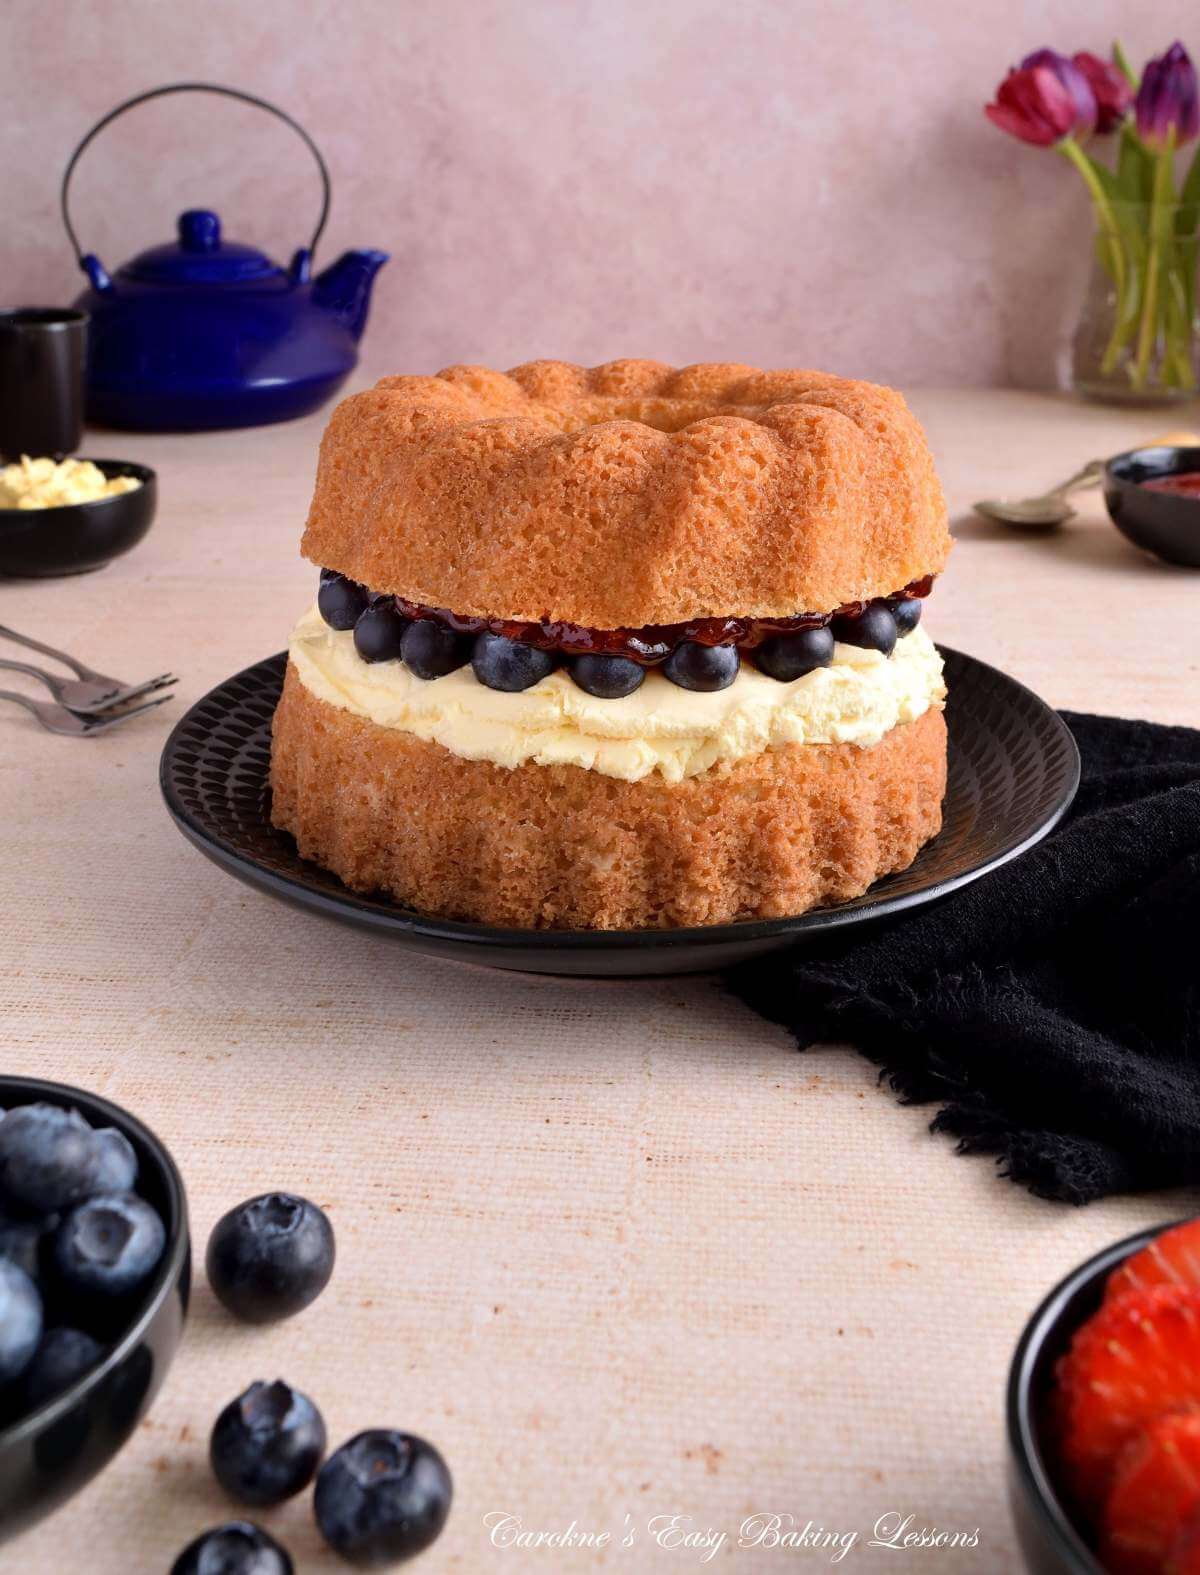
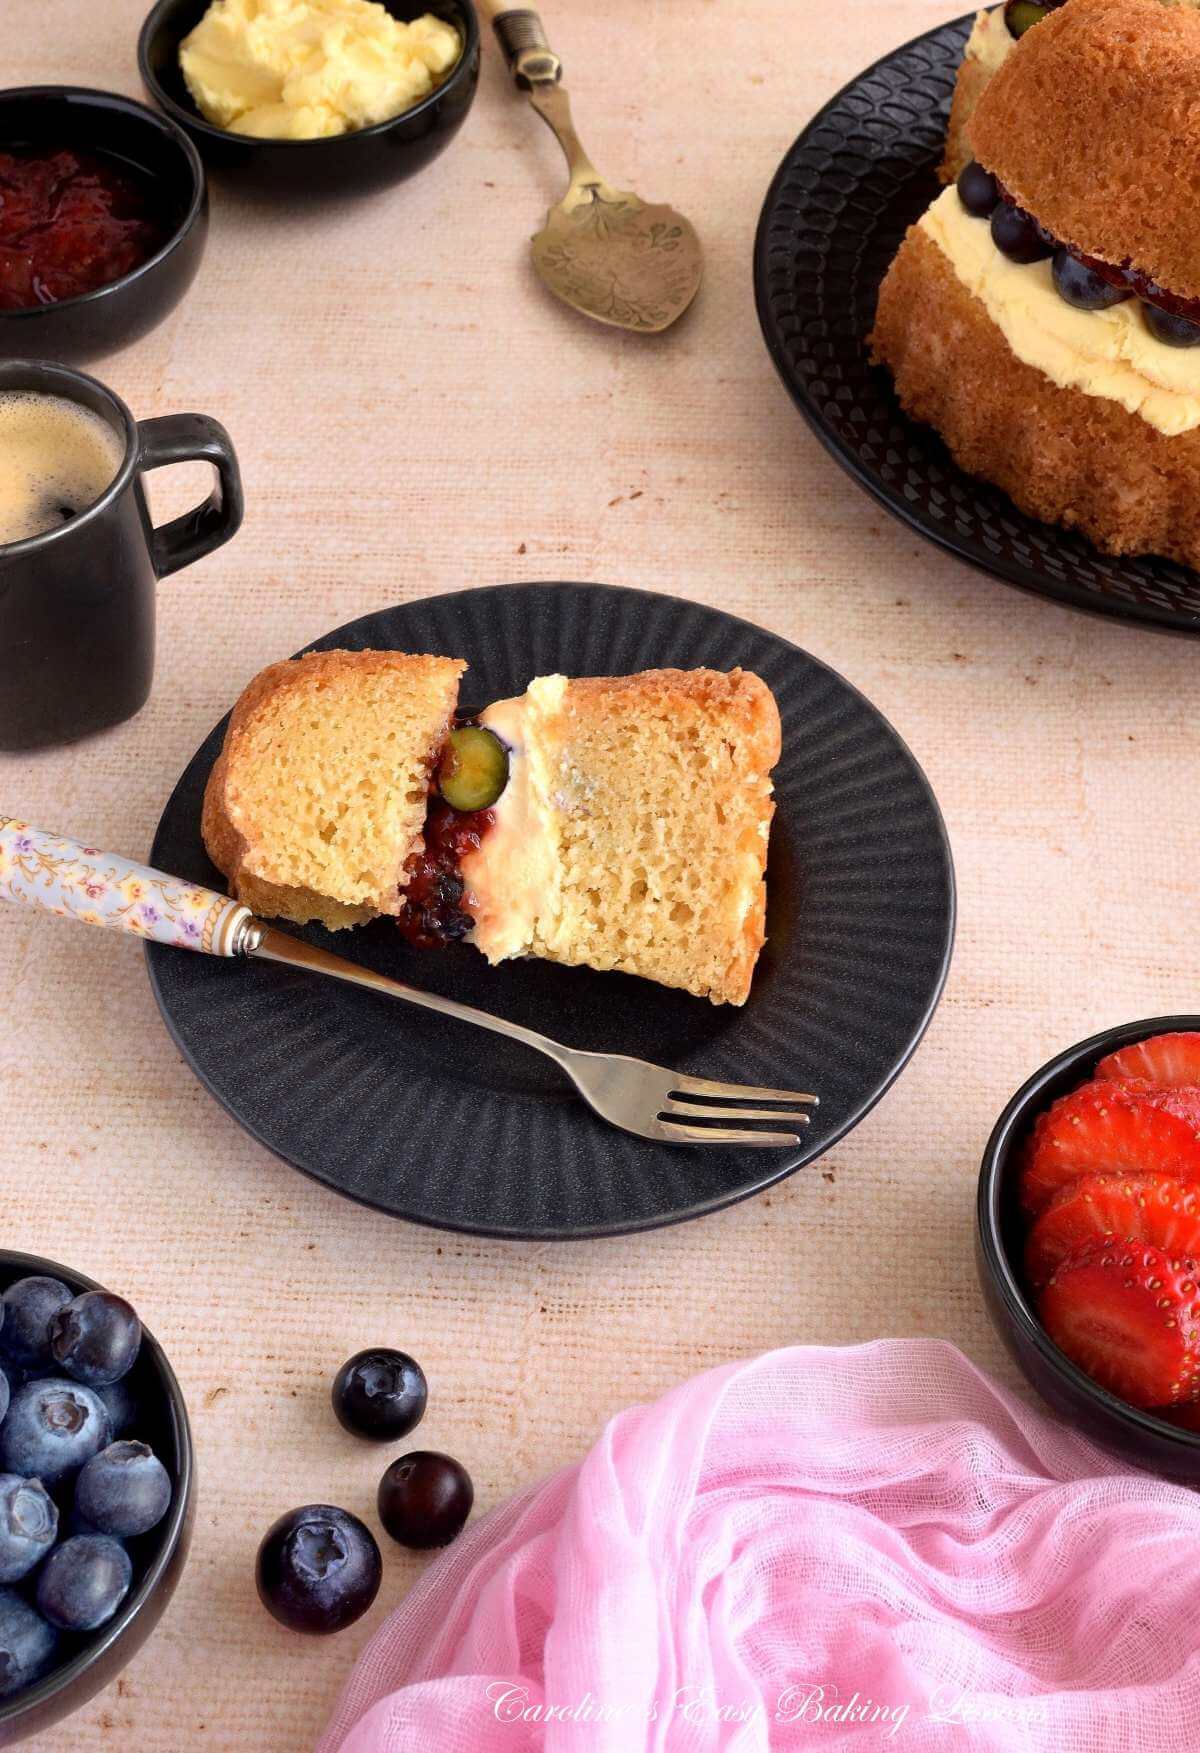
The cake is sliced in half and filled with cream & berries, just like a Victoria Sandwich Cake.


“What Is A Victoria Sandwich Cake“
A Victoria Sandwich cake, is a classic British layer cake. It has high proportion of egg & butter and not quite the same as an American Pound Cake, as it has a more open airy texture. Traditionally the cake is undecorated on top, sandwiches a jam and sometimes cream filling. (See photo).
You might hear it referred to as a Victoria Sponge cake, but the real name is Victoria Sandwich cake as it is usually baked in ‘sandwich tins’ (where the sides of the cake tins have a slight diagonal). It was also believed to have got its name because Queen Victoria enjoyed a slice with her afternoon tea.


Why Make This Chocolate Bundt Cake?
- Quick & easy to make
- Beginner bake
- Gluten-free
- Baked in a small basket air fryer
- Energy & money saving
- Minimal & simple decoration
- Tastes great
- Can be made anytime of the year
- Perfect make-ahead dessert
- Great for gifting or special occasions
- Easily customizable with different fruits & types of cream
- Step-by-step instructions
- Video tutorial
Ingredients & Alternatives
My gluten-free Victoria Sandwich bundt is made from the following basic ingredients:

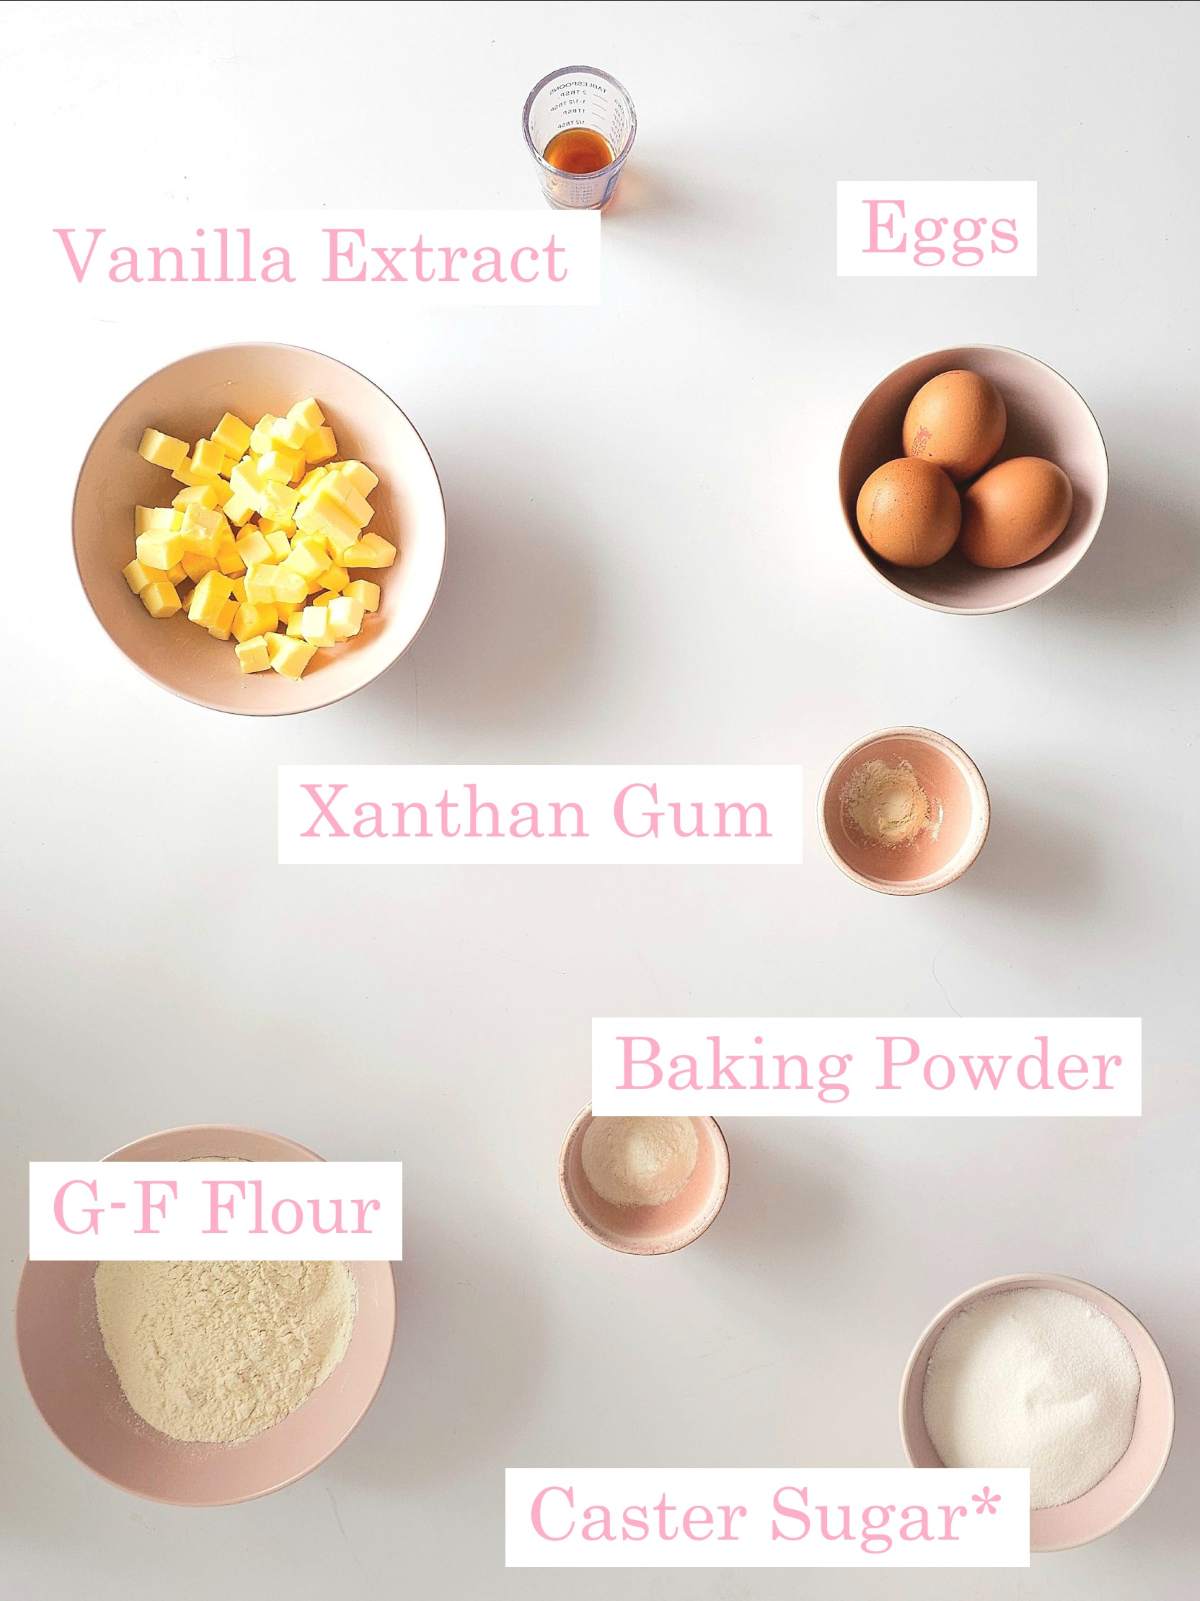
For The Cake Batter:
- Unsalted Butter
- Caster Sugar
- Eggs
- Vanilla Extract
- Gluten-free Flour
- Baking Powder
- Xanthan Gum
- Milk
For The Filling:
- Raspberry Jam/Preserve
- Fresh berries
- Double/Whipping cream
- OR Clotted cream
*see notes below on these ingredients

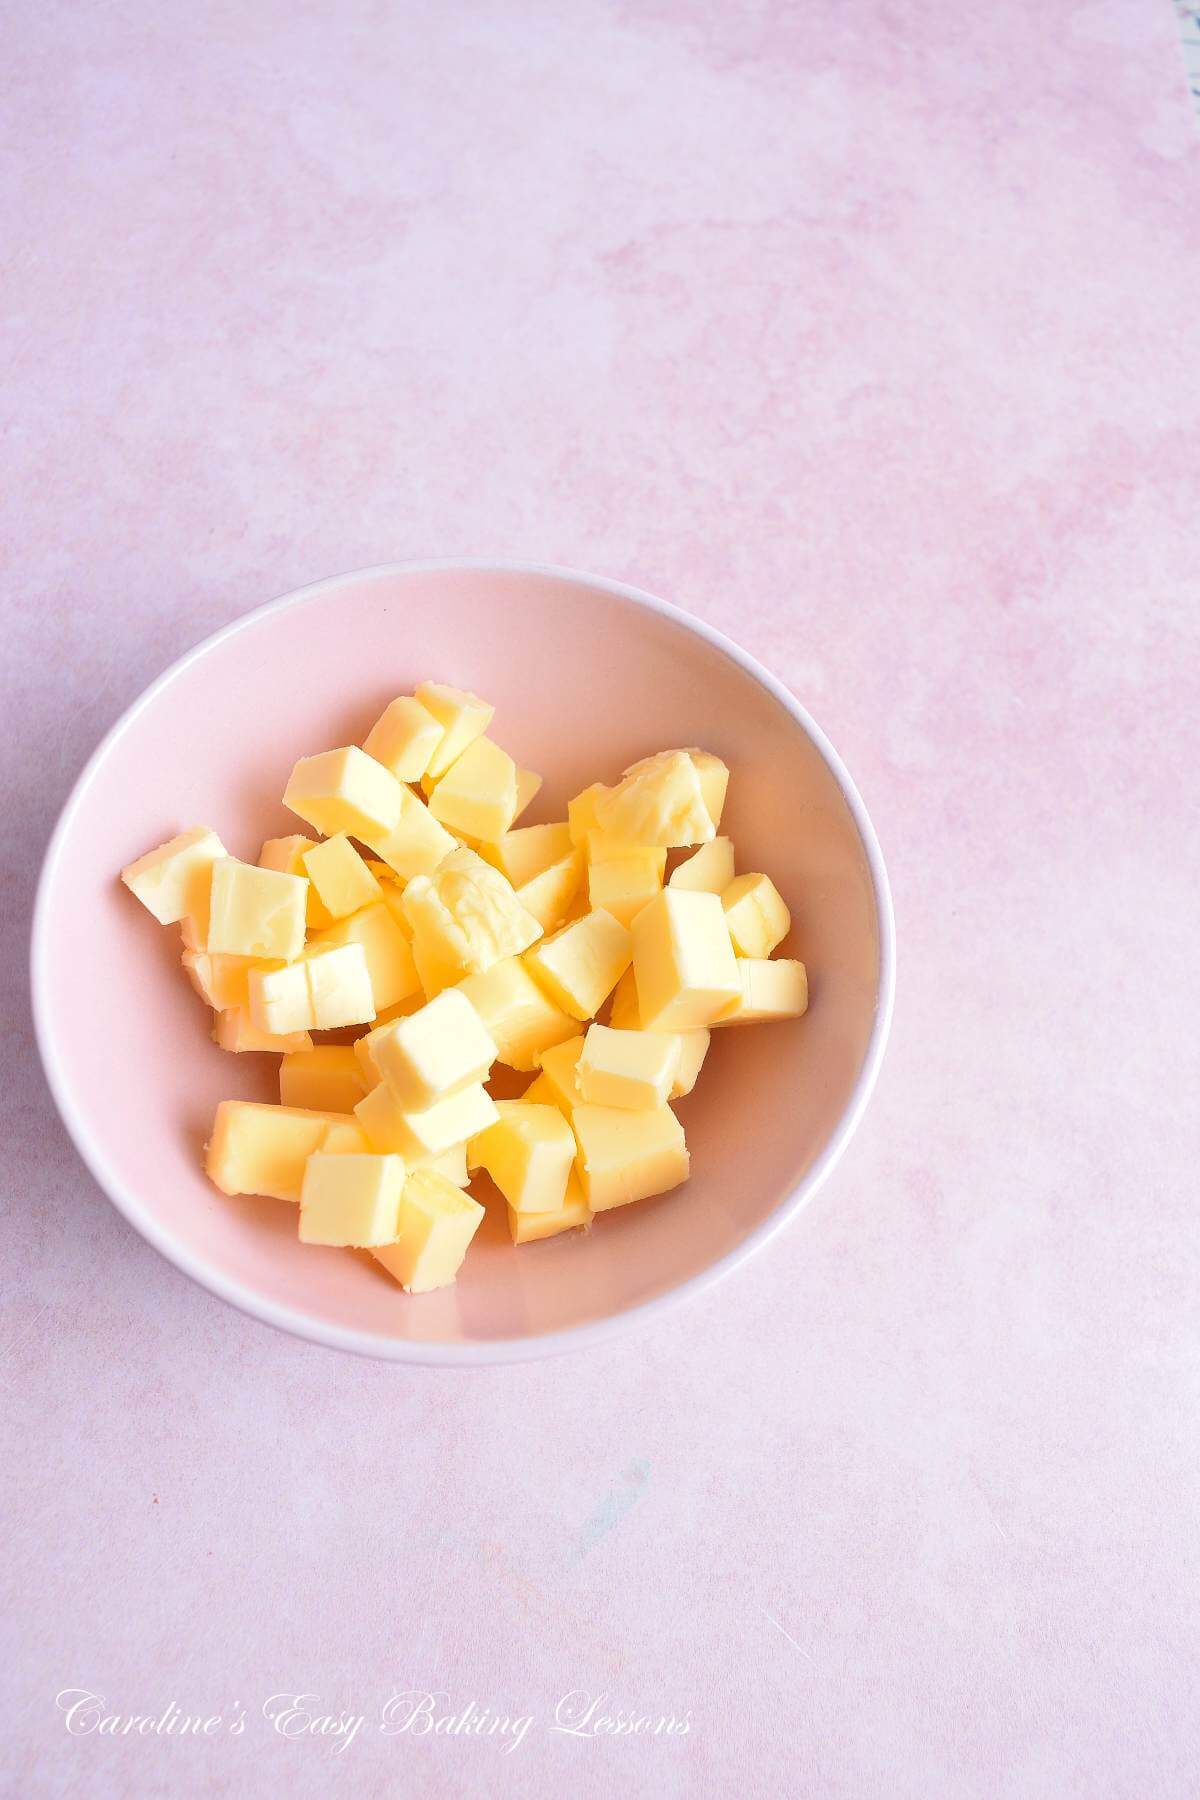
Unsalted Butter
Unsalted butter should always be used for best and consistent results. There is a higher water content in salted butter and this amount can vary from brand to brand. Since Covid, many US companies seem to be adding more water to their butters, which can be the cause of many people’s bakes suddenly not working as before.
**TOP TIP – cube your butter small (about 1cm (1/3”)) and it helps the butter soften quicker as well as incorporate into the batter easier.
Make Your Own Butter
Save yourself money and make your own butter, when double cream (heavy/whipping cream) is on sale and about to expire. Even the same day date, you can make your own butter & have buttermilk too.

Eggs
UK recipes often use medium to large sized eggs and this equates roughly to large to extra large US sized eggs.
**Make sure your eggs are at room temperature befoer using too.
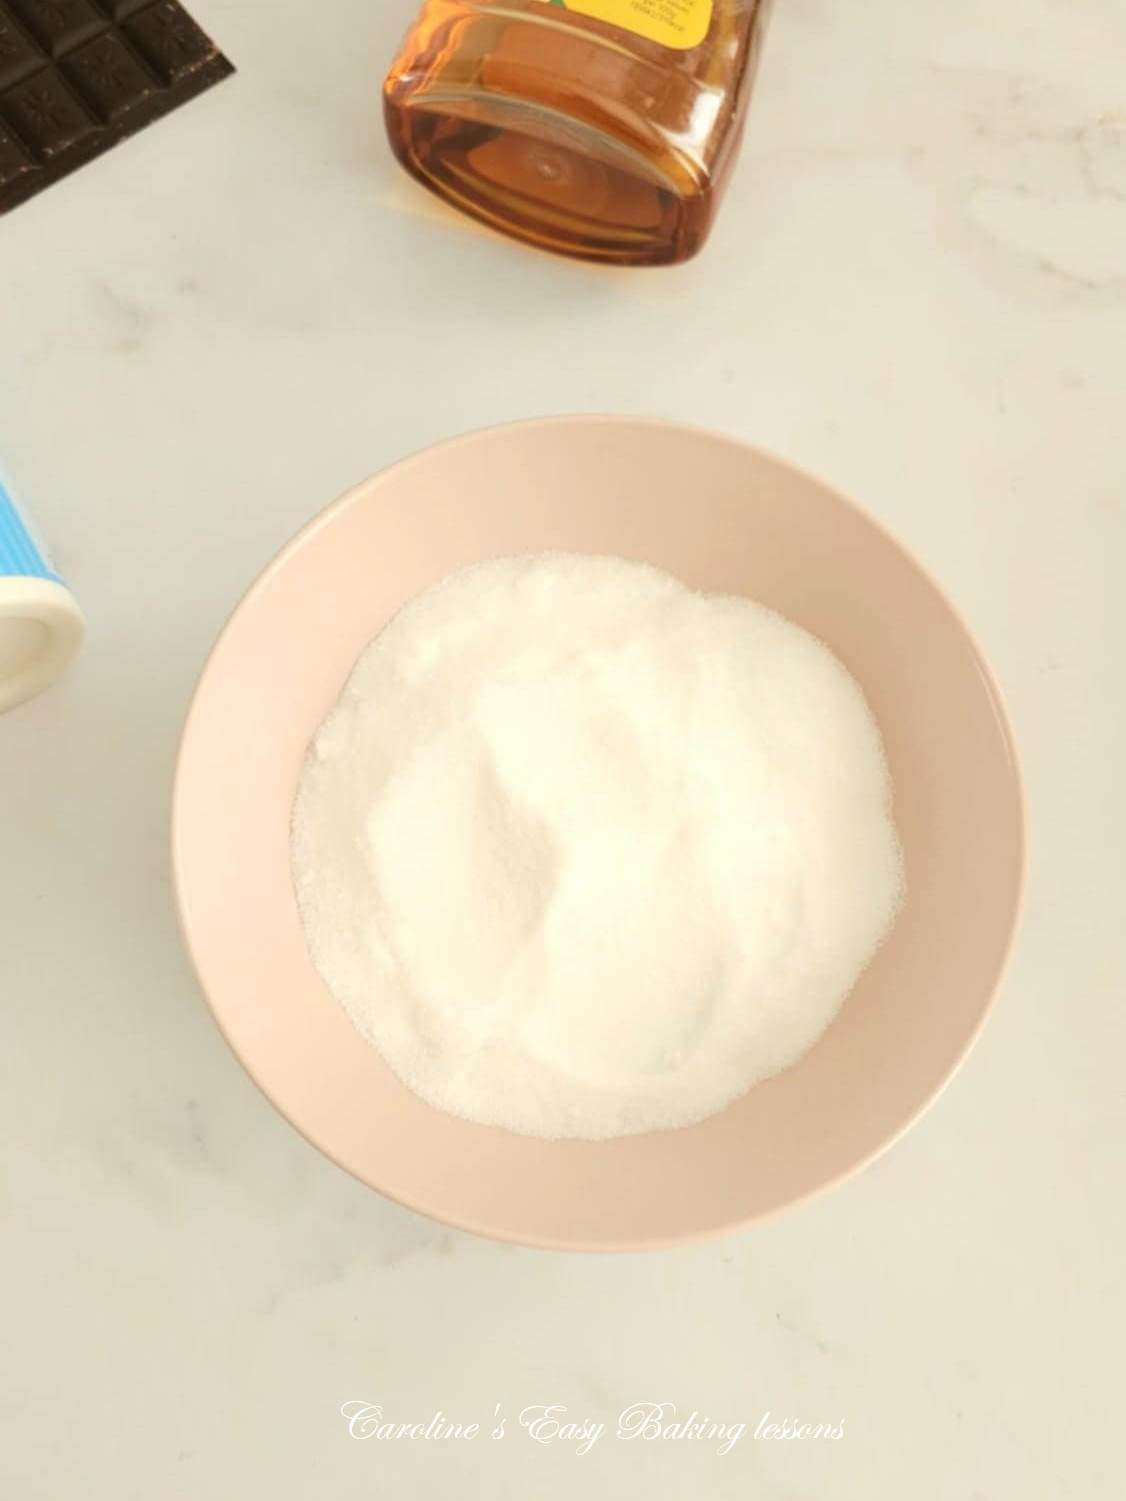
Caster Sugar
Like many British recipes, Caster Sugar is used. The US/Canadian equivalent is just Extra/Super Fine sugar. It should not be omitted as it is key to these light airy Victoria Sandwich cakes.
You can make your own Caster/Finer Sugar by lightly processing Granulated sugar. Some people use Ninja Bullets to do this. You want to do in small batches and to not ruin your machine.


If using US granulated, don’t process too much as your granulated sugar is slightly smaller granule size than our UK granulated. And remember to not go too far and make icing/powdered sugar.
See my reference image here of UK sugars.


Vanilla Extract
Use vanilla extract, not vanilla essence or ‘flavouring’. Not worth buying.
Quality extract is expensive however, so if you can, it works out better in the long run to make your own at home.
Learn how to make vanilla extract, with my article. Or, if you don’t want to use alcohol as the vanilla base, you can make a non-alcoholic version.
Using food grade vegetable glycerine for alcohol-free vanilla extract, is not just alcohol-free but can help keep the costs down too.


Flour & Baking Powder
Gluten-free Plain (All Purpose) flour as well as Gluten-free UK Self-raising Flour have both been used in recipe development. (**You can use regular flour too).
I like using Dove’s Farm Freee gluten-free flour. They can be purchased directly on the Freee website, as well as in major supermarkets like Asda, Tesco, Sainsbury’s. **Often found in the ‘Free-from’ section if not in the baking aisle.
Dove’s make not just gluten-free flours, but other speciality, organic & ancient grains flour, such as Spelt and Einkorn. Check out Dove’s Farm website. And their gluten-free range under the name Freee Foods.
Baking Powder
For an easy to source gluten-free baking powder, try Dr Oetker’s brand, that just happens to be gluten-free!

Xanthan Gum
Xanthan gum is used to bind ingredients where there is no gluten. It sometimes is included in generic gluten-free flour. But sometimes you need to add more depending on the bake.
Again I always use Freee Xanthan Gum, that is widely available in the UK, as mentioned above. (See photo above).
If your flour does not have any in it (or you are using regular flour not gluten-free, that does not need Xanthan), an alternative is Guar Gum.
MILK
A little milk is used to thin the batter just a bit. You can use any milk, or plant-based milk. Or just use some tepid water.

Cream Filling
Traditionally a Victoria Sandwich Cake is filled with raspberry or strawberry jam, sometimes berries and always whipped cream (not buttercream).
In the UK we use Double Cream, (or you can use Elmlea Double Cream alternative). And the US equivalent is Heavy/Whipping cream.
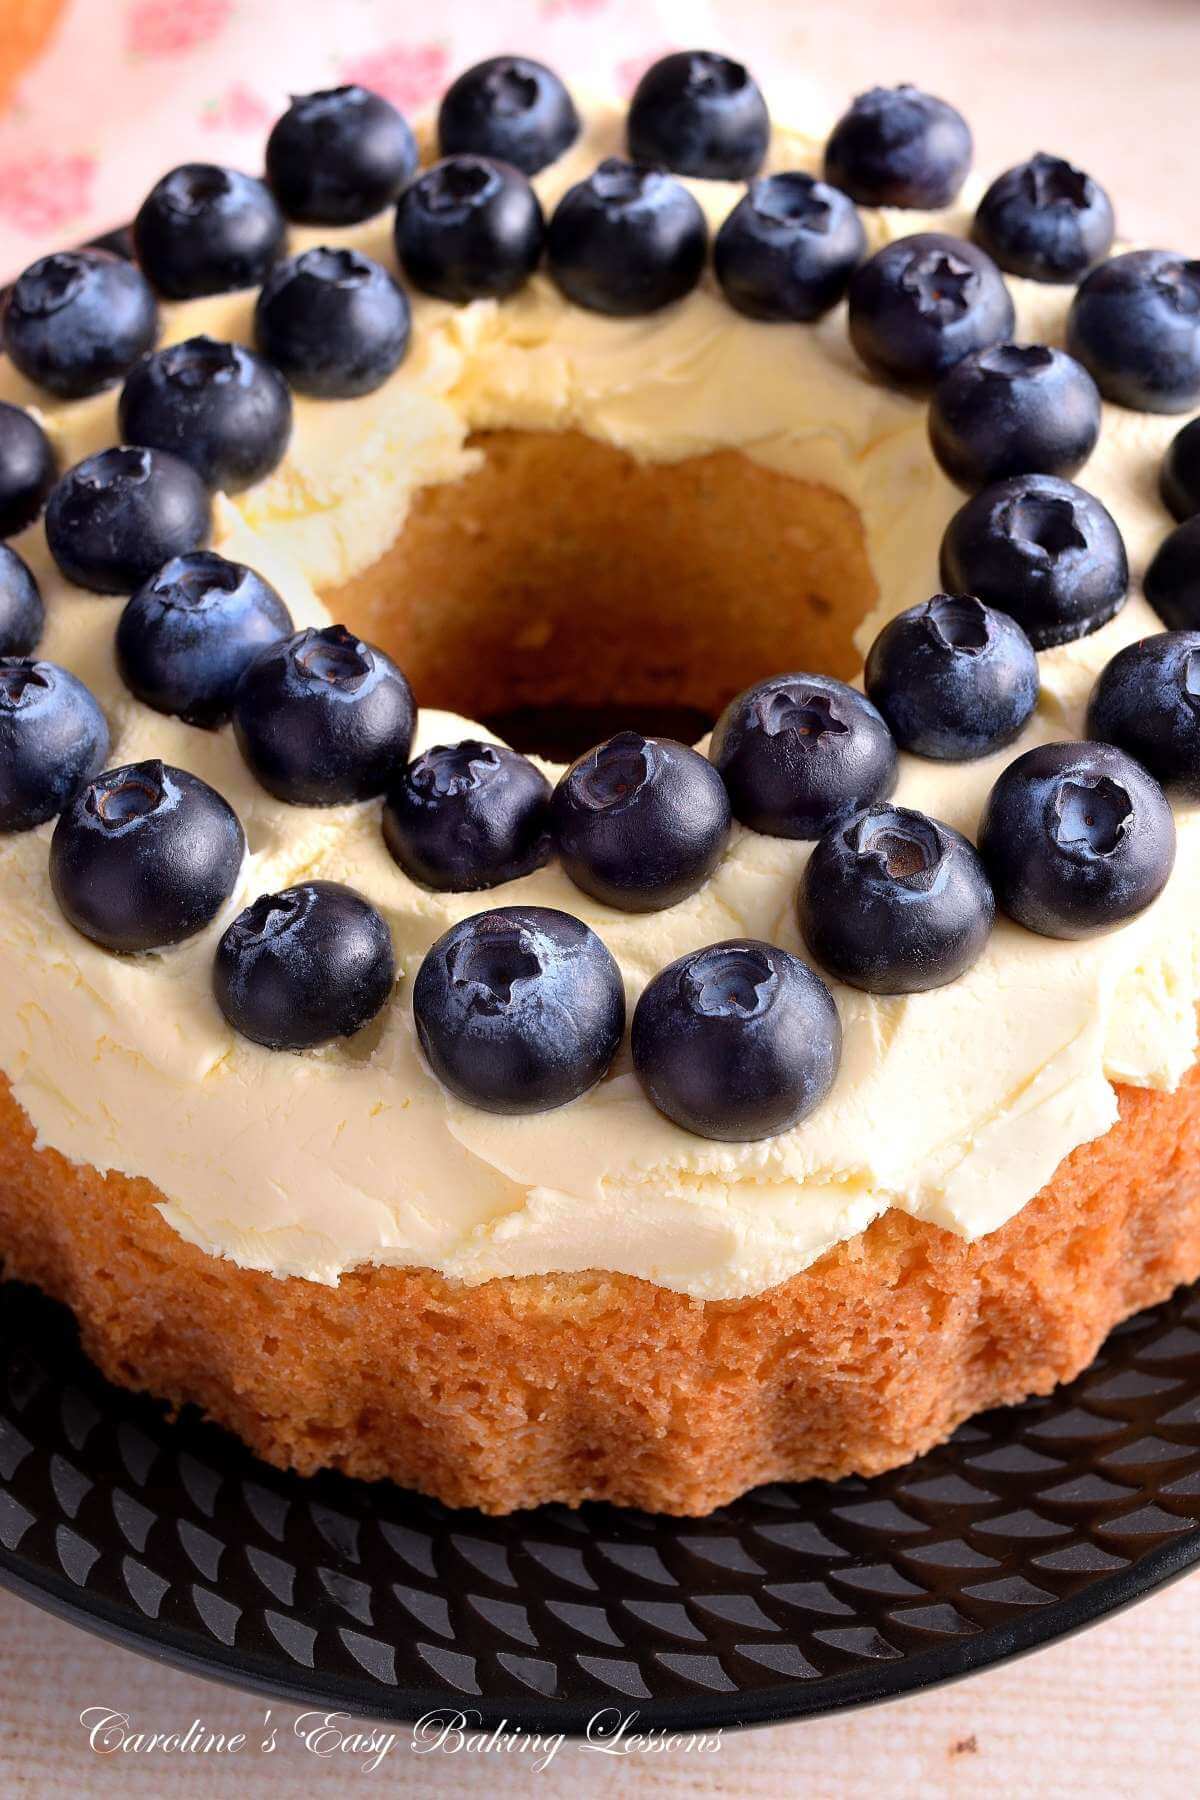
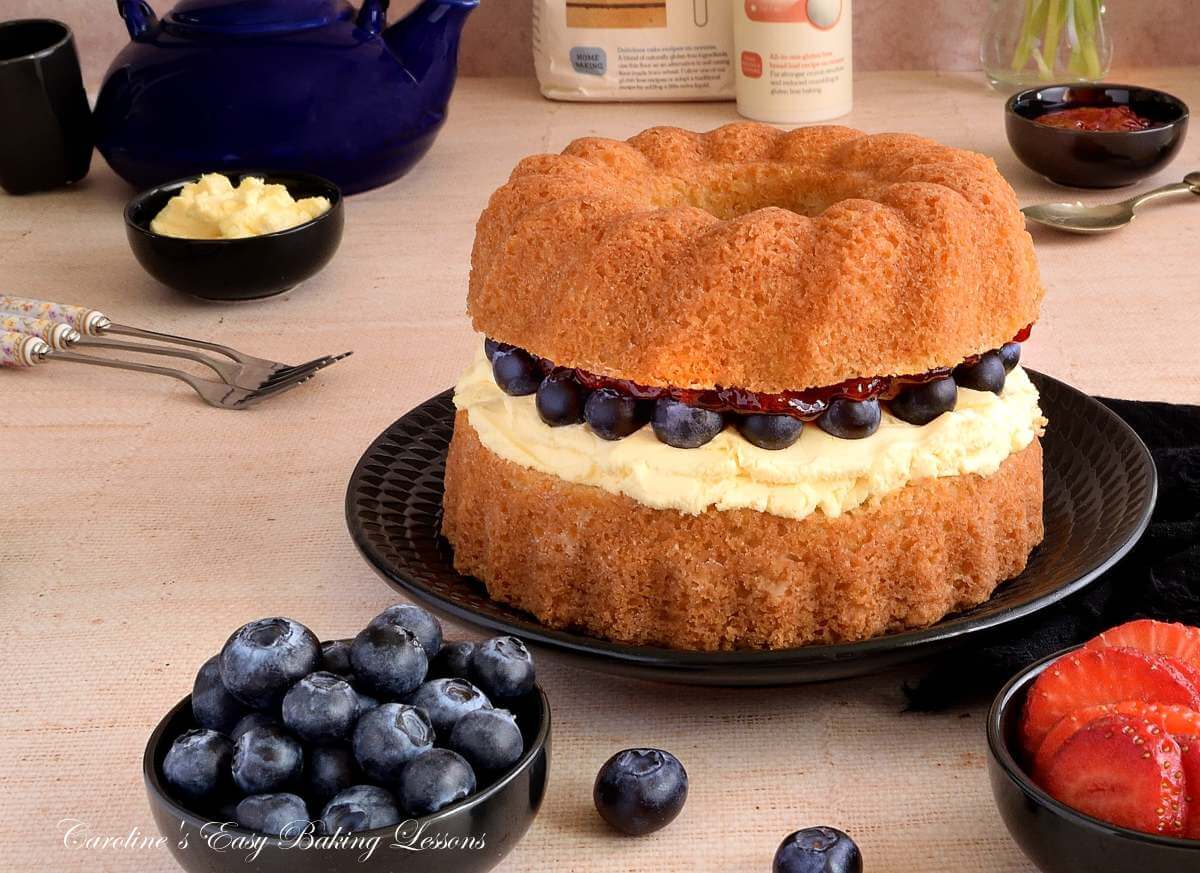
For a more neat cut and still keeping it very British, I also tested using Clotted Cream. This means you don’t need to do any whipping. The clotted cream holds its shape better than the cream. So if you want some Instagram worthy images of your cake, clotted cream is the way to go. And if you have any leftover, spread it on homemade scones!
(See image here of the clotted cream under the blueberries).

Berries
Choice of fruits
Fresh berries are optional and I have used strawberries, raspberries and blueberries for the recipe development.
Recipe Yield
This recipe makes a 6.5″/17cm bundt cake. A little smaller width than a traditional sized Victoria Sandwich cake, it is deep and so you can easily get a yield of 8 slices from it. **More on the bundt tin below.


Equipment
No special equipment required for making this bundt cake. You do need a slightly smaller bundt tin.
To fit a small basket air fryer, (mine is 3.5 litre, about 3.7 quarts), I used a 6.5″ (17cm) bundt tin. Sometimes called a ‘Kugelhopf Pan’ from its shape & design. They are usually slightly narrower than regular bundt tins but usually deeper. This one has a depth of 3.5″ (9cm) and is about a 5-6 cup capacity. Which is a little smaller than a regular one @ 8.6″ (22cm) wide & over 4″/11cm deep.


Using A Bigger Tin
If you have a bigger air fryer, open-front air fryer or want to use a regular oven, use the bigger tin & increase the recipe ingredients by 0.4 (multiply by 1.4). To see how to do this, check out my how to increase a recipe article.
Air Fryer Or Oven?
The recipe is designed for using the smaller bundt tin, that fits a small basket air fryer. In the photo is that same bundt tin in a 3.5 litre (3.7 quarts) air fryer. For my red plum orange Madeira bundt cake recipe.
See above if you want to bake in a bigger bundt tin.
Step-By-Step Instructions
1.Begin by Cubing your butter in small pieces, about 1cm (1/3”). This smaller surface area means the butter softens and comes to room temperature quicker.


It also makes working with the butter much easier and faster too. Just make sure you can squash & leave and indent in the butter cubes once ready. But not too soft it is almost melting.
2.Add the softened cubed butter to a mixing bowl and add in the Caster Sugar (Extra/Super Fine sugar). Briefly combine by hand before moving onto using an electric mixer. Start on the lowest speed and slowly beat until the ingredients start to come together.
3.Increase to medium to high speed and let beat until the mixture is a bit paler in colour and spreadable. This is called ‘creaming’ or you might be instructed to ‘cream the butter & sugar together’. Depending on the power of your mixer, it can take 1 – 3 minutes.

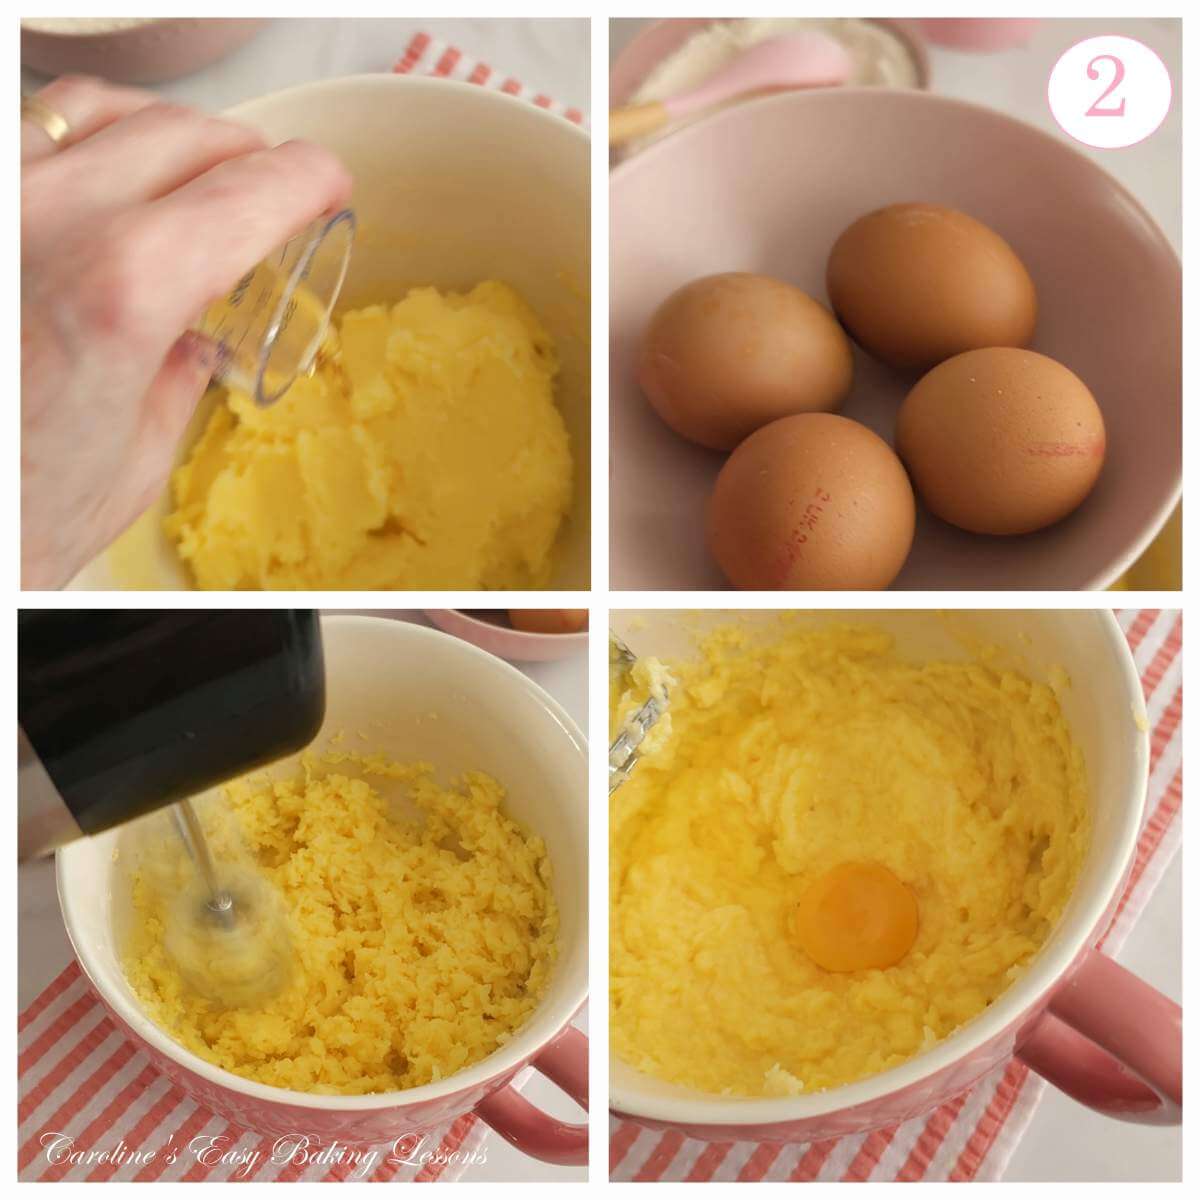
4.Next add in the vanilla extract. Learn how to make your own vanilla extract. or even the alcohol-free vanilla extract.
5.Then the eggs, one at a time, mixing in-between each addition.
***Just mix the egg in for about 10 -20 seconds, after each egg is added.
6. Now sieve over the gluten-free flour, Xanthan gum (if using), and the gluten-free baking powder. Mix while in the sieve & hold the sieve as high as possible to incorporate more air into the batter. (See Photo 3).


7. Start to briefly mix in the dry ingredients by hand.
8. Add in the milk (or tepid water).
9. Now move onto using an electric mixer to beat in the dry ingredients. (Use a splash guard or clean tea-towel on top if needed, but make sure to be on low speed to start with).
10. Beat until all combine, no dry patches at the bottom, but do not overmix as it can produce a tough bake. See Photo collage 3.

Prepare The Bundt Tin/Pan
1.Leave the cake batter to the side & pre-heat your air fryer only if your particular brand requires this. if using a regular oven, set to heat now too. Pre-heat to: 180c/160c Fan oven/350f/Gas Mark 4. **If your air fryer is new or quite powerful, I recommend using the lower fan oven temperature.
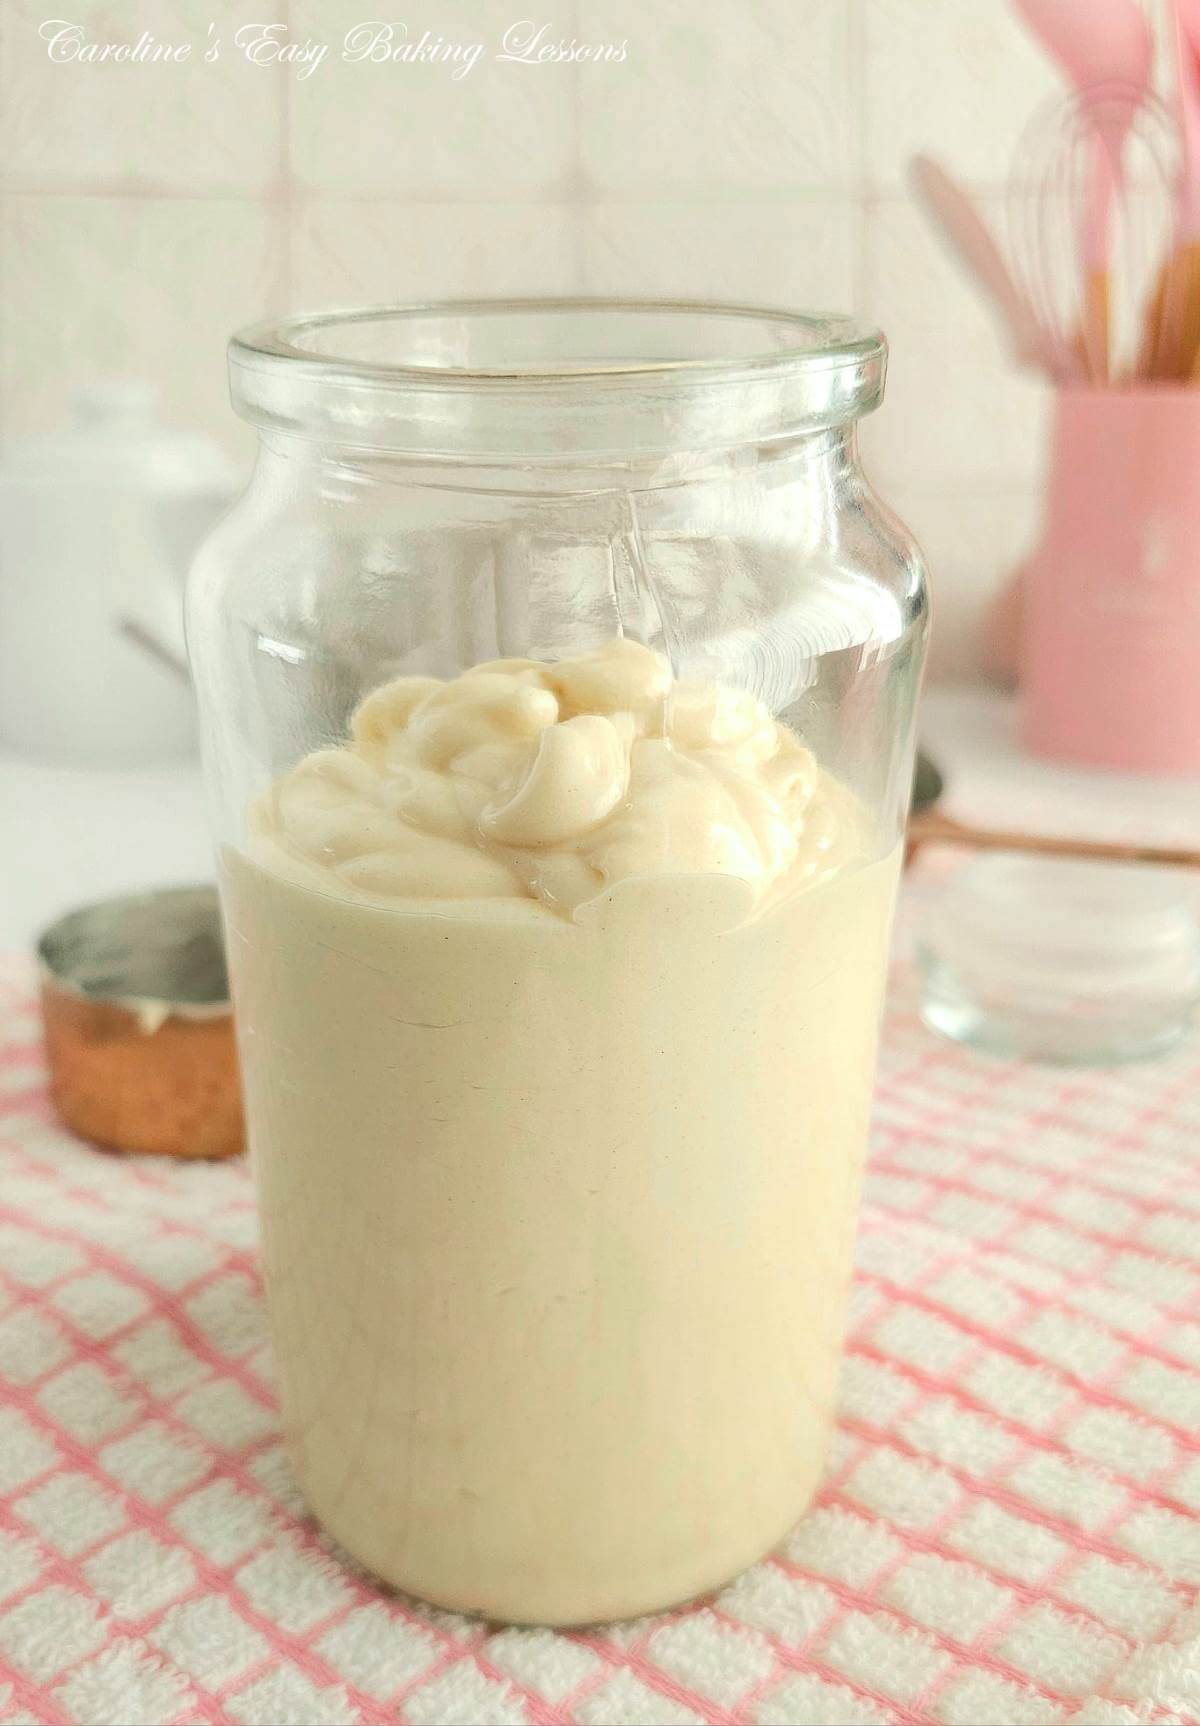
2.The bundt tin needs to be really well greased. You can generously apply cake release spray or use softened butter & flour. But my preferred method is to use homemade cake lining paste (AKA Cake Goop). This can be gluten-free too simply by using gluten-free flour. Check out how to make your own cake lining paste.
3.Decant 2 tbsp of the lining paste from the jar, straight form the fridge. Add to a small dish and have a brush ready.


4.Start applying at the bottom of the bundt, getting into the groves. Then brush up the sides of the inner tube. Now start applying up the sides of the tin, in uward strokes. Work your way around the tin and then apply a 2nd generous layer.
5.Spoon the batter into the bundt tin carefully. If any batter gets up the sides or on the inner tube, just wipe down after filling and brush a bit more lining paste on. Smooth and level out the batter.
6. Tap the tin a few times on the worktop/counter, then pop into the air fryer basket to bake. For bigger open-front air fryers or regular ovens, bake in the centre rack.
7.Bake for 25-30 minutes until risen, set and golden on top. (See Photo collage 5).

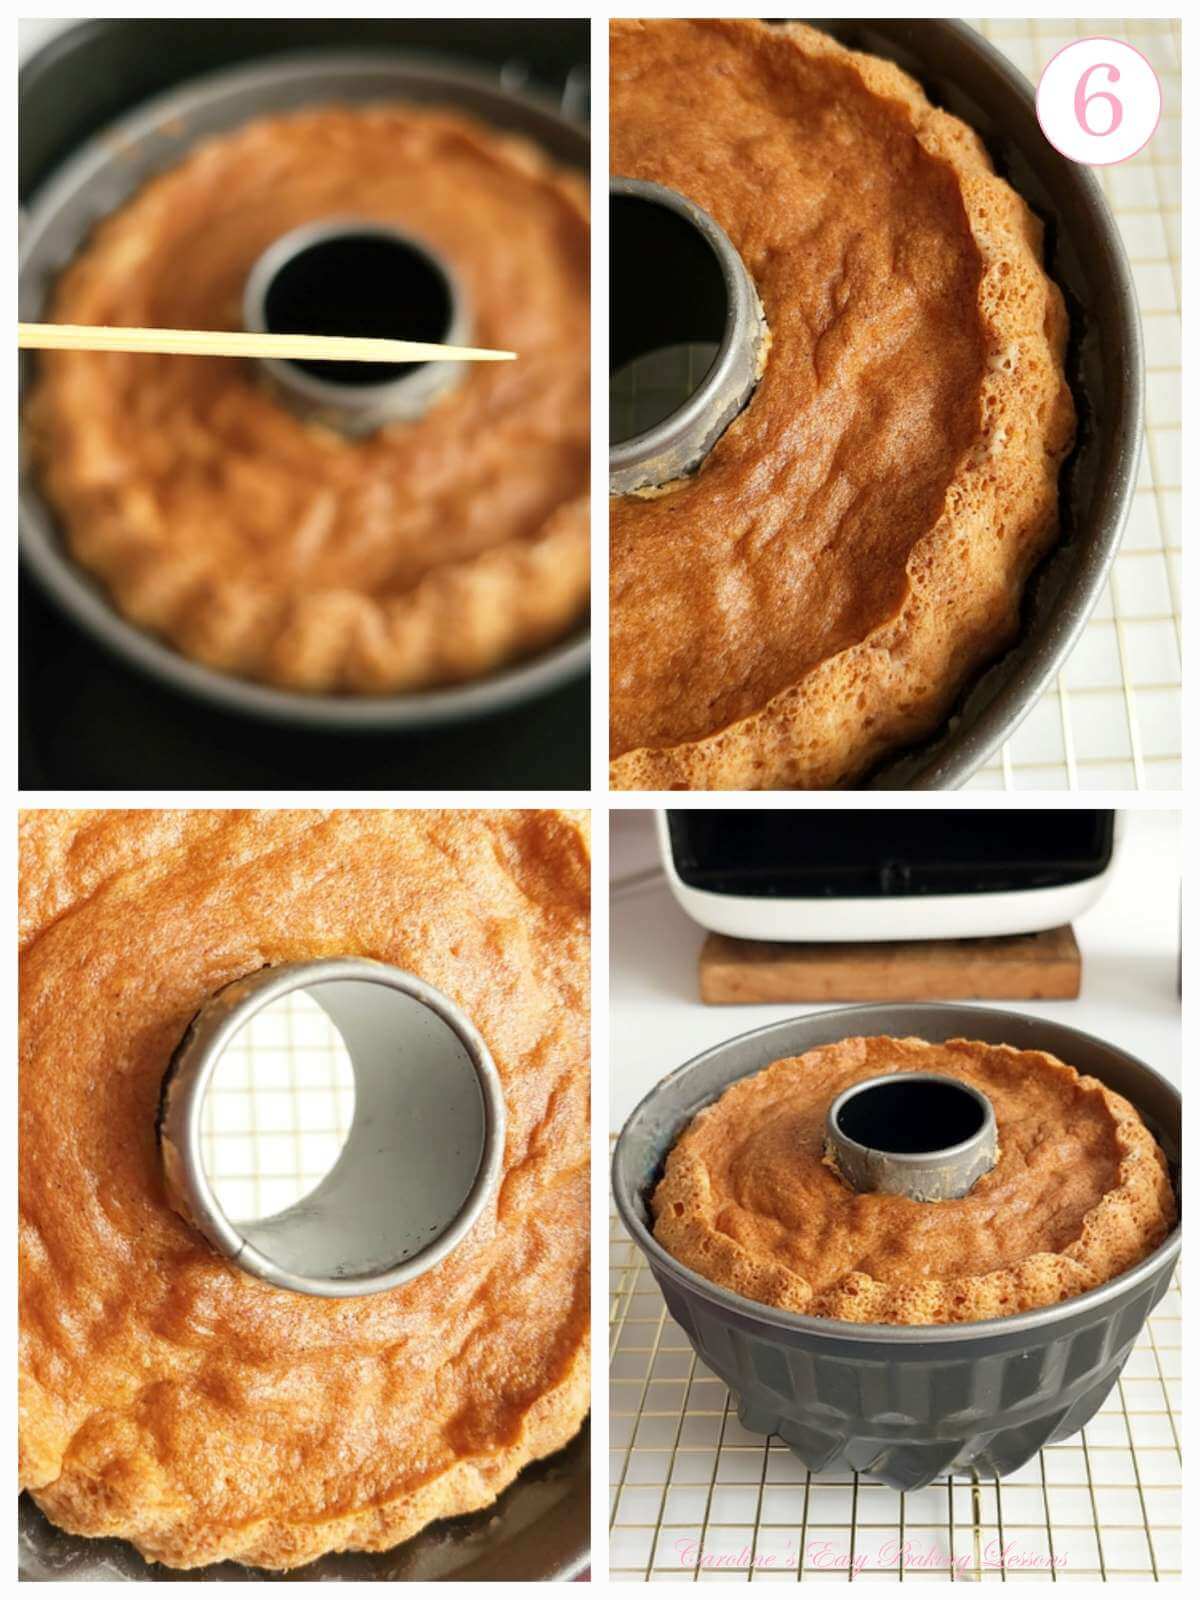
*** For small air fryers I recommend baking for about 18-20 minutes, (when it will look ready but checking with a cocktail stick would show not ready yet), covering with foil & weighing down with a metal spoon or knife to stop the foil moving. ***This is very important to prevent a fire. See the video for reference. Then bake for another 6- 8 minutes till done.
8. The cake will be ready when a cocktail stick comes out clean of crumbs. The sides of the cake will be coming away from the side of the bundt tin too. (See Photo 6).
9.Carefully remove from the air fryer basket, & leave on top of a cooling rack for 30 minutes. **Do not try to turn out before this.
See photo collage 6

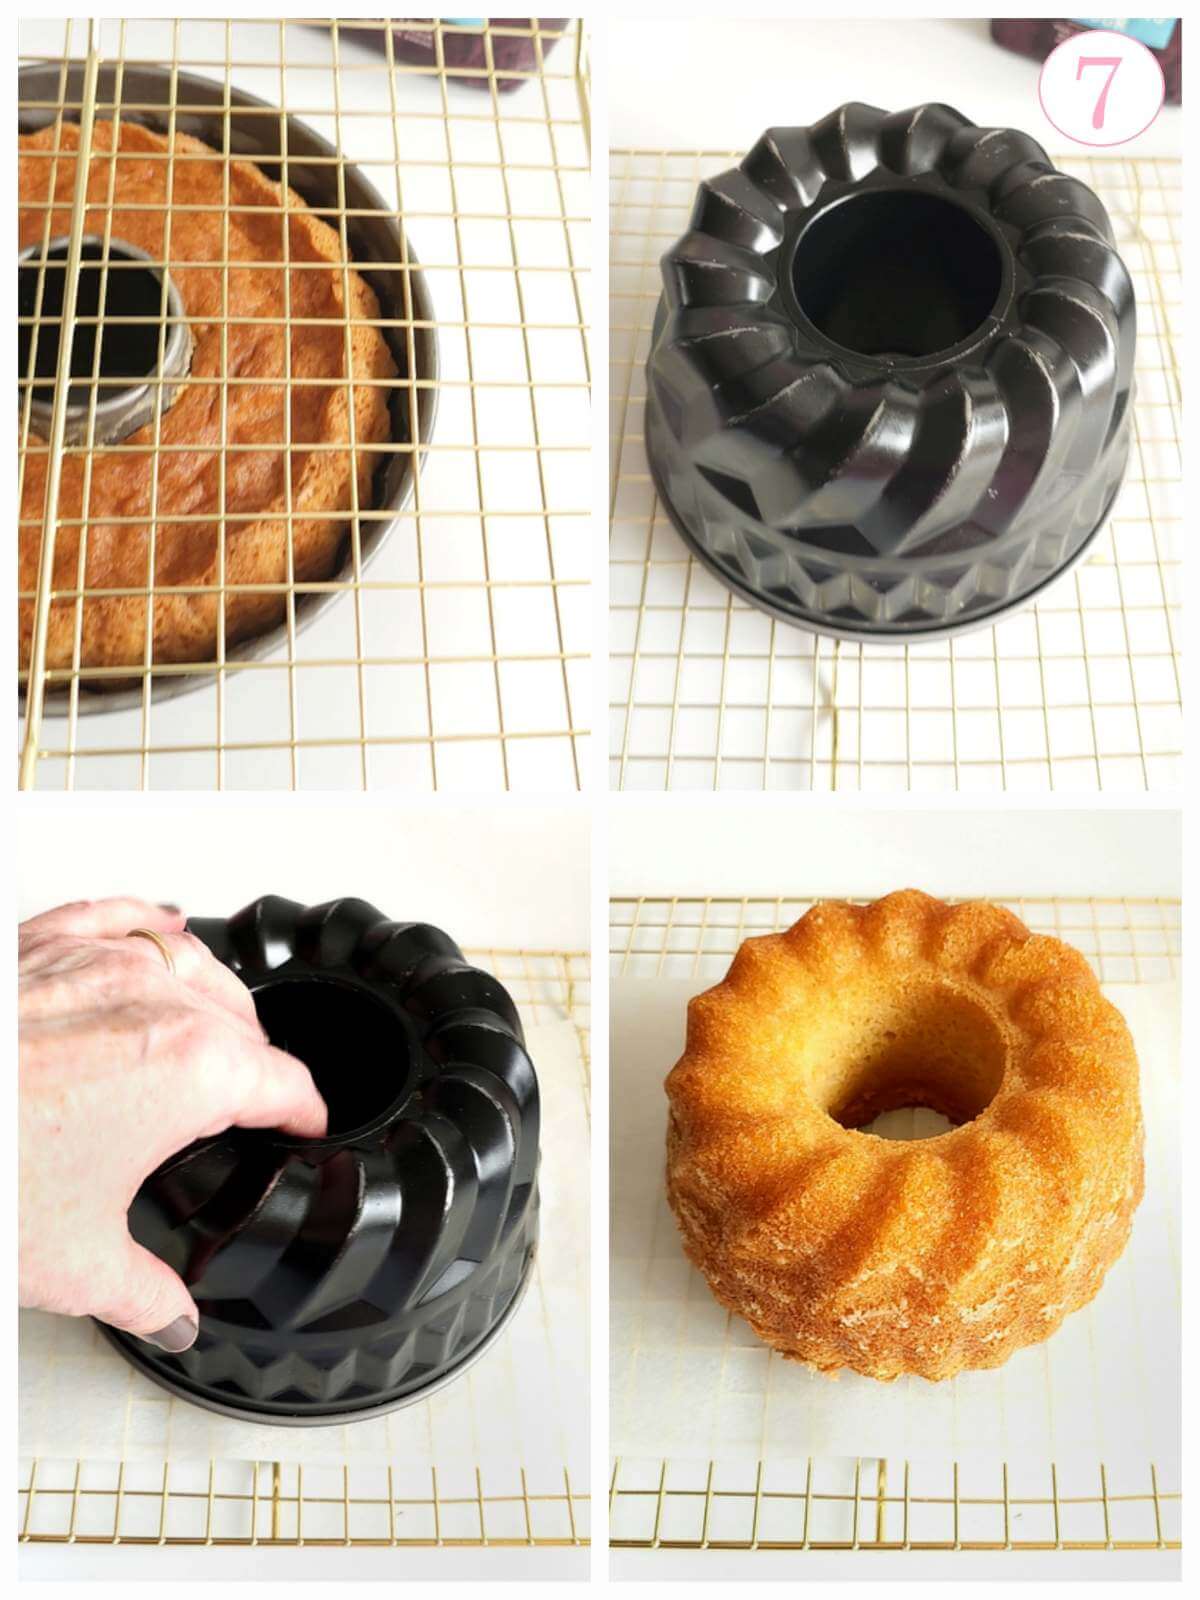
Turning Out The Cake
1.Place a plate, cake stand or the cooling rack, on top of the cake. **If using a cooling rack, place some baking paper on top before adding the cooling rack.
2. Hold everything together and flip upside-down.
3. Give the bundt tin a few taps and it should lift off releasing the cake easily and fully intact if you greased well. **Here the lining paste pays for itself.
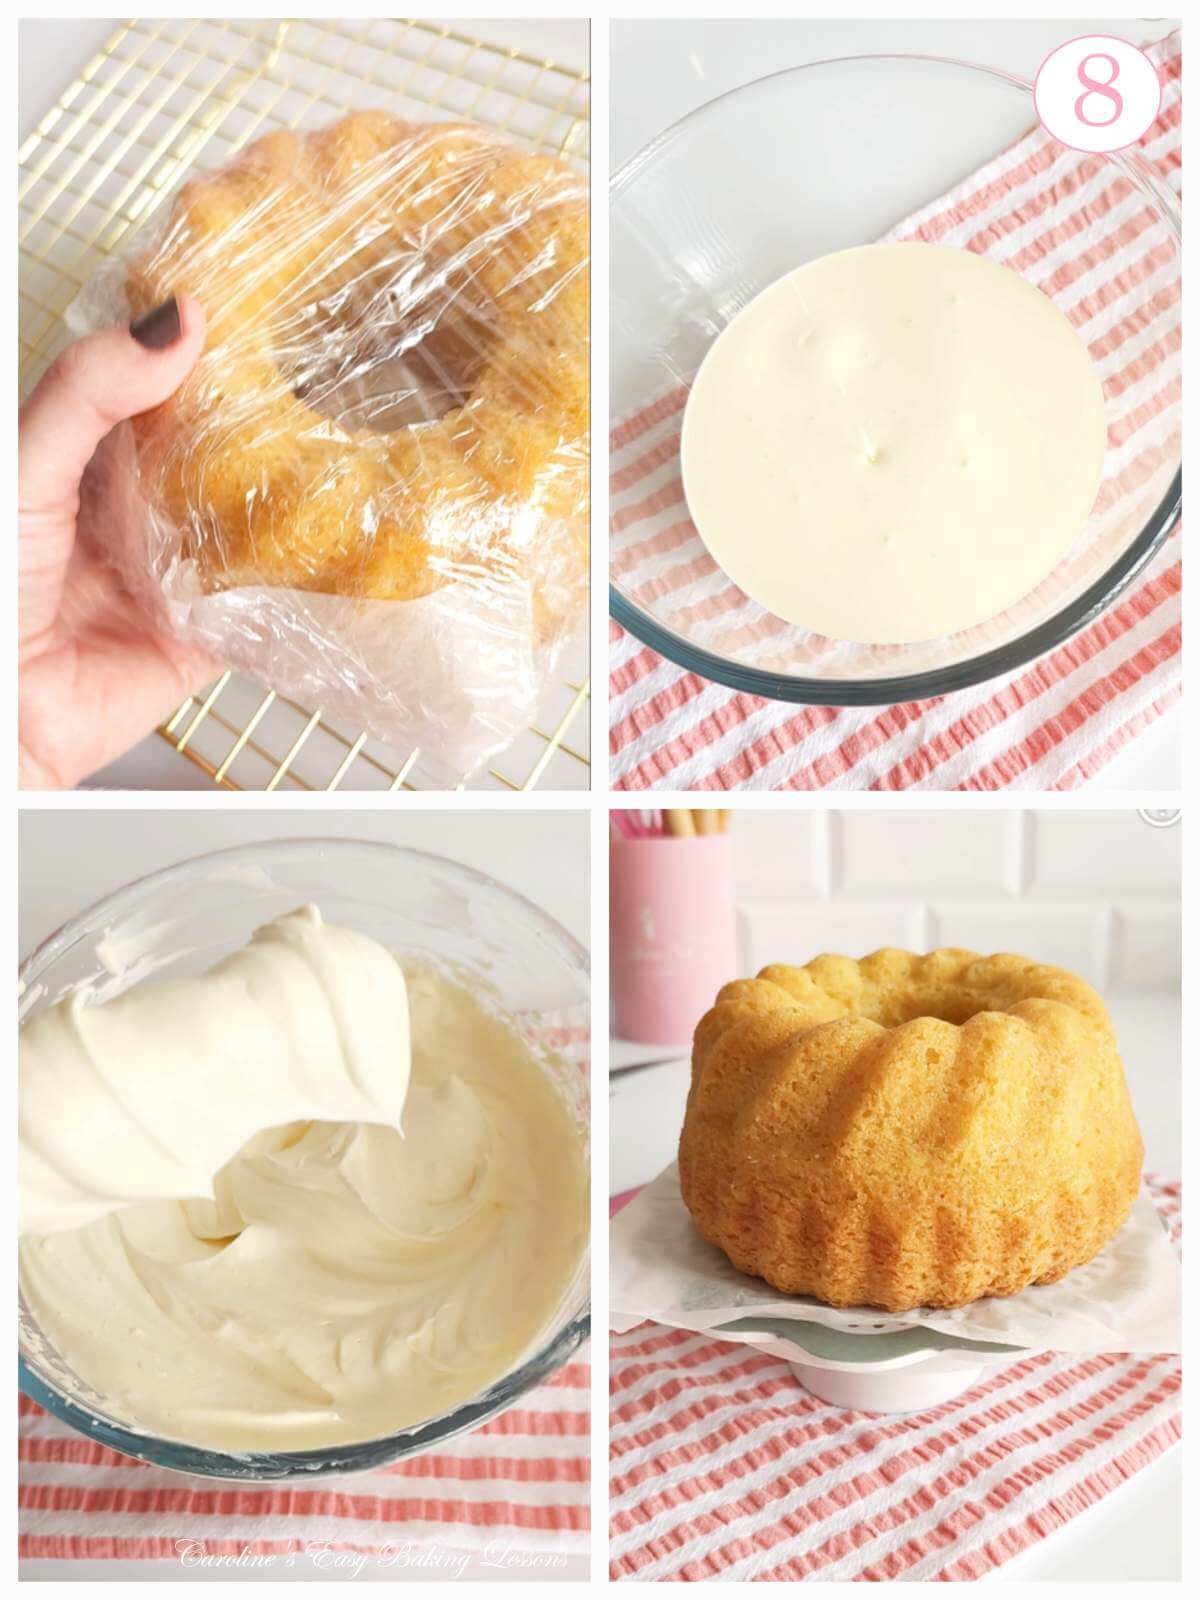
4. Leave to cool completely before attempting to slice the cake into 2 layers. This could be up to 1 hour. You can leave to cool longer & cut the next day, by wrapping well in cling film (plastic wrap) and leaving out at room temperature. Or you can speed it up by cooling on a high rack for 20 minutes, then fridge for 10 – 15 minutes (uncovered).

Preparing For Assembly
1.If using whipped cream for your filling, you can whip now or up to 2 days before using. Just wrap well and keep in the fridge.
2.Add the cream to a bowl at least double the volume of the cream, (or a stand-mixer bowl), and beat with an electric mixer. Start on low and then increase to medium to high speed, and whip the cream until very thick, full of body. You can test on the end of the beater (like in the video), or with a spatula, to see how the cream falls off the end. it should not fall at all, no bending no dripping, but holding its shape. Peaks can also be formed in the surface of the cream in the bowl. See Photo collage 8.
**If using clotted cream instead, remove from the fridge about 5-10 minutes before using.

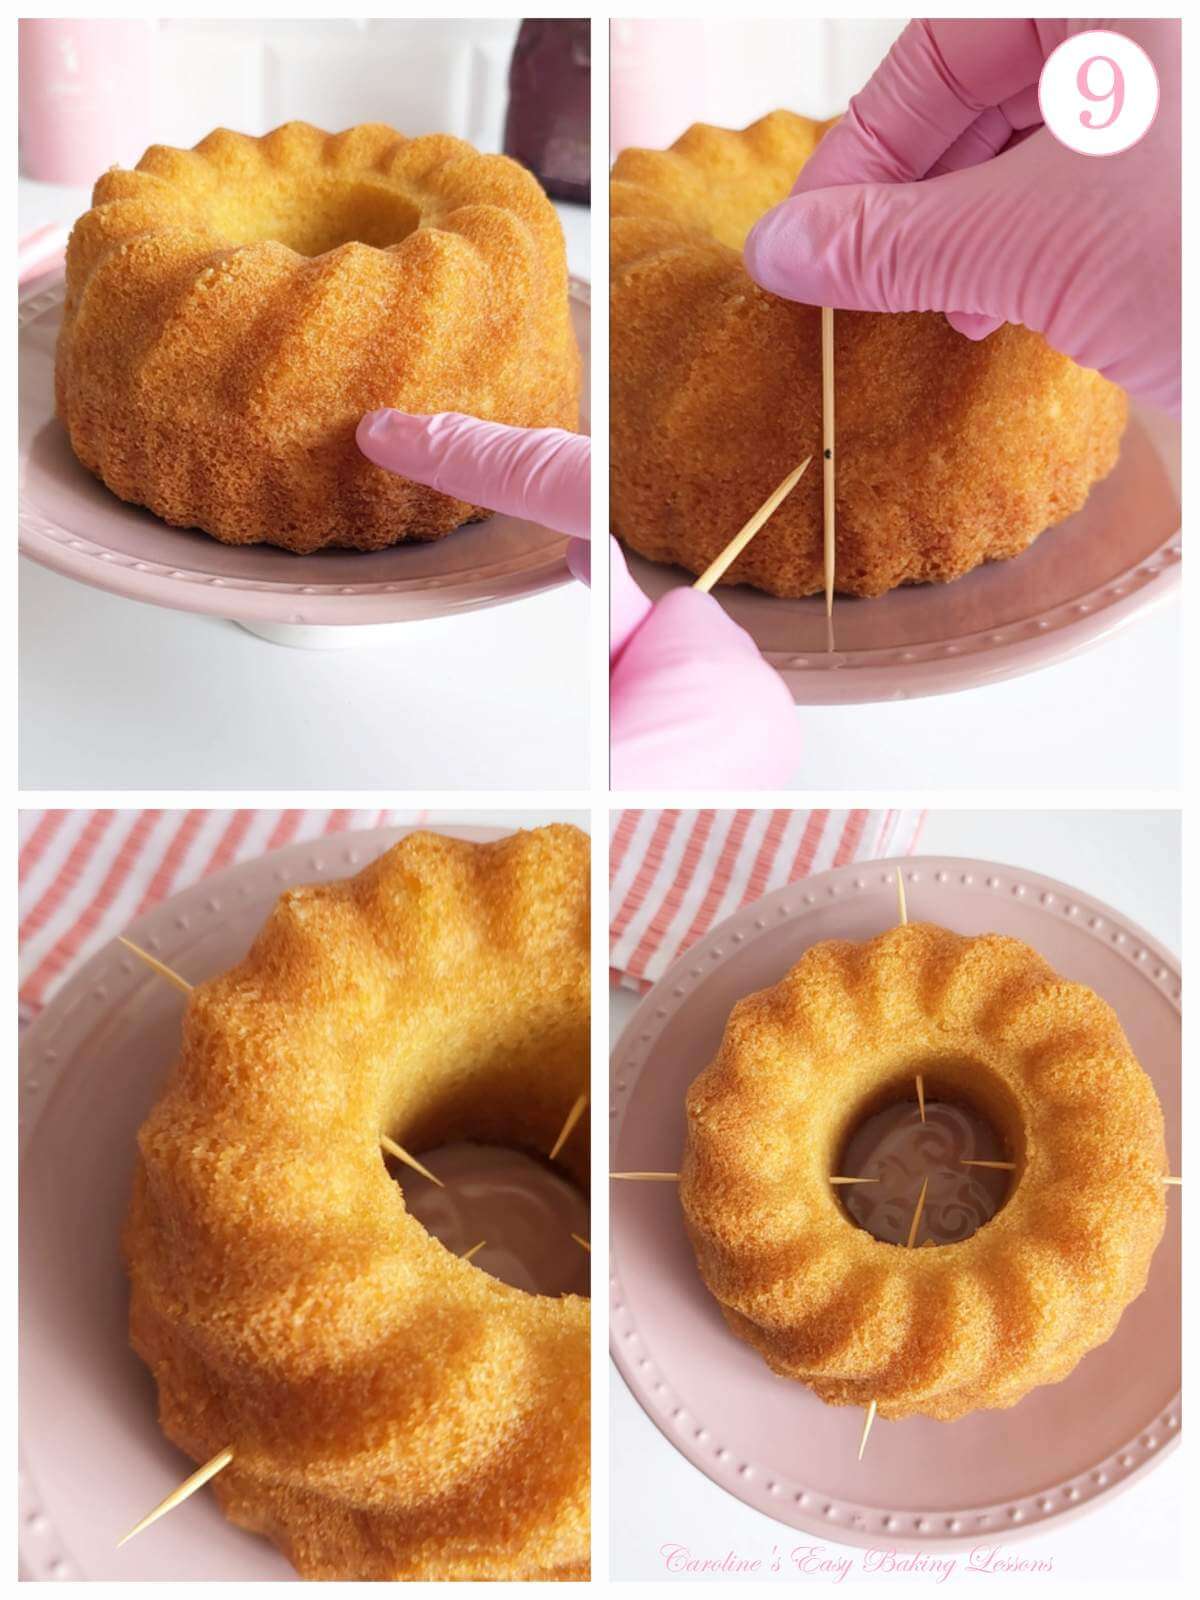
3.To slice the cake in half, it’s best to place on top of a cake stand or riser, something that gives a little height for you to work with. See Photo 8 above.
4. Have 4 – 8 cocktail sticks and insert one halfway through & up the height of the cake. This is where the cake will be cut. **TOP TIP – in the video you will see me make a mark on one stick for the height where the sticks will be inserted. (2nd image in collage 9).
5.Looking at the cake from above, think of where this stick is inserted as the 12 o’clock position. Then add 3 more sticks, (half-way up), in positions 3, 6 & 9 o’clock. See Photo collage 9. If you want you can add more than the 4 sticks.
6.Use a very long sharp knife for cutting the cake in half. It needs to be longer than the distance between 2 of the cocktail sticks.

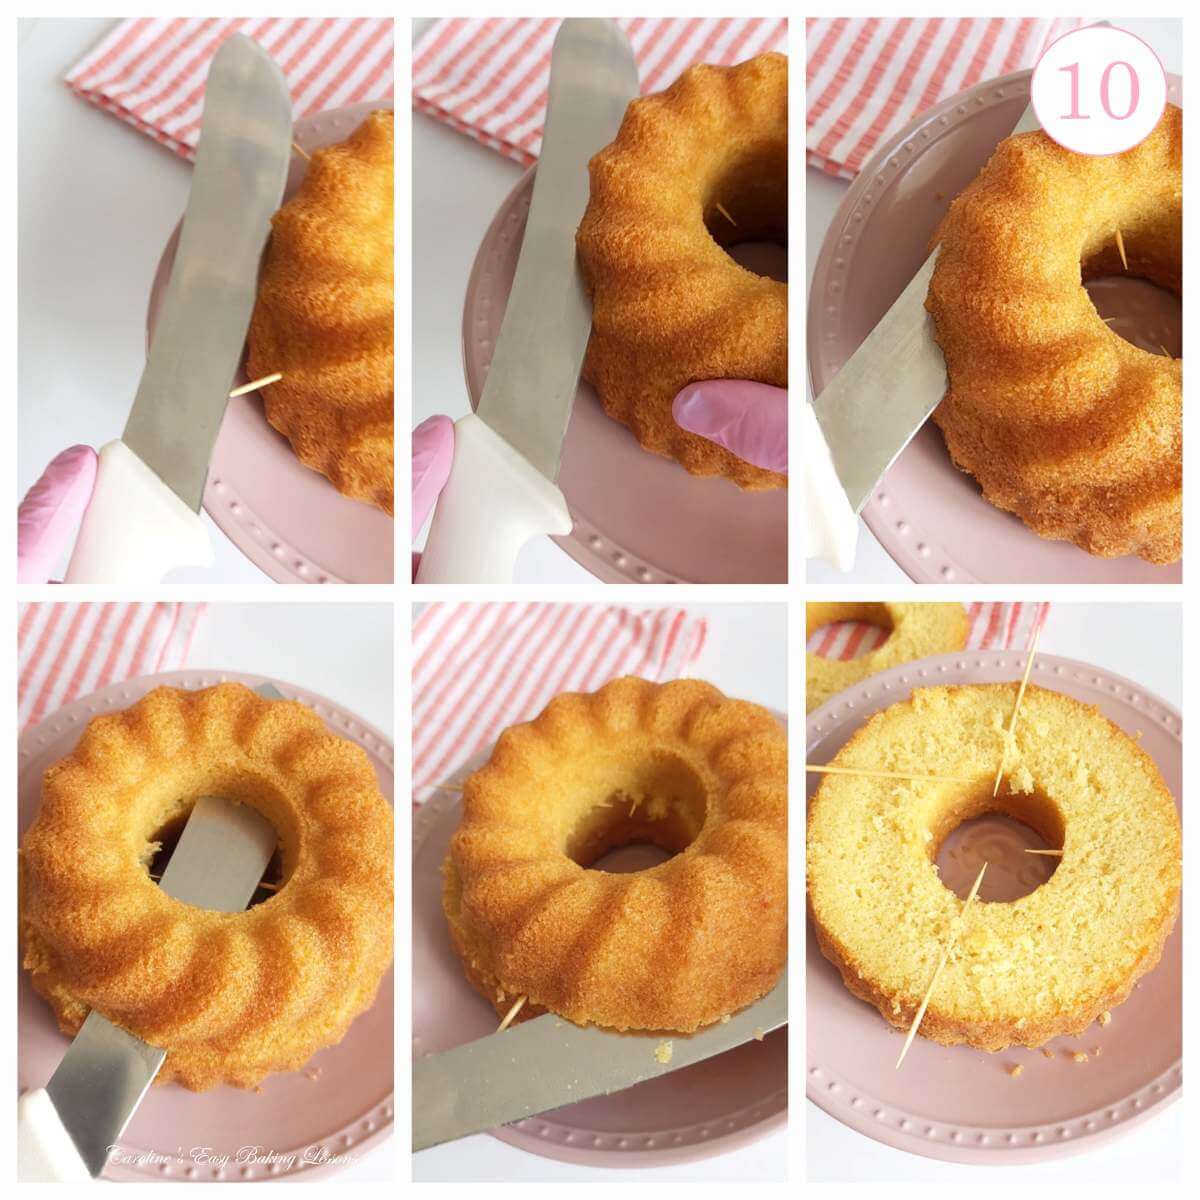
7.Have the knife on its side, sharp edge of the black facing in towards the cake, and rest it on 2 of the nearest cocktail sticks.
8.Hold the opposite side of the cake with one hand & gently start to cut the edge of the cake with an up and down sawing motion, making sure the knife still stays resting on the sticks. Only cut part of the way through, (about 1/3 – 1/2 inch or less than 1 cm).
9. Slide the knife along to the next cocktail stick, making sure it is still sitting on 2 sticks. Repeat the same cutting motion. Move onto the next stick and repeat till the outer edge of the cake is cut.

10. Start at the first 2 cocktail sticks, leaning the knife like before and saw the cake again, getting nearer to the centre. Use the opposite hand to rotate the cake a bit more as you work your way around the cake with this sawing motion.
11. Repeat until nearly cut all the way through. You will start to feel when this is getting nearer. Once your knife is in the centre of the cake, keep rotating and saw the final side of the bundt cake.
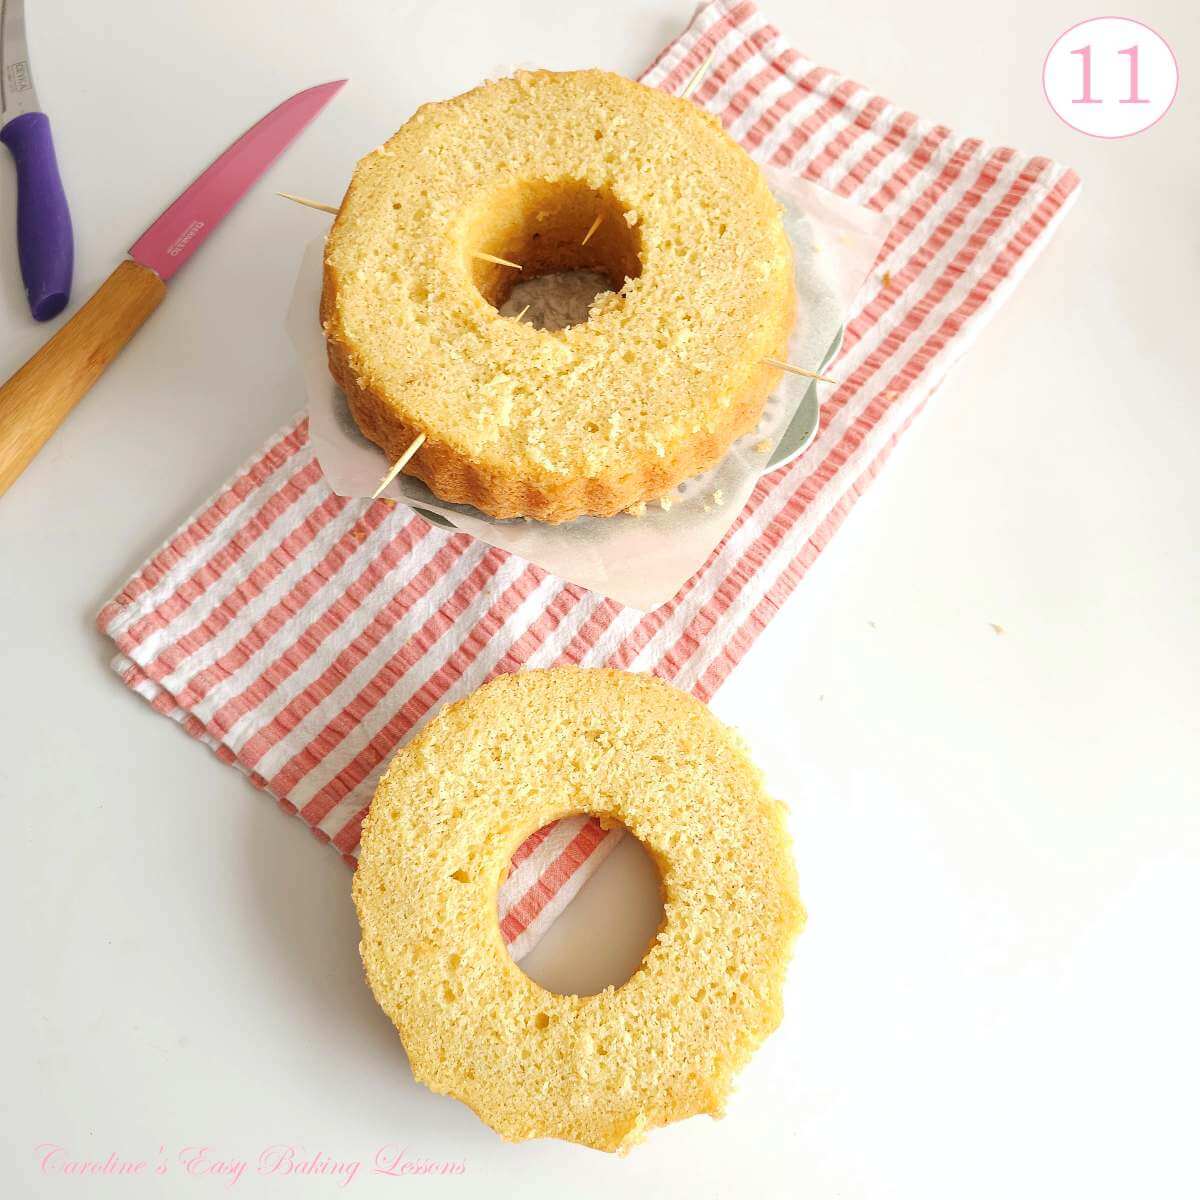
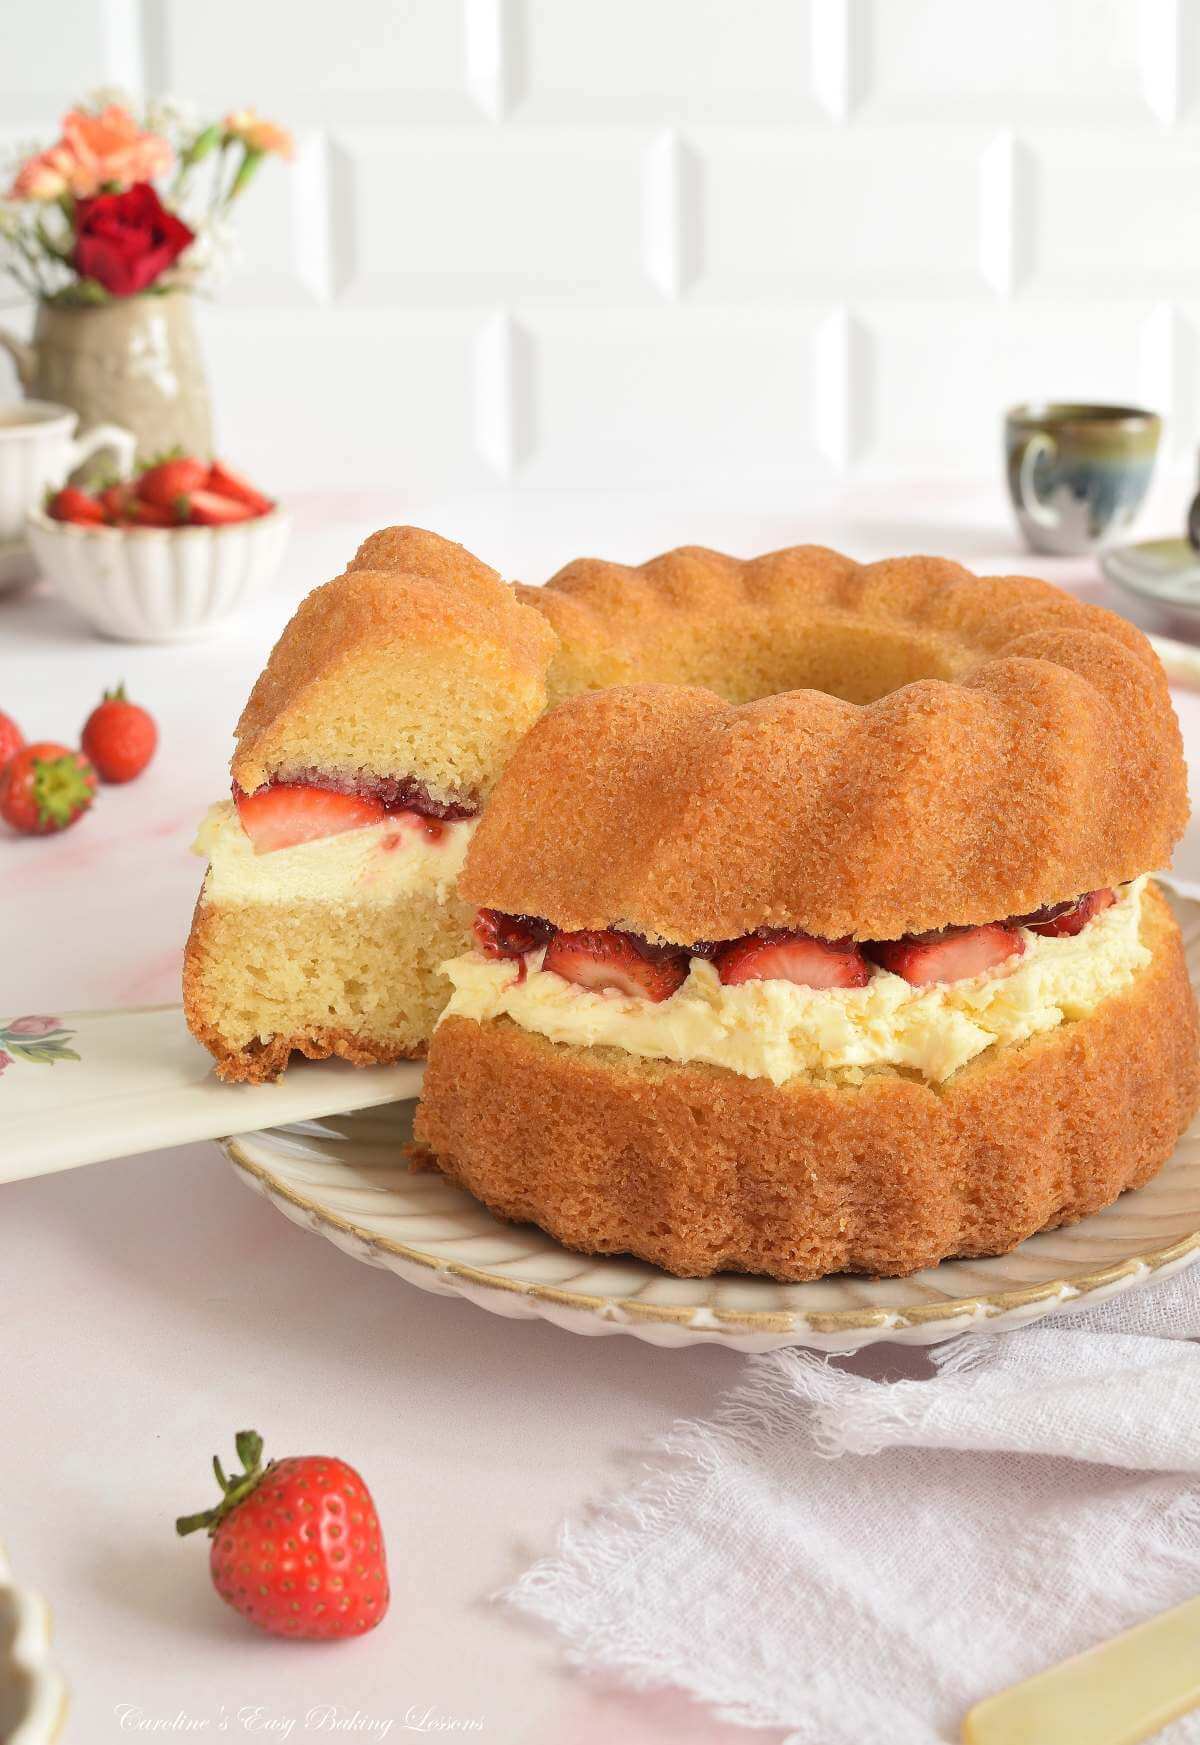
12.Very carefully lift off the cake layer and place on some paper, upside-down. If the base layer is not level, you can trim it now.
Assembling The Cake

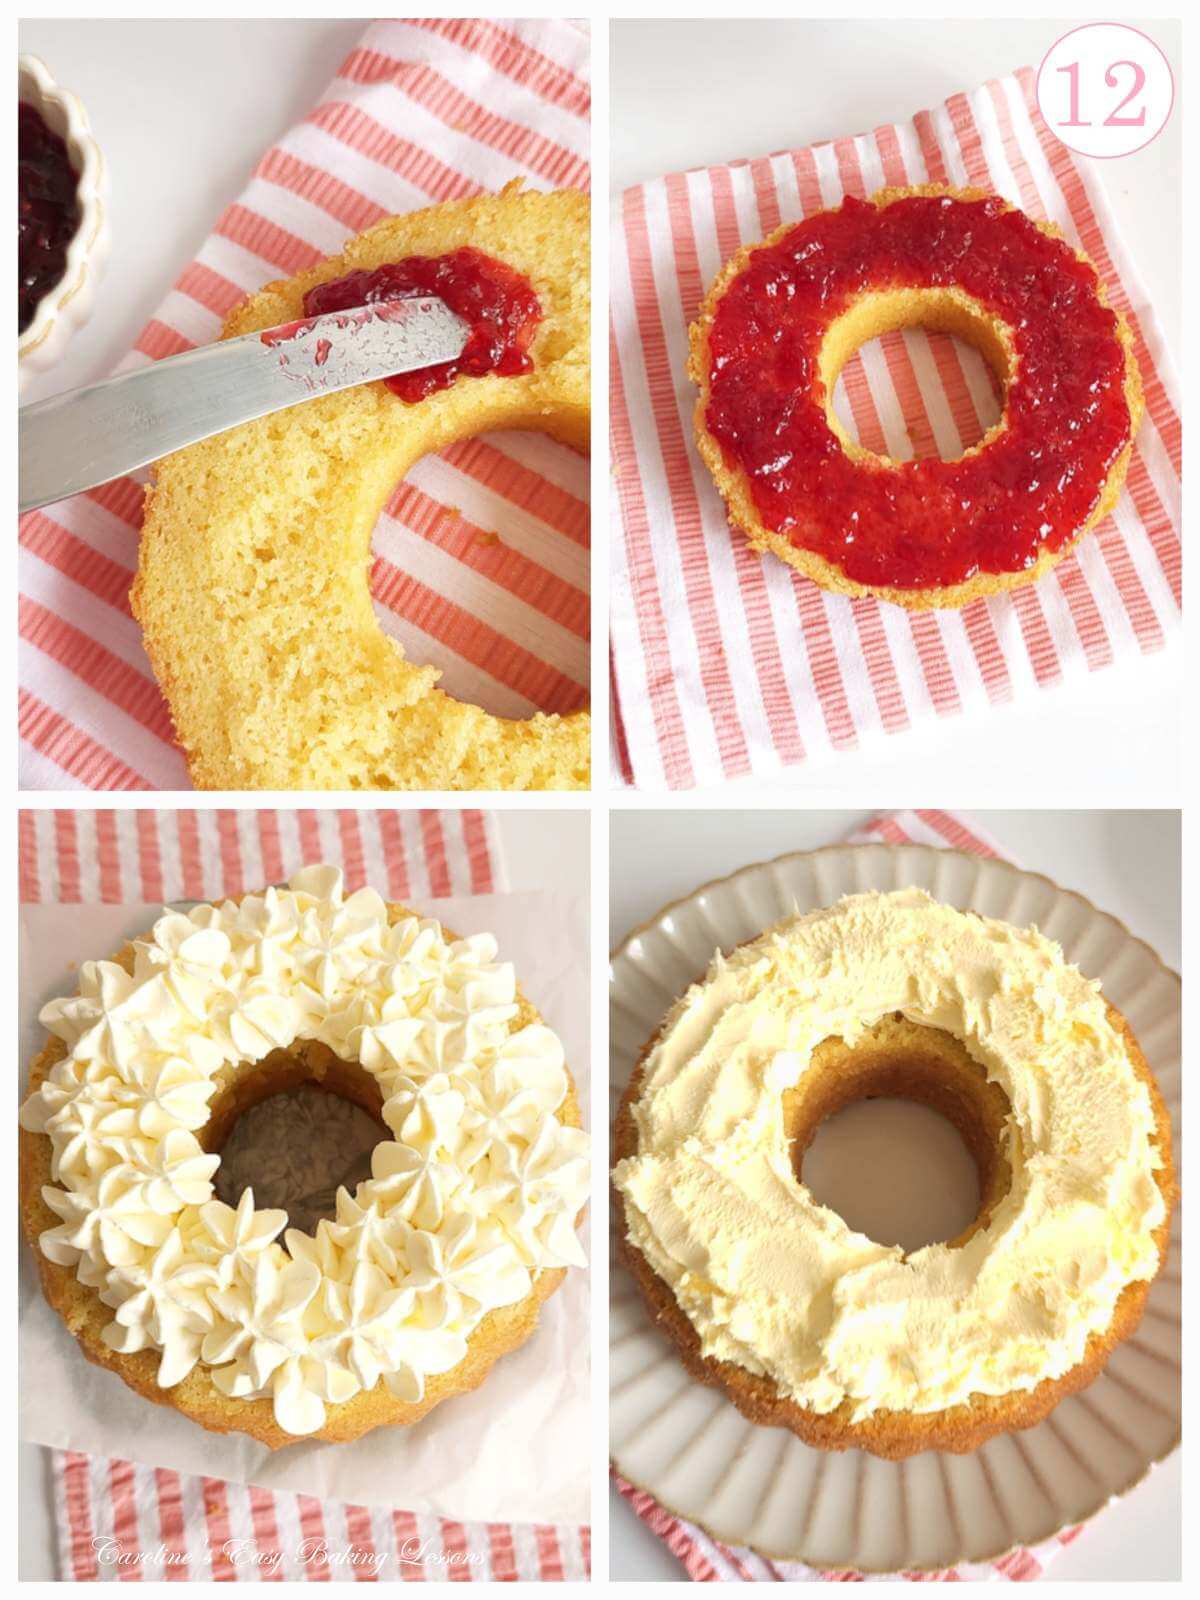
1.Jam can spread on either layer of the cake, but when using cream too, it’s going to be easier to spread on the under-side of the top cake layer. So while the top cake layer is turned cut-side up, (still on some paper or a flat plate), spread on 3 – 4 tsp of the jam.
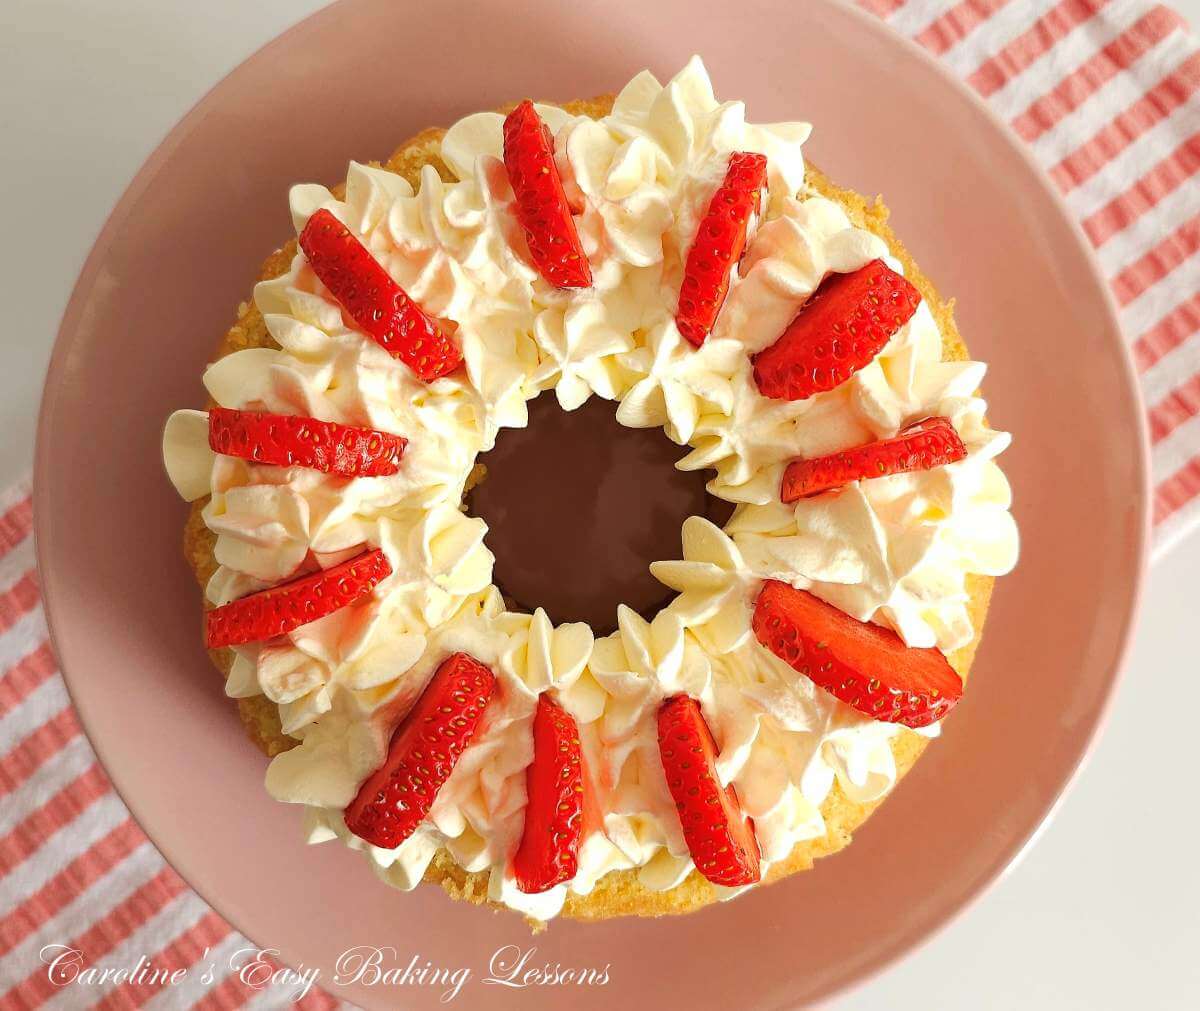
2. If using the whipped cream as a filling, I suggest piping it on. It doesn’t need to be fancy, or with a nozzle, but will give more height than if you just spread it on. For the whipped cream example in the images, I used a closed star-tipped nozzle and piped 3 rings of the piped cream to fill the width of the cake ring.
3.If using the clotted cream (which is great by the way), it is easiest to use 2 small spoons to spread it on. (**Make sure you have taken out of the fridge 10 minutes before using). Don’t worry about it looking super neat. Just make sure you apply a nice thick layer. It can be smoothed later if needed. It does firm up nice and make slicing & serving much better.

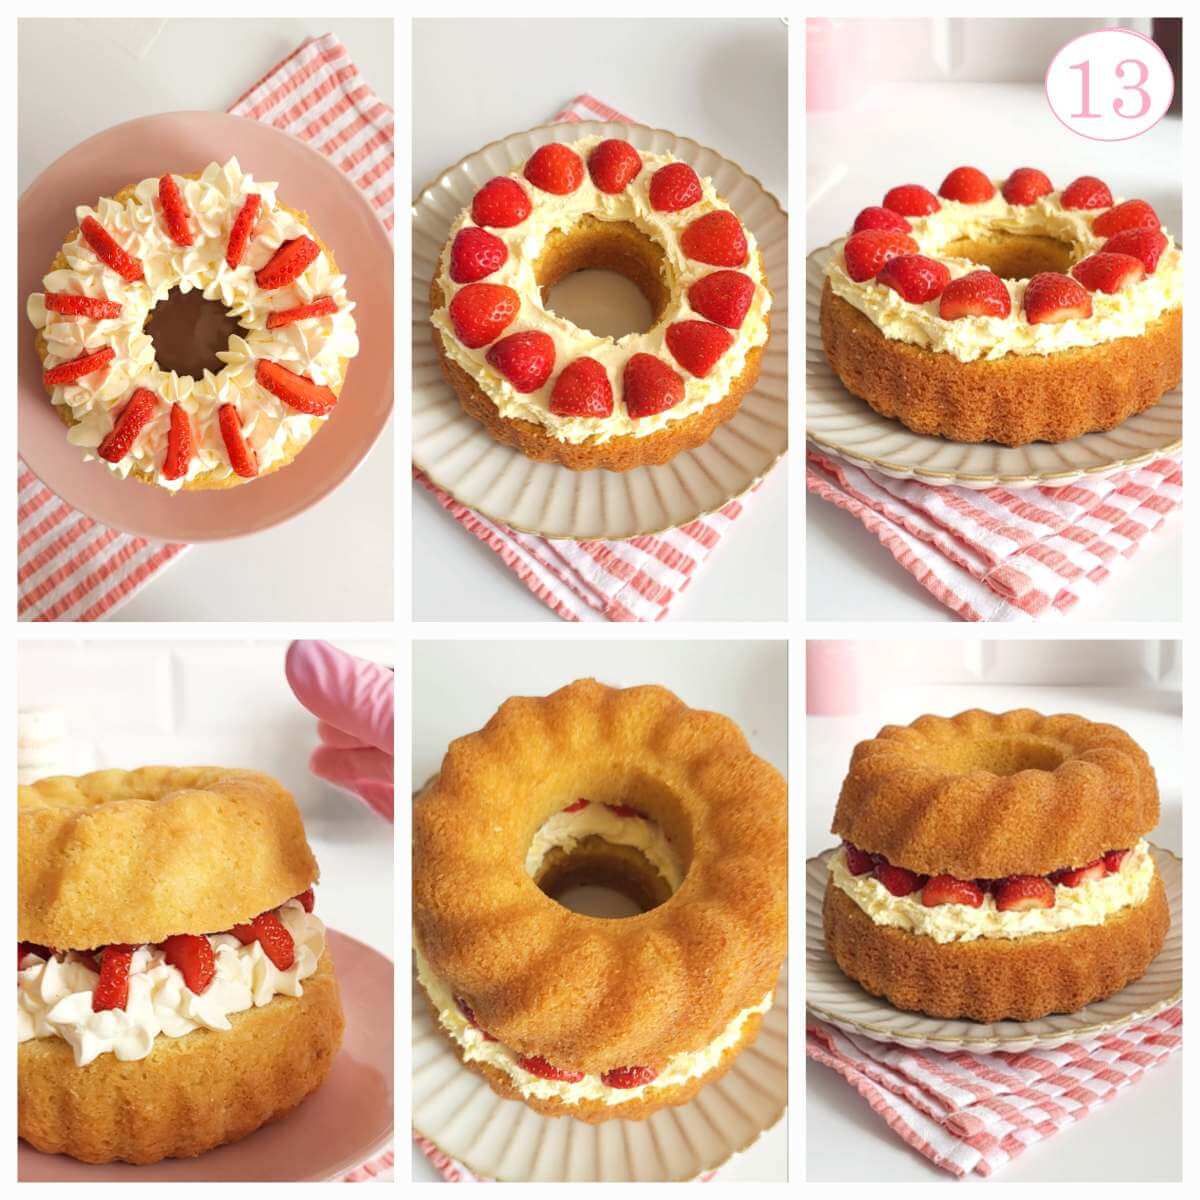
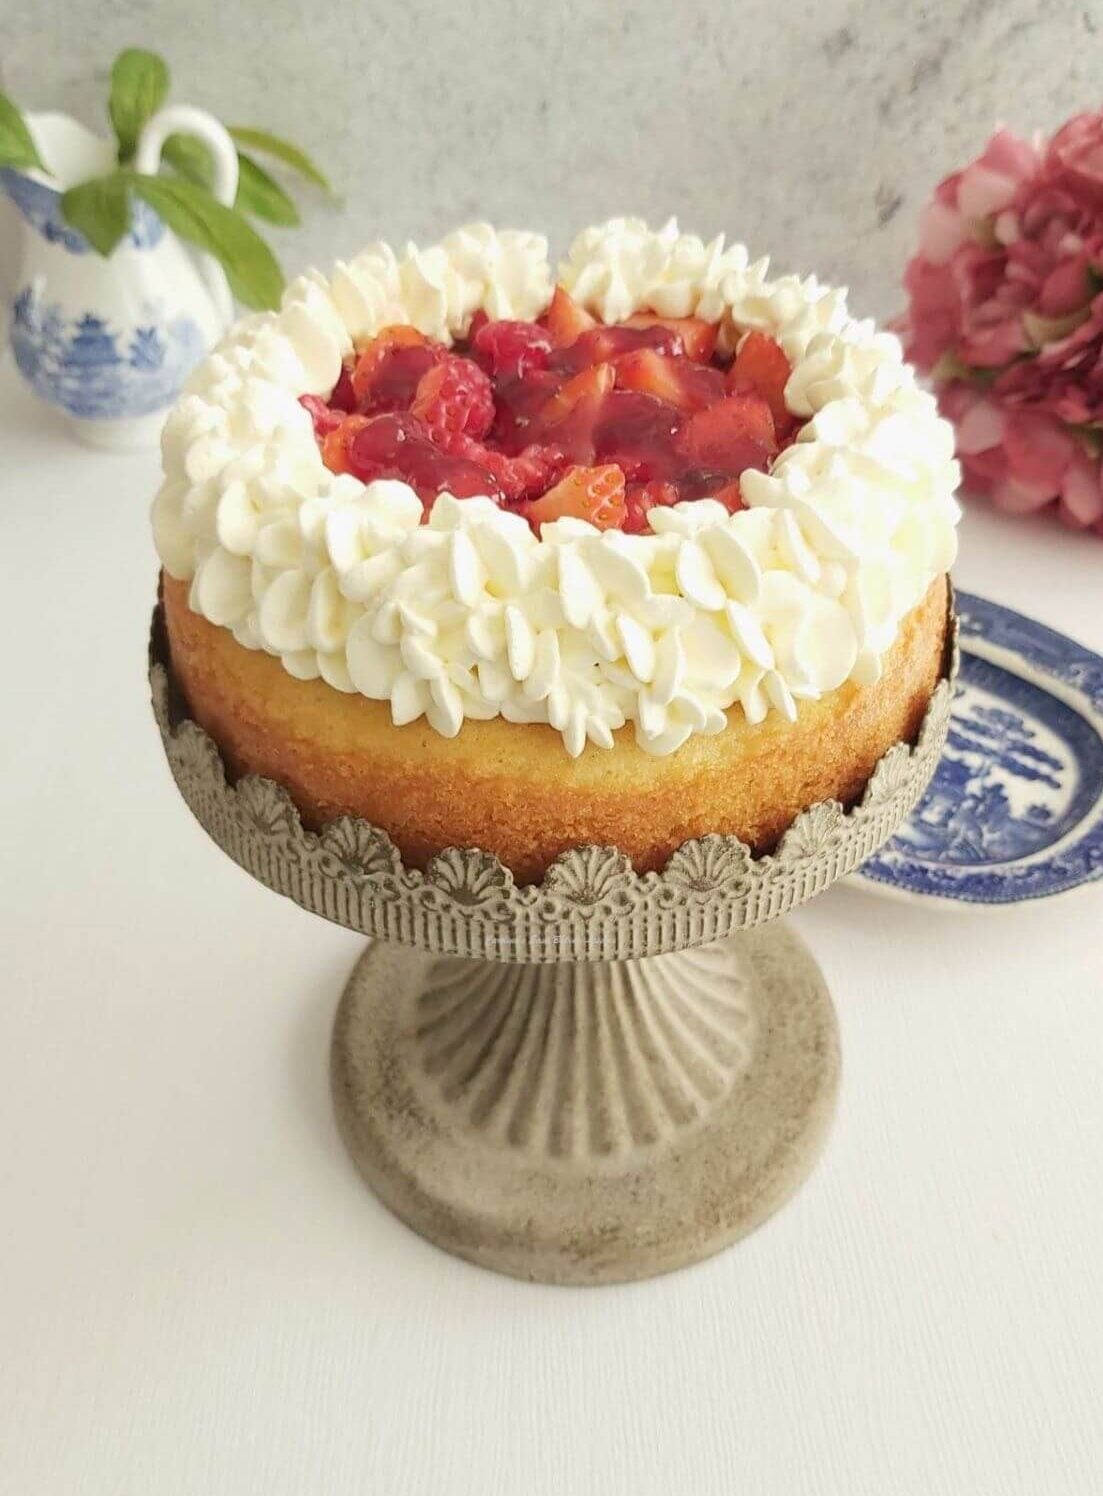
4.Add your strawberry slices/halves, or other berries like raspberries or blueberries, on top of the cream or clotted cream. You can add in a pattern, just try to make all level. (See Photo 13 with strawberries different ways, & using whipped cream & clotted cream).
5.Place this base layer into the fridge for 30 minutes. This helps firm the creams a bit better and reduce the buckling from the weight when the top layer is added. For piped cream, you can chill even for 1 hour.
6.Now very carefully & gently, add on the top layer of Victoria Sandwich cake. Don’t be tempted to push down. Pop back in the fridge for 30 minutes to set up.

Serving & Storing
1.A dusting of icing/powdered sugar is typically sieved on top of a Victoria Sandwich cake. However, it does have a tendency to be absorbed into the cake. So if you do want to add it, add right before cutting & serving. Just make sure it is a fine dusting of the sugar.
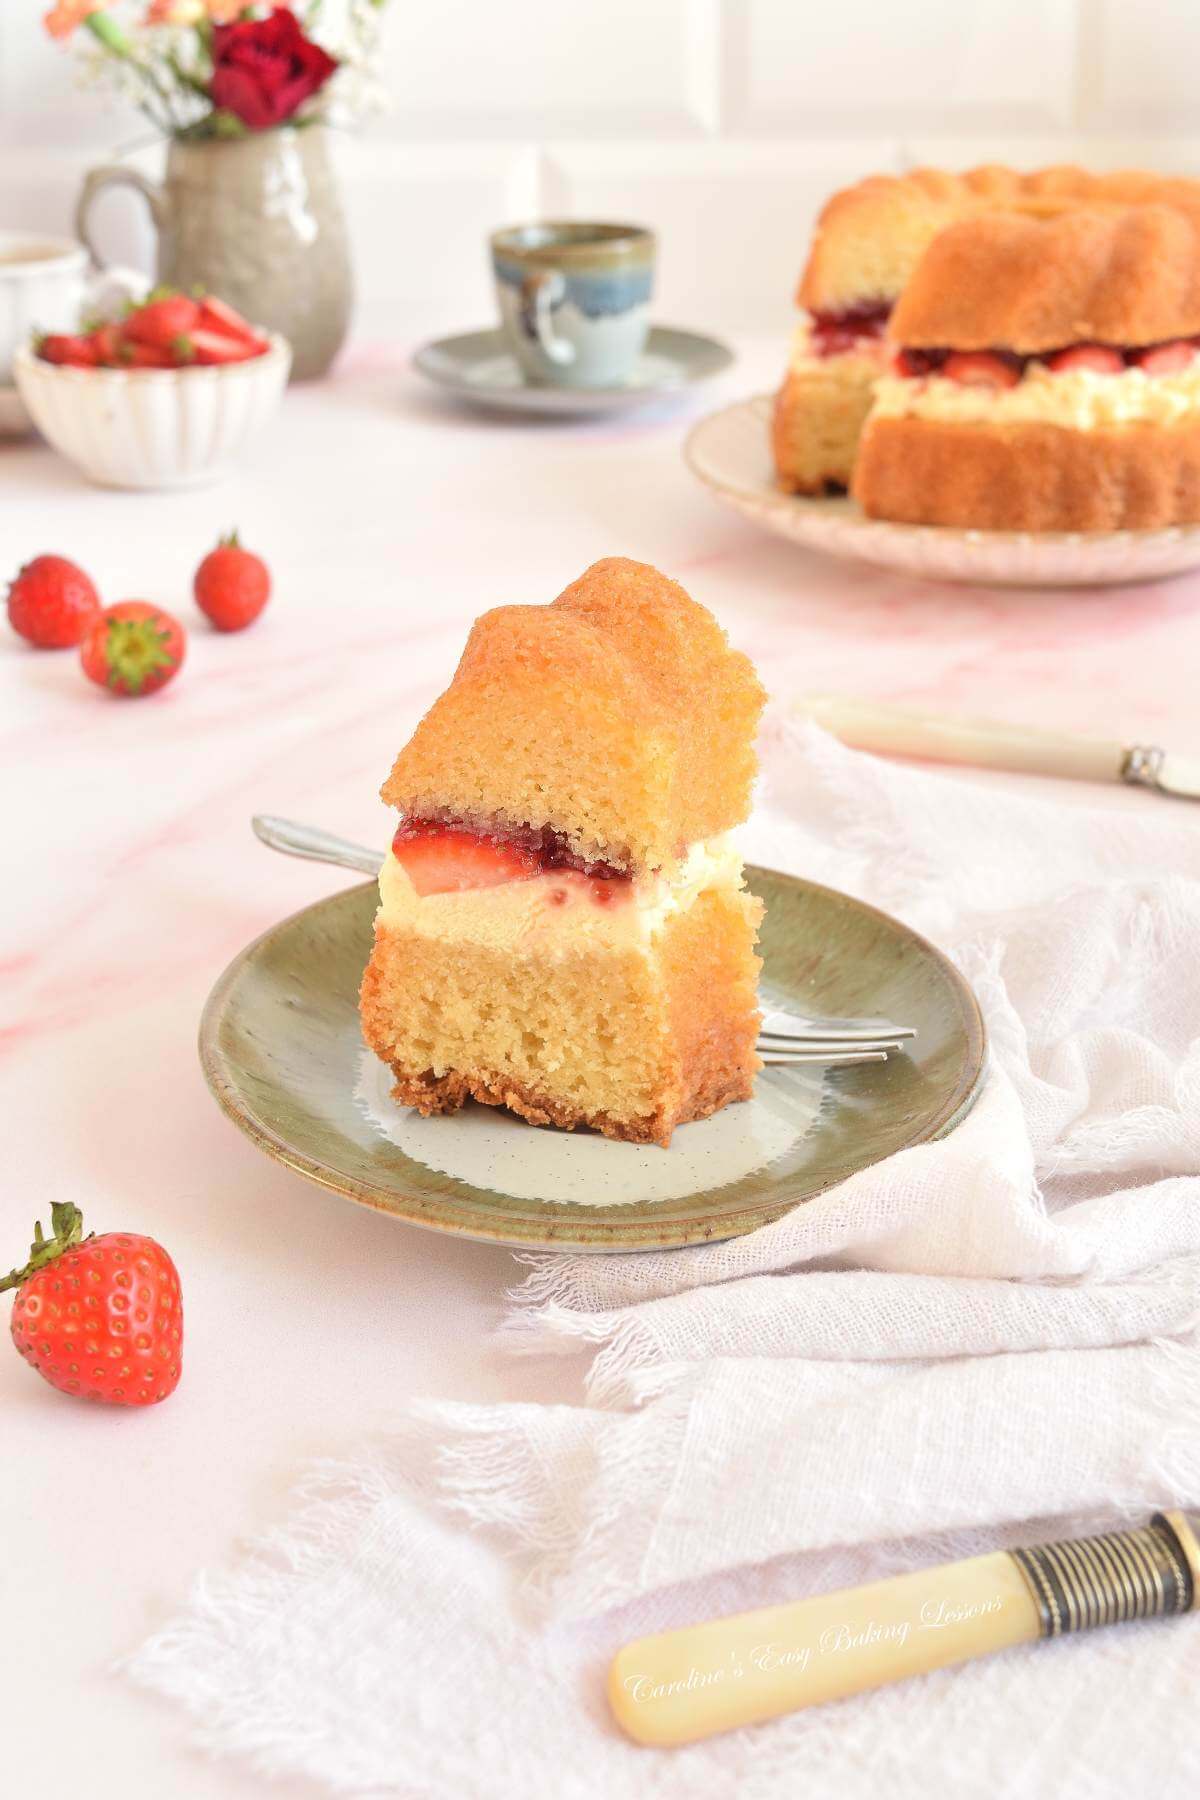
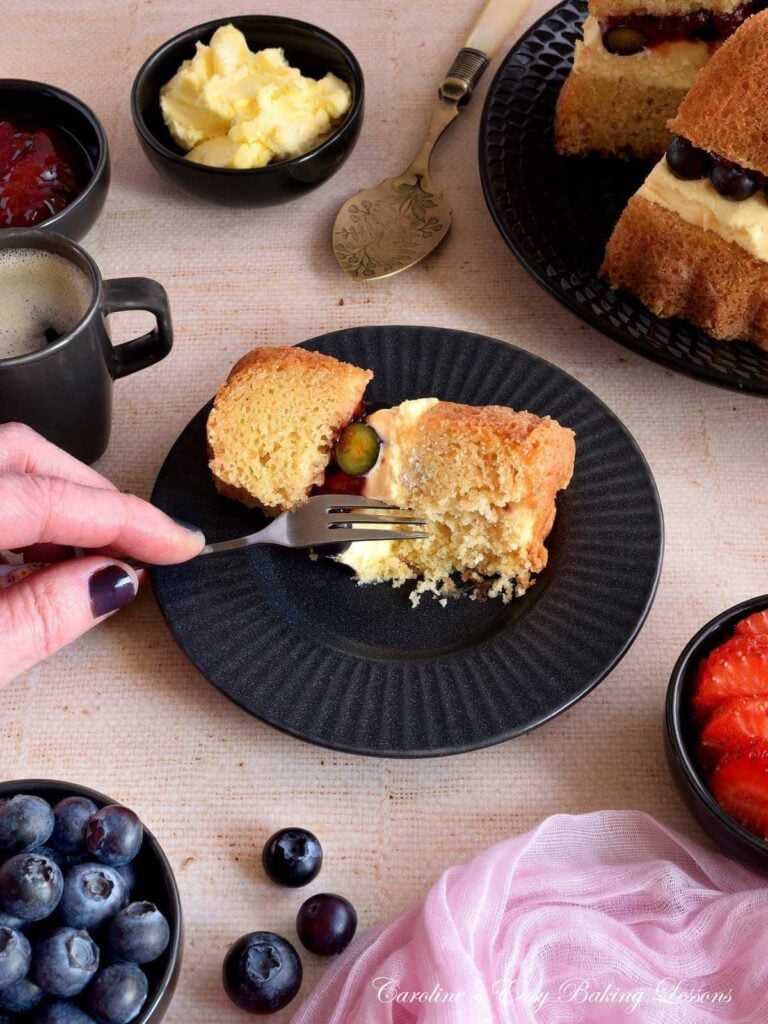
2.Cut the cake into 8 slices and serve with a hot cup of tea or coffee. You can add some more berries on the side if you want.

3.Store uncut cake, or leftovers under a glass cake dome, or in a metal cake or cookie tin. Preferably leave at room temperature or somewhere cool for up to 7 days1
If in a very warm environment, you can store in the fridge and that will produce much cleaner cut slices. But it can cause condensation and the texture changes.
4. Unfilled cake layers can be frozen. Ensure fully cooled before slicing and wrap individually, really well in cling film/plastic wrap, then some in some paper or foil, before placing in a labelled food bag or airtight container & freezing for up to 3 months2
DIFFICULTY LEVEL: easy, beginner


Recipe Card
Gluten-free Air Fryer Victoria Sandwich Bundt Layer Cake

Equipment
- Bundt Tin
- Baking spray, lining paste, or butter to grease (see note in instructions, or make Lining Paste)
- Scales or measuring cups
- Measuring Spoons
- Hand/stand mixer
- Sieve
- Timer or Phone Timer
- Cocktail sticks
- Cooling rack
- Bowl for whipping cream (optional)
- Piping bag & nozzle (optional, or food bag)
- Small measuring jug (optional, if piping cream)
Ingredients
- 113 grams Butter (4 oz, ½ cup/ 1 stick, unsalted, soft & cubed)*
- 113 grams Castor Sugar (4 oz, ½ rounded cup of super/extra fine sugar, Domino’s etc. *See note above)
- 3 Eggs (Medium to large, US Large – XLarge eggs)
- 113 grams Gluten-free Self-raising Flour (4 oz, level 1 cup. For Plain/All Purpose Flour, add extra 1½ tsp baking powder)*
- 1¾ tsp Baking Powder
- ⅓ tsp Xanthan Gum (approx. 1 gram*)
- 1½ tsp Vanilla Extract (read about Homemade Vanilla Extract)
- ¼ tsp Almond Extract (optional)
- 1-2 tbsp Milk (or water)
Filling Options:
- 180+ ml Double Cream (Minimum 6 fl oz, ¾ cup Heavy/Whipping cream unwhipped,
- 227 grams Clotted Cream (8 oz includes spare for serving on the side)
- 3 tbsp Strawberry Jam (60g, 2oz, or raspberry)
- 100 grams Fresh Berries: strawberries, blueberries, or raspberries (optional), see notes*
- OVEN: 180c/160c Fan Oven/350f/Gas Mark 4
Instructions
Prepare The Cake Batter
- Cube the 113 grams Butter small, about 1cm (⅓”) for quicker softening & easier combining.
- Pre-heat your air fryer or regular oven, if your air fryer needs this step. Set to: 180°c/160°c Fan oven/350°f/Gas Mark 4. **If using a new or powerful air fryer, I recommend using the lower fan oven temperature.
- Add the softened butter & 113 grams Castor Sugar (Extra/Super fine sugar) to a mixing bowl & briefly mix by hand. Then use an electric mixer to ‘cream’ the butter & sugar until paler and spreadable.
- Add the 1½ tsp Vanilla Extract, a ¼ tsp Almond Extract & then the 3 Eggs , one at time, mixing in-between each addition. (Learn how to make your own vanilla extract).
- Sieve over the 113 grams Gluten-free Self-raising Flour, ⅓ tsp Xanthan Gum, (if using) & the 1¾ tsp Baking Powder. (**If using Plain/All Purpose Flour, add an extra 1½ tsp baking powder). Sieve high and then add in 1-2 tbsp Milk. Start to mix by hand before using the mixer on low to mix just until combined. Don’t over-mix. it will be a thick batter.
Grease The Bundt
- Well grease the bundt tin/pan with cake release spray, butter & flour or homemade cake lining paste (cake goop). For lining paste, brush in upward strokes and apply 2 generous layers (see video & step-by-step instructions for more on this).
Baking The Cake
- Carefully spoon the batter into the greased bundt tin. Then level off the top best you can.
- Pop into the air fryer basket, or into the centre of a larger open-front air fryer or regular oven.
- Bake for 25-30 minutes until risen, set and a deep golden brown colour. A cocktail stick will come out clean of crumbs and the cake will be starting to come away from the sides of the bundt tin. **For small basket air fryers, I recommend baking for 18-20 minutes, when it will look ready, but not be cooked all the way through the centre. Now place foil on top of the cake and weigh it down carefully with a metal spoon for example. **DO NOT let the foil move about in an air fryer as it can be a fire risk. Continue baking for 6-8 more minutes and test with a cocktail stick until ready.
- Cool in the tin, on top of a cooling rack for 30 minutes.
- After 30 minutes, place a cake stand, plate or a cooling rack with a little paper, on top of the cake. Hold everything together and flip over. Lift off the tin and leave the cake to cool for at least 30 minutes.
Preparing For Assembly
- While the cake is cooling, or ahead of time, you can whip the 180+ ml Double Cream (if using), with an electric mixer till thick and with peaks. Spoon into a piping bag with an open star-tipped nozzle.
- Alternatively use 227 grams Clotted Cream, just removing from the fridge 10 mins before using.
- If using strawberries for the filling, find ones the same size or cut to about the same size. This will make layering the cake easier.
Dividing The Cake
- Once the cake is cooled (you can leave till next day), place on top of a cake stand or something to elevate it. Get 4 cocktail sticks and a long sharp knife. Insert one stick, half-way up the cake, and half-way through. Add 3 more sticks in positions that above, look like 3, 6, 9 & 12 O’clock positions.
- Rest the knife blade on top of 2 of the sticks, with the blade pointing towards the cake. Start small cutting motions to cut about 1cm (⅓”) into the cake. Then rotate the cake till cut all the way around the outer edge. Repeat this time sawing further into the centre of the cake till cut all the way through. Lift the top cake layer and trim the cake layers if needed.
Assembling The Cake
- Take the top layer, turn upside-down and spread on the 3 tbsp Strawberry Jam/preserve (using more if needed). Pipe the whipped cream on top of the base layer, or use 2 small spoons to spread on the clotted cream.
- Add the fresh berries to the cream layer, trying to make same height to be level. Place this base layer in the fridge for 30-60 minutes. For the clotted cream 30 minutes is fine.
- Then carefully lift the top layer, on top of the fruit and cream layer. Don’t press down. You can place back in the fridge for 20-30 minutes to set further. This is recommended for the whipped cream.
Serving & Storing
- You can dust on a fine layer of icing/powdered sugar for serving if you wish. Then cut into 8 slices. Serve with tea or coffee and with more berries & cream if you want.
- Store the cake under a cake dome or in a metal cake or cookie tin at room temperature for up to 7 days1. You can place in the fridge, where it will firm up, but it will cause condensation and make the texture of a Victoria Sandwich cake change and be more dense. Best out at room temperature or somewhere not too warm.
- Undecorated & uncut bundt cake can be frozen when well wrapped in cling film/plastic wrap, then some foil or paper, & finally in a labelled bag or air-tight container. Place at the back of the freezer and it will be fine for up to 3 months2.
Video
Notes

 Caster Sugar – this sugar is very important for the texture, so the best US substitute is Extra/Super Fine sugar. Or you can lightly process granulated sugar. See my sugar comparison image before the step-by-step instructions above.
Flavourings – Vanilla extract is better than flavouring/essence. It is costly but, so it is much better making your own vanilla extract. Or, you can make alcohol-free extracts to save even more. I also add a touch of almond extract to enhance flavour.
Caster Sugar – this sugar is very important for the texture, so the best US substitute is Extra/Super Fine sugar. Or you can lightly process granulated sugar. See my sugar comparison image before the step-by-step instructions above.
Flavourings – Vanilla extract is better than flavouring/essence. It is costly but, so it is much better making your own vanilla extract. Or, you can make alcohol-free extracts to save even more. I also add a touch of almond extract to enhance flavour.

 Flour – for the gluten-free flour I have used and recommend Doves Farm gluten-free range Freee Foods. You can use their Plain flour or their Self-raising flour. For their Plain flour (or any other All Purpose gluten-free flour), remember to add the 2 amounts of baking powder listed. And if making for someone who needs gluten-free, make sure the baking powder is gluten-free too. I use Dr Oetker. You can make a regular, gluten cake by using normal self-raising or plain (A.P.) flour.

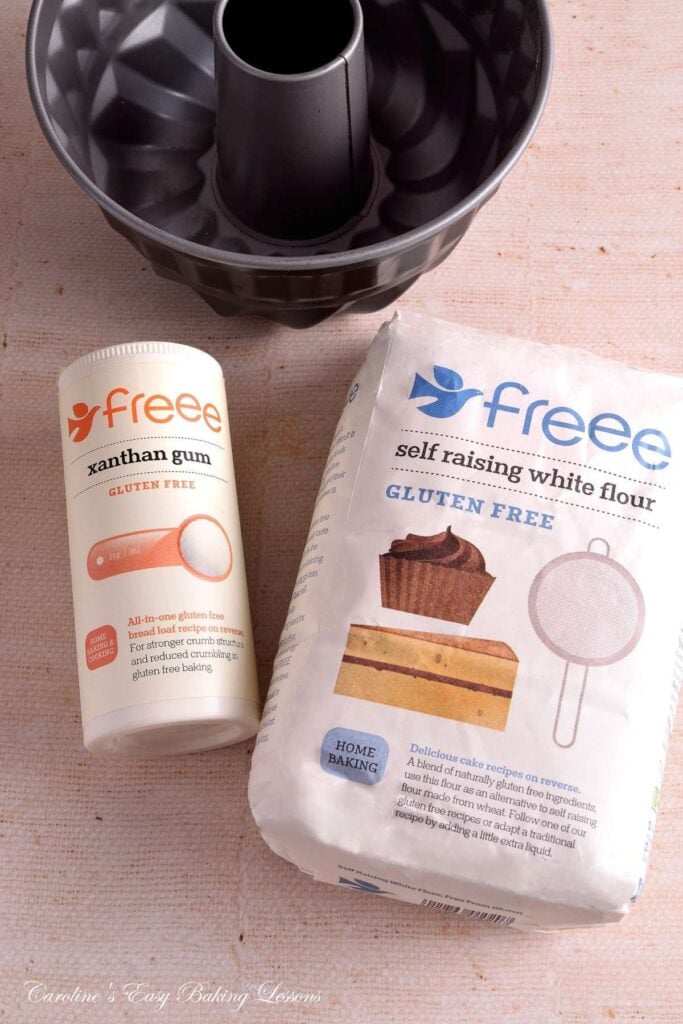 Xanthan Gum – this is the binding agent in gluten-free baking. There is some in the gluten-free flour, but a little more is needed for this cake. Again I use Freee Foods brand, that can be easily found in larger supermarkets, (with the gluten-free flour). Alternative is Guar Gum.
Cream Filling – whipped cream (from double/heavy/whipping cream) is traditional to a Victoria Sandwich cake. But I have also tried with clotted cream. This saves you whipping & piping the cream and sets better.
Xanthan Gum – this is the binding agent in gluten-free baking. There is some in the gluten-free flour, but a little more is needed for this cake. Again I use Freee Foods brand, that can be easily found in larger supermarkets, (with the gluten-free flour). Alternative is Guar Gum.
Cream Filling – whipped cream (from double/heavy/whipping cream) is traditional to a Victoria Sandwich cake. But I have also tried with clotted cream. This saves you whipping & piping the cream and sets better.

 Berry Filling – use fresh strawberries, raspberries or blueberries as the perfect accompaniment to cream layer cake.
Bundt Tin – as this is for a small basket air fryer, the cake is baked in a bundt tin that is a bit smaller than a regular ‘Kugelhopf Pan’, measuring 6.5″ (17cm) wide. A similar standard pan is about 8.6″ (22cm) wide. You can read more and learn how to make in the bigger tin, in the equipment section above.
Berry Filling – use fresh strawberries, raspberries or blueberries as the perfect accompaniment to cream layer cake.
Bundt Tin – as this is for a small basket air fryer, the cake is baked in a bundt tin that is a bit smaller than a regular ‘Kugelhopf Pan’, measuring 6.5″ (17cm) wide. A similar standard pan is about 8.6″ (22cm) wide. You can read more and learn how to make in the bigger tin, in the equipment section above.

 Air Fryer Or Oven? – this recipe is for a small basket air fryer, 3.5 litre, about 3.7 quarts but easily can be made in bigger open-front air fryer or regular oven.
Recipe Yield – using the same size and shape tin, this recipe yields 8 slices. They look small but are deep layers and with a nice amount of filling.
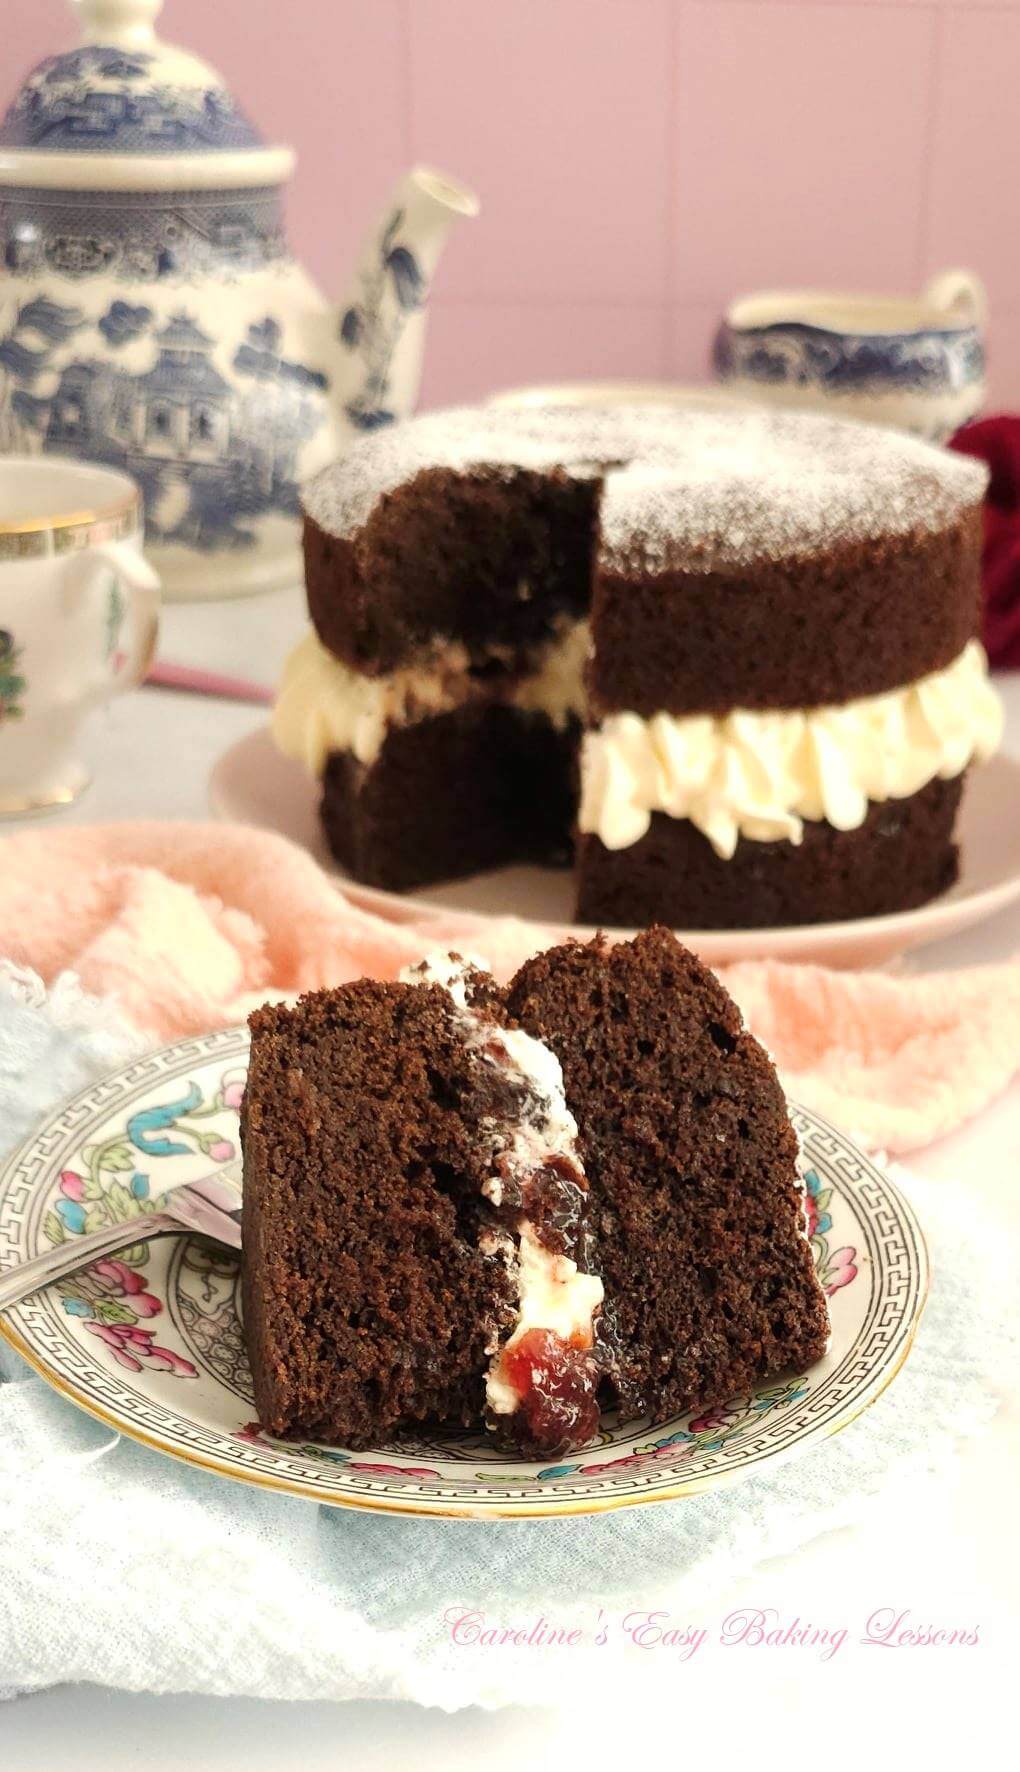
Other Victoria Sandwich cake recipes – you can see other Victoria Sandwich cake images below, or jump to the Victoria Sandwich cake recipes page.
1, 2 – see references below.
Air Fryer Or Oven? – this recipe is for a small basket air fryer, 3.5 litre, about 3.7 quarts but easily can be made in bigger open-front air fryer or regular oven.
Recipe Yield – using the same size and shape tin, this recipe yields 8 slices. They look small but are deep layers and with a nice amount of filling.
Other Victoria Sandwich cake recipes – you can see other Victoria Sandwich cake images below, or jump to the Victoria Sandwich cake recipes page.
1, 2 – see references below.

Nutritional Information – I am not a qualified nutritionist and all values are approximate. These are based on using ingredients as listed in the recipe card, (all clotted cream & blueberries) & where 1 serving is 1 slice from a yield of 8 slices. Make bigger or smaller slices, use different clream and these values will change. Values are calculated via MyFitnessPal.com.
Subscribe For More Recipes
Other Victoria Sandwich Cakes
See below images of my classic Victoria Sandwich Cake, the chocolate version, or the raspberry jam swirl recipe. Just click the image to go to the recipe or jump to the Victoria Sandwich Cakes recipe page.


Join My Facebook Group
Why not also join my – Facebook group Easy Online Baking Lessons, dedicated to this baking lessons website, as well as providing one-on-one support with myself & my team? Be sure to answer all security questions when requesting to join.
Follow me on social media:
Happy Learning & Baking!
Caro x


Air Fryer Gluten-free Victoria Sandwich Bundt
Search For Something You Fancy!
Caroline’s Easy Baking Lessons
- Storing Sponge Cakes details from Sponge.co.uk ↩︎
- Freezing Victoria Sandwich cake details from FreezeIt.co.uk/victoria-sandwich-cake/ ↩︎


