Buttercream Tutorial For Beginners

Buttercream Tutorial For Beginners, is one of my theory lessons for beginner bakers. Use in conjunction with my structured sweet & savoury lessons, to be the best baker you can be! Use as a master buttercream recipe, while you also master the art of baking from scratch.
Buttercream Tutorial For Beginners


This is my lesson for beginners, to make a simple buttercream. Part of my beginner baker lessons, this buttercream will act as a Master Buttercream recipe, that you can adjust, increase, flavour or colour as your baking confidence increases.
Recipe Yield
The amount this buttercream will make (yield), is about 1.5cups & is more than enough for 12 cupcakes or for filling and even topping a 7 or 8″ (17.75-20cm) layer cake.
You can increase the recipe quite simply, by using that option on the Recipe Card below.


Recipe Cards
So, what are Recipe Cards & why am I using this time in my Baking Lessons?
Well, recipe cards, are as the name suggests, a digital version of a traditional recipe card – what your recipe would be printed or hand-written on. The benefits of these recipe cards, is that they can be easily shared, saved or printed. Printed with or without the process photos or notes. So an easier option for me, than creating the entire lesson as a Word document for you to download and print. It also means less space taken up on my bulging website database (documents and quality photos take up a LOT of space).


Another great option with the Recipe card is ‘Cook Mode‘. Simply toggle that on or off (will be blue when on), and this stops the phone or tablet, from going black, when you are using it to follow along with a recipe, right when your hands are messy! How many times has that happened?
You can also use the ‘Jump To Recipe’, or ‘Skip To Recipe’ option and avoid any useful information that might come before it (so not always a benefit – but we have to offer it).
Ok back to the lesson. As is my style, all the tips and information you need, will be in the instructions/recipe below. No point mentioning a useful tip if it’s too late, I like to tell you right in the moment, when it has even more value. I will however, often highlight it in bold to draw attention to it. So you learner bakers, pay attention haha.


Learn how to make your own homemade buttercream, and then how to assemble & fill a piping bag to use said buttercream. There won’t be an in-depth lesson on how to pipe or with specific piping nozzles, as there is a wealth of videos on YouTube that are at your disposal and you can pick which ones you find the most interesting for you.
Top Research Tip – when watching videos on YouTube, and in particular for piping buttercream, got to the settings and watch on slow motion.


New Recipe
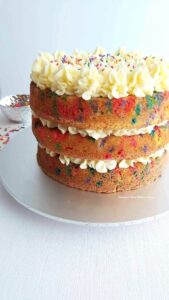
The next recipe and lesson is a 3 layer funfetti cake, (as seen in the photos). This is a vanilla sponge cake, made with large, bake-safe sprinkles in the batter. Filled with this same buttercream from here but a double batch, you will learn my tip for keeping nice piped rosettes between your cake layers. The cake is then finished off with some taller, well-defined buttercream rosettes and a few of the funfetti sprinkles.
Will make a great Mother’s Day cake, so check out the Funfetti Sprinkle Cake For Beginners.
DIFFICULTY LEVEL: easy, beginner
Simple Buttercream Tutorial For Beginners

Equipment
- Digital scales or measuring cups
- Mixing bowl
- Sieve
- Hand/stand mixer (or by hand with wooden spoon)
- Mixer Splash guard (or clean tea-towel)
- Measuring Spoon (½ tsp – baking teaspoon)
- Silicone Spatula (or similar)
- Piping bag/pastry bag (or piping syringe – optional)
- Cling film/plastic wrap (if not using right away)
Ingredients
- 150 grams Butter, unsalted, cubed & softened (5¼ oz, ⅔ cup)
- 300 grams Icing Sugar, sieved (10½ oz, 1½ cups powdered sugar)
- ½ tsp Vanilla Extract (Make your own Homemade Vanilla Extract)
Instructions
Preparing The Buttercream
- Start by softening the butter, and letting come to room temperature. When measuring the butter, cut into small cubes. I like to cut into pieces about 1cm, ⅓″ size, as a smaller surface area will soften quicker and in turn be easier to mix with. Watch my video on how to check if your butter is soft enough. See Photo 1 below.


- Once the cubed butter is soft enough, place in a mixing bowl, or bowl of your stand mixer, and beat until no longer in small cubes. (See Photo 1 above). Use a hand-mixer of stand-mixer to do this, (k paddle attachment if using a stand mixer). You can of course beat by hand with a wooden spoon instead. How long it will take depends how soft your butter is and how powerful your mixer is. Anything from 30 seconds to a few minutes.

- Next add in about half of your icing/powdered sugar (or about 1 cup's worth). You can pre-sieve the sugar or place a sieve over the mixing bowl. Some people don't bother sieving, but if the sugar has any clumps, and is not all an even fine powder consistency, it really is better to sieve it. (Push through the sieve with the back of a spoon to be quicker and make less mess). See Photo 2 above.

- After adding in the sugar, use a clean tea-towel, or stand mixer splash guard, to cover the bowl while you begin to mix together. (See Photo 3 above). Start off on the very lowest speed, (for powdered sugar and flour, this is a must). Then have a check, and increase the speed a little until the sugar is completely mixed in with the butter.
- Use a spatula to scrape any of the ingredients that might be up the sides of the bowl, not getting beaten in with the rest. Scrape them down into the bottom of the bowl, and repeat periodically during the mixing process if needed. See Photo 4 below.

- Now gradually add in more sugar (about ¼ cup/30g at a time), until the mixture is now a smooth thick buttercream. (See Photo 4 above, & 5 below). Depending on the recipe and ratio of butter to sugar, some will be thicker and stiffer than others. For this particular buttercream, that will pipe well-detailed rosettes from a star tipped nozzle, as well as not immediately collapse when layering cake on top, and firm up really nice on chilling, there is slightly more butter.
- Beat in the vanilla extract (try making homemade vanilla extract, it really is the best), and have a taste test. If the buttercream is sweet enough, don't add any more sugar. If the buttercream looks a little too thick, you can add in a tsp of milk at a time, until happy with the consistency. See Photo5 below. (Note how much paler the mixture is now). Like a chef, a baker should always taste test what they are making!


Using & Storing
- As soon as making up the buttercream, I recommend placing into a piping bag (if using), and then either using straight away, or covering the nozzle tip with some cling film/plastic wrap and placing somewhere cool. Placing in the fridge will harden the buttercream, and might make too hard to pipe. So bear this in mind if you do place in the fridge, as you will need to let it soften a little before using. Same applies if you leave in a bowl – well-cover with cling film/plastic wrap.
- Here is the link for the Funfetti Sprinkle Layer Cake that you see in the photos, with a double batch of this buttercream. For how to put together a disposable piping bag, and how to fill with your homemade buttercream, so my Lesson – Assembling & Filling A Piping Bag.

- Homemade buttercream can be left in the fridge for up to 1 month1. In a piping bag with the tip covered in plastic wrap/cling film and a bag on top, in a well-sealed container, or a covered bowl. Let come to room temperature before using, and to remove any air bubbles, mix on low speed with the k-paddle attachment for a few minutes. (Or scrape around the bowl with a flexible spatula).
- Prepared and covered buttercream, is also fine at room temperature, for up to 2 days2.

Freezing & Defrosting
- Buttercream can be frozen for 2 to 3 months3. Freeze in an airtight container with a tight lid. (You don't want any smells from other freezer food, so even wrap the container too). Defrost in the fridge overnight and then leave on a worktop/counter to come to room temperature. Defrosting too quickly and the smoothness of the buttercream can be lost. There will be some textural changes after freezing, which can be rectified by whisking the buttercream.


DIFFICULTY LEVEL: easy, beginner ★
Notes

 Try a different buttercream in my recipe for Egg & Butter-free Chocolate Cardamom Cupcakes With Espresso Buttercream.
Funfetti Layer Cake recipe coming soon.
For more cakes of all descriptions, to use your buttercream on, check out my cake page.
Try a different buttercream in my recipe for Egg & Butter-free Chocolate Cardamom Cupcakes With Espresso Buttercream.
Funfetti Layer Cake recipe coming soon.
For more cakes of all descriptions, to use your buttercream on, check out my cake page.

 Mother’s Day Cakes
Easter & Spring Baking
Holiday Baking
Mother’s Day Cakes
Easter & Spring Baking
Holiday Baking

References: 1,2 Chelsweets @ https://chelsweets.com/ 3 Freezeit.co.uk @ https://www.freezeit.co.uk/can-you-freeze-buttercream/ Additional second and third sources were used to confirm information supplied by the 2 websites named above, as well as information collated from other bakers.

Nutritional Information – I am not a qualified nutritionist and all values are approximate and from website MyFitnessPal.com. Values are based on a yield of buttercream for 12 cupcakes, and 1 serving of said 12 cupcakes. Paste the recipe link into MyFitnessPal.com and find the nutritional values for 1 whole batch.
Join My Facebook Group
Why not also join my – Facebook group Easy Online Baking Lessons, dedicated to this baking lessons website, as well as providing one-on-one support with myself & my team? Be sure to answer all security questions when requesting to join.
Subscribe For More Recipes
Want more great recipes, tips, baking information and newsletters? Then please consider subscribing by adding your email address below. Be sure to check for a confirmation email & respond back, so you can follow me & receive your free emails. Your personal information will not be shared with a third party.
Follow me on social media:
Happy Learning & Baking!
Caro x


BUTTERCREAM TUTORIAL FOR BEGINNERS
Search For Something You Fancy!
Caroline’s Easy Baking Lessons


LOVE LOVE LOVE all of your recipes and tutorials. They are so detailed and amazing. I shared this with my friend who is over the moon now to be able to make a perfect buttercream! Thank you.