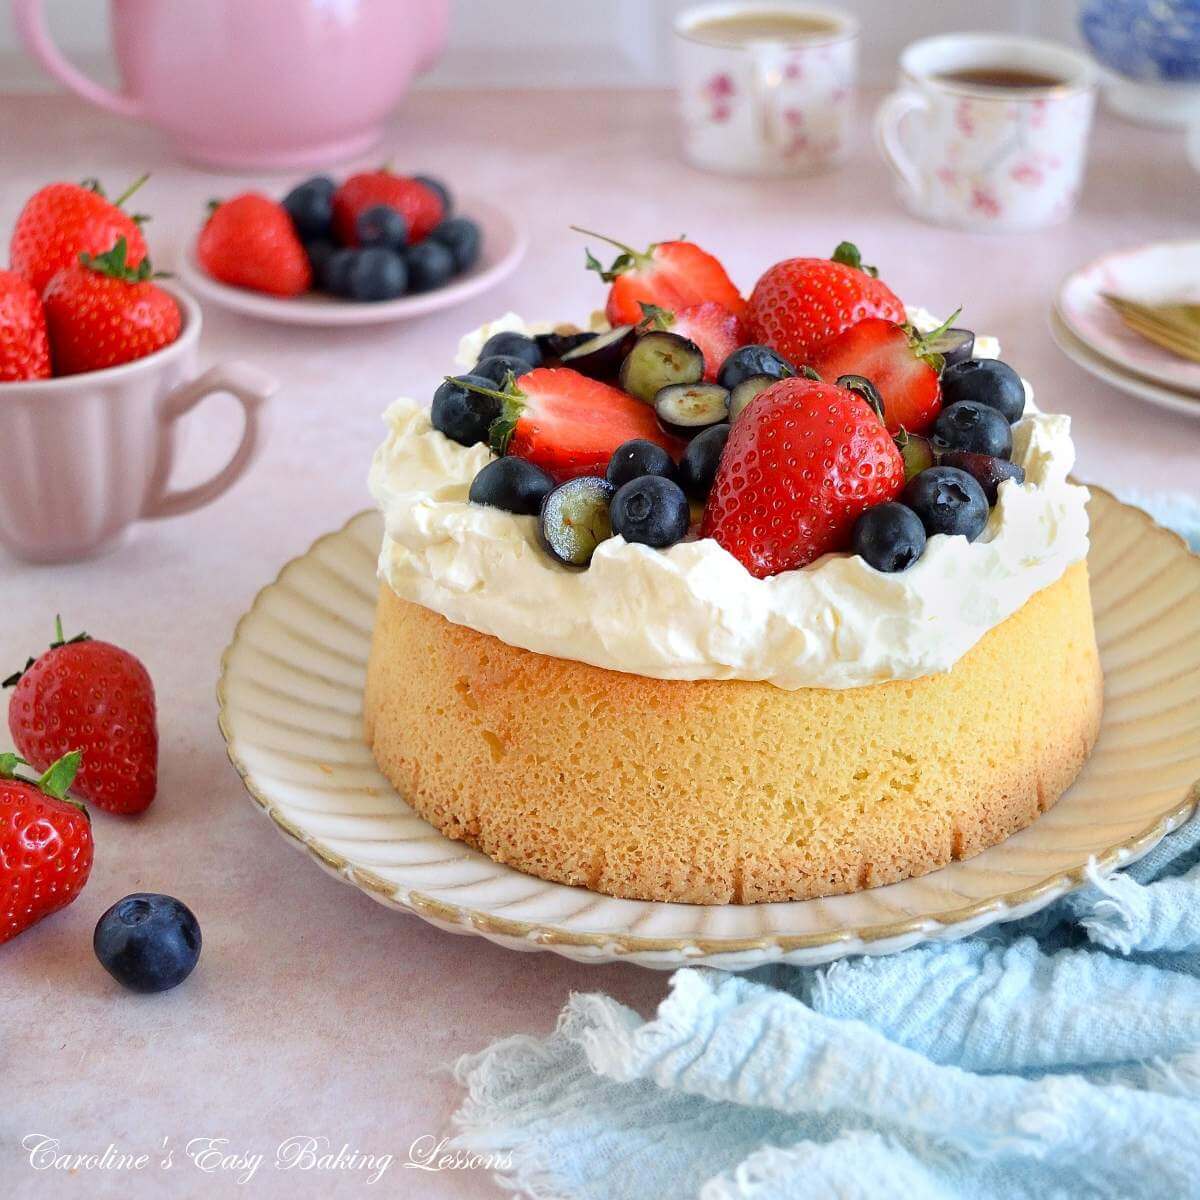
Air Fryer Butter-free Genoise Cake

This air fryer butter-free Génoise cake, is an easy no fuss cake, that fits a small air fryer & doesn't require decorating skills. Just spread on the whipped cream, add fresh fruit & you are ready for your Summer party!
Air Fryer Butter-free Genoise Cake
**This post may contain affiliate links to products I recommend. By clicking my unique links, (and purchasing), I will receive a small commision at no cost to you.**


***Click to jump to section***


What Is An Air Fryer Butter-free Génoise Cake?
This air fryer butter-free Génoise cake is made from a light Génoise-based cake & topped with whipped cream & fresh fruit.
Butter, oil & flour-free, this cake is made from only 3 ingredients. No baking powder or other leavening agent is used in a Génoise sponge, so the magic happens with the whisking of the eggs.
And to make it even better, the cake can be baked in a small basket air fryer.


Why Make This Génoise Cream Cake?
- Easy, beginner recipe
- 4-step process
- Minimal/simple decoration
- Energy & money saving air fryer recipe
- Light, butter & flour-free
- Perfect Summer party dessert


Ingredients & Substitutions
This air fryer Genoise cake is made from the following ingredients:
- Eggs
- Sugar
- Semolina
- Mango Extract or Vanilla*
To Decorate:
- Whipped Cream
- Mango/Vanilla Extract (optional)*
- Fresh berries, mango, grapes etc.
- Lemon curd (optional)*
***All ingredient amounts listed in Recipe Card below***

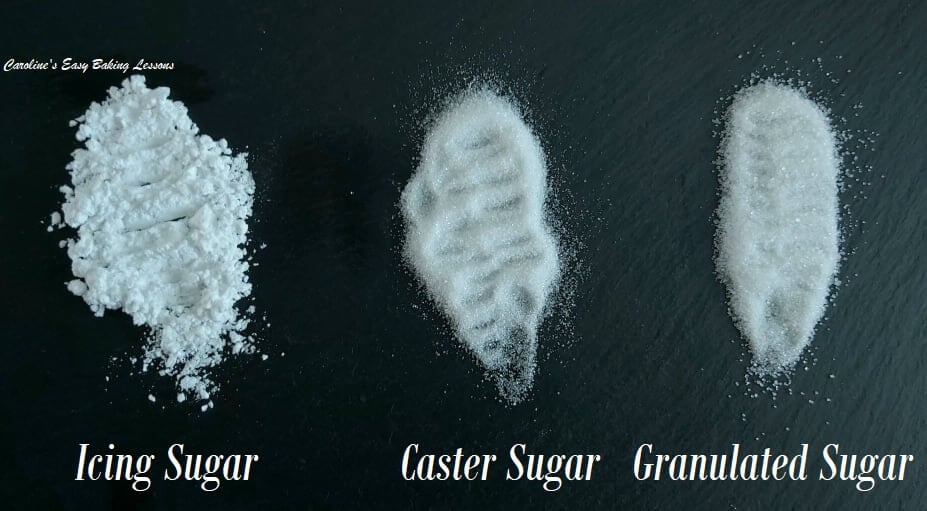
Sugar
Caster Sugar is used in a lot of UK baking & the fine texture works really well (as being very important) for this kind of butter-free cake, helping aerate the batter & raise the cake. US equivalent is Extra/Super Fine sugar, or you can blitz your own from granulated. See my sugar comparison photo for reference.


Semolina
Semolina is used in this cake recipe instead of flour. And only a small proportion too, as the eggs are what’s working the hardest to form & raise the cake.
Fine or course semolina (as shown in the photo), are both fine to use and have used both in recipe testing. You can find this easily and inexpensively in Asian food stores & in the foreign foods aisles of supermarkets. It is available online but a lot more expensive.
See the photo here of the fine & course semolina (check out the video too).


Other Uses For Semolina
You also have no need to worry about not using the left-over semolina, as it works great in other recipes too. Semolina works great sprinkled underneath & top of pizza dough. (My oldest son once said my pizza tasted like Dominoes pizza & I believe it was the semolina crust).
Try on the crust of Turkish cheese Pide too (as shown in the photo). Similarly, sprinkle semolina on top of homemade ciabatta bread. Semolina can also be used in place of rice flour to line a banneton for sourdough bread.


Extracts
You can use vanilla extract in the cake batter. This gives a nice classic vanilla cake taste – try making your own vanilla extract, or alcohol-free extract.
An amazing alternative, is to use Foodie Flavours mango extract. This highly concentrated extract works great in the cake, as well as giving an unexpected twist by also adding to your whipped cream. Try the extract in my Mango Cranberry Air Fryer Scones,
**Full disclosure – Foodie Flavours gifted me this extract to try out. No paid promotion, just honest feedback by a regular baker & recipe developer. Only products I use, love & trust, will ever be promoted or recommended.
However, a good alternative would be Foodie Flavours Passion Fruit extract, that you can buy from The Craft Company & if you use my affiliate link (above), I will receive a small commission, at no extra cost to you.
Eggs
UK medium to large eggs used & US equivalent is large to extra-large. Make sure to use the eggs at room temperature for best results.


Cream
Add some nice whipped cream to the cake. Whip up Double (Heavy/Whipping) cream or use a plant-based alternative. Try some of the mango extract in the cream, for an unexpected taste.
Fresh Berries
Fresh berries go great with this cream cake and any combination can be used. Strawberries, blueberries, mango to tie with the mango extract. Halved grapes was also really nice with the cream. Raspberries, kiwi & pineapple would be nice too. Just don’t add the fruit (especially if sliced or halved), until you are ready to serve. Just to preserve the integrity of the cake texture.
Lemon Curd
A little lemon curd (or other curd or jam), is nice on top of the cream.


***Please only add curd if you are serving soon as it can start working its way down the cake, even with a cream border. A little drizzle of the curd/jam on top of the fruit would probably work too**.
Equipment
All the equipment you need to make this Genoise cake are listed in the Recipe Card below, but the only essentials are an electric mixer (mainly for the beating of the egg white & the egg yolks & sugar.)


A 6″ (15.25cm) round deeper cake tin is used. (A depth of at least 7cm (2.75″) is ideal). This fits even in my small basket air fryer. A shallow sandwich tin would not be deep enough. The cake does rise a little and you don’t want it to touch the inside of the air fryer.
For other sizes of cake tins, (in larger air fryers or regular ovens), see my How To Increase A Recipe article, or How To Reduce A Recipe, both with all the calculations you need as well as worked examples.
Air Fryer
I recipe tested this cake in my small 3.5 litre (3.1 quart) basket air fryer. (See the collage photo here).
The basket of this air fryer is 17cm (6.75″) wide so the 6″ tin is ideal. Make sure to elevate the cake tin a little for even baking.


Recipe Yield
This recipe makes one deep 6″ (15.25 cm) round cake. with a yield of 6-8 slices.
More Génoise Cakes
Like these Genoise cakes? Or butter-free cakes? Then try this similar but layered, berries & fruit cake – Summer Berry Grietorte as seen in the photo.
Or how about Lamingtons, with coconut & jam or chocolate coating?
Step-By-Step Instructions


1.Start by checking the dimensions of your air fryer & if a 6″ /15.25cm round cake tin, by 7cm 2.75″ deep, will fit.(See the Equipment section above for more details).
2.Seperate your eggs carefully, trying not to get any egg yolk into the whites. (Some white in the yolks is fine).
3. Before starting to whisk the eggs, ensure your mixer and bowl is free of grease with this tip:
*TOP TIP – rub half a lemon on the bottom of your bowl and on the mixer beaters. This reduces the chances of your egg whites not whipping up enough.
3.Whisk the egg whites in a medium bowl, on high & until stiff or firm peaks are formed. See Photo collage 1. **Learn more in my Meringue By 3 Methods lesson, where I go through the ‘3 peaks’. Or, watch the meringue video.


4. In a large mixing bowl (or stand-mixer bowl), add the egg yolks, followed by the sugar.
5. Whisk the egg yolks & sugar together (no need to clean the beaters before using them).
6. Watch the mixture transform from a yellow thick wet sand look to a much paler in colour (almost cream coloured), smooth & liquid batter, that will also have increased in volume too. This can take a few minutes on high speed but you can test if whisked enough by performing the ‘ribbon test’ or ‘trail test’.
7.Use the beater (or spatula) to lift up some of the batter & observe how it falls back into the bowl. If it leaves a ‘trail’, that does not disappear immediately (at least 2 seconds is good), you know you have beaten enough & incorporated enough air into the batter (which remember will have no baking powder in).
Another way to test is to try & ‘write’ a number 8 on the top of the batter. If the beginning of the ‘8’ is still visible by the time you have finished ‘writing’ the 8, this is whisked enough. See Photo collage 2 & the video below (sign into your YouTube if needed).


8. Next, add flavouring in the form of vanilla extract or my new favourite – Mango extract! Try making your own vanilla extract, even an alcohol-free vanilla extract at home. Here I am using Foodie Flavours’ professional concentrated mango extract. Add 10 -14 drops (sometimes hard to see if they are coming out), or about 1 tsp if you have another brand of mango extract.
9.Now take about 1/3 of the whisked egg whites & add to the yolk/sugar mixture. ‘Fold in’ the whites, using a plastic/silicone or rubber spatula (not a metal spoon). ‘Write’ a figure 8 in the batter, where the batter is the ‘paper’ & the spatula your ‘pen’.
Very gently work the whites in, not needing to be fully incorporated yet. But be very careful not to deflate & knock out the air you just took time to incorporate.
See Photo collage 3.


10. Follow on with the 2nd amount of whites, folding in as before, then repeat a 3rd time. By this stage it will be much easier to fold, as the batter has loosened off.
11. Now add in 1/3 of the semolina, folding it in (again not 100% of the way), before repeating with two more increments. With the final addition, ensure it is all fully incorporated & check for any semolina at the bottom of the bowl.
See Photo 4 & the video for reference, and how thick the batter is. In Photo collage 5 below, you can see how the batter falls back into the bowl. Indicating we have a good amount of air in the batter, & so a cake that won’t bake off dense.


Greasing The Cake Tin
1.Well grease the bottom & up the insides of the 6″ (15.25cm) round cake tin. Here I used homemade lining paste (cake goop). Brushing generously in upward strokes. Alternately, I sometimes use FryLight cooking spray, but cake release spray or butter & flour will work too.
2. Then paper line the bottom of the tin with baking/parchment paper. I always recommend cutting the paper by this easy method, to stop paper baking into the cake & to ensure an easy release of the baked cake. See my how to cut paper rounds article, or the cutting parchment rounds video. See Photo 5.


Baking The Cake
1.Preheat your air fryer, if it needs it (to: 150°c/300°f). If using a regular oven, 170°c/150°c fan oven/335°f & gas mark 3.5
2.Very carefully pour the cake batter into the prepared tin, letting it fall itself into the tin. Then scrape the sides of the bowl gently for the remaining batter. Finally, shake the tin a little to level off the batter.
3.Pop into the air fryer basket (I placed on top of the shallow drip tray to allow for a little heat underneath.) Bake for 35 minutes without opening the air fryer! This is very important. If you open at anytime in-between this, you run the risk of it deflating in the centre (especially so with a flour and baking powder free cake).


4.After 35 minutes, open the air fryer and check for signs the cake is done. It will have risen, have a distinctive Genoise beige crispy crust to the top (do not push on the top). The cake will be starting to come away at the sides. Gently insert a wooden cocktail stick into the cake, about 1cm (1/3″) in from the edge & let the stick go almost all the way down. it should come out clean of any crumbs. If there are any, return to the air fryer and continue baking for 5 minutes more. Check again till no crumbs remain.
5. Leave the cake in the tin, placed on top of a cooling rack for at least 1 hour. I find for this depth & kind of cake, this helps it set up better.


6. Place a plate, cake stand or platter on top of the cake, hold altogether & turn over. Tap the tin to release the cake. **You might need to run a plastic knife or cocktail stick around the edges first.
Alternatively, you can turn the cake out onto a cooling rack, lined with a doubled over clean tea-towel & piece of baking paper (this all stops lines from the rack forming on the cake). See Photo collage 8.
7. Carefully peel back the paper circle & leave the cake to cool completely before decorating. **You can leave the cake undecorated for up to 3 days. Just wrap in cling film/plastic wrap once completely cooled down 7 leave out at room temperature.
Preparing The Cream
1. Whip up the double/heavy/whipping cream now, or even the day before. Simply add to a medium mixing bowl or stand-mixer & whip with the beaters( balloon attachment for a stand-mixer).


Beat on medium to high speed, ensuring you go all around the bowl if using a hand mixer, until you have thick cream that holds its shape. The cream will cling to the beater, sometimes with peaks and the cream in the bowl will have peaks too.
***Be careful not to over-mix (where it will start to go a yellow colour & look clumpy). This is essentially you making butter. But don’t worry if you do – just read my how to make butter & buttermilk lesson
2.Add 1/2 tsp vanilla extract if you like (we don’t usually add vanilla or any icing sugar, but now love also adding the mango extract to the cream). Add 5 drops of Food Flavours’ mango extract, or *1/2 tsp other mango extract. Then fold in gently to combine. Cover with cling film/plastic wrap & place in the fridge until ready to use.


Decorating The Cake
*****Only decorate the cake if serving no more than 30-60 minutes later. The weight & moisture of the fruit, can pull down the delicate cake. Adding lemon curd is optional but only advised if serving straight away.*****
1.Start by adding the whipped cream to the top of the cake. Make a ring around the centre, then add to the middle, using a spoon to make a slight recess. Here you can add some lemon curd or other jam you like.
***But only add if serving right after decorating as it will start to work down the cake.***
2. Add whole strawberries, strawberry halves and/or slices. Mango pieces, blueberries & even grapes on top of the cream.


3. Serve immediately (if you used lemon curd), or within 1 hour, & place in the fridge during this period.
4. Cut into 6 – 8 slices. Serve as it is, with a favourite hot tea or coffee. There will be plenty cream left over, so can be served on the side with more fruit if desired.
5. Left-over cake can be stored in the fridge, with cling film/plastic wrap on top for up to 24 hours. After that, the texture deteriorates, and will become moist from the fruit. Still very edible and tasty, just not looking as good or fit for presentation.
6. Alternatively, store the cake layer itself, as mentioned above, for up to 3 days before decorating.
Other fruit toppings below – strawberries, green grapes & mango


Recipe card
Butter-free Air fryer Cream Cake

Equipment
- Digital scales or measuring cups
- Measuring Spoons
- Electric Hand/stand mixer
- Medium Bowl
- 6" (15¼cm) Round Cake Tin (at least 7cm (2¾″) deep)
- Spray, lining paste or butter for greasing (try homemade lining paste)
- Wooden Cocktail stick
- Cooling rack
Ingredients
For The Sponge:
- 3 Medium Eggs (Medium to large, US large to extra large)*
- 125 grams Caster Sugar (4½ oz, rounded ½ cup Extra/Super Fine Sugar*)
- 12 drops Mango Extract (or 1½ tsp Vanilla Extract*)
- 75 grams Semolina (2⅔ oz, fine or coarse*)
For Decoration:
- 120 ml Whipping Cream (4 fl oz, 1 cup after whipping. Double, heavy or whipping cream*)
- 5 drops Mango Extract (for the cream, optional)
- Fresh berries & other fruit (about 5 medium strawberries, 8 blueberries, etc*)
Instructions
Prepare The Air Fryer
- Make sure your air fryer can take a 6″ (15¼ cm) round cake tin, by at least 7cm (2¾″) deep. If not see notes below for different sizes.
Prepare The Cake Batter:
- Seperate the 3 Medium Eggs without getting any yolk into the whites. Then rub a half lemon on the electric mixer's beater(s) & on the bottom of the medium mixing bowl to eliminate grease & make the whites whip easier.
- Next, whisk the egg whites on medium to high speed until stiff or firm peaks are formed. Try lifting the bowl upside-down or just try shaking the bowl to see if it's going to move or not.
- In a stand-mixer or large mixing bowl, beat the egg yolks and 125 grams Caster Sugar together (no need to clean the beater(s). Beat on high until the batter is much paler in colour, increased in volume & leaves a 'trail'. See the Step-by-step instructions before this for more, or check out the video for the 'ribbon/trail test' to determine if you have whisked enough. Do not proceed to the next step if you need to whisk more.
- Add the vanilla extract* or Foodie Flavours 12 drops Mango Extract to the egg yolk/sugar mixture. Then add about ⅓ of the whisked egg whites before gently 'folding in'. Use a rubber, silicone or plastic spatula & if you don't know how to 'fold' without knocking out the air you just incorporated, see the step-by-step directions above or the video. This really helps the cake to rise properly. But no need to incorporate 100% as we will add 2 more increments of the whites.
- Once you have added all the whites in, next add the 75 grams Semolina, again in 2 or 3 increments to help work it in carefully. The batter should still be very thick & leave a trail.
Prepare The Cake Tin:
- Well grease up the sides & bottom of the 6″ (15¼ cm)round cake tin. Try homemade lining paste (cake goop), cake release spray, or butter & flour. Then paper line the bottom with a circle of baking/parchment paper.
Baking The Cake:
- Pre-heat your air fryer if it is needed (to 150°c/300°f. (For a regular oven 170°c/150°c fan oven/335°f & gas mark 3.5).
- Gently let the cake batter fall into the prepared cake tin, then scrape the sides of the bowl, before shaking the tin to level off a little. Place inside the air fryer basket (or centre of an oven) & bake for 35 minutes without opening the air fryer/oven before this time.
- Then check the cake has risen, will have a crispy Genoise beige crust (do not press on the top)***. Gently try a wooden cocktail stick, about ⅓" (1cm) from the edge & insert most of the way down. It should come out clean of crumbs. If not, return to the air fryer/oven & bake for 5 minutes or until done.
- Leave in the tin & place on top of a cooling rack for at least 1 hour. Then turn out the cake onto a tea-towel topped cooling rack, cake stand orserving plate. (**Run a plastic knife or cocktail stick round the edges if needed). Carefully peel off the paper & leave to cool before decorating. Alternatively, wrap in cling film/plastic wrap once cooled, and leave out at room for up to 3 days, before decorating.
Whipping The Cream:
- Whip the 120 ml Whipping Cream till peaks form and then add 5 drops Mango Extract or 1/2 tsp vanilla extract if you like.
- You can make the cream a day ahead and just cover well with cling film/plastic wrap and store in the fridge till ready to use.
Decorating The Cake:
- ***Decorate the cake only when intending serving within 30-60 minutes as weight & moisture of the fruit & curd can pull down the soft cake. Adding curd is optional & only if serving soon.***
- Spread on the whipped cream & add a little lemon curd in the centre (optional).
- Half or slice some strawberries, blueberries, mango, grapes etc & then gently place on top of the cream-topped cake.
Serving & Storing:
- Serve immediately (especially if using the lemon curd) or within 60 minutes. Cut into 6 – 8 slices & enjoy with left-over cream & more fruit if desired.
- Any cake left-over can be stored in the fridge, with cling film/plastic wrap on top & is best if consumed within 24 hours. Moisture from the fruit, curd & fridge will impair the delicate texture of the cake so a good reason to eat more cake!
- Alternatively you can store the undecorated cake layer as instructed above, for up to 3 days before adding the cream & fruit.
Video
Notes

 Semolina – fine or coarse semolina both work well. See before the step-by-step instructions for more info.
Extract – highly recommend using Food Flavours mango extract in the cake and in the cream. Passion fruit and vanilla extract are good too.
Semolina – fine or coarse semolina both work well. See before the step-by-step instructions for more info.
Extract – highly recommend using Food Flavours mango extract in the cake and in the cream. Passion fruit and vanilla extract are good too.

 Fruits – use any of your favourite fruits for the top. ***Make sure to not add the fruit and lemon curd if not serving very soon***.
Yield/Servings – the 6″ cake can serve 6 – 8 slices. 6 slices being decent sized.
Air Fryer – This cake was recipe tested in a small basket air fryer, that holds nicely a 6″ (15.25cm) wide round & deep cake tin. But can be made in a regular oven, just use the alternative temperatures listed.
Fruits – use any of your favourite fruits for the top. ***Make sure to not add the fruit and lemon curd if not serving very soon***.
Yield/Servings – the 6″ cake can serve 6 – 8 slices. 6 slices being decent sized.
Air Fryer – This cake was recipe tested in a small basket air fryer, that holds nicely a 6″ (15.25cm) wide round & deep cake tin. But can be made in a regular oven, just use the alternative temperatures listed.

 Alternative Tin Size – see my how to increase a recipe article, or how to reduce a recipe or take a look at the Genoise Summer Berry Cake recipe with different depths of layer cakes.
Nutritional Information – I am not a qualified nutritionist and all values are approximate. These are based on using the ingredients as listed above, using all the cream & fruit (5 medium strawberries & 8 blueberries). I serving is 1 slice, calculated assuming a yield of 6 decent sized slices. Make bigger or smaller slices & these values will change. All values calculated via MyFitnessPal.com.


Subscribe For More Recipes
Join My Facebook Group
Why not also join my – Facebook group Easy Online Baking Lessons, dedicated to this baking lessons website, as well as providing one-on-one support with myself & my team? Be sure to answer all security questions when requesting to join.
Follow me on social media:
Happy Learning & Baking!
Caro x

Air Fryer Butter-free Genoise Cake
Search For Something You Fancy!
Caroline’s Easy Baking Lessons


Everyone in our house loved it and it is never around long enough to see how long it would last. So this is my best feedback!