90 Minute Pizza -Oven or Air Fryer

These 90 Minute Pizzas can be made in the oven or air fryer. Using a different mixing technique, total time can be reduced by 33 - 50% making them an easier weekly treat!
90 Minute Pizza – Air Fryer Or Oven
Savoury Lesson No.6


**Click link to jump to section**


What Is This 90 Minute Pizza?
This 90 minute pizza recipe is a smarter and quicker way to make a regular yeast-based, thin or deep crust pizza. Made partially with wholemeal/wholewheat flour, this pizza is a little gentler on your stomach. Topped with a basic herb-filled tomato & cheese layer, you can add extras such as meats or vegetables.
Recipe Inspiration
All my quicker bread recipes are an adaptation of a quicker method I discovered in the book ‘Easy Culinary Science For Better Cooking’, by Jessica Gavin (2018). She used a revolutionary method for preparing yeast-based doughs, that reduces the total time quite considerably.


Why Make This Recipe?
- Easy to make & a beginner’s recipe
- Step-by-step instructions & photos
- No special equipment
- Can be ready in 33 – 50% quicker than other recipes
- Bake in oven or air fryer
- Use air fryer & bake in hotter Summer months
- No special baking skills required
- Dough can be made ahead
- Taste great
- Adjust the herbs & toppings
- Video Tutorial
Find more energy & money-saving recipes & tips in my Baking On A Budget Series. Check out my Cello double air fryer review.


About The Quicker Bread Series
As mentioned above, this quicker method is my go-to way to prepare yeast, and you can find more quicker recipes like 90 Minute Burger Buns , or Quicker Tear-&-Share Dinner Rolls, in my Bread & Rolls page.
But what is this quicker method I hear you ask? Well, the way the ingredients are added is slightly different and takes you maybe 5 – 10 minutes longer than regular methods, but the proving time is drastically reduced. Recipes can be reduced by 1/3 to 50% compared to conventional methods.
How is this possible you ask? Well basically we are providing the yeast with its optimal environment to thrive and work quicker.
This quicker proving time does not affect the quality, taste or texture of the bake. For a true depth of flavour, you are looking for a slow prove such as leaving to rise in the fridge overnight. Proving for 1.5 – 2 hours does not do that.
Ingredients & Substitutions


My 90 Minute Pizza recipe is made from the following ingredients:
- Flour
- Yeast
- Salt
- Sugar
- Garlic Powder/Herbs
- Extra Virgin Olive Oil
- Tepid Water
- Eggs
For The Topping:
- Canned Tomato
- Herbs & Seasoning
- Cheese
- Meat (optional)
**Note ingredient amounts are listed in the Recipe card).


No special ingredients are required for the dough, just the inclusion of eggs & oil to enrich the dough and some garlic or onion powder for some flavour, which is optional.
Flour & Batches
Choice Of Flour – I made these pizzas with a combination of whole-wheat/wholemeal and plain (All Purpose) white flour, and so are a little healthier & better for your stomach, but tastes just as good.
If you want to make with all white flour, please reduce the water content to 360ml (1.5 cups, 12 fl oz). This is because whole-wheat flour absorbs more fluid than regular white flour. But why change the flour, when it works? Nobody could tell from eating it that it wasn’t all made form white flour. The only visible difference is the slight colouring of the dough.

A Note On The Flour Division
Please note the flour is separated into 3 amounts, as they need to be added in a specific way, and are referred to as [F1], [F2] & [F3] – flour 1, 2 & 3. This method works really well, and once you have done a few times, you really don’t need to refer to the recipe. And it’s the same process for making the dough, in all the quicker bread recipes of mine. So stick with the recipe and you will achieve the same result.
Yeast
This quicker pizza recipe was developed using both Active, Fast Acting & Instant dried yeast. If you want to use fresh yeast, see my Yeast Conversion Tables.


Eggs & Oil
All my quicker yeast recipes use eggs and oil. Typically I use Extra Virgin Olive Oil, but Virgin Olive Oil or Olive Oil will work too. Egg whites are usually used and the yolks kept for egg washing, but since we don’t need that for pizza, I have reduced the amount of egg whites slightly and used whole eggs so as not to have leftover egg yolks. Note too that UK medium to large eggs equate to about large to extra large eggs in US.
Topping – Cheese
The original recipe uses cheddar cheese, and best with Scottish extra mature cheese (a kind of extra sharp cheddar cheese). Use the yellow or orange coloured one. Alternatives are grated/shredded mozzarella or other hard cheddar, with mozzarella being added towards the end of baking as the mozzarella will burn easier.


Tomato Topping
You can make a basic tomato topping with tinned/canned tomatoes, tomato pieces or in the photos here, I have used Mutti Pola that is like a roughly blitzed kind of tomato. **We were reviewing this product so if you try it, let me know what you think.
To spread the mixture further, I often add a little tomato or pepper paste and a little water or you can make just from paste alone, but remember to add less water.
**Top Tip – add some smoked paprika to thicken your sauce if needed.


Herbs & Seasoning
You might already have your favourite herbs & seasoning if you make your own tomato sauces, but I love to use garlic. Garlic powder/granules is very convenient especially for quick meals. Recently I have been obsessed with Aldi’s Ready Steady Cook range, & the Garlic Mix in particular. It is a seasoning mix predominantly made up of garlic & rosemary & must be popular as often I can’t find it. Other herbs like ‘Mixed Herbs’, ‘Italian Herbs’, Oregano, basil etc go really well too.
Extra Toppings
Add any favourite toppings but bear in mind the amount of time for them to cook, perhaps slice thinner.


But also be aware that some ingredients will catch and burn quicker than the bake time. So for some of these pizzas in the photos, I used Turkish Sucuk – a type of aged slicing sausage. This can dry out in the oven, so on testing it was better to add the slices, half way through baking. I was out of spinach but luckily still had a basil plant, so that finished off these pizzas nicely!
Air Fryer Or Oven
This recipe was originally developed using a conventional oven, regular or fan oven. But has further been tested in an air fryer.


You can make in an open front large air fryer (similar to a mini countertop oven), making sure there is space above and below the pizza. You can adjust the diameter of the pizza base too to be able to fit the width of your open-front air fryer. *Read my Cello double air fryer review.
Recipe Yield
This recipe makes several pizzas, and depends on the thickness you make them. It can make:
- 4 Thin Crust
- 3 Thin + 1 mini deep
- 2 Deep crust
- 3 Regular Crust
ALL RECIPES CONVERTED & TESTED
All of my recipes include conversions in grams, ounces and cups. All been calculated by hand, by myself and tested several times, since Google is often inconsistent and inaccurate. I also have a conversion table, with common baking ingredients for you to refer to in my Baking Conversions Table.


Lessons Bakers
Beginner Bakers, please ALWAYS read the recipe directions a few times before even attempting to make the recipe. Often things like butter or eggs need to be taken out to bring to room temperature.
Experienced Bakers can skip to the Recipe Card below with abbreviated recipe instructions or check out the step-by-step directions below.
Jump to RecipeStep-By-Step Instructions
(*Note ingredient amounts are listed in Recipe Card below)
1. Have the 3 amounts of flours weighed or measured out in separate bowls – you can use the stand mixer bowl for the first whole-wheat flour, referred to as [F1].

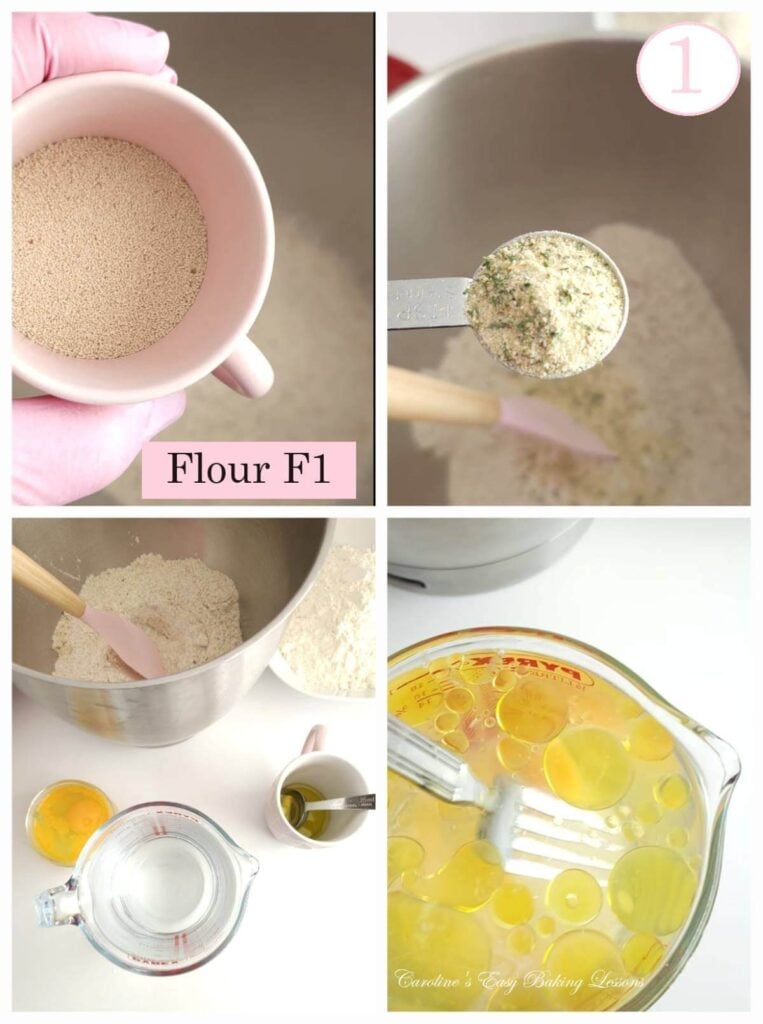
2. Mix the yeast in with the flour & mix to coat well before adding in the salt, sugar & herbs, mixing in-between each addition.
3. Place the oil and water into a microwave safe bowl or jug and heat for 30 – 45 seconds until just a little warm (120°f-130°f, 49°c-54°c). Alternatively use some hot water and cold water and check the temperature once mixed. It should be just above tepid, which you can check with your finger or on the back of your wrist like you would do with baby milk. Just make sure not too warm or it can kill the yeast.
4. Add the eggs and olive oil to the tepid water and whisk a little to combine. (See Photo 1).
5. Add all of the wet mixture to the mixing bowl that includes the F1 flour (which in this case is wholemeal/wholewheat flour).


6. Mix with the ‘k-paddle’ to begin with (not the kneading attachment), for exactly 2 minutes. be sure to time it as important for the recipe. Then leave to rest for 2 minutes, while the whole-wheat flour gets a chance to absorb the liquid. *Note this extra 2 minutes is not required for white flour.
7. Now add in the smaller bowl of white flour [F2], and mix again for 2 minutes. See Photo 2.
8. Switch to the kneading/dough hook attachment & slowly add in the last flour – [F3]. You might not need it all, (or a little more), but you want a dough that starts to come together as a very rough ball around the paddle. So mix for 10 seconds after each addition of flour and wait to see the ‘ball’ of dough. Note that the dough will be a bit sticky. See Photo 3 below.


9. Knead on medium speed for 4 minutes. During this time you can start preparing the topping and grating/shredding the cheese.
10. Using a rubber or silicone slim spatula, scrape the dough off the bowl from down the sides. Tilt the bowl, put on its side, so you can see the bottom. Continue scraping the dough out towards the top of the bowl. Oil (or spray oil) your dominant hand & ease the dough out and turn it over so the dough is flipped over.
11. Alternatively, just flick the dough over with a silicone spatula. Place the bowl back on the mixer & continue kneading for another 4 minutes. The dough does tend to stick at the bottom when kneading, & this is another reason why we turned it during kneading. (See Photo 3)


12. Once the total kneading time is up, the dough will be forming a ball and cleaning the sides of the bowl. Have a feel of the dough to know how well kneaded dough feels. (Note that dough with whole-wheat/meal flour will not feel quite as soft as white flour). Notice how stretchy it is when you lifted the dough hook up. Scrape any dough from the hook and into the bowl.
13. Now place a tea-towel on top of the bowl & leave somewhere warm & draft free for 15 minutes. See Photo 4.


14. While the dough is proving, you can make the tomato sauce. (Alternatively make before preparing the dough, or during kneading).
15. Add oil to your pot and fry the fresh garlic or tomato paste if using, just briefly for 10 – 15 seconds before adding in the chopped tomatoes.
16. Add salt, sugar, pepper, garlic powder (if not using fresh garlic), onion powder and any other seasoning you like. Then add a little boiled water to the tomato mixture & bring to a boil for a few minutes before reducing the heat to medium-low, and allow to simmer for 10 – 15 minutes.
Alternatively, just begin by adding the can of chopped tomatoes to the pan with seasoning, bring to a boil and simmer to thicken & reduce down. You can process/blitz the sauce if you like a smooth sauce. See Photo 5.


17. After the 15 minutes proving time, the dough should have risen quite noticeably (see the comparison pics in Photo 6). You need to ‘knock back’ the dough at this stage, (basically just deflating the dough by pushing your knuckles down on the surface of the risen dough – see Photo 6).
And this must be done to help redistribute the yeast to ensure rising once baking. So an important step not to be missed.
18. Place baking/parchment paper down on your counter/worktop, dusted with flour, before using a spatula to release the dough out & onto the paper.
19. Sprinkle flour on top of the dough and on your hands and form the dough into an even circle.


20. The dough will weigh about 1670g/59 oz and you can divide the dough by eye or weigh it. But this depends on what kind of base you want.
- For 4 thin pizza bases, divide by 4.
- For 3 thin & 1 mini deep pizza, divide dough into 4.
- For 2 deep, half the dough
- For 3 regular crust pizzas, divide by 3.
21. Form your piece of dough into a disc shape and then roll out on top of floured paper or surface, with a floured rolling pin until 10-11”/25.5-28 cm in diameter & transfer to the paper lined baking sheet/pizza tray. (See my video on cutting paper circles for baking/cooking).


22. Next spread about 4 – 5 soup spoons worth of the prepared tomato sauce on top of the pizza base, going right to the edges. See Photo 7 above.
23. Alternatively you can make a pizza base with a thicker crust, or even a cheese stuffed crust. Simply roll out to to 11”/28cm, then use your fingers to make an indent about 1″/2.5cm from the edge of the dough.
24. Repeat to make the indentation deeper, whilst at the same time using your opposite hand and pushing against the edge of the dough, towards the indent. Repeat this to make this edging deeper than the centre of the dough. You can also press out the dough from the centre, with your palms, to make it thinner in the middle. See video for a visual on this.
25. Add topping just to the centre of the pizza.


26. Bake the pizza in a pre-heated oven @ 190°c/170°c Fan Oven/375°f/Gas Mark 5, (or in your open-front air fryer, only pre-heating if your particular machine requires this). **For powerful/very new air fryers, I recommend using the lower temperature of 180°c/350°f.
27. Bake for 15- 20 minutes until the crust is baked all the way through and the topping is ready. For these Sucuk pieces (Turkish aged meat), I added them half-way through cooking to prevent them from drying up. Same can be done if you are using Mozzarella. Note the thin crust will bake quicker so check after 12 minutes.
28. Leave to cool on top of a cooking rack for about 5 minutes before removing the baking tray/sheet and leaving to cool a little more before trying to cut.


29. Slice the pizza into 12 triangles & enjoy!
30. Store left-over pizza in the fridge covered or in a food bag.
31. Re-heat pizza by placing in the oven/air fryer, with another baking tray/sheet on top to stop the top of the pizza from burning, and allow to heat through.
32. Ready-made or rolled pizza bases can be frozen (with no topping). Just wrap in paper then cling film & a labelled food bag, for 3 – 4 months1 . Defrost at room temperature or overnight in the fridge. Allow to come to room temperature before adding toppings and baking.
More information & tips can be found at Freezeit.co.uk. Alternatively, pizza dough can be made up to 3 days before using, if stored in the fridge, or made the day before topping and baking.
DIFFICULTY LEVEL: beginner, easy with guidance
Beginner bakers completing the lessons, please read the step-by-step instructions again before attempting to bake. Save the Recipe Card below but refer back to the detailed instructions & notes, as the Recipe Card is an abbreviated version of the recipe.
After completing this lesson, proceed to Theory Lesson 13 – Whisking Egg Yolks & Sugar To The Ribbon Stage.
Recipe Card
90 Minute Pizza – Quicker Baking

Equipment
- Scales of measuring cups
- Stand Mixer with dough hook (optional)
- Small to medium microwave-safe bowl/jug (Optional)
- Food thermometer (optional)
- Measuring Spoons
- Baking/parchment paper
- 2 Baking sheet/trays (or pizza trays)
- Tea-Towel
- Rolling Pin
- Cooling rack
Ingredients
For The Dough
- 250 grams Wholemeal/Wholewheat Flour F1 (8¾ oz, 2 cups, OR All Purpose Flour, Strong/Bread Flour*)
- 2 tsp Salt
- 2 tsp Garlic/Onion powder/granules (or favourite herbs – try Aldi Garlic herb Seasoning*)
- 2 tbsp Sugar
- 14 grams Dried Yeast (½ oz, 2 x ¼ oz/7g packets, 4½ tsp Instant or 5 tsp Active)*
- 400 ml Tepid Water (13½ fl oz, 1⅔ cups, @49-54°c/120-129°f)*
- 2 Eggs (Medium size, Large US egg)
- 4 tsp Extra Virgin Olive Oil (20ml, other oils in Notes)*
- 125 grams Plain Flour [F2] (4½ oz, 1 cup, All Purpose or Strong/Bread Flour)*
- 190-250 grams Plain Flour [F3] (8¾ oz, 2 cups, All Purpose Flour or Strong/Bread Flour)*
For The Topping
- 250 grams Extra/Mature Cheese (8¾ oz, extra/sharp cheddar, grated/shredded)
- 400 grams Tinned/Canned Tomatoes (14 oz, about 1¾ cups, whole, chopped, crushed)
- Onion slices, pepper slices, Sucuk, basil, spinach etc. (optional)
- 1 tsp Sugar
- Salt & Pepper (to taste)
- 1-2 tsp Garlic Powder/Granules (Or Italian Herbs, Mixed Herbs, Aldi Garlic Mix*)
- * Denotes see Notes
Instructions
Prepare The Pizza Dough
- Have all 3 amounts of flour measured/weighed out in separate bowls – 250 grams Wholemeal/Wholewheat Flour F1 can be in the mixer bowl. Add the 14 grams Dried Yeast and mix to combine before adding in the 2 tbsp Sugar, the 2 tsp Garlic/Onion powder/granules & 2 tsp Salt, mixing in-between each addition.
- Heat the 400 ml Tepid Water in a heat-safe jug in the microwave, for 30 – 45 seconds until a little warm and tepid, with a temperature of (120°f-130°f, 49°c-54°c). Alternatively, mix cold & hot water & test with your finger for a tepid temperature, similar to temperature for baby milk.
- Add the 4 tsp Extra Virgin Olive Oil & 2 Eggs to the warm water & mix together before adding to the mixing bowl. Use the 'k' paddle/mixer paddle attachment on your stand mixer, and mix for 2 minutes, on medium speed, being sure to time this.
- Add in 125 grams Plain Flour [F2] , (the smaller one), and mix again for 2 minutes.
- Add half of the 190-250 grams Plain Flour [F3] & switch to the dough/kneading hook before mixing for 30 seconds. Gradually add more flour till it starts to come together as a slightly sticky rough ball. You might not need all the flour or a little more.
- Knead on medium to high speed for 4 minutes, flip the dough over and continue kneading for 4 minutes. Alternatively knead by hand on a lightly floured surface for 10 minutes till relatively smooth & a little less sticky.
Prove The Dough
- Remove the dough from the kneading hook, cover the bowl with a clean tea-towel and place in a warm draft-free area for 15 minutes.
Prepare The Tomato Sauce
- The tomato sauce can be made ahead of time. Simply add the 400 grams Tinned/Canned Tomatoes to a cooking pot, let come to a boil, add a little water and reduce the heat to a simmer. Add in the 1 tsp Sugar, Salt & Pepper & 1-2 tsp Garlic Powder/Granules (or our favourite herbs) and leave to thicken enough for a spreadable sauce. You can blitz the mixture with an immersion blender if you want a smooth sauce.
- Prepare baking trays/baking sheets or pizza trays with baking/parchment paper & a dusting of flour. (Don't bake without paper). See my video on how to cut paper for round tins.
Dividing The Dough
- Pre-heat the oven or open-front air fryer, to 190°c/170°c Fan Oven/375°f/Gas Mark 5. **For powerful/very new air fryers, I recommend using the lower temperature of 180°c/350°f.**
- After just 15 minutes proving, the dough will have risen quite a bit. 'Knock the dough back' by using your knuckles to deflate the dough. Release the dough out of the bowl onto a floured & papered surface, sprinkle flour on top and on your hands, before forming into a disc shape.
- The dough will weigh about 1670g/59 oz and can make different depth of pizzas by doing the following: for 4 thin crust, divide dough into 4. For 3 thin & one mini deep crust, divide into 4. For 2 deep crust, half the dough & for 3 regular crust, divide dough into 3 pieces.
Rolling Out The Pizzas
- Form each piece of dough into a smooth ball before placing on a flour dusted & paper lined tray. Take one ball of dough first, and place the rest in the fridge while you prepare the first pizza (otherwise the dough will over-prove).
- Roll out the disc of dough on a floured surface or between baking/parchment paper, with a floured rolling pin. Turn the dough over often to prevent it sticking, and sprinkle a little more flour every so often. Roll out to 10-11" (25½ -28cm) & even 12" (30cm) for thin crust. To make a thicker end crust, see the video or step-by-step instructions before this Recipe Card.
- Transfer to the paper lined baking sheet/pizza tray. Spread 4-5 spoons of the prepared tomato topping on the pizza base before adding some of the 250 grams Extra/Mature Cheese & any other toppings you are using. (Mozzarella and other quick cooking toppings can be added half-way through baking).
Bake The Pizza
- Prepare a second pizza base & bake in the oven for 15-20 minutes till cooked through to the centre. While cooking, remove the other balls of dough from the fridge and prepare more pizzas.
- Leave to cool in the tray/baking sheet for 5 – 10 minutes on a cooling rack, & then transfer to the cooling rack, paper and all, to cool down a little more before slicing.
Serving & Storage
- Slice each pizza into 12 triangles & enjoy!
- Store left-over pizza in the fridge covered or in a food bag. Re-heat in oven/air fryer with a baking sheet on top to stop burning, until warmed through. Ready-made dough or plain bases can be frozen, wrapped in paper and cling film/plastic wrap in a labelled food bag for 3 – 4 months1. Room temperature defrosting or overnight in the fridge & allows to come to room temperature before rolling out or topping.
Video
Notes
 Oil -Extra Virgin Olive Oil used, with alternative being virgin olive oil, olive oil or any other neutral oil.
Cheese – I love using extra/mature Scottish cheese (an extra/sharp cheddar cheese) but use your favourite.
Toppings – the meat I used in the photos was Turkish Sucuk – an aged slicing sausage but salami etc can be used.
Oil -Extra Virgin Olive Oil used, with alternative being virgin olive oil, olive oil or any other neutral oil.
Cheese – I love using extra/mature Scottish cheese (an extra/sharp cheddar cheese) but use your favourite.
Toppings – the meat I used in the photos was Turkish Sucuk – an aged slicing sausage but salami etc can be used.


 Check out my Beginners’ Guide To Yeast Recipes, or go to my Bread & Roll recipes page.
***Read my Cello double air fryer review.
Check out my Beginners’ Guide To Yeast Recipes, or go to my Bread & Roll recipes page.
***Read my Cello double air fryer review.
NUTRITIONAL VALUES – I am not a qualified nutritionist, and all nutritional values are approximate & based on making 3 regular crust pizzas with cheese & tomato topping, as per the ingredients listed above. One ‘serving’ for convenience is calculated as one slice, where 12 slices are cut from one pizza. Cut smaller or larger slices, make more or less pizzas & these values will change. All information from website MyFitnessPal.com.


Subscribe For More Recipes
Join My Facebook Group
Why not also join my – Facebook group Easy Online Baking Lessons, dedicated to this baking lessons website, as well as providing one-on-one support with myself & my team? Be sure to answer all security questions when requesting to join.
Follow me on social media:
Happy Learning & Baking!
Caro x


90 Minute Pizza – Oven Or Air Fryer
Search For Something You Fancy!
Caroline’s Easy Baking Lessons
Reference:
- Freezing Pizza Bases – https://freezeit.co.uk/can-you-freeze-pizza-bases/ ↩︎
Old pizza photos


Excellent recipe. The instructions are easy to follow plus the addition of a video. I don’t do a lot of yeast recipes but this was so easy. Thank you for sharing.
Thnak you so much for the great feedback!