Christmas Fondant Topper Ideas – Part 6 Christmas Cake Bake-together

Part 6 of the Traditional British Christmas Cake Bake-together, is easy Christmas fondant topper ideas for beginners.
CHRISTMAS FONDANT TOPPER IDEAS
Traditional Christmas Cake Bake-together Part 6


Here’s your next instalment in the Traditional Christmas Cake Bake-together. In Part 5 I showed how to colour fondant instead of buying lots of coloured fondant and only using small amounts.
Now comes the fun part of cutting out toppers for your Christmas cakes. For complete beginners to decorating cakes, I will show you how to use cutters – the standard ones and ‘press-out’ ones. So although this is for Christmas themed cake toppers, the same principles apply to whatever theme you are making them for.
The examples I will show are using small cutters that can be applied to mini cakes and even bigger cakes or on the sides of bigger cakes.
TIPS FOR WORKING WITH FONDANT
The great thing about working with fondant like this, is that you can make the toppers days even weeks ahead of time.
Just let them dry and set up before covering and then leave out at room temperature, but away from direct sunlight, as it will fade any colouring in your fondant.


EQUIPMENT NEEDED
- Fondant, multiple colours (see Part 5 for how to colour fondant)
- Rolling Pin (fondant pin, or if using paper/rolling mats, a regular pin is fine)
- Baking/Parchment or Non-stick Paper
- Rolling Area (Fondant mat, pastry board or worktop/counter with paper)
- Xmas themed Cookie or Fondant Cutters (see Photo 1)
- Round Cookie Cutters (optional, or even rim of a glass)

- Bowl or plate with icing/powdered sugar or corn flour/starch to dip cutter
in - Tray or flat plate to store the fondant cut outs
- Cling Film/Plastic Wrap
- Palette Knife (optional)
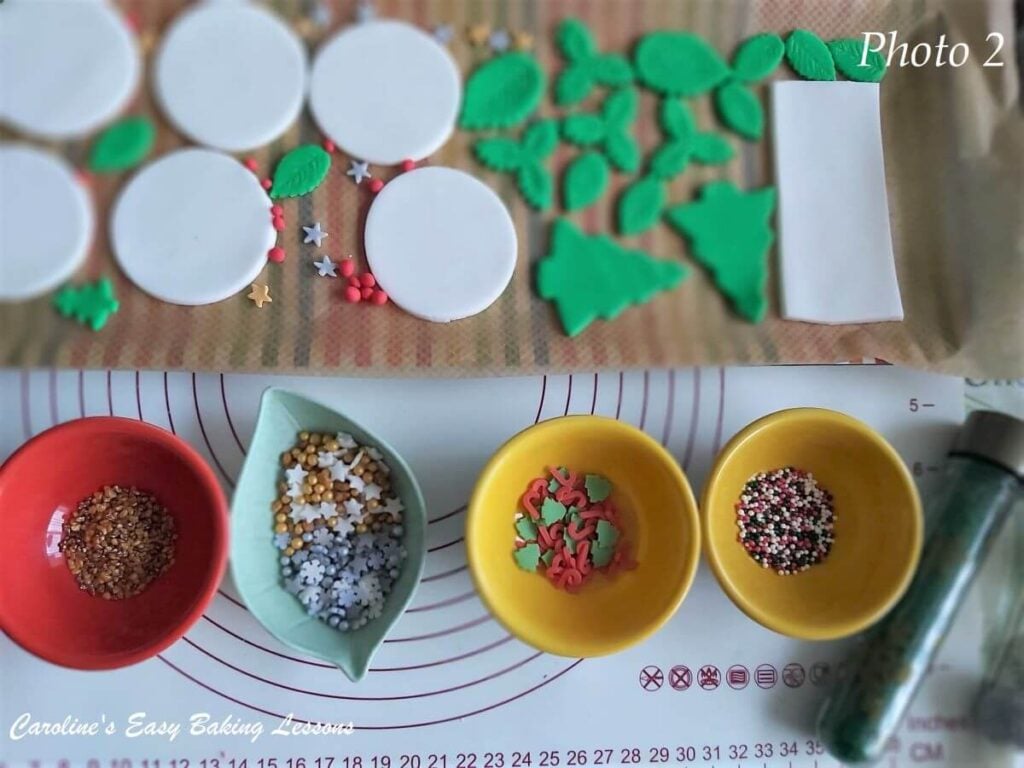
- Sprinkles (seasonal or any kind) – see Photo 2
- Lustre dust, food safe glitter, etc (optional)Very Small Paint Brush
- Small Paint Brush
- Food safe glue or water, or clear alcohol
- Small sugar craft tools, tweezers or wooden cocktail stick
DIRECTIONS FOR MAKING FONDANT CAKE TOPPERS


To make fondant cake toppers, begin by taking a large piece of the fondant and knead till it is soft and pliable. If it starts off hard and dry, just keep kneading till easy to manage.
Use either baking/parchment/non-stick paper, or a worktop/counter space dusted with icing/powdered sugar or corn flour/starch to roll out your fondant. For bigger pieces of fondant, or for covering cakes, I use 2 clear non-stick fondant mats. (See Photo 3). This comes as a set from Iced Jems and even has circular markings and guides on it to tell you the width you have rolled the fondant out to – go to Iced Jems website
HOW TO ROLL OUT FONDANT
Too roll out you fondant, start from the centre and roll away and towards yourself. If you are just doing cupcake/small toppers, no need to roll out a circle. Easiest to start off with a square or rectangular rough shape and continue rolling in that shape. Doesn’t need to be perfect, just roll from the centre and make sure the middle is no ticker than the edges. Continue rolling till the fondant is quite thin. Fondant too often I see rolled too thick. You want it to be a lot thinner than the likes of pastry. 2mm or 1/12” at the most, and smaller if what you are cutting out is small already. Remember delicate looking will look more realistic!


CUTTING OUT THE FONDANT SHAPES
Dip your cutter in the bowl/plate with icing/powdered sugar or corn flour/starch and shake off the excess, before placing the cutter in the centre of your rolled out fondant. Push down, and give a slight twist to the cutter (this will give a cleaner cut). Lift the cutter up and cut out the another. Repeat until you have used all the fondant of have enough toppers (dipping in more sugar or cornflour/starch if needed). See Photo 4.


Pull away the excess fondant scraps and roll them into a ball. Then transfer the fondant toppers to the prepared tray or plate, lined with paper. Using a palette knife to do this minimises damaging the fondant. See Photo 5. Lay them flat, or if it’s for leaves or flowers, you can bend slightly and randomly to look more realistic. Popping something small under the end of a fondant leaf for example can give it a curled, 3D look.


USING ‘PUSH-OUT’ OR ‘PUSH RELEASE’ CUTTERS
For ‘Push-out’ cutters, push down as above and give a slight twist. Then lift up the cutter and position over the prepared tray/plat with paper and push the release end. The fondant piece should just drop out. For details on leaves for example, I turn the cutter over before releasing it, and rub something small (like the end of a small paint brush) over the fondant so it picks up the veining of the leaf and then release onto the paper. See Photo 6 where I did the same thing with the details on a Santa cut-out.
FOR MINI CAKE/CUPCAKE TOPPERS
To make mini cake/cupcake fondant toppers, simply cut out white fondant with a round cookie cutter, the width of the top of your cake. (See Photo 4 above). Then brush a little food glue, water or clear alcohol on the under side of the fondant cut out you want to place on top of the white fondant. Then position in place gently pressing down.
MAKING FONDANT HOLLY LEAVES
To make fondant Holly leaves, simply cut out leaves, then make the red berries from tiny pieces of red fondant rolled into balls. Be sure to get the vien details on your leaves and make the leaves really thin. Make lots and leave on paper to hard and set up a little. Then glue the leaves into position on top of the white fondant, before placing the tiny red fondant balls in the centre, on top of the leaves. I usually like to use 3 berries at a time. See Photo 7.

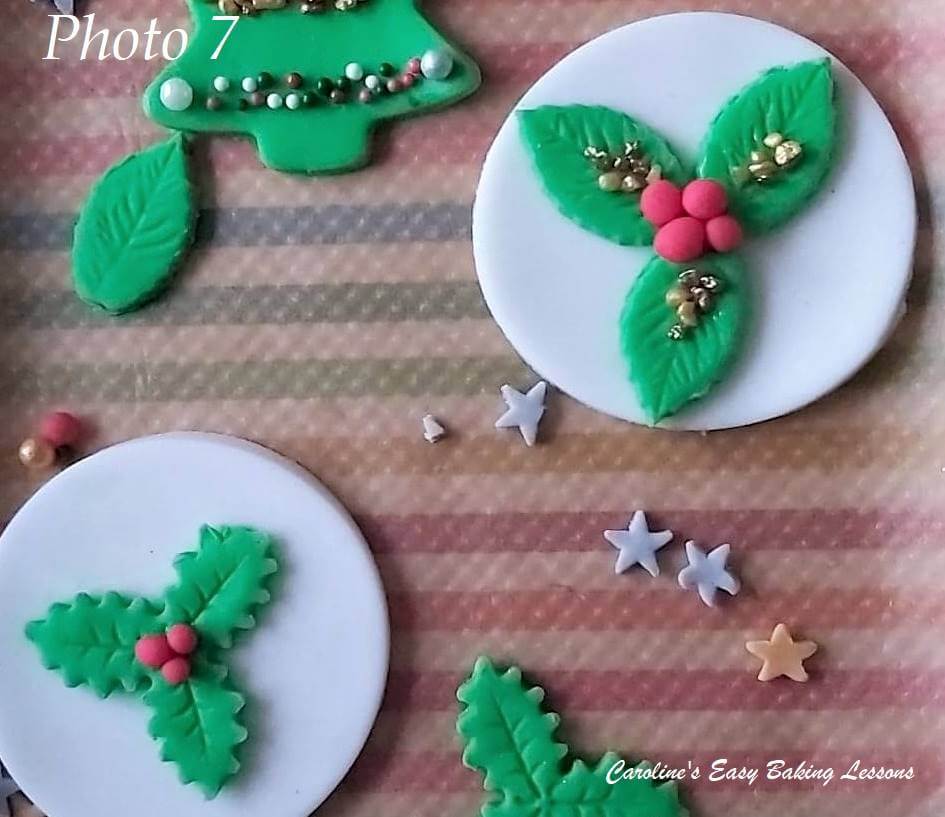
You can leave to dry or if you want the fondant to be shiny, brush on clear alcohol (water can be used too but evaporates quicker). You can also sprinkle on some food glitter or lustre dust on top of the leaves to give a softer, snowing effect. Just brush on some glue or clear alcohol and then take small pinches of the glitter/dust and sprinkle over the top of the leaf. Add more until you achieve the level you want.
Top Tips For 3D – If you want 3d or curved/curled leaves, instead of leaving them flat to dry, you can place little things under part of the leaves to shape them. or bend them slightly and leave to set. This gives a more realistic look and works well well the fondant is not too thick.

ADDING SPRINKLES TO YOUR FONDANT TOPPERS
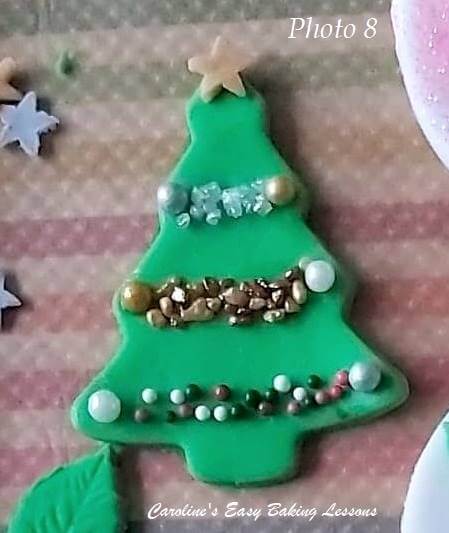
Another way to add detail to your fondant topper cut outs, is to add things such as sprinkles. For the Christmas Tree cut out, I simply brushed glue in lines across the tree, in-line with the branches of the tree. Then I carefully added in some small sprinkles in lines, to make it look like tinsel. I alternated the sprinkles I used and I added tiny coloured sprinkle balls to look like Christmas baubles. It was then finished off with a gold sprinkle star. See Photo 8 and the video for alternative looks.


I also used this same method of painting glue in strips and then filling with sprinkles, on this photo, where I made a gold glitter band above some holly, to make it wreath-like. Very effective and the gold contrasts well against the white and with the red and green. See Photo 9.
AFTER MAKING YOUR FONDANT TOPPERS
For working with fondant in general, you want to leave of the paper, for at least 30 minutes to dry and set up. Then cover well with cling film/plastic wrap and store till ready. Be careful not to leave in direct sunlight as it fades coloured fondant. Also store fondant toppers at room temperature, as the fridge can cause condensation and for the fondant to weep.
I hope this was helpful as a beginners’ introduction to fondant toppers. You can also store the cut outs, apply directly to the top of your larger Christmas cakes (onto a fondant or Royal Icing top) nearer to decorating time.


FONDANT PENGUIN CAKE TOPPER
New for 2021, here’s my fondant Penguin cake topper tutorial. Includes step-by-step instructions and photos on how to make the cute snow scene, as well as how to cover the cake.
Go to Fondant Penguin Christmas Cake Tutorial
Part 7 in the bake-together, is on covering your Christmas cakes. Traditionally you add a layer of marzipan/almond paste and then either fondant or Royal icing. (For details on how much and how to make your own, go to What To Cover The Christmas Cake With -Part 4.


Thanks for reading and watching. Remember you can DOWNLOAD this tutorial to save to your phone or computer for using or printing off later. Select the ‘download’ button below.
DIFFICULTY RATING – Easy, Beginner
Follow me on social media:
Happy Learning & Baking!
Caro x


Christmas Fondant Topper Ideas – Part 6 Christmas Cake Bake-together
Search For Something You Fancy!
Caroline’s Easy Baking Lessons


