Coconut Ice – The No-bake Treat

Coconut Ice - The No-bake Quick Sweet Treat. Perfect gifting candy, anytime of the year but super cute for Valentine's day or Christmas gifting & easy too! Get the kiddies involved & get their hands messy!
Coconut Ice – No-Bake Treat
Ideal For Gifting
Guess post by Mrs D
**Original post 3/11/2021, updated photos & video Feb. 2025


***click to jump to section***
This is a very popular recipe that our Mrs D makes regularly and often hands out as food gifts to her grandchildrens’ school teachers.
She actually sent me up a care box, filled with foods she had made, and it included this sweet coconut treat. I can tell you these are great and perfect for when you fancy something sweet.
*”2025 I have added my photos, step-by-step & video, with a darker pink coconut ice version.


What Is Coconut Ice?
Coconut Ice is a classic no-bake British sweet treat, that has been around since at least the 1950’s. Post World Word II, when rationing and sugar shortages stopped, it is believed this treat was created in celebration of the end of rationing & the availability of sugar again.
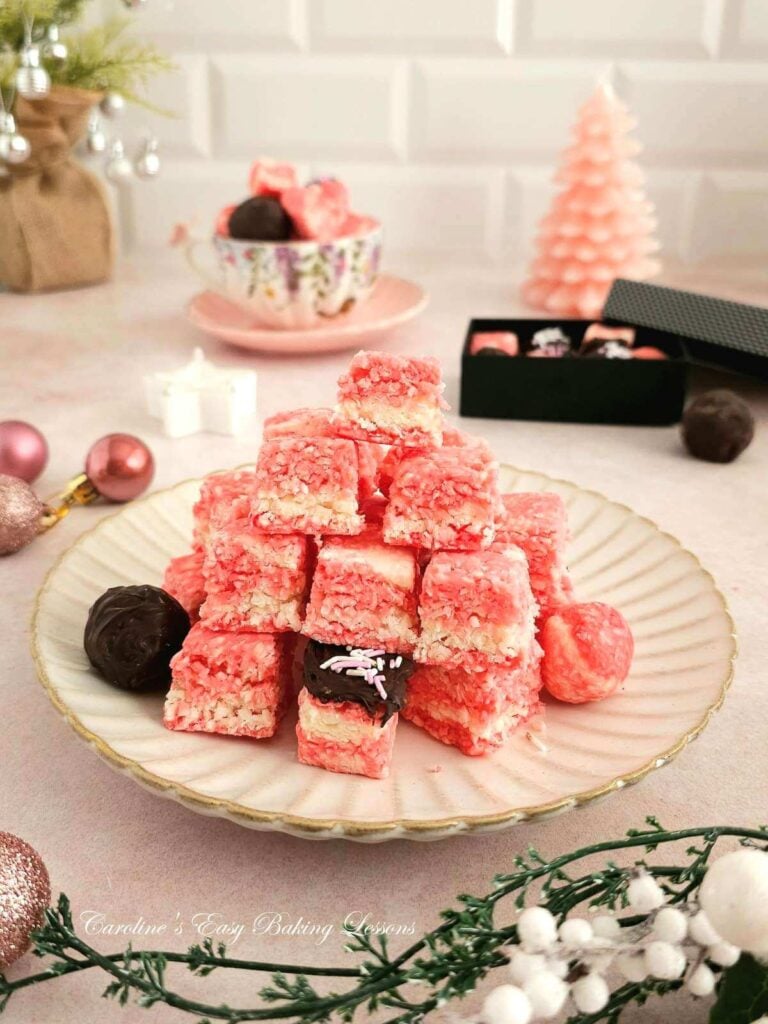
Consisting of a white layer of a mixture made from condensed milk, sugar & coconut, the top layer is coloured pale pink & chilled till set. Then usually cut into bite-sized squares. (See Mrs D’s original photo below).
With its simplicity & use of pantry staples, this recipe has become popular in other countries, and the US has a similar confectionery, with a 3rd layer of chocolate, called a Neapolitan Coconut1


Why Use This Recipe?
- Simple & Quick
- Makes Quite A Lot
- Quick Homemade Gift
- Uses Just 3 Common Ingredients
- Vegan & Vegetarian


Simple & Quick
This recipe is so simple you could make with the kiddies or even get them to make them. No baking required, these are ideal for kids. They will love getting their hands in to help with colouring the sweets.
Makes Quite A Lot
The recipe also makes about 45 squares, so great for sharing out.
Vegan & Vegetarian
Coconut Ice is also Vegan & Vegetarian friendly, so perfect for gifting to others..
Ingredient Notes


The coconut ice is made just from 3 basic pantry ingredients, plus colouring:
- Icing (Powdered) Sugar
- Coconut**
- Sweetened Condensed Milk
- Red/Pink Food Colouring
Decoration (optional):
- Chocolate
- Coconut
- Sprinkles
- Crushed Nuts etc
**see notes below


Coconut
For this traditional British confectionery, (and many British bakes), desiccated coconut is used. The nearest equivalent in the US is unsweetened shredded coconut. **Note however, that the shredded coconut is in larger pieces than desiccated. So you might want to chop lightly. See my comparison photo here, or go check out my article on Differences between US & UK baking ingredients.


Food Colouring
The traditional colour of coconut ice is a pink and white layer, using a pink or red food colouring. Best to use a paste colouring or gel as liquid food colouring can add too much moisture.
Please note that I used SugarFlair red colouring paste and made a marbled darker pink of something a little different, but you could easily alter the colours for any occasion or party theme you have.


Decorations
Decorating the coconut ice is optional, but as I tried cutting out some love heart shaped ones for Valentine’s, I had scraps leftover. So rolling into a ball made sense. You can leave like that, or dip them in melted chocolate or candy melts.
Cover in more coconut (definitely chop or lightly process shredded coconut for this), or use sprinkles or chopped nuts, while the chocolate is still wet. Makes for a nice addition to any homemade food gift or cookie plate at Christmas.
Step-By-Step Instructions


1.Start by adding the icing/powdered sugar to a medium-large mixing bowl.
2. Add in the desiccated coconut, & mix together.
3. Next, add the can/tin of sweetened condensed milk.
4. Use a wooden spoon to combine and work in the milk.
* I made by hand but a gentle mix on a stand-mixer might be possible.


5. Use your hands to bring the mixture together, adding more icing/powdered sugar if it is too sticky. You want to be able to mould the mixture together, as shown in Photo collage 2,
6. Divide the coconut mixture into 2 bowls. (*Make sure it’s not a favourite bowl as it might get stained).
7. Add a very small amount of red or pink food colouring to one half of the mixture. I used SugarFlair red paste colouring. Wearing gloves, knead the colour into the mixture till combined.
(If you want a darker pink like mine & some marbling, take the pink mixture and place a little less than 1/2 of the mixture, place in a 3rd bowl. Take small pieces of the white mixture and mix into the smaller pink mixture to make a paler pink, but also leave it a little marbled with white pieces visible occasionally).


8. Prepare a square cake tin/pan or rectangular one (dimensions in the equipment list below). Grease first, before placing a sheet of baking/parchment paper inside.
9. Make sure the paper is long enough to go up 2 of the sides, for easier removal.
10. For the traditional pale pink and white coconut ice, take chunks of the white mixture, and divide up into the bottom of the prepared cake tin.
11. Use your hand to spread the mixture out, filling the base and making an even layer.


12. Next, take the pink mixture and dot over the white layer, spreading out to cover the base layer completely. If it is too sticky at all or difficult to do, you can pop in the fridge for 15 minutes before adding the second layer.
13. Place in the fridge or somewhere cool to set for 1.5 – 2 hours. (Alternatively, 30 minutes fridge & 30 minutes freezer).
14. For the darker pink marbled version, do the reverse and start with the darkest pink mixture. Place at the bottom as your first layer.
15. Next dot the white mixture on top & spread out in one even layer. Finally, take the lighter pink marbled mixture and dot on top of the white layer, before spreading out, trying to keep the marbled effect.
**You can use some paper to help smooth and flatten each layer – see the video below for me doing this. Place in the fridge for 1.5 – 2 hours, (or fridge 30 minutes & freezer 30 minutes).


Slicing
1. Once ready, gently lift the paper out of the tin, releasing the coconut ice.
2. Place on top of a chopping board before attempting to cut into small bite-sized squares/rectangles.
3. If a little too hard to cut, leave out on the worktop/counter for a little.
4. For heart-shaped ones, use a metal cutter and pull away the scrap pieces.


5.Roll the scrap pieces into a ball about 2.5cm/1″ wide.
6. Once cut or rolled, place in the fridge for about 10-15 minutes.
Decorating
1. Melt chocolate pieces or candy melts in the microwave or in a double boiler. For microwaving chocolate, heat on 30 second interval, max. Mixing in-between each burst or you will burn and ruin the chocolate.
2. Prepare for the chocolate coating by having baking/parchment paper ready to place on.
3. Dip balls of coconut ice in the melted chocolate & use a small spoon or fruit fork to cut off excess chocolate, letting it drip back into the bowl.


4. You can also spread or dip the heart & square shaped pieces, giving a chocolate coating on one side.
5. Place on the paper and then while still wet, add some coconut, sprinkles or chopped nuts on top.
6. Leave for the chocolate to set before removing from the paper.
(You can trim off break off any excess chocolate that pools at the bottom).


Serving & Storing
1.The coconut ice can be enjoyed now or stored for gifting later.
2. Store in a metal cake or cookie tin, or in a jar. Place in a nice jar with a ribbon & tag for some pretty food gifting. Or add to a Christmas cookie plate. Try adding some microwave chocolate fudge too.
DIFFICULTY LEVEL: Super easy & kid friendly


Other No-Bake Treats
How about some other no-bake sweets treats? Like microwave chocolate fudge, including a Baileys Irish Cream version.
Or tropical cake truffles, that uses staples and lefovers & does not use buttercream or cream cheese frosting. Cover in chocolate for an extra special gift.
Protein Chocolate Truffles is another no bake option.
Recipe Card
Coconut Ice – The No-bake Quick Sweet Treat

Equipment
- Scales or measuring cups
- Mixing spoon
- Large mixing bowl
- Sieve
- Baking/parchment paper
- 23cm x 20cm x 4cm deep cake tin (9” x 8” x 1½ ”) ** see notes
- Cling film/plastic wrap
Ingredients
- 397 grams Sweetened Condensed milk (14 oz or 1¼ US cups)
- 350 grams Desiccated Coconut (12¼ oz or 5 level US cups Dry Shredded Unsweetened Coconut) ** see notes
- 350 grams Icing sugar (12⅓ oz or 3 US cups Powdered/Confectioners' Sugar)
- Few Drops Pink or Red Food Colouring (Preferably gel or paste colouring, see notes)
Decoration (optional):
- 100 grams Chocolate (3 oz, I used dark/bitter chocolate)
- Sprinkles, coconut, crushed nuts (optional)
Instructions
- Line the tin and sides with baking/parchment paper.
- Pour the 397 grams Sweetened Condensed milk into a bowl and sieve in the 350 grams Icing sugar . Mix really well & then add the 350 grams Desiccated Coconut and mix until it is all incorporated.
- Spoon half of the mixture into the tin and press down really well using back of a spoon or damp fingers.
- Add a few drops of pink or red food colouring to the remaining mixture, mix well & add more until you get the shade of pink you like. Some prefer it darker but I used about 6 drops but it does vary by what make of colouring you use. Using gel will require less colouring than liquid, and paste colouring even less. **Be sure to wear gloves as it stains badly. See notes.
- Spoon the pink coloured mixture on top of the white and press down really well as before. Ensure that you get into the corners well.
- Cover with cling film/plastic wrap and leave to chill for about 2 hours.
- Use the paper to lift the coconut ice out and then cut into bite-size pieces. Or cut out heart shapes and roll the excess into balls. Cover or dip in melted chocolate for decoration.
- Keep in an airtight container in the fridge. This will keep for about 2 weeks if its not all been eaten by then!
Video
Notes

 Coconut – For the dry shredded unsweetened coconut, you might want to just chop it a little to get a slightly smaller consistency like UK desiccated coconut (see photo before this Recipe Card
Food Colouring – For food colouring, gel or paste is best and Sugarflair is recommended. Be sure to wear gloves as it stains, also to gradually add in and mix before adding anymore colouring, as it takes time to develop.
Coconut – For the dry shredded unsweetened coconut, you might want to just chop it a little to get a slightly smaller consistency like UK desiccated coconut (see photo before this Recipe Card
Food Colouring – For food colouring, gel or paste is best and Sugarflair is recommended. Be sure to wear gloves as it stains, also to gradually add in and mix before adding anymore colouring, as it takes time to develop.
 Yield & Servings – at least 45 pieces can be made (this was a mixture of lots of rectangular bite-sized pieces, plus several love hearts & balls of coconut ice. 1 serving is based on an average yield of 45 pieces.
Decoration (optional) – cut some love heart shapes and roll excess mixture into balls. Coat with melted chocolate and add some sprinkles, more coconut or chopped nuts for an extra special Valentine’s or Christmas treat. Add to a nice glass jar and add a ribbon.
Yield & Servings – at least 45 pieces can be made (this was a mixture of lots of rectangular bite-sized pieces, plus several love hearts & balls of coconut ice. 1 serving is based on an average yield of 45 pieces.
Decoration (optional) – cut some love heart shapes and roll excess mixture into balls. Coat with melted chocolate and add some sprinkles, more coconut or chopped nuts for an extra special Valentine’s or Christmas treat. Add to a nice glass jar and add a ribbon.

 Go to Microwave Chocolate Fudge recipe. No-Bake Chocolate Truffles.. No-Bake Peanut Brittle, or Tropical Cake Truffles.
Go to Valentine’s Day Recipes, or Christmas Recipes
Click for more easy sweet or savoury treats.
Go to Microwave Chocolate Fudge recipe. No-Bake Chocolate Truffles.. No-Bake Peanut Brittle, or Tropical Cake Truffles.
Go to Valentine’s Day Recipes, or Christmas Recipes
Click for more easy sweet or savoury treats.

Nutritional Values – I am not a qualified nutritionist and all values are approximate. 1 serving is 1 piece, based on an average yield of 45 pieces (without chocolate or decoration). Make smaller or bigger pieces ,and these values will change. All values calculated via MyFitnessPal.com.


Subscribe For More Recipes
Want more great recipes, tips, baking information and newsletters? Then please consider subscribing by adding your email address below. Be sure to check for a confirmation email & respond back, so you can follow me & receive your free emails. Your personal information will not be shared with a third party.
Join My Facebook Group
Why not also join my – Facebook group Easy Online Baking Lessons, dedicated to this baking lessons website, as well as providing one-on-one support with myself & my team? Be sure to answer all security questions when requesting to join.
Follow me on social media:
Happy Learning & Baking!
Mrs D & Caro x
Coconut Ice – The No-bake Treat
Search For Something You Fancy!
Caroline’s Easy Baking Lessons
- Coconut Ice history & more, from website Articles Factory.com/coconut ice/ ↩︎


OMG easy and tasty. Love it.
Thanks, so pleased you like it!