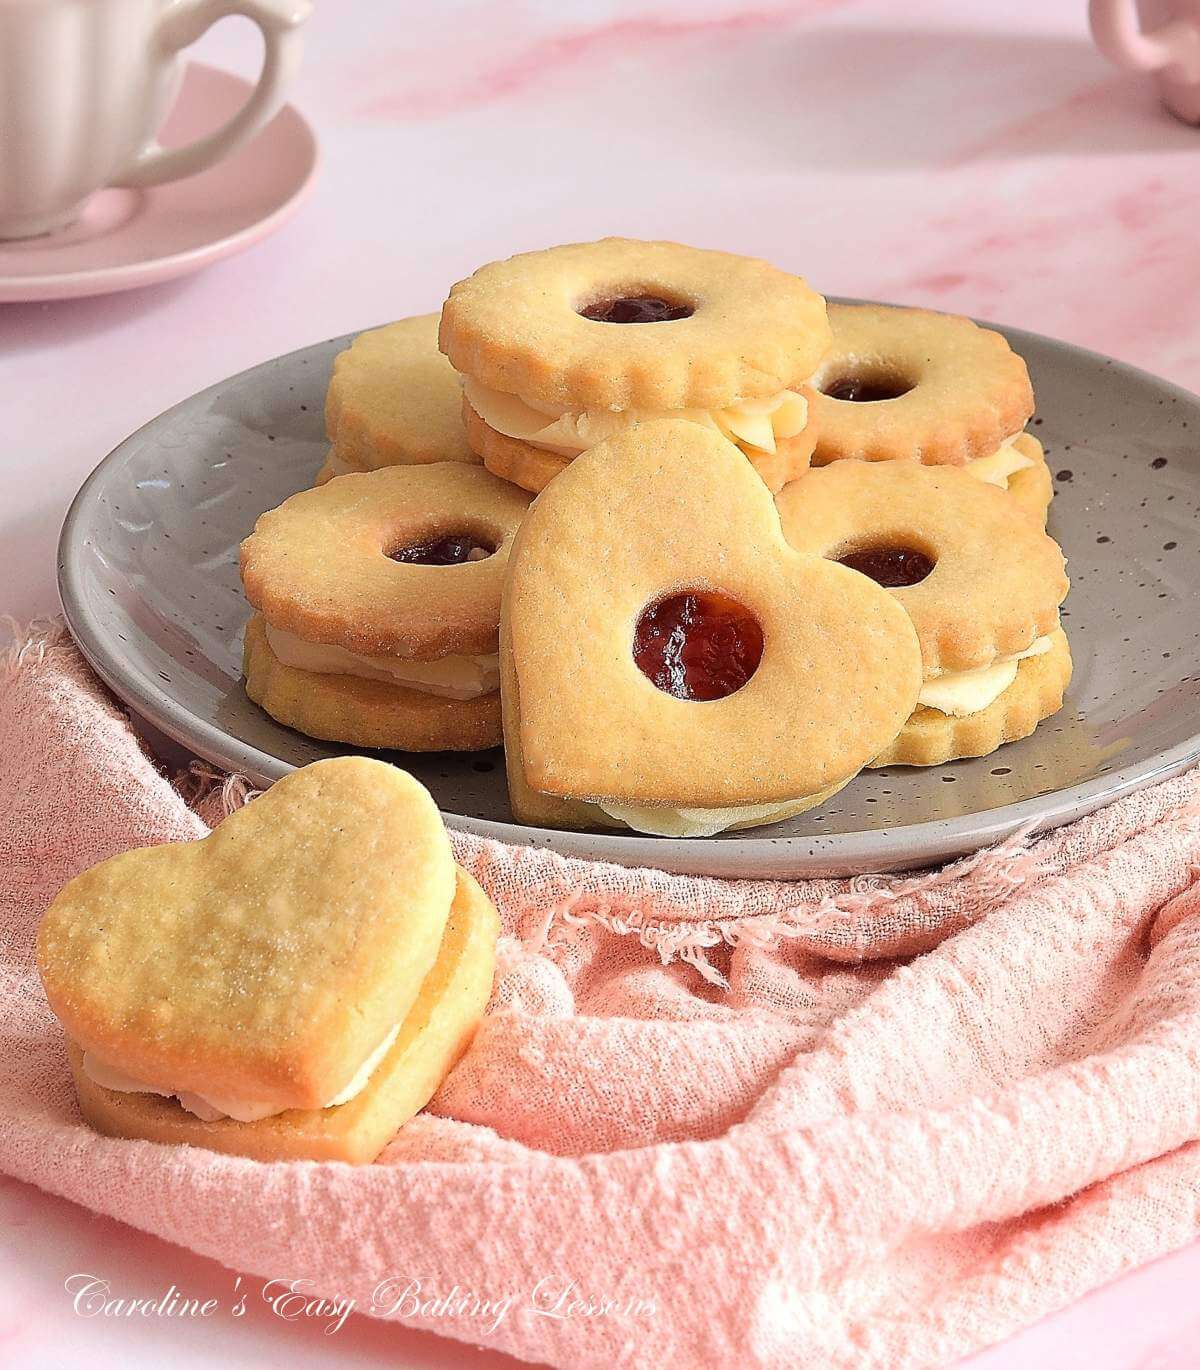
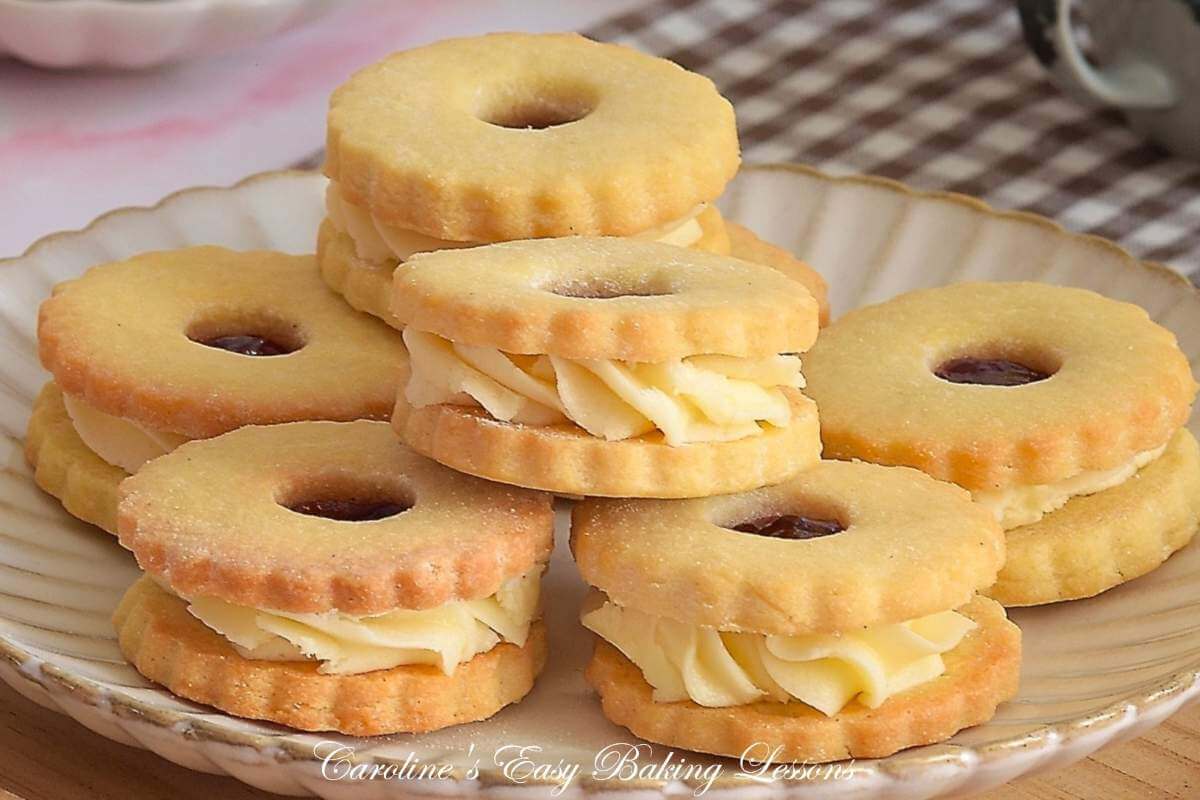
Seasonal Jammie Dodgers (Classic British Cookie)

Seasonal Jammie Dodgers are my take on this British classic sandwich cookie, but with a customizable seasonal twist. So perfect for any occasion. Let me show you how:
**Original recipe 27/09/21, updated images & video 29/010/25**

***click to jump to section***


What Is A Jammie Dodger?
A Jammie Dodger is a classic and still very popular, British manufactured biscuit – a cookie to other countries. They were born in Wales, in the Burton Biscuit Company, back in the 1960’s.
The Jammie Dodger is made from a soft, very short biscuit, sandwiching a raspberry jam filling. Hence part of the name – Jammie.
My version of the biscuit can also be made with a firm vanilla buttercream accompanying the jam filling. This takes to another level. You can omit if you like, but it’s the same filling I use in my Viennese Whirls

Why Is It Called A Jammie Dodger?
“So why is this British sandwich cookie called a Jammie Dodger?”
Part of the name – Jammie, comes from the filling of the biscuit – the jam.
The name of the Jammie Dodger biscuit also is believed to come from a character called Rodger The Dodger, who appeared from 1953 in classic British comic book ‘The Beano’. (I grew up reading that, and the annuals each year).
The term Jammie Dodger, can also mean having a lot of undeserved luck, which could also be referring to the Rodger The Dodger character.

Why Make Seasonal Jammie Dodgers?
- Easy to make
- Taste great
- Step-by-step instructions & video
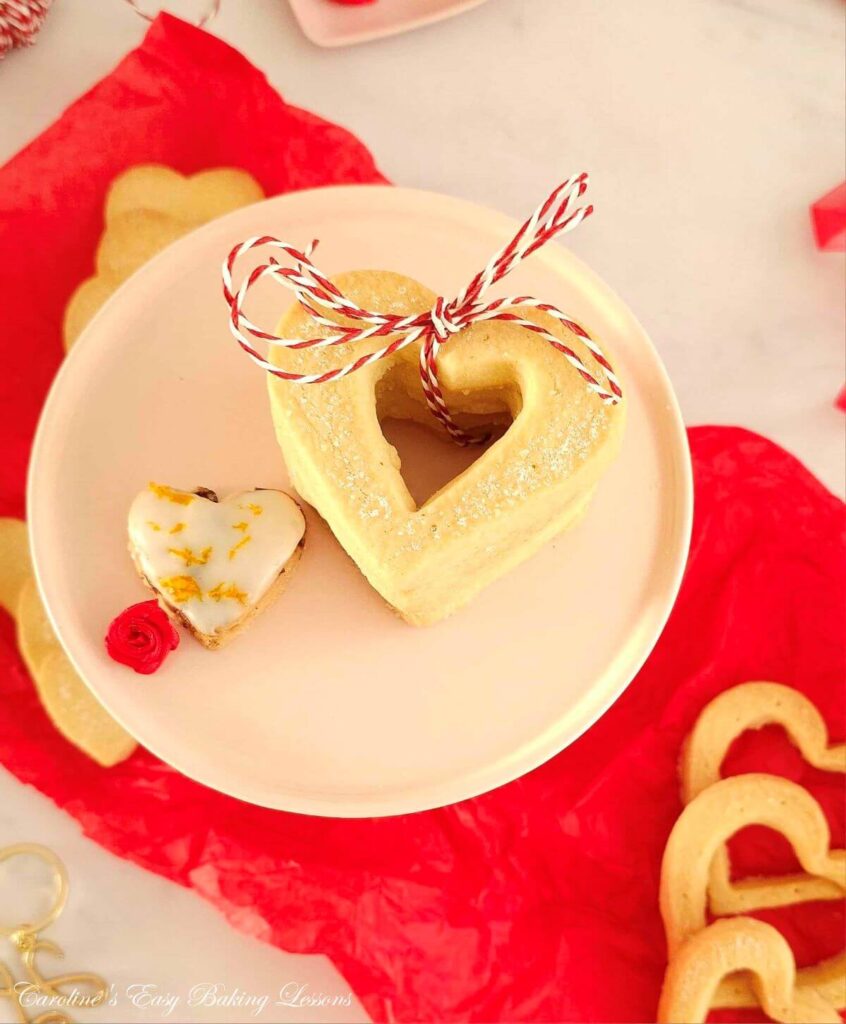
- Very customizable – Easter, Halloween, Christmas, Valentines etc.
- Clean of artificial sweeteners, additives or preservatives
- Perfect for cookie plates or holiday gifting
- Can be made ahead


Ingredients & Alternatives
My seasonal Jammie Dodger biscuits are made from the following basic ingredients:
For The Dough:
- Unsalted Butter*
- Sugar
- Egg*
- Vanilla Extract*
- Almond Extract*
- Flour
- Salt

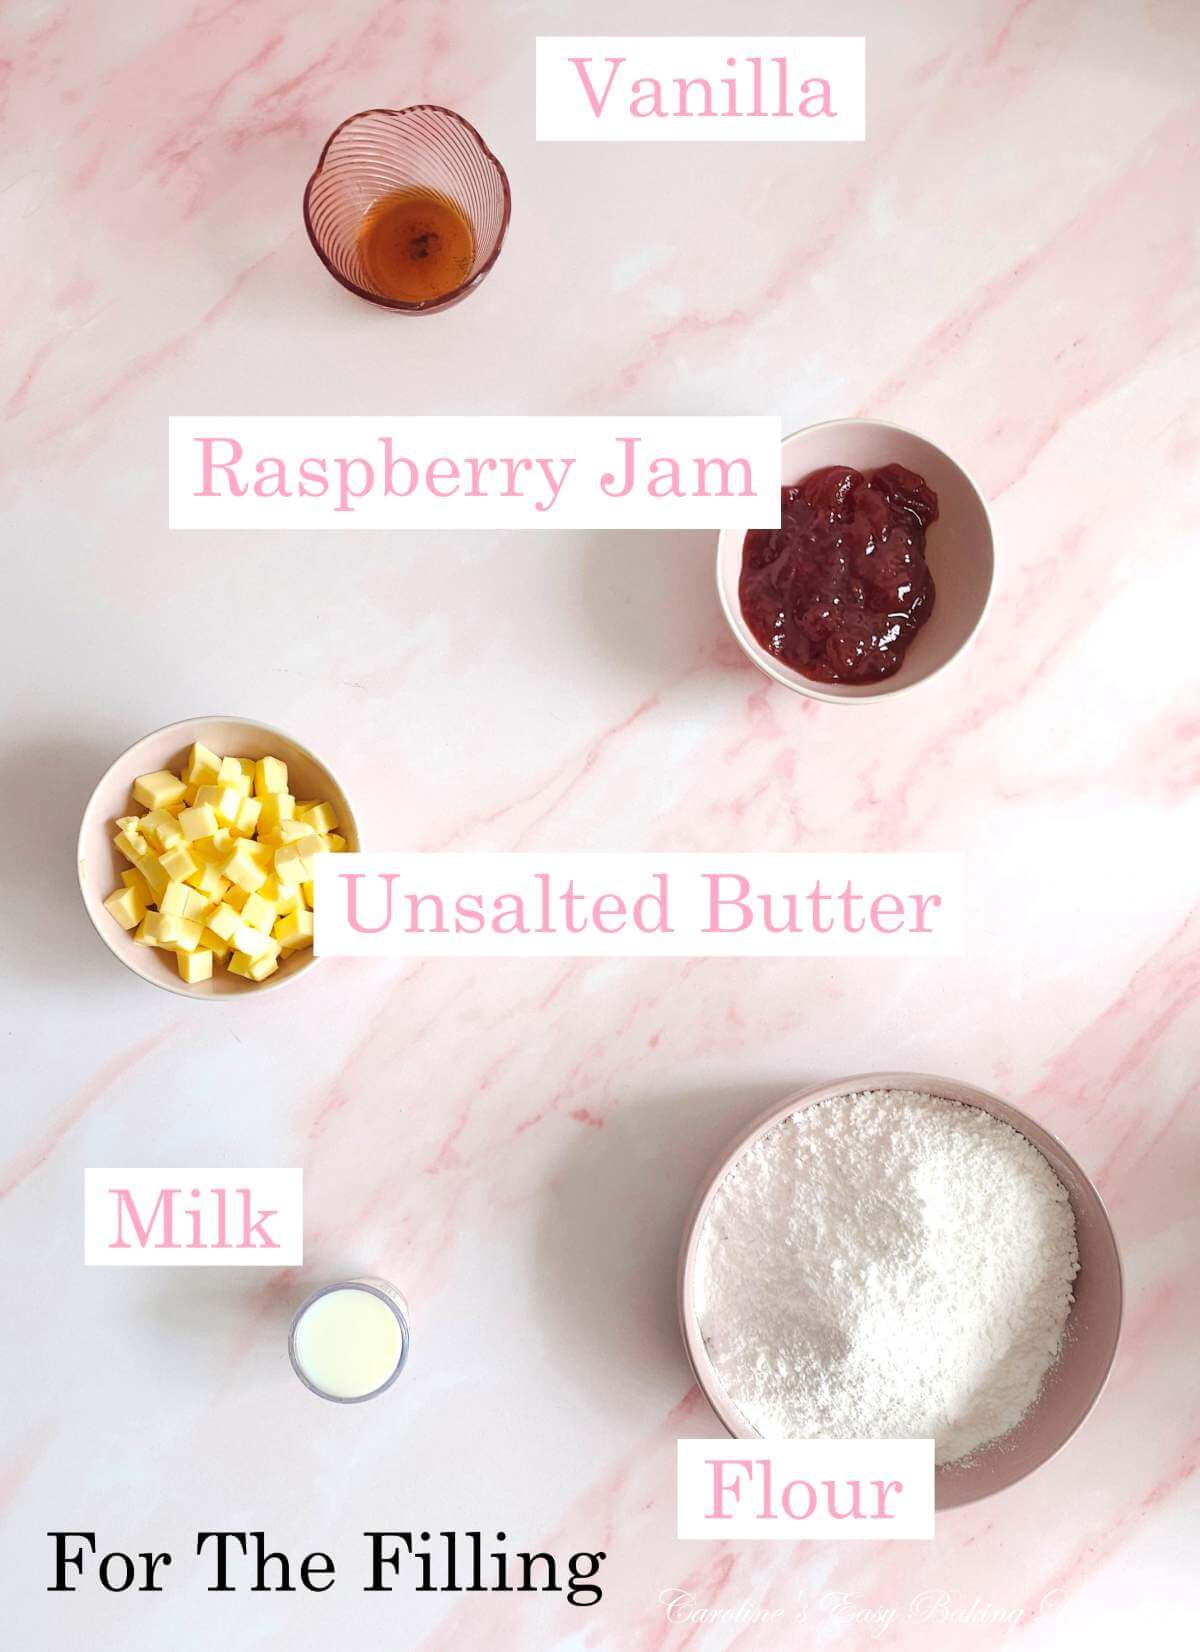
For The Filling:
- Unsalted Butter
- Icing (Powdered) Sugar
- Vanilla Extract
- Milk
- Jam/Jelly/preserve*
***see notes below
Egg
UK medium to large sized eggs are used and US equivalent is large to extra large size. Make sure at room temperature too before using.


Butter
Unsalted butter is always recommended for best & consistent result. Salted has a higher water content, which can vary from brand to brand. Meaning the fat content can change too, leading to inconsistent baked results.
**TOP TIP – cube the butter small (about ) and this smaller surface areas results in the butter softening quicker. It also incorporated in the dough better.
Try making with your own homemade butter. Read my article for making homemade buttermilk & butter.

Vanilla & Almond Extract
Vanilla and almond extract are both used in the biscuit dough. Just a small amount of almond extract brings out the vanilla taste.
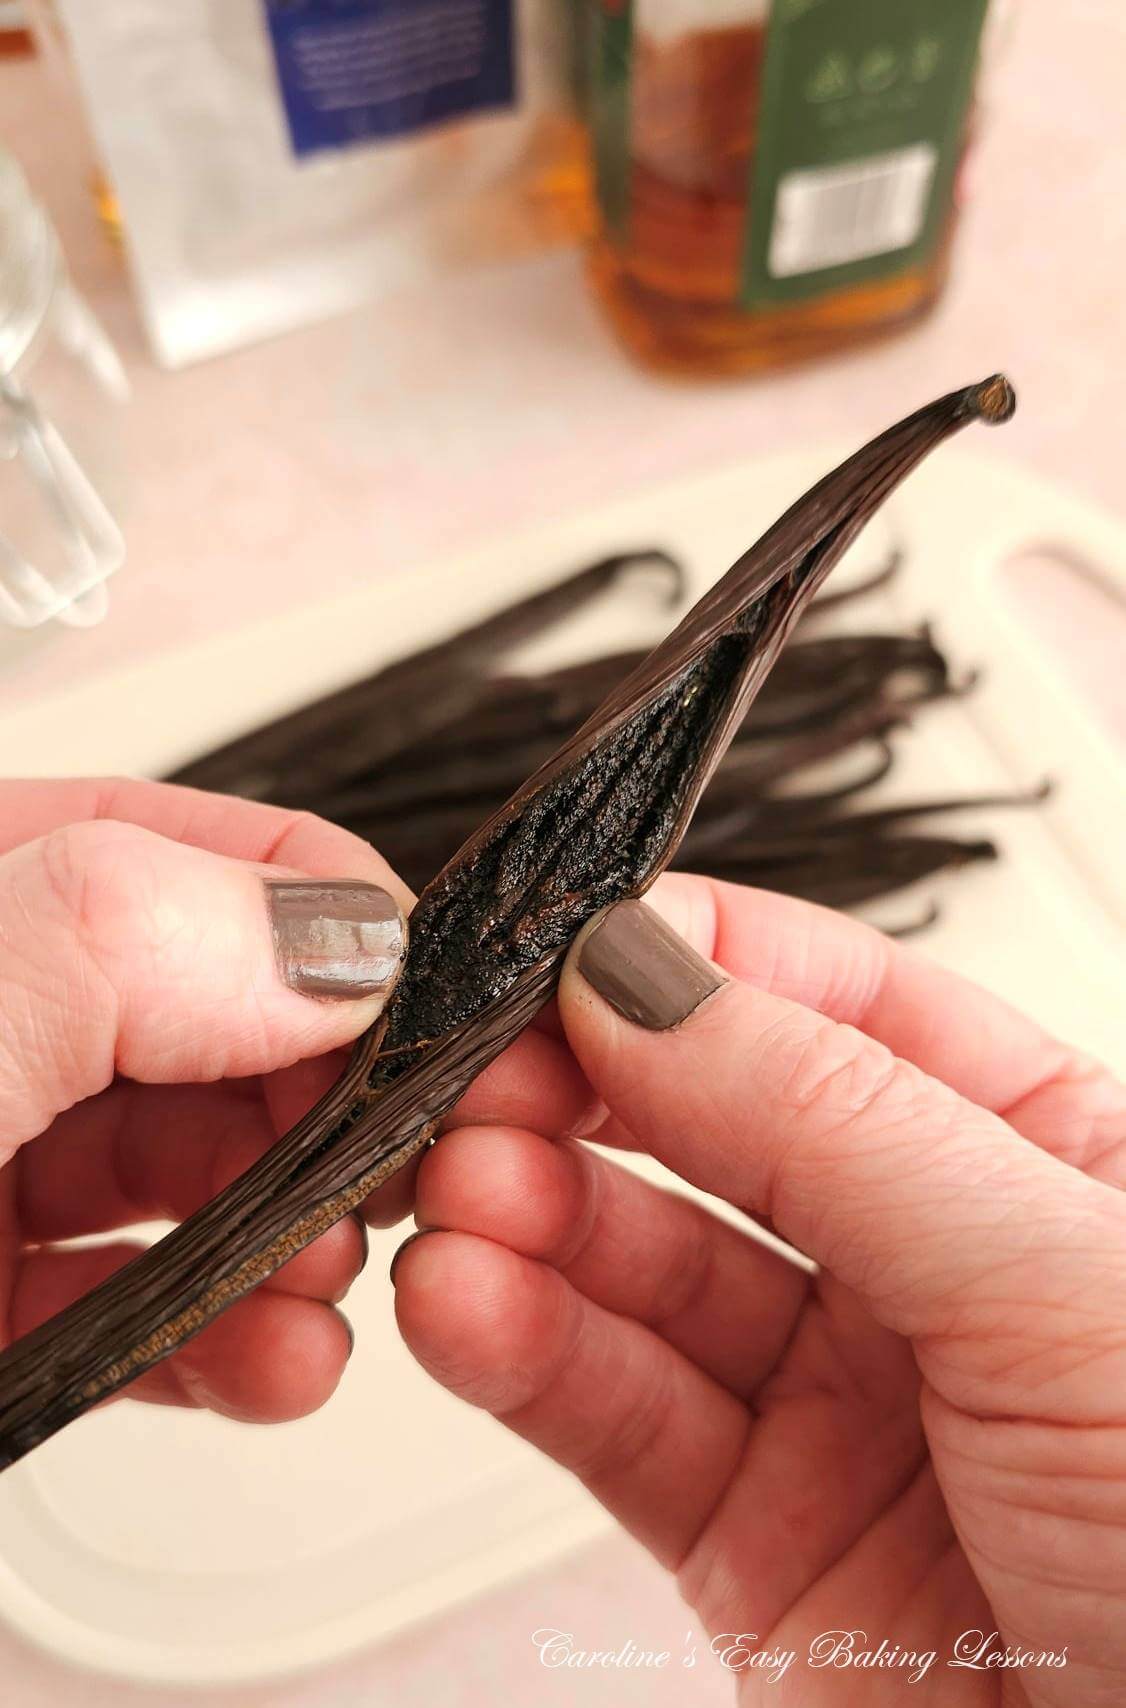
Learn how to make your own homemade vanilla extract, or try making alcohol-free almond extract at home.
Jam
Raspberry or strawberry jam are classics for these sandwich cookies. I recommend Lidl’s preserve, really good. You can use a different jam, like cherry or apricot. or make your own jam from any fruits you have. Read my plum orange jam recipe to get you started.

Equipment
Basic baking equipment needed for this recipe. (Full list provided in the Recipe card below). I highly recommend using digital scales for precision. However, I have included the ounce and cup measurement. Note these values are all hand measured by myself in recipe testing, as Google results can be inaccurate or inconsistent. Check out my Baking Ingredient Conversions table.
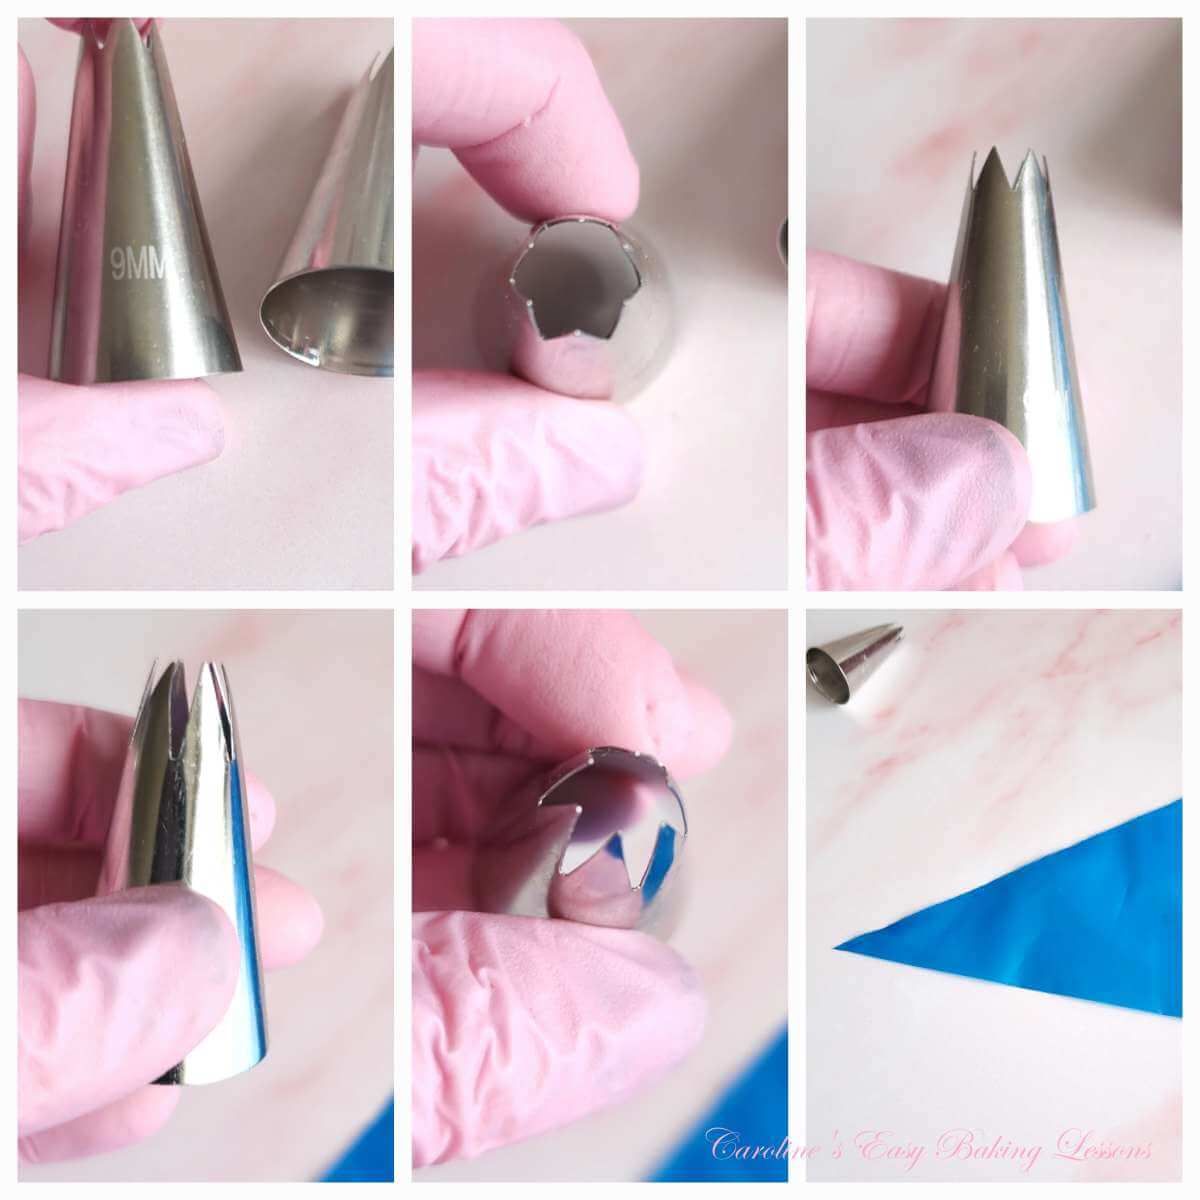
A piping bag & nozzle (or even an unused large food bag), can be used for the buttercream filling. For reference, I often use this Wilton 9M open star-tipped, or 9mm closed star-tipped as shown in the photo collage.


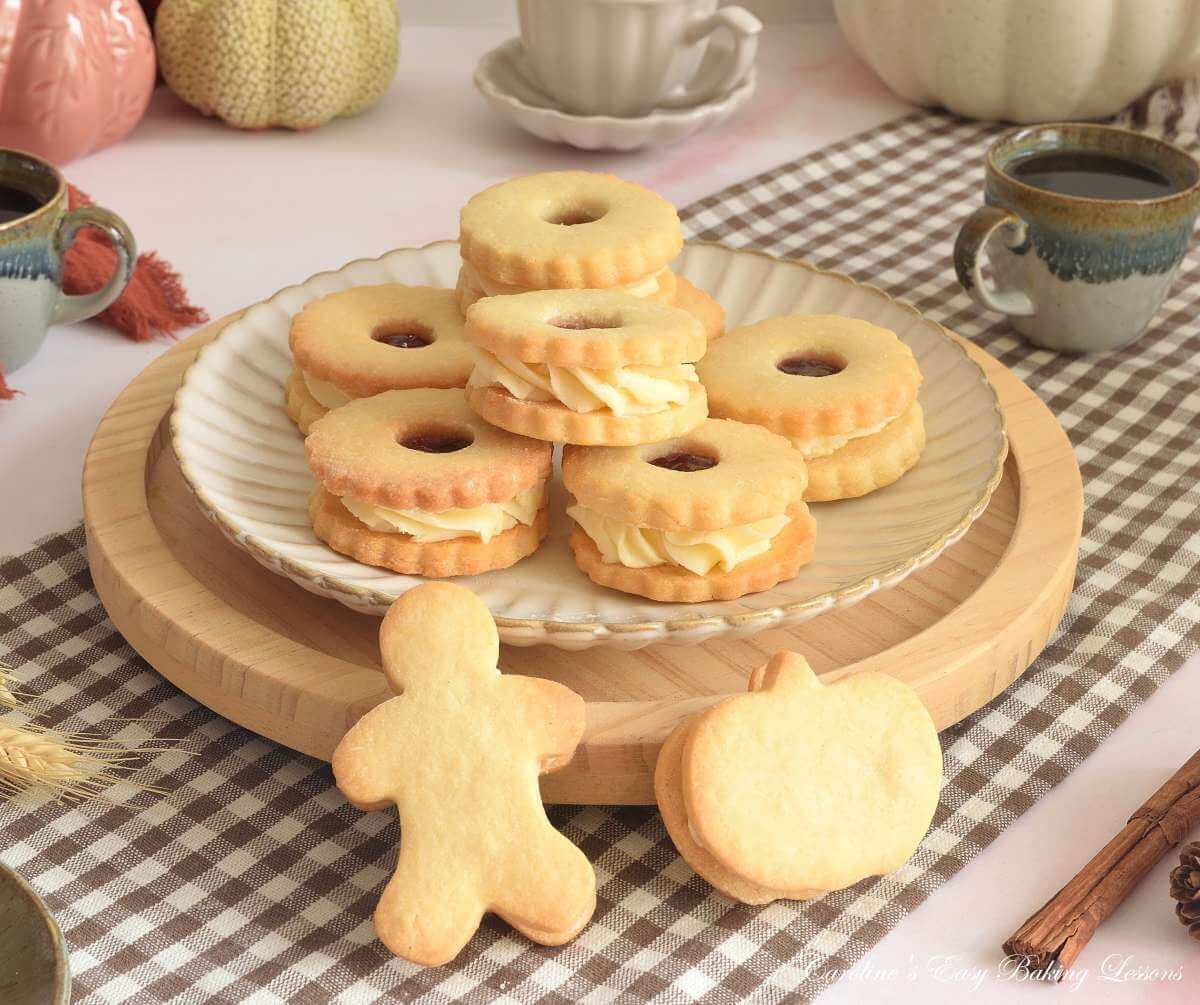
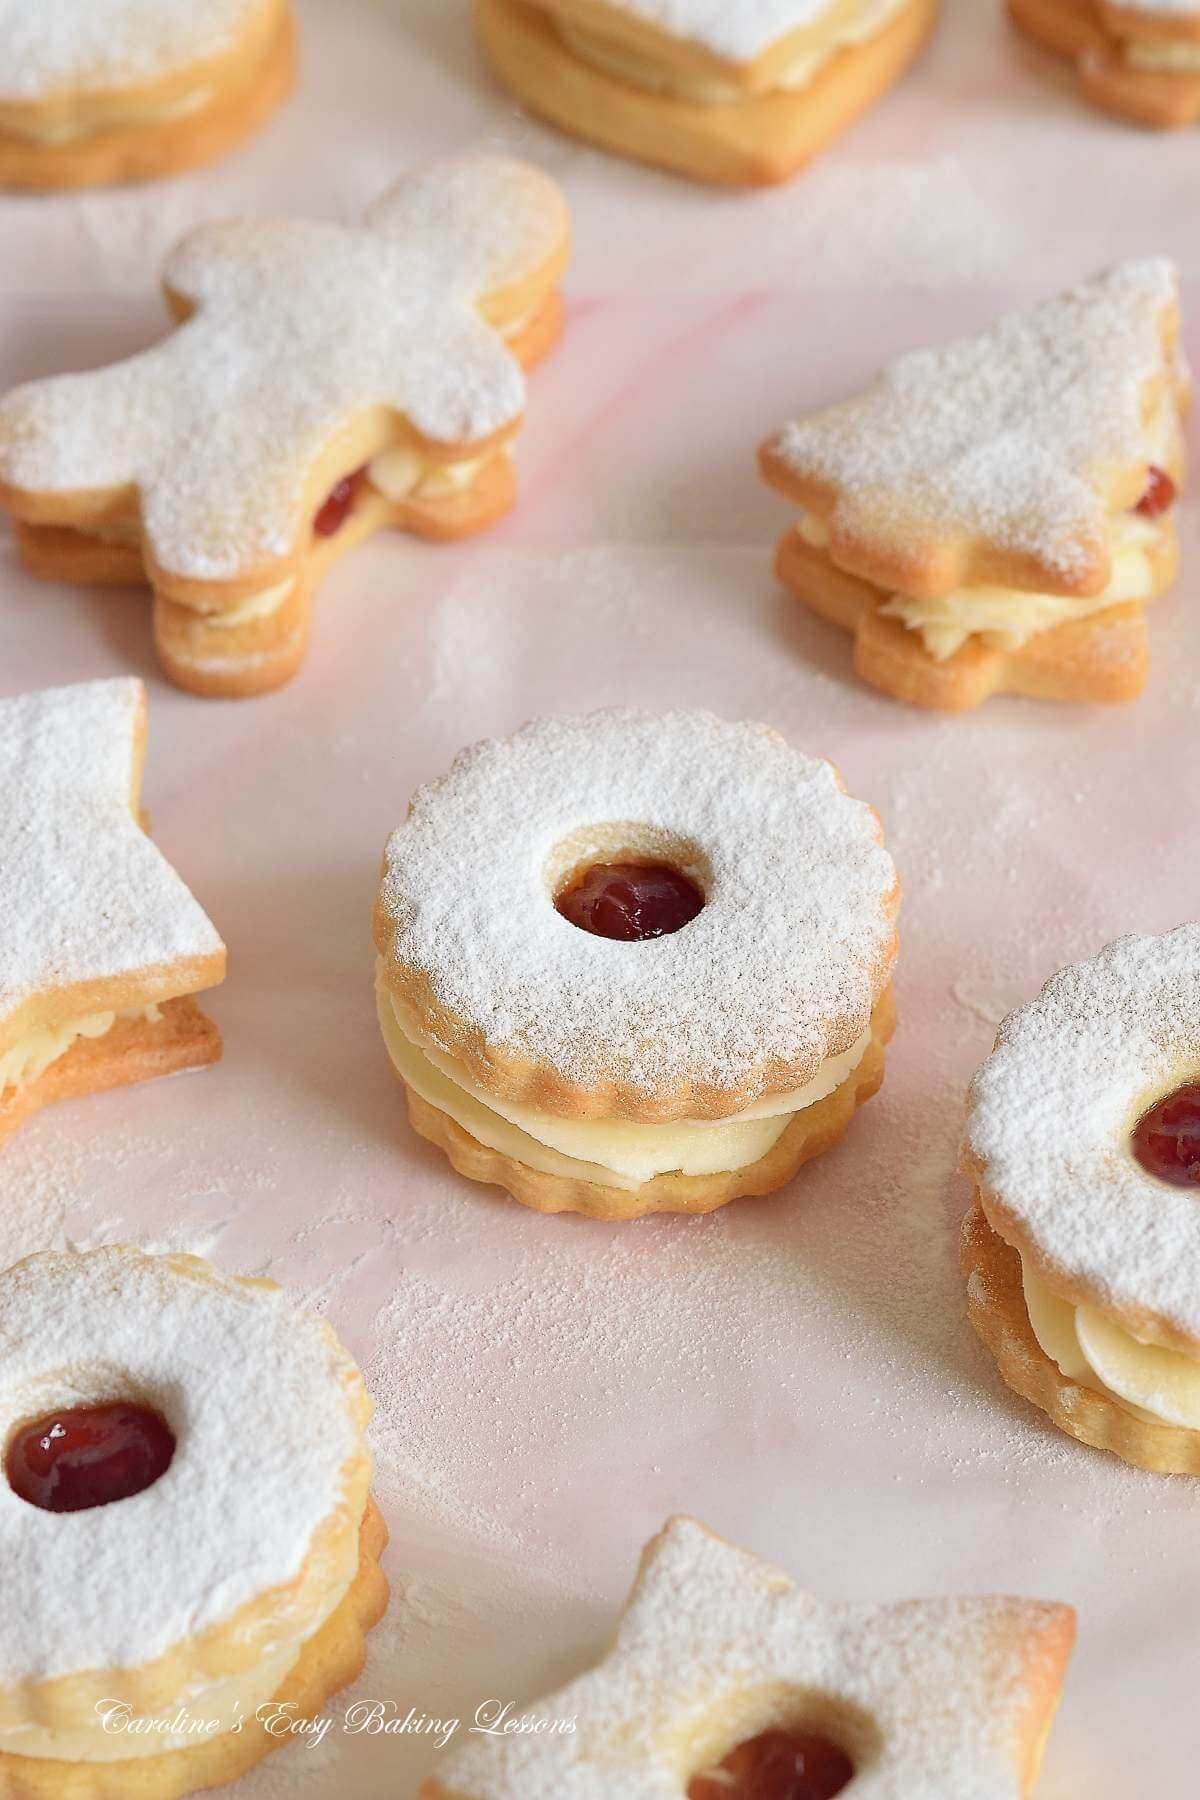
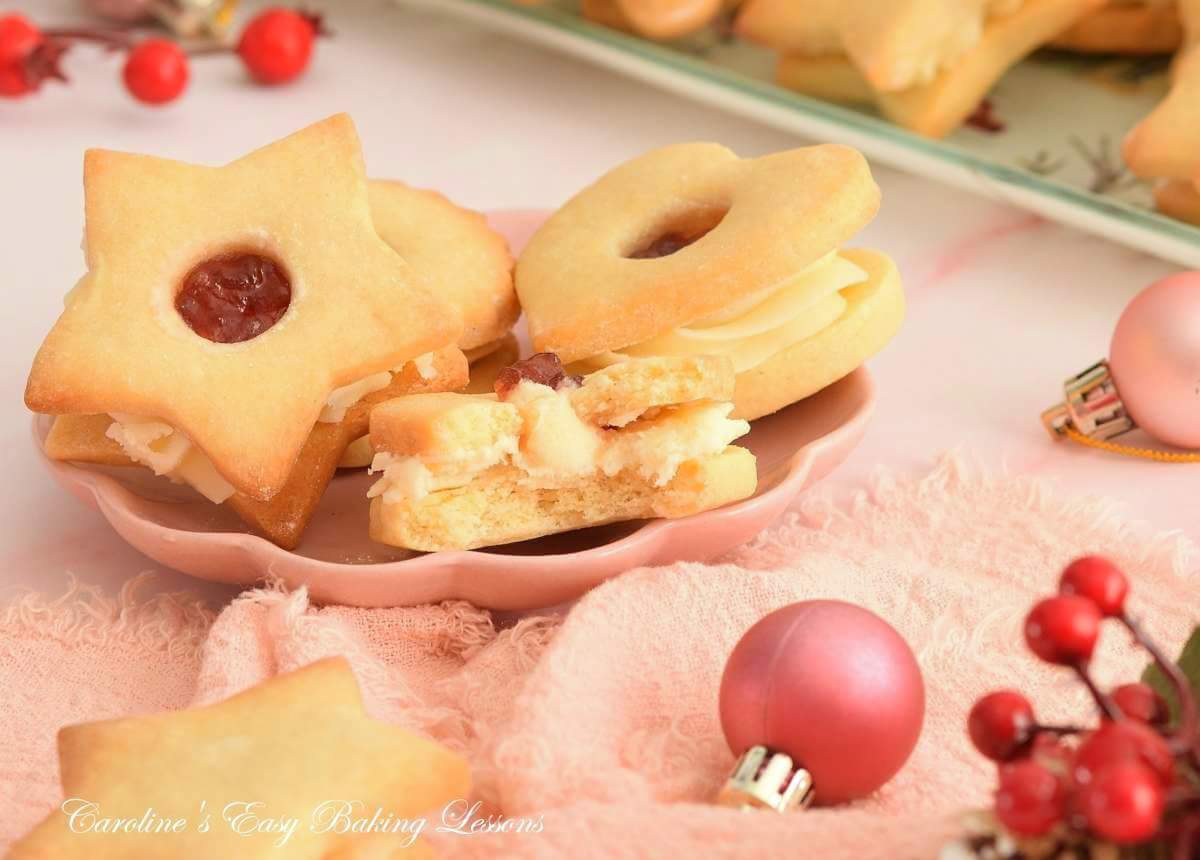
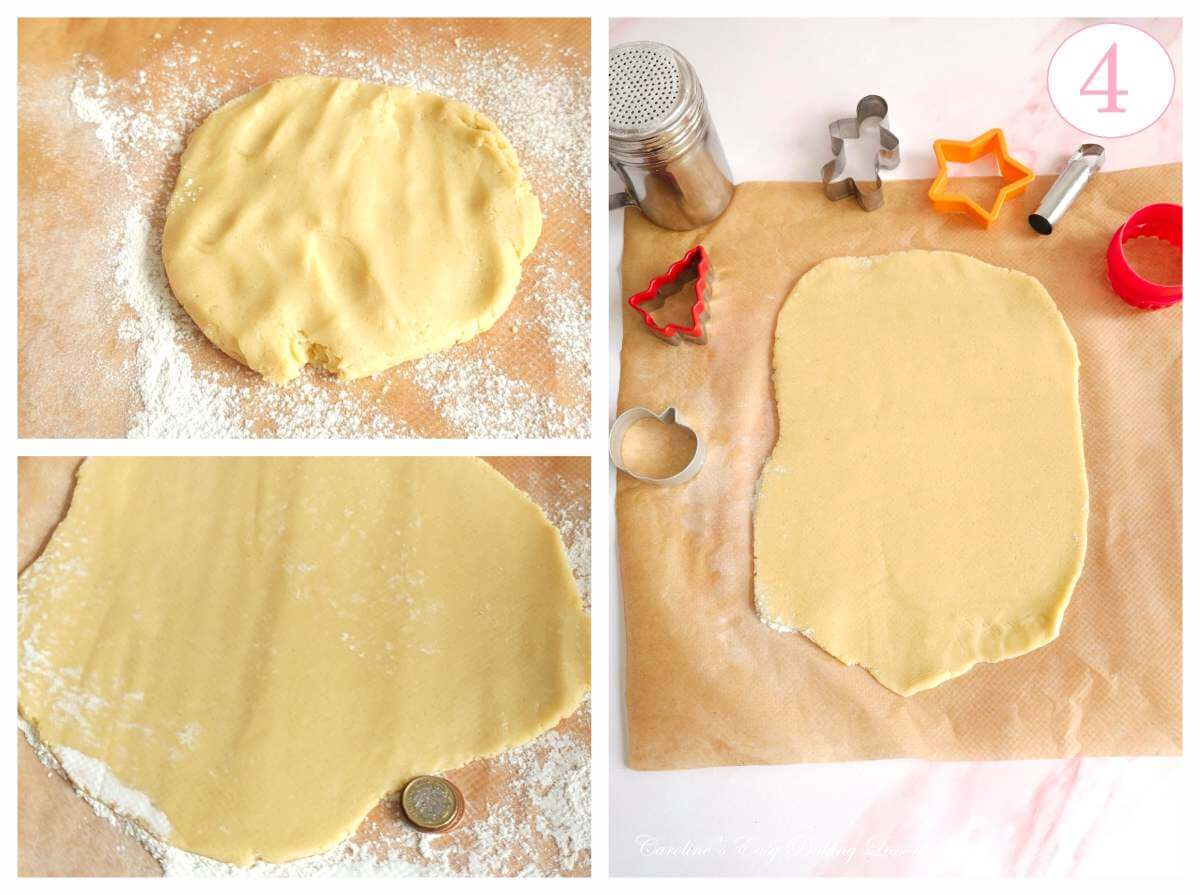
The cookie cutters I used in the recipe testing and in these photos included a 5¾cm (2¼”) round, fluted edge cutter for standard Jammie Dodgers. A 6cm (2.3″) 5-point star, 6cm (2.3″) tall Christmas tree, 5.5cm (2″) pumpkin, 7.5cm (3″) tall gingerbread man and a 5.5cm (2″) love heart.
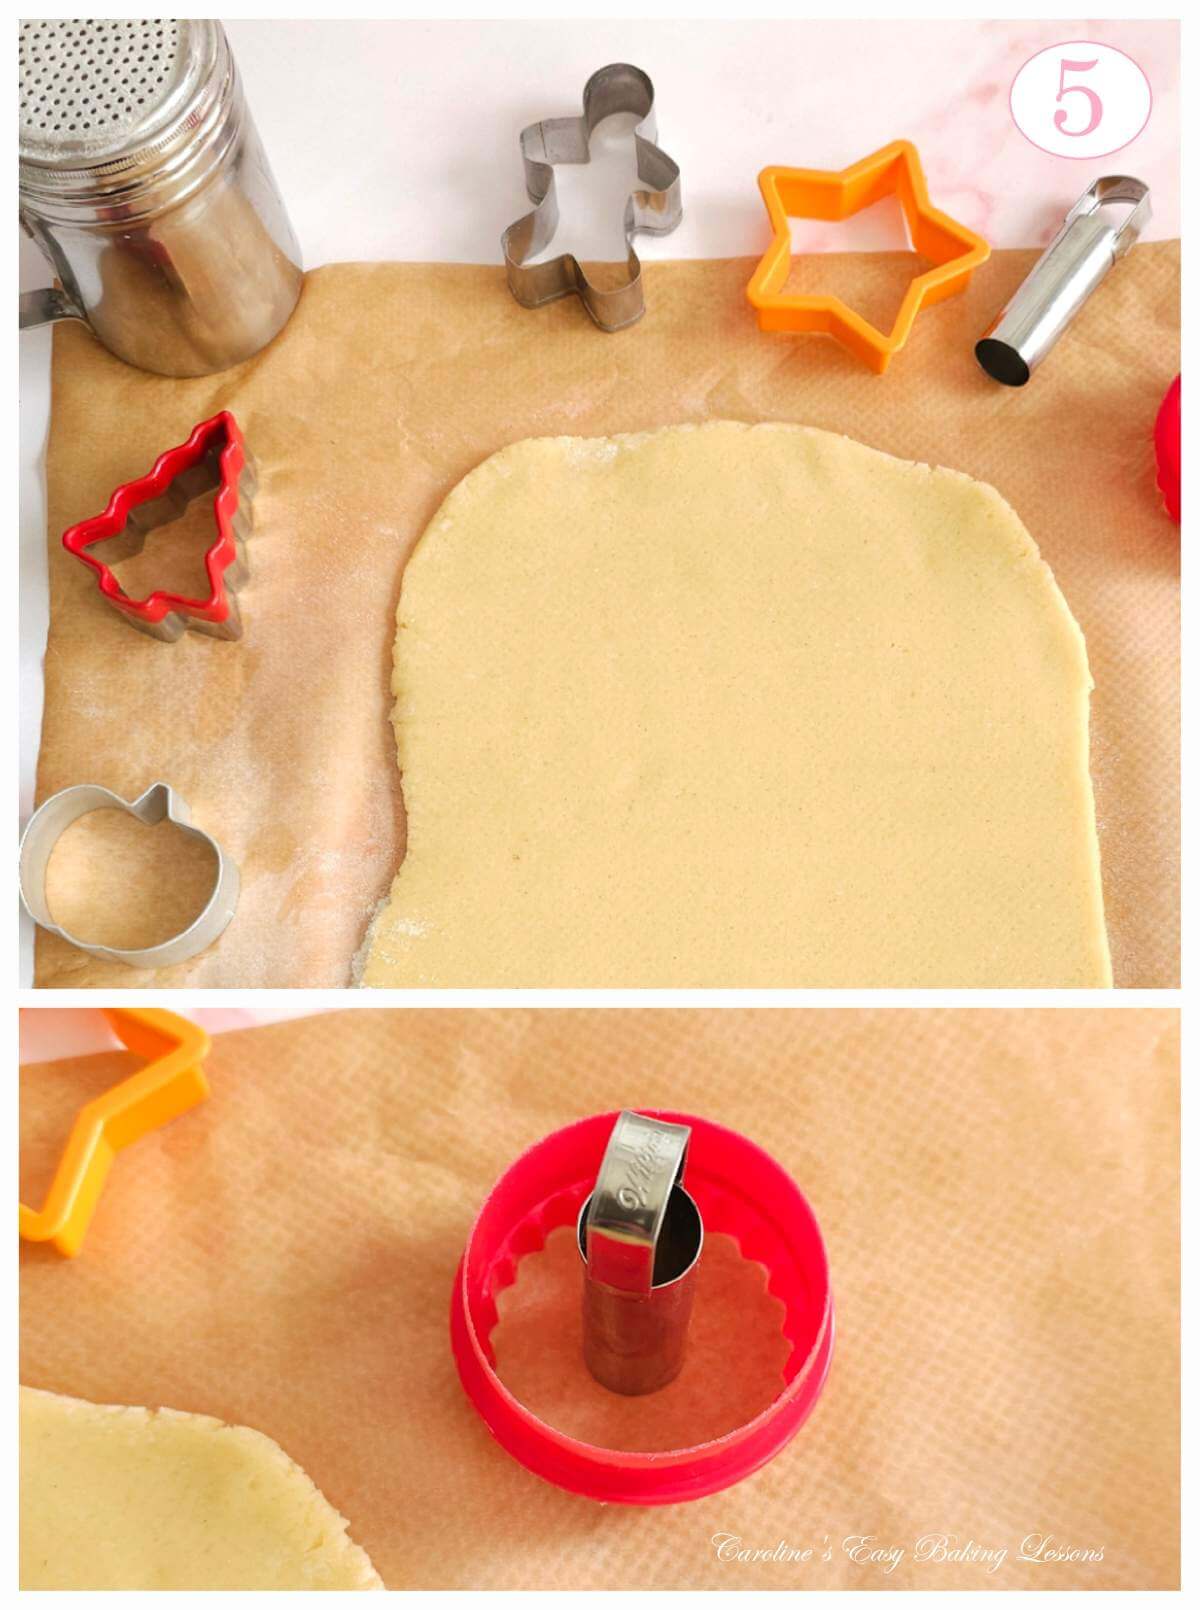
For the cut-out centre, I used a 18mm (2/3″) Wilton cupcake corer but an apple corer would work too.
The opposite end of a small to medium piping nozzle would work too, but harder to get out.
Small pastry and fondant push-release cutters like love hearts, and stars would also be good.
Recipe Yield
This recipe makes at least 20 Jammie Dodger biscuits using the same size cookie cutter I used.

Seasonal Varieties
These Jammie Dodgers, are great for customizing for any season or theme.
Try using Halloween or Autumn/Fall cookie cutters. Use some holiday shaped cutters to make great gifts for Christmas.
Use some heart shaped cutters for the perfect Valentine’s day or date night treat!
In the photos we have themed for Christmas, Autumn & Valentines. But the possibilities are endless.
Step-By-Step Instructions

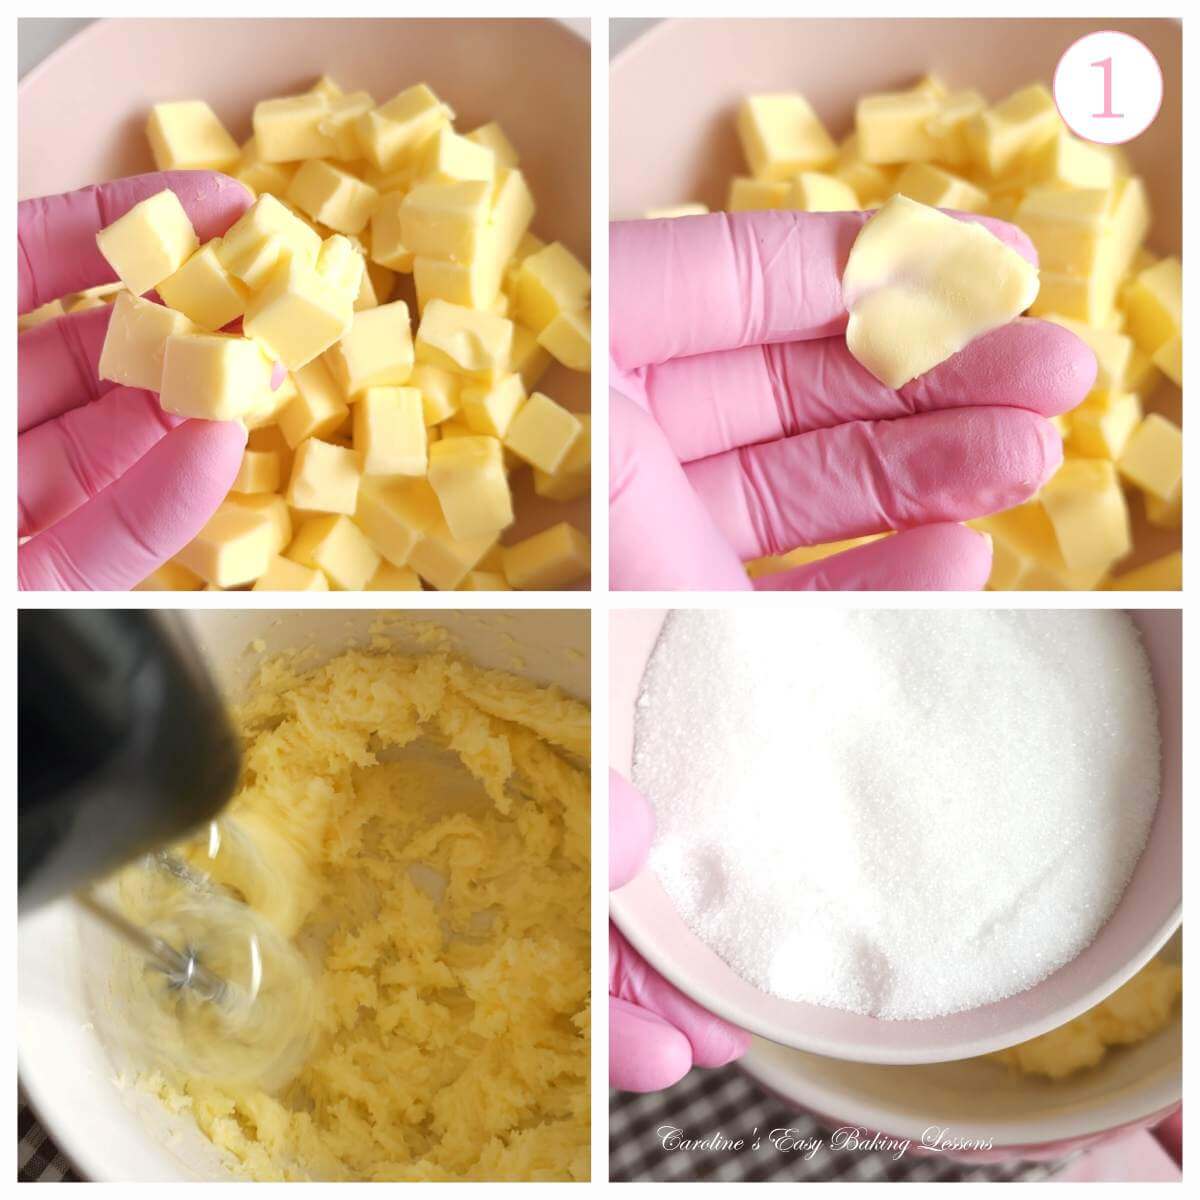
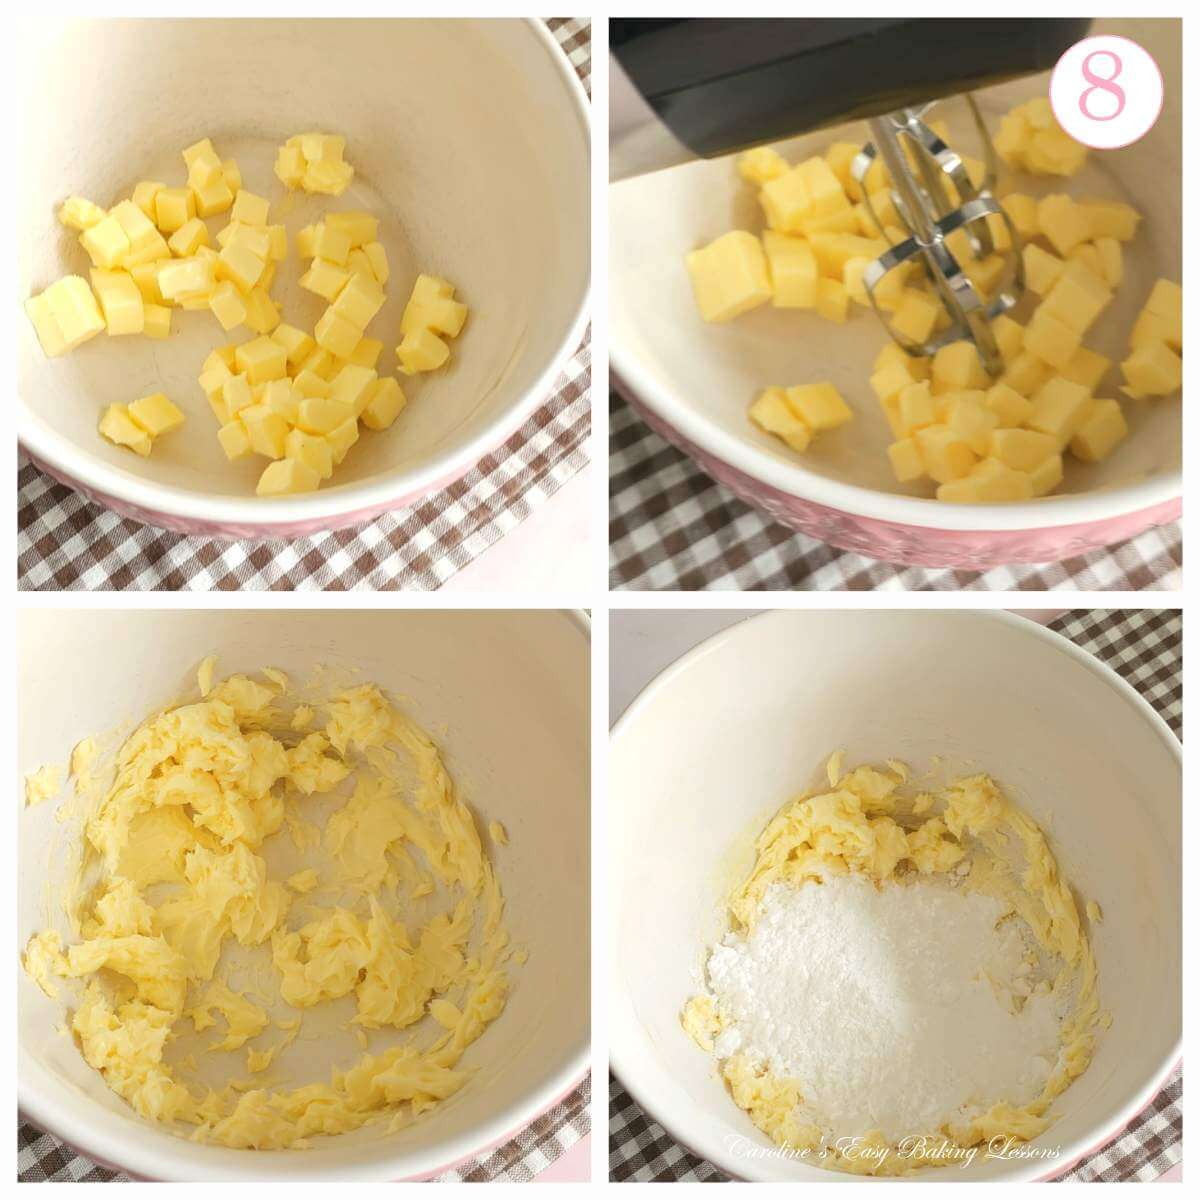
1.Start off by cubing the butter small (about ½” (1¼ cm) in size), as the smaller surface area softens the butter quicker. If you run out of time, try this video hack to soften butter in 12 minutes. (See Photo collage 1).
2. Add the softened cubed butter to a mixing bowl and use an electric mixer to beat the butter for about 1 minutes.
3. Then add in the sugar & continue beating (known as ‘creaming’), until well incorporated, soft and spreadable and slightly paler in colour. See Photo collage 2 below.

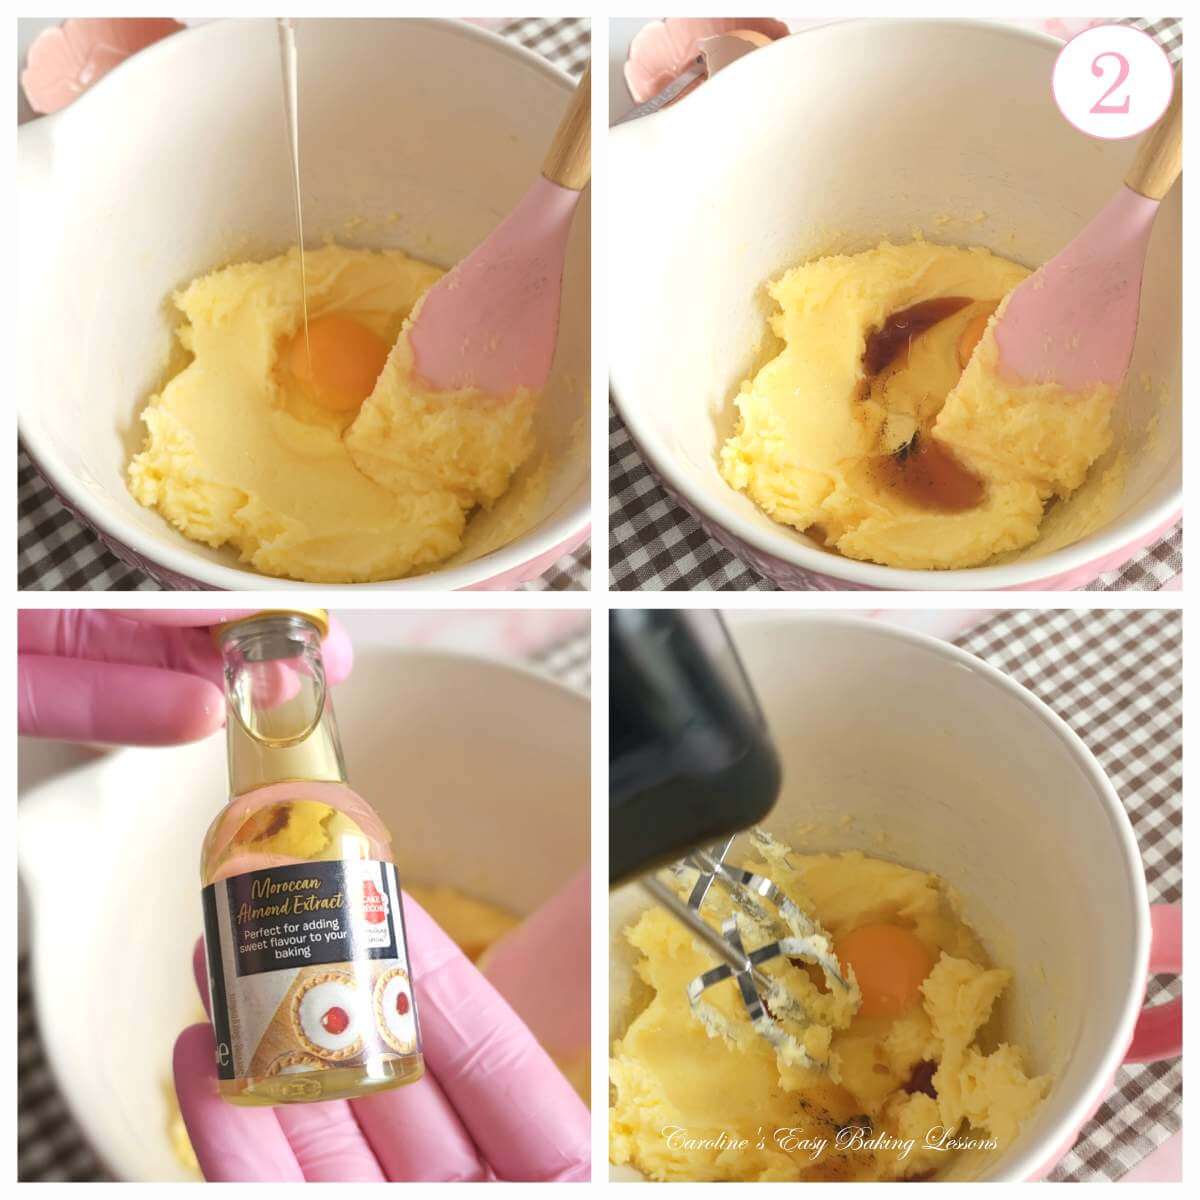
4.Next, add in the egg, followed by the vanilla extract & then the almond extract.
5. Beat with a mixer, just until combined. (About 20-30 seconds).
6. Combine the baking powder with the bowl of flour and mix through. Followed by the salt.
7.Now add the flour mixture on top of the wet mixture.
8. Roughly mix the flour in by hand with a spatula, before moving onto using a mixer, on low speed!


9.Then use the mixer on low to medium speed until all the flour is combined and absorbed. Scrape down the sides of the bowl and continue mixing until the mixture looks a beige colour and moist, but still in pieces. (See video & photo collage 3 for reference.)
10. Now use your hands to gently bring the dough together, (rather than over-mix with the mixer). Form into a smooth soft ball & flatten into a disc shape.
See Photo collage 3.

11. Half the dough and form back into 2 discs. Place one disc of dough back into the bowl.
12. Take the second disc of dough & place on floured baking/parchment paper, followed by another sheet on paper on top.
13. Roll out the dough to a thickness of 7-8mm (1/4-1/3″), about a thickness or 2 £1 coins plus a 2p coin. Repeat with 2nd disc of dough and layer on a tray that fits your fridge, with paper in-between & chill for 1 hour.

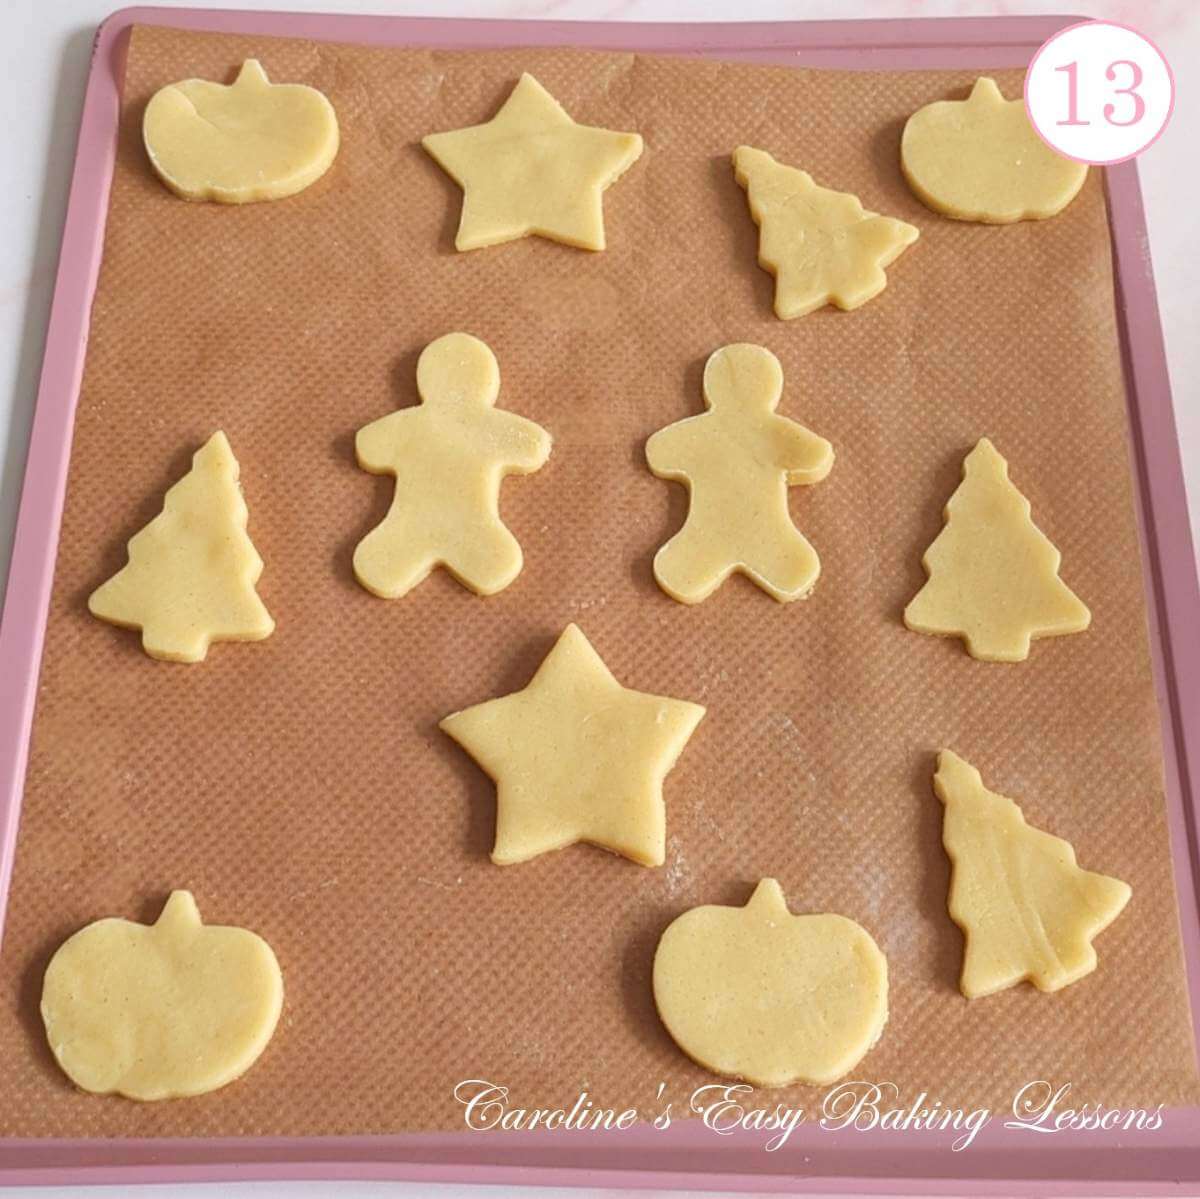
14.Once the 2 sheets of dough have chilled for 1 hour (any longer and might be too hard to cut out), prepare your cookie cutters you will be using.
15. I used the fluted edge of a 5¾cm (2¼”) round cutter (same one as I use for my air fryer British scones. The round is good for all-year round version of the Jammie Dodgers.
I used a cupcake corer for the middle cut-out, but the opposite end of a small-medium piping nozzle would work too. (See Photo collage 5). You could also use a small star or love heart shaped pastry cutter.
Other options are large stars, Christmas trees (did reindeer one time), pumpkins, gingerbread man etc. That do not always require you to have a cut-out in the top biscuit. See Photo collage 5.

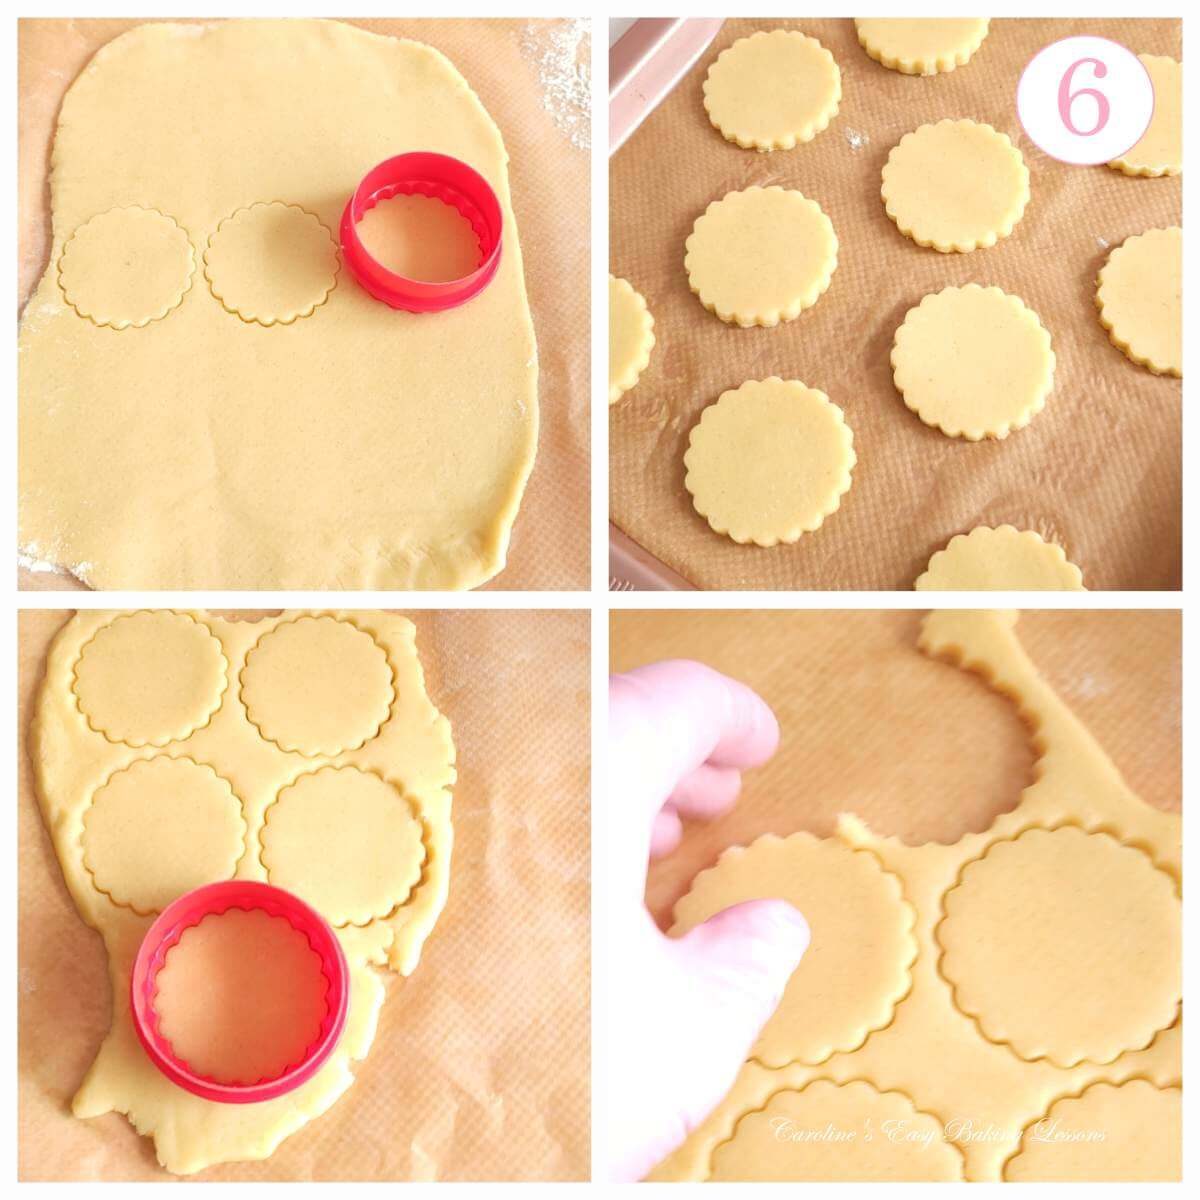
16. Dip your cookie cutter in a small dish/plate of flour, before cutting out as many cookies as you can. from this first sheet of dough. For the round biscuits, use the fluted edge of the cutter if you can.
17. Pull back the excess dough, before using a palette knife to carefully transfer the biscuit cut-outs to a paper lined baking tray/baking sheet (or even a tray that will fit in your fridge). Don’t worry about leaving gaps.
18.Re-roll the excess dough and continue cutting till the dough is used up. ***If using shaped cookie cutters, make sure you have pairs of each shape to make a sandwich cookie.


19. Fill the baking trays with all the cut outs, with no need to leave spaces in-between as we are only chilling just now.
20. Use a very small round cookie cutter, opposite end of a medium sized piping nozzle or even a cake or apple-corer, to cut out a small circle in the centre of some of the cookie dough. These will make the ‘top’ of your sandwich cookie, so make sure half have this cutout. (See Photo collage 7).
21. Re-roll the remaining small pieces of dough for more biscuits.
22. Place the dough cut-outs in the fridge for 1 hour to relax and firm up. Meanwhile you can prepare the buttercream & have a tea or coffee!

Making The Buttercream
1.Prepare your buttercream filling, which can even be made a day before using.
2.Make sure your butter is soft and cubed like before, before adding to a mixing bowl and beating until softer and no longer in cube shape. (About 30-60 seconds).
3.Gradually sieve over 1/4 – 1/3 of the icing (powdered) sugar into the butter. (Alternatively, pre-sieve the sugar when measuring/weighing out).
4. Mix briefly by hand before using the mixer until combined.


5. Add more of the sugar, till all is added.
6.Continue beating the mixture while its consistency goes through stages before being ready.
7. In Photo collage 9, you can see these stages. The mixture is like sand, but with slightly bigger/more coarse size pieces. (image 1, top left).
8.The next stage, the pieces become larger, and larger and if you have not made buttercream before, you might think you have done something wrong by the look of the texture. (See image 2 & 3 in the photo collage).
9.Just keep going and it will suddenly become a smooth but thick buttercream. Some might stick in the beater but is fine. Now add the vanilla extract & milk, and beat again for about 10 seconds or until combined. (See collage & video).

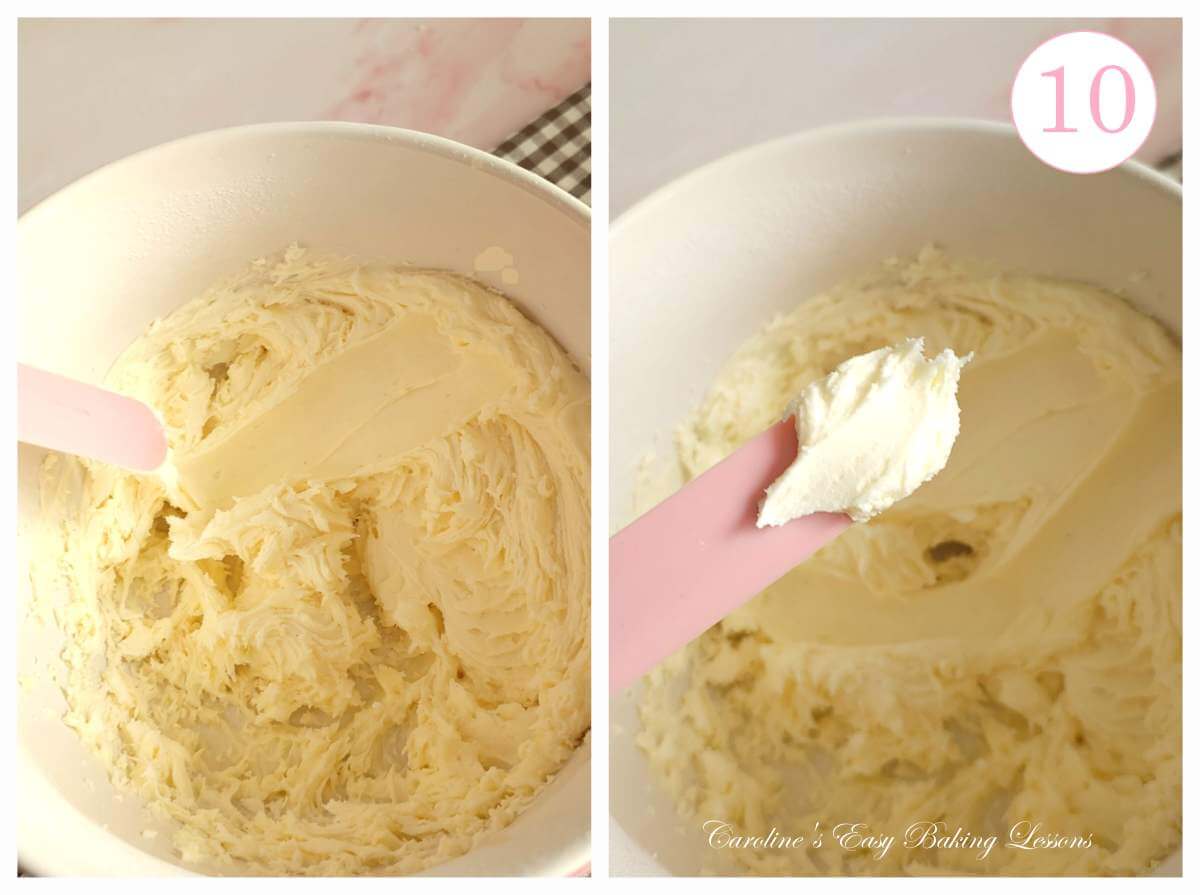
10. To release any buttercream from the beaters, simply keep the mixer on, inside the bowl, slow the speed down and have the beaters above the level of the buttercream and watch the buttercream come off.
11. Scrape down the sides of the bowl and test the buttercream that should be smooth and silky & now spreadable. (See Photo collage 10).

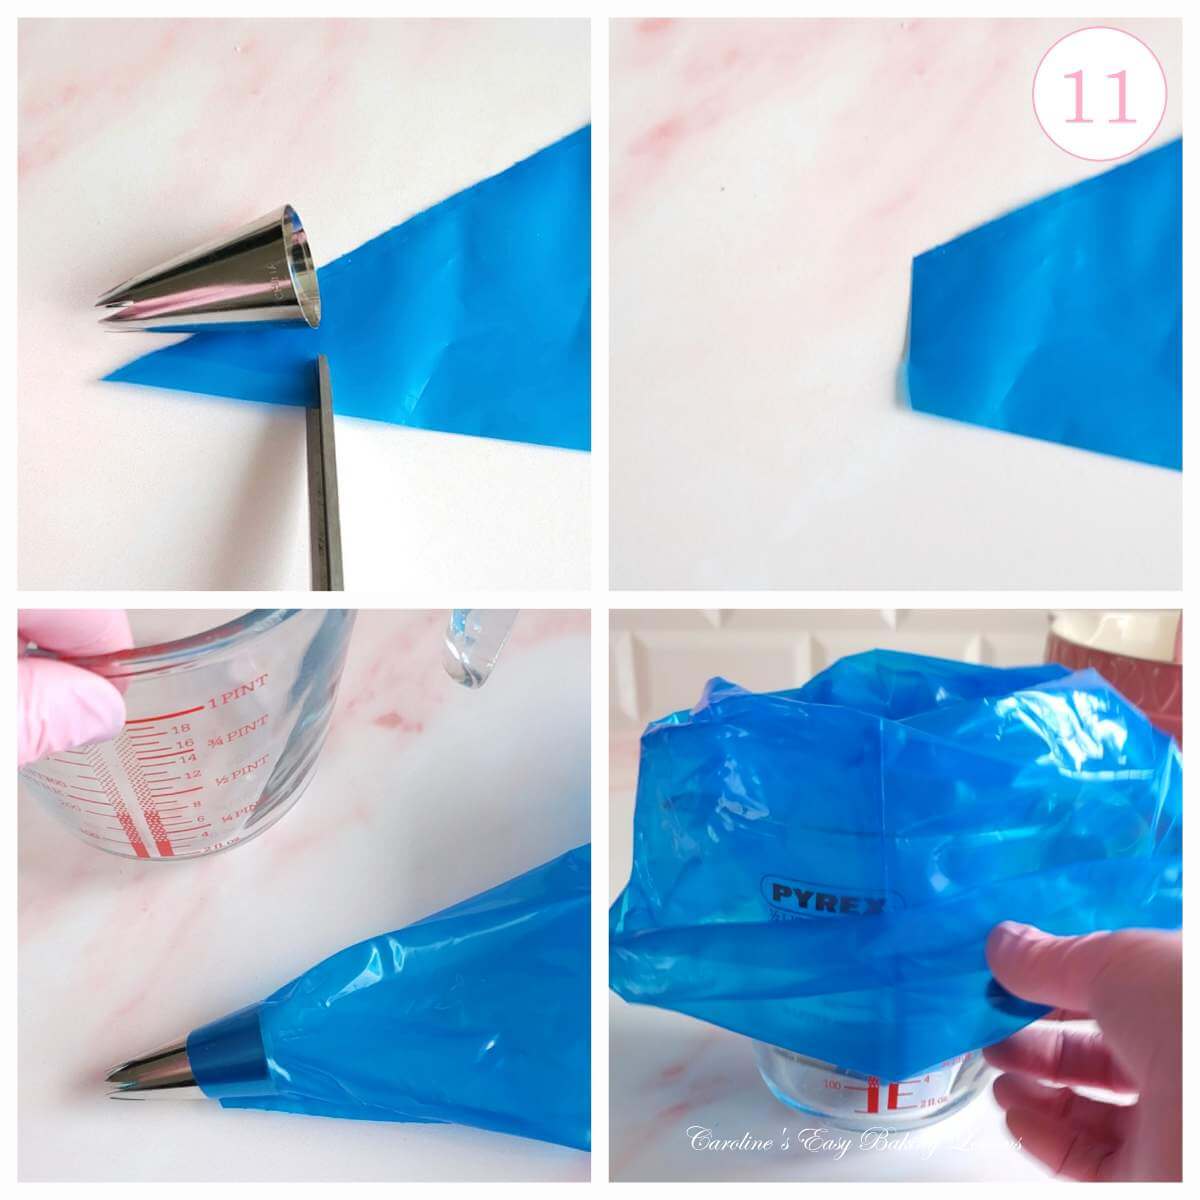
12.Line up your piping nozzle at the end of the medium-sized piping bag tip to see where to cut off. (See photo collage 11).
13.Cut off the end, in a straight line, then open the bag, slipping the nozzle inside.
14. Take a jug or extra large cup and place the piping bag inside. Bend the nozzle so it points upwards,
15. Open the bag and turn the ends over the sides of the jug. (See video & Photo collage 11).

***Using the jug, keeps the bag open, making adding the buttercream much easier and hands-free.
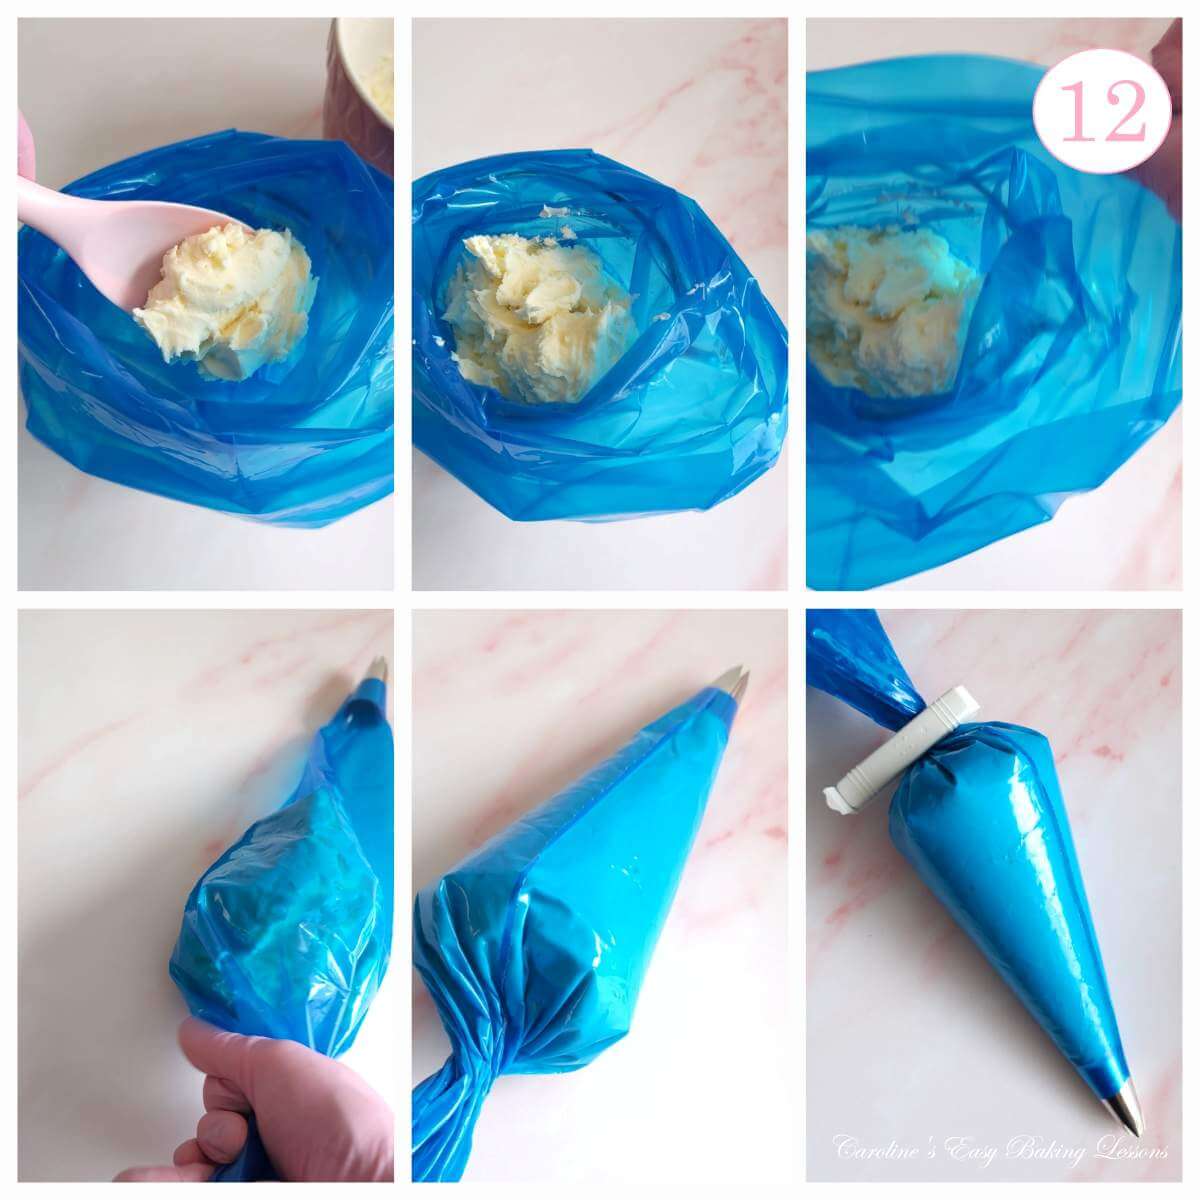
16. Use a spoon and spatula to scoop the buttercream into the piping bag. Continue till no more than 80% full or all the buttercream is added.
17.Hold closed the end of the bag and squeeze the buttercream along to the nozzle tip.
18. Once near the tip, twist the end of the bag tight and close with something like a food bag clip or even a peg. (See Photo collage 12). Leave till the biscuits are ready, or place in the fridge till ready to use. (Making sure to take out about 10 minutes ahead of time so not too stiff to pipe).

Baking The Biscuits
1.Preheat your oven to: 180°c/ 160°c Fan Oven/ 350°f/ Gas Mark 4, to coincide with the end of the 1 hour chill time.
2. Once heated, remove the trays of biscuit cut-outs from the fridge and spread them over 2 – 3 baking trays/baking sheets, leaving a gap of at least 2.5cm/1″ **Any smaller ones or the ones with cut-out centre, can be placed on one tray together.
3. Bake the biscuits for 8-11 minutes, until just beginning to colour on the edges and will move when gently nudged. **Do not try to pick them us, as fragile. Note, that smaller or thinner rolled biscuits will bake a little faster.


4. Remove from the oven and leave as they are, on top of cooling racks for 5-10 minutes.
5. Carefully transfer the biscuits off of the baking tray and onto the rack, via the paper. Leave to cool completely before filling.
***These Jammie Dodger biscuits can be made up to 3 days ahead of filling them. Just allow to cool completely before placing in a paper lined cake or cookie tin (use the paper you use to bake them on). Alternatively use an air-tight container and keep out at room temperature.

Assembling The Biscuits
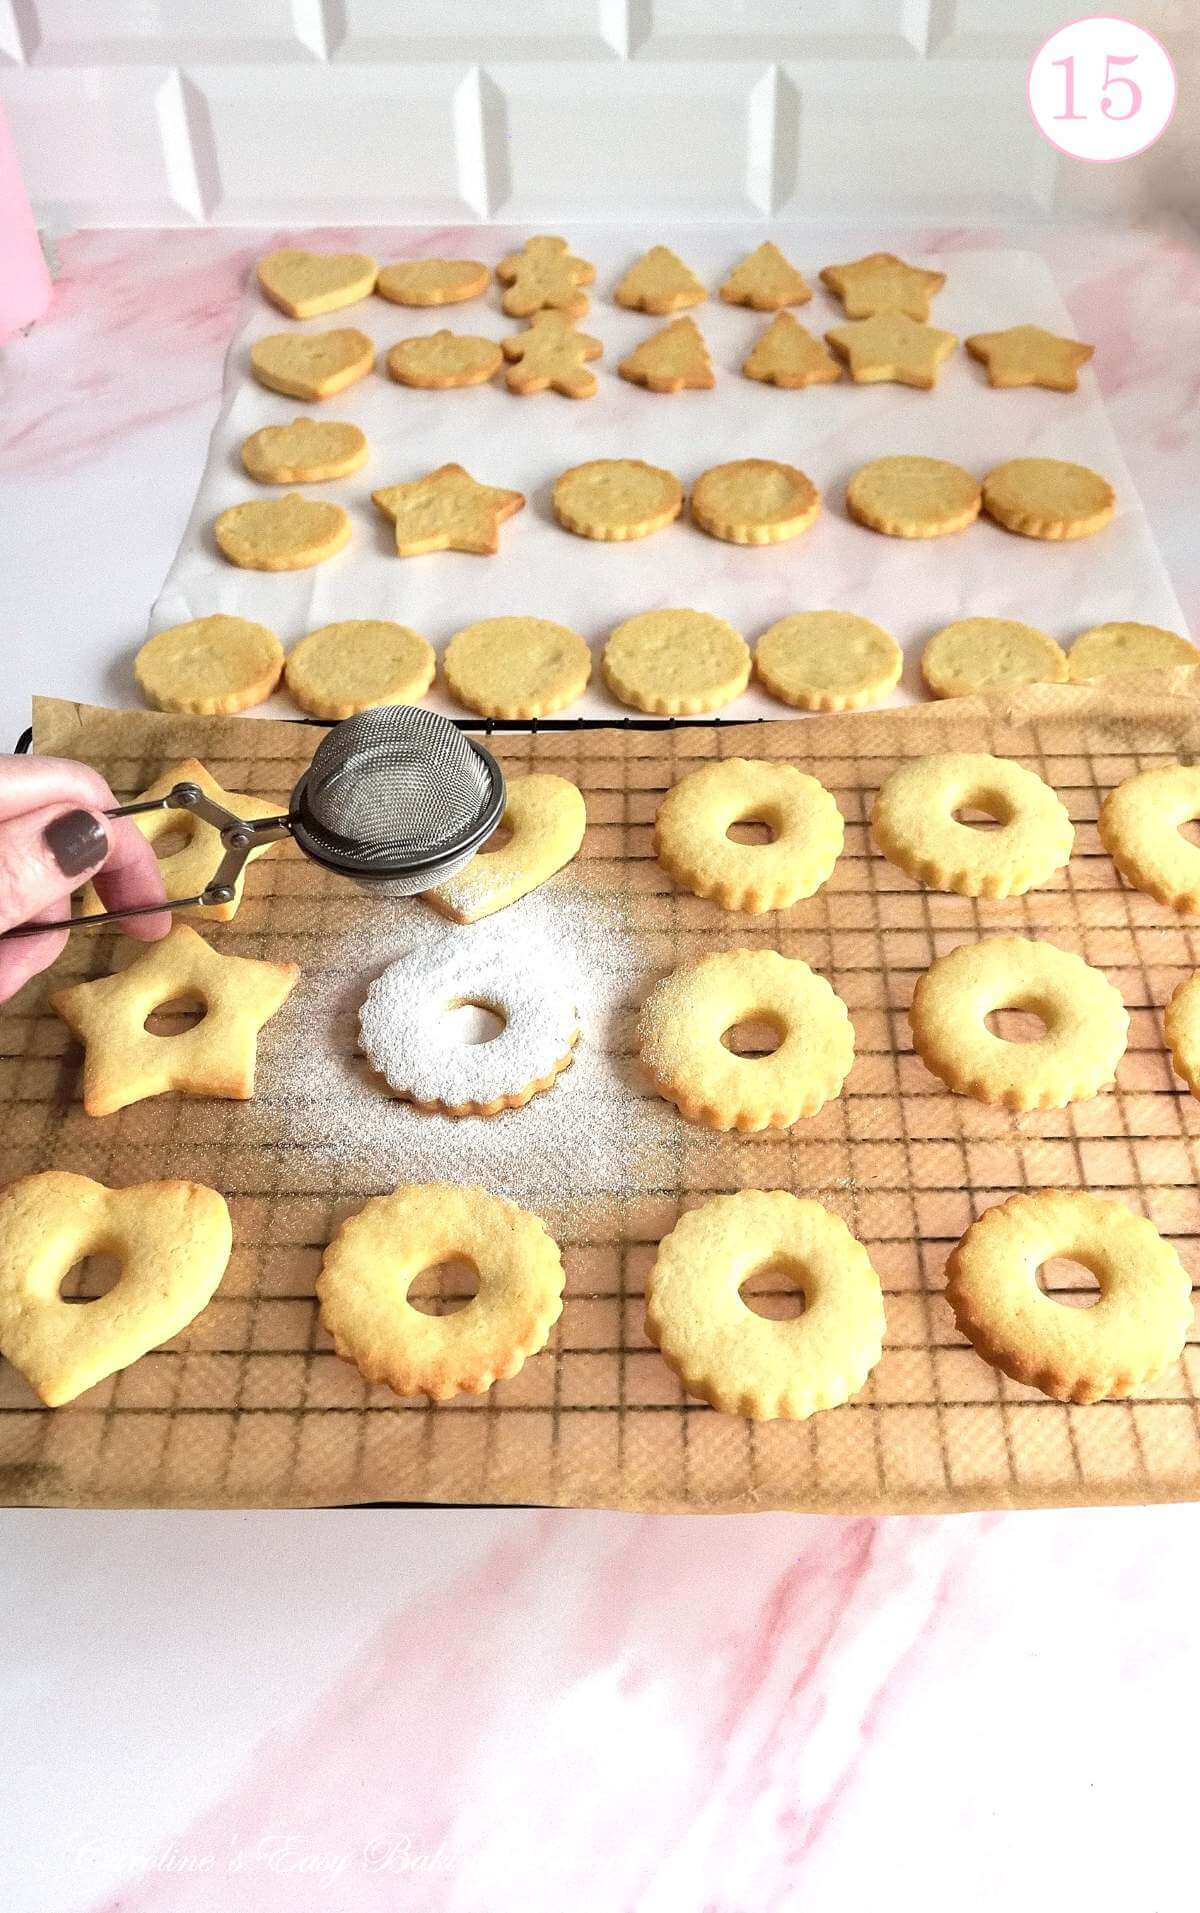
1.Once ready to fill the Jammie Dodger sandwich cookies, first start by cutting 2 large sheets of baking/parchment paper. Then start to ‘pair up’ the biscuits. Similar themed shaped ones together, or the ‘top’ & ‘bottoms’.
2. Now separate the ’pairs’ onto the 2 sheets of paper, by taking the first ‘top’ biscuit & placing on the first sheet of paper and the ‘bottom’ onto the other sheet, but turn it upside-down. Repeat with the rest, keeping the order so that pairs are still going to come together.
(See Photo 15 for what I mean).
You can dust the ‘tops’ of the biscuits with a fine dusting of icing/powdered sugar but not typical for Jammie Dodgers. To do this for the cookies with a cut-out top, dust them with sugar when you have the ‘tops’ altogether and before assembling the seasonal Jammie Dodgers, as shown in Photo 15.

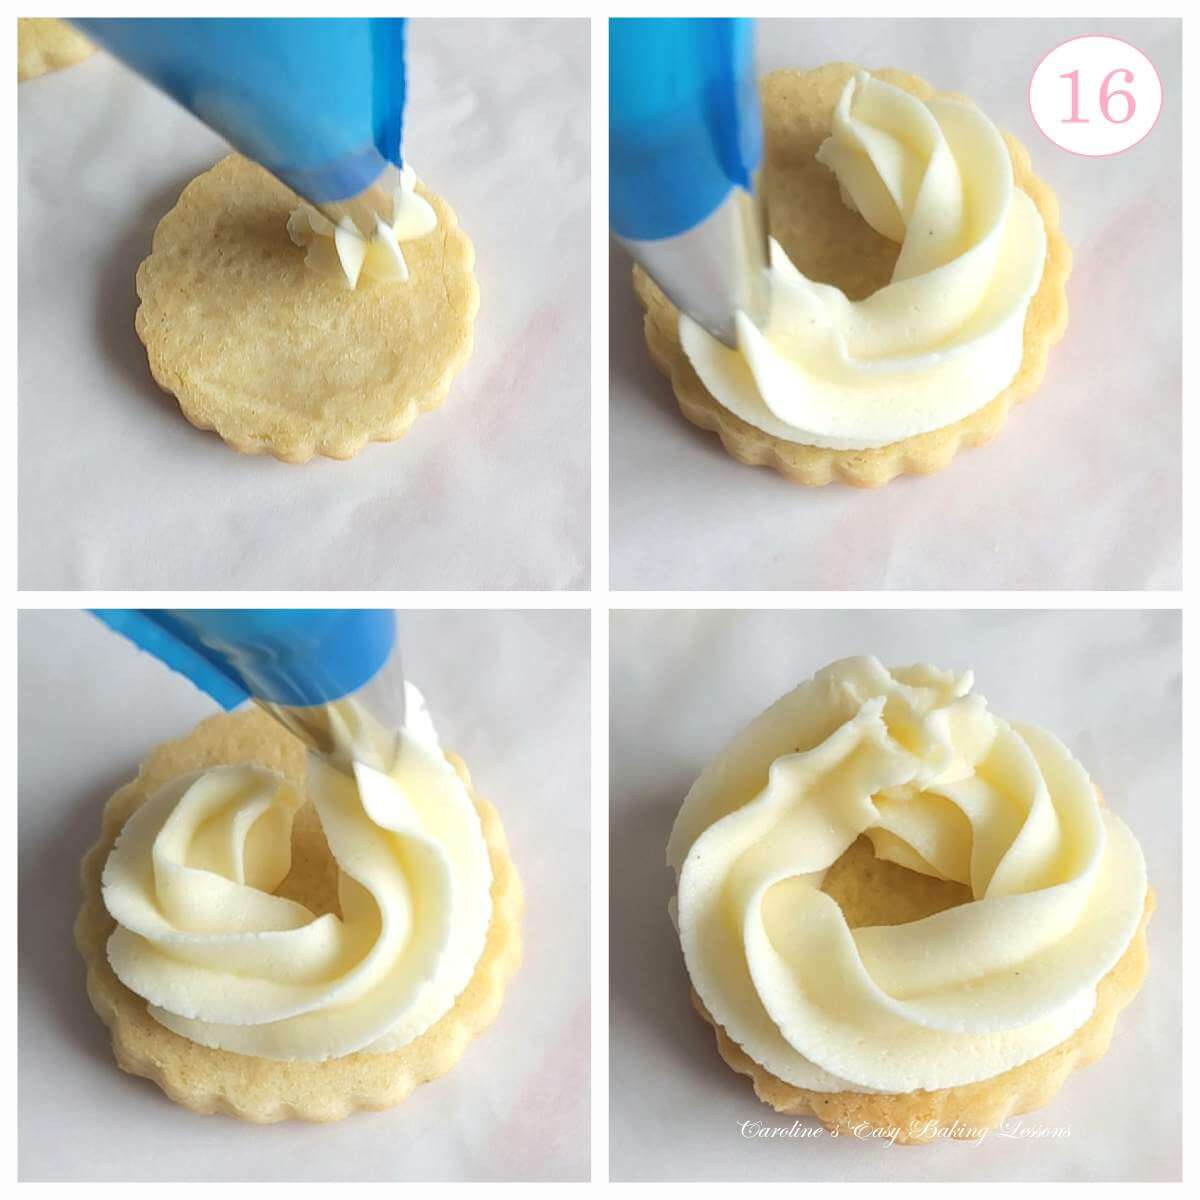
3. Cut another small piece of paper to work on assembling one biscuit. And place the first ‘bottom’ biscuit down, upside-down.
4. Take the filled piping bag, maing sure it is closed tight, use your dominant hand to hold where the nozzle is and the other hand to hold where the bag is twsited shut. Squeeze the bottom endof the bag, have the nozle piping upwards and stop once the buttercream is about to come out of the nozzle.
5. Now place the tip of the nozzle onto the biscuit, on the outer edge, squeeze the bag and let the buttercream flow out, whilst you use your dominant hand (near the nozzle), to make a circular motion and ring of buttercream.


6.Just before coming to the end, release the pressure, lift up a little (and since the buttercream is firmer, use a butterknife to stop the flow).
***Note, when piping whipped cream for example, lifting up & releasing pressure is enough to stop the flow of the cream.)
7.Alternatively, you can use the dominant hand to rotate the biscuit in a circular motion, while you pipe the buttercream at the same time.
8. Repeat with each biscuit base, or you can just fill & assemble one biscuit at a time.

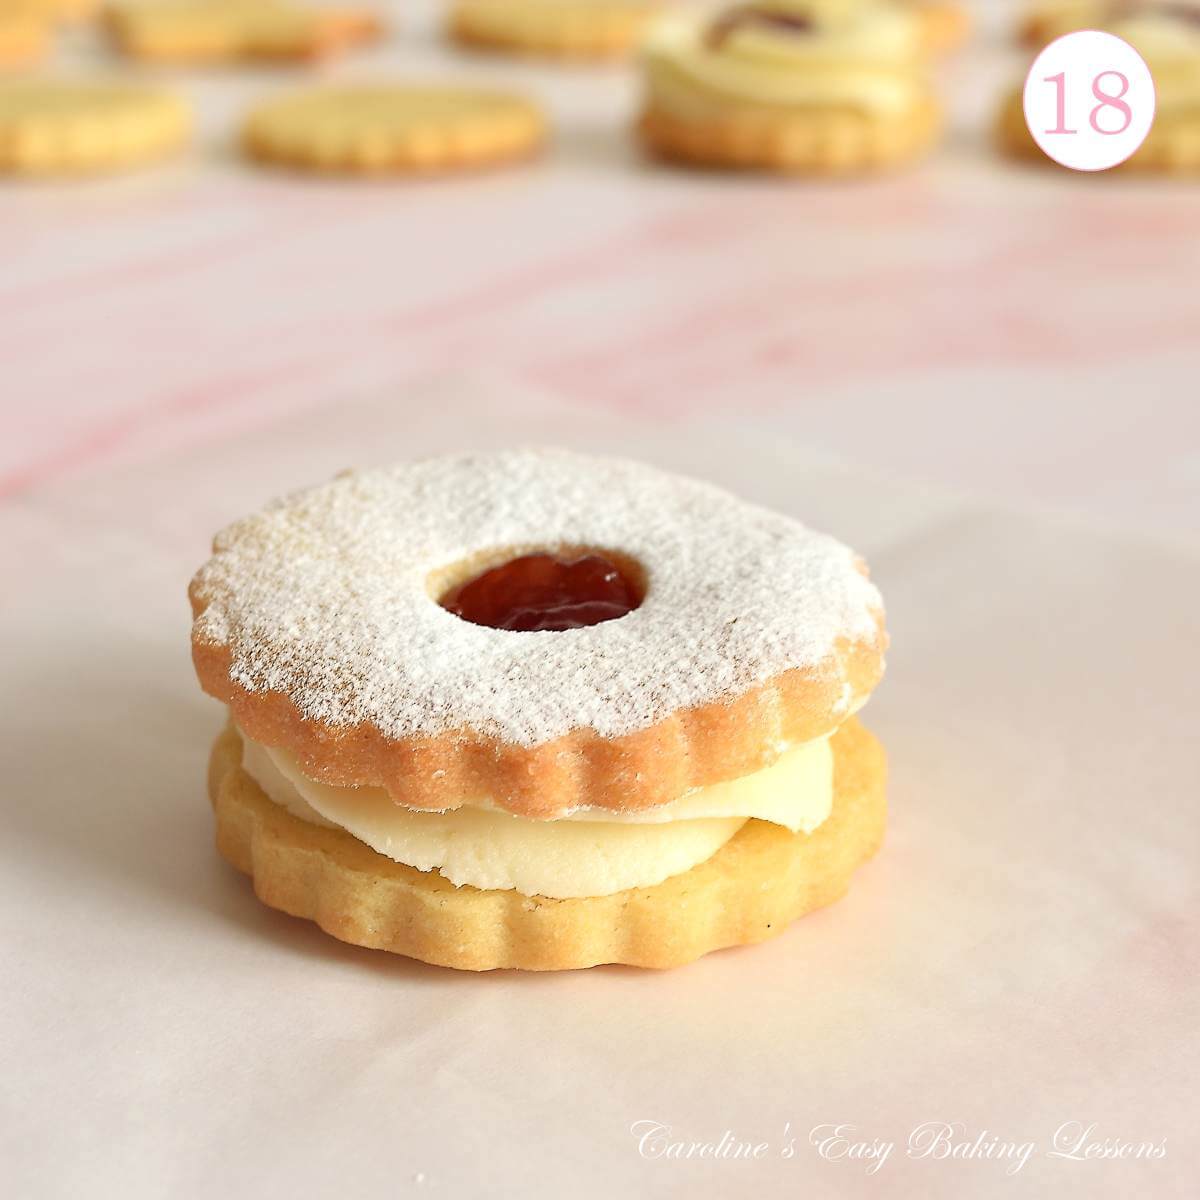
9.Add a small spoon’s worth of jam into the centre of the ring of piped buttercream.
You can add a little or enough to come almost level with the height of the buttercream.
10. Take the corresponding ‘top’ biscuit and gently place on top, and only squeezing together ever so gently.
See Photo 18, (where the top was dusted with sieved icing/powdered sugar – optional).


Serving & Storing
1.Serve the sandwich cookies once assembled or store for enjoying later with a favourite hot drink.
2.Add as one of the cookies on your cookie plate this Christmas, or add to a food gift hamper. Great for gifting anytime of the year with or without seasonal cutter.
3.Store the biscuits in a metal cake or cookie tin, with the paper used to bake them on, (can be stacked). Leave at room temperature and these will be fine for at least 4 days. In warmer times, you can store in the tin, in the fridge, and this will give a slightly firmer buttercream filling, lasting up to 1 week. Just be careful of condensation, that can make the biscuits more soft.

Tips For Gifting
To keep the sandwich cookies nice and neat for gifting, I recommend placing each biscuit in a paper cupcake case (or even smaller fairy paper cases).
It is also a nice way to present them and eat them if there is no plate to catch the crumbs.


Use the paper cases and add to a pretty tin, lined with some tissue paper (or even baking/parchment paper) for easy gifting. Add a ribbon and tag, with the biscuit name, how to store & that almond extract is used, just in case anyone has allergies. Or add to a gift box and just advise them to store in a tin or air-tight container.
Alternatively, you can add some in with your Christmas cookie plate with lots of other different cookies & sweets, again in the cases, to keep best & not take on any strong flavours from other cookies.
DIFFICULTY LEVEL: easy, beginner
Recipe Card
Holidays Jammie Dodgers

Equipment
- Digital scales or measuring cups
- Measuring Spoons
- Electric Hand/stand mixer
- Baking/parchment paper
- Flour (for dusting)
- Cookie Cutters (5¾cm (2¼”) round fluted, or other seasonal cutters*)
- Palette knife, or butter knife
- 2-3 Baking tray/sheets (full sized)
- Cooling rack
- Piping bag and nozzle (see notes below)*
- Clip or peg
Ingredients
For The Biscuit Dough:
- 170 grams Unsalted Butter (6 oz, ¾ cup, cubed small & softened)*
- 134 grams Sugar (4¾ oz, ⅔ cup)
- 1 Medium – Large Egg (large to extra-large US size, room temperature)
- 2 tsp Vanilla Extract (see notes*)
- ¼ tsp Almond Extract
- 280 grams Plain Flour (10 oz, 2¼ cup, All Purpose Flour)
- ¼ tsp Baking Powder (rounded ¼ teaspoon)
- ¼ tsp Salt
For The Filling:
- 80 grams Unsalted Butter (3 oz, ⅓ cup, softened*)
- 250 grams Icing Sugar (8¾ oz, 2 cups, sieved)
- ½ tsp Vanilla Extract (see notes*)
- 2 tbsp Milk (30 ml, 1 fl oz*)
- 85 grams Raspberry Jam (3 oz, 8 tsps, ½ cup*)
Instructions
To Prepare The Dough:
- Cube the butter small (about ½”, 1¼ cm) because smaller surface area softens quicker. Once softened, add to a mixing bowl & beat with an electric mixer for about 1 minute. Then add the sugar and 'cream' together till incorporated, spreadable & a little paler in colour.
- Add in the egg, then the almond extract & vanilla extract, beating for about 20 seconds until combined. Mix the baking powder & salt in with the flour, before adding on top of the wet mixture & roughly mixing by hand.
- Beat on low to medium speed with the electric mixer until all the flour is worked in. Scrape down the sides & mix until a beige colour but still in pieces. (See video for reference). Then use your hands to bring the dough together into a smooth soft ball, before flattening into a disc shape.
- Divide the dough into 2 discs and place one back into the bowl. Place the second disc of dough onto flour dusted baking/parchment paper with a second sheet on top. Roll out to a thickness of about 7-8mm (¼-⅓″), then repeat with the rest of the dough and chill stacked in the fridge for 1 hour.
Cut Out The Biscuits:
- See the Step-by-step instructions and equipment notes before this Recipe Card for details on the cookie cutter size & shapes. Start by dipping the fluted edge of the round cookie cutter in some flour before cutting out the biscuits. Then pull back the excess dough & use a palette knife to carefully transfer to a paper-lined baking tray/sheet (or tray that will fit in your fridge). No need to leave gaps.
- Re-roll the excess dough, and cut out more cookies till all the dough is used up. With a small round pastry/fondant cutter, corer or opposite end of a small piping nozzle, cut out the centre of half of your round biscuit cut-outs. Re-roll the excess dough for more biscuits. Fill & stack the baking trays & place in the fridge to chill for 1 hour.
Prepare The Buttercream:
- The buttercream can be made now or a day or so before. Have the unsalted butter cubed small and softened before adding to a mixing bowl & beating for about 30-60 seconds till no longer cubes. Gradually adding the sieved icing sugar in 3 to 4 increments, mixing briefly by hand before using the mixer on a low speed to begin with. Continue beating until the mixture becomes a thick but smooth buttercream. (New to making buttercream? Then check the step-by-step instructions of the stages it goes through). Next add the vanilla extract & milk, and beat for 10 seconds to combine & become smooth, silky & spreadable.
- Cut the piping bag tip to fit your nozzle (see equipment notes below) before placing inside & use a jug to hold open the piping bag. Scoop the buttercream into the bag, twist shut and squeeze the buttercream to the nozzle end, before twisting & tightening again & closing tight with a clip or peg.
Baking The Biscuits:
- While chilling the biscuit cutouts, pre-heat the oven to: 180°c/ 160°c Fan Oven/ 350°f/ Gas Mark 4. Remove the trays form the fridge and spread the biscuits out leaving a gap of at least 2½ cm/1″ and place smaller biscuits on the same tray. Bake for 8-11 minutes till baked, edges just starting to colour & will move when gently nudged. **Do not try to lift.
- Leave on the tray on top of the cooling rack for 5-10 minutes, then transfer to just the rack, using the paper. Leave to cool completely before assembling. Can be filled up to 3 days later.
Assemble The Biscuits:
- 'Pair up' the biscuits and then separate the 'tops' from the 'bottom' biscuits out onto 2 sheets of baking/parchment paper. And turn the 'bottom' biscuits upside-down. **If you want to sugar dust the tops that have a circle cutout in the centre, do so now by sieving over a fine layer of icing/powdered sugar.
- Take one of the 'bottom' biscuits, still upside-down & pipe on a ring of buttercream, leaving a little gap in the centre. Then spoon on the jam, into the centre. Take the corresponding 'top' biscuit for the Jammie Dodger, and carefully place on top, only gently squeezing together. Repeat with the rest of the biscuits until all the sandwich biscuits are paired up.
Serving & Storing:
- The Seasonal Jammie Dodger biscuits can be served now or stored for later. Best stored in a metal cake or cookie tin and they will be fine for at least 4 days. Store in the fridge when room temperature is warm, and the buttercream will firm up. Just keep in the tin, lined with paper and be careful of condensation. **Tip, sit each biscuit in a cupcake or fairy cake paper case.
Video
Notes

 Milk – any type of milk, lactose-free or cream can be used.
Jam – raspberry jam/preserve/jelly is used. You can use a little more than listed in the ingredients list if you wish.
Cookie Cutters – the standard Jammie Dodgers are best made with a round fluted cookie cutter, about 5¾cm (2¼”) in diameter.
Milk – any type of milk, lactose-free or cream can be used.
Jam – raspberry jam/preserve/jelly is used. You can use a little more than listed in the ingredients list if you wish.
Cookie Cutters – the standard Jammie Dodgers are best made with a round fluted cookie cutter, about 5¾cm (2¼”) in diameter.

 Seasonal Cutters – try love hearts, pumpkins, acorns, Christmas trees, stars, gingerbread men etc for a seasonal Jammie Didger biscuit.
Piping Bag & Nozzle – a medium to large piping bag was used and a Wilton 9M open star-tipped nozzle, but a 9mm closed star-tipped would also be good. A piping syringe could also be used, but the nozzles are smaller sized. Alternatively you could use an unused food bag, with/without a piping nozzle.
Seasonal Cutters – try love hearts, pumpkins, acorns, Christmas trees, stars, gingerbread men etc for a seasonal Jammie Didger biscuit.
Piping Bag & Nozzle – a medium to large piping bag was used and a Wilton 9M open star-tipped nozzle, but a 9mm closed star-tipped would also be good. A piping syringe could also be used, but the nozzles are smaller sized. Alternatively you could use an unused food bag, with/without a piping nozzle.

 Recipe Yield – if you use the 5¾cm (2¼”) round cookie cutter, or other cutter, about the same size/area, you will get at least 20 sandwich cookies. Use smaller or bigger cutters, and this amount will change.
Try some other British biscuits, like chocolate digestives, Viennese whirls or Scottish shortbread.
Recipe Yield – if you use the 5¾cm (2¼”) round cookie cutter, or other cutter, about the same size/area, you will get at least 20 sandwich cookies. Use smaller or bigger cutters, and this amount will change.
Try some other British biscuits, like chocolate digestives, Viennese whirls or Scottish shortbread.


Nutritional Information – I am not a qualified nutritionist & all values are approximate. These values are for 1 Jammie Dodger biscuit, from a yield of 21 sandwich biscuits/cookies, using ingredients as listed above, same cookie cutter size, and using all the jam & buttercream. Use a bigger or smaller cookie cutter and these values will change. All values calculated by MyFitnessPal.com.
Check out some other seasonal recipes by clicking on the images below, or go to the Occasions page & look at the Christmas, Autumn & Vaentine’s recipes.


Subscribe For More Recipes
Want more great recipes, tips, baking information and newsletters? Then please consider subscribing by adding your email address below. Be sure to check for a confirmation email & respond back, so you can follow me & receive your free emails. Your personal information will not be shared with a third party.
Join My Facebook Group
Why not also join my – Facebook group Easy Online Baking Lessons, dedicated to this baking lessons website, as well as providing one-on-one support with myself & my team? Be sure to answer all security questions when requesting to join.
Follow me on social media:
Happy Learning & Baking!
Caro x
Seasonal Jammie Dodgers (Classic British Cookie)
Search For Something You Fancy!
Caroline’s Easy Baking Lessons


