Anna Olson’s Chocolate Pumpkin Bundt Review

Here is my review of Anna Olson's Chocolate & Pumpkin Bundt Cake recipe. Includes how to make your own homemade pumpkin puree & ideas for using every part of the pumpkin for no food waste.
Review Of Anna Olson’s Chocolate & Pumpkin Bundt Cake


This chocolate & pumpkin bundt cake is a recipe I tested and reviewed back in Autumn of last year and actually made for a friend’s birthday. I had been making my own roasted pumpkin puree & had added my recipe to the site. But also had some more pumpkins to use up and that meant more puree to use up. So after a little research I decided on this recipe for Chocolate & Pumpkin Bundt Cake by one of my favourite bakers, Anna Olson


She is actually one of the first bakers I started watching when I first was learning to bake. All her recipes I have ever tried have been successful.
I also was liking the idea of creating a pattern with the contrasting colours of the pumpkin and chocolate cake, as well as using my pretty bundt pan.
Avoid Food Waste
If you are planning on carving a pumpkin this Halloween, why not read my article on How To Use Every Part Of A Pumpkin? Includes some recipes for each part, and how to avoid food waste.
Making The Cake Batter
I began the process by making some buttermilk. Not something you can get everywhere in the UK, but very popular in American recipes. (**See my homemade buttermilk & butter recipe).


To make your own ‘version’ of buttermilk for the recipe, (I say version as it’s not real buttermilk, but rather provides the necessary acidic properties required), you can add either white vinegar or lemon juice to milk. For every 1 cup (240ml) of milk used, you add either 1 tbsp of lemon juice or 1 tbsp of white vinegar. This is enough for any recipe. Add the vinegar or lemon and leave it at least 10 minutes.
On returning, you will see the milk looking a little strange and almost curdled like. (See my photo). But don’t worry – this is normal and just a reaction to the acid, whereby the fat and liquid is beginning to separate. Once like this, it’s ready to use in any recipe.


The recipe has you begin by pre-heating your oven. I rarely do this before starting a recipe as it would heat up too soon and I often find this in recipes (even when I had my old oven).
I also didn’t grease the bundt pan then either. I use a great paste like cake release that I make at home – check out the Cake Lining Paste recipe I use. (See photo collage here). I find it can dry out a little if applied too early, so always apply right before filling the tin. This lining paste is the best for bundts, always works. Just apply plenty. Note it’s a white coloured paste, so for this recipe, I added cocoa to a few spoons of it, and mixed to make a light brown colour.


Then we are instructed to sieve our dry ingredients (flour, raising agents & spices (note it’s using 2 1/2 tsp of the baking powder, as you are keeping back 1/4 tsp for later)- but also the white sugar is added here too) in a large bowl and mix together.
In another bowl we are adding our wet ingredients – eggs, pumpkin puree, some of the buttermilk (take note of that), brown sugar & oil and whisking together. See photo.
These wet ingredients are then added to the dry and whisked until smooth. See photo of the pumpkin cake batter.


Making The Chocolate Batter
At this stage you are instructed to divide the batter in half and add the cocoa and remaining buttermilk, plus 1 tsp baking powder to one of bowls and whisk till combined. This makes your chocolate batter (well chocolate and pumpkin really). See my photo below.
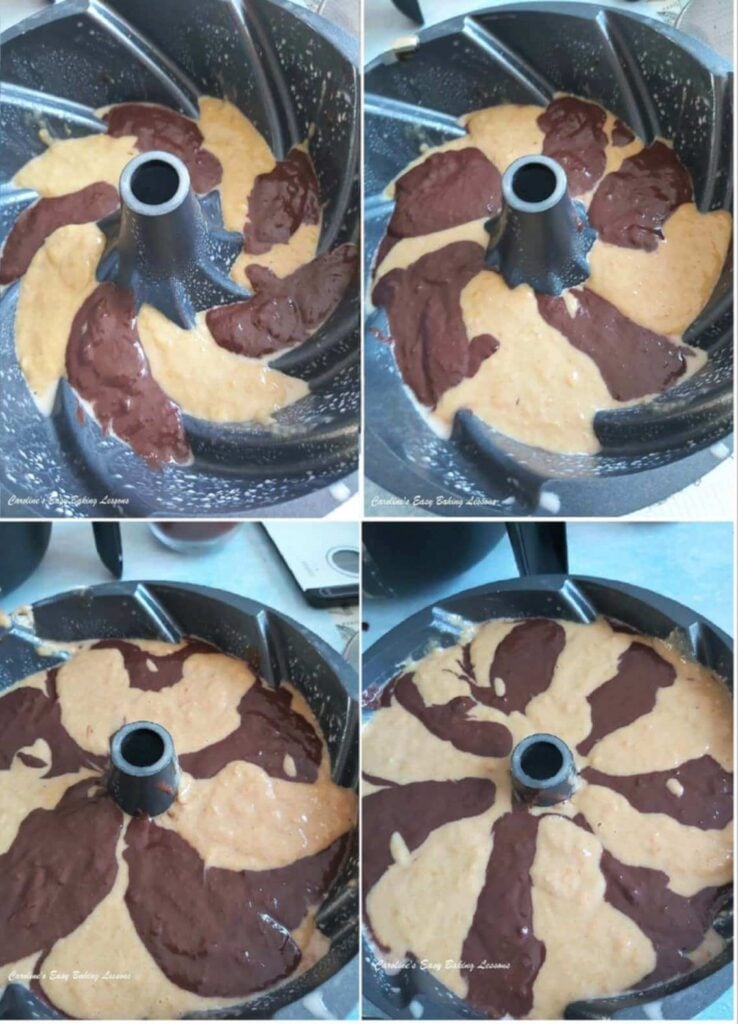
The recipe directs to “Dollop alternating large spoonfuls of pumpkin and chocolate batter into the pan, until both batters are used up“. I however went a step further, and instead of doing this with large spoons worth, I alternated the colours between the groves of the bunt pan. Once layering, I also alternated the pattern too. I also didn’t swirl the batter because I wanted to see how the 2 batters would react and hopefully get a really nice effect, not only on the outside but also the inside of the cake once cut. (See photo collage below)
My method for making more swirls in the cake


Point to note too, there was quite a lot of batter for my bundt pan. It’s the biggest I have and thought it would do, until I filled with the batter. Even more so when it was baking, and I could see it got a really good rise, well above the rim of the pan. (See my photo). Since it was for someone else’s birthday, trimming off the excess cake from the top, did mean I could do the required taste test – just to make sure it was up to standard – of course!
Talking of baking the cake, Celcius and Fahrenheit temperatures were given, but no fan oven or gas mark temperatures. The cake was also to bake for 60 -75 minutes, until a wooden skewer came out clean of crumbs. Mine finished baking close on to the 1 hour 15 minutes.


Cool for 30 minutes and then turn the cake out to cool down further. This is correct, as bundts should not be turned out right away or they have a chance of breaking up. My cake came out really well, nothing left behind. Told you the Cake Lining Paste was good!
Since I was doing this cake at short notice, I didn’t make the recipes glaze although I need to try it at a later date, as I love browned butter & it sounded lovely. Instead I just made a small amount of simple icing/glaze with icing/powdered sugar and water and made not too thick but thin enough to run down the groves of the bundt pan, slowly. Getting the right consistency here, gives nicer finish and not a pool of glaze on the plate. Make sure too the cake is cooled so the glaze doesn’t melt.


HOW DID WE LIKE THE CAKE?
Well taste wise the cake was nice and light too, but pumpkin still makes me think of carrot cake. Everyone liked it. Be nice to try with the butterscotch frosting.
Would I Make Again?
I will make again, and perhaps use in a different cake tin, or make muffins from it. I would probably downsize the recipe by about 20% to fit my bundt pan better. That said, it did use the amount of pumpkin puree I had, so better idea to not fill the bundt pan as much, and use the excess for cupcakes, or even mini bundts. Mini bundts would be nice!


HOW DO I RATE THIS RECIPE?
Unlike most of my recipe reviews, I have lots of sections, breaking down the recipe and assessing it. However, this recipe doens’t need that. It’s more a case of a few things missing like some temperatures. Not any thorough instructions or process photos, (but is essencialy very straight forward). There is also only a shot of the slice of cake in the recipe. However, I also found a video of Anna making it on YouTube channel Oh Yum. Lots of her videos are on there (I often can’t access her Canadian website to watch her site videos there).
So everything covered in the video really, including what the end cake is to look like. And as mentioned I liked the cake itself. So taking everything into consideration, I rate this cake a 7.5/10.
Once I try the butterscotch frosting, that score might just go higher! So watch this space. Here’s a few of the missing details from the recipe – Fan Oven: 160c, Gas Mark 4.


Here is the recipe link – go to Anna Olson’s Chocolate Pumpkin Bundt Cake
Here’s the video link – go to Anna Olson’s Chocolate Pumpkin Bundt Cake Video


Another easy bundt cake to try is this Chocolate Hazelnut Bundt Cake I reviewed.
Please see the sharing options or even printing, at the right/bottom of your screen (bottom of your screen for mobiles, and down the right-hand side on computers). You can even pin this to your own Pinterest page. You could also leave some feedback if you like.
Click for more Halloween & Autumn/Fall recipes
Subscribe For More Recipes
Want more great recipes, tips, baking information and newsletters? Then please consider subscribing by adding your email address below. Be sure to check for a confirmation email & respond back, so you can follow me & receive your free emails. Your personal information will not be shared with a third party.
Join My Facebook Group
Why not also join my – Facebook group Easy Online Baking Lessons, dedicated to this baking lessons website, as well as providing one-on-one support with myself & my team? Be sure to answer all security questions when requesting to join.
Follow me on social media:
Happy Learning & Baking!
Caro x


Anna Olson’s Chocolate Pumpkin Bundt Review
Search For Something You Fancy!
Caroline’s Easy Baking Lessons


wonderful review, I have two of her cookbooks and used to watch her videos when available in PBS – unfortunately no longer here where I live
Yes I learned to bake watching her programmes. Had them saved on the Virgin TV box harddrive back then.