Easy Safer Microwave Chocolate Fudge

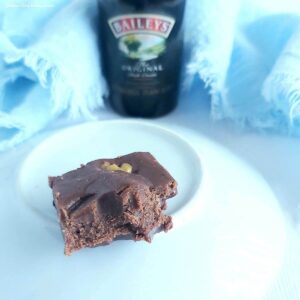
Easy Safer Microwave Chocolate Fudge is my simple & safer way to make fudge. Perfect for food gifting, you can add dried fruit, nuts, sprinkles or candy and make for any season. Makes a sweet Valentine's or Christmas food gift & is made extra special by adding Baileys Irish Cream!
Easy Safer Microwave Chocolate Fudge
The Safer Way To Make Fudge!


*Originally posted 14/11/2018, new photos & recipe card 12/02/2023
Why Make Microwave Fudge?
Safer Than Stove Top Fudge
This recipe I came up with myself after trying so many versions of fudge making. I don’t like making anything like this on the stove as mine didn’t always work right & I always burn things, including myself! So I turned to the microwave & after a lot of practice came up with the best recipe & the quickest.


Warning About Other Microwave Fudge Recipes
Now be careful of other microwave chocolate fudge recipes. Those that just melt & heat, don’t make proper fudge.
My recipe is designed to simulate the mixing and heating process of the stove top method. If you heat & mix well enough & keep an eye on the visual cues that it’s ready (ie. the mixture becomes thicker, comes away from the sides of the dish, and you can see the structure is changing), then you will produce something very very close to stove top fudge.
If you want to be super precise, get heating and mixing in bursts, until the microwave fudge mixture reaches at least 105 °c(220 °f).


Ingredients & Alternatives
This easy chocolate fudge is made from only 4 base ingredients:
- Dark/Plain/Bitter Chocolate,
- Milk/Semi-sweet Chocolate,
- Butter, unsalted,
- Sweetened Condensed Milk &
- Icing/powdered Sugar
Made from pantry staples, and just a very small amount of butter, this fudge can be inexpensive to make, with no need for expensive high cocoa content chocolate or couverture chocolate. I used Lidl’s basic milk & dark (bitter) chocolate, that was 39p for a 100g as at December 2022.
See the photo below, where I have used 5 ingredients from Lidl, to make the fudge, as well as add extra toppings.


Different Flavours Of Fudge
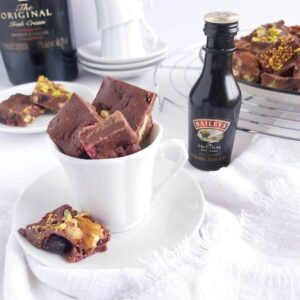
This batch was made with 1 tin/can of sweetened condensed milk, and I made 3 different flavours out of it. One third was plain chocolate, one third I added orange extract, (Sainsbury’s Taste The Difference Valencian Orange Extract to be exact). The final third I added some Baileys Irish Cream liqueur.
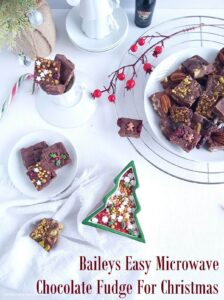
Some dried cranberries & chopped walnuts were also added to the 2 flavoured batches. With the third plain fudge being topped off with halved Toffifee, and chopped Oreos and Maltesers (chocolate malt balls). See photo above and below.


Some were also topped off with sprinkles, for seasonal themes (see the Christmas holly & berries, and mini gingerbread men). As well as some Cadbury’s mini eggs halved, whole pecans and chopped pistachios.
Alternative Flavours & Toppings
They are all yummy flavours, but you can alter according to different tastes/food allergies etc. For flavourings, mint extract would also be nice, as would brandy or rum. Another alternative to adding flavours, is using flavoured chocolate.
Glaze cherries, chopped Crunchie/honeycomb (sponge candy/cinder toffee) or raisins, all make good alternatives to add to the fudge.
The Process At A Glance


This microwave fudge could not be simpler to make, and quite quick hands-on time too. (See photo).
Simply begin by greasing & preparing your dish (1). Then melt chocolate in the microwave (30 second bursts) & adding in the butter and sweetened condensed milk, (2).
The mixture is microwaved in 30 second increments, until very hot, thicker & noticeably very different in structure (use a thermometer if you wish, but not essential). (3)
A small amount of icing/powdered sugar is added before adding to the prepared container to set for at least 3 hours, (4). After that is simply a case of cutting in pieces.
Tips For Microwave Chocolate Fudge


Type Of Bowl To Use
For first time making, it is best to use a medium-large plastic bowl for cooking the fudge, as when the mixture is nearly ready it starts to come away from the sides of the bowl. But any microwave-safe bowl works, including glass Pyrex.
What To Set The Fudge In
You will need some square or rectangular containers, maybe food storage dishes/Tupperware or even chocolate molds if you want them to look fancy. I have also on this occasion, used a square baking tin that I make my brownies in, as well as recycling a metal tin that chocolate mints had been in. (See photo below).


And because I wanted some different flavours and types of fudge, I made a divider from a piece of cardboard packaging that was going to the recycle bin. (2) above. I just trimmed it slightly to fit the width of the tin, folded to double it, wrapped in foil and then cling film/plastic wrap (3). Then I placed in the centre of the tin, and held in position with another 2 tiny pieces of cardboard towards the top edge of the tin, between the cardboard and tin (4). In the end I also used it to help straighten, smooth and even out the fudge too. Came in very hand!
If using a chocolate mold, make sure the molds are for flat, plain shapes, as the fudge doesn’t hold any detailing very well and makes it harder to remove the fudge. The love heart shaped mold worked out not bad.


Greasing The Tin/Dish
For easy removal of the fudge once set, greasing is essential. For plastic Tupperware or food storage containers, I recommend spraying with a cooking oil or baking spray. Cake release spray, or my favourite for all baking and cooking, is Frylight oil spray (I use the butter, sunflower or coconut oil ones, and usually buy in B&M, Home Bargains, Lidl or Aldi).


For the cake tins, (or metal chocolate tin like I used), I sprayed first, then placed some cling film/plastic wrap on the bottom and up the sides of the tin. Press it in position, as flat as possible, and this will make removal so much easier.
I also used the spray for greasing the heart-shaped mold (see above). Then I used a small brush to make sure it was in all the corners, then dabbed very gently with some kitchen paper/paper towel. This is because you don’t want a thick layer of the oil on the mold. An alternative would be to use a piece of the kitchen paper dipped in some oil, and wipe onto the mold.


Perfect For Gifting
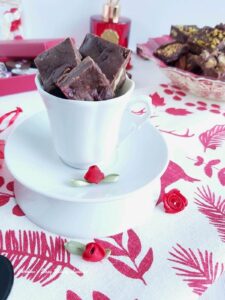
This microwave chocolate fudge is perfect for food gifting, at Valentines and for Christmas. Or any season really. Just add appropriate sprinkles, or mini Easter eggs. (See photos above and below).
Gifting Tips
e sure to label the tag that they should be kept in the fridge (or somewhere cold), in an airtight container, so they don’t soften too much and will keep longer. Gift in cellophane bags, in a bix, gift box, or even a nice glass jar. For some examples, see my Last Minute Christmas Food Gifting article.


Recipe Yield – about 100 pieces can me made from this recipe, with dimensions of about 2cm by 2.5cm (0.7 x 1″), based on a depth of about 2cm/0.75″.
But on this occasion, in these photos, I cut the fudge larger, and square shaped. Sized over 2.5cm/1″, as well as making the hearts. I made about 60 pieces this time.
Join My Facebook Group
Why not also join my Facebook group Easy Online Baking Lessons, dedicated to this baking lessons website, as well as providing one-on-one support with myself & my team? Be sure to answer all security questions when requesting to join. Click to join the Facebook group.


Share The Love
Please see the sharing options or even printing, at the right/bottom of your screen (bottom of your screen for mobiles, and down the right-hand side on computers). You can even pin this to your own Pinterest page. The Recipe Card below, can also be saved, shared or printed (with/without the process photos & notes). You could also leave some feedback & rate the recipe if you like (scroll to very bottom of the page). Thanks xxx
Recipe Card
Easy Safer Microwave Chocolate Fudge

Equipment
- Scales or measuring cups
- Measuring Spoons (tsp & tbsp)
- Medium to Large plastic bowl (microwave safe)
- Spoons
- Microwave
- Small sieve (or fine tea strainer)
- Baking spray or Cake Release Spray (I recommend Frylight cooking spray)
- Cling Film (plastic wrap/Saran wrap)
- Square/Rectangular plastic tubs, food containers, metal tin/baking tins, or sweet/chocolate molds (see notes on silicone molds)
Ingredients
- 200 grams Dark/Plain Chocolate (Bitter chocolate, 7 oz)*
- 200 grams Milk Chocolate (Semi-sweet chocolate, 7 oz)*
- 25 grams Butter, cubed (unsalted, 2 level tbsp, 0.8 oz)
- 1 Tin Sweetened Condensed Milk (397g/14 fl oz or 1+ ⅓ cup)
- 2 tsp Icing Sugar, sieved (Powdered sugar)
Flavours & Extra Decorations
- 2 tsp Orange extract (optional – alternative peppermint extract)**
- 1-1½ tsp Bailey’s Irish Cream (alternative brandy, rum – optional)**
- Nuts of choice (chopped & optional – pecans, walnuts, pistachios etc.)
- Dried cranberries, raisins etc (optional)***
- Chocolate or Cookies, chopped (Maltesers, Toffifee, Oreos as examples used)
- Sprinkles – coloured themes, seasons, etc. (coloured, themes, seasons, etc.)
- ** Quantities for flavourings per ⅓ batch only
- *** handful of nuts &/or fruits per ⅓ batch
Instructions
- Begin by oiling/greasing the dishes you are going to use, all ready for using immediately, when the fudge is cooked. (photos before the recipe card for ways to grease silicone and metal tins). You can also use some cling film/plastic wrap on top of the greased dishes, such as for metal tins.
- Break up the chocolate & into a large microwave-safe bowl before popping in the microwave for 1 minute (at the most). (See notes on bowls to use). Mix the chocolate around (even if it doesn't look like it's melting), & microwave for 30 seconds.
- Mix again & in doing so the heat of the bowl & movement will result in more melting of the chocolate. If all melted proceed to the next step. Depending on the power of your microwave, the time taken to completely melt will vary. If needed, continue cooking for 30 second bursts, mixing well in-between each time, until completely melted. Never go any higher than 30 seconds for melting chocolate in the microwave or you can ‘burn’ the chocolate and made it hard. (For 400g/14 oz of chocolate, 60 seconds at the beginning is fine).


- Immediately add the cubed butter, mixing well until all melted & combined. See Photo 1 above.
- Then add in the tin of condensed milk, mixing through before popping back in the microwave & cooking for another 30 secs.
- Mix this fudge mixture really well, & microwave again for a further 30 seconds. The mixture will be starting to thicken after each 30 seconds.

- Continue mixing & cooking for 30 second bursts until the mixture starts to come together & is coming away & stopping sticking to the sides of the bowl (this happens with a plastic bowl). See Photo 2 above, for how the mixture will look. (And Photo 3 below). It should be extremely hot at this point, and almost bubbling. If you want to be super precise, you are looking for a temperature of at least 105 °c (220 °f for microwave fudge). **Click Photo 2 and then pinch to zoom in
- Add in the sieved icing/powdered sugar & mix until all combined.

- If adding nuts etc, do so right now. For this batch in the photos, I split into 3. A third was plain fudge flavour, a third had orange extract added, and the final third had Bailey's added to it. Some I added cranberries or chopped walnuts to the fudge mixture. See Photo 3 above.
- And some I topped with nuts, chopped cookies and chocolates (Malteseres/Malt balls and Toffifee). **If dividing the mixture up, I recommend to place the ones you are not working on yet, back into the warm microwave to sit.)

- Once you have added your extra flavours or fruits/nuts, spoon into the prepared tin/dish, and using clean hands (or gloves is handy), press the fudge mixture into place. Smooth down as best you can and be sure to push into the sides of the dish. I was using a larger metal tin than normal, and had made a divider card, which was also handy to straighten the edges of the fudge mixture. (see Photo 4 above where it is dividing the tin). At this stage you want to also add any more nuts or cookie pieces etc, into the top-most part of the fudge. Then grab your 2nd portion of the fudge mixture and repeat till all fudge has been placed in the dishes for setting. You will notice that as time goes on, it will be beginning to get firmer.

- Cover with a lid or cling film/plastic wrap and refrigerate for at least 3 hours. The fudge will look set before this but leaving as long as possible makes removal & cutting much easier.
- Once set, turn out onto a chopping board, tap until the fudge comes out. Cut with a sharp knife into whatever sizes you like. Run a butter knife all around the sides if removal isn’t easy. Using cling film/plastic wrap is usually much easier. See Photo 5 above.


Storing
- Best kept in the fridge or somewhere cold & wrapped or in an airtight container & can last for weeks.
Video
Notes

 Chocolate – no need for expensive high cocoa content chocolate or couverture chocolate. I used Lidl’s basic milk & dark (bitter) chocolate, that was 39p for a 100g bar, as at December 2022.
Type Of Bowl To Cook In – medium to large microwave-save plastic bowl, or glass Pyrex bowl.
Chocolate – no need for expensive high cocoa content chocolate or couverture chocolate. I used Lidl’s basic milk & dark (bitter) chocolate, that was 39p for a 100g bar, as at December 2022.
Type Of Bowl To Cook In – medium to large microwave-save plastic bowl, or glass Pyrex bowl.

 Dishes For Setting -square or rectangular containers, metal cake/chocolate tins, or food storage/Tupperware, can be used. Dishes with straight sides/edges, will give neater looking fudge pieces.
Cutting Tips -chilling long enough & using a sharp knife will make cleaner cuts.
Dishes For Setting -square or rectangular containers, metal cake/chocolate tins, or food storage/Tupperware, can be used. Dishes with straight sides/edges, will give neater looking fudge pieces.
Cutting Tips -chilling long enough & using a sharp knife will make cleaner cuts.

 Removing From The Dish -make sure to oil/grease the dish before putting the fudge mixture in, to aid removal. (I recommend Frylight cooking spray for the greasing). Also using cling film/plastic wrap on top of the greasing, works best.
Tips For Silicone Molds – don’t over-grease & push fudge tight into mold to stop air pockets forming.
Removing From The Dish -make sure to oil/grease the dish before putting the fudge mixture in, to aid removal. (I recommend Frylight cooking spray for the greasing). Also using cling film/plastic wrap on top of the greasing, works best.
Tips For Silicone Molds – don’t over-grease & push fudge tight into mold to stop air pockets forming.

 Different Flavours – this batch was made with 1 tin/can of sweetened condensed milk, & I made 3 different flavours out of it: plain chocolate, chocolate orange & Bailey’s Irish Cream.
**So please note quantities of orange extract & Bailey’s are per 1/3 of a batch.
Adding Extras – I added died cranberries & chopped walnuts to the fudge before placing in the tin. And taste great. You can also add more nuts like pecans, & chopped pistachios to the top of the fudge. Leave plain on the top, or add some sprinkles or halved mini chocolate Easter eggs, and theme your fudge for the holidays.
Different Flavours – this batch was made with 1 tin/can of sweetened condensed milk, & I made 3 different flavours out of it: plain chocolate, chocolate orange & Bailey’s Irish Cream.
**So please note quantities of orange extract & Bailey’s are per 1/3 of a batch.
Adding Extras – I added died cranberries & chopped walnuts to the fudge before placing in the tin. And taste great. You can also add more nuts like pecans, & chopped pistachios to the top of the fudge. Leave plain on the top, or add some sprinkles or halved mini chocolate Easter eggs, and theme your fudge for the holidays.

 Gifting Tip – tag your fudge & write that it should be kept in the fridge/somewhere cold, to keep firm & last longer.
Tropical Cake Truffles From left-overs
Gifting Tip – tag your fudge & write that it should be kept in the fridge/somewhere cold, to keep firm & last longer.
Tropical Cake Truffles From left-overs

 More Easy Food Gift Recipes
Christmas Recipes Page
More Easy Food Gift Recipes
Christmas Recipes Page

**Nutritional Values – I am not a qualified nutrionist and these values are approximate and will vary from brand to brand of ingredients. All values based on a serving of 6 pieces, assuming 120 pieces produced per recipe & sourced from Soupersage.com. See recipe Yeild above for sizings.
DIFFICULTY LEVEL: easy, beginner
Readers’ Photos
Recently website follower and baker Shona, used the recipe and made those shown in Photo 6. Here’s what she said in a Facebook post –


"Chocolate orange fudge using Caro's recipe but swapping ordinary plain and milk chocolate for orange plain (bitter) & milk (semi-sweet) - YUM! Absolutely unctuous, a real treat! Thank you
I think Shona’s fudge looks amazing and she has got them so neat and straight. Simply perfect and a great treat for Father’s Day (or any other day!)
Subscribe For More Recipes
Want more great recipes, tips, baking information and newsletters? Then please consider subscribing by adding your email address below. Be sure to check for a confirmation email & respond back, so you can follow me & receive your free emails. Your personal information will not be shared with a third party.
Go to Christmas Recipes, my Valentine’s Day Recipes or check the Visual Index:


Follow me on social media:
Happy Learning & Baking!
Caro x


Easy Safer Microwave Chocolate Fudge
Search For Something You Fancy!
Caroline’s Easy Baking Lessons


Such an easy recipe to follow and better than using the stove. I burn myself a lot so this was better, and saved energy too which is a bonus. The Bailey ones were the best, and made a really nice soft texture.