Chocolate Orange Vertical Swiss Roll Cake

This is my chocolate orange vertical Swiss roll cake tutorial, that is also gluten-free! Learn how to confidently make Swiss rolls (jelly rolls) and how to take that skill further and make a showstopping vertical Swiss roll cake that reveals a surprise when sliced!
Chocolate Orange Vertical Swiss Roll Cake
A Different Twist On A Roll Cake

**Click to jump to section**


What Is A vertical Swiss Roll?
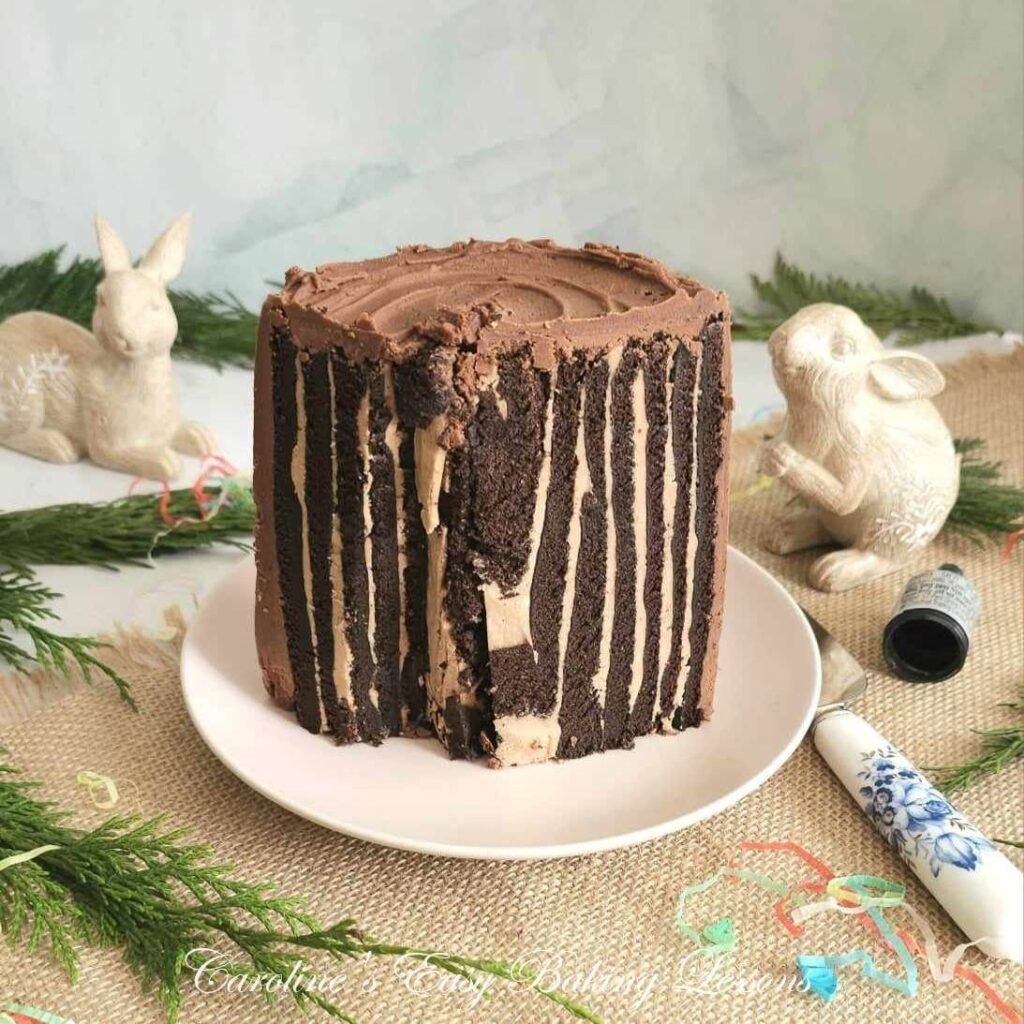
A vertical Swiss roll cake is a form of a Swiss roll/Jelly roll cake. With a Swiss roll cake being a light thin sponge, made with no butter, oil or baking powder (similar to a Genoise). Filled & roll up & served in slices, showing the ‘swirl’. A vertical Swiss roll however, this much coveted ‘swirl’ or spiral shape takes a different form as the vertical cake rolls outwards, as opposed to a regular cake roll that you roll horizontally. The cake is covered and looks like a cake on the outside, however, when slices are cu in regular cake style shape, the many layers are revealed, but as a surprise in vertical layers. In this vertical chocolate Swiss roll cake, the slices show a pattern that resembles zebra print.


Why Make My Recipe?
I am known for my thorough recipes, with step-by-step detailed instructions and process photos to guide beginners. I take the same approach for teaching how to make Swiss rolls as many bakers are apprehensive of making them. The following being some reasons why:
- Fear of rolling the cake
- Fear of the cake cracking
- Fear of the cake breaking
- Fear of making a mess
- Fear of the cake being rubbery
- Flour-free, gluten-free recipe


I have developed details tutorials for all my Swiss roll recipes, that address these common issues bakers experience, regardless of their experience in baking. These fears mentioned above, can lead the baker to not roll tight enough and this in turn can lead to fillings oozing out and hence the coveted ‘swirl’ shape is not achieved.
The fear of a rubbery cake comes from making cakes that have no leavening agent and rely on incorporating air into the batter. If the egg yolks and sugar are not whisked long enough, the resulting cake doesn’t rise at all and makes for a very chewy rubbery cake. I address this issue in depth by demonstrating the ‘ribbon test’ (also known as ‘trail test’ or ‘ribbon stage’) that can be performed to ascertain if you have whisked long enough.


This whisking incorporates natural air, and you don’t want to knock out this air when mixing, so gently folding & in a certain pattern, is always advised.
The rolling issues are also addressed in the instructions, photos & video, mainly by starting with a nice roll of the cake, as well as not panicking and being firm with rolling.
More on these common mistakes when we come to them in the step-by-step directions below. You can check out more Swiss roll tutorials or view my latest one – Blueberry Orange Patterned Swiss Roll tutorial. Or check out my cake videos on YouTube.
Ingredients


For The Cake Batter:
- Eggs
- Sugar
- Cocoa Powder
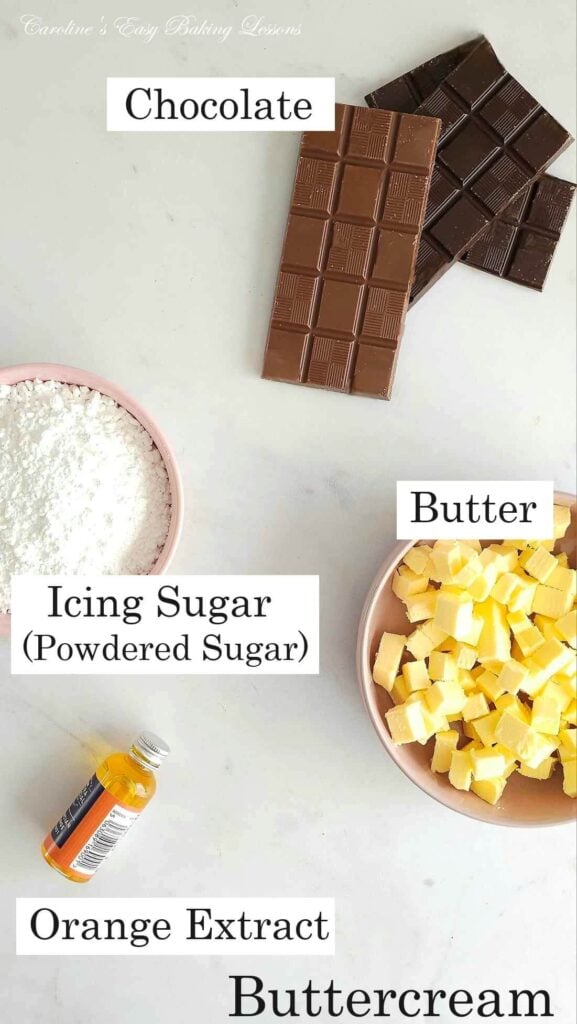
For The Buttercream:
- Unsalted Butter
- Icing/Powdered Sugar
- Chocolate
- Orange Extract
Caster Sugar
The US equivalent to UK Caster Sugar is Extra/Super Fine Sugar . Used a lot in our British baking for incorporating air naturally into batter, you can make your own from granulated, by lightly processing.

Eggs
Because the cake is flour-free and because there is no baking powder (leavening), we have a lot of eggs. The recipe is based on UK medium to large sized eggs, which is about the same size as large to extra large US eggs. With baking, eggs should always be at room temperature before using them, for the best results.
The eggs also must be separated. You might find recipes using whole eggs, but producing a Swiss roll that isn’t rubbery and rolls easily is achieved much easier by whisking the egg whites & yolks separately.
Cocoa Powder
The cake is flour free (making it gluten-free too) but still forms a cake, by the use of the cocoa powder, (just like Choclate Brownies has a relatively small amount of flour in it).
Chocolate
No need for expensive/baking chocolate. A combination of dark/plain/bitter chocolate & milk/semi-sweet provides enough depth of flavour in the chocolate orange buttercream, even with inexpensive shops’ own brands. Aldi & Lidl basic chocolate is quite good for baking too.


Equipment
No real fancy baking equipment is needed for this veritical cake roll. A list of all equipment is detailed in the Recipe Card below, however here is details on the cake tin:
Cake Tin/Pan – you can buy a Swiss/Jelly Roll cake tin/pan which are about 33 x 23cm (13 x 9”) with a very small lip of about 2 – 3 cm ( ¾ – 1⅛”). However, I always use my 2 cookie trays/sheets that are 37 x 24 x 2cm (14 x 9¾ x ¾”) on the base and with a little lip, making them great for thin cake rolls.
Recipe Yield
The recipe makes one cake, approximately 5×5” (12¾ x 12¾ cm), and serves about 18 slices. Since the cake is tall and chocolate rich, you don’t want big slices, and so should get about 18 servings from the cake.


Decoration
This vertical chocolate roll cake, doesn’t need much decoration and can easily be finished off with bits you can find in the garden or park. I added some tree branches that had been cut recently, but you can also use some leaves and even some flowers would have been nice too. If having for Spring/Easter, you can add some rabbit ornaments or at Christmas time, add some red berries, holly etc. Check out my Yule Log recipe for fondant berries & holly, or check my Fondant Tutorials Page for more ideas.
Make A Bigger/Small Cake
To make a wider but slightly shorter cake, you can cut the 2 Swiss roll cakes into a total of 6 strips. Alternatively, you could make 3 or 4 Swiss roll cakes for a much wider cake.


Step-By-Step Instructions
Make The Cakes
1. Begin by very carefully separating the eggs. Have 2 dishes ready for this and use whichever method works best for you. I use the shell but you can use egg separators, your clean hands or even a small sieve.


**Does not matter if any whites are in with the yolks, but any yolk in the whites, and the whites will not whip to stiff peaks.
2. To save cleaning the mixer beaters twice, whisk the egg whites first and they need to be really clean and free of any oil. **Tip – after cleaning the bowl and beater(s), rub a half lemon on the bottom of the bowl and on the beaters.
3. Beat the egg whites on medium to high speed until stiff peaks form. See Photo 1.


4. After whipping the egg whites, whisk the egg yolks in a medium-sized bowl until the yolks are broken up, then add in the caster sugar (extra/super fine sugar).
5. Beat the yolks and sugar till the mixture becomes a pale cream colour, is creamy looking, the volume has increased and leaves a trail.
**Trail/Ribbon Test**
To test if the yolks and sugar have been beaten enough, lift the beater out of the bowl and let the mixture drip onto the surface of the mixture in the bowl.
See if you can write an ‘8’ in the batter, where the ‘trail/ribbon’ of batter, does not immediately sink/vanish. See Photo 2 where I have labelled where the ‘8-pattern’ is. Hard to show with it being white, but see the video below for reference. Or my YouTube video for Ribbon test.


6. Set oven to: 180°c/160°c Fan oven/360°f/Gas mark 4.
7. Now add the cocoa powder to the whisked yolks & sugar, and fold in very gently with a rubber, silicone or plastic spatula (not metal as it can knock out the air you incorporated). Fold in in a figure ‘8’, where the pen is your spatula and the paper your batter (See video).
8. Now add about ¼ of the whipped egg whites to the mixture, and again very carefully fold in. It does not need to be 100% mixed in before you repeat with the other ¾ of the batter, adding a ¼ at a time. You will find the batter will loosen when more is added and making it much easier to incorporate. See Photo 3.
8. Now move on to greasing and lining your tins/pans. You can use Swiss/Jelly Roll tins/pans but I use my 2 cookie trays that have a small lip. (See equipment notes above for sizes). Grease the bottom & sides, then paper line. Here I am using Frylight cooking spray, or you can use homemade lining paste (cake goop), cake release spray or butter.


9. Careful pour the cake batter equally between the 2 prepared cake/cookie trays/sheets, as seen in Photo 4, before giving a few taps on the counter/worktop.
10. Bake in the centre of the oven for 12-15 minutes till set, a cocktail stick comes out clean of crumbs and the sides are coming away from the tin (See Photo 4, 4th pic).
11. While the cakes are baking, prepare your area to work as you will be releasing the cakes as soon as out of the oven. This is essential for Swiss/Jelly rolls. You need 2 clean tea-towels (bigger than the cakes) as well as 2 sheets of baking/parchment paper and some icing/powdered sugar for dusting.
12. Immediately out of the oven, run a cocktail stick around the edges of the cake to help release. Sprinkle/sieve some icing/powdered sugar on top of the cakes, then place the paper on top, followed by the tea-towel.


13. Carefully hold it all together, resting one long side of the tin on the table & slowly lower it all down & onto the table, with the cake upside-down. Then lift off the tin. *You can use a second tin if you have one to flip it all over.
14. Carefully peal back the paper & start to roll up the cake, with the paper & tea-towel inside, being sure to start with a tight bend.
15. Squeeze for a tight roll and neaten the ends as you go until all rolled up.
16. Twist and close the ends shut with a clip, peg etc and repeat all this with your second cake.
17. Place on a large flat plate or tray, in the fridge, with the cake ‘seam-side’ down & leave to cool for 30 minutes.


Prepare The Buttercream
1. Meanwhile prepare the chocolate buttercreams for the filling and coating. Start by melting broken chocolate in the microwave in 30-second bursts, mixing in-between each. Leave to the side to cool a little.
2. Meanwhile, beat the softened cubed butter until smooth. **Tip – small cubes softens & comes to room temperature quicker).
3. Add in the icing/powdered sugar very gradually in increments, with the help of a clean tea-towel if needed, until all incorporated. See Photo 6.


4. Next add 2 tbsp of the melted chocolate to the buttercream and mix till combined.
5. Decant a little more than ½ of this paler chocolate buttercream to another bowl and leave to the side. This will be used for the cake filling.
6. Now add the rest of the melted chocolate to the leftover buttercream & mix till combined. See Photo 7.
7. Add 1 – 2 tbsp orange extract and taste test before adding anymore.


Filling & Rolling The Cake
1. Once the cakes have had their cooling time, carefully unwrap and unroll. You will notice the cake is bent over where you started rolling, this is ‘cake-memory‘.
2. Line the 2 cakes up and make sure they are the same size on the shorter end, trimming if needed. Then cut the 2 cakes length-wise into 4 long strips of cake. (If you want a slightly shorter but wider vertical Swiss roll cake, you can cut a total of 6 strips). See Photo 8.
3. Decide which of the 4 cake strips you want to start rolling from, trim the bent-over cake end from the other 3 strips. Spread the paler buttercream you reserved, over the cake strips, filling in the bent-over end. (See Photo 8).


4. Start rolling up with the bent-over end strip, rolling tight and neatly like before, until you are near the end.
5. Line up the 2nd cake strip to meet the end of the 1st cake roll and roll the cake over the ‘join‘. Take care at this stage so the 2 cake ends meet, before you roll up the entire 2nd cake strip.
6. Repeat with the 3rd cake strip and then the 4th strip until you have one wide cake roll. Squeeze and tighten the ends as you go like before.
7. Add a layer of buttercream to smooth the end of the cake roll. See Photo 9.


**Note you can roll the 2nd – 4th cake strips when the cake is standing upright, and wrap rather than roll, but I found it harder for the joins to meet by that method.
8. Turn the cake upright and place on a cake board or plate to work on. (Use whichever end will make the cake sit the most level).
9. Place in the fridge for 30 minutes to settle down before decorating.
Covering The Cake
1. Apply a layer of chocolate orange buttercream to the top, covering the swirl, before moving onto the sides.


2. Apply upward strokes to cover the sides if horizontal ones are not so easy for you. You will be covering with vertical strokes to look like bark anyway and does not need to be neat and smooth.
You also do not need to worry about where the top of the sides meets the top layer as this too gives a more realistic look. See Photos 10 & 11.
3. Chill the cake for 30 – 60 minutes to set this first layer. You can cover the cake with some acetate wraps if you have some, not essential but so handy for moving the cake. (See Photo 11).


4. Next, apply a thick layer until you are happy with the design or the buttercream is used up (there should be plenty).
5. Add more to the top of the cake too, swirling the palette knife in a circular motion, to resemble a tree trunk.
6. Add the acetate again if using and place the cake in the fridge to set for at least 1 hour. This will make the buttercream harder since the outer coating has more chocolate in it, it will set up harder than the cake filling.
7. Meanwhile find some leaves or small branches from the garden or park to add as decoration, cleaning & drying well before using.


8. When ready to serve, transfer the cake to a clean plate/cake stand etc (using a cake board or acetate wrap helps with this).
9. Decorate with some green foliage, real or fake and some ornaments if you like. Make for Spring, Christmas or for a woodland/park/jungle themed cake. Check out my Fondant tutorial page or my Yule Log recipe for ideas.
Serving & Storing
1. Slice the cake from chilled, in long straight edged slices rather than pizza-style slices/wedges as it is a deep cake. Slices about 1½ cm (⅔”) thin and you will get at least 16 slices. Serve with whipped cream or ice-cream.
2. Store the veritcal Swiss roll cake somewhere cool (fridge is ok without any fondant decorations) and loosely cover. Will last at lea½st 3 days.
Recipe Card
Chocolate Orange Flour-free Vertical Swiss Roll Cake

Equipment
- Scales or measuring cups
- measuring Spoon – tbsp
- Large mixing bowl
- Hand or Stand Mixer:
- Medium Bowl
- Sieve
- Plastic/rubber spatula for folding
- 2 Baking tray/sheet or jelly/swiss roll tray/sheet (see notes)
- Baking spray oil or butter for greasing
- Baking/parchment paper
- Wooden Cocktail stick
- 2 Tea-Towel (wider and longer than the baking sheet/tray)
- 4 Clips/Pegs (or string)
- Baking Palette Knife (off-set best)
Ingredients
- 12 Medium/Large Eggs (US large or extra large size)
- 300 grams Caster Sugar (10½ oz, 2 cup level extra/super fine, *see notes)
- 100 grams Cocoa Powder (3½ oz, ⅔ cup)
- 188 grams Dark/plain Chocolate (6⅔ oz, bitter chocolate, *see notes)
- 122 grams Milk Chocolate (4 oz, semi-sweet chocolate)
- 300 grams Icing Sugar (10½ oz, 2½ cups Powdered Sugar, sieved)
- 300 grams Unsalted Butter (10½ oz, 1⅓ cup, 2⅔ sticks, cubed & softened)
- 1 – 2 tbsp Orange Extract (or even peppermint or coffee)
Instructions
Prepare The Cake Batter
- Begin by separating the 12 Medium/Large Eggs, & thoroughly clean the mixer bowl and beaters, followed by rubbing a lemon over them to help with egg white whipping. Whisk the egg whites first, till stiff peaks are formed.
- Now whisk the egg yolks & 300 grams Caster Sugar, (without cleaning the egg white bowl as not needed, carefully decanting if needed). Whisk the yolks & sugar till creamy, pale in colour & increased in volume. Perform the 'ribbon/trail' test to see if whisked enough. (See step-by-step instructions before this Recipe Card for more, or watch the trail/ribbon test video.
- Heat oven to: 180°c/160°c Fan oven/360°f/Gas mark 4. Grease the baking tin/tray & paper line the bottom. Use Frylight cooking spray, homemade lining paste/cake goop, cake release spray, or butter & flour.
- Gently fold in the 100 grams Cocoa Powder to the whisked yolks/sugar, with a rubber/silicone/plastic spatula, (not a metal one), until all incorporated.
- Add ¼ of the egg whites to the mixture & very gently fold in, before adding another ¼ of the egg whites until all incorporated, being as gentle as possible (see video).
Bake The Cake
- Pour the cake batter equally between the 2 prepared cake tins & tap a few times on the counter/worktop before popping in the centre of the oven to bake for 12-15 minutes till cooked, and coming away from the sides.
- While the cakes are baking, prepare an area to work as the cakes will be removed as soon as out of the oven.
Turning Out The Cake
- As soon as removing the cakes from the oven, run a cocktail stick around the edges of the cakes to help turning the cake out. Sieve or sprinkle icing/powdered sugar on the cake, then place baking/parchment paper on top, followed by a clean tea-towel.
- Hold everything together and turn the cakes over (slowly lower down when on the tin's longest side, or use another tin to help flipping everything over). Then lift the tin off to release the cake & carefully peel off the paper.
1st Time Rolling The Cakes
- Right away, start to roll up the cake, (from the shorter end), with the paper and tea-towel inside, starting with a tight roll, squeezing and neatening the ends as you go. Repeat for the second cake roll and twist then tie the end of the tea-towel with clips, pegs etc to told closed.
1st Chilling Time
- Place the cake rolls in the fridge, seam side down and chill for 30 minutes.
Prepare Buttercream Filling & Coating
- Meanwhile prepare the buttercream filling & coating. Begin by melting 188 grams Dark/plain Chocolate & 122 grams Milk Chocolate in the microwave in 30-second bursts till melted, then leave to the side. Briefly beat 300 grams Unsalted Butter (softened), & very gradually add in the 300 grams Icing Sugar (powdered sugar) till incorporated.
- Add just 2 tbsp of the melted chocolate to the buttercream mixture & beat to combine. Remove a little more than ½ of this paler chocolate buttercream to another bowl and leave to the side for the cake filling later.
- Add the rest of the melted chocolate to the remaining buttercream & mix till combined. Add 1 – 2 tbsp Orange Extract , taste test and add more orange extract if required.
Filing & Assembling
- Unwrap and unroll the cakes, place side by side and make sure the shorter sides are equal, trimming if needed. Cut the cakes in half length-ways to make 4 long cake strips. (For a shorter but wider cake, cut a total of 6 strips). Trim the 'cake memory' bent over ends of cake, from all but one of the cake strips.
- Spread the paler chocolate buttercream over the cake strips, filling the curled over cake. Start to roll up this cake strip with the curled over end, tightly like before, until you are near the end, (less the paper and tea-towel). Position the 2nd cake strip to meet the end of the 1st cake strip, rolling the cake over the join. Very carefully roll to the end and repeat with the other 2 strips. Use buttercream to help join the seams if needed, and smooth the end of the 4th strip with buttercream too. **Note you can add the 2nd to 4th layers with the cake upright and wrap instead of roll, but as a flour-free cake, this was easier to do by rolling.
Chill The Vertical Cake Roll
- Wrap the cake with some acetate (optional) and place in the fridge to set the filling for 30 minutes.
Applying Buttercream Bark
- Spread chocolate buttercream on the top of the cake and on the sides as a crumb coat, but no need to scrape off the buttercream, just apply a layer to cover. Spread on the sides in upward strokes to resemble tree bark. Then chill the cake for 30 – 60 minutes to set.
- Now apply a more generous layer(s) to all of the cake, making a bark design & making a swirl on the top of the cake. Make as thick a layer as you want or are happy with (there will be plenty of buttercream). Wrap the acetate around again if using, and chill for at least 1 hour.
Staging/Decorating
- Once ready to serve the cake, transfer the cake to a cake stand, cake board etc (using the acetate makes moving so much easier). You can decorate the vertical Swiss roll cake with some leaves or as I did, some pieces of tree branches that had been cut down already. The green colour works really well with the chocolate cake, bringing it alive. If having for Easter/Spring, add some little bunnies and mini chocolate eggs, or for Christmas, add some red berries and some holly. These you can make from fondant (see my Flour Free Yule Log recipe for details.


Serving & Storage
- After chilling, slice the cake in thin slices about 1½ cm (⅔”) thin and in straight slices as it is a deep cake. Serve with some cream or even ice-cream.
- Store the cake somewhere cool (fridge is fine without fondant decorations), and cover loosely. Will last at least 3 days.
Video
Notes
 Baking Tin/Sheet – Swiss Roll/Jelly roll tins/pans are about 33 x 23cm (13 x 9”) and a small depth of 2 – 3 cm ( ¾ – 1⅛”). However, I use a cookie tray/sheet for making Swiss Rolls. I have 2 slightly different sizes that work well, and are about 37 x 24 x 2cm (14 x 9¾ x ¾ “) with this very small lip.
Servings – the cake makes about 18 slices and since tall and rich, thin long straight slices are recommended.
Baking Tin/Sheet – Swiss Roll/Jelly roll tins/pans are about 33 x 23cm (13 x 9”) and a small depth of 2 – 3 cm ( ¾ – 1⅛”). However, I use a cookie tray/sheet for making Swiss Rolls. I have 2 slightly different sizes that work well, and are about 37 x 24 x 2cm (14 x 9¾ x ¾ “) with this very small lip.
Servings – the cake makes about 18 slices and since tall and rich, thin long straight slices are recommended.
 Make In Stages – the vertical cake roll can be made in stages and several days ahead. The cake and buttercream must be made at the same time, same for rolling the cake. You can however assemble one day, cover another day and serve another day after that.
For more information, and step-by-step instructions and process photos, see before this Recipe Card.
Make In Stages – the vertical cake roll can be made in stages and several days ahead. The cake and buttercream must be made at the same time, same for rolling the cake. You can however assemble one day, cover another day and serve another day after that.
For more information, and step-by-step instructions and process photos, see before this Recipe Card.
 See more Swiss Roll recipes, or check out the Christmas page. Jump to the cake page for more ideas, or go to the Index Page to look for your favourite recipe.
**I am not a qualified nutritionist, & all nutritional values approximate & based on a thin slice of cake, based on cutting 18 portions as per above. Bigger or smaller slices & the nutritional values will change. All values from My Fitness Pal.com
Subscribe For More Recipes
Want more great recipes, tips, baking information and newsletters? Then please consider subscribing by adding your email address below. Be sure to check for a confirmation email & respond back, so you can follow me & receive your free emails. Your personal information will not be shared with a third party.


Join My Facebook Group
Why not also join my – Facebook group Easy Online Baking Lessons, dedicated to this baking lessons website, as well as providing one-on-one support with myself & my team? Be sure to answer all security questions when requesting to join.
Follow me on social media:
Happy Learning & Baking!
Caro x


Chocolate Orange Vertical Swiss Roll
Search For Something You Fancy!
Caroline’s Easy Baking Lessons


