Pide – Homemade Turkish Pizza

Try my recipe for Pide - homemade Turkish pizza. Made from a yeasted dough, I use a quicker method to still produce an authentic Turkish Pide pizza at home.
Pide – Homemade Turkish Pizza


Learn All You Need To Know To Make At Home


**Select to jump to section


What Is Turkish Pide?
And Other Frequently Asked Questions
Turkish Pide is an oval-shaped yeasted flatbread but also likened to pizza because of its toppings. Some other countries have a similar dish, & in Turkey (Türkiye), it is called Pide, (pronounced ‘Pee-de’), where Pide also means bread.
“What is Turkish Pide made from?”
Turkish Pide Pizza is made from a leavened dough that is enriched with egg whites & extra virgin olive oil & is often topped with cheese & spicy sausage meat.
“How is (Turkish) Pide different from Pizza?”
Turkish Pide is different to ‘regular’ pizza, where the shape is different, in more of an oval ‘boat-shaped’ form. There is also no tomato sauce on the base of a Turkish pide pizza.

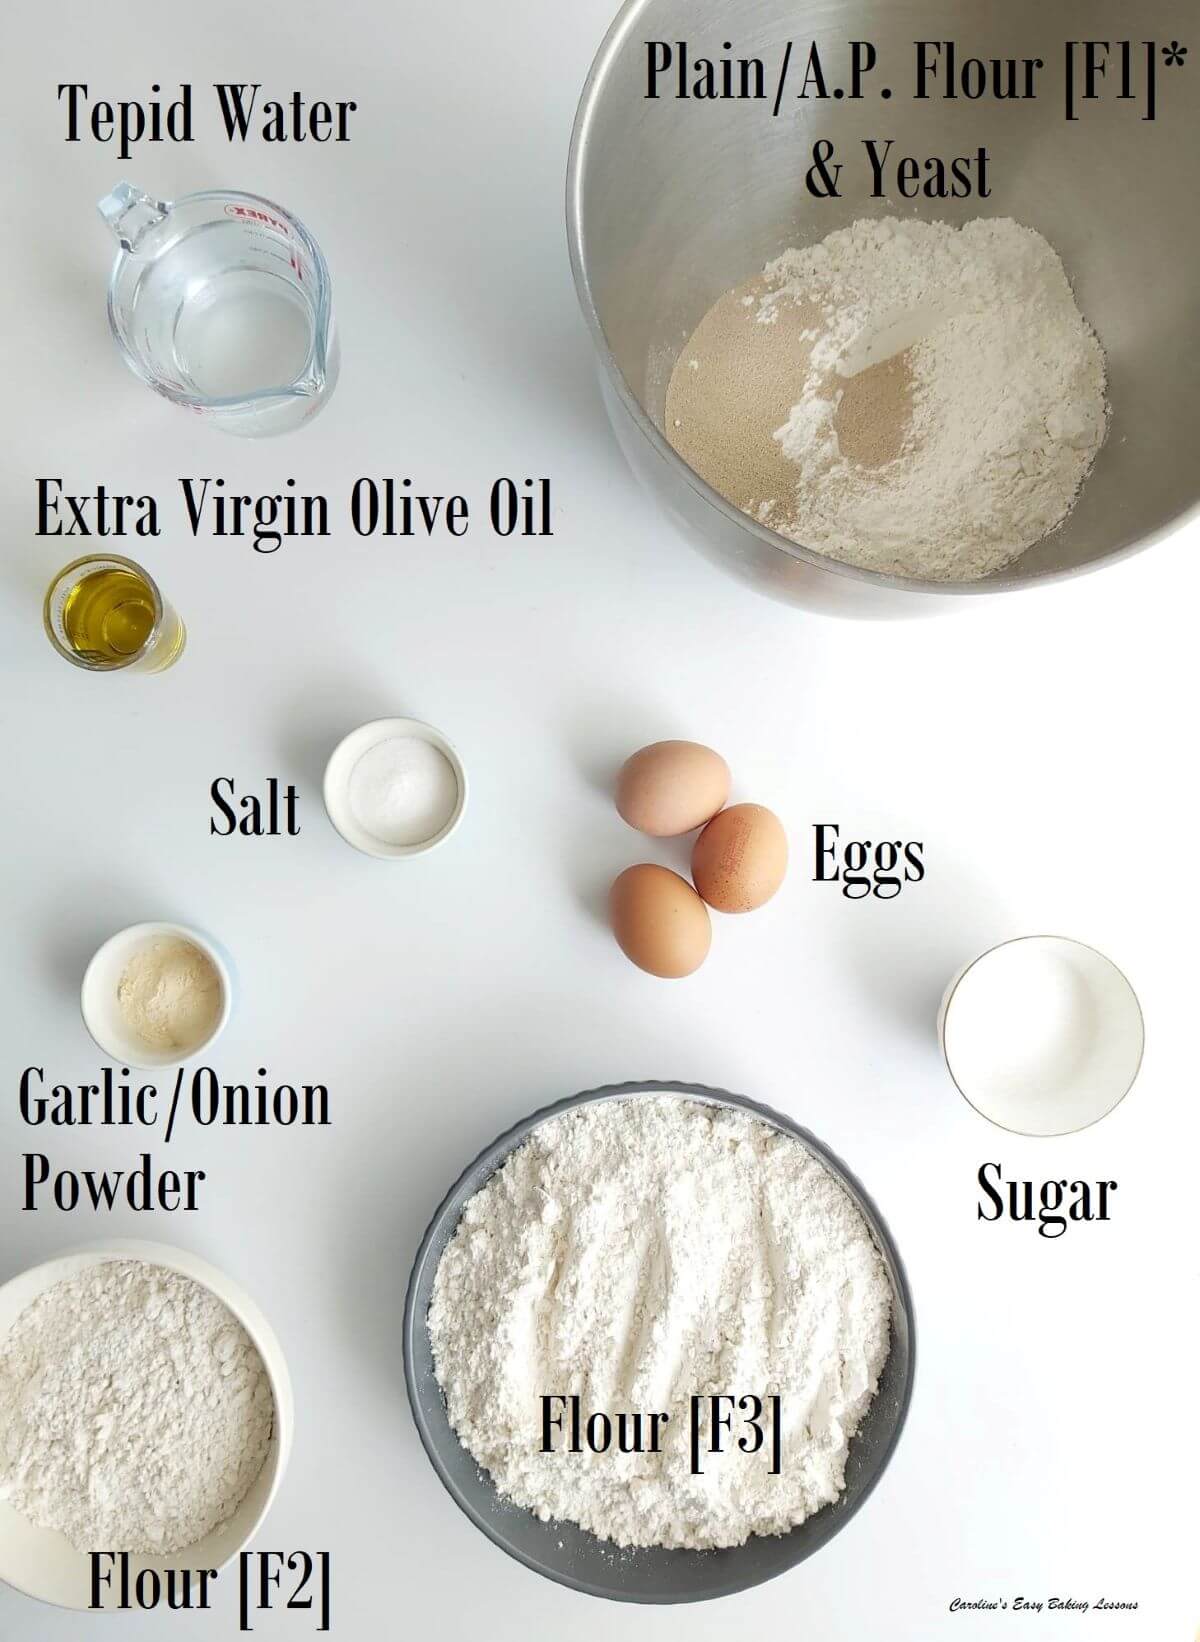
Ingredients & Substitutions
- Flour
- Yeast
- Salt
- Sugar
- Garlic/Onion powder/granules
- Tepid Water
- Extra Virgin Olive Oil
- Eggs
- Coarse Semolina (optional)
For The Toppings:
- Cheese
- Tomato
- Onion
- Spicy Meat


Flour
I almost always use just Plain (All Purpose) flour for my breads. But you can of course use bread flour (strong flour), if that is what you have.
I also sometimes use a combination of white flour and wholemeal (wholewheat) flour for these breads. I recommend using 40% wholemeal flour and not 100%. And be sure to increase your water content by about 10-11%. (More details in the Recipe Card). Note some of the photos are of using wholemeal flour.


Seasoning
I use slightly different seasoning depending on what I have. It only gives a subtle flavour so you can either use garlic or onion powder or granules. I recently have been using Aldi’s ‘Garlic Herb Mix’, that is predominantly garlic and rosemary. You can of course omit if you prefer.
Oil
Extra Virgin Olive Oil is used in the pide recipe to make for a much more pliable dough that is easier to roll out and work with. You can of course substitute with Virgin Olive Oil, Olive Oil, or any other neutral oil of choice.
Semolina
Coarse Semolina (Coarse Semolina Flour/Duran Wheat Flour) is used and although optional, it is used on the top & bottom of the pide crust, and provides a nice texture, as well as stopping the dough from sticking.
Toppings


There are several traditional toppings for Turkish pide pizzas. They never have a tomato sauce base (which is funny considering how many dishes are made with a tomato sauce made from a tomato paste.
Cheese is very popular and you can use Turkish Peynir (pay-near) a soft white cheese, kind of similar to Feta. But another one commonly used is called Kaşar. (See photo). This is medium-hard ‘yellow’ cheese, a little firmer than Mozzarella and comes in round blocks like Edam. Made from some sheep or goat’s milk, it is a pain to slice sometimes but a bit easier when frozen. I am able to source it here in Glasgow, Scotland from some Mediterranean or Asian shops, as well as the foreign food aile in the larger supermarkets like Asda. A good alternative would be Mozzarella or other hard cheese.
I am not a fan of Turkish white cheese, so often use Scottish extra mature cheese (extra/sharp cheddar) in ones for me. Great with finely chopped onion & tomato.


Meat Toppings
Turkish Sucuk (soo-jook) is a popular topping paired with the cheese and is an aged, spicy, mixed ground meat slicing sausage. Thin slices or small cubes are advised due to the quick baking time of the pide. This again can be sourced at Balkan, Middle Eastern and Central Asian shops, and may also be known as Sujuk. You could replace with salami or pepperoni.
A minced (ground) beef/lamb topping is also popular but I find it expensive, so tend to either use Sucuk for the meat-eaters, or just do meat-free ones. Another nice one is with cheese & spinach.


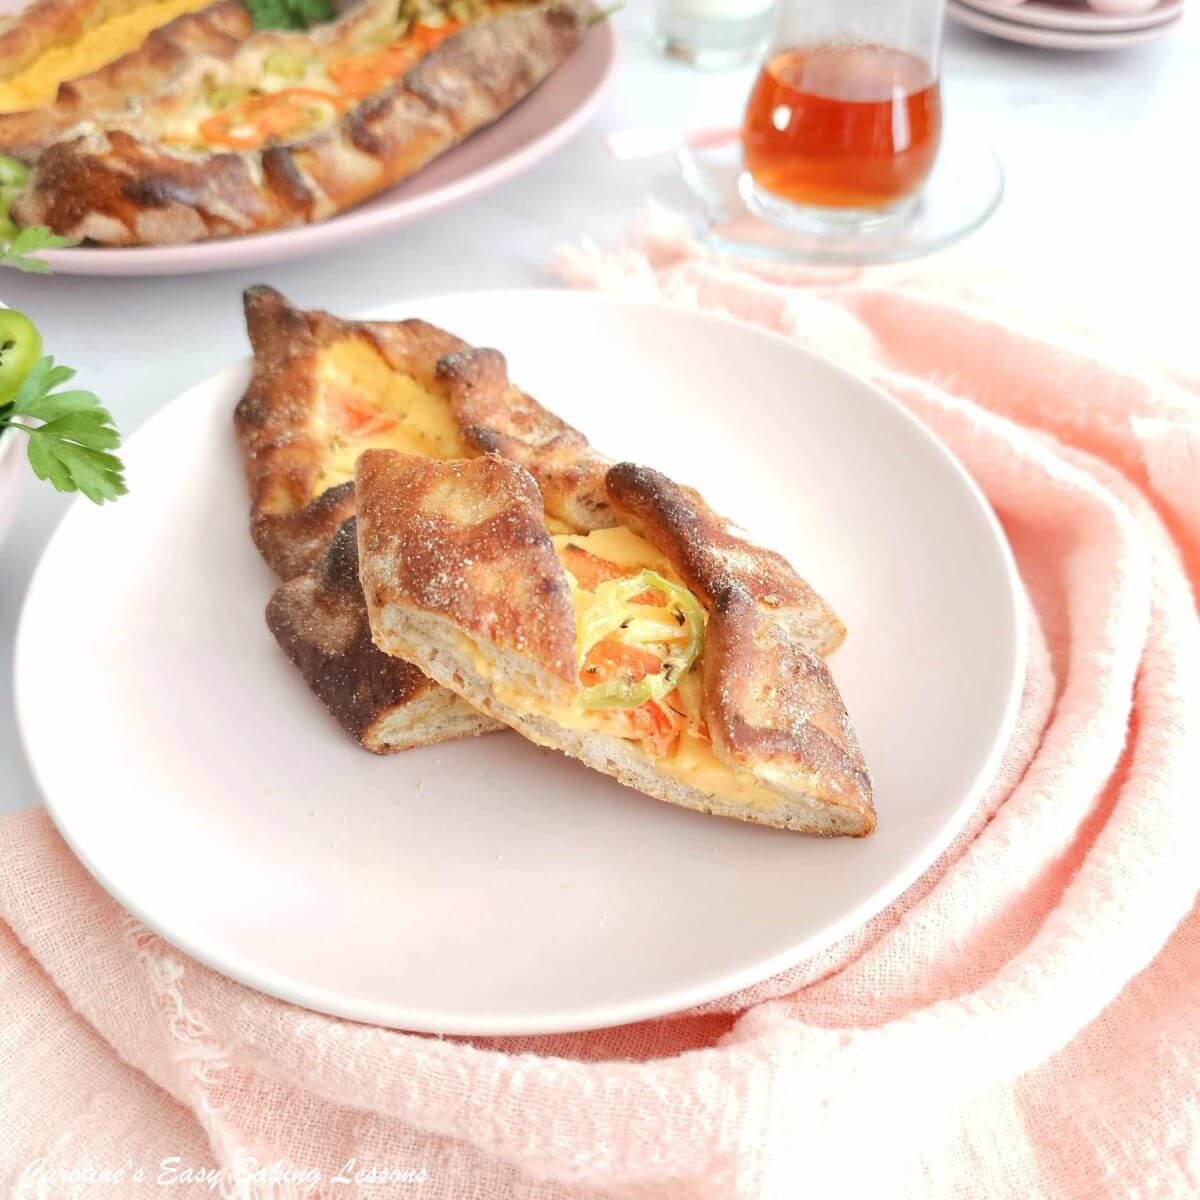
Egg Topping
It is also very common to crack an egg on top of the chosen topping, in the final 2 or 3 minutes of baking. It is meant to be a runny yolk but in some of the pics mine were when the yolk burst. Still tastes good but and is entirely optional BUT a traditional way to have it.
What To Serve With Turkish Pide/Pizza?
Turkish pide is always served alongside some cold Ayran. This a watered-down salty yoghurt drink & again can be sourced in other countries or you can make your own quite easily at home. Here is a traditional Ayran recipe by my friend Ayla who is a trained chef from Turkey but living in the UK and has a wonderful Turkish food blog called Cooking Gorgeous.


Authentic Turkish Cooking/Baking
Which leads me on nicely to talking about ‘traditional’ and ‘authentic’ Turkish recipes. Please do not be convinced by these titles on big websites, who rank 1st to 3rd on page one of Google searches as they are often not the same as how they are made or eaten in Turkey. You really need to experience these foods how they are made in their country of origin, (and not only once) to really see the truly ‘authentic’ recipe. There will be regional variations as Turkey (Türkiye) is an enormous country, but they will be very similar.
I appreciate it can be hard to source specific ingredients, which is fine, but they should not be using titles of ‘authentic’ or ‘traditional’ if they are using substitutions – but rather terms like ‘based on’ or ‘inspired by..’.


So why trust me, the red-haired Scot? Well, my recipes have been developed over dozens of testings over many years, and most importantly have been approved by my Turkish husband of 25 years. And let me tell you – he is hard to please!
Other Turkish Recipes
Not all of my Turkish recipes are online at the moment, but I do have some great ones for you. Other yeast-based recipes like Poğaça – cheese stuffed rolls, or Ramazan Pidesi – Turkish ramadan Bread, both using the quicker method.
Latest recipe is yeast-free, no bake Lahmacun – a spicy meat topped flatbread. More Turkish recipes or reviews can be found on my Turkish foods page.


The Quicker Method
This quicker method of working with yeasted dough, was created by Jessica Gavin, and taken from her book – ‘Easy Culinary Science For Better Cooking’, (2018).
The mixing method is different and results in much quicker proving time, saving you as much as 30-50% compared to traditional methods.
I have subsequently re-designed and developed my most-baked yeast recipes to include this method.
Why It Works
The method works, as it provides the most optimal environment for the yeast to work, with no compromise on taste, texture, rise or quality of bake.


Recipe Yield
I have set the recipe yield to 4 pide, but it is very easy to increase the amount made, by using the option on the Recipe Card to increase the recipe yield. You can also half the recipe to make 2, but not really worth the effort for 2, so what you can do is store half the dough after its first prove, well-covered in the fridge for up to 24 hours and even make another yeast-based recipe or some rolls from the dough.
Equipment
No special equipment needed for the recipe, but if you don’t have a stand-mixer, you will need to knead the dough by hand! And we will be using home ovens.


Share The Love
Please see the sharing options or even printing, at the right/bottom of your screen (bottom of your screen for mobiles, and down the right-hand side on computers). You can even pin this to your own Pinterest page.
Join My Facebook Group
Why not also join my – Facebook Group Easy Online Baking Lessons, dedicated to this baking lessons website, as well as providing one-on-one support with myself & my team? Be sure to answer all security questions when requesting to join.
Click to join Facebook Group Easy Online Baking Lessons,
Step-By-Step Instructions
1. Begin by making sure your flour is divided into 3 – (referred to as F1, F2 & F3 in the ingredients list in the Recipe Card below). F1, can be measured/weighed into the mixing bowl.
2. Next you want the water to be tepid and a temperature of about 49-54°c (120-130°f). First time, you can use the microwave and heat for 30 – 45 seconds until just a little warm . Alternatively, you can add cold water to hot water to reach the quoted temperature. After time, you can do this by touch alone.


3. Meanwhile, add yeast to the F1 flour in the mixing bowl, mix briefly through, before adding in the sugar, salt & the garlic/onion powder.
4. Add the egg white & extra virgin olive oil to the tepid water, before adding into the ingredients in the mixing bowl. (See Photo 1).


5. Use the ‘k-paddle’ or mixing attachment and mix on low -medium speed for exactly 2 minutes (be sure to time it).
6. Add in F2 flour (the smaller amount) and let it mix again for another timed 2 minutes. (Photo 2, 2nd/3rd pic)
7. Now swap over to the dough/kneading hook and add in half of the F3 flour amount, letting it mix for 30 seconds.
8. Gradually add in more flour until the mixture starts to come together as a slightly sticky rough shaggy ball.


**You might not need all the flour or more. This is because, different flour, different places & how it is milled, determines the amount of liquid it will absorb. Please note for using partially wholemeal/wholewheat flour, please leave 30 seconds before adding in more flour. See Photo 2
9. Now knead the dough on medium to high speed (whichever your own machine needs), for 4 minutes.
10. Remove the mixing bowl, place on its side & use a spatula to push the dough down & over itself, in effect turning it over, so you can knead again for another 4 minutes. (This ensures an even knead). Have a feel of the dough after kneading as it will be smoother & stretchy as see in Photo 3. (Wholemeal flour will be less smooth)


11. Cover the bowl of kneaded dough with a clean tea-towel and place in a warm draft-free area for 15 minutes.
12. Now put the kettle on and have a quick cuppa!
13. The dough will have noticeably risen even in this short time (as opposed to the 1.5 – 2 hours proving of normal recipes – the key being the tepid water & mixing method. See Photo 4.
14. Now you must ‘knock-back’ the dough. This is basically using your knuckles and punching down on the risen dough, knocking out the air. This is essential so that the yeast can be redistributed to allow them to activate in the second prove and help rising during the bake.


15. Paper line 1 or 2 baking trays/baking sheets, dusted with some flour.
16. Use your spatula or floured hands to release the dough out of the bowl onto a paper topped chopping board. Then use a floured knife to divide the dough into 4 equal pieces of dough before rolling into tight balls.
17. Place on the prepared trays/sheets & leave in the same warm draught-free place for 40-45 minutes to rise again


18. Prepare an area to work on. I prefer to use baking/parchment paper that I can re-use and cut to size to help guide me with rolling out size. Pre-heat your oven to 220°c/200°c Fan Oven/425°f/Gas Mark 7
19. Form one ball of the risen dough into an oval shape as seen in Photo 6 (where I was using wholemeal/wheat flour).
20. Roll out with a flour dusted rolling pin (mine is a Turkish rolling pin called an Oklava (okla-va)). Roll out gradually, keeping the oval shape, until your pide pizza base is about 12¾ cm/5″ wide and upto 33 cm/13″ long. You want the dough quite thin in comparison to a pizza as it will thicken on baking. (See Photo 6).


21. Now dust your paper lined baking trays/baking sheets, with coarse semolina (Coarse Semolina Flour/Duran Wheat Flour). This is also used on Ciabatta and stops the dough sticking as well as providing a nice crunch.
22. Lift the rolled out pide base to the tray before rolling out more & adding those too before any toppings. (Don’t add the toppings before lifting into the tray).


23. Now you can add the cheese slices to the centre most area of the pide base, leaving a little space at the ends (see Photo 8).
24. Then add on top your sliced or chopped Sucuk (or other spicy aged sausage meat), or go vegetarian and add sliced tomato and onion.
25. Next, pinch the ends of the pide base together, before bringing the sides over, making a ‘boat-shape’, covering some of the topping. In Photo 8 & the video you can see I like to pinch the sides between my thumb & index finger, to make them sit in place. You can almost close them up as they do widen on baking (some regions of Turkey they do them completely closed up).


26. Repeat for all 4 pide and then add just a splash of milk or oil to your remaining egg yolk & whisk together.
27. Brush the egg-wash onto all visible areas of the pide base & then sprinkle on some more semolina along the ‘crust’ (optional).


28. Pop the prepared pide pizzas in the pre-heated oven and bake for about 12 minutes.
29. If you want to add an egg to the final pide, crack one egg into a small bowl, being careful not to burst the yoke. This is easier than cracking directly onto the pide.
30. Carefully pour the egg onto the pide after about 8-9 minutes baking & leave it to cook for about 3 or 4 minutes till the white is set & the yolk slightly set but still runny.
31. Leave to cool on the tray/baking sheet for 5 minutes before transferring to the cooling rack, paper and all, to cool down a little before slicing.


32. Photo 11 shows an example of Scottish extra mature cheese (extra sharp cheddar) and tomato slices. As well as cutting very small cubes of the Sucuk meat and adding some parsley as garnish at the end.
33. To serve, slice the pide pizza into about 6 strips & eat alongside a cold glass of Ayran (a Turkish yoghurt-based salty drink – try this Aryan recipe).
34. Store the pide in food bags or air-tight containers in the fridge, after fully cooling down. These will last at least 2 days in the fridge.
35. Reheat the pide or pide slices in an air fryer or oven for a few minutes till warm to touch.
Hope you liked the recipe in detail.
All ingredient amounts can be found in the Recipe Card below. This is a printable version, abbreviated, and you can use to save, share or rate the recipe. (**Tip, you can jump to the Recipe Card from the option at the top of this recipe post).
Please take a minute to rate the post/recipe & leave some feedback. It helps me out so much.
Thanks, Caro xxx
Recipe Card
Quicker Turkish Pide Pizza

Equipment
- Stand Mixer with dough hook (optional)
- Scales of measuring cups
- Small to medium microwave-safe bowl/jug (Optional)
- 2 Small bowls to separate the eggs
- Food thermometer (optional)
- Measuring Spoons
- Pastry Brush (or small artist/paint brush)
- Small bowl for egg wash
- Baking/parchment paper
- 2 Baking sheet/trays
- Tea-Towel
- Rolling Pin
- Chopping board and knife
- Timer or Phone Timer
- Cooling rack
Ingredients
For The Dough
- 135 grams Plain Flour [F1] (4¾ oz, 1 cup+ 1 tbsp, All Purpose Flour, Strong/Bread Flour OR Wholemeal/wholewheat for F1 only*
- 1 tsp Salt
- 1 tsp Garlic/Onion powder/granules (optional)
- 1 tbsp Sugar
- 7 grams Dried Yeast (¼ oz, 1x ¼ oz packet, 2¼ tsp Instant or 2½ tsp Active)*
- 200 ml Tepid Water (6¾ fl oz, ¾ cup+ 2 tsp @49-54°c/120-129°f)*
- 1 Egg White, medium (Large US egg)
- 2 tsp Extra Virgin Olive Oil (10ml, other oils in Notes)*
- 67 grams Plain Flour [F2] (2⅓ oz, ½ cup+ 1 tsp, All Purpose or Strong/Bread Flour)*
- 134 grams Plain Flour [F3] (4¾ oz, 1 cup+ 1 tbsp, All Purpose Flour, Strong/Bread Flour)*
- Coarse Semolina (Coarse Semolina Flour/Duran Wheat Flour for sprinkling)*
For The Topping
- 1 Egg yolk (with splash of milk for egg wash)
- 250 grams Turkish Kaşar cheese, sliced (8¾ oz, alternatives in notes*)
- 250 grams Sucuk (8¾ oz, Turkish sausage meat)* OR
- 250 grams Extra/Mature Cheese, sliced (8¾ oz, extra/sharp cheddar)
- 2 Tomatoes, sliced or chopped (optional)
- Onion slices, pepper slices (optional)
- Egg (1 per Pide, optional)
- * Denotes see Notes
Instructions
Prepare The Dough
- Measure out all the ingredients first, with the three amounts of flour ([F1], [F2] & [F3]) all in separate bowls. F1 flour can be in the stand mixer bowl. (**F1 flour can be wholemeal/wholewheat flour).
- Add the yeast to the F1 flour before mixing together. Then add the salt, then the garlic/onion powder, followed by the sugar, mixing in-between each addition.
- Heat the water till tepid/slightly warm, at about 120-130°f, 49-54°c. (See notes for ways to do this if needed). Then add in the egg white & olive oil before mixing together.
- Add the liquid mixture to the mixing bowl & briefly mix by hand before using the 'k' paddle/mixer paddle attachment on a stand mixer, and mixing for 2 minutes, on medium speed. Be sure to time this.
- Add in F2 flour (the smaller one), and mix again for 2 minutes.
- Now add half of flour F3 & swap to the dough/kneading hook before mixing for 30 seconds. Gradually add more flour until the mixture starts to come together as a slightly sticky rough shaggy ball. You might not need all of the flour or perhaps a little more.
- Knead the dough on medium to high speed (whichever your own machine needs), for 4 minutes. Then tilt the bowl & use a spatula to flip the dough over and continue kneading for another 4 minutes. Alternatively, knead by hand on a lightly floured surface for 10 minutes till smooth & a little less sticky.
Prove The Dough
- Remove the dough hook & scrape the dough off, before covering the bowl with a clean tea-towel and placing in a warm draft-free area for 15 minutes.
Prepare The Baking Trays/Sheets
- Prepare baking trays/baking sheets with baking/parchment paper & a dusting of flour. (Don't bake without paper).
Dividing The Dough
- The dough should have risen in that short time. Place a sheet of paper on top of a chopping board, with flour on top & scrape the dough out onto the paper. Using floured hands, form into a disc & cut into 4 equal pieces.
- Roll each piece of dough into a tight smooth ball (note if using wholemeal/wholewheat flour the dough will be less smooth looking) & place on the floured baking/parchment paper.
2nd Prove
- Leave for 40 – 45 minutes for its second prove, in the same warm, draught-free place.
Shaping The Pide Pizza
- Heat the oven to – 220°c/200°c Fan Oven/425°f/Gas Mark 7. In a small bowl, mix the left-over egg yolk with a splash of milk & place to the side with a brush for later.
- Take one of the risen balls of dough, shape into an oval and place on floured baking/parchment paper. Use a flour dusted rolling pin and carefully roll out the dough in a long & thin oval shape, about 12¾ cm/5″ wide and up to 33 cm/13″ long. (See photo below, video or step-by-step instructions before this Recipe Card).
- Transfer the rolled out Pide pizza to the semolina dusted & paper lined baking tray/baking sheet. Roll out the other 3 pide & place on your tray/sheet. (Note you don't need any gaps at this point).
- Once on the trays/sheets, place slices of the cheese in the centre most area of the pide base, leaving a little gap at the 2 small ends. Top with sliced/chopped Sucuk, tomato, onion, spinach etc. Then pinch the 2 short ends together & lift the sides over to partially cover some of the topping, forming a 'boat-shape'. Use your thumb & index finger to pinch these sides of the dough together, helping the dough to sit better on top of the toppings (see photo). Brush the egg-wash on these exposed areas of dough and sprinkle some semolina on top (optional).


Bake The Turkish Pide Pizza
- Bake in the centre of the oven for about 12 minutes till deep golden and cooked through to the bottom. If you want to add a traditional egg on top of the Pide, carefully crack one egg into a small bowl, before pouring onto the pide after about 8 minutes of baking. Then bake for a further 3 – 4 minutes until the egg is cooked.
- Leave to cool on the tray/baking sheet for 5 minutes before transferring to the cooling rack, paper and all, to cool down a little before slicing.


Serving & Storage
- To serve, slice the pide pizza into 6 strips & eat alongside a cold glass of Ayran (a Turkish yoghurt-based salty drink – try this Ayran recipe).
- Store cooled down pide in food bags or air-tight containers in the fridge. These will last at least 2 days in the fridge. Reheat the pide/pide slices in an air fryer or oven for a few minutes till warm to touch.
Video
Notes

 Water – microwave water for 30 – 45 seconds until just a little warm . Alternatively, add cold water to hot water to reach the quoted temperature. After time, you can do this by touch alone & is similar to checking temperature for baby’s milk.
Coarse Semolina – used to dust the paper-lined baking trays/baking sheets, to stop the Pide sticking & to give a nice texture to the crust. American equivalent is Coarse Semolina Flour/Duran Wheat Flour.
Water – microwave water for 30 – 45 seconds until just a little warm . Alternatively, add cold water to hot water to reach the quoted temperature. After time, you can do this by touch alone & is similar to checking temperature for baby’s milk.
Coarse Semolina – used to dust the paper-lined baking trays/baking sheets, to stop the Pide sticking & to give a nice texture to the crust. American equivalent is Coarse Semolina Flour/Duran Wheat Flour.
 Yeast – I have used both Active or Fast Acting dried yeast for these recipes. If you want to be exact or use fresh yeast, see my Yeast Conversion tables.
Oil -alternatives to extra virgin olive oil, such as virgin olive oil, olive oil or any other neutral oil.
Recipe Yield – 4 Pide pizzas.
Yeast – I have used both Active or Fast Acting dried yeast for these recipes. If you want to be exact or use fresh yeast, see my Yeast Conversion tables.
Oil -alternatives to extra virgin olive oil, such as virgin olive oil, olive oil or any other neutral oil.
Recipe Yield – 4 Pide pizzas.

 Toppings – ingredient amounts given for one type of topping. More details before recipe.
Detailed instructions, photos & information can be found before this Recipe Card.
More Quicker Yeast Recipes – Check out more Quicker Yeast Bread & Roll Recipes (including Pizza), such as 2 Hour Bagels recipe.
Toppings – ingredient amounts given for one type of topping. More details before recipe.
Detailed instructions, photos & information can be found before this Recipe Card.
More Quicker Yeast Recipes – Check out more Quicker Yeast Bread & Roll Recipes (including Pizza), such as 2 Hour Bagels recipe.
 Check out my Beginners’ Guide To Yeast Recipes, or go to my Bread & Roll recipes page.
Another popular Turkish recipe is Poĝaça – cheese filled rolls, or yeast-free Poğaça, no-bake Lahmacun, a spicy meat topped flatbread (below).
Check out my Beginners’ Guide To Yeast Recipes, or go to my Bread & Roll recipes page.
Another popular Turkish recipe is Poĝaça – cheese filled rolls, or yeast-free Poğaça, no-bake Lahmacun, a spicy meat topped flatbread (below).


NUTRITIONAL VALUES – I am not a qualified nutritionist, and all nutritional values are approximate & based on a serving of 1 whole Pide pizza, made as per above with Turkish cheese & meat, with cheese & tomato topping (cheese & tomato toppings will have lower values & adding an egg will increase the values). All information calculated from website My Fitness Pal.com


Subscribe For More Recipes
Follow me on social media:
Happy Learning & Baking!
Caro x

Pide – Homemade Turkish Pizza
Search For Something You Fancy!
Caroline’s Easy Baking Lessons


Another yes, yes and yeeeessss
Glad you like it!
Another great quicker recipe from you. I loved trying this one out for you. Such a great recipe in quicker time too.
So glad you liked the recipe Jane.