90 Minute Burger Buns – Quicker Baking

If you want to make fresh rolls or burger buns, but don’t have the time for the usual 3 to 4 hours for normal yeast-based recipes, you should try this recipe for 90 Minute Burger Buns. Thorough step-by-step instructions for these quicker buns, measurements in grams, ounces & cups, makes big burger buns & they taste great too!
90 Minute Burger Buns
Savoury Lesson 9
*Original post 07/06/2019, updated photos & Recipe Card added 16/09/23


The Quicker Bread Series

Following on from the Quicker Yeast Making Technique, that included 2 Hour Tear-And-Share Dinner Rolls, & 90 Minute Cheese Pizza, I now have developed a recipe for 90 minute burger buns, that can be prepared, baked and out of the oven in 90 minutes (if you don’t stop to take hundreds of photos like me).
This is all thanks to a quicker recipe method by Jessica Gavin, and taken from her book – ‘Easy Culinary Science For Better Cooking’, (2018).
Check out more quicker bread recipes, including bagels & Turkish cheese stuffed rolls – go to Quicker Breads
Why It Is Quicker
The quicker process involves a little more time spent on initially preparing the dough, but has a significantly shorter rising time (also known as proving). This recipe only rests for 15 minutes, compared to standard yeast methods of anything from 1 – 1.5 hours. So this dough, (which is still yeast based), is a game changer, especially for bakes that normally require 2 rising times and can take between 3 – 4 hours to make. But don’t think for one minute that there is any sacrifice on taste or look of the final bake. If anything it is even more yummy.


A Note On Ingredients
So no special ingredients are required for the dough, just the inclusion of egg whites.
Note the flour is separated into 3 amounts, as they need added in a specific way, and are referred to as [F1], [F2] & [F3]. This method works really well, and once you have done a few times, you really don’t need to refer to the recipe. And it’s the same process for making the dough, in all the Quicker Yeast recipes of mine. So stick with the recipe and you will achieve the same result.


The Yeast – An additional note on the yeast. Normally I use fast acting instant dry yeast, but during the lockdown and shortages, I was only able to get active dry yeast in bulk. So this recipe has been developed and tested using both types of yeast, and with the same amount, with very little difference.
If you can only get fresh yeast, you want 28g (1 oz) of this type of yeast. For more conversions of different yeast, see my Yeast Table.


Very Big Burger Buns
Also note the recipe makes 8 large burger buns, about 11 cm (4 1/3 inches) pre-baked and about 12.5cm (5 inches) after the 2nd prove. As seen in the photo, the rolled-out dough is about hand-width.
So if your cooked burgers are a bit smaller in diameter, just roll a little smaller.
If you want regular sized burger buns, simple divide the dough into 12 equal pieces at step 8 below.


I am not going to keep you much longer from the recipe, but just have a look at the video below, that was used for a Facebook group bake-along, where my 2 hour tear-and-share dinner rolls recipe was used, to introduce beginners to bread making. It’s an almost real-time tutorial just so you can see even better how this process works. Watch it one time, and then you will have the hang of it.
Go to 90 Minute Dinner Roles Video
DOWNLOAD the step-by-step recipe in full, all details all photos, to save to your phone or computer. Simply click the ‘download’ button below. Experienced bakers can save, share or print the abbreviated Recipe Card at the bottom.


**Lessons Students – follow the detailed step-by-step instructions below and not the Recipe Card, which is an abbreviated version of the recipe for those used to handling yeast dough.
Step-By-Step Instructions
1. Have the 3 amounts of flours weighted or measured out in separate bowls – you can use the stand mixer bowl for the first flour, [F1]. Place the oil and water into a microwave safe bowl or jug and heat for 30 – 45 seconds until just a little warm (120-130f, 49-54c). Alternatively used some hot water and cold water and check the temperature once mixed. It should be just above tepid.
2.Mix the salt into the first flour, [F1] and give it a good mix through. This is because yeast should never come into direct contact with salt or it will reduce the power of the yeast. This way the salt is coated in flour.
3.Add in the yeast, sugar and onion powder (if using) and mix through, one at a time. Once the water and oil is warmed, add this as well as the egg white to this dry mixture. Using the paddle (or ‘k’ hook) on the mixer, mix for 2 minutes. Be sure to time this. See Photo 1 below.


4. Now add in the smaller bowl of flour [F2], and mix for 2 minutes with a timer. The mixing in this recipe is very important so remember to time it.
5.Slowly add in the flour from [F3]. You might not need it all, (or a little more – sometimes I have needed an extra 3/4c or 90g), but you want a dough that starts to come together as a very rough ball around the paddle. So mix for 10 seconds after each addition of flour and wait to see the ‘ball’ of dough. Note that the dough will be a bit sticky. See Photo 1 above.
6.Now put the dough hook onto the stand mixer (use a scraper to get the dough off the paddle), and knead on medium speed for 4 minutes.
7. Using a rubber or silicone slim spatula, scrape the dough off the bowl from down the sides. Then tilt the bowl and put on its side, so you can see the bottom. Continue scraping the dough out towards the top of the bowl. Now wash and then put oil (or spray oil) onto your dominant hand and ease the dough out and turn it over so that the bottom of the dough is now at the top end of the bowl. Alternatively, just flick the dough over with a silicone spatula.


Place the bowl back on the mixer and continue kneading for another 4 minutes. The dough does tend to stick at the bottom when kneading, and this is another reason why we turned it during kneading. Once the total kneading time is up, the dough will be forming a ball and cleaning the sides of the bowl. Have a feel of the dough to know how well kneaded dough feels. (See photo 3 above). Note also how stretchy it is when you lifted the dough hook up. Scrape any dough from the hook and into the bowl. Now place a towel on top of the bowl and leave somewhere warm and draft free for 15 minutes. See Photo 3 below of before and after just 15 minutes proving.


8. Well flour some baking/parchment paper or worktop/counter and your rolling pin. Release the dough from the bowl like before, (without oiled hands this time) and tipping, scrapping out onto the worktop. Turn the dough over and let it get a bit more flour on it. Knead the flour into the dough for a few seconds, adding small amounts of flour if needed for it to be manageable.


Now divide the dough into 8 pieces. For equal sizes you can weigh or, what I do is form into 2 large disc shapes. Then divide each disc into 4 triangle segments like a pizza. This produces 8 pieces & gives nice big burger buns. These are about 11 cm (4 1/3 inches) pre-baked & a bit bigger once baked. So if you want regular sized burger buns, divide the dough into 12 (make 2 discs of dough and then divide each into 6). See Photo 5 below.
Rolling Balls Of Dough
9. Now take each piece of dough and roll into a tight neat ball. (See Photo 5 below). To do this I pull the dough and tuck under itself. This repeated action, not only works the dough a little, but causes surface tension, which in line creates a tighter ball of dough. For more on this, see the video for the burger buns above, on watch the next short video below.


Shaping The Rolls
10. Prepare 2 large baking trays/sheets with some baking/parchment paper. Oil in place if there’s no lip on them or the buns will slide off. Place the rolled balls of dough on top of one of these trays/sheets and lightly flour your working area again. Take one of the balls of dough and with a floured rolling pin, start to roll from the centre of the dough and away from yourself just once & roll this time back the way, towards yourself. Do this 2 more times (See Photo 6 below).


11. Next lift the dough with one hand & use the other to spread the flour to where the dough was. Turn the dough 90 degrees so that is now an oblong, sitting horizontally, see Photo 7 below.
12. Now repeat the same rolling process. You should now have a wide circle of dough. It will be about 11 cm (4 1/3 inches) wide pre-baked and about 12.5cm (5 inches) after the 2nd prove). *If your cooked burgers are usually smaller than this diameter, roll the buns slightly smaller.


13. Repeat for all balls of dough and place on the 2 or 3 prepared baking sheets/trays, with plenty space in-between. See video above.
14. Now brush some egg wash all over the top and sides of the dough. Sprinkle on some sea-salt or sesame seeds if you wish. (Completely dipping in the seeds is also nice). See Photo 8 below.


15. Leave, in the same draft free area for 30 – 40 minutes, while they will swell up a little, but not double in size. **Note that if your environment is really warm and sunny, this could take just 20-25 minutes, so keep an eye on them and get the oven on sooner if needed. You don’t want to over-prove or they can sink when baking. See Photo 9 below
16. Heat up the oven to 220c/200c Fan Oven/425f/Gas Mark 7 before the rising time is up.


17. Place the trays/sheets of rolls into the hot oven and bake for 12 – 16 minutes, until a deep golden colour all over. (See Photo 10). I was used to having an old oven, and un-even baking so I would time my bakes, turning the trays and rotating between the shelves if more than one tray was used. I also often turn the rolls over in the last few minutes, and apply any egg-wash that is left. You want to tap the top and bottom of the rolls when the top is golden and risen and compare. The bottom is often softer and not a ‘hollow’ sound and so needs a few minutes more of baking, bottom side up.


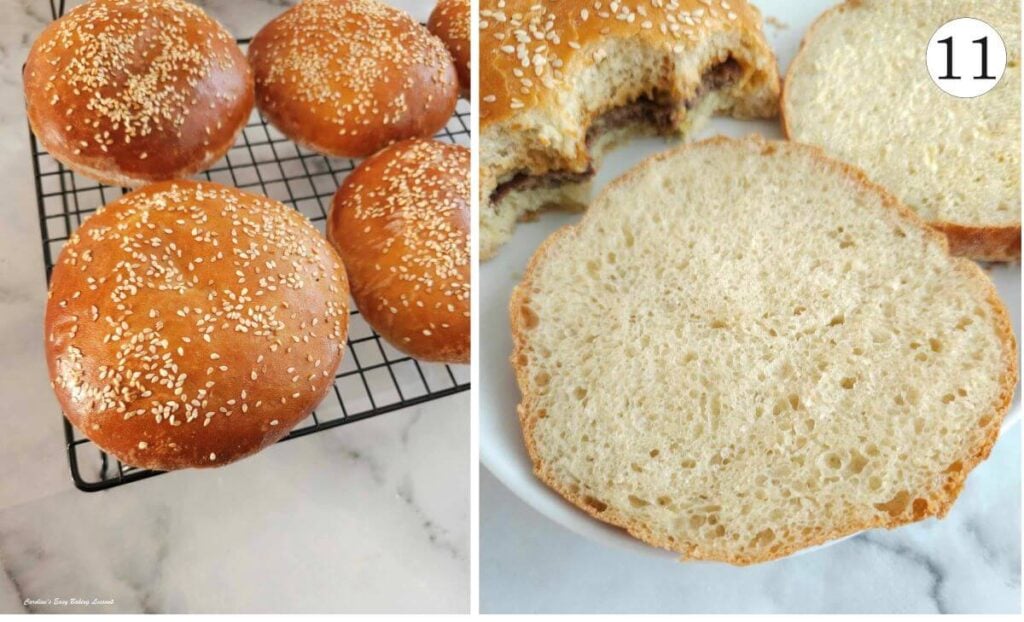
19. Leave on the tray for 5 minutes, on top of a cooling rack, before transferring the rolls/buns, paper and all on to the cooling rack. Leave to cool as much as possible and this will make cutting easier. Slice in half with a large serrated bread nice and enjoy with your favourite burger. See Photo 11 above.
20. Left-overs can be stored in a sealed food bag for a few days. Can easily be frozen, just place a piece of kitchen paper/paper towel inside and this will absorb any moisture when defrosting. You can also make them last a bit longer, by placing the heal/end of a bought loaf of bread in with the buns, and this will help preserve them a little longer.


DIFFICULTY LEVEL: easy with guidance
Share The Love
Please see the sharing options or even printing, at the right/bottom of your screen (bottom of your screen for mobiles, and down the right-hand side on computers). You can even pin this to your own Pinterest page. Alternatively, you can download this complete step-by-step lesson, see below. Or Use the abbreviated Recipe card to save, share or print. You could also leave some feedback if you like.
Click the ‘Download’ button below, to save to your phone or computer.


Recipe Card
90 Minute Bigger Burger Buns

Equipment
- Stand Mixer with dough hook (optional)
- Scales of measuring cups
- Small to medium microwave-safe bowl/jug (Optional)
- 2 Small bowls to separate the eggs
- Food thermometer (optional)
- Measuring Spoons
- Pastry Brush (or small artist/paint brush)
- Small bowl for egg wash
- Baking/parchment paper
- 3 Baking sheet/trays (or 2 extra large)
- Tea-Towel
- Rolling Pin
- Timer or Phone Timer
- Cooling rack
Ingredients
For The Dough
- 250 grams Plain or Strong Bread Flour – [F1] ( 8¾ oz, 2 cups All Purpose or Bread Flour) – [F1]*
- 2 tsp Salt
- 2 tsp Garlic or Onion powder/granules (optional)
- 2 tbsp Sugar
- 14 grams Dried Yeast, Instant/Active (½ oz, 2 x ¼ oz packets, 4½ tsp Instant or 5 tsp Active*)
- 400 ml Tepid Water (13½ fl oz, 1⅔ cups, ( 49-54°c/120-129°f) see recipe instructions for more)
- 2 Egg White, medium – Large (Large – XLarge US eggs, 3 small UK or 3 medium/large US)
- 4 tsp Olive Oil or E.V.O. Oil (20ml)
- 125 grams Plain or Strong bread Flour– [F2] (4½ oz, 1 cup All Purpose or Bread Flour) – [F2]*
- 250 grams Plain or Strong bread Flour – [F3] (8¾ oz, 2 cups All Purpose or Bread Flour) – [F3]*
For The Topping
- 1 Egg yolk & splash of milk for egg wash (freeze or use other yolks)
- Sesame seeds (optional)
- * Denotes see Notes
Instructions
Prepare The Dough
- Measure out all the ingredients first, with the three amounts of flour ([F1], [F2] & [F3]) all in separate bowls. [F1] flour can be in the stand mixer bowl.
- Heat the water in a microwave-safe jug for about 30-45 seconds till just a little warm. You are looking for a temperature of 120-130°f, 49-54°c. Alternatively you can mix hot and cold water & test for a tepid temperature with your finger. Next add in the egg whites & olive oil before mixing together.
- Have the [F1] flour in the mixing bowl, and add in the yeast before mixing together. Add the salt, then the garlic/onion powder, followed by the sugar, mixing in-between each addition.
- Add the tepid liquid mixture once it is ready, mix briefly by hand before using the 'k' paddle/mixer paddle attachement (not the kneading hook yet). Set a timer to mix for 2 minutes, on medium speed. Timings are important in this recipe. Add in [F2] flour (the smaller one), and mix again for 2 minutes.
- Add half of [F3] flour & let the stand-mixer incorporate the flour on low-medium speed. Swap over to the dough hook & slowly add in the rest of [F3] flour until you have a dough that is starting to come together, as a very rough ball around the paddle and just a little sticky. You might not need it all or perhaps a little more.
- Knead the mixture on medium speed for 4 minutes, before tilting the bowl on its side and scraping the dough down to turn it over, before resuming kneading for a further 4 minutes. (Do not add more flour). Alternatively, knead by hand on a lightly floured surface for 10 minutes till smooth & a little less sticky.
Prove The Dough
- Remove the dough hook, scrape the dough from the hook into the bowl & cover with a clean tea-towel. Leave in a warm & draft free place for 15 minutes.
Prepare The Baking Trays/Sheets
- While the dough is having its first prove, prepare the baking trays/sheets by lining with baking/parchment paper. (Don't bake without paper).
Shaping The Burger Buns
- Flour baking/parchment paper or a clean worktop/counter to work on. Scrape the dough to release onto the floured area/paper & with floured hands shape the dough into a circle or oval shape before cutting the dough in half with a floured knife, as equally as possible. Divide each dough portion into 4 to make 8 pieces. If you want to weigh the dough pieces, for 8 larger burger buns, the weight is about 152g (5⅓oz).
- Roll the 8 pieces of dough into tight neat balls (see video in step-by-step process before this Recipe card). Place on some floured baking/parchment paper while you roll out one bun at a time.
- Place one ball of dough on floured paper or a worktop/counter, use a floured rolling pin to roll the dough from the centre & away from you, then back to centre and towards you. Repeat 2 more times before lifting with one hand & using the other to spread flour to the working area. Place the dough back down but at a 90 degree turn so horizontal and repeat the same rolling process. The dough will now be about 11 cm (4⅓ inches) wide & wider after proving. So if your burgers are not as wide, don't roll out quite as wide. Alternatively if small, divide the dough into 12 pieces. Place on the prepared paper-lined baking sheet/tray.
Topping The Buns
- Brush egg-wash (1 left-over egg yolk mixed with a splash of milk), on top of the rolled-out burger bun, being sure to brush all over the surface. Sprinkle on sesame seeds, or leave plain if you prefer. You can also completely cover in seeds by dipping in a bowl of seeds. Repeat for the other 7 buns, leaving at least 2½cm/1" gap in-between the burger buns.
Second Prove
- Leave in the same warm, draught free place for 30 – 40 minutes for its 2nd prove. Note they will increase a little, but not double in size. If in a very warm environment, keep an eye as this may take 20-25 minutes & you don't want to over-prove. Heat the oven to – 220°c/200°c Fan Oven/425°f/Gas Mark 7 to coincide with the ending of the 2nd prove.
Bake The Burger Buns
- Bake in the centre of the oven, for 12–16 minutes, until deep golden brown colour all over. You can turn and rotate the baking sheets/trays for an even bake if your oven has hot spots, by doing so after 7 minutes. Near the end of baking I also like to turn the buns over, apply any remaining egg-wash to the undersides & let the bottoms bake for a few more minutes.
- Remove from the oven, leave on the baking sheet & place on top of a cooling rack for 5 minutes. Meanwhile place any remaining uncooked burger buns in to bake. After 5 minutes, transfer the cooked buns with the paper, onto the cooling rack and allow to cool down completely before cutting.
Serving & Storage
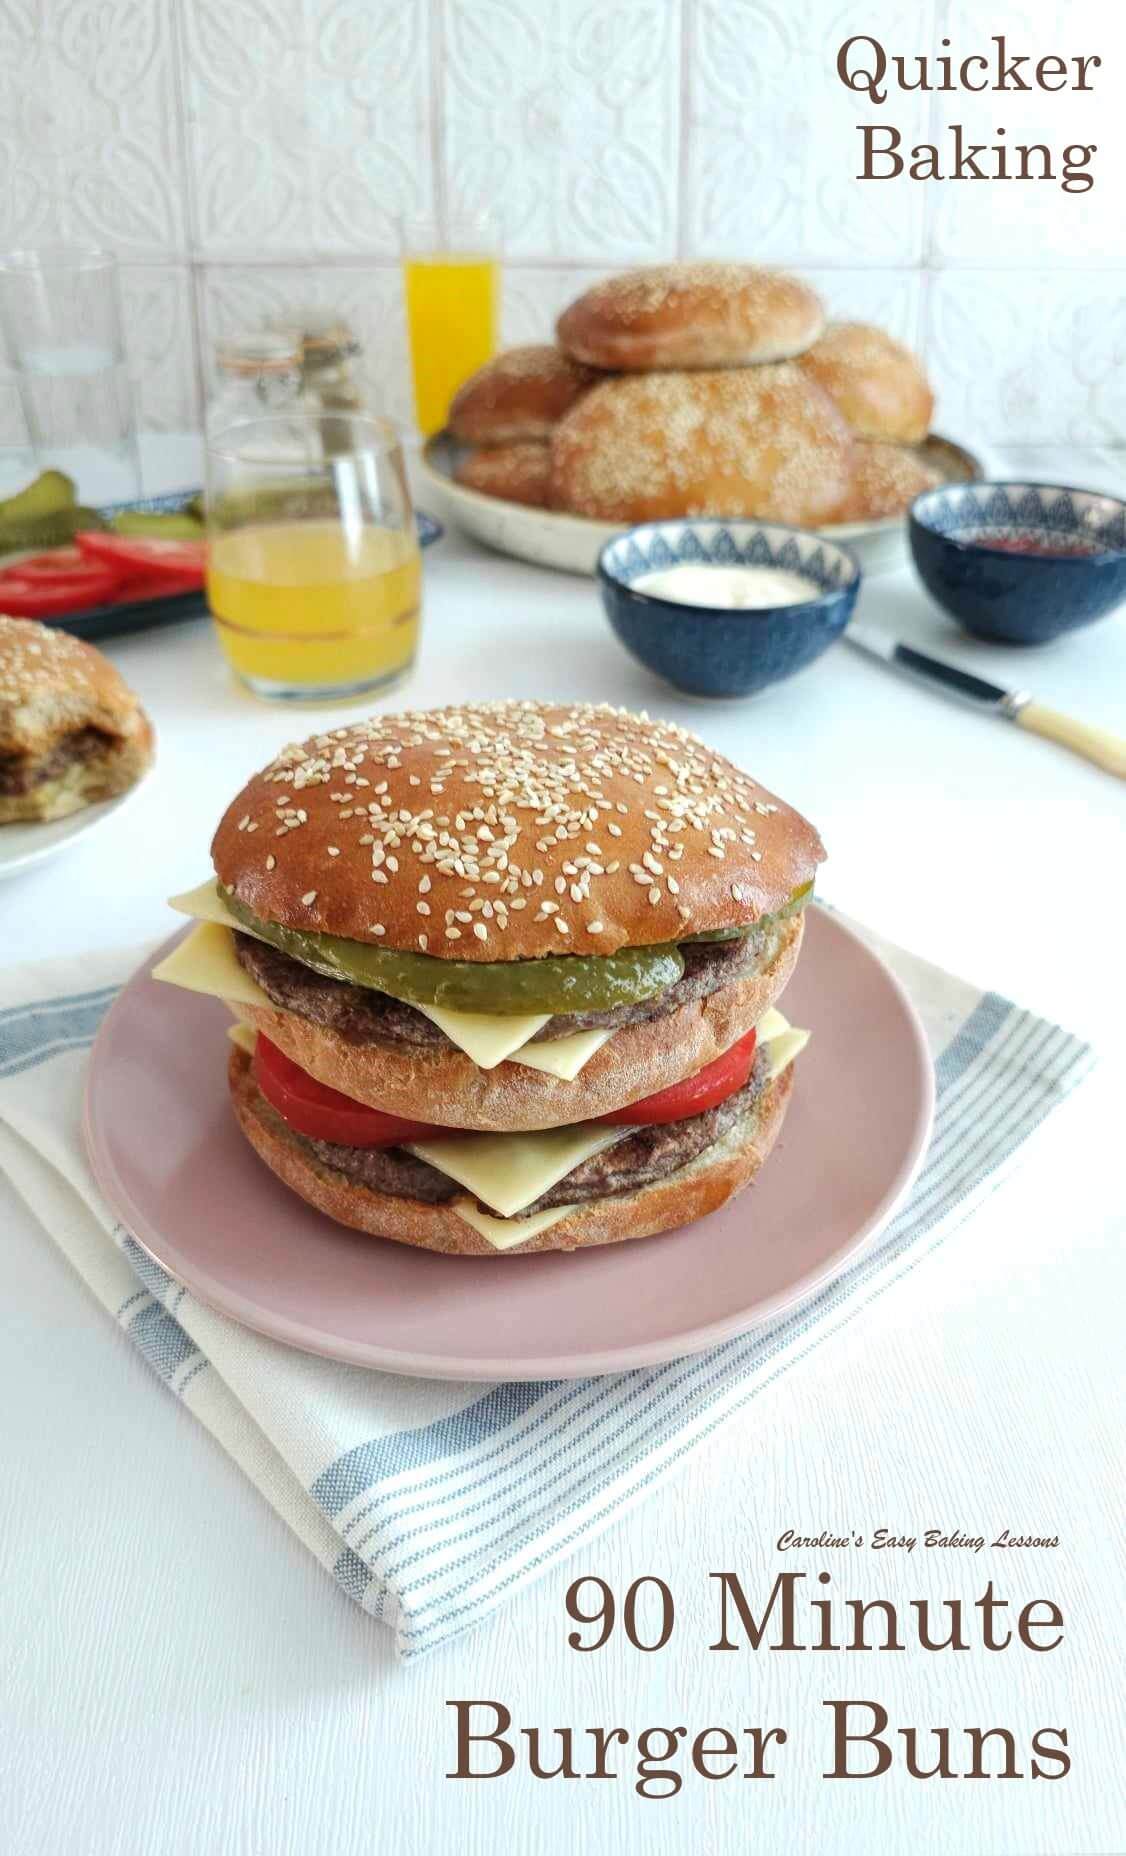
- Slice the buns in half with a serrated bread knife & fill with your favourite large burger and toppings. Use an extra slice of bun & make a double-decker burger as seen in the photos. Vine tomatoes, gherkins sliced horizontally & Gouda cheese slices were used in these burger buns.
- Store left-over burger buns in sealed food baggies for 2 or 3 days and keep away from direct sunlight. Placing the 'heal', end slice of shop bought bread in the bag, will also preserve the rolls. They also freeze well in food bags & placing a sheet of kitchen paper/paper towel in with it, will also help absorb moisture when defrosting. They can be frozen for about 3 months1 and defrosted at room temperature, or overnight in the fridge, but let come to room temperature before using.
Video
Notes

 Yeast – I have used both Active or Fast Acting dried yeast for these recipes. If you want to be exact or use fresh yeast, see my Yeast Conversion tables.
Recipe Yield – 8 large burger buns.
Check out my Beginners’ Guide To Yeast Recipes, or go to my Bread & Roll recipes page.
Another popular Turkish recipe is Poĝaça – cheese filled rolls. Try my 2 hour, yeast-based recipe.
Yeast – I have used both Active or Fast Acting dried yeast for these recipes. If you want to be exact or use fresh yeast, see my Yeast Conversion tables.
Recipe Yield – 8 large burger buns.
Check out my Beginners’ Guide To Yeast Recipes, or go to my Bread & Roll recipes page.
Another popular Turkish recipe is Poĝaça – cheese filled rolls. Try my 2 hour, yeast-based recipe.


References: 1 Freezing time taken from site Freezeit.co.uk @ https://www.freezeit.co.uk/can-you-freeze-bread/
NUTRITIONAL VALUES – I am not a qualified nutritionist, and all nutritional values are approximate & based on a serving of 1 large burger buns, from a recipe yield of 8 burger buns, weiging about 151g/5.25oz before baking. Values calculated from website My Fitness Pal.com, where more macros can be found & saved. If you have a MyfitnessPal account, go to my 90 Minute Burger Buns recipe on MyFitnesspal.com
Subscribe For More Recipes
Join My Facebook Group
Why not also join my – Facebook group Easy Online Baking Lessons, dedicated to this baking lessons website, as well as providing one-on-one support with myself & my team? Be sure to answer all security questions when requesting to join.
Follow me on social media:
Happy Learning & Baking!
Caro x

90 Minute Burger Buns
Search For Something You Fancy!
Caroline’s Easy Baking Lessons


This is my absolute go to for burger buns. The recipe and videos and hints are so easy to follow and it does just take 90 minutes! They taste great too!!
This is a great recipe. The step-by-step instructions are so good and they are so easy to make.
Absolutely love all your quicker bread recipes. These are not only tasty with a lovely crumb, but such big burger buns they are ideal for Halal beef burger we get that don’t shrink much. I froze a couple too like you said. Great recipe again.