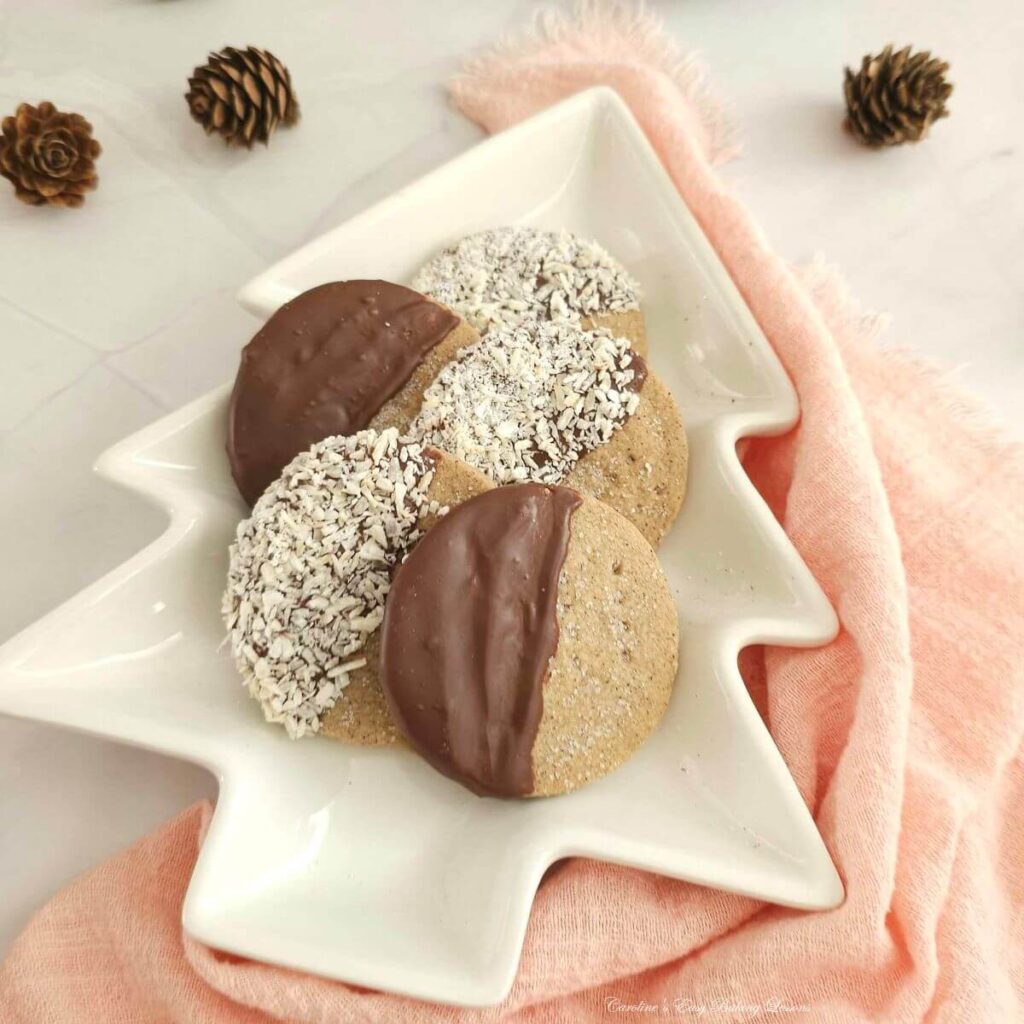
Chocolate Coconut Scottish Shortbread

Chocolate & Coconut Scottish Shortbread is based on my traditional Scottish shortbread recipe, with a melt-in-the-mouth texture, just as we make them here in Scotland.
Chocolate & Coconut Scottish Shortbread

***click to jump to section***


Using my Traditional Scottish Shortbread recipe, I developed this chocolate and coconut version, with just a hint of anise! Still with the same melt in the mouth texture, I have been told my shortbread is so much better than a certain popular brand you can buy! So if you love my shortbread recipe, the next experience is the Chocolate & Coconut Scottish Shortbread.
Biscuit Means Cookie
For our American readers, these are biscuits and not to be confused with American biscuits, and is just our word for cookies.

Common Questions About Scottish Shortbread
“What is the difference between a shortbread cookie and a Scottish shortbread cookie?“
“Is Scottish shortbread different?“
“Why is Scottish shortbread so good?“
The Answers
Scottish shortbread is ALWAYS made using 100% butter – no margarine, no baking spreads/blocks, or mixed vegetable butters. They are an ‘all-butter’ type of biscuit/cookie, with a ‘short’ texture, coming from the high butter to sugar ratio, but most identifiable, to a true Scottish and homemade shortbread, is the melt-in-the-mouth texture. Scottish shortbread is soft and delicate and the texture is achieved with the inclusion of cornflour (corn starch).


Why Use This Recipe?
This recipe is based on my traditional Scottish Shortbread recipe, as it is supposed to be made, no margarine or baking spread in sight, just real butter. You can trust me – I am Scottish 🙂 These soft and melt in the mouth buttery biscuits are surprisingly only made up of 4 main ingredients: butter, flour, corn flour & Sugar. The corn flour (corn starch), helps to give that extra soft texture that I mentioned & just ‘melts in the mouth’.
Be very careful when baking the shortbread, as you want them to be baked but still very pale in colour. They will still be soft when taken out of the oven, so make sure when transferring to a cooling rack, that you use the baking/parchment paper or else you will have a crumbled mess on the floor!


Tips For Making Great Scottish Shortbread
- Use an Authentic Scottish recipe with the proper ingredients.
- Don’t use a food processor & a rolling pin – gentle handling helps create a soft shortbread.
- Always chill the shortbread before baking.
- Don’t over-bake – bake until almost cooked through. Shortbread should not be golden but very pale.
Check out A Short History Of Shortbread from website Bake From Scratch..


Ingredient Notes
Scottish shortbread consists of these base ingredients:
- Butter
- Sugar
- Flour
- Cornflour (Corn Starch)
For this Chocolate Coconut Scottish shortbread version, we also use:
- Anise (optional)
- Chocolate
- Coconut
Cornflour
Cornflour is important for the texture and is just a different name for Corn Starch.
Chocolate
I used a mix of milk & dark chocolate (semi-sweet & dark), but you can use whatever you like.
Anise is optional & grinding Star Anise seeds also works. The flavour is subtle & nobody knows what it is that makes this shortbread taste great & different from the original.


Caster Sugar
If you are in the US/Canada and can’t get extra/super fine sugar as an equivalent for the UK caster sugar, you can make your own by grinding regular granulated sugar a little bit or processing lightly.
Do not go as fine as a powder, keep it as small granules. Just note that US granulated is slightly smaller a granule size than our UK version. See my comparison photo of different sugars from the UK. (Read more in my article on differences of UK & US baking ingredients).

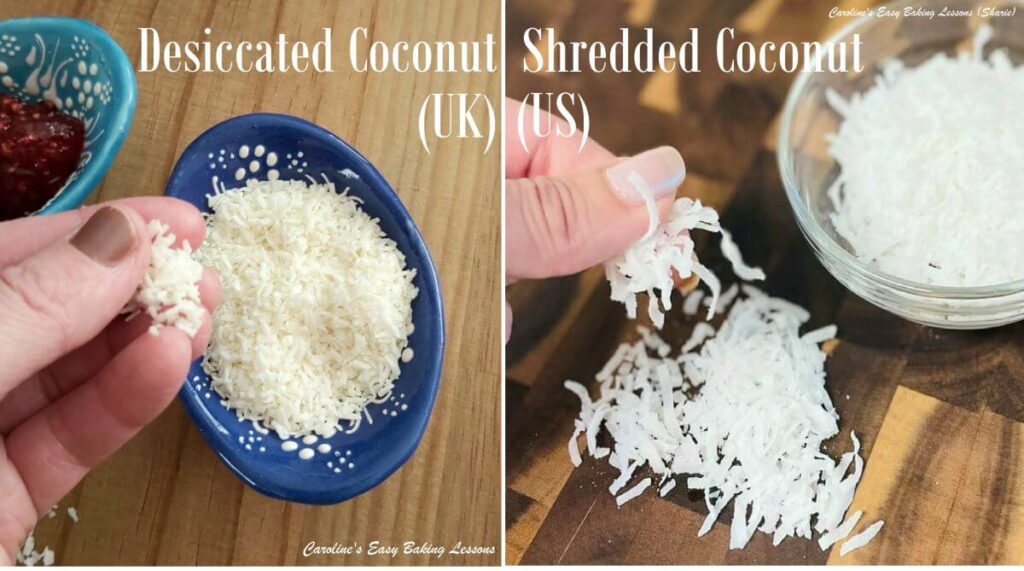
Desiccated Coconut
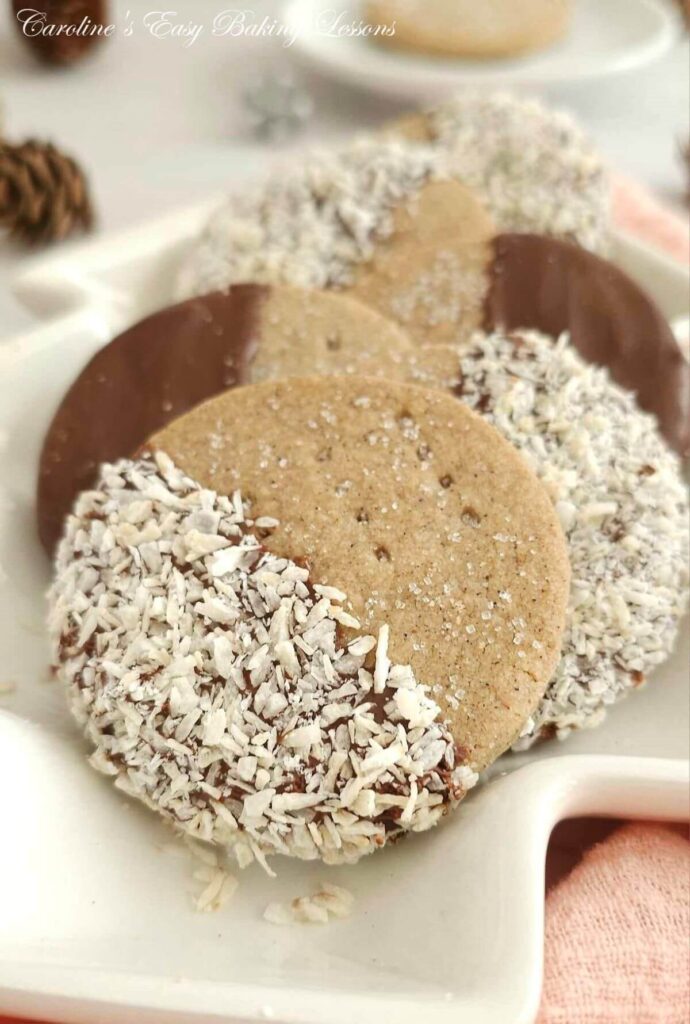
This version of my Scottish shortbread, is half coated with chocolate and coconut. The equivalent of UK Desiccated coconut is US shredded, unsweetened coconut. Note however, that shredded coconut is a lot bigger. (See my comparison photo). So you have the option of chopping or blitzing it a little, or just using as is.


More Experienced Bakers
For more experienced bakers, skip the step-by-step photo recipe below and jump to the abbreviated version – The Recipe Card. Click below:
Jump to RecipeOr continue reading for step-by-step instructions & process photos.

Saving & Printing The Recipe
See saving, printing & sharing options on screen, or print the recipe, via the Recipe card below.
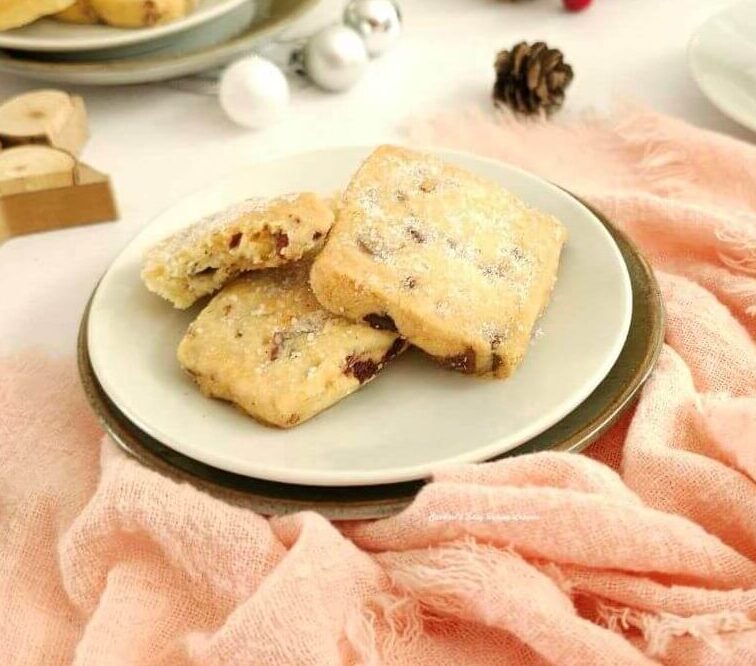
Also see my Cranberry, Orange & Pecan Scottish Shortbread recipe.
Let’s get baking!
Step-By-Step Instructions
1. Weigh out, cube the butter and leave out till softened. I like to cut my butter into about 1cm (less than ½ inch) cubes, as a smaller surface area will soften & come to room temperature faster. See Photo 1 below. If you forget to take the butter out to soften, here’s a hack I reviewed to soften butter in about 10 minutes.
2. Weigh the sugar into your mixing bowl and add in the butter. Combine these two ingredients, firstly with a quick mix by hand with a spoon or spatula. Then mix on low speed with a stand/hand-mixer until light and fluffy, (known as ‘creaming the butter’).


You can of course do by hand with a spoon and some elbow power! See Photo 1 for how it should look once creamed. Soft and paste like and easy to spread. Don’t over beat it though as much as you would for cakes.
3. If your baking trays/sheets do not have a lip edge, best to lightly oil/grease the baking/parchment paper in place. This avoids the cookies sliding off (I know this from experience!).
4. Place the bowl back on the scales with the sieve on top and set to zero (TARE button). Weigh in the flour, ground anise, cornflour/Corn Starch & pinch of salt through the sieve. (Alternatively add in with a measuring cup). Mix in by hand, don’t use a mixer or processor. See Photo 2.


5. Now I like to use a Pastry Cutter/blender for this part- it helps you incorporate the flours into the butter/sugar mixture much more easily and is quicker, (especially when your hands hurt sometimes like mine! Great for pastry too). See Photo 2. With the pastry cutter, you push down on the bottom of the bowl and perform a crushing and turning motion, rotating left and right. Do this to all the mixture until the butter had taken in all the flour, (see Photo 2).
Alternatively, you can do this ‘cutting in’ process, using 2 butter knives or rubbing between your fingertips. Note though that the mixture will not come together into a ball at this stage. It will be very crumbly and that is fine.


6. Next, in the bowl or on a large sheet of baking/parchment paper very gently knead the dough just until it starts to come together, and no more. It will change from a white lumpy powder into a beige smooth dough. See Photo 3. Don’t over knead it, as we want a soft delicate biscuit.
7. On lightly floured paper, or between 2 sheets of paper, roll the dough out to a thickness of about ½ cm (5mm or ⅕”) thick. See Photo 3, for an idea of how it should look.
8. Using a flour dipped cutter, cut out as many biscuits as you can. Gently peel back the excess dough, & use a palette knife to gently place the cut out cookie dough, on the prepared baking trays/sheets. No need to leave a gap at this stage. (See Photo 4 bottom left pic).


9. Using the scraps left over, gently sqeeze the dough together & roll out again before cutting out more biscuits. Repeat until all the dough is used up.
10. Once all has been very carefully transferred to the baking tray/sheet, make holes with a fork over the top of the biscuits. See Photo 4.
11. Place the baking trays/sheets in the fridge (or somewhere extra cold) for 60 minutes. If you omit this step, the shortbread will be too soft and not hold any of its shape. If you can’t get the baking trays/sheets into the fridge, you could try transferring with the paper, to regular trays, with no need for a gap in-between.


12. When the time is nearly up, heat up the oven to 180°c/160°c Fan/350°f/Gas Mark 4, (or sooner if your oven takes a long time to come to temperature).
13. Place 2 trays/sheets in the oven & bake for about 15 minutes. You may need a little longer, but you want to take them out when the edges are just starting to turn a very pale golden colour. (See Photo 5). I turned & rotated the trays during baking to ensure an even bake. If the biscuits move when very gently pushed, they are ready.
Be warned though that they are still soft, so take the trays out and leave for 5-7mins before touching them. At this just out of the oven stage, sprinkle plenty of granulated sugar on top of the biscuits.


14. After the 5-7 minutes, transfer (very carefully) to a cooling rack by lifting the baking/parchment paper. Leave the biscuits to cool down completely.
15, Once cooled down, melt the chocolate. I use the microwave, break up the chocolate and microwave in 30 second bursts, with mixing in-between each burst. The more you heat, the more the mixing distributes the heat evenly, helping the chocolate to melt & thus less heating required & less chance of burning the chocolate. Never heat longer than 30 seconds at a time. Alternatively, melt the broken chocolate, in a bowl on top of a pan of barely simmering water (making sure the bowl does not touch the water in the pan).


19. Proceed with dipping and coating the rest of the biscuits and leave to set. You can place in the fridge to set quicker, but if the room temperature is not too hot, they will set quite quickly.
20. Enjoy now with a cup of tea or coffee (or Whisky) or store in an airtight tin or container where they will last at least a week. I prefer cake tins. Once set, they are fine for stacking.
DIFFICULTY LEVEL: Easy, beginner

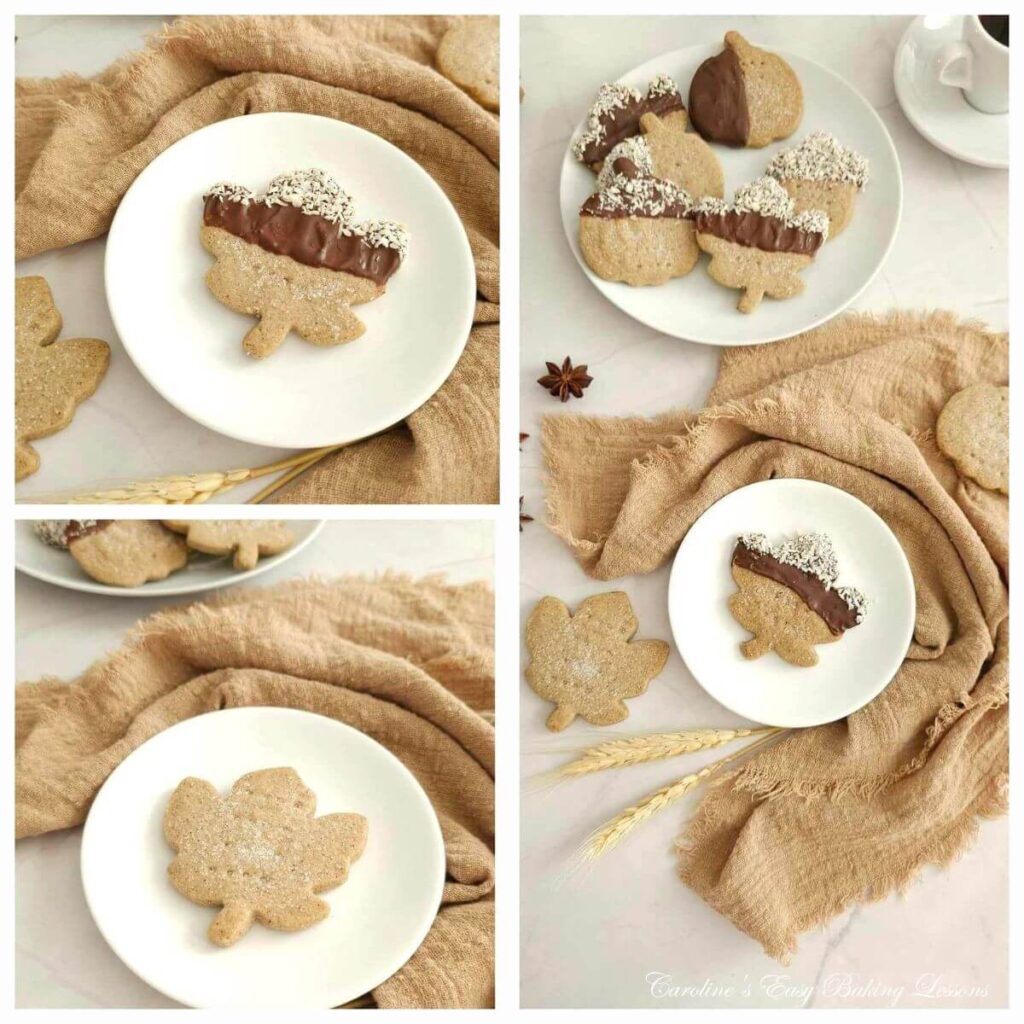
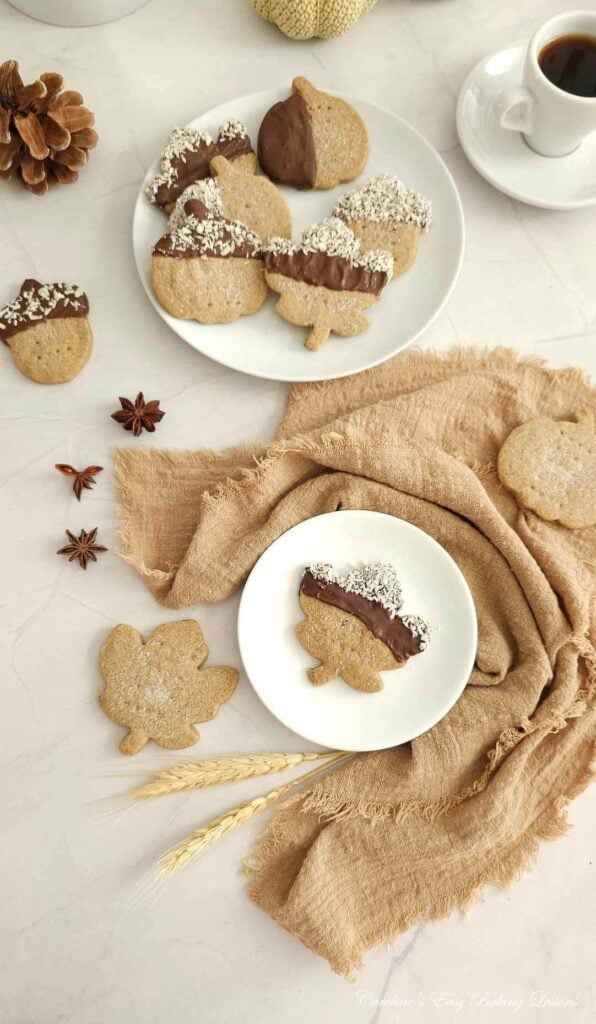
Seasonal Shortbread
Use different cutters and make the shortbread seasonal. Pictured here we have Autumnal/Fall inspired shapes with maple leaves, pumpkins & acorns.
Christmas cookie cutters work well too. Cutters like reindeers are more difficult as the legs can break easily.
Try some chopped nuts like pistachios, in place of the coconut, or some seasonal sprinkles for a beautiful cookie plate this holiday season.
Check out the Christmas recipes page.


Here’s some of the shortbread made by my friend Sally who just happened to appear on The Great American Baking Show this year on the holiday’s edition (2019). She flavoured hers with orange zest and cardamom, and added a nice glaze too! Check Sally’s blog out – Bewitching Kitchen
READERS’ PHOTOS & FEEDBACK
This is one of my popular recipes, but don’t just take my word for it. Read what others thought and see photos of their bakes using my recipe.


Recipe Card
Chocolate Coconut Scottish Shortbread

Equipment
- Scales or measuring cups
- Large spoon
- Stand or Hand Mixer, (or Medium-Large Mixing bowl & spoon)
- Pastry Cutter/pastry blender (optional)
- Baking/parchment paper
- Baking Sheet/Tray x 2
- Cookie cutter, round – I used one about 2"/5cm in diameter
- Palette knife or sharp kitchen spatula
- Timer or Phone Timer
- Cooling rack
- Bowl for melting chocolate
- Bowl for coconut
Ingredients
For The Biscuit Dough
- 225 grams Butter unsalted, cubed & softened (1 cup/2 sticks or 8 oz)
- 110 grams Caster Sugar (3¾ oz, ½ cup Extra/super fine sugar, see above notes)
- 225 grams Plain Flour (1 ¾ cups All Purpose or 8 oz)
- 110 grams Corn Flour (3¾ oz, 1 cup less 1 tbsp Corn Starch *see above)
- 1¾ – 2 tsp Anise, powdered (optional)
- Pinch of Salt
For The Coating
- Granulated Sugar for topping
- 200 grams Chocolate (50/50 Milk & Dark) (7 oz, half bitter, half semi-sweet)
- 100 grams Desiccated Coconut (1 cup, unsweetened shredded coconut, see above & notes)
Instructions
Prepare The Dough
- Weigh, cube the butter & leave to soften. Cut about 1cm (less than ½ inch) pieces & the smaller surface area will soften & come to room temperature quicker. If you forget to take the butter out, here’s a video hack I reviewed to soften butter in about 10 minutes.
- Add the sugar to the butter in your mixing bowl, give a light mix together & then ‘Cream’ together with a stand/hand mixer until light and fluffy.
- Line baking sheets/trays with baking/parchment paper & grease in place if the trays do not have a lip, (or you could lose your biscuits).
- Sieve the flour, cornflour/corn starch, pinch of salt & anise, into the sugar/butter mixture & briefly mix in by hand, don’t use a mixer.
- Using a pastry cutter/pastry blender, work the flour into the mixture, until it resembles large breadcrumbs. Alternatively do this ‘cutting in’ process, using 2 butter knives, or by rubbing through your fingertips. The dough should be a very crumbly mixture at this stage. Using the sides of the bowl or on top of baking/parchment paper, gently knead the dough just until it comes together.
- Place between 2 sheets of floured paper & roll out to at least ½cm (5mm or ⅕ ") thick. Use a flour dipped cutter & cut out as many biscuits as you can.
- Transfer with a palette knife to prepared tray, (not need for a gap in-between at this stage, so you have less trays to fit in the fridge). Make holes with a fork all over the surface of the dough, going about ⅓ to ½ way through.
Chill The Dough
- Place in the fridge (or somewhere extra cold) for 60 minutes. This should never be omitted & you can leave in the fridge overnight.
Bake The Shortbread
- Heat up the oven to 180°c/160°c Fan/350°f/Gas Mark 4, to coincide with the chilling time ending.
- Ensure there is a gap of about 2½ cm/1" in-between each shortbread biscuit, before popping in the oven to bake for approximately 15 minutes. Remove when the edges are just starting to turn a very pale golden colour. (Similar to sugar cookie colour). They will be very soft, so carefully leave to cool as they are, for 5 – 7 minutes on a cooling rack. As soon as out the oven, sprinkle plenty granulated sugar on top of all the shortbread.
- After the 5-7 minutes, transfer (very carefully) to a cooling rack by lifting/sliding the baking/parchment paper & leave to cool completely.
Decorating The Biscuits
- Melt the chocolate in the microwave, by breaking up chocolate & microwave in 30 second bursts, mixing well in-between each burst. Never heat longer than 30 seconds or it can burn. Alternatively, melt the broken chocolate, in a bowl on top of a pan of barely simmering water.
- Leave the melted chocolate to cool a few minutes, before dipping half of a biscuit into it. Dip & use a small spoon to scrape the excess from the underside of the shortbread.
- Immediately hold the chocolate end of the biscuit, over the bowl of coconut, and gently dip down. Use your opposite hand or a small spoon to sprinkle more coconut on the wet chocolate till covered.
- Shake excess & place down on some paper & allow to set while you coat some more. These will set quickly but you can pop in the fridge to speed it up.


Serving & Storing
- Serve with a cup of tea or coffee & store in an airtight container (I recommend cake or cookie tins), and they will last up to 1 week.
Video
Notes
 Ground Anise – optional & gives a subtle taste. Grind Star Anise pods as an alternative.
Desiccated Coconut – alternative is unsweetened shredded coconut after lightly chopping or processing. (See comparison photo be Recipe Card).
Ground Anise – optional & gives a subtle taste. Grind Star Anise pods as an alternative.
Desiccated Coconut – alternative is unsweetened shredded coconut after lightly chopping or processing. (See comparison photo be Recipe Card).
 Chilling The Dough – do not skip this stage as very important for most biscuit/cookie recipes.
Freezing – I am told Shortbread can be frozen, but I have never tried myself, so can’t say for sure how these will compare to freshly baked ones.
Chilling The Dough – do not skip this stage as very important for most biscuit/cookie recipes.
Freezing – I am told Shortbread can be frozen, but I have never tried myself, so can’t say for sure how these will compare to freshly baked ones.

 Reader Favourite – see my Readers’ Pics & Feedback page to hear why others rave about my Scottish shortbread. (Original Scottish Shortbread version in the photo above).
Seasonal Cookie Cutters – use seasonal cutters, just not really intricate ones because of the soft nature of the biscuits.
Reader Favourite – see my Readers’ Pics & Feedback page to hear why others rave about my Scottish shortbread. (Original Scottish Shortbread version in the photo above).
Seasonal Cookie Cutters – use seasonal cutters, just not really intricate ones because of the soft nature of the biscuits.
 Go to my flavoured Shortbread – Cranberry, Orange & Pecan Shortbread above.
See my Biscuit & Cookie page for more ideas Or jump to the Christmas recipes page
Go to my flavoured Shortbread – Cranberry, Orange & Pecan Shortbread above.
See my Biscuit & Cookie page for more ideas Or jump to the Christmas recipes page

 Please take a few seconds to rate this recipe – click the ‘RATE’ button, or scroll down to the very bottom of the main recipe post & leave your feedback, thanks Caro xx
Follow me on social media:
Happy Learning & Baking!
Caro x


Chocolate Coconut Scottish SHortbread
Search For Something You Fancy!
Caroline’s Easy Baking Lessons


A great recipe and instructions and proper Scottish shortbread cookies. Use all the time.