Cranberry Orange Pecan Scottish Shortbread

This Cranberry Orange Pecan Scottish Shortbread recipe, is a variation on my classic Traditional Scottish Shortbread recipe, with some additions that take this biscuit to the next level.
Cranberry, Orange & Pecan Scottish Shortbread
Based On A very Traditional Scottish Recipe
(By A flame-haired Scot 😊)


Traditional Scottish Recipe
This recipe is based on traditional Scottish shortbread, and the shortbread we eat here in Scotland. Which makes it perfect for Christmas & Hogmanay celebrations, or food gifting anytime of the year.


**Click to jump to section
Biscuits Or Cookies?
For our American readers, biscuits are what we call our cookies, not to be confused with US biscuits. If you want to learn more, check out my Differences Between UK & US Baking Ingredients article.


Why Make Scottish Shortbread?
This cranberry orange & pecan Scottish shortbread is based on a true Scottish recipe and the way it is still made today.
Scottish shortbread is super simple to make too with no difficult processes, and ideal for beginner bakers.
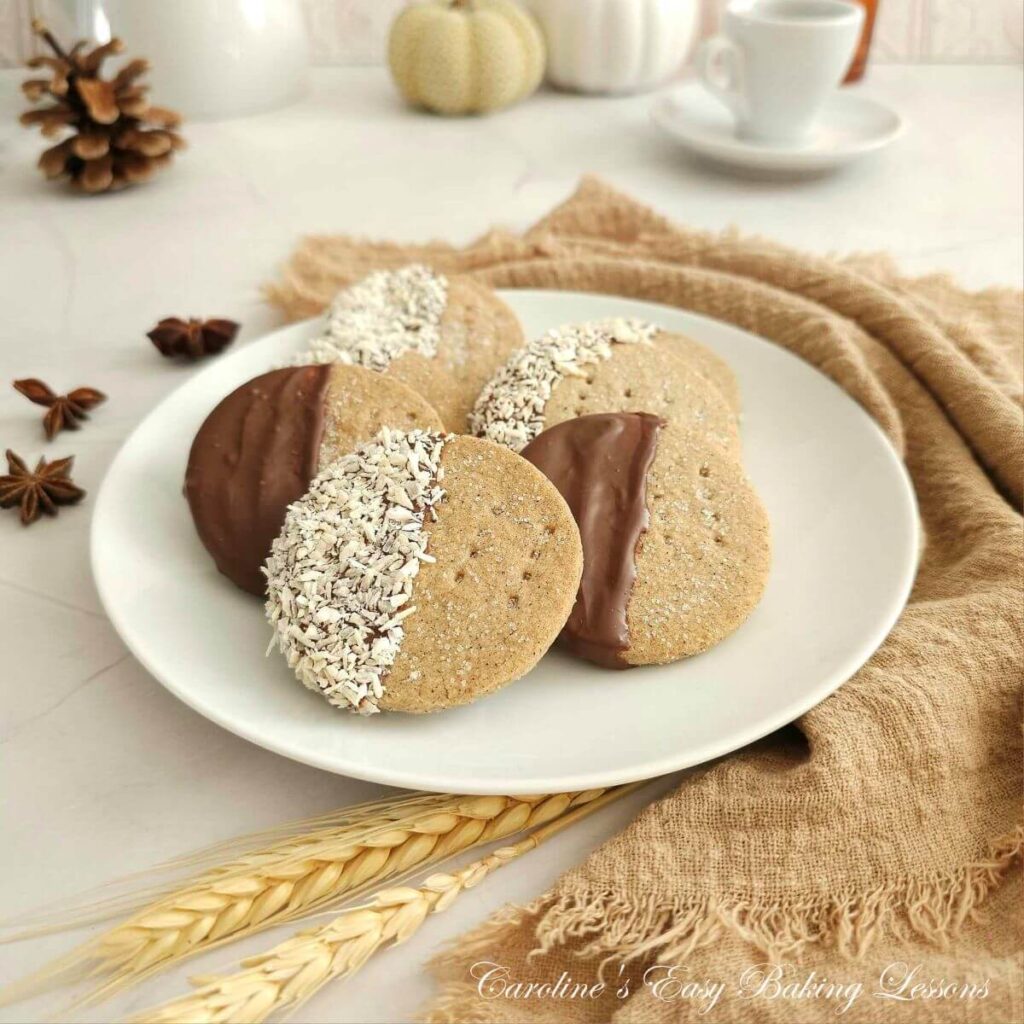
Makes for a simple but delicious & different type of cookie to include in your food gifting at Christmas. With no decorating required, you can easily make different shapes and flavours to add to a cookie plate. Try my original Scottish Shortbread recipe, or the Chocolate Coconut Scottish Shortbread version, (see them in the photos below).
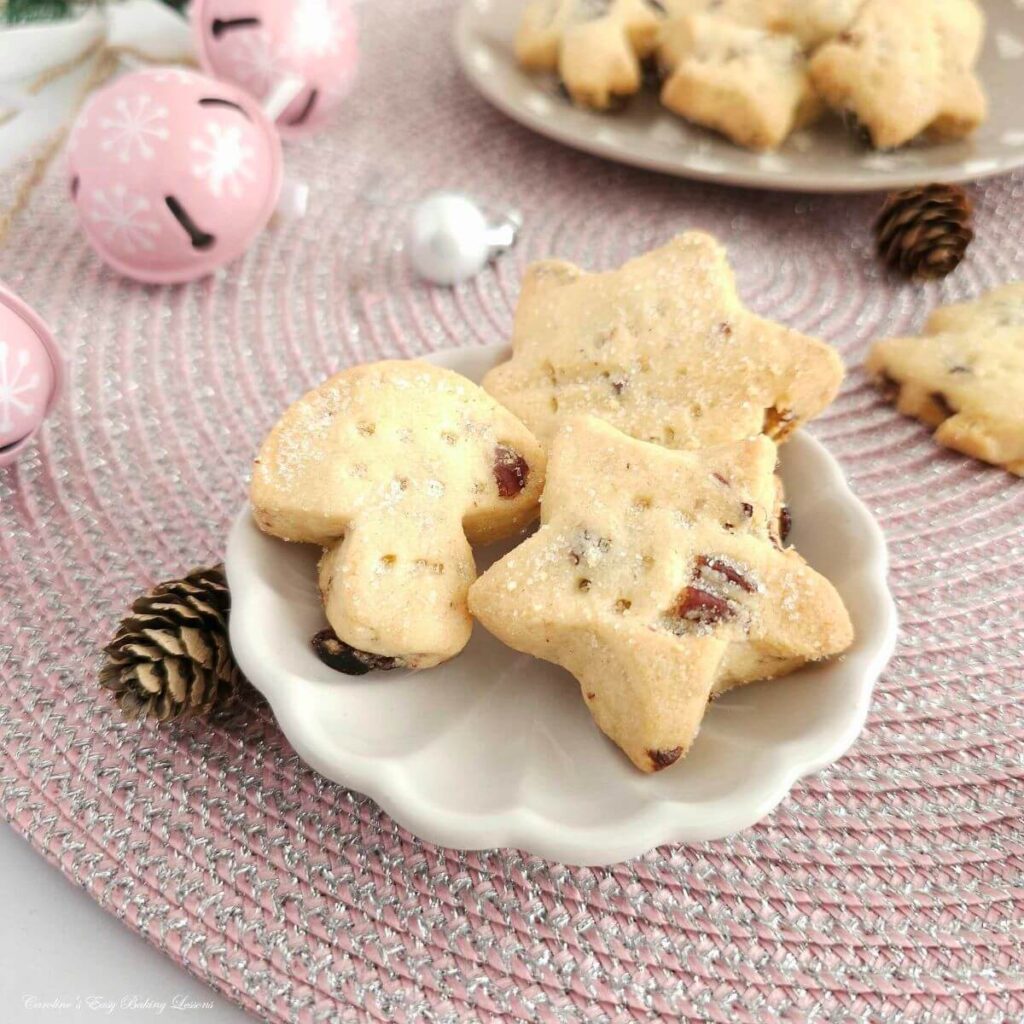
Use seasonal cookie cutters and make holiday shortbread. I made some Christmas trees, 2 sizes of stars & some trending toadstools!


Ingredients & Alternatives


What Is Scottish Shortbread Made Of?
These soft and melt in the mouth buttery biscuits are surprisingly only made up of 4 main Scottish shortbread base ingredients:
- Butter
- Sugar
- Flour
- Cornflour (Corn Starch)
For added flavour & texture we also have:
- Dried Sweetened Cranberries
- Orange Extract
- Pecans
The cornflour (corn starch), helps to give that extra soft texture that just ‘melts in the mouth’! So don’t omit.
Caster Sugar
The equivalent of Caster Sugar, is extra/super fine sugar in the states.


Make Your Own Caster Sugar
If you can’t source either sugars, you can make by grinding granulated sugar or processing lightly. Don’t go as fine as a powder, keep as small granules. See photo of icing sugar (powdered sugar), caster sugar & granulated sugar granule sizes for reference. Note US granulated is slightly finer granule size than our UK one. Read more about Differences In UK & US Baking Ingredients


Orange Extract & Nuts
I used a premium orange extract, but you can easily used orange zest and a tsp of orange juice. You can also omit the nuts if there’s any allergies, or use a different nut if you like too 🙂 Dried sweetened cranberries are great for eating & using in your baking.
Alternatives
You can also try some chopped hazelnuts in place of pecans, or chocolate chips in place of the dried cranberries. For cup measurements, the 61g of roughly chopped hazelnuts was about ½ cup and the 50g of chocolate chips a ⅓ cup.

Equipment
Full list of equipment & ingredient amounts needed for making cranberry orange pecan Scottish shortbread, are listed in the Recipe Card at the bottom of the page.
Shortbread, like British scones, is easily make using a Pastry Cutter (also known as a Pastry Blender). This is great if your hands hurt and saves you rubbing between your fingertips or using 2 butter knives.
Cookie Cutter – in these photos I used a 6½cm x 3cm/ (2½” x 1¼”) rectangular cutter & a second batch with 4cm (1¾”) square cutter.
Recipe Yield
This shortbread recipe makes 32 biscuits if using the same size rectangular cutter as I did (or cut the finger biscuits to that size). 41 biscuits with the square cutter.
Can I Use A Mold?
The shear delicate nature of Scottish shortbread, means it is not great in cookie moulds. The chances of the dough sticking or breaking is very high. A few readers have used a mold with my original recipe, but you need to work the dough more, well grease the mould, and bake longer. These can all make a tougher dough & lose the melt-in-the-mouth texture of Scottish shortbread.


Some Tips For Shortbread
- Always use proper butter, no Baking Spreads or margarine.
- Don’t use a food processor but rather your hands to bring the dough together.
- Don’t over-bake. Scottish shortbread should be pale and similar colour to sugar cookies.
- You can of course do half of the batch regular and half with these flavour additions, just remember to half the amounts.
- To stop nuts flying about so much when chopping, place inside a food baggie and lightly bash. Alternatively use 2 large knives held together with one hand & the opposite hand used to hold the 2 tips, while chopping.


Nutritional Values – if you track what you eat, nutritional values for 1 serving, can be found in the Recipe Card below. Values from MyFitnessPal.com, where you can not only save recipes & macros of foods you eat, but you can use it for free to track what you eat each day. I am not sponsored by MyFitnessPal.com, but some ofmy recipes are saved there. Go to my Cranberry Orange Pecan Scottish Shortbread recipe on MyFitnessPal.com.
Step-By-Step Instructions
Prepare The Dough
1. Weigh or measure out and cube the butter and leave out till softened. I like to cut to about 1cm or ⅓” size as a smaller surface area will soften faster. If you forget to take out in time, here’s a little video hack for softening in about 12 minutes that I reviewed.


2. Weigh/measure out the sugar into you mixing bowl and add in the softened butter. Combine these two ingredients with a stand-mixer or hand mixer until light and fluffy, (known as ‘creaming the butter’). You can of course do by hand with a spoon and some elbow power! See Photo 1.
3. Lightly oil/grease baking trays/sheets before placing baking (parchment) paper on top, if there is no lip or edge.


4. Place the bowl back on the scales with the sieve on top and set to zero (TARE). Weigh in the flour, cornflour (corn starch) & salt through the sieve, then mix briefly by hand. See Photo 2.
5. Now I like to use a Pastry Cutter/Pastry Blender for this part, it helps you incorporate the flours into the butter/sugar mixture much more easily & is quicker, (especially when your hands hurt sometimes like mine!) With the pastry cutter, you push down on the bottom of the bowl and perform a crushing and turning motion, rotating left and right. Do this to all the mixture until the butter had taken in all the flours. See Photo 2.


Note though that the mixture will not come together into a ball at this stage. It will be very crumbly and that is fine. Otherwise you wouldn’t have the soft texture after baking. This is also why I don’t knead the dough as such. Try to avoid using a food processor, as it isn’t as gentle on the dough.


6. Remove the crumbly dough from the mixing bowl and squeeze it together, forming into a rectangular shape by hand, (no rolling out), like in Photo 3. Place on some baking/parchment paper then spread out roughly with your fingertips to open up the dough before adding in half of the orange extract (1 tsp). See Photo 4 where I dotted the extract over the top of the dough.
*Tip – add some orange zest too for even more flavour, or in place of the extract.
7. Next fold the ends of the dough over, into the centre of the dough, covering where you added the extract. Turn the dough over, turn it 90 degrees and repeat the folding.
8.Add in half of the dried cranberries and chopped nuts on top of the dough, before folding the dough again, like before. See Photo 4. Repeat with the remaining cranberries, nuts and extract, folding and working the extra ingredients into the dough, as gently as possible. See Photo 5 below.


9. Once all the ingredients are worked into the dough, gently bring it together into a rough square or rectangular shape. The dough will be nice and soft now, but will still need to be chilled to relax the gluten that has just be worked. (See Photo 5).
10. Place in the fridge for 10 minutes for the dough to also firm up and make rolling easier. Not forming into a disc shape, will also mean less rolling out as you will get more shapes from it.
*Tip – leave the shortbread dough in the fridge overnight if need be. Just wrap well in cling film/plastic wrap.
Cutting The Shortbread
Using A Cutter
1. To use a cookie cutter to cut out the biscuits, roll out your shortbread dough between 2 sheets of baking/parchment paper (these can be re-used). Roll out to a rectangular shape, to a thickness of about 1-1½ cm ( ⅓– ⅔“). Dip a rectangular cookie cutter (see sizing in equipment section), into a small bowl with a little flour, before pressing down on the rolled-out dough, to cut out as many biscuits as possible. See Photo 6.


2. Leave transferring the biscuits till all cut out, and simply pull back the excess dough. ‘Dock’ the surface of the biscuits with a fork to help release air when baking and reduce spreeding, before carefully transferring the biscuits to the prepared baking tray/cookie sheet with a palette knife. (Leave at least 1½ cm (⅔“) gap in-between the biscuits).


Freehand Shaping
Traditionally, Scottish shortbread can be make without a cookie cutter and freehand, in either biscuit ‘fingers’ or Petticoat Tail triangles, (see Photo 7 above). For the Petticoat Tails, form about ⅓ of the shortbread dough into a flat disk, 1-1½ cm ( ⅓– ⅔“) deep, and about 10cm (4″) in diameter. Divide into 6 triangles, ‘dock’ the surface with a fork, and form a crimp at the edges, by squeezing the biscuit dough between your thumb and index finger, like in Photo 7.
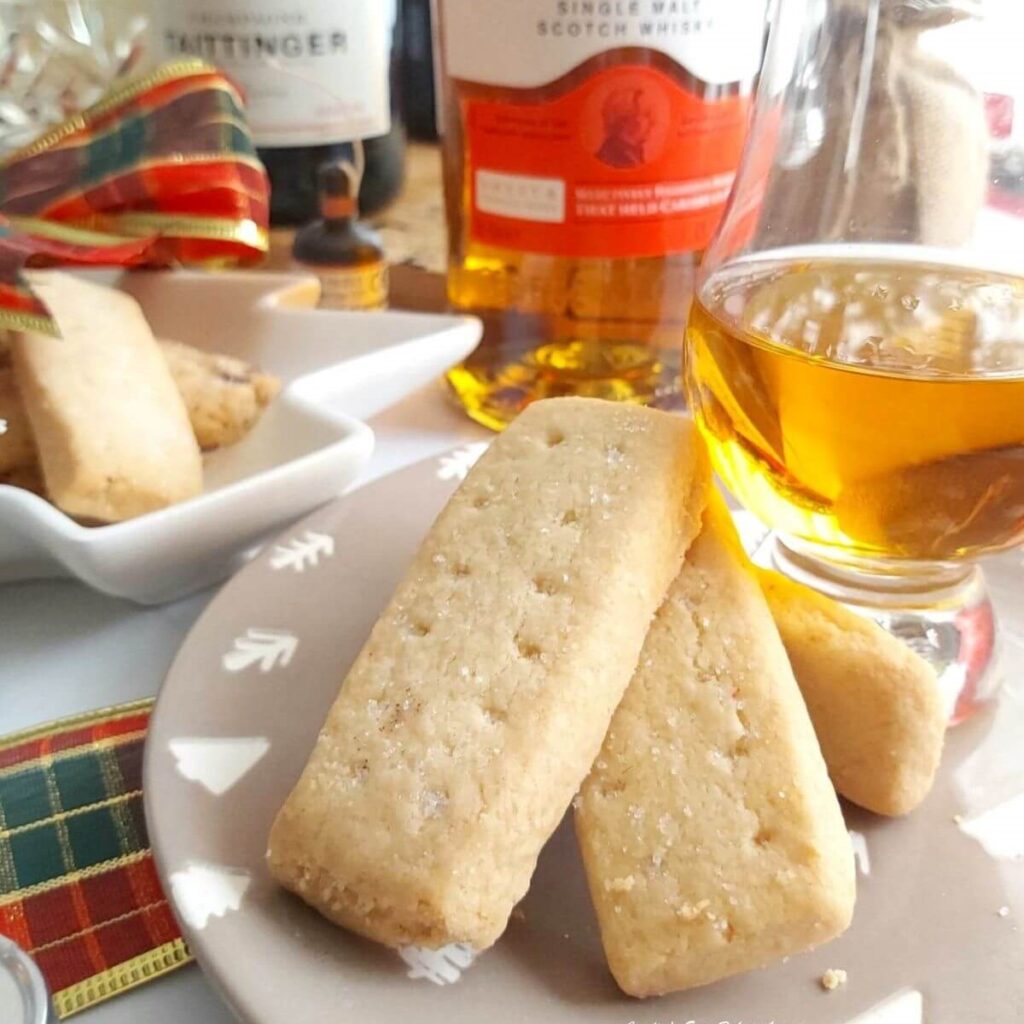
For shortbread fingers, form the dough into a rough rectangle by hand & without a rolling pin, with a depth of 1-1½ cm (⅓– ⅔“). Then use a knife to trim the edges straight & cut fingers about 1½ cm (⅔“) by 6¼ cm (2½” ).


**Cut slightly thinner than you want as they will puff up a little on baking. Roll up the scraps of dough and form more biscuit fingers or other shapes.
With cranberry & nut inclusions, cutting can be a bit more difficult & you might have to go over some of the cuts & fold excess cranberries under the biscuit. See Photo 8 of the classic Scottish shortbread recipe cut into fingers.


*Tip For Neat Biscuits – after cutting the biscuit fingers, use 2 knives to straighten the sides to make cleaner, sharper edges & sides. Turn the shortbread fingers over, place on the cookie tray, chill for 30 minutes, then turn them over and continue chilling for another 30 minutes before the baking time.
Chill The Biscuits
1.After all biscuits are on the cookie trays, chill the shortbread in the fridge for 1 hour. Be sure not to skip this part as it is essential for the soft texture and for less spreading. *Tip – You can also leave the cut out of shortbread dough in the fridge overnight. Just cover in cling film/plastic wrap and bake straight from the fridge.
2. Heat the oven to 180c/160c Fan Oven/350f/Gas Mark 4, to coincide with the ending of the 1 hour chill time.


Bake The Shortbread
1. Place 2 of the cookie trays/sheets in the oven and bake for 14 – 18 minutes. (If you have a 3rd tray, keep in the fridge). You may need a little longer baking time, but you want to take them out when the edges are just starting to turn a very pale golden colour, (see photos below). The rest of the shortbread should be quite pale, like sugar cookies. You can turn and rotate the trays during baking to ensure an even bake if needed, after 8 minutes.
2.To test if ready to come out, attempt to push the biscuits to see if they will move when very gently pushed. Be aware though that they will still be soft, and so should be left on the baking trays for 5-10mins. As soon as removing from the oven, sprinkle plenty of granulated sugar on top of the biscuits.
Cooling The Shortbread
1. After the 10 minutes of cooling, carefully transfer the baked shortbread to a cooling rack by lifting the baking/parchment paper. Slide the paper & biscuits onto the rack. The biscuits are very delicate, so this I find to be the best way to move them and reduce breakages.
2. Leave to cool down completely on the cooling rack.
Serving & Storage
1. Enjoy cranberry orange pecan shortbread once cooled, with a cup of tea or coffee (or Whisky if you prefer).
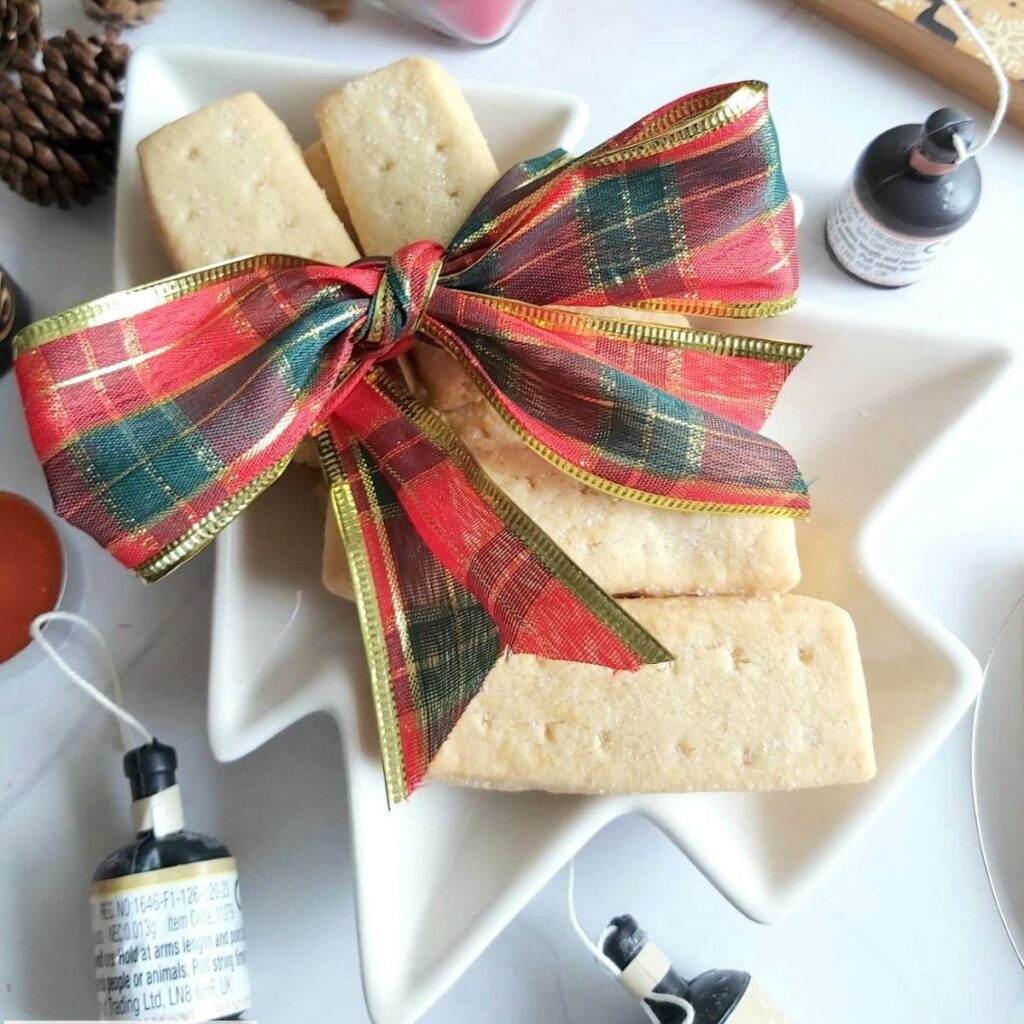
2. Once cooled, store Scottish shortbread in an airtight tin or container for at least 7 days. I find storing cakes & biscuits in a metal cookie or cake tin helps keep them fresh longer.
I once shipped my shortbread from Scotland to America, well wrapped inside a tight-fitting cake tin. The delivery took 2 weeks, but the shortbread was still good!
Thanks for reading. Click to see my Original Authentic Scottish Shortbread recipe. Or newer Chocolate Coconute Scottish Shortbread, with just a hind of anise!
DIFFICULTY LEVEL: easy, beginner


Christmas Shortbread
Use some seasonal cookie cutters and make cute Scottish shortbread for the holidays.
- Great addition to a cookie plate.
- Great for gifting homemade goods.
- Bulk/batch baking easy to do.
- No decoration required at all.
- Can be made ahead.
- Dough can be chilled for a few days before baking.
See in the photos, some in Christmas tree shapes, various sizes of stars and popular toadstools!


READERS’ PHOTOS & FEEDBACK
Check out my page of my different shortbread recipes, made by my readers – Readers’ Cookies Page . First a lovely photo by Doana & Below are just 2 photos of the lovely bakes by Sally P, & Vicki D, from a Great British Bake Off, (Great British Baking Show) Facebook group I run. To join the GBBO Fans Facebook group, be sure to answer all questions & say how you found the group.


Follow Me For More Recipes
SIGN UP FOR MY NEWSLETTER – I would love it so much if you could sign up for my newsletter. I will send out monthly emails, showing the latest recipes and articles, and latest info. Occasionally there will be the odd seasonal emails, but is really a means of reaching you, if you are not already in one of the Facebook groups I admin. Please note too, that these email addresses are not shared or sold onto another party. Thanks so much Caro xxx


Recipe Card
Cranberry Orange Pecan Scottish Shortbread

Equipment
- Scales or measuring cups
- Large spoon
- Stand or Hand Mixer, (or Medium-Large Mixing bowl & spoon)
- Pastry Cutter/pastry blender (optional)
- Knife & chopping board
- Baking/parchment paper
- Baking Sheet/Tray x 2
- Rectangular Cookie Cutter (Optional – 6½cm x 3cm/ 2½" x 1¼" used, & a 4cm / 1¾" square cutter)*
- Palette knife or sharp kitchen spatula
- Timer or Phone Timer
- Cooling rack
- * See Notes after Recipe Card
Ingredients
- 225 grams Butter, unsalted, cubed & softened (1 cup/2 sticks or 8 oz)
- 110 grams Caster Sugar (3¾ oz), ½ cup Extra/super fine sugar)*
- 225 grams Plain Flour (1 ¾ cups All Purpose or 8 oz)
- 110 grams Corn Flour (3¾ oz, 1 cup less 1 tbsp Corn Starch)
- Pinch of Salt
- 2 tsp Orange Extract (Or zest of 1 orange)
- 73 grams Dried Sweetened Cranberries (1¼ cup, 2½ oz)
- 52 grams Pecans, roughly chopped (¾ cup, 1¾ oz – Optional – hazelnuts also work well)
- Granulated Sugar for topping
Instructions
Prepare The Biscuit Dough
- Weigh/measure & cube the butter before leaving to soften. (Cut about 1cm or ⅓” size as smaller surface area will soften faster). Forgot or in a hurry? Try this video hack for softening in about 12 minutes.
- Add the sugar to your mixing bowl before adding in the softened butter & lightly mixing by hand before moving onto using the hand mixer or stand mixer, on a low speed to begin with . Use the mixer and k-paddle (not the beater attachment), to ‘Cream’ the butter & sugar together.
- Prepare 2 or 3 large baking/cookie sheets/trays with some baking/parchment paper, greasing in place if these do not have any lip (or your cookies might slide off).
- Sieve over the flour, corn flour/starch & pinch of salt and gently start to mix into the sugar/butter mixture by hand only. Do not use a mixer or food processor.
- Take a Pastry Cutter/Pastry blender and push down on the bottom of the bowl, rotating left & right. Repeat on all areas of the mixture until the butter has taken on all the flour. This is recommended if your hands hurt or tire easily & will only take a minute. Alternatively, you can do this ‘Cutting In’ process, with 2 butter knives, or rubbing the mixture between your fingertips. See this done in my British Scones video, at 5 minutes in. **Note the mixture will not come together into a ball, but be crumbly at this stage.
- In the mixing bowl, or on top of lightly floured baking/parchment paper, very gently use your hands and squeeze the dough till it comes together. Then form into a rectangular or square shape, (about 4"/10cm width), rather than a flat disc.
Flavouring The Shortbread
- Lightly flour a counter/worktop or some baking/parchment paper, and use your fingers or palms, to open the dough up a bit more, no need for a rolling pin. (See Photo 3 before this recipe card for a visual). Then dot over half of the orange extract (1 tsp), and gently knead into the dough for a few seconds. **If you want to make 2 different flavours, you can half the dough at this stage.
- Open up the dough again and add in half of the cranberries & nuts before folding over the ends, towards the centre, to cover over the nuts & fruit. Turn over the dough, rotate 90 degrees and repeat the folding process. Then repeat with the remaining orange extract, cranberries & nuts. You should have an orange smelling, fruit/nut studded dough now. Gently form into a rectangular shape & chill for 10 minutes to relax the dough a little. *Tip – you can chill the shortbread dough in the fridge overnight if needed, by wrapping well with cling film/plastic wrap.
Cutting Out The Shortbread
- Lightly flour a counter/worktop or some baking/parchment paper, and use a rolling pin to open up the shortbread dough to a rough rectangle or square shape, with a thickness of about 1-1½ cm ( ⅓– ⅔“). *Tip – use 2 sheets of paper to do this & keep the rolling pin clean). Use a flour dipped rectangular cookie cutter to cut out the shortbread, leaving moving the dough till you have finished cutting out. Pull back the excess dough, use a fork to ‘Dock’ the shortbread pieces, before carefully transferring to a prepared cookie tray with a palette knife. (See Photo 6 before this Recipe Card).
- Traditionally, Scottish shortbread is made without a cutter and freehand, in biscuit ‘fingers’ or Petticoat Tail triangles. For Petticoat Tails, shape ⅓ of the dough into a ball then a flat disk, 1-1½ cm ( ⅓– ⅔“) deep, about 10cm (4″) in diameter. Cut into 6 triangles, ‘Dock’ the surface, and crimp the edges, by squeezing the dough between your thumb and index finger.
- For simple shortbread fingers, shape the dough into a rough rectangle by hand, with a depth of 1-1½ cm (⅓– ⅔“). Trim the edges straight, and cut biscuit fingers about 1½ cm (⅔“) wide by 6¼ cm (2½” ) long. *Cut slightly thinner, as they puff a little on baking. Use the left-over scraps to make petticoat tails, or more fingers. Go over the cuts again if need be, as the cranberries and nuts make cutting not as easy. Again ‘Dock’ the shortbread fingers before placing on the tray, with at least 1½ cm (⅔“) gap in-between the biscuits.
Chill The Shortbread Dough
- Place the baking sheets/trays in the fridge for 1 hour. This step should not be omitted or the shortbread will spread and join together and lose their soft texture.
- Alternatively, you can cover the cut-out shortbread with cling film/plastic wrap and leave in the fridge overnight or for 2 days maximum, and simply bake directly from the fridge).
Bake The Shortbread
- Before the 1 hour is up, set the oven to 180°c/160°c Fan/350°f/Gas Mark 4.
- Place 2 of the prepared shortbread trays/baking sheets in the centre of the oven & bake for 14 – 18 minutes. You may need a little longer, however do not over-bake. Only the edges will be turning a very pale golden colour and the rest will be pale like sugar cookies. Turn & rotate the trays during baking if needed, but after 8 minutes. Test by gently pushing the biscuit, which should move but still be soft.
- Place the cookie tray on top of a cooling rack, sprinkle plenty of granulated sugar on top of all the shortbread and leave where they are for 5 – 10 minutes. Meanwhile bake your 3rd lot of shortbread.
- Once the shortbread has had 5 – 10 minutes to cool and set a little, you need to very carefully transfer & remove from the baking sheet. Scottish shortbread is extremely delicate so the best way to do this is use the baking/parchment paper, by pulling one end and sliding the shortbread (and paper), onto the cooling rack. Then leave to cool down completely.


Serving & Storing
- Enjoy cranberry orange pecan shortbread once cooled, with tea or coffee (or Whisky if you prefer).
- Store cooled Scottish shortbread in an airtight tin or container for at least 7 days. Metal cake or cookie tins are highly recommended. I have had Scottish shortbread still taste great after 14 days.


Video
Notes
 Cookie Cutter – for these updated photos I used a rectangular cutter – 6½cm x 3cm/ (2½” x 1¼”) & for a second batch a 4cm (1¾”) square cutter. You can use other cutter as per the photos above this Recipe Card.
Caster Sugar – US equivalent is Extra/Super Fine Sugar. Process your own from Granulated sugar – see my sugar comparison photos before this Recipe Card.
Cookie Cutter – for these updated photos I used a rectangular cutter – 6½cm x 3cm/ (2½” x 1¼”) & for a second batch a 4cm (1¾”) square cutter. You can use other cutter as per the photos above this Recipe Card.
Caster Sugar – US equivalent is Extra/Super Fine Sugar. Process your own from Granulated sugar – see my sugar comparison photos before this Recipe Card.

 Alternative Ingredients – hazelnuts and walnuts also work well in place of the pecans. In the square biscuits, I replaced the nuts with chocolate chips. Orange zest can be used if you don’t have orange extract, but I highly recommend using extract.
Recipe Yield/Servings – this shortbread recipe makes 32 biscuits if using the same size rectangular cutter as I did for the fingers. Or 41 with the square cutter. For nutritional values only, 1 serving is based on 1 rectangular shortbread finger.
Alternative Ingredients – hazelnuts and walnuts also work well in place of the pecans. In the square biscuits, I replaced the nuts with chocolate chips. Orange zest can be used if you don’t have orange extract, but I highly recommend using extract.
Recipe Yield/Servings – this shortbread recipe makes 32 biscuits if using the same size rectangular cutter as I did for the fingers. Or 41 with the square cutter. For nutritional values only, 1 serving is based on 1 rectangular shortbread finger.

 Scottish Shortbread Tips
*Don’t omit the Cornflour (Corn Starch), as it gives the melt-in-the-mouth texture. As well as proper butter, this makes a traditional Scottish recipe we are used to here in Scotland.
*Only very light, minimal kneading to bring dough & inclusions together.
*Do not skip the chilling stage – very important for these and most biscuit/cookies.
*Don’t over-bake – should be pale like sugar cookies, firm up on cooling & be a very soft delicate texture.
Scottish Shortbread Tips
*Don’t omit the Cornflour (Corn Starch), as it gives the melt-in-the-mouth texture. As well as proper butter, this makes a traditional Scottish recipe we are used to here in Scotland.
*Only very light, minimal kneading to bring dough & inclusions together.
*Do not skip the chilling stage – very important for these and most biscuit/cookies.
*Don’t over-bake – should be pale like sugar cookies, firm up on cooling & be a very soft delicate texture.
 Please see the detailed recipe process photos & further information, before this Recipe Card. Where readers’ pics and feedback page can also be found.
See my original Scottish Shortbread recipe, or Chocolate & Coconut Scottish Shortbread (shown above & below).
Please see the detailed recipe process photos & further information, before this Recipe Card. Where readers’ pics and feedback page can also be found.
See my original Scottish Shortbread recipe, or Chocolate & Coconut Scottish Shortbread (shown above & below).

 Love cranberry orange combination? Then why not try my other Scottish recipe – Madeira Cake. This is also great with fresh or frozen cranberries, or try the new Cranberry Orange Madeira Cake Muffins version.
 Please take a few seconds to rate this post & recipe – by scrolling down to the very bottom of the page, thanks Caro xx
NUTRITIONAL VALUES – I am not a qualified nutritionist, and all nutritional values approximate & based on a serving of 1 rectangular/finger biscuit as per size stated above, where recipe yield is 32 rectangular biscuits/cookies. Make more or less cookies & the nutritional values will change. Values calculated from website My Fitness Pal.com, where more macros can be found & tracked. Go to my Cranberry Shortbread Pecan Scottish Shortbread recipe on MyFitnessPal.com


Try Cranberry Orange Pecan Shortbread, Chocolate Coconut Shortbread or Original Scottish Shortbread (L to R)
Follow me on social media:
Happy Learning & Baking!
Caro x


Cranberry Orange Pecan Scottish Shortbread
Search For Something You Fancy!
Caroline’s Easy Baking Lessons


This is my go to recipe every time. The shortbread is so light and melts in your mouth. I also make them and put them in decorative bags as a gift. Best shortbread recipe I know
Just love this recipe and your site. Thanks again.