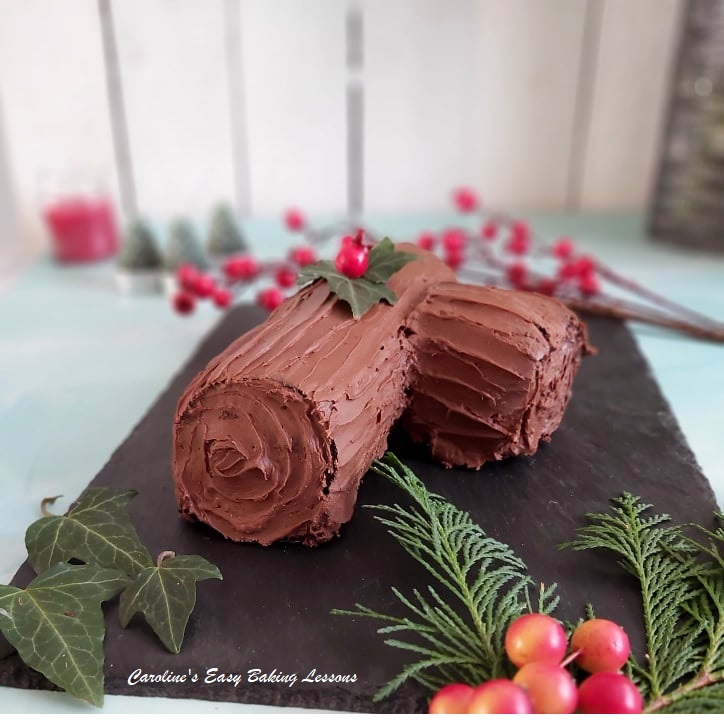
Chocolate & Orange Yule Log – Gluten Free!

Here's my recipe for a Chocolate & Orange Yule Log. Also known as a Bûche de Noël, I originally developed this recipe in 2019, & I just updated with some new improved photos in 2021. It just happens to be Gluten Free too, so ideal for holiday entertaining. Hope you enjoy it, as much as we do!
Chocolate & Orange Yule Log
Bûche de Noël
That Happens To Be Gluten Free!


Such An Easy Process
This really is a very simple process to make this Christmas Chocolate & Orange Yule Log cake. The only time-consuming part is waiting for it to firm up. If the buttercream is too soft, it just won’t cut nicely and show the ‘swirl’. It really is worth it though. A real showstopper in looks and taste, we won’t tell anyone how easy it was.
Flour-free & Gluten Free
The Bûche de Noël also just so happens to be gluten free, with no flour in the cake or raising agent. Just check your flavour extract though, as some are not gluten free.


Flavouring The Cake
Which leads me onto the flavouring. I opted for orange to pair nicely with the chocolate, but peppermint and also coffee extract would work well too.
A Note On The Ingredients
I want to get right to the Chocolate & Orange Yule Log recipe, but here are some quick notes first before we get there. A note on the ingredients.
What is the Yule Log made of?
- Eggs (separated)
- Sugar
- Cocoa Powder
- Chocolate
- Orange Extract


Sugar
Caster sugar, equivalent in the states and Canada is extra/super fine sugar. If you can’t get that, you could make your own by a little pulsing of granulated sugar in a food processor.
Just be aware that US granulated is a slightly smaller granule size than our UK version. Do not go as far as a powder. See the photo below of our sugars in the UK. Alternatively, use rounded 2/3 cups of granulated sugar.
Eggs
Use medium or large UK sized eggs, which is US large and extra large size.
**All ingredient amounts and equipment are listed in the Recipe Card below
Jump to RecipeUK Baking Sugars
, caster sugar (M) & Granulated sugar - UK (R)")
, caster sugar (M) & Granulated sugar - UK (R)")


Chocolate For A Chocolate & Orange Yule Log
No need for baking chocolate, or expensive high cocoa content chocolate. Supermarket own brand is fine, as long as a high proportion of all chocolate used, is made up of dark/bitter chocolate. If you really don’t like dark/bitter chocolate, lower it & increase the milk/semi-sweet chocolate but no more than say 45% of the total chocolate used.
Baking Equipment
For the Chocolate & Orange Yule Log I used one of my regular baking sheets/trays that has a bit of a lip. It is 33 x 23 x 1.5 cm, or 13 x 9 x ⅔”. A Swiss or jelly roll sheet/tray will work too. Try not to go more than 2.5cm or 1 inch bigger or smaller than this, or it will be too shallow or thick a sponge layer.


Swiss/Jelly Roll Video
You can also refer to this newer recipe – Chocolate Swiss/Jelly Roll, that includes more photos, as well as a video tutorial.
Click to view the Chocolate Swiss Roll Recipe
NEW YULE LOG VIDEO
Or, watch the new Yule Log Video below:
Download the recipe and photo tutorial to your phone or computer, for saving or printing off later. Click the ‘download’ button below:
You can also save, share or print the Recipe Card below that is an abbreviated version of the recipe.
Jump to Recipe


- String or something to tie with
- Baking palette knife, off-set best
- Cake stand or large display plate
- Cake dome/lid (optional)
- Red & Green Fondant icing OR white fondant and red & green food colouring, (preferably paste over gel). Only a small amount needed.
- Gloves for colouring the fondant
- Fondant rolling mat or baking/parchment paper
- Rolling pin
- Craft knife or sharp blade.
- Edible black pen (see notes).
- Holly Leaf template (or draw free-hand. You can print off this recipe and it will include a Holly leaf template to cut out and use as a guide)
- Sprinkles (optional)

INSTRUCTIONS


1. Heat up the oven to 180c/160c Fan oven/360f/Gas mark 4. Use baking oil spray or some butter to lightly grease your baking tin/sheet and place a cut piece of baking/parchment paper on top.
2. Whisk the egg whites in the medium bowl for at least 1 minute at high speed, until stiff peaks are formed. (The volume will increase considerably, and the whites will be like clouds). Lift the beaters upwards and see how the whites fall, like in Photo 2 below.


3. Place the egg yolks into the large bowl or stand mixer bowl, and add or weigh in the sugar. Then whisk on high speed for about 2 minutes, until the mixture changes from a strong orange colour to much paler, thicker, creamy and if you drizzle some mixture from the end of the mixer, it will fall onto the rest of the mixture, and ‘leave a trail’ for a few seconds before it disappears. This is also known as the ‘ribbon stage’ or ‘trail stage’. See Photo 3 below or check out my Ribbon Stage Video.


4. Next fold the cocoa powder into the whisked egg yolks/sugar mixture. Use a plastic or rubber baking spatula as metal will knock out the air you incorporated. There is no other rising agent (also known as leavening) in this recipe, so we want to keep as much air as we can. Mix as if you were writing a number 8, where the spatula is your pen & the batter your paper. See Photo 4.


5. Now fold 1/3 of the egg whites into the cocoa batter. Go slow and be gentle. Then add another 1/3 of the whites and fold in again. Repeat for the final 1/3 of whites. Remember to scrape the sides as you ‘write’ or ‘fold’ the whites in and do so just until no more whites are visible. See Photo 5 & 6 below.


6. Pour the mixture into the prepared cake tin, moving the bowl as you let it drop down, filling any gaps as you go. Give the tin a shake to distribute it evenly, using the spatula as little as possible. Give the tin a few taps on the worktop/counter to expel any trapped air and place in the oven. See Photo 6.


7. Bake for about 15 minutes until a cocktail stick inserted in the middle comes out clean, and the cake is starting to come away from the sides of the tin. I like to turn the tin half-way through cooking to ensure an even bake. I used the end of a spoon to pull out the tin without getting my thumb in the cake! See Photo 7.
While the cake is baking, get a clean tea towel, baking/parchment paper, icing/powdered sugar & a small sieve ready for the next stage.


8. Place the baking/parchment paper on top of the clean tea-towel and sprinkle or sieve icing/powdered sugar on top of the paper. You can use cocoa powder instead if you are not going to cover the Chocolate & Orange Yule Log, but I prefer icing sugar as it’s less expensive and prevents sticking. See Photo 8.
9. As soon as the cake is out of the oven, run a knife along the edges to make sure it will release. Then, with oven gloves till on, flip the baking tin/sheet over, and onto the prepared tea-towel and paper. (Be warned, there will be a sugar cloud. I used to brush the sugar onto the tea-towel, but it still sometimes stuck).
10. Gently peel back the baking/parchment paper from around all the edges, before pulling off completely. Don’t worry if there are some crumbs stuck on, just pay attention to it not breaking. Little breaks/tears at the outer edges is fine, as these will be trimmed off.


11. Start at the short width end, and fold and squeeze the cake together to get a good start to the swirl, making sure to have the towel & paper rolled inside too. Once started, roll up quickly while still warm. See Video. Let it sit with the seam side underneath. Then use some string, pegs etc, to hold the ends closed tight. See Photo 9. Place on a tray & chill for about 45 minutes for it to cool down.
12. Meanwhile, cube and weigh/measure out your butter for the buttercream, and leave out to soften. Then sieve and measure out the icing/powdered sugar. 5 minutes before the chilling time is up, make up the frosting and filling. Add the icing/powdered sugar gradually to the softened & beaten butter, (I sometimes place a clean towel over the mixer). Then add in the orange extract. See Photo 10 below.


13. Melt the broken chocolate up in the microwave, in 30 second bursts, mixing well in-between each burst. Never heat longer than 30 seconds or you might burn the chocolate. Leave to cool a little, so it doesn’t melt the butter.
14. Now add in only 2 tbsp of the melted cooled chocolate and mix till fully incorporated. See Photo 11.


15. Reserve just over half of this chocolate frosting and place in a different bowl, that will be used for the filling.
16. Next add in the rest of the melted chocolate to the remaining cocoa buttercream mixture and mix till fully incorporated. Also do a taste test and add more orange extract if needed. See Photo 12.


17. Unroll the cake and leave it flat, still on the paper. Then use the reserved (paler chocolate coloured frosting) and divide up on top of the rolled-out cake. Then using a palette knife, spread out the filling evenly, getting right to the edges. Try to make it as even as possible. See Photo 13.
18. Next begin to re-roll the cake without the paper or tea-towel, making sure to get a tight start to it, and roll right to the end. (See in Photo 13, where the cake has ‘remembered’ the rolled up state, and is curled over at where you will begin to roll up).


19. Wrap the rolled-up cake in the tea-towel & tie the ends like before. Place on a tray or large plate in the fridge and make sure the seam side is underneath. Chill for 1 hour to firm the buttercream and give cleaner slices. See Photo 14.
***Tip – you can instead, leave in the fridge overnight and finish the cake next day.
20. Get a cake stand, rectangular platter or large serving plate ready. Cut a piece of baking/parchment paper a bit wider than the size of the plate/stand and cut into 4 pieces. Then position on top of the plate/stand to cover it, (that will catch all the frosting mess). See Photo 14.


21. On top of some baking/parchment paper, use a very sharp long knife, & cut off a little under 1/3 of the cake roll off, (if you want a branch coming off the roll). Pick the least perfect end. See Photo 15.
22. Next, very carefully, position the main cake ‘log’ on top of the plate/stand, ensuring the paper stays in place.


23. Now decide on which side you want to place the branch. You will cut a little of the cake off the end at an angle so that the branch doesn’t point straight out when you join it. I put mine on the right side, and cut off from the top right edge, and angled the knife towards the bottom, a little off from the left. See Photo 16, left pic, where I checked the cake by placing against the main log.
24. Turn the piece of cake branch over and apply a layer of frosting to use as cement. See Photo 16.


25. Position the branch a bit before the half-way mark, and push into place. Take a small tea making spoon and drop some frosting over the join area and use the end of the spoon or your finger to spread it into the gap all the way around. Doesn’t need to be perfect. See Photo 17.
26. Now apply some frosting onto the ends of the cake roll. You can either use your palette knife to spread flat or, do so in a swirl to create an appearance of tree rings. See Photo 18 below


28. Next apply a layer of buttercream along the sides, same side as where the branch is – see Photo 18, right pic. Apply using the palette knife and spread by pulling the palette knife horizontally, in one direction, you can create and build up a ‘bark-like’ covering. Repeat this, working your way up a little, letting it overlap slightly. Do both ends like in Photo 18, and then begin on the tree branch.


29. For the ends of the log, let the frosting come to a rough end when you come to the ends as it will look more natural. No need for perfect straight lines. You will be building up the ‘bark’ too, so lots of practice.
30. Next I found it easiest to work round in this order, applying to the top of the log, going over the branch join area. Note too, when pulling the palette knife to the end, scrape any excess buttercream onto the top of your bowl. Just like if you were applying a buttercream crumb-coat to a layer cake. See Photo 19.


32. Once happy or all the frosting is used up (you can save the left-over frosting for something else), cover the Chocolate & Orange Yule Log with a cake cover if possible and place in the fridge or somewhere cold. I put in the garage, where it was cold. ***Don’t forget to carefully pull the 4 pieces of baking/parchment away before chilling.
You can wait 5 or 10 minutes to do this if needed. You can eat right away if you wish, but when it sets up, it gives not only a nicer look, slices easier too & best of all, you can show the ‘swirl’ better. So chill at least 1 hour. See Photo 20. Your Chocolate & Orange Yule Log (Bûche de Noël) is formed.


Making Fondant Holly
33. While the cake is chilling, you can make holly leaves if you like, like I did for the 2019 photos. Free-hand, just draw a few Holly leave shapes that would fit your Yule Log, on some paper (baking/parchment paper would be good). Cut these leaves out and then use as stencils to cut leaves, from rolled out green fondant. To make it more realistic, be sure to roll the fondant very thin. (Maximum 2mm or 1/12″ for something small like this). Alternatively, use leaf shaped fondant cutters.
34. Roll at least 6 little balls from the red fondant for the berries. They don’t all need to be the same size. But at least 5mm, or 1/5″ in diameter. Take a black food pen or regular pen (make sure no one eats them), and push down to make a hole part of the way through and leaving a black indent behind.


35. Leave the berries & leaves on a piece of baking/parchment paper to dry. Note these can be made ahead of time, even weeks before. Just cover well with cling film/plastic wrap, store at room temperature and away from direct sunlight as this can fade the colours. Don’t put in the fridge as it creates condensation on the fondant.
36. Position 3 of the leaves on top of the middle of the cake, letting them curve round the cake. Then position the berries in the middle, on top of the ends of the leaves. You can also place spare leaves and berries on the side of the place. Sprinkle the cake and or place with some decorative sprinkles if wished. See Photo. Before serving, you can also dust with icing/powdered sugar if you wish.
37. Slice with a sharp knife and enjoy! Store leftovers somewhere cold and will last up to 3 days.


Recipe Card
Chocolate Orange Yule Log – Gluten-free

Equipment
- Scales or measuring cups
- measuring Spoon – tbsp
- Large mixing bowl
- Hand or Stand Mixer:
- Medium Bowl
- Sieve
- Plastic/rubber spatula for folding
- Baking tray/sheet or jelly/swiss roll tray/sheet (see notes)
- Baking spray oil or butter for greasing
- Baking/parchment paper
- Wooden Cocktail stick/tooth pick
- 2nd tray/sheet (at least size as 1st one)
- Tea-Towel (wider and longer than the baking sheet/tray)
- String (or pegs/clips)
- Baking Palette Knife (off-set best)
- Red & Green Fondant Icing (optional – OR white fondant, red & green food colouring – preferably paste over gel)
- Gloves (optional)
- Fondant rolling mat or baking/parchment paper (Optional or or baking/parchment paper)
- Rolling Pin (optional)
- Craft knife or sharp blade. (optional or sharp blade)
- Sprinkles (optional)
Ingredients
- 6 Eggs, medium or large, separated. (US large or extra large size)
- 150 grams Caster Sugar (5¼ oz, 1 cup extra/super fine, *see notes)
- 50 grams Cocoa Powder (1¾ oz, ⅓ cup)
- 125 grams Dark/plain Chocolate (4½ oz, bitter chocolate, *see notes)
- 75 grams Milk Chocolate (2½ oz, semi-sweet chocolate)
- 200 grams Icing Sugar, sieved (7 oz, 1⅔ cups Powdered Sugar)
- 200 grams Butter – unsalted, cubed & softened (7 oz, rounded ¾ cup)
- 3 tbsp Orange Extract (or even peppermint or coffee)
Instructions
- Heat oven to: 180c/160c Fan oven/360f/Gas mark 4
- Use baking spray, cake release spray or butter, to well grease the baking tin/sheet before lining with baking/parchment paper trimmed to fit the tin.
Prepare The Cake Batter
- Whisk just the egg whites in the medium bowl (tip – wipe the bowl and beaters with lemon juice or vinegar to ensure no fails). Whisk on medium to high for at least 1 minute until increased in volume & stiff peaks are formed.
- Place the egg yolks into the largest bowl or bowl of a stand mixer, and add in the sugar. No need to clean the beaters, just proceed to beat on high speed for about 2 minutes, until mixture changes from orange colour to pale cream colour, thicker and increased in volume. Perform a 'ribbon test', or 'trail test' to ensure mixed enough.
- Fold the cocoa powder into the yolk/sugar mixture using a plastic, rubber or silicone baking spatula as metal can knock out the air incorporated. Fold in an '8' pattern until all the cocoa is incorporated.
- Next fold ⅓ of the egg whites into this cocoa batter very gently, until nearly all incorporated. Repeat 2 more times till all whites are incorporated, being sure to scrape sides and bottom of bowl.
- Pour batter into prepared tin. and let it spread out and fill the tin. Give the tin a few taps on the worktop/counter to expel any trapped air and place in the oven.
Bake The Cake
- Bake for about 15 minutes, till cocktail stick come out clean of crumbs. While baking, prepare for turning out immediately on taking the cake out of the oven.
Turning Out The Cake
- Place baking/parchment paper on top of a clean tea towel, then cover in icing/powdered sugar (or cocoa powder).
- As soon as cake is out of the oven, run a palette knife or cocktail stick round the edges to stop any sticking, before very carefully turning the cake out onto the prepared paper and towel.
- Remove the baking tin/sheet and then gently peel back the baking/parchment paper, starting from the edges before pulling off completely.
- Starting at the shorter end nearest you, roll the cake up, with the paper and tea-towel inside. Begin with a firm bend and proceed to roll, squeezing the ends as you go. Be quick & don't hesitate (see more in the Yule Log video). Let it sit with the cake seam side underneath (Or place inside a whisky tube or postal tube for a good swirl). Use some string, pegs etc, to hold twisted ends closed. Place on a tray & chill for 45 minutes for it to cool down and retain its 'rolled memory'.
Prepare Buttercream Filling & Coating
- Meanwhile, 5 minutes before the chilling time is up, make up the buttercream by adding icing/powdered sugar to the softened cubed butter & beating till smooth. Add in the orange extract, then melt the chocolate in the microwave in 30 second bursts, mixing in-between each addition till all melted. (Do not microwave longer than 30 seconds at any one time). Leave to cool a little for a few minutes.
- Add in only 2 tbsp of the melted chocolate and mix till fully incorporated. Reserve just over ½ of this chocolate buttercream, place in another bowl (this will be the filling).
- Add the rest of the melted chocolate to the remaining chocolate buttercream & mix till fully incorporated. Taste test and add more orange extract if wished.
Fill The Yule Log
- Once the cake chill time is up, unwrap and unroll the cake carefully, leaving it still on the paper once opened up. Use the reserved paler chocolate buttercream to spread all over the cake evenly, getting right to the edges.
- Start to the roll the cake up like before, using the cake shape the cake has formed, to guide you, making sure to roll tightly. Don't worry is any filling comes out of the ends. ***Be sure not to roll the paper inside of the cake this time. Once rolled, wrap the log in the paper and tea-towel, twist the ends and close shut before placing in the fridge for 1 hour for the filling to set up. This can be left overnight.
Decorate The Yule Log
- Prepare a cake stand, rectangular platter or large serving plate by placing 4 pieces of baking/parchment paper on top (hold in place with a little buttercream).
- Place the chilled yule log on some baking/parchment paper and use a sharp knife to trim off a little more than ¼ of the cake (you can use an end with cracks for this). Carefully place the yule log on top of the prepare paper & plate.
- Decide which side you want the 'branch' to be on & then slice a little off the end at an angle so the branch is not pointing straight out. Place against the yule log and once happy, spread some of the buttercream on the end and use as a 'cement' to hold in position.
- Attach to the yule log and use a small teaspoon to drop some frosting at the join and smooth over – doesn't need to be perfect. Apply buttercream to the ends of the yule log using a palette knife and spread flat or create a swirl for the tree rings.
- Next, spread buttercream on the side of the yule log where the branch is, apply and spread horizontally & create a build-up of 'bark'. Do both sides and then begin on the branch, before moving onto the rest of the log. Let the buttercream come to a rough edge on the main length of the log for a more natural look. Repeat and build up the bark.
Chill The Yule Log
- Now apply to the top of the log, going over the branch join as you go. Once happy or all buttercream used up, remove the parchment paper, cover the yule log with a cake cover, if possible (or upturned large food tub), and place in the fridge or somewhere cold. Chill at least 1 hour for better cuts.
Adding Decoration
- Decorate with any foliage you have or fake Christmas foliage, or make some fondant holly and berries. Draw free-hand holly shapes as a guide to cut around, or use a leaf cutter to make fondant leaves. (try to roll the fondant tin, maximum 2mm (1/12"). See my fondant tutorials for more details or how to colour the fondant.
- Roll at least 6 little red balls for the berries – no need for exact same size but in proportion to leaf size. Try for at least 5mm (⅕") diameter. You can use a cocktail stick or something slightly thicker to make little hole in the top of the 'berry'. Or use a black food pen to make the whole and leave the colour behind. (Tip you can use a non-food save marker if not eating the fondant).
- Leave the fondant decoration on baking/parchment paper to dry. Can be made ahead of time (weeks even months in advance – see my Fondant Lessons for tips). Don't put in the fridge or leave in direct sunlight that will fade the colour.
Serving & Storage
- After chilling, slice the yule log in slices about 1" (2½cm), and serve as it is or with some cream and your favourite warm holiday drink!
- Store the cake somewhere cool (fridge is fine without fondant decorations), and cover of have in an airtight container. Will last about 3 days.
Video
Notes
**I am not a qualified nutritionist, & all nutritional values approximate & based on a serving of 1 x 1 “/2.5cm thick slice of cake, based on cutting 10 portions. Bigger or smaller slices & the nutritional values will change. All values from Whisk.com.


Sharing The Love
Please see the sharing options or even printing, at the right/bottom of your screen (bottom of your screen for mobile devices, and down the right-hand side on computers). You can even pin this to your own Pinterest page. Alternatively, you can download this article, see top of recipe. You could also leave some feedback if you like.
DIFFICULTY LEVEL: Intermediate
Follow me on social media:
Thanks for reading.
Happy Learning & Baking!
Caro xx


Leave some feedback if you like 🙂


Chocolate Orange Yule Log
Search For Something You Fancy!
Caroline’s Easy Baking Lessons


This is such a great recipe. Shows step-by-step instructions how to make the perfect swiss roll and makes a lovely yule log. Thanks for another excellent recipe.
Love this recipe and so does the family. Such a detailed recipe and tastes so good together. Might try a chocolate coffee one next time.
This recipe is lovely. Its so easy to make if you follow instructions. Only recipe I make. Thank you for sharing.
Thank you and I loved the photo you shared on FB of the yule log you made. Was lovely!