HALLOWEEN FONDANT DECORATED SANDWICH COOKIES – Including Mummy Sandwich Cookies

HALLOWEEN FONDANT DECORATED SANDWICH COOKIES
Including Mummy Sandwich Cookies
By Caro
Here’s my jam filled sandwich cookies, made using Halloween cookie cutters, and decorated with fondant, these are fit for any Halloween party table! Very easy to make at home and taste better than shop bought. The key is to roll the fondant thin! Let me show you….


On developing this recipe for fondant decorated Halloween sandwich cookies, I discovered that not all of my Halloween cookie cutters worked that great. Many of the plastic ones with imprints of details (like on the bats or pumpkins), didn’t come out too good. Hard to transfer the detailing, and much of the detailing was lost on baking, despite the cookies having been chilled. So I had the idea of using some fondant on top of the cookies and added detailing that way.
It also led on to the creation of the Mummy Sandwich Cookie. This was super simple to do and you could easily make as a cupcake topper in the same way.


Why Use Fondant?
Much quicker and easier to work with, if you are not experienced with Royal icing, these fondant decorated Halloween sandwich cookies are ideal. You could get the little kiddies helping too.
Many people say they don’t like fondant, but too many people roll fondant out too thick. When it’s thinner, and paired with the cookie and jam filling, it is much nicer. Now if you want to go a step further and make your own fondant, then this I am reliably informed tastes much better than shop bought.


Which Cutters To Use?
To make these fondant Halloween sandwich cookies, you can use any Halloween cookie cutters you have, or even use just regular round ones (which make me think, hey you could still do a square shaped Mummy Cookie, and be like Roblox!) But whatever ones you use, you will also use them to cut out the fondant shape. So for this reason, I don’t recommend cutting them freehand – unless you have great fine knife skills. You could use a template too, but cutters are much quicker and easier. Not to mention safer if there’s small kids around helping you.
I used a 6.7 mm (just over 2.5 inches) in diameter round cutter. You could make a bit smaller but wouldn’t advise on too much smaller, as it will be harder to add the detailing.


A Note On The Recipe
To make these fondant topped Halloween sandwich cookies, I have included a direct link to my recipe for making the sandwich cookies (it’s actually for my Jammie Dodgers, but you don’t need to add the buttercream). Once you have baked the cookies, you either come back on over to here and decorate and then sandwich them together, or store them to decorate next day.
For the required ingredients & equipment, see the cookie recipe, as well as what I have listed below.


Nearly There…
What’s also good about these fondant Halloween sandwich cookies, is you know exactly what you are eating, with no additives or artificial flavours or preservatives. They taste really good too. My favourite is raspberry jam and they are very soft and crumbly – just the way I like them.
Remember too you can DOWNLOAD the recipe onto your phone or computer. Just click the ‘download’ button below.
For experienced bakers you skip to the Recipe card that is an abbreviated version of the recipe. See below
Jump to RecipeNothing else to say other than have fun making and decorating these. It can be quite relaxing and therapeutic if you take your time with it.

EQUIPMENT
*See Sandwich Cookie recipe for ingredients & equipment
- Fondant Icing (I used white, black & orange. To learn colouring your own, go to my tutorial on How To Colour Fondant or watch the Colouring Fondant Video.
- Sprinkles, Sugar/Candy Eyes, Chocolate Chips, etc for decoration
- Rolling pin (or fondant rolling pin)
- Halloween themed cookie cutters (I also used 6.7cm/2.5″ round one)
- Sharp small Knife or craft blade
- Ruler or something straight to cut along
- Silicone mat or baking/parchment paper
- Edible glue or water & a small brush
INSTRUCTIONS


1. Make up the biscuit/cookies as per the Jammie Dodger Sandwich Cookie recipe . Remember too, if using any cutters that are not symmetrical, remember to be aware that when cutting out the dough, you might have to turn the cutter around so that the cookie is reversed, for it to be an even pairing of cookies when you sandwich them together. See Photo 1. Make sure you chill till they are firm before you bake them. Bake only till colouring around the edges. If you think you over baked, once out of the oven, slide the paper and cookies onto a cooling rack so that they don’t continue to cook from the residual heat of the baking tray/sheet. If not going to decorate soon, once cooled down, store the cookies in an airtight container, preferably a tin box.
2. To Make The Pumpkin Cookies


Colour and roll out the orange fondant till quite thin, (ideally 1 or 2 mm or up to 1/12″), then cut out the pumpkin shape using your cookie cutter. Remove the cut out fondant and neaten the edges with a sharp knife or craft blade. Then place the fondant on top of your cookie to see how much bigger the cookie is (it will have increased in size a little when baking). I like to roll the piece of cut out fondant in both directions, to widen it to fit the cookie a little better. Next brush some food glue or water onto the top of the cookie. See Photo 2 above.


Next, carefully position the orange fondant piece on top of the cookie, and smooth down the edges with your finger tips. Now make the facial features by rolling out a little black fondant and cutting a long thin rectangle strip, (the width you want the mouth to be), and using a sharp blade, cut out triangles like in Photo 3 above. Position the mouth in place (see 2 different ways in photo 3 above) and then use the left over triangles to make the eyes and nose. Glue in position and then press down gently with your finger. See Photo 3 above.
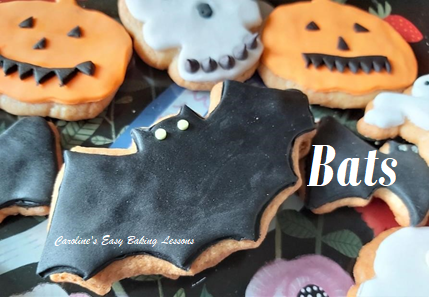
3. Bat Sandwich Cookies


Like before, thinly roll out black fondant and cut out the bats with your cookie cutter. I used two different sized ones (See Photo 4 above). Then position the cut out fondant on top of the cookie to see how much it has increased on baking. Then widen the cut out by rolling it a little in both directions until nearly the size of the cookie. Then apply food glue or water to the top of the cookie and simply position the fondant on top. Gently, smooth out the edges with your finger tips. Decorate the bat with some eyes. I used neon cake sprinkles I had, that were the perfect size and colour to stand out from the black fondant. Use whatever you have. (These sprinkles were from a Halloween themed sprinkle set I had bought before).
4. Scull/Skeleton Heads & Ghosts


To make the fondant Halloween skulls and ghosts, simply roll out the white fondant and cut out the shapes using your cookie cutters. Remove the cut out fondant and neaten the edges with a sharp knife or craft blade. Then place the fondant on top of your cookie to see how much bigger the cookie is (it will have increased in size a little when baking). I like to roll the piece of cut out fondant in both directions, to widen it to fit the cookie a little better. Next brush some food glue or water onto the top of the cookie. Then simply position on top and gently smooth the edges with your finger tips, following the shape of the cookie.


Finish the Halloween sandwich cookies, by adding facial features for the skull and ghost using cake sprinkles or even cutting sweets/candy. I used Halloween sprinkles, in the shape of skull & cross bones for the eyes, and trimmed the edges off to make the nose. The teeth were made with chocolate chips and all positioned in place with food glue and pressed down. For the second skull cookie, I used sweet/candy eyes (these can be purchased in stores or on-line). For the ghost cookie, simple tiny black round sprinkle balls were good enough and made the ghost look like it was saying ‘boooooo’.
5. Mummy Sandwich Cookies


Roll out the black fondant as before and cut out with the round cookie cutter you used for the cookie. Remove the cut out fondant and neaten the edges with a sharp knife or craft blade. Then place the fondant on top of your cookie to see how much bigger the cookie is (it will have increased in size a little when baking). I like to roll the piece of cut out fondant in both directions, to widen it to fit the cookie better. Next brush some food glue or water onto the top of the cookie. Then simply position on top and gently smooth the edges with your finger tips, following the shape of the cookie. See Photo 6 above.
Now roll out some white fondant, enough for you to get a 8 x 8 cm square (under 3 inches). Then take a ruler and cut thin long strips for the bandages, about 3 or 4 mm (up to 1/6 inch) wide. (If using a smaller cookie, then cut in proportion to that). See Photo 6 above.


Position some sugar/candy eyes (or other white sprinkles), in the top 1/3 of the cookie, then take a strip of the white fondant bandages, and place on the top ‘corner’ to towards the right and smooth over as if it was a very short hat to cover the cookie edge. Then take another strip and position just below the first one, leaving a little gap for the black fondant to show through. Trim off the edges towards the bottom of the edge of the cookie and smooth underneath. See Photo 7 above.


Take another strip and start on the left side of it’s right eyes, and position vertically to about mid way. (See Photo 7 above, middle pic). Then position a few more strips to the left of it, remembering to let each strip be a little longer each time (take into account the final bandages that will go across the way will be angles, sloping towards the left). Then position strips just overlapping the vertical ones a little (you can smooth the ones underneath a little if you like), at a slight diagonal as in pic above & Photo 7. Keep positioning and trimming and smoothing the edges, until you come to the bottom of the cookie. Your Fondant Mummy Cookie is complete!
Once All The Cookies Are Decorated


Once you have decorated all your Halloween themed cookies, simply spread the filling of your choice onto the base cookie, not going as far as the edges. (I used raspberry, cherry & my homemade plum jam, lemon curd & chocolate spread on these in the photo above). Finally, simply position the fondant decorated Halloween top cookie on top of the jam cookie and close together, very very gently, (as they might break).
Serve and enjoy, or store in an airtight container – I prefer a biscuit tin as it keeps them nice and soft as they are intended.
ABBREVIATED RECIPE – Recipe Card
HALLOWEEN FONDANT DECORATED SANDWICH COOKIES

Equipment
- Rolling Pin
- Halloween/Fall themed cookie cutters in small sizes
- Sharp small Knife or craft blade
- Ruler or something straight to cut along
- Silicone mat or baking/parchment paper to work on
- Small brush & food glue or water
- For equipment for making the cookies, see link below (or in main recipe) for Jammie Dodger cookies.
Ingredients
- Sugar Cookies (cooked & cooled – go to my soft Sandwich Cookie recipe)
- Jam, Jelly, Curd, Chocolate Spread (for filling if making sandwich cookies)
Instructions
MAKE THE SANDWICH COOKIES
- Make your own recipe for soft sandwich cookies, or go to my Sandwich Cookie recipe
- Follow recipe up until the cookies are cooled – do not sandwich them yet. Can be stored in a tin or airtight container and decorated next day or 2.
PREPARING THE FONDANT DECORATIONS
- For each type of cookie, roll out the appropriate coloured fondant till quite thin, (ideally 1 or 2 mm or up to 1/12"), then cut out the Halloween shape using your chosen cookie cutter. (Orange for pumpkin or you could do white/Black for bats & Mummy). Remove the cut-out fondant & neaten the edges with a sharp knife or craft blade. Then place the fondant on top of your shaped cookie to see how much bigger the cookie is (it will have increased in size a little when baking). I like to roll the piece of cut out fondant in both directions, to widen it to fit the cookie a little better. Next brush some food glue or water onto the top of the cookie. Then carefully position this cut coloured fondant piece on top of the cookie & smooth down the edges with your finger tips
MAKING THE PUMPKIN COOKIES
- For the Pumpkin Jack-O-Lantern cookies, make the facial features by rolling out a little black fondant & cutting a long thin rectangle strip, (the width you want the mouth to be), & using a sharp blade, cut out triangles like in the photo above.
- Position the mouth in place (see 2 different ways in photos above) & then use the left-over triangles to make the eyes & nose. Glue in position & then press down gently with your finger. Leave to dry & set.
MAKING THE BAT COOKIES
- After adding the black fondant, decorate the bat with some eyes. I used neon cake sprinkles I had, that were the perfect size & colour to stand out from the black fondant. Use whatever you have. Leave to set & dry.
MAKING SKULL/SKELETON & GHOST COOKIES
- Finish the white Halloween sandwich cookies, by adding facial features for the skull & ghost using cake sprinkles or even cutting sweets/candy. I used Halloween sprinkles, in the shape of skull & cross bones for the eyes & trimmed the edges off to make the nose. The teeth were made with chocolate chips & all positioned in place with food glue & pressed down. For the second skull cookie, I used sweet/candy eyes (these can be purchased in stores or on-line). For the ghost cookie, simple tiny black round sprinkle balls were good enough.
MAKING FONDANT MUMMY SANDWICH COOKIES
- Now roll out some white fondant, enough for you to get a 8 x 8 cm square (under 3"). Then take a ruler & cut thin long strips for the bandages, about 3 or 4 mm (up to 1/6 inch) wide. (If using a smaller cookie, then cut in proportion to that).
- Position some sugar/candy eyes (or other white sprinkles), in the top 1/3 of the cookie, then take a strip of the white fondant bandages, & place on the top ‘corner’ to towards the right & smooth over as if it was a very short hat to cover the cookie edge. Then take another strip and position just below the first one, leaving a little gap for the black fondant to show through. Trim off the edges towards the bottom of the edge of the cookie & smooth underneath.
- Take another strip & start on the left side of its right eyes & position vertically to about mid-way. (See Photos). Then position a few more strips to the left of it, remembering to let each strip be a little longer each time (take into account the final bandages that will go across the way will be angles, sloping towards the left). Then position strips just over-lapping the vertical ones a little (you can smooth the ones underneath a little if you like), at a slight diagonal as in pic above. Keep positioning & trimming & smoothing the edges, until you come to the bottom of the cookie.
FINISHING THE HALLOW SANDWICH COOKIES
- Once you have decorated all your Halloween themed cookies, simply spread the filling of your choice onto the undecorated base cookie, not going as far as the edges. (I used raspberry, cherry & my homemade plum jam, lemon curd & chocolate spread on these.). Finally, simply position the fondant decorated Halloween top cookie on top of the jam cookie and close together, very very gently, (as they might break).
- Serve & enjoy, or store in an airtight container – I prefer a biscuit tin as it keeps them nice & soft as they are intended.
Notes


SIGN UP FOR MY NEWSLETTER – I would love it so much if you could sign up for my newsletter. I will send out monthly emails, showing the latest recipes and articles, and latest info. Being a site without ads, building a following, is even more important and will keep it up and running and for free to everyone. Occasionally there will be the odd seasonal emails, but is really a means of reaching you, if you are not already in one of the Facebook groups I admin. Please note too, that these email addresses are not shared or sold onto another party. Thanks so much Caro xxx


Please see the sharing options or even printing, at the right/bottom of your screen (bottom of your screen for mobiles, and down the right-hand side on computers). You can even pin this to your own Pinterest page. Alternatively, you can download this article, see below. You could also leave some feedback if you like.
Click the ‘Download’ button below, to save to your phone or computer.
DIFFICULTY LEVEL: easy, with guidance


Follow me on social media:
Thanks for reading
Happy Baking & Making
Happy Tummies & Memories!
Caro xx
Leave some feedback if you like 🙂
Caroline’s Easy Baking Lessons
.


