Whisking Egg Yolks & Sugar To ‘Ribbon’ Or ‘Trail’ Stage

‘Ribbon Test’, ‘Trail Test’, ‘Ribbon Stage’ or ‘Trail Stage’ are phrases you will hear or see written in recipes, when whisking eggs & sugar, & more often just the yolks & sugar. But what is it, how do we do it & why should we do this in our baking? Read on to find out.
Whisking Egg Yolks & Sugar To The ‘Ribbon’ Or ‘Trail’ Stage

You might have used a recipe or two, where you were to whisk egg yolks and sugar (or sometimes the whole egg), and be instructed to do so until you reach the ‘ribbon stage’ or the batter leaves a ‘trail’. Having reviewed so many good and not so good recipes, I know lots of these can be less than helpful in explaining or showing what these terms mean. So here is a quick article & video to show you what the mixture should look like.

WHY DO WE NEED TO DO THIS TEST?
But first, why do we need to use this technique? Cakes where there is no raising agent (also known as leavening agent), such as baking powder, bicarbonate of soda (baking soda), cream of tartar or yeast, need a little help for the cake to rise and not be very dense.
The whisking of the eggs to a certain stage, is so effective, that even flourless cakes can be made using this technique (example being my Chocolate & Orange Yule Log, Flourless Chocolate Swiss/Jell Roll) or Blueberry Orange Patterned Swiss Roll. More examples of cakes using this technique include Swiss/jelly rolls as mentioned, as well as a Genoise sponge. But I also use it in my Chocolate Brownie recipe. It really does make the difference & help get a nice gooey brownie 🙂

Whole Eggs Or Separate Eggs?
Now some recipes will have you whisking the whole eggs and sugar to this ”Ribbon Stage’, whilst others you separate the eggs and whisk the yolks with the sugar, and whisk the whites on their own (just like when making meringue – see photo). I prefer the later, as the more air you can get into the batter with 2 lots of whisking, the better the rise.

HOW TO WHISK THE YOLKS & SUGAR
So how do we do this technique? Well I separate the eggs (and just a note, don’t worry if any of the white gets in with the yolk. Just avoid the yolks getting in with the whites. This is because the whites are less likely to whisk successfully with traces of yolk in them). See Photo.
Once they are separated, I will whisk the whites first if I am using them at the same time (that way, I don’t need to clean the beaters before whisking the yolks & sugar. This is because when whisking whites, like any meringues, you need the bowl & betters to be extremely clean and free of oils. Tip – Rub lemon on the bowl and betters to help*).

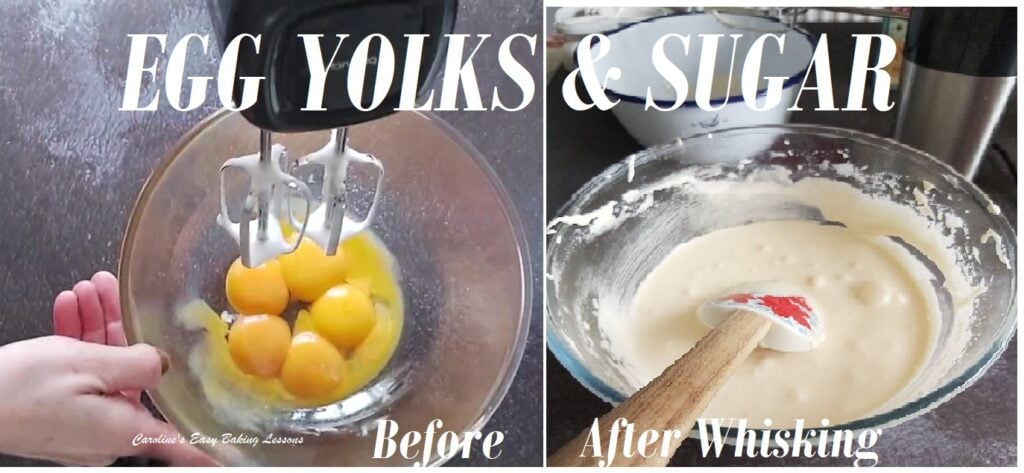
I mix the yolks and sugar together (on low to begin, or the sugar will go everywhere) and this will very quickly produce an orange coloured mixture. The next step is to whisk the yolks and sugar on high speed, (moving the mixer if it’s a hand held one), until the mixture becomes much paler in colour (an off cream colour) and be thick and creamy. (See Photo).
HOW TO TELL IF WHISKED ENOUGH – THE ‘TEST’
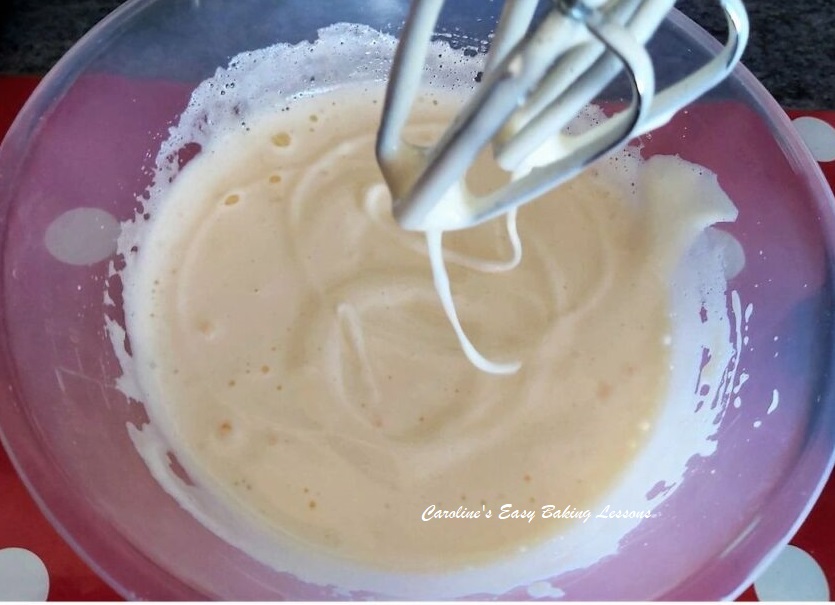
To tell if it is whisked enough, lift up the beater (s) with mixture on the end and swirl a number 8 (or pattern) on the surface of the batter with the dripping mixture. If the pattern, is visible and doesn’t disappear right away, then it is whisked enough. See Photo below. It can be described as ‘leaving a trail’ like the way the batter has fallen in the photo below.


For the cake recipes, you will then fold the separated whisked eggs, very gently into the rest of the cake batter, (and I prefer a rubber or silicone spatula for this, so as not to knock out any of the air you just worked up by whisking well). And all that remains, is for the cake to be baked.
Here is a more recent cake recipe – my Chocolate Orange Yule Log, where you will see the whisked eggs right at the beginning of the video.
Now view my really quick video on the process I just described and look out for one on whisking egg whites too. You can also check out my Giant Jaffa Cake video, where I made a Genoise cake, using this same method.
Please see the sharing options or even printing, at the right/bottom of your screen (bottom of your screen for mobile devices, and down the right-hand side on computers). You can even pin this to your own Pinterest page. Alternatively, you can DOWNLOAD this article to save to your phone or computer, for using or printing off later. Click the ‘Download‘ button below.
Thanks for reading and watching.
Follow me on social media:
Happy Baking & Making
Happy Memories & Tummies!


