Essential Baking Equipment – Theory Lesson 1

This theory lesson, details the essential baking equipment required for successful baking. Wanting to learn to bake or looking for gift ideas for the beginner baker? Then check out my updated guide for essential baking equipment.
Essential Baking Equipment
Theory Lesson 1
Baking Is A Science
“Baking is a science – chemistry of a precisely measured set of ingredients, prepared and altered in a specific way to produce something very different in taste, texture and volume, (as well as being delicious to eat)! “
to quote myself 🙂


Equipment For Beginner Bakers
“So what equipment do you really need?”
Below is a list of what I consider essential equipment. For the first few lessons’ recipes you won’t need everything but make sure you have a thorough read through this guide, as you will need everything at some point.
Alternative Equipment
Note however that there may be another household or kitchen item that you could use as a substitute and I will briefly mention those in this lesson. A fuller list will be discussed in Alternative Baking Equipment – Theory Lesson 2.
Download The Lesson
You can download this lesson – click below to save to phone or computer for using later or printing off.
Essential Baking Equipment


Digital Scales
Scales are used for measuring dry ingredients. Measuring in Kg (kilogram), g (gram), lb (pound) & oz (ounce) units of measurement. This type of scales is more accurate & have larger weighing plate than other types of scales.
Additional ingredients can also be added at the same time by simply resetting the scales to zero each time you want to add in a new ingredient (simply press the TARE button).
Some scales will also provide ml (millilitre). However, this is not 100% accurate, other than for liquids such as water & so using a gram weight instead of volume can be better.
TOP TIP – A good tip is to always have a spare battery for the scales just in case, although they do generally last a long time.


Measuring Cups
While scales are much more accurate & consistent, your country might use measuring cups. Measuring cups are used for measuring both liquids and dry ingredients, such as vegetable oil, warm water, flour, sugar and chocolate chips. These are particularly useful if you don’t have scales and come in ¼, ⅓, ½ & 1 cup sizes.
They are often used in American recipes. Please note that if you want to use measuring cups but the recipe is not in cup measurements, you will need to find the relevant cup size for that particular ingredient. This is because different dry ingredients have different weights per cup size.


For example, 1 cup of flour weighs 125g but 1 cup of caster sugar is the equivalent of 225g. There is even variation between similar ingredients. 1 cup of granulated sugar weighs 200g compared to caster sugar being 225g because it’s a finer grain and therefore more can be packed into a cup. You can simply Google: “150g of granulated sugar in cups” (answer being ¾ cup).
Conversions With Cups & Grams
I provide a table of common ingredients and their measurements in a handy table you can download & print off later. Note that if you are using a scale, these are not essential, and as mentioned, scales are more accurate.


Measuring Spoons
These spoons are plastic or metal and come in a range of sizes: 1 tbsp (tablespoon), 1 tsp (teaspoon), ½ tsp, ½ tsp, ¼ tsp & ⅛ tsp Sometimes – 2 tbsp, ½ tbsp & 2 tsp are also available.
These are for measuring dry ingredients, (for example salt, baking powder, sugar & cinnamon) and have a corresponding gram weight for each, depending on the ingredient you are measuring.
They can also be used for measuring liquids, (such as oil, vanilla extract, milk & water), and the equivalent of these are ml (millilitre). 1 tsp of liquid is 5ml & 1 tbsp is 15ml.


These are essential as ‘tea spoons’ that you use when making tea & coffee and dessert spoons are not the same as baking/cooking teaspoons & tablespoons and would produce inconsistent results in your bakes or cooking. The plastic ones can be bought for as little as £1 ($1.26) and be low maintenance.
● Note that standard recipes call for roughly level measurements of these spoons so level it off with a knife and remove the excess. (It may appear in the recipe as“1 level tsp”.
● Note also that some recipes may describe as “rounded” or “heaped tsp/tbsp” which is one that is not level. But since these spoons can come in a good selection of sizes, these measurements are not too common.


Measuring Jugs
These are for measuring liquid volume and they come in plastic, metal or in glass. Their units of measurement are printed on them and consist of the following: millilitres (ml), litres (L) or fluid ounces (fl. oz).
These are used for bigger volumes than measuring spoons can hold. They often have a spout, making pouring out easier. They can range from 50ml right up to 2 litres (1.7 – 67.6 fl oz).
Some may also have ‘cup’ as a unit of measurement on them. This is often used in American & Canadian recipes. But please note that ‘cup’ measurements on these jugs are for liquid ingredients & not to be confused with cups of dry ingredients.

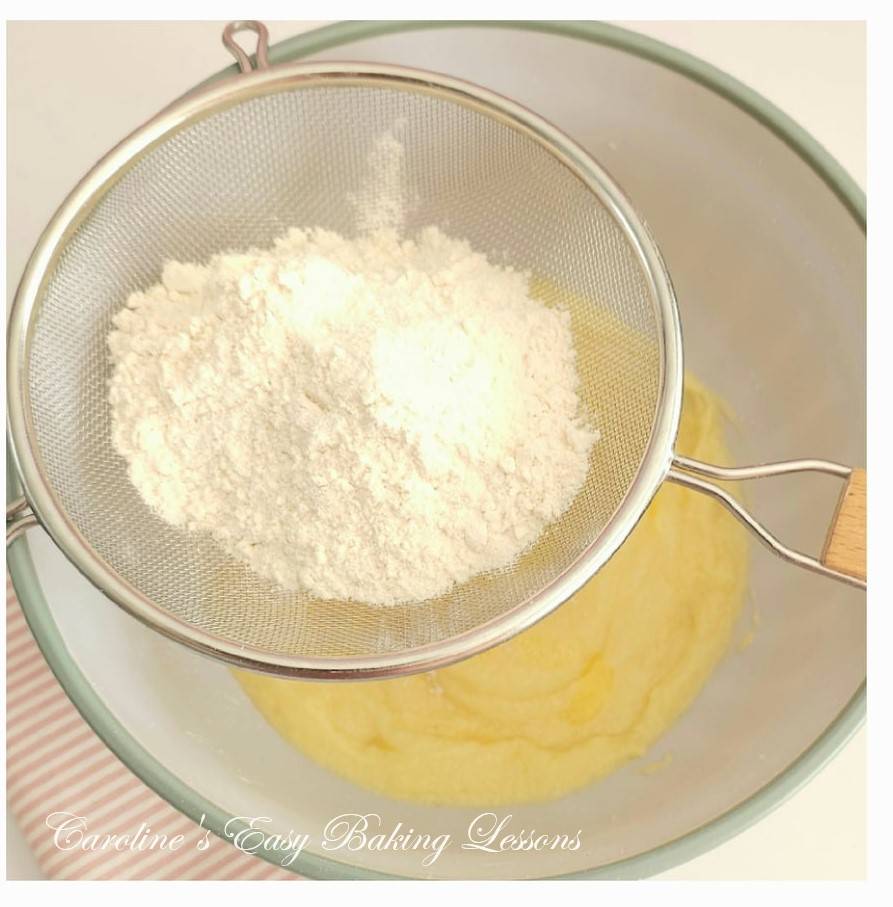
Sieve
A sieve has fine mesh within it to ensure there are no lumps in your flour or powdered sugar. They also provide more volume and rising in your baked goodies. It is known in baking terms as ‘aerating’, in other words introducing air into the mixture.
**Don’t believe the false information that sieving was only for checking for flour weevils. Sieving incorporates air & will result in a nice rise to your bake.
I find these standard sieves to be better than ‘the sieve jugs, (known as a sifter). Whilst these have markings on them to show your volume, you must squeeze the handle so many times to sieve the ingredient. Not only that, but they don’t come in a big enough size for me.


One sieve will do, but at least 2 of different sizes will be more beneficial. I advise you purchase a metal one, standard size of about 16½ cm (6½ inches) diameter, (or greater if you have mixing bowls that big) and will fit over medium to large bowls.
An ideal size for a second sieve would be about 11cm (4¼ inches) diameter. These are good if you are short on space, or only have small bowls, but it will take a bit more time to get all your ingredients sieved.
Later on you might want an extra small sieve, about tea strainer size or a bit bigger. This can be used for dusting icing sugar, (powdered sugar), over your cakes. Remember to always sieve icing/powdered sugar.


Large Mixing Bowl
A large mixing bowl is not only essential but more beneficial than having a full set of varying sizes. You can still mix smaller quantities of batter or dough, in a large bowl.
Ideally you want one with a diameter bigger than your sieve and the sieve with its long handle will sit nicely on top. You don’t need to purchase expensive bowls either. Whilst ceramic Mason Cash are gorgeous, a plastic/melamine one will do just as well. Plastic bowls are particularly good when proving bread, much lighter for lifting and not quite as saddening if you drop & break it.


You may even already have some suitable bowls in your kitchen, maybe even a large salad bowl.
If you have a stand mixer, this bowl will be useful on and off the mixer, but I highly recommend purchasing a 2nd large bowl to have on hand.
For weighing out small quantities, any small bowls you already have in your cupboards, such as cereal bowls are good enough for the job.
See the photo here with pink cereal & dip bowls from Ikea, that are 16cm & 12cm wide respectively.


Wooden Spoon Or Large Metal Spoon
A wooden spoon or even a large metal serving spoon or one for salads, would do for mixing your ingredients together, and for when not using a hand-mixer or stand- mixer. Other options are plastic or silicone spoons, that are often found in kitchen cooking utensil sets.
Plastic Or Silicone Baking Spatula
Plastic, rubber or silicone spatulas are handy as they are flexible compared to spoons & good for scraping down bowls. They also help with removing batter or dough – particularly good for sticky bread dough. They can also be used for decorating & spreading jam for example.


Metal Whisk
A metal whisk will be handy for beating eggs, dry ingredients etc by hand, especially if you don’t have a mixer. You can also make whipped cream for your desserts by whisking double/heavy cream.
I would only recommend a silicone one if the bowl or cooking pan you are using is non-stick.
This style of metal & silicone whisk as in the picture, with a bulbous end is a Piano Whisk, or more commonly known as a ‘balloon whisk’. Read on to learn more about different whisks .


Hand Or Stand Mixer
Hand-held electric mixers are obviously quicker than mixing by hand but can also be cheap and compact for easy storage. You will however find yourself standing for quite some time for certain recipes and so your hand and back can get sore. So, for most people a Stand Mixer (standalone) is better.
They are more expensive, but more efficient, can do the job itself and some recipes will turn out better with this type of equipment. There is no need to go out and buy a KitchenAid or similarly very expensive mixer (in the £200+ category).


As long as the mixer does everything that you personally want from it and take into account how often you will use it, as well as how much worktop (counter) space you have, then cheaper ones will suffice (at least for the time being – once you are star bakers you can save for a better one!)
Some better machines also come with a ‘dough’ hook that is for kneading bread. This is particularly handy if you can’t knead by hand for long. Note however, that this works best if the machine has a strong and powerful motor. My Kenwood Chef XL in the photo is my ‘Workhorse’ & more powerful than standard KitchenAid mixers.


Cupcake Tray/Pan – (12 Hole Or 2 X 6 Hole)
You should always use cupcake or muffin cases/liners in cupcake trays/pans and not just the cakes on their own.
Most recipes are for 12 or 24 cupcakes so having at least one twelve-hole cupcake tray is an essential. Most 12-hole trays will fit in one shelf of your oven (here in the UK), so having 2 can speed up the baking time if the recipe makes 24 cakes.
Use cupcake cases to line them and so cake removal will be easy.


But if you can afford to buy better quality cupcake trays/sheets, I recommend heavy duty ones. Even some of the expensive ones are lightweight and if you can feel it might bend – don’t buy it.
My best ones are from Aldi, their premium baking range and they have a black marble finish to them. They are solid and cost about £8 ($10.23) for a 12 hole tray. After using one tray I was so impressed with the quality, I purchased another on-line and it was delivered for free. (See first photo).
These trays can also be used for savoury bakes and not just cupcakes.


Muffin Or Cupcake Paper Liners & Paper Cases
This is another must for whenever you are making cupcakes or muffins. ALWAYS bake with these cases in cupcake/muffin trays/pans because if you don’t they will never hold their shape completely whilst baking.
NEVER bake directly into the holes of cupcake/muffin trays/sheets. Apart from paper cases making it easier to get the cakes out in one piece, you are also preserving the life of your cupcake tray, especially if it’s non-stick! Quality non-stick products are very expensive and so you really don’t want to be scraping to get the cakes out. Save yourself the hassle and buy cases, which are relatively inexpensive and can be bought in most places.


However, please DO NOT buy the ones that have a metallic finish to the outside of them. The cakes always stick to these cases. I don’t know what it is made of in the inside, but these have proved to be a waste of money, especially if your cakes are using oil instead of butter.
Cupcake cases can also be used for when making mince pies or even muffin cases for mini pies or quiches. You can also get them in smaller sizes for holding things like truffles, known as Petit Four cases.
Silicone ones, in various shapes are also available and so reusable. And my tip for these, is to place the silicone cases inside the cupcake tray and they will hold their shape well. (In the photo are silicone mini bundt cases).


Baking Sheets/Trays x 2
Two full size baking trays/baking sheets or cookie sheets would be more beneficial, especially for making cookies so you can get more done at the same time. Oven trays that you have already will do at first, but if they are well used and have a build up of grease maybe from savoury foods, you might not want to use them for sweet baking.
I have trays that I just use for sweet baking or breads and don’t bake things like pizza on them. Again, heavy duty ones are best as they don’t buckle in high temperatures and ensure a more even bake & longevity.


Darker coloured trays/pans are better for bread making as these types of trays absorb more heat, and are not so good for small, quicker bakes such as cookies. As mentioned previously, always line your tray/sheet with baking/parchment paper for longevity.
In the photo collage you will also see a rectangular baking tray that you use for traybakes such as Brownies or Lamingtons as they are usually a little deeper. But you could still use for cookies etc.
These are similar to sheet pans in the US, but with various depths, and sometimes come with lids which is really helpful for storing your cakes. Which leads me onto cake tins & cake pans.


Baking & Cake Tins/Pans
I would recommend purchasing 2 round cake tins/pans (also known as sandwich tins which Victora Sandwich cakes are usually baked in). And with a diameter of at least 18cm (7 inches) & at least 1 inch (2½ cm) deep. 20cm (8 inches) is also a common size for recipes.
A square tin at least 20 x 20 cm (8 inches square), would also be good or a rectangular tin for cakes, squares, tray bakes, bars etc.
Spring-form Tins/Loose Based
‘Spring-form’ pans have a clip that opens & expands the sides of the tin, releasing the base, allowing easy removal of the cake. These come in round & square shaped.
Another option is ‘loose-based’ pans. The base is loose, making releasing the bake easier. These come in various sizes, as well as tart/pie tins. However, these 2 types of easy release tins are more expensive.


Baking Or Parchment Paper
This is an absolute MUST for me. Your dough or baked goods will not stick to the tray or tin if you use baking/parchment paper. This means you don’t need to buy expensive non-stick baking equipment. Using paper also preserves the life of your equipment you are using too.
Be aware though that grease proof paper is NOT so good. Good baking/parchment paper should be brown and not too thin. I have bought countless cheap paper (about £1/$1.26) and regretted it when the food was stuck to the paper and ruined. I have never found any of the white paper (in the UK), good either.
The best and cheapest I buy is Bacofoil Non Stick Baking Paper (usually get a 10m roll). Typically it is less expensive in Savers or Home Bargains. They had brought out a ‘sheet’ version which was not as economical as the sheet sizes are quite big. But I have been able to source the 10ml roll again in Savers as at July 2024. But it is so good that I can often re-use it and get my money’s worth.


You will line your baking/cookie trays/sheets with it as well as your cake tins. Never be without it. You can also use it as a clean area to work on, with say cookie or bread dough. Roll dough between 2 sheets for less mess & easy clean up too. I also use this type of paper when making fondant work too.
Another option is silicone baking mats for your baking trays/cookie sheets. These come in quite large sizes so you can easily cut to fit your baking tray/sheet. You hand wash them so are re-usable. I don’t use them anymore as I feel they give off a smell after a while & you need to thoroughly air dry them.


Oven Thermometer
Every oven is different: running hot, running cold, or has hot spots. For these reasons, recipes can not be exact with their baking times. Purchasing an inexpensive oven thermometer, will save you from burning or under-cooking your bake.
So if for example it turns out your oven is running 20°c hotter, you just reduce the temperature on your own oven by 20°c for every subsequent bake. You can purchase in some shops or online. Amazon sells in multi-packs and I always have 2 thermometers in the oven at the same time, purely because of recipe testing & development. You on the other hand I would recommend a 2 pack for better value for money and to always have a spare on hand when needed.


Oven Glove/Mit
An oven glove or oven mitt is very important. Different styles and materials are available, but just make sure they are extra thick as you don’t want to get burnt. Doubling up on tea-towels works as a last-minute substitute.
Timer
A timer is an absolute must to get your timings right as a minute over or under can result in burnt or under-cooked bakes. The timings I give in my recipes are those that work for my oven, but everyone’s oven is different, hence why a time range is given.


Turning & swapping will ensure an even bake and reduces the risk of burnt biscuits, especially when you are just learning. With practice you will know how much longer your oven will need to finish the bake, as well as when to take them out of the oven. Therefore monitoring timing is essential. Most ovens will have a timer (so make use of it), or use the timer on your mobile phone.


Wooden Cocktail Sticks/Toothpick
For making cakes, wooden toothpicks or cocktail sticks, are inexpensive and used to check your cakes or cupcakes are fully baked. You can purchase cake testers, but I just prefer cocktail sticks as they are inexpensive and have multiple uses.
Insert in the centre of the cake, and if ready, there should not be any wet batter or crumbs for most cakes.


Cooling Rack
Wire cooling racks allow the bakes to cool quicker and stop the cooking process. This is why recipes will say to leave in the tray for a few minutes, (to continue to cook) and then transfer to a cooling rack alone, (to stop cooking from residual heat off the tray and be able to cool down). These can be bought relatively inexpensively. If you don’t have one, the metal rack of a grill tray would work too, allowing heat to escape. I have 3 racks that stack on top of each other, saving valuable worktop space!
TOP TIP – A tip for ensuring your cookies don’t fall when transferring to the cooling rack, is to move using the paper.


Rolling Pin
A rolling pin is an essential part of a baker’s kit. They come in a variety of different materials, sizes, patterns etc. I recommend a long heavy wooden one. One with no handles allows you to roll out a wider area than one with handles.
A matte one or one with as little varnish as possible is the best as varnished ones can stick to the dough and you end up putting too much extra flour on it (and ruining the structure of the bake).
ALWAYS HANDWASH gently with a sponge & never immerse in water. Leave it out to air-dry completely.


Biscuit/Cookie Cutters
Nests of varying sizes or shapes of cookie cutters can be purchased quite inexpensively these days. They come in metal or plastic and can be straight or flute-edged (scalloped edging). Note that the metal variety will cut easier, giving a cleaner cut.
ALWAYS dust with flour or icing/powdered sugar before using, to avoid the cutter sticking to the dough. An alternative to cutters is lids or the rim of drinking glasses.
Cookie cutters can also be used for cutting out pastry & fondant.


Pastry Brush
A brush will be used for glazing uncooked bakes, such as bread rolls and pastry and gives a nice finish to the items, as well as helping stop burning and drying out. Standard pastry brushes are wooden and come in various sizes. A small one will do to begin with, (about 1 – 2cm (⅖ – ⅘ inch) wide bristle area).
For many years now I have been using artist painting brushes, with better bristles & a wide variety of sizes available, while being less expensive than a pastry brush.
Silicone brushes are widely available now, inexpensive and the bristles won’t fall out. I however, don’t like the feel of them and find the bristles too hard for some bakes. I quite often see them used in baking videos and notice once baked that these can give quite a rough finish to a bake, with it clear where the thick silicone bristles were used.


SPRAY OIL
I recommend Fry Light cooking spray for lots of baking needs and is less expensive then cake release spray. I tend to use the butter one, but have used Sunflower, Extra Virgin Olive Oil & Rapeseed Oil ones too. I generally use it to oil/grease baking tins/pans and on baking trays/sheets, holding parchment in position if they don’t have a lip to them. I also use it in bowls when I am proofing dough for things such as bread or pizza. Works great on silicone bundt cases too.
They tend to be more expensive in supermarkets, but stores such as Aldi, Lidl, B&M & Home Bargains sell them for under £2 ($2.56) & you can use for cooking too.


Cake Lining Paste
An alternative to cake release spray or using butter & flour to grease cake pans, is home-made Lining Paste. This can be used not only for lining/greasing cake tins/pans, but for anytime you need greasing in your baking or cooking. It is also known as Cake Goop & is excellent for bundt pans.
In the photo collage you will see the lining paste applied to a very intricately detailed bundt pan & the cake releasing beautifully, no sticking at all.
Easy to make, stores in the fridge for a long time, ready to use whenever needed in baking or cooking. Learn how to make it in my Homemade Lining Paste Review.


Zester/Fine Grater/Micro Plane
Another recommendation, although not always essential is something to use to zest lemons. You can purchase inexpensive zesters, or use a very fine grater or micro plane. You might already have something for your cooking that you could use. I favour a very sharp grater (yes I have cut myself trying to clean it), for zesting lemons. I use a hand-held grater for fresh nutmeg and a micro plane for things like garlic.
Good Bread Knife
A long-serrated bread knife to easily slice bread and cut open rolls is essential. It’s a case of the ‘correct tool for the job’ as little vegetable knives literally ‘won’t cut it’!! And a good long sharp knife for your cakes.


Pastry Blend/Cutter
A pastry cutter/pastry blender, is used for ‘cutting’ butter into dry ingredients such as flour, and if done long enough it will produce a texture similar to ‘bread crumbs’. This is what you want if you are making pastry or scones.
This ‘cutting in’ technique, can also be done using 2 butter knives & will be explained later when you need to know, or better still, rubbing between your fingertips.
This tool is really essential if you have any problems with your hands or fingers that get sore or tired easily & don’t have a food processor. Very inexpensive too.


Palette Knives
A palette knife is used for lifting cookies etc, as well as spreading frosting onto cakes and scraping down bowls.
A baking palette knife can be any of the shapes in the photo and in a variety of different sizes, each having their own use. (The top knife is tapered, middle is angled or offset & bottom knife is straight edged). For beginners however, the standard straight edge palette knife will do for lifting cookies and spreading. In some cases, a good substitute could be a standard kitchen spatula, metal or plastic.
Subscribe For More Recipes
Want more great recipes, tips, baking information and newsletters? Then please consider subscribing by adding your email address below. Be sure to check for a confirmation email & respond back, so you can follow me & receive your free emails. Your personal information will not be shared with a third party.
Join My Facebook Group
Why not also join my – Facebook group Easy Online Baking Lessons, dedicated to this baking lessons website, as well as providing one-on-one support with myself & my team? Be sure to answer all security questions when requesting to join.
Next Step
Now that you have an understanding of essential equipment, proceed to Savoury Lesson 1 – 30 Minute Yeast free Cheesy Bread (as seen below) & read what baking equipment you need for the recipe.


Follow me on social media:
Happy Learning & Baking!
Caro x


Essential Baking Equipment – Theory lesson 1
Search For Something You Fancy!
Caroline’s Easy Baking Lessons


Found this to be excellent to refer to and answered so many questions and I’ve learnt from it too. Thank you
So pleased Diana. Thank you