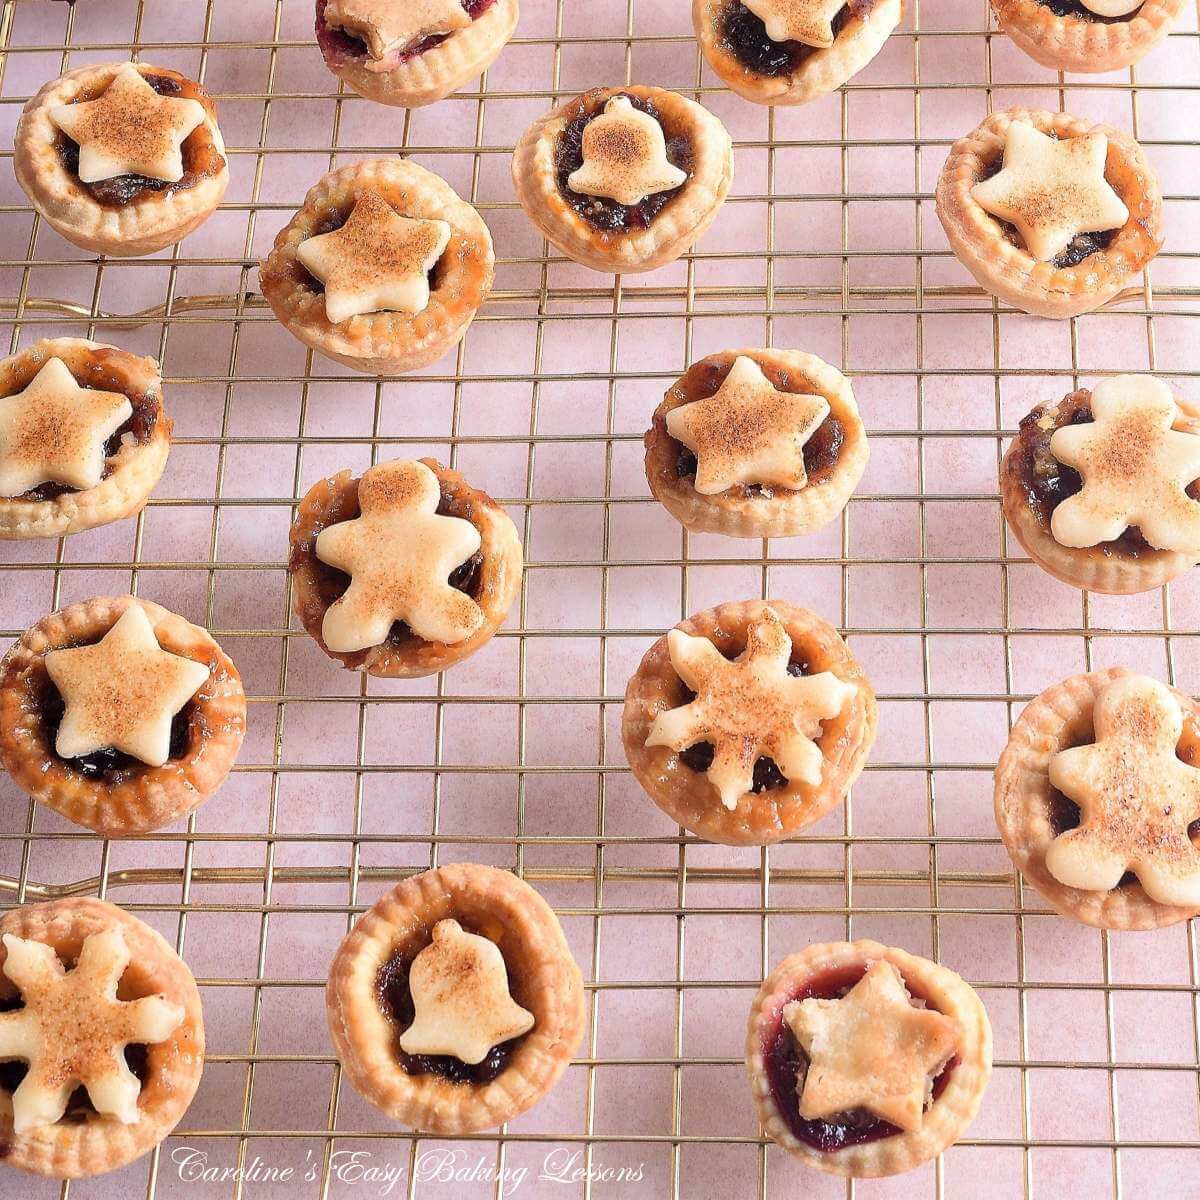
Mini Mince Pies With Marzipan

Learn how to make mini mince pies with marzipan toppers, using my step-by-step tutorial, that even beginners can use. Make your own buttery pastry, fill with mincemeat & finish with seasonal marzipan toppers.
Mini Mince Pies With Marzipan
Step-by-step tutorial
*original recipe posted 20/12/2020, new images 14/20/2025

***click to jump to section


What Are Mini Mince Pies?
Mince pies are a British classic sweet pastry, enjoyed in the lead up to, and including Christmas time.
Made from a buttery sweet shortcrust pastry, they are filled with mincemeat. Often topped with a pastry lid, they can also have alternatives like a Viennese biscuit batter piped on top.
My version, is 24 mini mince pies. Bite-sized and with festive marzipan cut-outs on top
Some people, (mostly kids), don’t enjoy the mincemeat filling, so I have provided some alternative fillings below. And because there’s 24 pies, you can use more than one filling.
Now I hear many of you ask – “What is mincemeat?” “Why is there meat in a sweet pie?” Read on and all will be explained in the ingredients section below.


Why Use This Recipe?
- Tastes great
- Super easy process
- Detailed step-by-step process
- No experience required
- No mixer required
- Great For gifting & sharing
- Can be made ahead of time & in stages
- Almost all homemade
- True British Christmas food


Can Be made Ahead of Time
As mentioned, these mini mince pies don’t need to be made same day of eating. You can enjoy warm or room temperature, but can be made days before.
The prepared mini pies can be made and stored in a metal cake or cookie tin for about 5 day1
You can make the pastry dough one day, form the pastry cases next day, and fill and bake the 3rd day.
Preparing the pastry dough, or the pastry shells, can also be made & refrigerated for up to 3 days2
Both can also be frozen for 3-6 months3
Ingredient Notes
My recipe for mini mince pies is made up of the following basic ingredients:

- sweet shortcrust pastry dough
- mincemeat
- marzipan
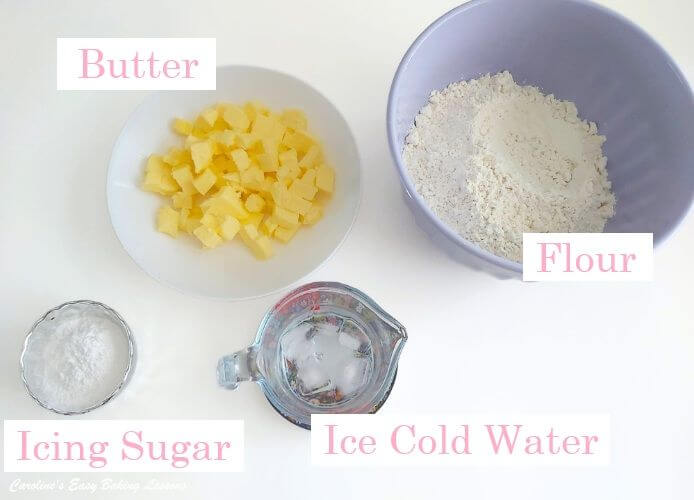
For the pastry dough:
- Plain (All Purpose) flour
- Icing (Powdered) Sugar
- Unsalted butter
- Egg
- Ice-cold Water


Unsalted Butter
Unsalted butter should always be used in your baking, even if it is a savoury bake. It will give best & most consistent results.
Salted butter has higher water content and this varies from brand to brand. And this means less fat content that affects the bake. Since 2020 more people are having baking fails, and it seems to be down to more water in the butter to reduce production costs. So best to stick to unsalted.
Or, if you see double/whipping cream on sale or about to expire, (even a day later), make your own butter. Read how to make buttermilk & butter at home, that you can even freeze.
Flour
Plain Flour (All Purpose Flour) is used to make the sweet shortcrust pastry dough. If you have some pastry flour or ’00 flour’, these could be used as alternatives.

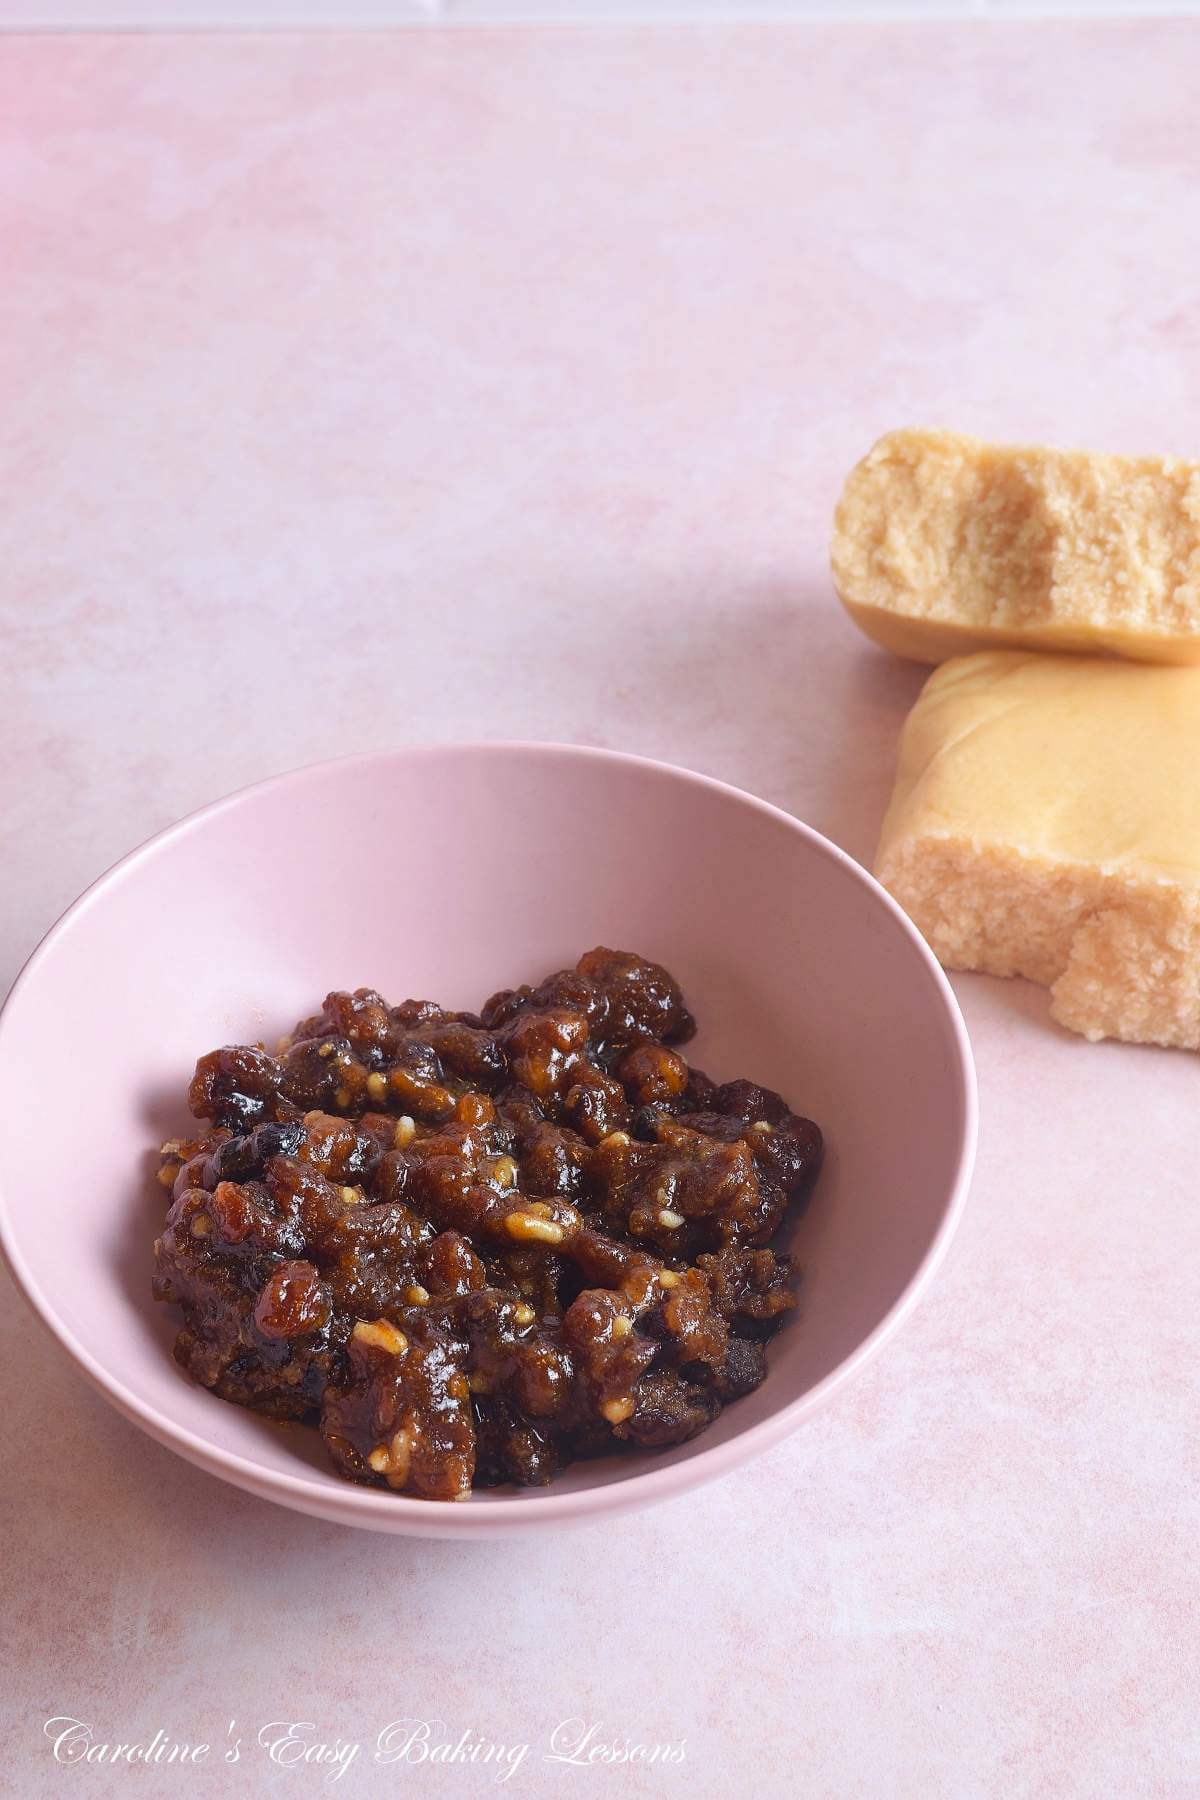
What Is Mincemeat?
Mincemeat is a very thick sweet mixture of dried fruits. Once upon a time there was some meat in it. These days the only thing a vegetarian or vegan has to worry about is if there is some suet in the mincemeat. For our American readers, small pieces of suet are sometimes in jars of mincemeat. You can get the vegetarian kind with vegetable suet. More supermarkets sell them. And some in the lead up to Christmas, will also sell ones with brandy or other flavours like salted caramel.
You can also make your own mincemeat by using the left-over sweet alcohol liquid from soaking your Christmas cake fruit. Try this Delia Smith recipe for mincemeat.
Icing Sugar
The equivalent of UK Icing Sugar is Powdered sugar. But you can also use Confectioners’ sugar too (it just has a little corn starch (cornflour) in it).


Alternative Fillings
I have over the years made some extra fillings for those who don’t like mincemeat. Lemon curd is amazing. Jams like raspberry and strawberry go well, as does pairing with some chocolate spread. The chocolate also goes well with some peanut butter filling. All have the child-friendly stamp of approval.
Just don’t fill as much with these alternative fillings as they tend to bubble up a bit more when baking. And fillings like chocolate spread or peanut butter work best when paired with something else a bit more moist like the jam.
Because there are 24 mini pies, you can make several fillings. This year I also used some homemade cranberry jam (left-over from cranberry oat bars), and paired with chocolate spread.


Marzipan
Marzipan (similar to almond paste), comes in white and golden versions in UK supermarkets and tastes great with pastries. A little cooking and it tastes even more special.
You can use on its own as the topping, or under pastry topping if you have any extra pastry.
Icing Sugar & Glitter
Icing sugar (Powdered Sugar), can be dusted on top of the mini mince pies before serving. I also in some of the images used edible glitter spray. Like lustre dust, but in spray form. The silver one by Betty Winters from B&M is often less expensive & gives a nice sparkle.

Equipment
Digital scales are always going to be more accurate than measuring cups, but all my recipes have cup measurements, that I hand-measured by myself during recipe testing.
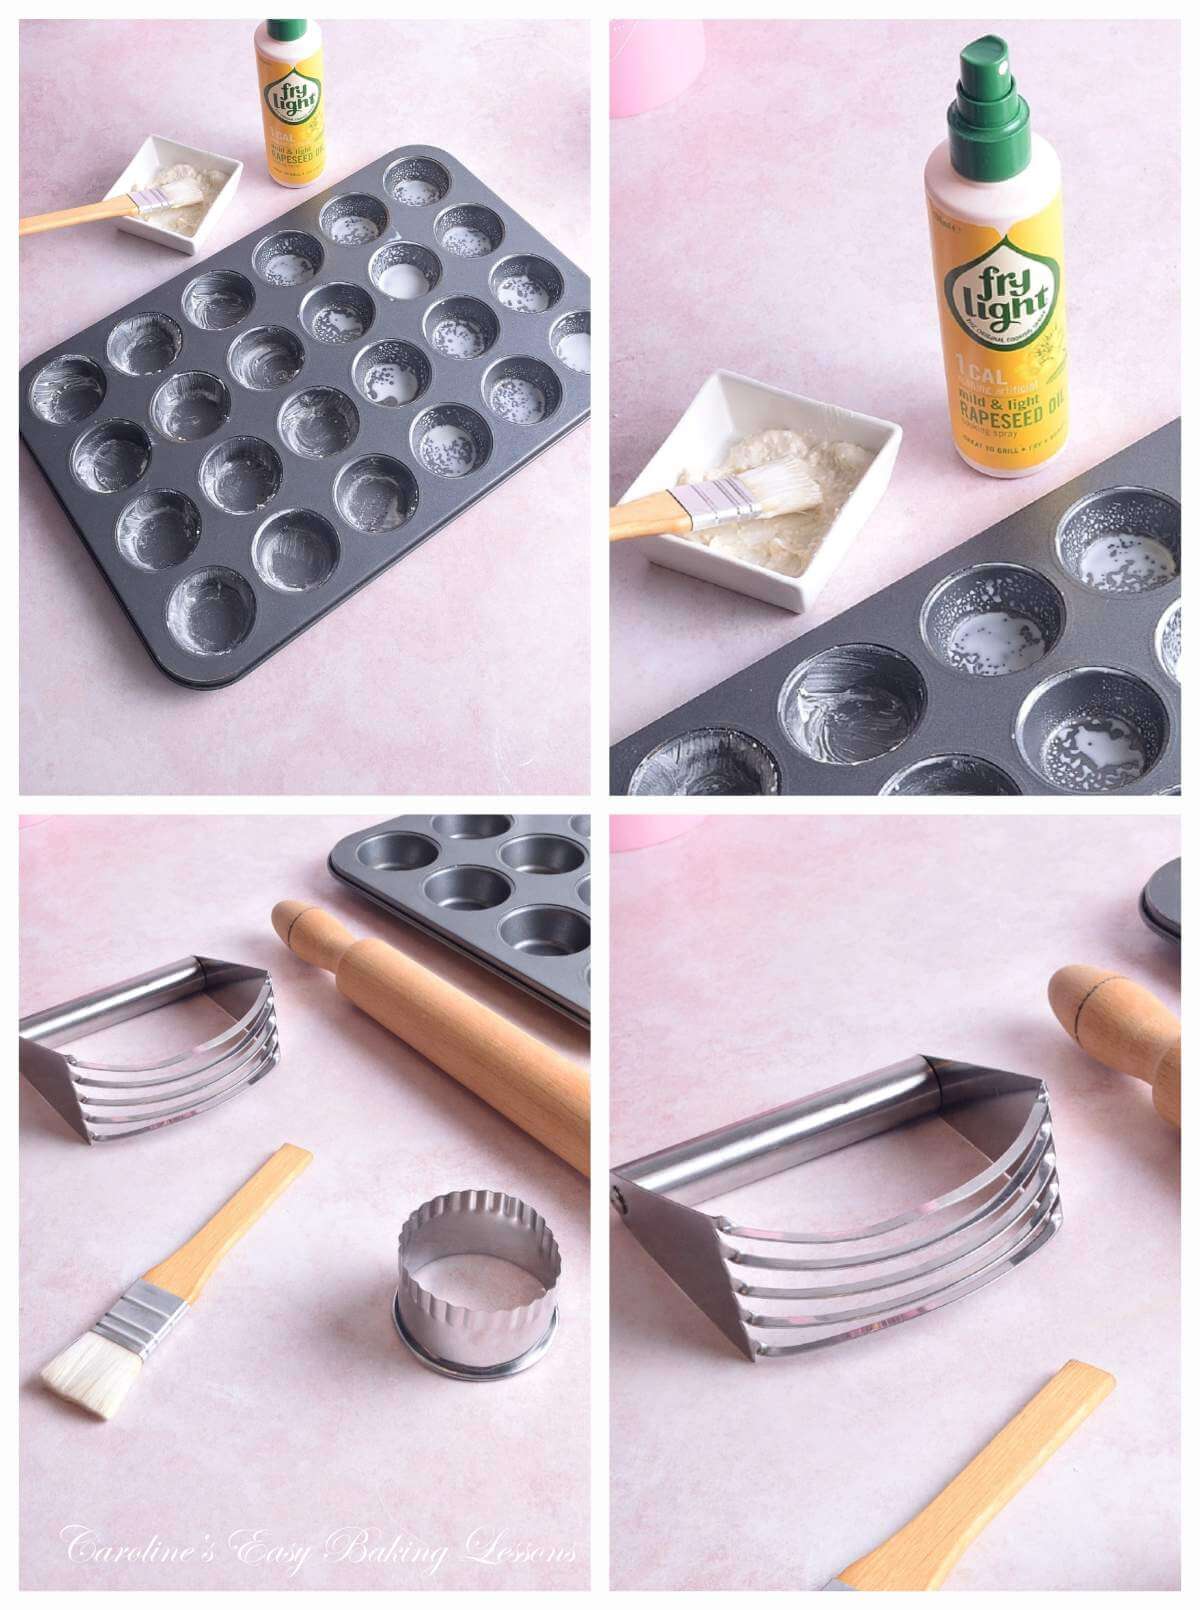
A pastry cutter (also known as a pastry blender) can be used for making the pastry if your hands get sore/tired easily. (See photo). But you can instead use your fingertips or 2 butter knives.
A 24-hole mini muffin tin/sheet is used. But you could use 6 or 12-hole mini muffin tins. Or, use the recipe for making 10-12 regular sized mince pies in a mince pie tin or cupcake tin.
To fit the mini muffin tin, I used a 5.5cm (2.5″) fluted edge cookie cutter, that I thinned a little after cutting out. So you could use 5.5cm (2.5″) to 6.5cm (3″) size.


Rolling pin is always going to be handy, but you could use a good long glass bottle if you had to. Just roll out in-between 2 sheets of baking/parchment paper.
If you use homemade lining paste (cake goop) for greasing, a small brush is good. No need for expensive pastry brushes (and the silicone are not great), so get some various sized artist brushes.
Small festive cutter are good for topping the mini pies. The smallest ones I used (at 1″/2.5cm, the bells etc), came with a cookie cutter set, and they are what’s used for cutting out the centre of cookies. Larger ones than that, like the gingerbread man and the plastic push-release type (often used for fondant), all fit good enough for toppers. Being 3-4cm (over 1 -1.6″).
You could just cut circles of marzipan, about the size of the top of the mini muffin tin holes (5cm, 2″, but smaller once baked).


Recipe Yield
This recipe makes 24 mini mince pies with marzipan toppers. Enough pastry to make 24 mini pie cases (using mini muffin tin).
For regular sized mince pies using mince pie tin or cupcake tins, you will get about 10-12 pastry cases. You might need a bit more mincemeat filling, but still plenty left-over from a jar.
Top Tips
- Be gentle making & kneading pastry & try to avoid using a food processor, to avoid a tough pastry.
- Don’t skip ‘docking’ (making holes in the base of unbaked pastry) – it lets steam escape on baking.
- Don’t skip chilling the pastry when formed as it relaxes the gluten in the dough.
- Don’t add the marzipan toppers for the full baking time as they will spread – after 7 minutes or under a pastry top.
Step-by-Step Instructions


Prepare The Pastry Dough:
1.Weigh the butter while cubing to about 1cm (⅓”) & return to the fridge. (See Photo collage 1).
2. Remove the butter from the fridge, 30 mins before starting the recipe. This ensures the butter is soft enough to handle, but still cold. During which time you could gather the other ingredients.
3. Add the flour to a mixing bowl & add in the icing sugar (powdered sugar). Mix to combine.
4.Now add in the butter cubes (that were sitting out for 30 minutes).


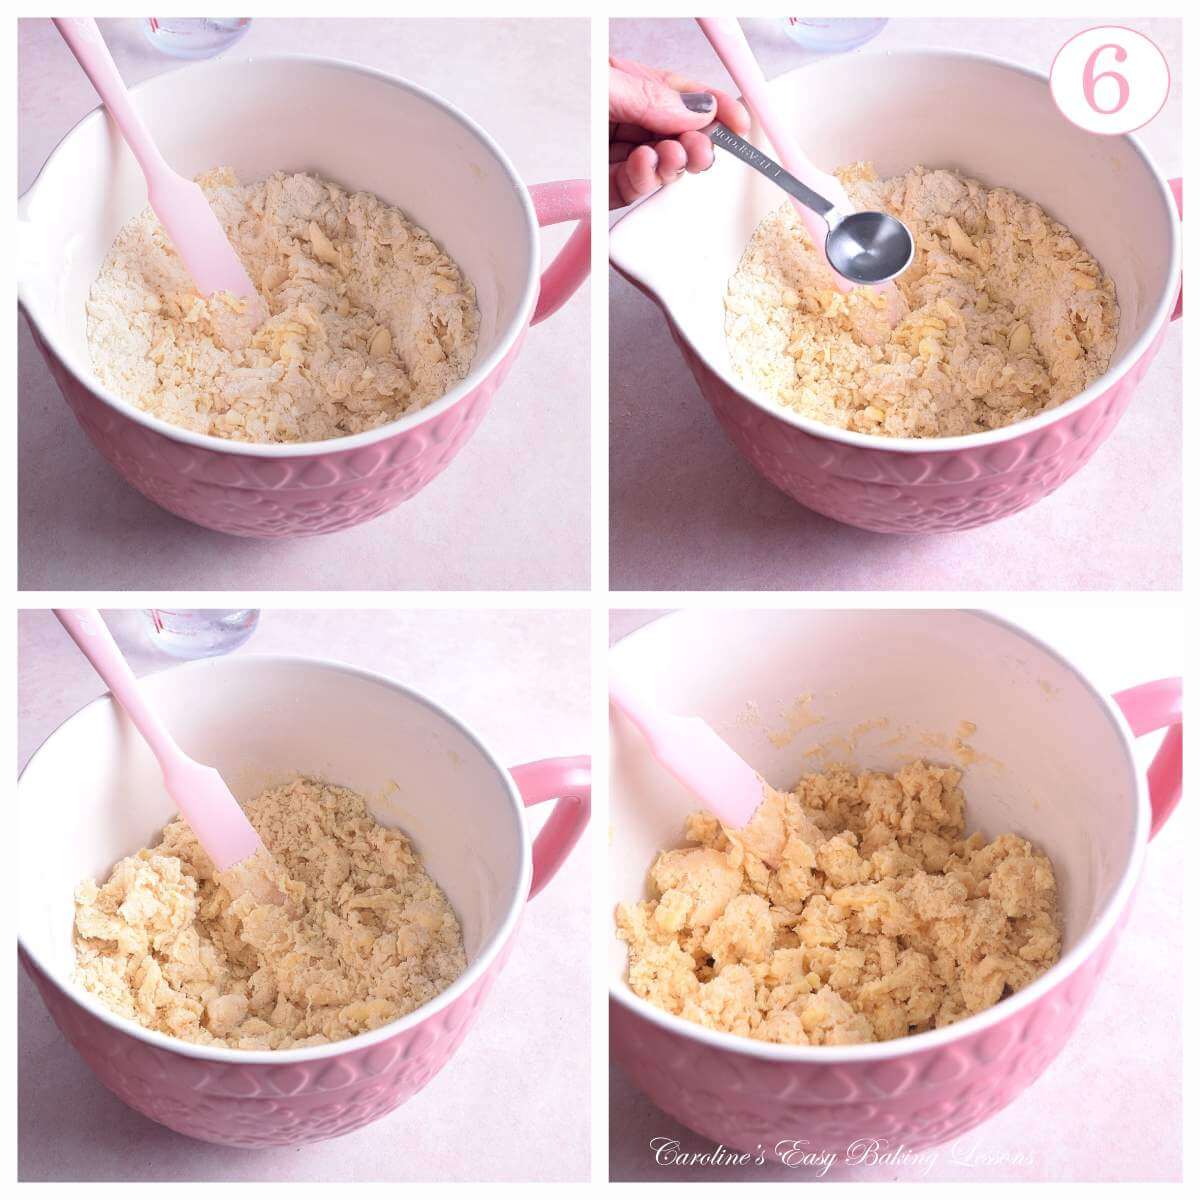
5. Use a pastry cutter (also called a pastry blender) to ‘cut the butter in’. This just means working the mixture till the butter is coated and in smaller pieces. If your hands/finger get tired or sore easily, the pastry cutter is easier to use.
6. Push down with the cutter, onto the mixture & turn the cutter left & right, making sure to keep contact with bottom of the bowl. Repeat this rotating & crushing motion, unblocking the cutter when needed.
7. You want the butter in smaller pieces, and often described as having a rough & large, ‘breadcrumb consistency’.


8. Alternatively you can use 2 butter knives or even your fingertips to cut-in the butter.
9. Lift the mixture up between your fingers, & rub your thumbs across the tips of your fingers, and then let the mixture fall back into the bowl.
10.Repeat working your way across the bowl, lifting the mixture high each time.
11. A few odd bigger lumps is fine.
(See Photo collage 3).


Top Tip – This can be done quicker in a food processor but is not as gently and this can produce a tough pastry so not advised for beginner bakers.
12. Make a well in the centre of the flour mixture.
13. Crack the egg into a small bowl, (reserve 2 tsp of the egg white), then add into the well.
14. Use a fork to gently whisk the egg first, and then gradually start to mix in the dry ingredients.
(See Photo collage 4).


15. Work in the egg to the dry a little, then grab your ice-cold water. (Here I used a small jug of cold water with ice cubes).
16.Use a teaspoon (tsp) and add 1 tsp to the mixture (be careful not to add the ice cubes).
17. Very gradually add more small spoons of cold water until the mixture becomes a more yellow than beige colour, and is now in large pieces (see photo collage 5 below, bottom right image).
18. Now get your hands into the bowl and start to knead the mixture together.


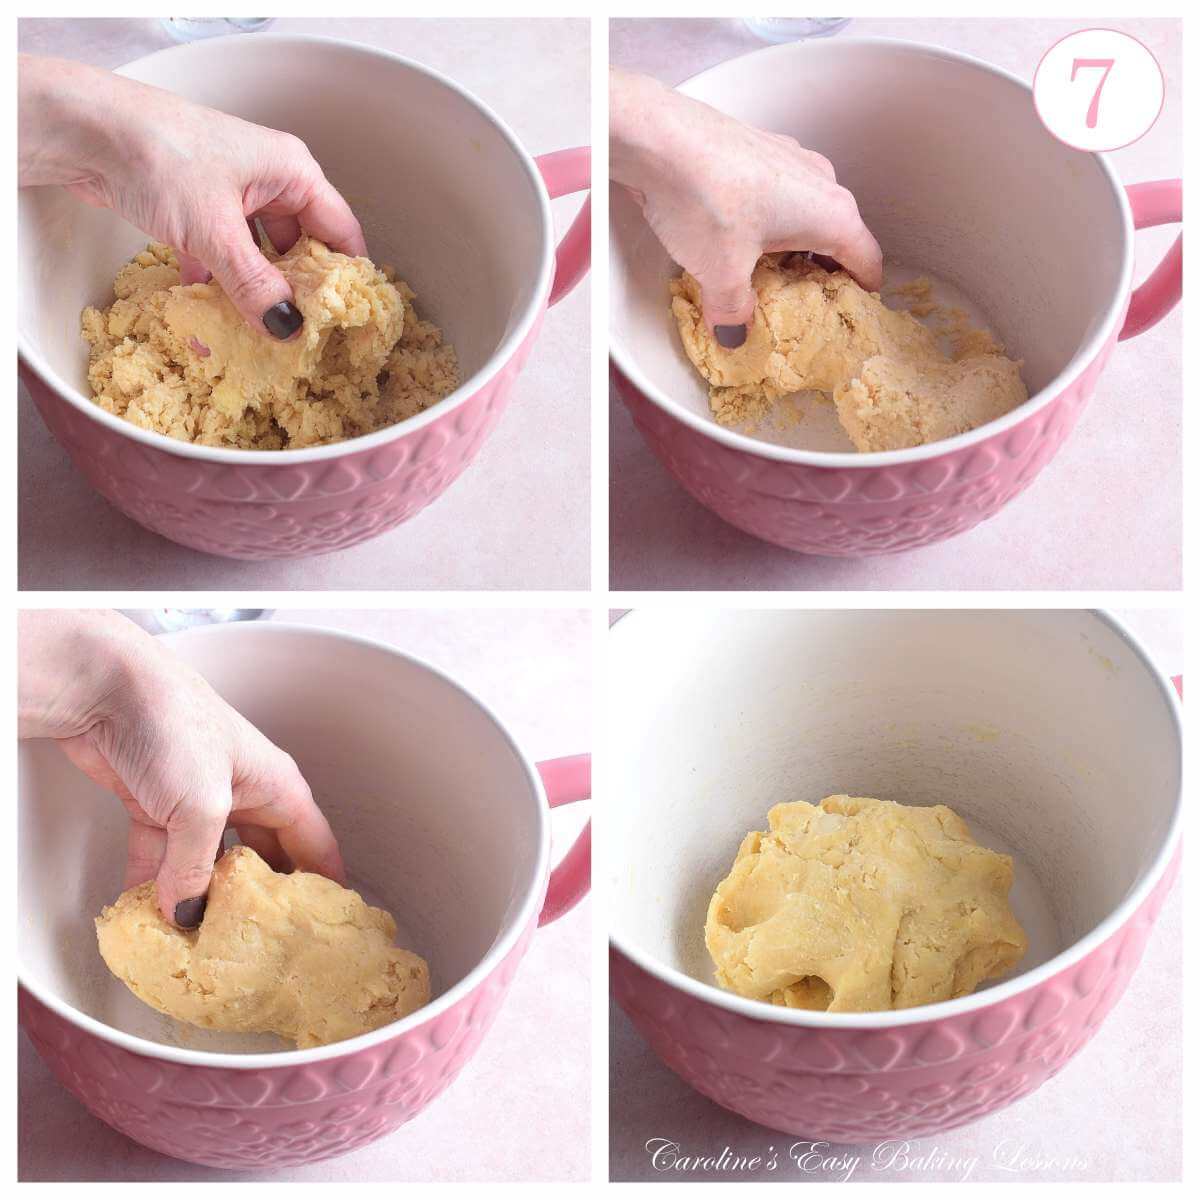


19. Work the dough until it starts to come together as a relatively smooth mass that holds together. If a little too dry, wet your hands a little to work in.
20.Form into a ball then a disc & place on top of some baking/parchment paper.
21. Wrap in the paper, then cover with cling film/plastic wrap.
22. Place on a flat plate or tray and into the fridge to rest for 30-60 minutes. This helps relax the gluten strands in the pastry that we just worked on. You can also leave in the fridge (or freezer), for up to 3 days2 till ready to roll out.

Preparing The Tin
1.Start to grease and paper-line your mini muffin tin (mini muffin tray/sheet), to coincide with when the pastry dough will have finished its chill time.
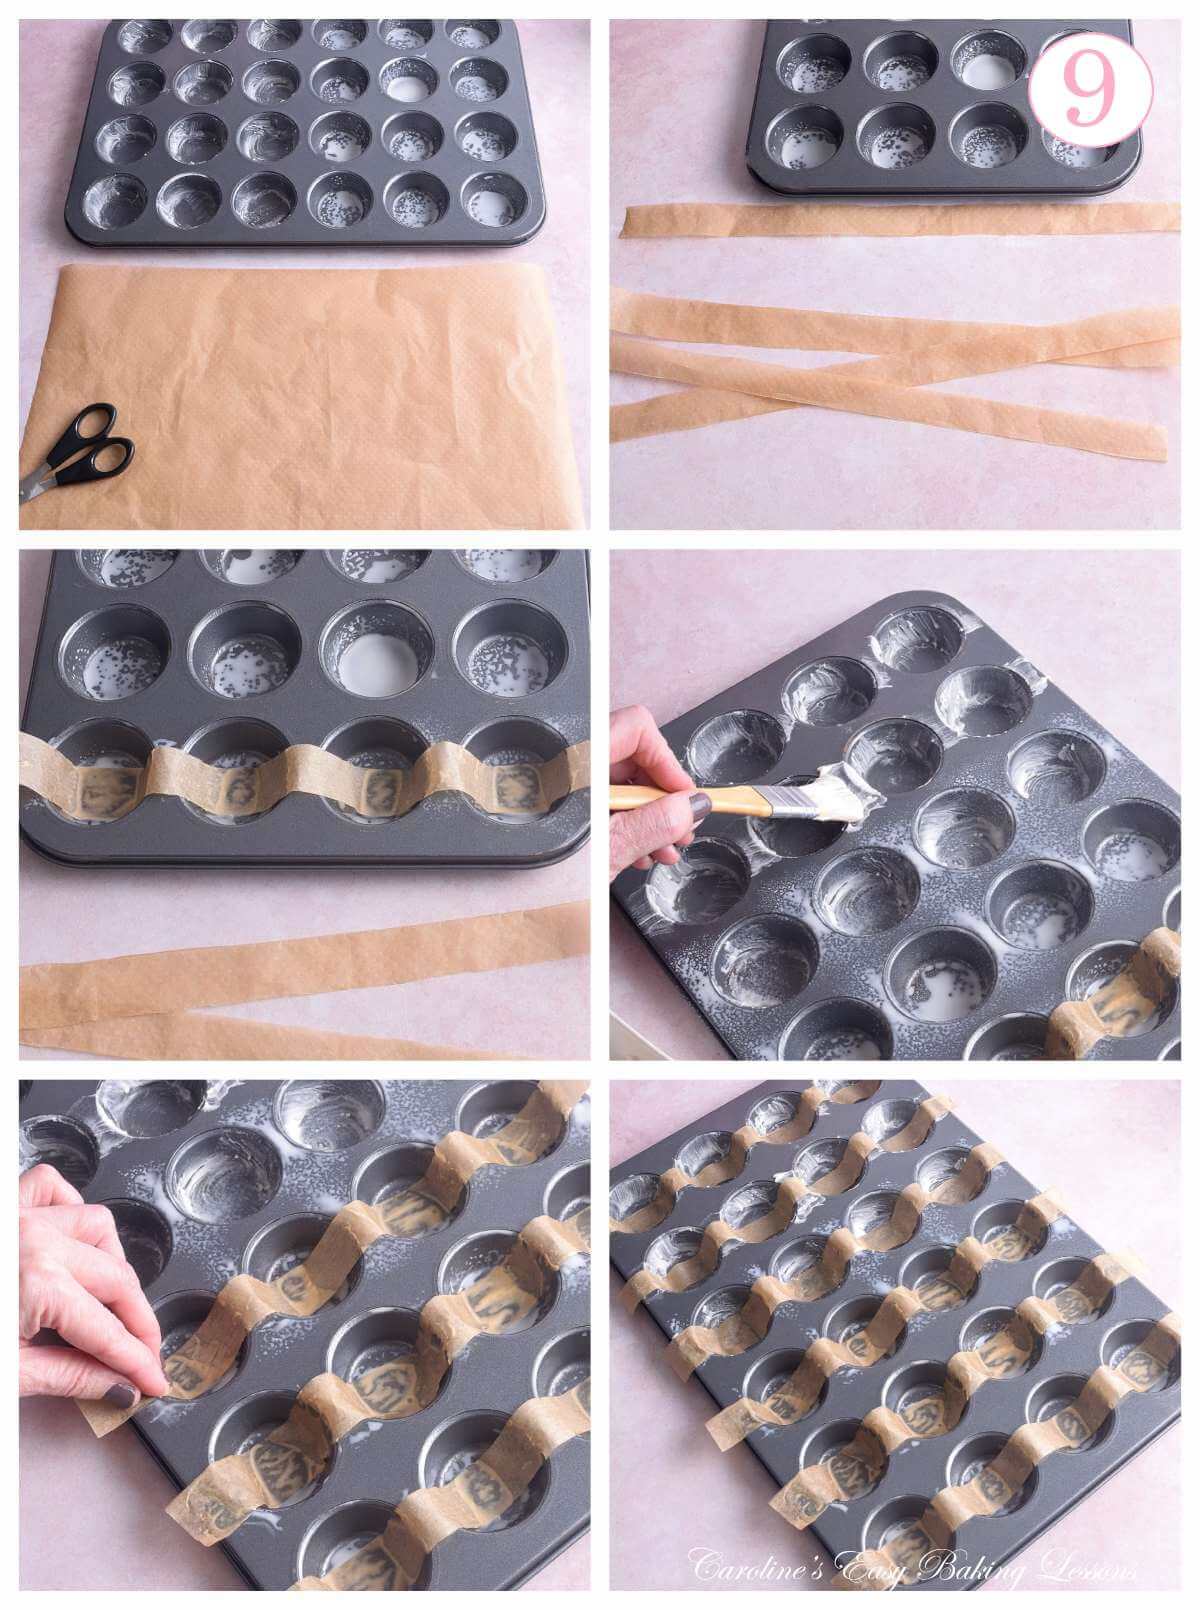
2.Well grease the bottom & up the sides of the inside of each mini muffin cup. Here I used 2 different methods to show both work well. Half were greased with Frylight cooking spray (that works just as good as any cake release spray). The rest were greased with my homemade cake lining paste (cake goop).
3.Then cut long strips of baking/parchment paper (length being just a little longer than the length of the longest side of the tin/pan – ie the 6 hole side, mine is 38cm/15″), & make the strips 1.5cm (1.66″) wide. Cut out 6 strips.
4.Place the strip over and into 4 cups of the tray as shown in photo collage 9. Grease in-between each cup to help the paper stay down.


Rolling Out & Forming The Pies
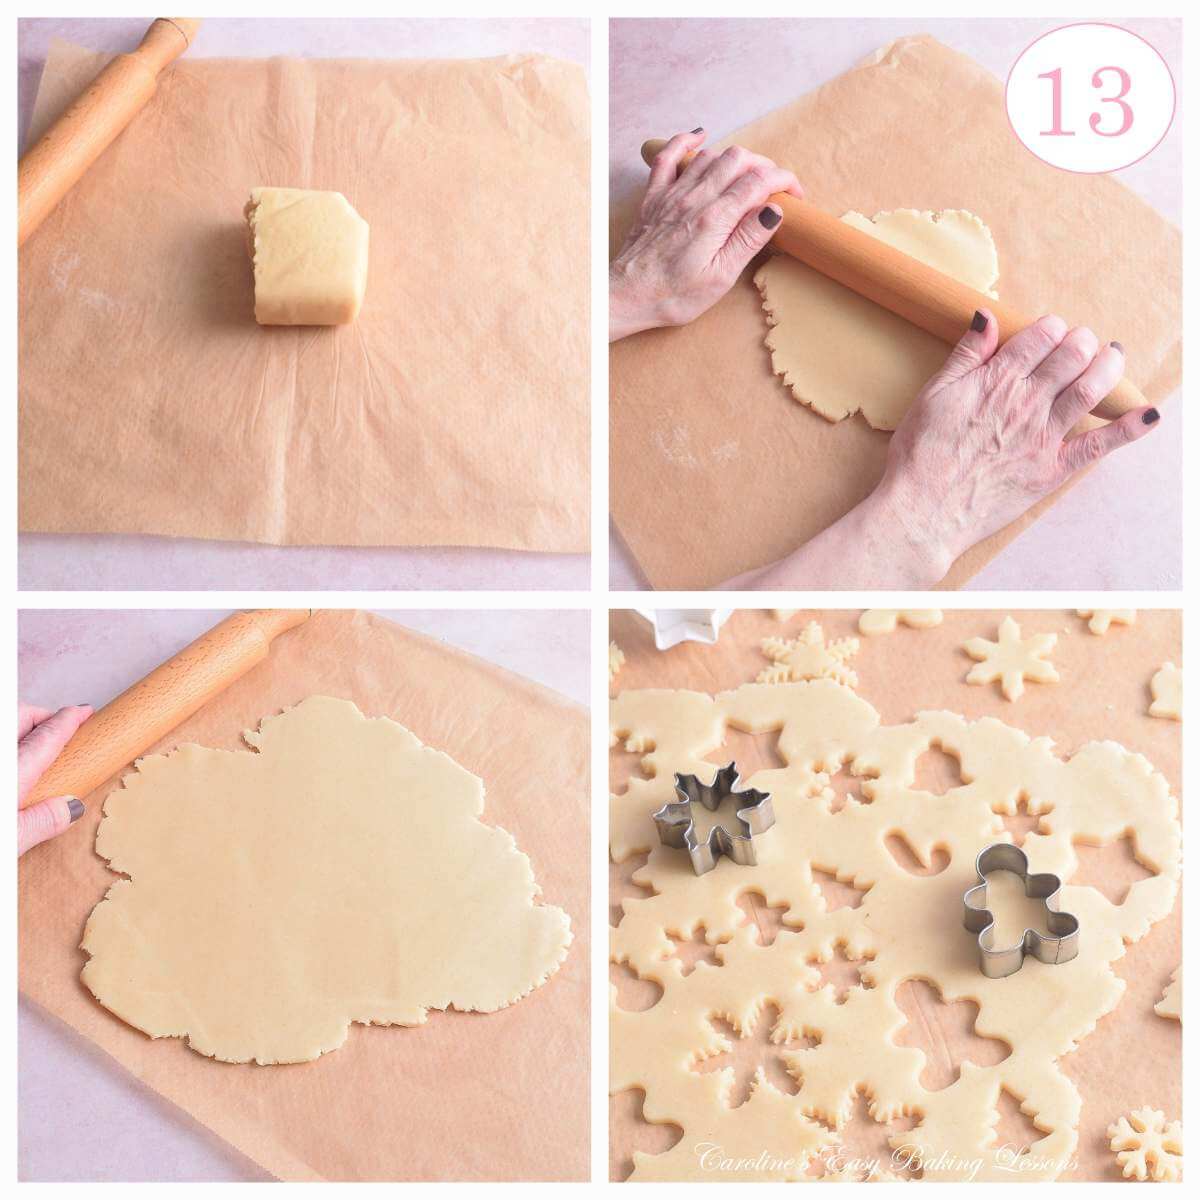
1.Place the pastry disc on floured paper or a work area (if you had the pastry chilled for a longer time, you might need to remove from the fridge about 30 minutes or so before rolling or it will be too difficult).
2. Flour a rolling pin (or use 2 sheets of paper), and roll the dough out into a thickness of about a UK £1 coin. (3.2 mm). I like to wrap in cling film/plastic wrap for hygiene.
3.Alternatively use a ruler and aim for about 1/8″ (3-4mm). Or you could use those rolling pins that have rings on them to get an even thickness.
See photo collage 10.

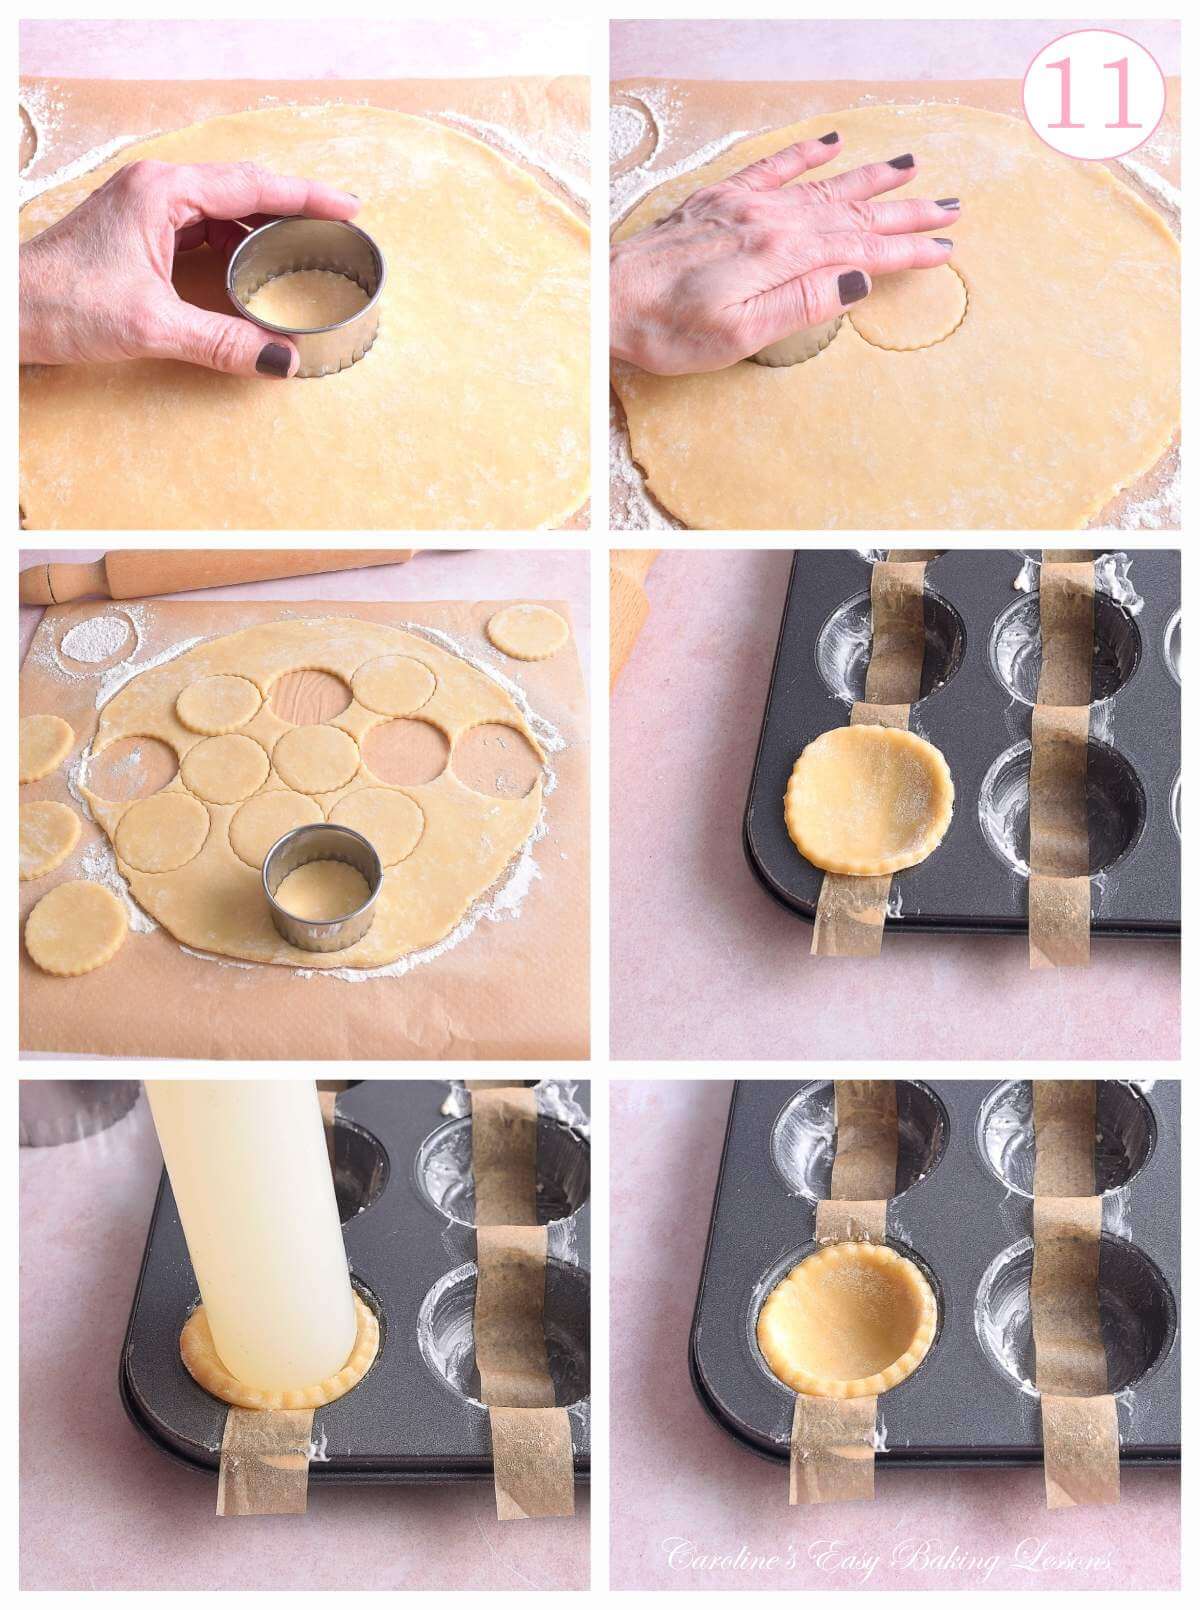
4.Dip the fluted edge of the cutter in flour, shake lightly and then cut out as many circles as you can.
5.Take one pastry disc and use your finger-tips to thin the edges slightly, or just run the rolling pin over it just a little.
6.Place the pastry on top of one of the mini muffin cups/holes then use a round edged rolling pin or something similar, that is about the size of the tin hole. Here I used a large silicone rolling pin for fondant.
7.Gently push down on the centre of the pastry circle, gently guiding it to fit into the muffin cup. If you need to reposition it, the paper will help you. Just make sure to re-grease if needed.
See Photo collage 11.

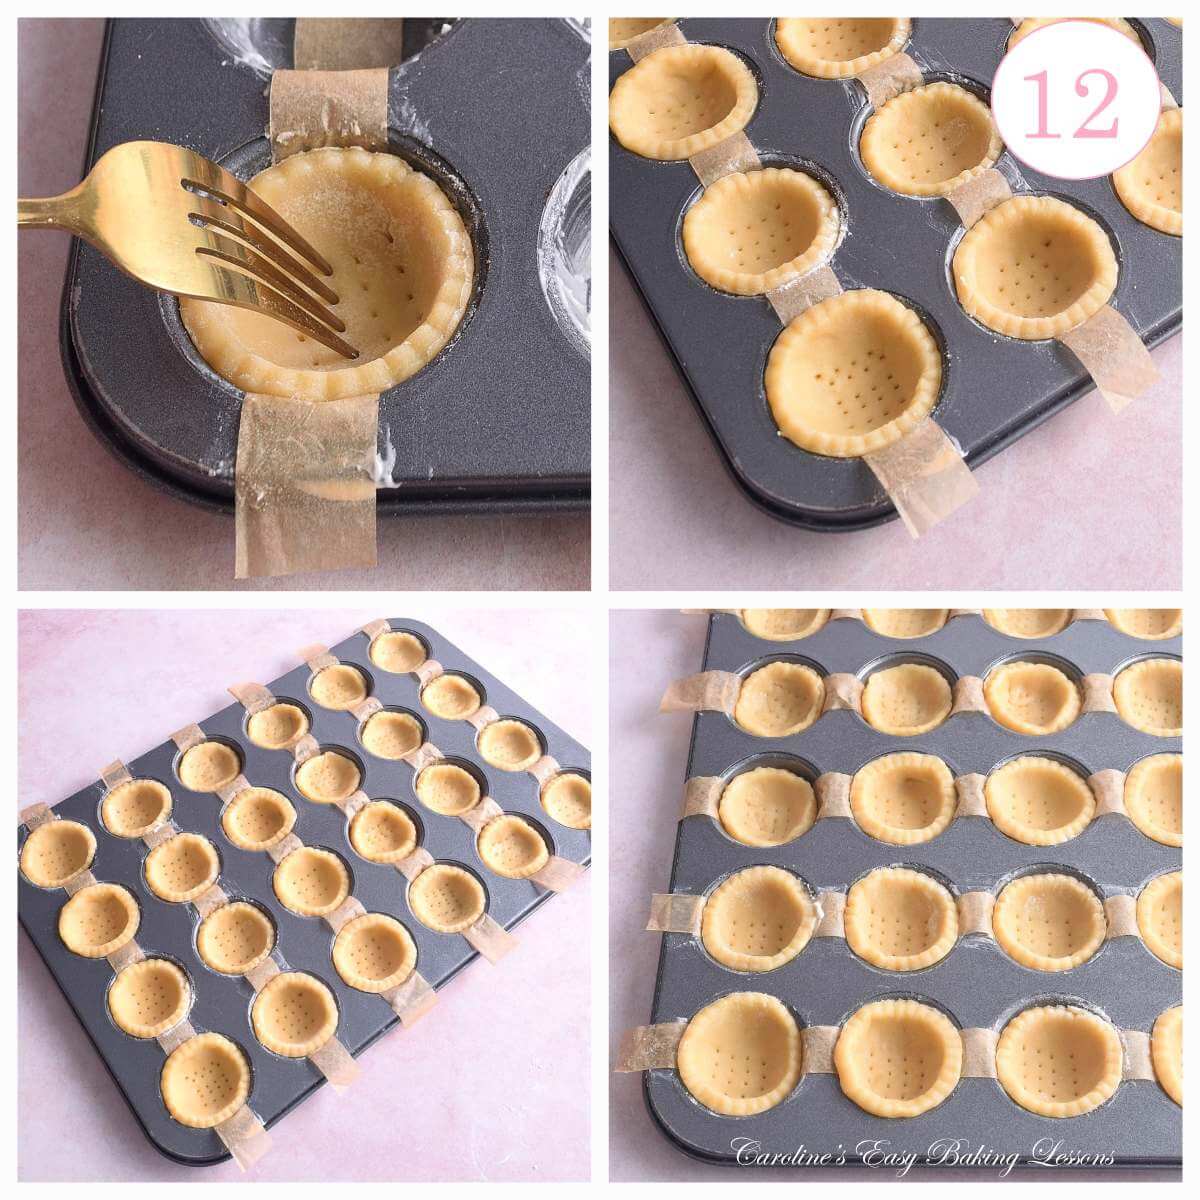
8. Use a fork to ‘dock’ the base of the pastry case. Make about 4 – 5 rows of these holes to allow heat to escape and help prevent ‘soggy bottoms’ to your mini mince pies.
9.Form the rest of the pastry cases, making sure to dock each one. Whisk the reserved 2 tsp egg white with 1 tsp milk or oil, & brush along the edge of the pastry cases.
10. Place in the fridge for 30 minutes to chill and to help the pastry relax again. We don’t want tough pastry! Meanwhile you can prepare your marzipan toppers.

Cutting Out The Marzipan
1.Give the marzipan a bit of a knead if it is too hard.
2.Place on top of some baking/parchment paper, on a silicone rolling mat.
3.Roll out the marzipan to a thickness just about the same as the pastry.
4.Cut our small seasonal shapes, such as gingerbread men, candy canes, snowflakes, Christmas trees, bells etc. I used a combination of regular metal cutters & the push-release ones uses for pastry & fondant. (See Photo 13). Preheat the oven to: 200°c/180°c Fan oven/400°F/Gas Mark 6.


Baking The Mini Mince Pies
1.Once the formed pastry cases have been chilled,.fill each one with about 1/2 tsp worth of the mincemeat.
Alternatively, use combinations such as peanut butter and jam/jelly (think peanut butter and strawberry jam). Lemon curd, other jams or even left-over homemade cranberry jam (from my fresh cranberry oat bars recipe). That I paired with some chocolate spread. The chocolate spread also goes nicely with the peanut butter. Just make sure to not fill more than 3/4 full as the mixture can bubble up quite a bit more than the mincemeat filling.
2.Pop in the pre-heated oven & bake for 6-7 minutes. Then remove and add the marzipan toppers. *The marzipan toppers should not be added until the mini pies have already baked a little. Continue baking for another 7-10 minutes until the pies are a nice golden colour & the marzipan has a little colour to it.


Alternatively, place a pastry cut-out on top of the marzipan shape, and this can all be baked all at the same time. Just make the pastry a little thinner.
Another alternative is to bake the mini mince pies with no topping, and then just use a blow torch on the marzipan pieces to give them some colour. Baking the marzipan does give a different texture and taste.
3.Leave on top of a cooling rack to cool for about 10 minutes before easily removing from the mini muffin tin with the use of the paper strips. (*These can be removed after chilling & before baking if you were making lots of pastry cases for future baking.)
4.Leave to cool more on the rack or enjoy warm.


Serving & Storing
1.You can serve the mini mince pies at room temperature or warmed. Not a fan of cold pastry myself. Lovely on their own or with some cream, clotted cream or some like with some brandy whipped cream.
2.Particularly good warm with the sides mentioned above. Eat warm after baking or pop in an already hot oven or the air fryer (covered with some foil), for a few minutes until warmed through. ***Be very careful of the filling not being piping hot as it will burn your mouth. Cut in half and let the excess heat escape before eating.
3.Store in a metal cake or cookie tin at room temperature for about 5 days. I have not tried freezing baked mini mince pies, but the pastry can be made one day, cases formed another day, and baked a different day again. Prepared pastry dough or the pastry cases, can be made ahead of time and kept in the fridge for up to 3 days2 or in the freezer for 3-6 months3.
4.For freezing pastry dough (or pastry scraps), wrap in paper, then cling film/plastic wrap, or foil and finally into a labelled food bag or container. (This protection helps prevent freezer burn).
5.For freezing unbaked pastry cases, flash freeze on a paper lined baking tray/baking sheet till frozen. Then wrap each one as described above, and then place in a well-fitting air tight container to keep their shape and from breaking.
DIFFICULTY LEVEL: Beginner, not too hard


Other Recipes Using Mincemeat
Click an image below to jump to the recipe using mincemeat, or go to the Christmas page


Recipe Card
Mini MInce Pies Tutorial

Equipment
- Scales or measuring cups
- Measuring Spoons
- Medium mixing bowl
- Spatula or Spoon
- Pastry Cutter/Pastry Blender (optional)
- Baking/parchment paper
- Cling film/plastic wrap
- Scissors
- 24-hole Mini Muffin Tray
- For greasing (Frylight cooking spray or Lining Paste)
- Pastry Brush or artist/paint brush
- Rolling Pin
- Fluted round cookie cutter (5.5 – 6.5cm (2.5"-3") on the fluted side)
- Cooling rack
- Small Cookie/Fondant Cutters (3-4cm (over 1 -1.6″)
Ingredients
For the pastry dough:
- 190 grams Plain Flour (6¾ oz, 1⅓ cups, All Purpose*)
- 22 grams Icing Sugar (3 tbsps, ¾ oz, Powdered or Confectioners' Sugar)
- 78 grams Unsalted Butter (2¾ oz, ⅓ cup, cubed small, see notes*)
- 1 Egg (medium to large UK, large to xl US, room temperature)
- Ice Cold Water (Few tablespoons worth)
For the filling & Topping:
- 190 grams Mincemeat (6½ oz*)
- 100 grams Marzipan (3½ oz, almond paste)
For Decoration (optional):
- Icing Sugar (Powdered or Confectioners' Sugar for dusting, optional)
- Edible Glitter (for decoration, optional)
Instructions
Prepare The Pastry Dough:
- Cube the cold 78 grams Unsalted Butter into small pieces about 1cm (⅓”) & return to the fridge. Remove from the fridge 30 minutes before beginning. Add 190 grams Plain Flour & 22 grams Icing Sugar (powdered sugar) to a mixing bowl & combine, before adding in the cubed butter. Use a pastry cutter (pastry blender), your fingertips or 2 butter knives to 'cut-in' the butter, until you have a a rough but large ‘breadcrumb consistency’. (See the step-by-step instructions for more details & images). A food processor is not recommended for beginner bakers as it can produce tough pastry.
- Crack open 1 Egg & reserve 2 tsp of the egg white. Then make a well in the centre of the mixture, add in the egg, whisk just the egg, then gradually work into the dry mixture. Then start to add in 1 tsp Ice Cold Water. Very gradually add in enough cold water, while working it in, until the mixture becomes more yellow in colour and in large pieces. Knead by hand into a relatively smooth dough that holds together. Form into a disc, wrap in paper then cling film/plastic wrap. Place on a flat plate and into the fridge for 30 – 60 minutes to relax. Alternatively you can refrigerate for up to 31 days or freeze for 3-6 months2
Preparing The Mini Muffin Tin/Tray:
- Use a 24-hole mini muffin tin for the mini mince pies. Here is a good trick for easy removal. Well grease all the holes, (I use either Frylight cooking spray or homemade lining paste (cake goop). Cut strips of baking/parchment paper, the length of the 6-hole side of the tray. Cut them about 1½cm (1⅔″) wide and 6 in total.
- Place the strips along the 4-hole-side, pushing into the holes. You can grease in-between the holes to help keep in place. (See photo collage 9 in the step-by-step instructions). These help lifting out the pies easily. Repeat until all 6 strips are used up.
Forming The Pastries:
- Roll out the relaxed pastry dough on floured baking/parchment paper until a thickness of about a UK £1 coin (3-4mm, ⅛”)
- Dip the fluted side of the cutter in flour & cut out as many circles as you can. Thin the edges of one disc of pastry a little and place on top of one of the mini muffin cups/holes. Use the rounded end of a rolling pin to gently push the pastry circle down into the cup. If you need to re-position, use the paper strip to help you. Use a fork to ‘dock’ the base of the pastry shell with 4 or 5 rows of holes.
- Repeat with the rest of the pastry circles. Then re-roll the excess pastry and cut out the rest of the pastry until you have all 24 mini pie cases formed. Whisk the reserved 2 tsp egg white with 1 tsp milk or oil, & brush along the edge of the pastry cases. Chill for 30 minutes.
Prepare The Marzipan Toppers:
- Give the 100 grams Marzipan a knead if required, before placing on some baking/parchment paper. Roll out to a thickness at the same as the pastry (3-4mm, ⅛") .
- Cut out at least 24 small seasonal shapes that will fit or just overlap the width of the mini pies. Leave to the side.
Filling & Baking The Pies:
- Preheat the oven to: 200°c/180°c Fan oven/400°F/Gas Mark 6.
- After the chilling, fill each pastry case with about ½ tsp of 190 grams Mincemeat filling till about ¾ full. If using jam, chocolate spread, curd, peanut butter, etc. Fill a bit less, as they do tend to bubble up a bit.
- Place in the centre of the pre-heated oven to bake for about 6-7 minutes until starting to colour. After this point you can add the marzipan cut-outs on top. **Do not add before this or they will over-cook. Alternatively, you can place marzipan under pastry cut-outs if you have any pastry leftover.
- Continue baking for another 7-10 minutes until the pies are a nice golden colour & the marzipan has a little colour to it.
- Leave to cool in the tin over a cooling rack for 10 minutes, then use the paper to remove all 24 pies & cool just on the rack.
Serving & Storing:
- Serve a little warm or room temperature with some cream, or favourite accompaniment. You can re-heat in an already hot oven or in the air fryer, covered with foil till warmed through. Just be careful of piping hot filling.


- Store the pastries in a metal cake or cookie tin at room temperature and they will be fine for about 5 days3
- Pastry dough & unbaked pastry cases can all be made ahead, or even frozen. See step-by-step instructions for details.

Notes

 Mincemeat – jars can easily be purchased or try making your own. For more details see the ingredient information section above.
Marzipan – like almond paste. Not to be added to the pies until half-way through baking.
Other Fillings – try jams, lemon curd, peanut butter and jam, chocolate spread and jam.
Mincemeat – jars can easily be purchased or try making your own. For more details see the ingredient information section above.
Marzipan – like almond paste. Not to be added to the pies until half-way through baking.
Other Fillings – try jams, lemon curd, peanut butter and jam, chocolate spread and jam.

 Baking Tray/Sheet – a 24-hole mini muffin tray was used.
Cookie Cutter – use the fluted edge of a round cookie cutter sized 5.5 -6.5cm (2.5-3“).
Baking Tray/Sheet – a 24-hole mini muffin tray was used.
Cookie Cutter – use the fluted edge of a round cookie cutter sized 5.5 -6.5cm (2.5-3“).

 Marzipan Toppers Cutters – use small cutters from 3-4cm (over 1 -1.6″).
Recipe Yield – makes 24 mini mince pies.
References – please see references as foot of the main recipe page.
Marzipan Toppers Cutters – use small cutters from 3-4cm (over 1 -1.6″).
Recipe Yield – makes 24 mini mince pies.
References – please see references as foot of the main recipe page.


Nutritional Information – I am not a qualified nutritionist and all values are approximate. Based on using all ingredients listed for mincemeat filling, where 1 serving is once mini pie, from a yield of 24 pies. Make bigger or smaller pies and these values will change. Calculated via MyFitnessPal.com.
Check out some more biscuit/cookie recipes. Click an image to jump to the recipe, or go to the Biscuits/Cookies page.


Subscribe For More Recipes
Want more great recipes, tips, baking information & newsletters? Then please consider subscribing by adding your email address below. Be sure to check for a confirmation email & respond back, so you can follow me & receive your free emails. Your personal information will not be shared with a third party. PLUS: a FREE oven & air fryer temperature conversions table as a thankyou!
Join My Facebook Group
Why not also join my – Facebook group Easy Online Baking Lessons, dedicated to this baking lessons website, as well as providing one-on-one support with myself & my team? Be sure to answer all security questions when requesting to join.
Follow me on social media:
Happy Learning & Baking!
Caro x


Mini Mince Pies With Marzipan
Search For Something You Fancy!
Caroline’s Easy Baking Lessons
Old images from 2020


References:
- How long to store baked mince pies – from RaymondBlanc.com ↩︎
- How long to refridgerate uncooked pastry dough – from Freezeit.co.uk ↩︎
- How long to freeze uncooked pastry dough – from Freezeit.co.uk ↩︎


