Mango Cranberry British Air fryer Scones

Try my new recipe for Mango & Cranberry British Air fryer Scones! Step-by-step tutorial for scones that rise well, & how to bake in the air fryer! This time using Foodie Flavours Mango extract for an amazing fruity taste!
Mango & Cranberry British Air fryer Scones
Step-By-Step Tutorial
**Post updated 27 March 2025


**Click to jump to section**


What Are Mango Cranberry Air Fryer Scones?
These mango & cranberry scones are my popular air fryer British scones, but with added amazing flavours. Enhanced with dried cranberries, Foodie Flavours mango extract gives an extra juicy taste to the cranberries, making them a bit more special.
Why Make These Scones?
- Quick & easy
- Make in the air fryer or oven
- Money & energy-saving method
- Taste amazing!
- Full step-by-step instructions
- Video tutorial
- No decoration required
- Enjoy with your favourite fillings


A Big Reason To Use My Recipe
Apart from being thoroughly written, photographed & videoed, I am Scottish and live in Britain, with a first-hand knowledge of how our scones should look & taste.
After practicing, tweaking & more practice, I developed the recipe for perfect scones.
But I didn’t stop there. After extensive research into what problems people might have making British scones, I was able to go a step further and provide a thorough scone tutorial, aimed for success. And how did I do that? By explaining what NOT TO DO when it comes to making scones!


My tutorial was tested out by lots of home bakers across the globe, in a Facebook scones bake-along weekend in 2020.
Over 1000 scones were made that weekend using my recipe, with great success & even for those using gluten free flour & lactose-free milk. See photo of just some of the lovely scones baked.
(Click to join the Great British Bake Off Fans Facebook group).
Ingredient Notes


These British scones are made from the following ingredients:
- Flour
- Baking Powder
- Unsalted Butter
- Sugar
- Eggs
- Milk
- Dried Cranberries
- Foodie Flavours Mango Extract
*See notes below
Flour
You can use either UK Self-raising flour or Plain (All Purpose) Flour for these scones. Both require you to add baking powder. So be sure to use a total of *** baking powder if using Plain/A.P. flour.


Unsalted Butter
Unsalted butter should always be used for sweet or savoury baking for best and consistent results. Learn how to make your own butter & buttermilk from double/heavy cream when about to expire.
**Cube your butter small (1cm, ⅓” ). You do not need cold butter to make scones. Let the butter soften enough to work with.
Eggs
UK medium to large-sized eggs are used and US equivalent is large to extra large sized.


Sugar
Caster sugar is used in British scones. Not for sweetness but to help build the scone structure. The amount is very small in proportion to flour, but enough, such that it supports a tall framework and rise for the scone, as well as helping to promote a tender crumb. It also acts as a natural preserving agent. US equivalent is Extra/Super Fine Sugar. Or you can process your own. (See my sugar comparison photo).


Milk
I use cow’s milk in my scones recipes, using any semi-skimmed and low fat milk. But I do know some of my readers have successfully used lactose-free milk, as well as goat’s milk. The only difference is a slightly paler top of the scones.
Mango Extract
While cranberry orange is one of my favourite combinations (and I do have many such recipes), once you try mango with cranberry you won’t go back.


I used Foodie Flavours’ mango extract that I was kindly gifted in a PR package. This is a British company, with so many different extracts. Last I checked, over 70 different natural extracts! I first tried their pineapple extract that I use in my Tropical Banana Bread recipe.
Very concentrated, their extracts taste great & in this case, the mango extract made the cranberries taste extra juicy & sweet, proving that they are a winning combination. Check out Foodie Flavours extracts on their website, where many of their extracts don’t contain added sugar, are vegan & vegetarian & are alcohol, dairy & gluten-free.
I also recommend signing up for their newsletter emails, as they often do special deals so ideal time to try them out.
Equipment
Not much in the way of equipment needed for making British scones. No electric mixer and I don’t recommend a food-processor.
For working in the butter, I do use a simple pastry cutter (also called a pastry blender), as shown below.


This is good for when your hands hurt easily. You can instead use your fingertips or even 2 butter knives as an alternative to the pastry cutter.
A round cookie cutter is recommended, and preferably the straight edge side. I use one about 5¾cm (2¼”) in diameter. You can use a smaller one, but once you start going bigger, it can affect the rise of the scones.
Egg-wash is brushed on top of the scones before baking. I stopped buying pastry brushes years ago in place of using artist brushes. Less expensive and you can have different sizes, for different bakes, for the same price as a pastry brush.


I also do not recommend using the silicone baking brushes. While they are less expensive and easy to clean, they don’t cover the bakes as good because the silicone bristles are so big.
If you don’t have a new or unused artist brush, you can use something like a butter wrapper or some baking/parchment paper to rub the egg-wash on. Just be extra careful not to let any drip down the sides.
This recipe works for air fryer and also regular oven. Instructions for both are given, and can even be made in a small basket-style air fryer.
***Read my Cello double air fryer review.
**Full list of equipment given in the recipe card.


Tips For Scones That Rise
Working with a lot of bakers who struggled with scones & achieving a good rise, I always advise the following things NOT TO DO:
- DO NOT use a food processor – mix by hand, or use a pastry cutter.
- DO NOT roll out the dough – pat out with your hands.
- DO NOT pat out thinner than 1″ (2.5cm) deep.
- DO NOT twist the cookie cutter – it impedes the sides of the scone & the rise.
- DO NOT touch the sides of the scones if possible.
- DO NOT let the egg-wash drip down the sides – impedes the rise.
- DO NOT be rough with the dough – light hands.
- DO NOT use cold butter straight from the fridge – there is no need.


You can read more about these scone tips on my Classic British Scones recipe, or watch the Scones video on my YouTube channel.
Recipe Yield
Using the same size cutter as me (about 5¾cm, 2¼”) and keeping the dough an even thickness of at least 1″ (2.5cm), the recipe should yield 10-11 scones.
Step-By-Step Instructions


1. Start by cubing your butter when measuring or weighing it out. I always recommend to cut roughly into 1cm, ⅓” size pieces for baking anything, as the smaller surface area softens the butter quicker. It also is easier to work into the dough/batter when in small pieces. In the case of scones, we want to let the butter soften enough so we can work it in. It does not need to be cold like butter for pastry.
2. Once the butter has softened enough that you can push your thumb on a cube, with some pressure & leave an indent, you are ready to start.
3. Add the flour & baking powder to a mixing bowl. For Plain (All Purpose) flour, add a total of 7.5 tsp (3.5 tbsp) baking powder (yes this amount is correct). And if using UK Self-raising flour, add just 2 level tsp of baking powder & whisk together.


4.Add in the softened cubed butter & toss to coat the butter in flour. Then move on to what is termed ‘cutting in’. This simply means working in the butter, until it is coated by the flour, and in small pieces, often described as “resembling breadcrumbs”. Note it does not need to be perfect and all the same size of pieces. Scones are very forgiving in that respect. Of all the scones I have made, roughly cutting in has always worked for me & doesn’t take long.
5. Hold the side of the bowl with one hand & use the other hand to use a Pastry Cutter/Pastry Blender (as seen in Photo 2). Push down on the butter & flour & perform a rotating left & right motion. Lift & repeat across the mixture, makign sure to make contact with the bottom of the bowl. Perdiodically there will be butte rpieces stuck in the pastry blender, that you should remove. Takes me just a minute or so to work in the butter.


6. Alternatively you can use 2 butter knives or even your hands to do the cutting in. In the video you can see how I use the pastry cutter & my hands. Lift some of the flour & butter in your hands & rub your thumbs across your fingers. Repeating this rubbing with your fingertips will start to break down the butter pieces & the lifting motion will also incorporate air into the mixture.
7. Now add in the Caster/extra fine sugar & mix together. Make a well in the centre & place to the side.


8. Crack the 2 eggs into a jug and whisk to combine. Add enough milk to bring the egg mixture to the 300ml level (about 10 fl oz, 1.25 cups). Then give a good whisk to combine.
9. Remove 2 tbsps of this egg-wash into a small bowl and reserve for later.
10. Add half of the egg-wash to the well of flour mixture & use a spoon or spatula to work the liquid into the dry ingredients. Push down on the flour to get it to take on as much liquid as possible before adding anymore liquid. Any wet areas, just push them onto dry patches that might be hiding at the bottom of the bowl.


11. Only add drops of egg mixture from here on in and you can even use your hands to mix it in, ensuring no dry patches remain. You want the dough to come together and be just a little bit sticky. So, often you won’t need all the egg mixture. See Photo 5 and video for reference.
12. Add 1/3 of the roughly chopped cranberries to the dough & lightly work in by hand.
13. Form the dough into a rough disc shape and turn out onto a floured work area or baking/parchment paper.


14. Spread out the dough and add another 1/3 of the cranberries on top (placing evenly across the surface of the dough). Then add 10 drops of the Foodie Flavours Mango extract across the cranberries.
15. Fold the dough over, into the centre, then turn it over and open out the dough again. Repeat with the remaining cranberries & 10 more drops of mango extract. Fold the dough into the centre, then gently form into a disc (about 5”/13cm in diameter).
**Alternatively, you can chop the dried cranberries and then add just 10 drops of the mango extract and coat, before leaving at least 30 minutes for the flavour to be absorbed. Then add the remaining 10 drops of extract when adding the cranberries to the dough.


16. Lift the dough and dust some more flour underneath before placing the dough back down again. Pat out the dough by hand, (DO NOT use a rolling pin). Open out till the dough is an even thickness and at least 1″ (2.5cm) deep. Don’t go smaller, but you can go slightly deeper but not much.
17. Dip your cookie cutter (not the fluted edge), in some flour & cut out the scones. Push down on the cutter – DO NOT TWIST THE CUTTER. This impedes the rise. You should be able to get at least 6 from dough patted out to 1″ deep. Any scones that don’t lift up with the cutter, just leave to the end.


18. Shake the scone onto the paper-lined baking tray, or for small air-fryers, on top of a small piece of baking/parchment paper. Ensure just big enough to go under 3 – 4 scones as excess paper can be a fire risk in air fryers. A small silicone oven-safe mat would work too. Try not to touch the sides of the scone if possible.
19. Gently pull back the excess dough, and free any scones that didn’t lift up with the cutter. Then use a palette knife to gently transfer the scone to the baking tray.
20. Brush the reserved egg-wash on top of the scones, making sure not to let any liquid drip down the sides (as it hampers the rise). TOP TIP – tap off excess liquid from your brush, then gently start brushing on the liquid, from the centre of the top of the scone. Then work your way outwards to reduce the chances of drips. (See the video for this).


21. If using a small air fryer, you will probably get the first lot of scones baking before you roll up the scraps of dough. If using a regular oven, egg-wash once you have cut out all the scones. Very gently bring the dough together into a disc (does not need to be perfect or smooth, and remember too much handling & kneading impairs the rise). That said, the scones from the scraps of dough, never turn out as perfect as the first ones.
22. Pat the dough out to no more than 1″ (2.5cm) this time. And proceed to cut out more scones, bringing together the dough until all used up. Ensure all scones have carefully brushed on egg-wash before baking.


Baking The Scones – Air Fryer
1. For baking the scones in a small basket-style air fryer, you will bake in batches (unless you halve the recipe). Place baking/parchment paper on the rack of your air fryer basket – only enough paper to go under the number of scones you are baking, with no excess paper around the edges. Paper that is not held down is a fire hazard in an air fryer. In my 3.5 litre/3.7 quarts air fryer (basket no wider than, 6″ (15cm) inside), I can bake 4 scones at once.
2. This first lot of scones can be baking while you cut out more scones.
3. Preheat your air-fryer if your own machine requires this. Otherwise, set to 200°c/400°f and cook for 8 – 10 minutes until the scones are well risen & golden on top. (**Air fryer photo collage 10 here of classic scones).
4. Carefully turn the scones over and brush any remaining egg-washing (egg-mixture), onto the bottom of the scones & bake for 3 – 4 minutes till golden. Small basket air fryers usually require this final step.


5. Transfer the baked scones to a cooling rack & leave to cool while you bake the next lot of scones.
6. For larger air fryers, bake as you would normally with your machine, using a lined baking tray/baking sheet ensuring no paper touches the top of the inside.
Baking In The Oven
1. When using a regular oven, pre-heat to 220°c/200°c Fan Oven/425°f/Gas Mark 6, switching the oven on before you begin forming the dough. ***You can turn your oven on once the scones have been cut & have no adverse effects.


2. Bake all the scones on one large baking tray (cookie sheet), with a little space in-between. Ensuring you have carefully egg-washed the tops of the scones (taking care not to let it drip down the sides – see photo 10 above or video for reference.).
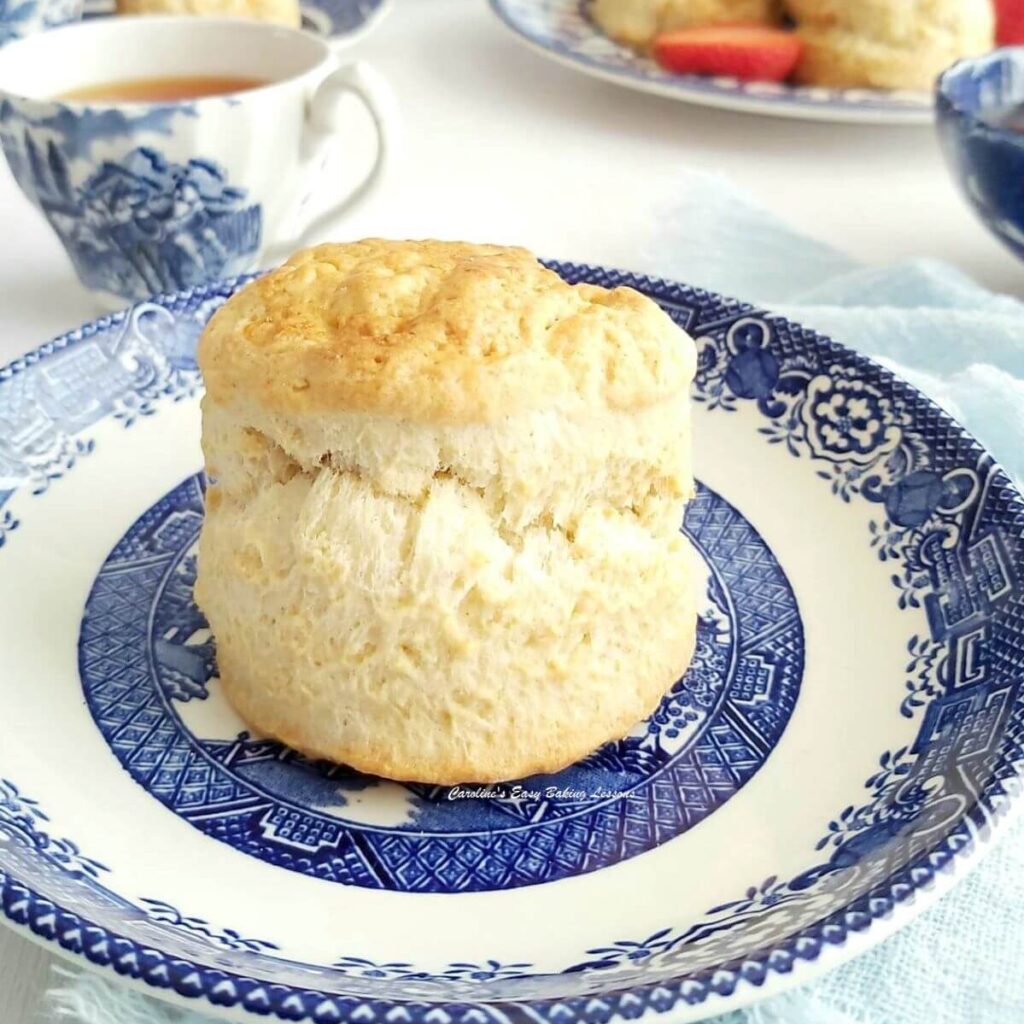
3. Pop the scones in the centre of the oven to bake for about 12 minutes. The scones should have risen well and be a deep golden shade (unless you used a different kind of milk). British scones should not be pale, so continue baking a few more minutes if paler than shown in Photo 12.
4. Once baked, leave on the tray, on top of a cooling rack for 5 minutes before transferring to the rack alone & allowing to cool down more.
5. Serve the scones a little warm or room temperature by cutting in half. Enjoy with your favourite filling – such as cream (clotted or whipped), jam, butter, some berries or try lemon curd as shown here. And of course eat alongside a nice hot cup of tea!
6. Scones are best stored in a metal cake or cookie tin on some paper, and they will be fine for at least 4 days. If you store in the fridge, this can cause condensation so is not advised.


7. Scones freeze well too. Wrap each one in baking/parchment paper, then cling film (plastic wrap) and place inside a labelled food bag or air tight container (multiple layers of protection prevent freezer burn & ensure the scones can last for up to 3 months1).
Take out when you want one, leaving out on the counter/worktop for a little while until defrosted. Once ready to eat, cut in half and place in the microwave for no more than 15 seconds and they will be like just baked again.
DIFFICULTY LEVEL: easy, beginner
Other Scone Recipes
Like the scone recipe and tutorial? Then try my other scone recipes. Regular oven and air fryer version of classic British scones, double chocolate orange scones & savoury cheese scones. New for 2025, lemon blueberry air fryer scones.


Recipe Card
Air Fryer British Cranberry Mango Scones

Equipment
- Scales or measuring cups
- Measuring Spoons
- Mixing spoon
- Jug
- Large mixing bowl
- Pastry Cutter/Pastry Blender (optional – or 2 butter knives, or use fingers)
- Whisk or fork
- Baking/parchment paper (make sure good for hot temperatures)
- Round Cookie Cutter (5½-6cm or 1⅙-2⅓″, mine is 5¾cm or 2¼")
- Small bowl/dish (for egg-wash)
- Pastry brush or clean artist brush
- Air Fryer (or regular oven)
- Cooling rack
Ingredients
Dry Ingredients
- 450 grams Plain Flour (15¾ oz , 3⅔ cups Plain/All Purpose PLUS
- 7½ tsp Baking Powder ( level tsp, Yes, correct amount – only use 2 tsp for UK Self-raising flour*)
Wet Ingredients
- 50 grams Caster Sugar (1¾ oz, level ¼ cup Extra/Super Fine Sugar*)
- 75 grams Butter (unsalted, cubed & a little softened, 2½ oz or level 2/3 stick or ⅓ cup)
- 2 Med-Large Eggs (US – Large or Extra Large)
- 240 ml Milk (1 cup, 8 fl oz – approx., or Buttermilk*)
- 80 grams Dried Cranberries (2¾ oz, ⅔ cup before chopping)
- 20 drops Foodie Flavours Mango Extract (or 2 – 2½ tsp other mango extract*)
* Denotes -see notes
Instructions
Prepare Air Fryer
- Cut the 75 grams Butter to about 1cm (⅓") size when weighing or measuring it, as smaller surface area softens quicker. We DO NOT USE COLD BUTTER, but not too soft either.
- If using a small basket-air fryer, plan out how many scones you can bake at one time with the cookie cutter. (Normally about 4 or 5).
- For the air fryer, cut a small piece of baking/parchment paper just big enough to hold the scones, with no excess that can cause a fire in an air fryer. **Make sure you are using paper that is safe for high temperature – do not use grease-proof.
Prepare The Dough
- Mix the 450 grams Plain Flour with 7½ tsp Baking Powder. (If using UK self-raising flour, only add 2 tsp baking powder). Then mix in the softened 75 grams Butter (unsalted) & toss to coat. 'Cut the butter' into the flour with a pastry cutter (pastry blender) until like rough large breadcrumbs. Should only take about 1 minute to do, or you can use 2 butter knives or your hands. Lift the mixture between your fingers, and run your thumb across the fingertips. Regularly lift more mixture up and work across the bowl. See video for reference. DO NOT USE A FOOD PROCESSOR.
- Add in the 50 grams Caster Sugar (extra/super fine sugar & should not be omitted) & mix till combined. Leave to the side and crack 2 Med-Large Eggs into a jug, before adding in enough of 240 ml Milk to take it to the 300ml (10 fl oz, 1¼ cup level). Give a good whisk to combine. Reserve 2 tsbp in a small dish for egg-washing later.
- Make a well in the centre of the flour mixture & add half of the egg/milk mixture. Mix in before using a spoon or spatula to push down on the mixture, making the flour take on as much liquid as possible, before adding anymore liquid. Add only little drops from here on, till a dough starts to come together and is only a little bit sticky. You can use your hands to bring it together & feel the texture, before forming into a disc. **Note you might not need all the egg/milk mixture or need a tiny bit more.
- Flour a work area (or use the bottom of the bowl if large enough), and open out the dough with your knuckles or palms. Add ⅓ – ½ of the chopped 80 grams Dried Cranberries on top of the surface of the dough, followed by 10 drops of the Foodie Flavours Mango Extract. Fold over the ends of the dough, into the centre, then turn the dough over and open out again by hand. Sprinkle the rest of the cranberries on top, as well as 10 more drops of the extract & repeat the folding over motion. This should incorporate the cranberries evenly.
- Flour a work area or baking/parchment paper. Form the dough into a disc & open out to at least 1" (2½ cm) thick by using your palms (DO NOT USE A ROLLING PIN).
- Dip the cookie cutter (straight edge side), into some flour before cutting out the scones. Try for as many as you can get form this first round. 5-6 scones is normal. Any scones that lift up, shake onto a prepared, paper-lined baking tray (baking sheet) if using a regular oven or larger air fryer. Or onto the prepared basket air fryer rack. TRY NOT TO TOUCH THE SIDES OF THE SCONES. Any scones that don't lift up can be released at the end by pulling away the excess dough & transferring with a spatula.
- Once you have your scones on the air fryer rack (on top of small piece of paper), very carefully brush the reserved egg-wash on top of the scones, making sure not to let it drip down the sides. **TOP TIP – tap your brush of excess liquid, then brush from the centre of the top of the scone, working your way out, to reduce chances of drips.
Bake The Scones
- Preheat your air fryer if your machine requires it, to 200°c/400°f before baking the scones for 8 – 10 minutes. The scones should be well risen and golden. Then carefully turn the scones over, brush on any left-over egg-wash & continue baking for another 4 minutes, until the bottoms are golden. This extra step is usually required for a small basket-style air fryer.
- If using a large open-front air fryer or regular oven, bake all the scones at one time, in a pre-heated oven to: 220°c/200°c Fan Oven/425°f/Gas Mark 6.
- For the air fryer scones, while the first batch are baking, gently bring together the excess dough as best as possible with as little handling as you can. These will not bake off as perfec tas the first batch but will still taste great. Pat out as before & cut out as many scones as you can (normally about 11 scones). Make sure the correct thickness each time.
- When the first scones are baked, transfer to a cooling rack & continue baking the next batch.
Serving, Storing & Freezing
- Serve the scones warm or at room temperature, cut in half. Top each piece with butter, whipped or clotted cream, jam or curd. Try some homemade butter, blueberry orange curd, or the lemon curd I used in the photos.


- Store left-over scones (or bake ahead of time), in a metal cake or cookie tin & they can last about 1 week.
- Scones freeze really well. Wrap each scone in paper, then cling film/plastic wrap or foil, followed by a labelled food bag or airtight container. These scones are fine for up to 3 months1. Defrost scones at room temperature or in the fridge overnight. When defrosted, cut in half and microwave for no more than 15 seconds and they will taste like just baked.

Video
Notes

 Butter – unsalted butter is always recommended in sweet or savoury baking, for best & consistent results.
Milk – the recipe was developed using cow’s milk. But I know readers have successfully used lactose-free & goat’s milk. (The scones just might not be as a deep golden colour). Buttermilk works great too. Read my Homemade Buttermilk & Butter recipe.
Eggs – UK medium to large sized used, which is about large to extra large in US sizing.
Butter – unsalted butter is always recommended in sweet or savoury baking, for best & consistent results.
Milk – the recipe was developed using cow’s milk. But I know readers have successfully used lactose-free & goat’s milk. (The scones just might not be as a deep golden colour). Buttermilk works great too. Read my Homemade Buttermilk & Butter recipe.
Eggs – UK medium to large sized used, which is about large to extra large in US sizing.
 Mango Extract – believe me when I say this mango extract by Foodie Flavours is amazing. Try the pineapple one in my Tropical Banana Bread, or Pineapple Coconut Cake Truffles. read more about them before this recipe card or check out their flavours on the Foodie Flavours website.
Cookie Cutter – straight edged cookie cutter advised, and with a diameter of 5 to 6cm or 2 to 2⅓″. My cutter is 5¾cm or 2¼”.
Air Fryer – my small basket-style air fryer can make 4 scones at a time. Read more before the step-by-step instructions. Alternatively you can use a regular oven, with all the temperatures provided in the recipe. **Read my Cello double air fryer review.
Mango Extract – believe me when I say this mango extract by Foodie Flavours is amazing. Try the pineapple one in my Tropical Banana Bread, or Pineapple Coconut Cake Truffles. read more about them before this recipe card or check out their flavours on the Foodie Flavours website.
Cookie Cutter – straight edged cookie cutter advised, and with a diameter of 5 to 6cm or 2 to 2⅓″. My cutter is 5¾cm or 2¼”.
Air Fryer – my small basket-style air fryer can make 4 scones at a time. Read more before the step-by-step instructions. Alternatively you can use a regular oven, with all the temperatures provided in the recipe. **Read my Cello double air fryer review.

 **Total Time to make – based on making 3 batches of 4 scones, for 12 minutes each in a basket-style air fryer. If your air fryer is larger, and can bake more than 4 scones at one time, (or use a regular oven), total time would be reduced.
New for 2026, Gluten-free AIr Fryer Scones.
Browse Recipe Index
Try my beginner’s recipe – Tear-&-Share Cheese Scones for an easier recipe.
**Total Time to make – based on making 3 batches of 4 scones, for 12 minutes each in a basket-style air fryer. If your air fryer is larger, and can bake more than 4 scones at one time, (or use a regular oven), total time would be reduced.
New for 2026, Gluten-free AIr Fryer Scones.
Browse Recipe Index
Try my beginner’s recipe – Tear-&-Share Cheese Scones for an easier recipe.

 Reference – 1 Freezing information from website Freeze It.co.uk @ https://freezeit.co.uk/can-you-freeze-scones/
***I am not a qualified nutritionist, & all nutritional values are based on a serving of 1 mango cranberry scone (from a batch of 12 as per recipe above), with no fillings/toppings. Bigger or smaller scones & the nutritional values will change. All values from MyFitnessPal.com
Try some other classic British baking – just click on the photo below to jump to the recipe.


Subscribe For More Recipes
Want more great recipes, tips, baking information and newsletters? Then please consider subscribing by adding your email address below. Be sure to check for a confirmation email & respond back, so you can follow me & receive your free emails. Your personal information will not be shared with a third party.
Join My Facebook Group
Why not also join my – Facebook group Easy Online Baking Lessons, dedicated to this baking lessons website, as well as providing one-on-one support with myself & my team? Be sure to answer all security questions when requesting to join.
Follow me on social media:
Happy Learning & Baking!
Caro x

Mango & Cranberry British Air fryer Scones
Search For Something You Fancy!
Caroline’s Easy Baking Lessons
Reference:
- Freezing information from website Freeze It.co.uk @ https://freezeit.co.uk/can-you-freeze-scones/ ↩︎


