Traditional British Scones In The Air Fryer

My popular British Scones can easily be made in an air fryer, provided you stick to my tips for a successful rise. No matter how small your air fryer, you too can make these scones. With added bonuses of the fryer using less power, saving money & not making the kitchen hot so you can still make your home baked treats in the warmer months.
Air Fryer Traditional British Scones
Baking On A Budget Series


• Save Energy & Money Using An Air Fryer
• Make Smaller Batches
• No Hot Kitchen, So Still Bake In Summer

**Selecect to jump to section**


Why Make These Air Fryer British Scones?
The air fryer will not only save you energy and therefore money, you can make smaller batches (and potentially eat less). But best of all, for those of you who are lucky enough for it to be nice and warm weather in the summer months, the air fryer won’t make the kitchen hot and hence won’t make you any hotter either. So no reason for you not to keep baking.
But why make scones using my recipe you ask?
Well I am Scottish and I not only use a traditional recipe, these scones are how we make them here in the UK.


No special baking equipment is needed either to make scones. You don’t need a hand/stand-mixer, food processor, or even a rolling pin. You use a manual whisk, for the egg/milk mixture, but could easily be done with a fork instead. You can use a pastry cutter (also known as a pastry blender), if your hands get sore easily. But your hands are your best tool for making great scones.
Another reason to use my recipe, is that I have also worked extensively with other home bakers, to analyse problems that they have. The most common being scones that don’t rise, or not as expected. So my scone recipe is very different by emphasizing what things you should NOT DO and that is the key to the rise in these scones.
And finally, all my recipes are lessons with thorough tutorials, with step-by-step process shots and instructions, to help you succeed in your baking journey.


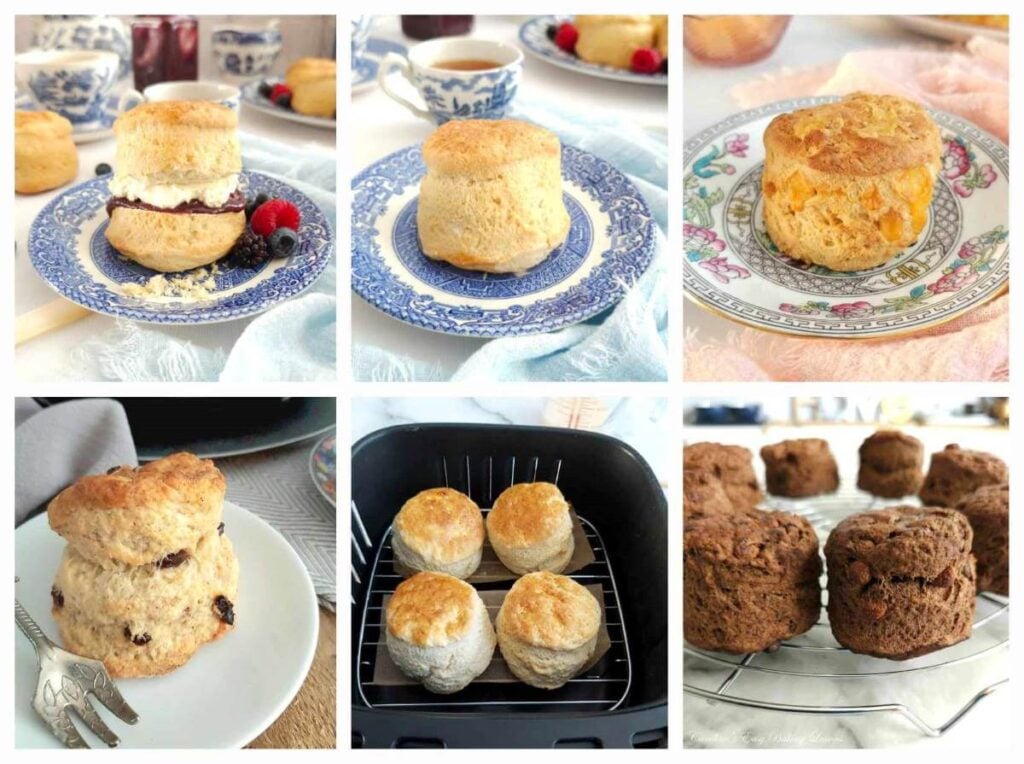
There is also a video tutorial from 2020, that I filmed for when I held a scones bake-along in the Great British Bake Off Fans Facebook Group that I admin. The almost real-time video was to show the gentle handling of the dough as well as the things not to do and was sent out along with the recipe during the bake-along weekend, that involved members from all over the world, baking these scones at the same time. Well over 1000 scones were baked that weekend and with great success, especially for some who had been struggling for many years to achieve a great rise. (Pictured are just some of the bakers’ scones from the bake-along).
Other Air Fryer Scone Recipes
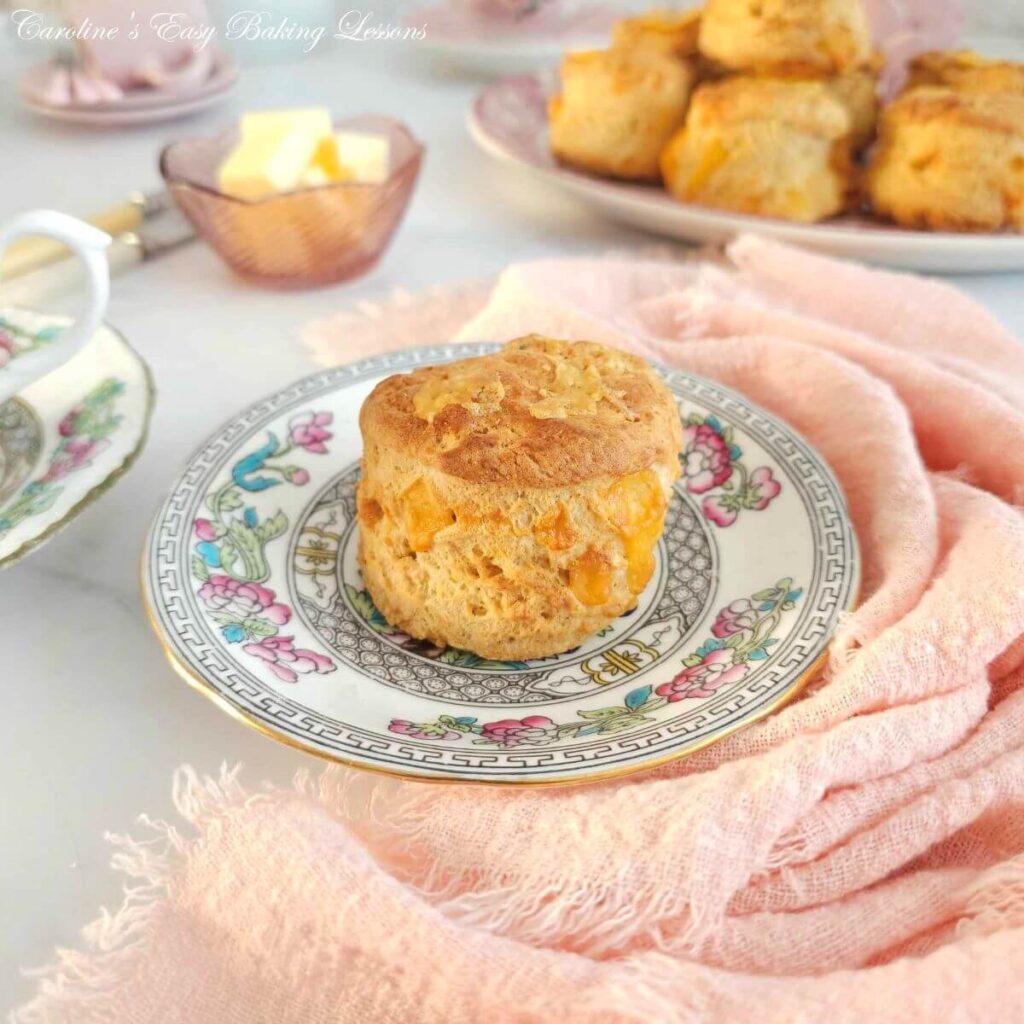
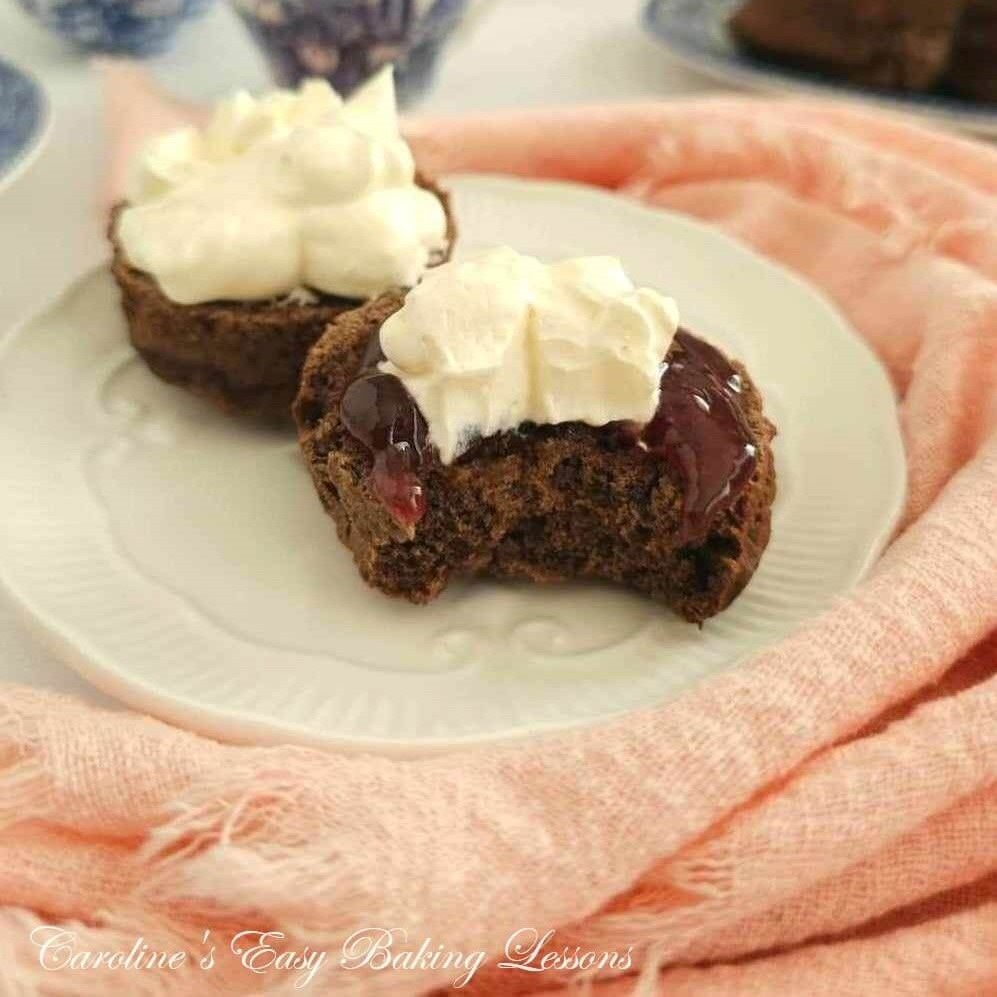
Try my new air fryer scones recipe – Air Fryer Double Chocolate Orange British Scones or Air Fryer Cheese Scones!


Detailed Scones Lesson & Video Tutorial
To not duplicate too much of the same content on my own site, and not to make the recipe any longer than needed, I am going to refer you to my original British Scones recipe, for more detailed information of the important tips for scones. So you can check that out if you want more details. Otherwise you can jump to the recipe below. (Note the recipe will also have important tips within it.)


Notes On Ingredients
Again, you can read more about the ingredients and why they are needed in the original recipe, but here is a brief outline of the ingredients & substitutes.
SUGAR – British scones are always made with caster sugar and the US/Canadian nearest alternative is Extra/Super Fine Sugar, or Bakers’ Sugar. So no need to pay more online for caster sugar. Alternatively, you can make your own caster sugar and less expensively, by grinding granulated sugar. Grind or process the granulated sugar, but lightly. Do not go as fine as a powder (like icing/powdered sugar), keep it as small granules. refer to the comparison photo below, as US granulated sugar, is slightly smaller a granule size than the UK equivalent.
**The use of fine sugar, is crucial in these scones, so should not be omitted.


FLOUR
UK scones use Self-raising flour. But you can also make them using Plain/All purpose flour by adding baking powder. With testing by myself and other bakers in the states, I have adjusted the ratio of baking powder to flour, and do not use what you will find if you search on Google. Too much baking powder causes a metallic taste and sometimes scones to rise and fall. I have included in the ingredient list, how much baking powder to add, but please also note that if not using self-raising flour, you must add the 2 amounts of baking powder. Otherwise your scones will not rise properly.
Gluten Free Flour & Alternative Milks
During the Facebook group bake-along, All Purpose flour, Gluten-free Flour, Coconut Milk & even Goats Butter was used by some members, for health reasons. And I am pleased to say, all of them had success with their scones. The only difference that was noted, was that sometimes the scones can be not quite as golden on top, if cow’s milk was not used in the egg-wash. Otherwise, they were all the same.


Recipe Yield
To learn more about equivalent ingredients between UK & American baking, read my Differences Between UK & British Baking Ingredients article. Or check out my Ingredient Measurement Conversions Table.
Adding Extra Ingredients
I would advise on making these scones for the first time, with no additional ingredients like raisins or chocolate chips for example, as if you add too much in terms of weight, this heaviness can make the scones not rise as well as the plain version.
You can also refer to my Cheese Scones or Cranberry Spiced Scones, for the maximum weight to add.


SIGN UP FOR MY NEWSLETTER


My Small Air Fryer
You do not need the most expensive, biggest or latest air fryer to still make these scones. I was not keen on having an air fryer as there is 4 of us, and even the bigger or double basket air fryers, are not good for a full dinner. I also don’t have space in my tiny kitchen for one. However, my youngest son had asked for one for making things for himself instead of turning on the oven. Mrs D had also tried my Cheese Scones in her air fryer, with success, so I got thinking about getting one and trying my recipes in it.
Obviously with more people using air fryers now with the energy and cost of living crisis, it seemed a sensible idea to work on air fryer recipes. And the final thing that made me get an air fryer, was with it not heating up the kitchen like an oven can, then it is ideal to be able to still bake in the warmer months.


We were picking a different model, but when my husband saw this Mi Smart Air Fryer in B&M for £70 I think it was, he thought it ideal for my son as he can turn it on and off when connected to his phone.
It is still one of the smaller sized air fryers with 3.5 litre capacity (that would equate to about 3.7 quarts) and so the basket is not very wide. I can get a 6″ round tin in nicely with enough space for air to flow around it. It does come with the 2 racks (as you can see in the photo collage), so you can cook on 2 levels.
I am now an absolute air fryer convert! I used for quick dinners for my son, but I also even slow cooked a beef joint in it and when the meat was resting, I finished off some roast potatoes, (that I had part cooked in the microwave when the meat was cooking). So it is possible to feed 3 or 4 adults with it, if you are smart with your timings. Great for re-heating things, like rolls for example.
As for my bakes, I has successfully converted 4 or 5 of my recipes and this is the first one I am sharing with you. So look out for more air fryer bakes in the coming summer months.
Full disclosure, I have not been sponsored or gifted this air fryer. I bought myself and have been very pleased with it so far.


Recipe Card
Air Fryer British Scones – That Rise To The Occasion!

Equipment
- Scales or measuring cups
- Measuring Spoons
- Mixing spoon
- Jug
- Large mixing bowl
- Pastry cutter/blender or 2 butter knives
- Whisk or fork
- Spare flour
- Baking/parchment paper
- Cookie Cutter (5-6cm or 2-2⅓″, mine is 5¾cm or 2¼")
- Small bowl/dish
- Pastry brush or clean artist brush
- Cooling rack
- Air Fryer (Any size as mine is small, for regular oven recipe see link below)
Ingredients
- 75 grams Butter, unsalted, cubed & at softened (2½ oz or level 2/3 stick or ⅓ cup)
- 450 grams Self-raising Flour (OR 15 ¾oz , 3⅔ cups All Purpose/Plain Flour PLUS 5½ (level) tsp Baking powder ) * See notes.
- 2 tsp Baking Powder (rounded tsp) (In addition to that above if using Plain/A.P. flour – see notes*)
- 50 grams Caster Sugar (1¾ oz or 1 level ¼ cup** – see note above)
- 2 Med-Large Eggs (US – Large or Extra Large)
- 225 ml Milk approx. (up to 7½ fl oz or 1 cup) – will depend on size of eggs used.
Instructions
Prepare The Dough
- Cube the butter before weighing or measuring, and it will come to room temperature quicker. (I like to cut about 1cm or ⅓" size). If short on time, try this hack I reviewed for softening butter in about 12 minutes.
- Before making the scone dough, have your air fryer ready. Use your cookie cutter and see how many scones you could place on your air fryer's own rack. My air fryer is quite small, but I managed 4 easily, with some space in-between (see Photo 1 below).
- I also used the taller rack, as it will allow the air to circulate up and around the scones easier. Just make sure that there is plenty of room above the rack, as these scones will rise high if made properly (over 2"/5cm). And since I used the rack, I needed to add some baking/parchment paper. And to allow as much air to flow, I cut 2 small rectangles of paper, to hold 2 scones on each. (See Photo 1 below). Use your cookie cutter to make sure these pieces of paper are big enough for your scones, but not too much to block the heat of the air fryer. Leave the paper on the rack for once you cut the scones, and also some more paper, to place the rest of the batch on.


- Add the flour and baking powder to a medium-sized mixing bowl, mix briefly and then add in the softened cubed butter, before mixing again. (See Photo 2 below).

- 'Cut the butter' into the flour using a pastry cutter/pastry blender, two butter knives, or your fingertips, until the butter pieces are smaller and coated in flour, and about large breadcrumb consistency. (For more more details on these methods, see my original British Scones recipe, or watch the video below). Note it does not need to all be the same size pieces or take too long to do. (See Photo 3 below). Toss in the sugar and mix through.

- Next add the eggs to a small measuring jug, beat well before topping up the eggs with milk, to 300ml/10 fl oz or 1 ¼ cup level. (Since egg sizes vary, you might not need as much milk as stated in the ingredients list). Whisk to combine, before removing 2 tbsps and placing into a small dish to use as an egg-wash. (See Photo 4 below).

- Add about half of the egg-milk mixture to the dry ingredients, mix together before gradually adding more of the liquid, until a soft but slightly sticky dough is formed. I like to use a large spoon to begin to mix in, and move on to using my hands near the end. (See Photo 5 below). DO NOT USE A FOOD PROCESSOR OR MIXER. Only add enough of the liquid until just a little sticky.

- Flour some baking/parchment paper to work on (you can re-use it, or use a clean worktop/counter or pastry board). Add a little flour to a small bowl that you will be able to dip your cookie cutter in.
- Bring the dough together by hand (with floured hands), form into a ball and then flatten into a disc on your floured work area. Use your hands only NOT A ROLLING PIN, to flatten the dough more, to a thickness of at least 1"/2½cm high. This is very important, as too shallow and you run the rise of the scones not rising enough. See Photo 6 below).

- Use your flour dusted cookie cutter (make sure not to use too big a cutter), to cut out the scones. DO NOT TWIST THE COOKIE CUTTER! This is very important for a good rise to scones. If the scone does not lift off once cut, don't worry. Just leave to end. Otherwise, let the scone fall onto your prepared baking/parchment paper strips, and proceed to cut the next scone. Once you have cut as many as you can get (normally about 4), any scones that have not lifted, simply pull the excess dough away, and then use a palette knife to very carefully lift up the scone and transfer to the paper, without touching the sides. See Photo 7 below).
- Gently bring the scraps of excess scone dough together as best you can, flatten as before and cut out more scones. Note that with scones, these last few scones, won’t be as perfect as the first ones, just because of more handling, but will still taste great. And remember to not make to shallow.
- Lastly, brush the egg/milk mixture you reserved, and very gently and carefully, brush onto the tops of the scones. Start from the centre and go slowly, and try not to let any liquid drip down this sides, as this can impair the rise. Shaking/taping the brush first is a good idea. Watch my video below for more on this. (See Photo 7 below)


Bake The Scones
- Bake your first lot of scones in the air fryer, (I did 4), at a temperature of 200°c/400°f for about 8-12 minutes until well risen and golden in colour. (See Photo 8 below). You can check the scones part-way through if your air fryer beeps for you to do so. Once completely baked on top and sides, gently turn over and check the bottoms. Mine were baked but very white on the bottom, after 8 minutes, (see Photo 7 above). So I used some of the left-over egg-wash and continued baking for a further 2 to 4 minutes till coloured. Note some air fryers do not need you to turn over the bakes. (See Photo 8 below).

- Place the baked scones on a cooling rack, while you carefully transfer the next batch of prepared scones on to the paper on top of the air fryer rack, and baking as before. After doing the first batch, you will have a better idea how long your own air fryer takes to bake the scones, so adjust accordingly.

Serving, Storing & Freezing The Scones
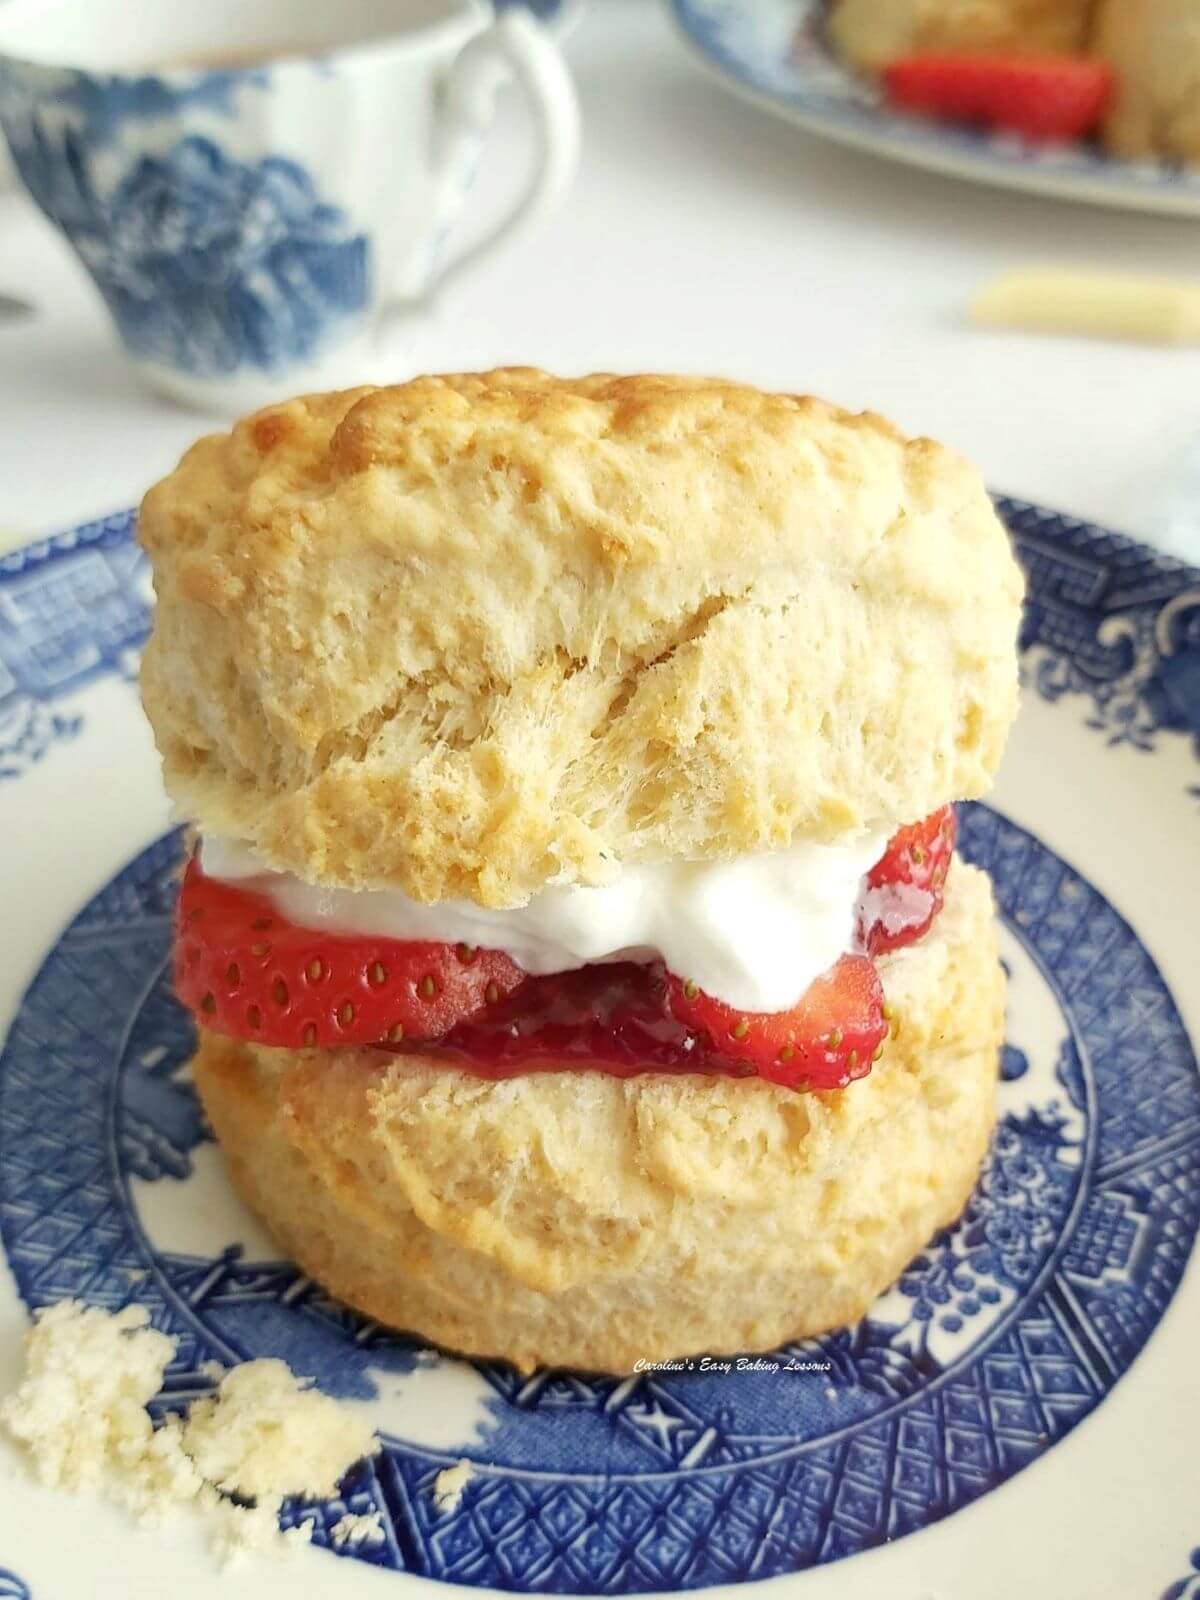
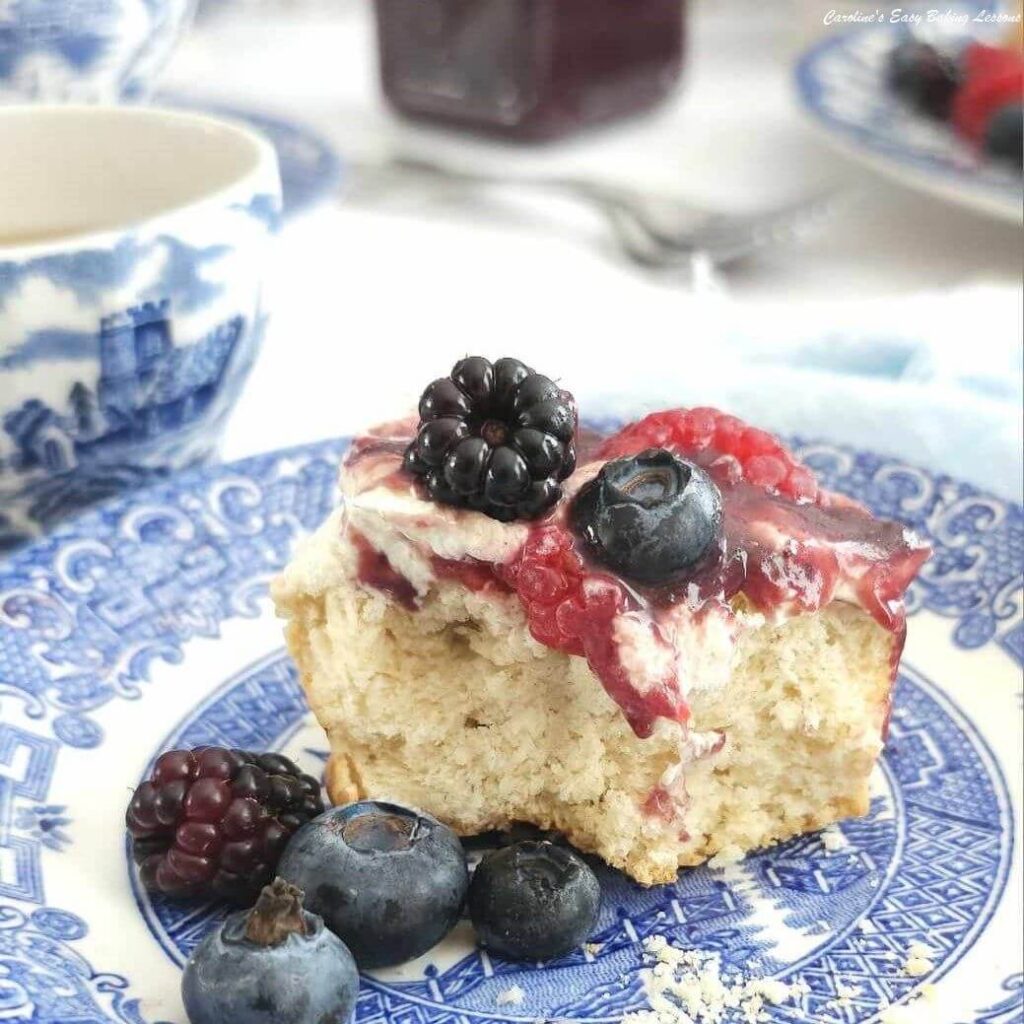
- By the time all your scones have been made, the first batch will be cooled enough to enjoy. Half the scone and add fillings such as jam, cream (clotted cream if you like it or can source it), blueberry orange curd, lemon curd, fig curd, butter etc. Although often sandwiched together, a scone with a good rise, will be very hard to eat that tall, so leave halved, and you can have a mixture of your favourite toppings.

- Store left-overs in an air-tight container, (I use a cake tin) and will last 3 – 4 days if kept cool.
- Scones can easily be frozen and enjoyed later. Wrap completely cooled scones in baking/parchment paper, some foil or cling film/plastic wrap on top and finally a labelled food bag. (These extra layers, that can be re-used, ensure no freezer burn or freezer taste). Frozen scones can last for 3 months, and should be defrosted at room temperature. If you want to enjoy them warm, simply cut in half and place on a plate in the microwave for only 20 seconds, on the air fryer whole for 1-2 minutes (be careful not to dry it out), or in a conventional oven if you have on already, for a few minutes till warm to touch.


Video
Notes


 Yield – using the recommended cutter and thickness, you should get about 10 – 12 scones from the recipe. If your air fryer can fit 5 scones, you could also half the recipe to make a half-batch and only have to bake one time.
Check out my Mango Cranberry Air Fryer Scones recipe, or my savoury version – Cheese British Scones. Kids can also try my super simple Tear-&-Share Cheese Scones, with no need to cut out the dough. **New for 2025, lemon blueberry air fryer scones.
New for 2026, Gluten-free AIr Fryer Scones.
Yield – using the recommended cutter and thickness, you should get about 10 – 12 scones from the recipe. If your air fryer can fit 5 scones, you could also half the recipe to make a half-batch and only have to bake one time.
Check out my Mango Cranberry Air Fryer Scones recipe, or my savoury version – Cheese British Scones. Kids can also try my super simple Tear-&-Share Cheese Scones, with no need to cut out the dough. **New for 2025, lemon blueberry air fryer scones.
New for 2026, Gluten-free AIr Fryer Scones.

 More information and tips before the main recipe.
**Total Time to make, based on baking 3 batches of 4 scones, for 12 minutes each. If your air fryer is larger, and can bake more than 4 scones at one time, total time would be reduced by about 12 minutes.
 Try the Air Fryer Double Chocolate Orange British Scones or new Air Fryer Cheese Scones.

***I am not a qualified nutritionist, and all nutritional values are based on a serving of 1 scone (from a batch of 12 as per recipe above), with no toppings. Bigger or smaller scones & the nutritional values will change. All values from Whisk.com.


DIFFICULTY LEVEL: easy, with guidance
Why not also join my Facebook group Easy Online Baking Lessons – Easy Online Baking Lessons, dedicated to this baking lessons website, as well as providing one-on-one support with myself & my team? Be sure to answer all security questions when requesting to join. Click to join the Facebook group.
Please see the sharing options or even printing, at the right/bottom of your screen (bottom of your screen for mobiles, and down the right-hand side on computers). You can even pin this to your own Pinterest page. Alternatively, you can save, print or share this recipe, via the Recipe Card. You could also leave some feedback if you like (at very bottom of the page).


Follow me on social media:
Thanks for reading
Happy Learning & Baking!
Caro xx


Search for something you fancy!
Leave Some Feedback/Rating Below Please
Caroline’s Easy Baking Lessons


I’ve tried to make scones so many times and they turn out like biscuits, Just made my second batch of scones, my husband’s favourite and they turned out perfectly, took slightly longer than the recipe but I did make them bigger this time.
Thank you for leaving feedback. So pleased you finally had success (my very first time, using a BBC Good Food recipe, they were like biscuits too). And yes if you cut the scones deeper, they will take a longer to bake. Caro xxx
A long post but worth the reading. These were delicious!
Glad you liked them. Long post with ALL you need to know for scones that rise and in the air fryer too!
Hi. is that correct ? 5 1/2 teaspoons of baking powder 🤔
Hi, yes indead 5.5 tsp. There is a lot of flour so this is required, 5.5 level teaspoons is my equivalent to 450g Self-raising flour . BUT you need to also add 2 more tsp in addition to the 5.5. So if you were using self-raising flour, you would only add the 2 tsp. Hope that makes sense.
Warning. My parchment paper started on fire. I would not recommend using the paper in the air fryer as it can happen in a flash.
However, the recipe is excellent and delicious!
I will use a pan instead of parchment from now on.
We are also air fryer lovers!
So sorry your paper caught on fire. Some paper is not good for high temperatures (greaseproof etc isn’t great for higher temperaturess – I use Bacaofil Baking Paper), and you must make sure no paper is able to move about with the air flow. Only small amount under the scones. If you can use something that will allow air to flow under the scones like a rack, rather than a pan, that would be best. Maybe even silicone cupcakes cases would work. Glad you liked the recipe.
Hi Caro
Many thanks for channelling your enthusiasm for baking into this wonderful website!
I am a retired widower. I am only 60, but I am young at heart!
I was a baker for 20 years in a small home bakery just outside Glasgow. I’ve had mental/physical health issues for a wee while, but I’m in a much better place now. I bought an Air Fryer 3 weeks ago, and it’s great for home baking and cooking/baking for one. Using your recipe, I’ve just finished today’s second batch of plain scones.
They are delicious! I am delighted that your recipes are available online.
For me, baking and cooking are therapeutic. We visualize and create something that is hopefully pleasing to see and tasty! I am experimental, so I tweak here and there with varying success! I can’t wait to delve further into your site, Caro, and hopefully contribute some of my baking/cooking experiments to help home-bakers/cooks visiting your site.
Thanks again, Caro.
Kind Regards
Gerry
Traditional plain scones dont have sugar in them. Enough sweet stuff is added with jam and cream
Only add sugar for rich fruit scones.
Ask Delia Smith
As I mentioned in the YouTube comment Christina, sugar is not for sweetness as only about 10% in proportion to the amount of flour for these 12 scones. Sugar plays an important role in baking. It is a natural preservative & has been used as such for many many generations. It also helps make the scones have a tender crumb and retains moisture, again preserving the bake. But most importantly for scones, sugar & eggs provide structure, or a framework if you like, that creates the classic rise of a British scone. Scones should never be flat but rise high, with that characteristic look on the sides and sugar supports this. And if you check out Mary Berry recipes you will see sugar features in her scone recipes. You can learn more about the science of baking in my article – https://www.easyonlinebakinglessons.com/science-of-baking-understanding-how-ingredients-work/
Thank you so much for this recipe! I tried this using a 6L air fryer and portioned the recipe to yield 6 scones instead of 12. The scones turned out perfectly —light, crusty on on the outside and soft on the inside, and delicious. First time to bake scones (and in an air fryer); I followed everything you wrote here to a T and it worked wonders. Thank you so much for sharing!
I am so pleased you used the recipe and had great success. With scones it is a case of being aware of things not to do. Did you take any photo by chance? Would love to see them.I have some more scone recipes you might like to try later too. Would it be ok to use your great feedback on the site/recipe page? And thanks for taking the time too, to give feedback, much appreciated.
Unfortunately all the scones were snapped up before a photo can be taken! But please feel free to use my feedback on the recipe page—I’m glad to spread the word! Thanks again so much, I’ll be sure to take a look at other recipes you have in here.
“..snapped up before a photo could be taken” – I will take that as a complement & you should too! Thanks so much!
I’ve just made these scones in my new air fryer and they’re AMAZING! I’ve struggled to find a recipe using my conventional oven. This recipe and my air fryer have produced the fluffiest, lightest scones with a wonderful flavour (I used salted butter, because that’s what I had). My husband has fallen in love with me all over again after I gave him one with cream and jam!! Thank you.
Aww thanks so much for the wonderful feedback and taking the time to rate and leave feedback Jill. Much appreciated. I am so pleased they turned out great. A LOT of work and research went into my scone recipes. Did you take a photo? And would I be able to use your feedback on the site please?
I wonder if I were to add vanilla plus currants how much I would add to this recipe? Looking forward to making this authentic recipe!
Once again thank you so much for sharing this. Your scone recipe is the best and the beauty of this tutorial is that it’s the same recipe but being able to make in my air fryer. I only wanted a few so this was idea and the bake was just the same as if baked in the oven. Brilliant
I have made your oven baked scones several times now and so I know these will be great too. Amazing what you can make in an air fryer!