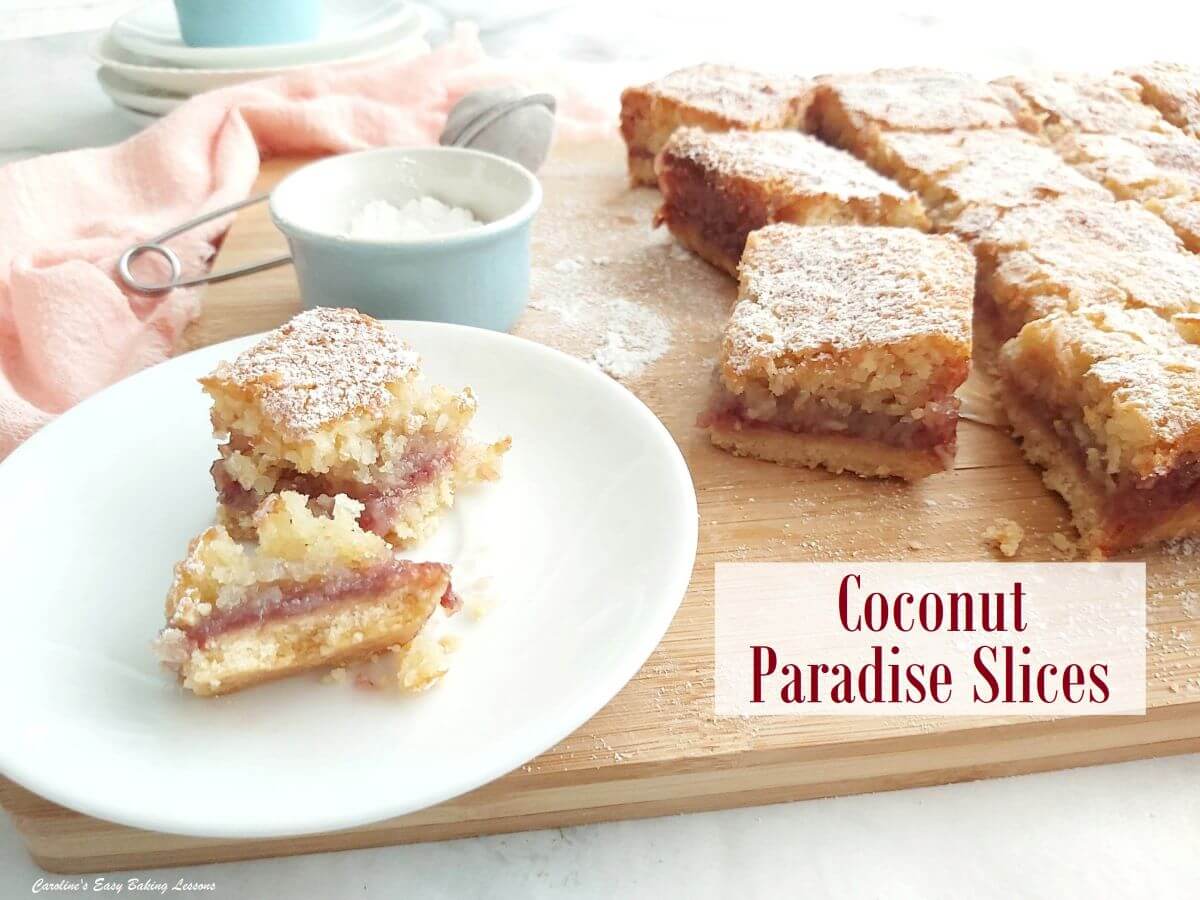
Coconut Paradise Slices

Coconut Paradise Slices combine a shortbread-style base, a coconut & ground almond topping, sandwiching a yummy raspberry jam filling. An easy classic British traybake recipe!
Coconut Paradise Slices


What Are Coconut Paradise Slices?
These Paradise Slices are a soft bake, with shortbread, raspberry jam and a delicate mixture of coconut & ground almonds.
Coconut Paradise slices also unsurprisingly contains coconut. The original classic British traybake, had this name, but variations exists with alternative fillings and additional ingredients such as glaze cherries, or raisins.
I am a big fan of raspberry jam, especially in my baking and combined with coconut, so no hard decision on what to use as a filling. (See my other Raspberry & Coconut recipes).


To add to the ‘tropical’ side of these slices or ‘squares/bars’, I also added some pineapple extract. I use and highly recommend Foodie Flavours Pineapple Extract. Concentrated and they have so many flavours. I added to the topping but you could also add to the base too if you like. (Note, 20 drops of Food Extracts is 1ml, and approximately equal to 1 to 2 tbsp generic ‘flavouring’.
The ingredients list is long, but the process is quite straight forward and easy enough to do. It is also one of my most visited recipes, and popular among fellow bakers in Facebook groups.
A Note On Ingredients


Caster Sugar
I was talking of ingredients, & there is caster sugar in the base and topping. If you are in the states or Canada, please don’t go to the bother of trying to source and paying through the nose to buy imports of this sugar. Super/extra fine sugar or baker’s sugar is a good equivalent.
Make Your Own Caster Sugar
You can also make your own caster sugar by grinding regular granulated sugar but only a little, as US granulated sugar crystals are actually a little smaller than our UK granulated sugar. Do not grind down into a powder or you will have icing/powdered sugar.
Sugar Comparison Photos


See my photo above, of a comparison of our UK sugars. You might also like to check out Differences Between UK & US Baking Ingredients, or my Conversion Of Common Baking Ingredients into Grams, Cups & Ounces article. All can easily be saved to your phone or computer, saved to your own Pinterest board, printed or shared.

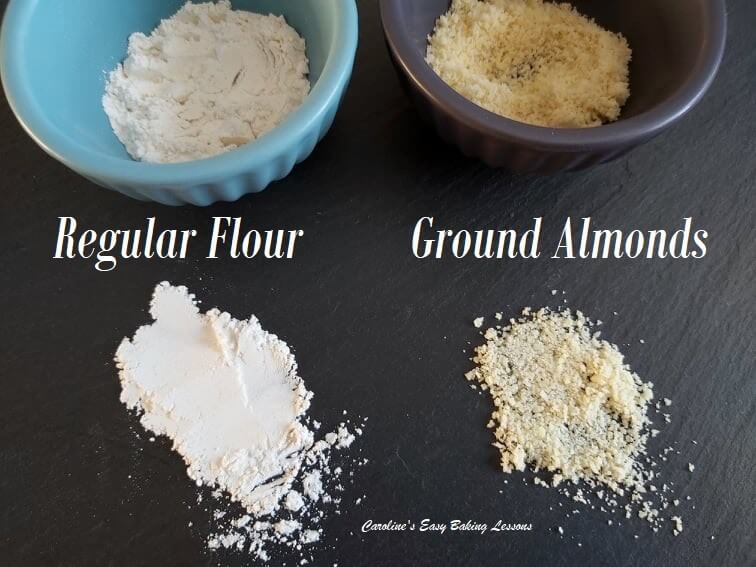
Ground Almonds
The same goes for the ground almonds. The closest alternative would be Fine Almond Meal. Grounds Almonds is not quite the same as almond flour. (See photo). The flour is much finer and hence produces a different texture in the final bake. But for this recipe you can use almond flour if you already have it.
Make Your Own Ground Almonds
YouTube videos show how to grind your own almonds (shell & all) and can be less expensive than the almond flour. You basically bash them in a food bag first, and then process or grind to the consistency shown in my photo.


Why You Need Ground Almonds
Please note too, that ground almonds provide structure, (as well as moisture form the oils), and so a substitution of regular flour or almond flour, will not provide that same structure. Doesn’t mean that you won’t have a nice bake, but rather not be quite the same as the recipe was developed to be.
Desiccated Coconut
US/Canadian unsweetened shredded coconut is the nearest alternative to UK Desiccated coconut. However, desiccated coconut is smaller and finer pieces. See comparison photo below. So depending on what you are making, you might want to lightly chop the shredded coconut. In this recipe it is inside the topping & since you are using the processor, I recommend lightly processing the shredded coconut before starting the recipe.


For more on UK & US/Canadian baking ingredients, see my Differences Between US & UK Baking Ingredients article.


Baking Dish To Use
The only other thing to talk about is the baking dish/baking pan size. This recipe can be made in a 23x23cm/ (9×9″) square dish. I wouldn’t recommend anything much bigger.
You can make in a rectangular tin too. Just make sure that the length added to the width of the tin doesn’t exceed 46cm (18″). In otherwords a 12×6″ (30.5 x 15.25 cm) and a 10×8″ (25.5 x 20.25cm), would work fine.
For a larger rectangular tin – such as 30x23cm (12×9″), or square 27x27cm (10.5 x 10.5″), increase the recipe ingredients by 16% (ie. multiple by 1.16).
Readers’ Photos


See photos baked by Rifaat, with blackcurrant jam & secondly by Diana! I think they both look amazing and I am so proud! Well done ladies!!
The PROCESS AT A GLANCE


*Alternatively go to the Recipe Card for process photos & detailed instructions.
Jump to Recipe1.Begin by making the shortbread-style base layer, by using a food processor, pastry blender/pastry cutter, 2 butter knives, of your fingertips, to ‘cut the butter in’, until the mixture resembles breadcrumbs.
2. Grease and line your baking tin (see photo where I used Frylight 1cal cooking spray), before adding the shortbread mixture, flattening down by hand and chilling for 1 hour.
3. Next bake the base layer, in a pre-heated oven at 160c/140c Fan Oven/ 325f/Gas Mark 3, for about 18 minutes until starting to colour.


4. Meanwhile prepare the topping by creaming the softened butter with the sugar, in the processor, or with a mixer, before adding in the eggs, one at a time.
5. Add the remaining dry ingredients and mix till combined. Once the base is out of the oven, increase the oven temperature to – 190°c/170°c Fan Oven/375° f/Gas Mark 5.
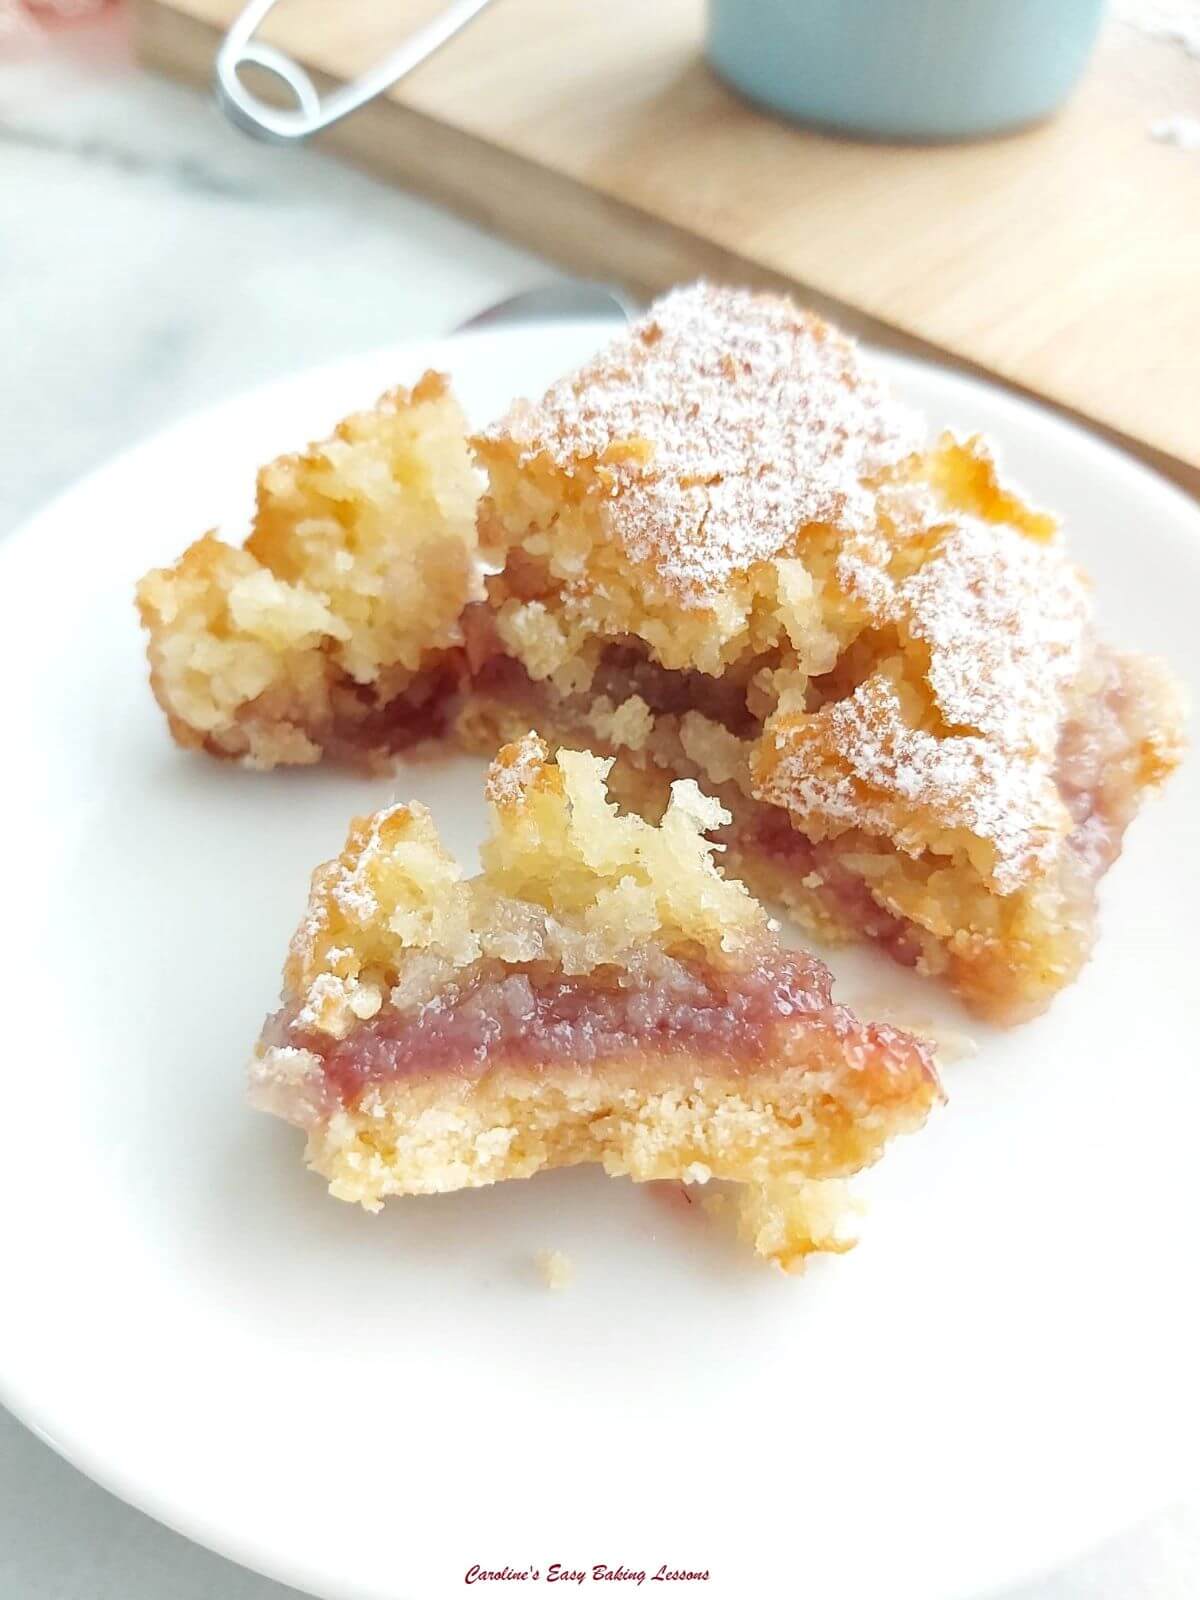
6. Spread the jam on the part-baked base layer, before spooning on the coconut/ground almonds topping, spreading and baking for 25 – 30 minutes. Since there is no flour, it will be different to a regular cake. It will still appear a bit wobbly when moved, but a cocktail stick will be clean of crumbs when ready. Don’t be afraid to let it colour.
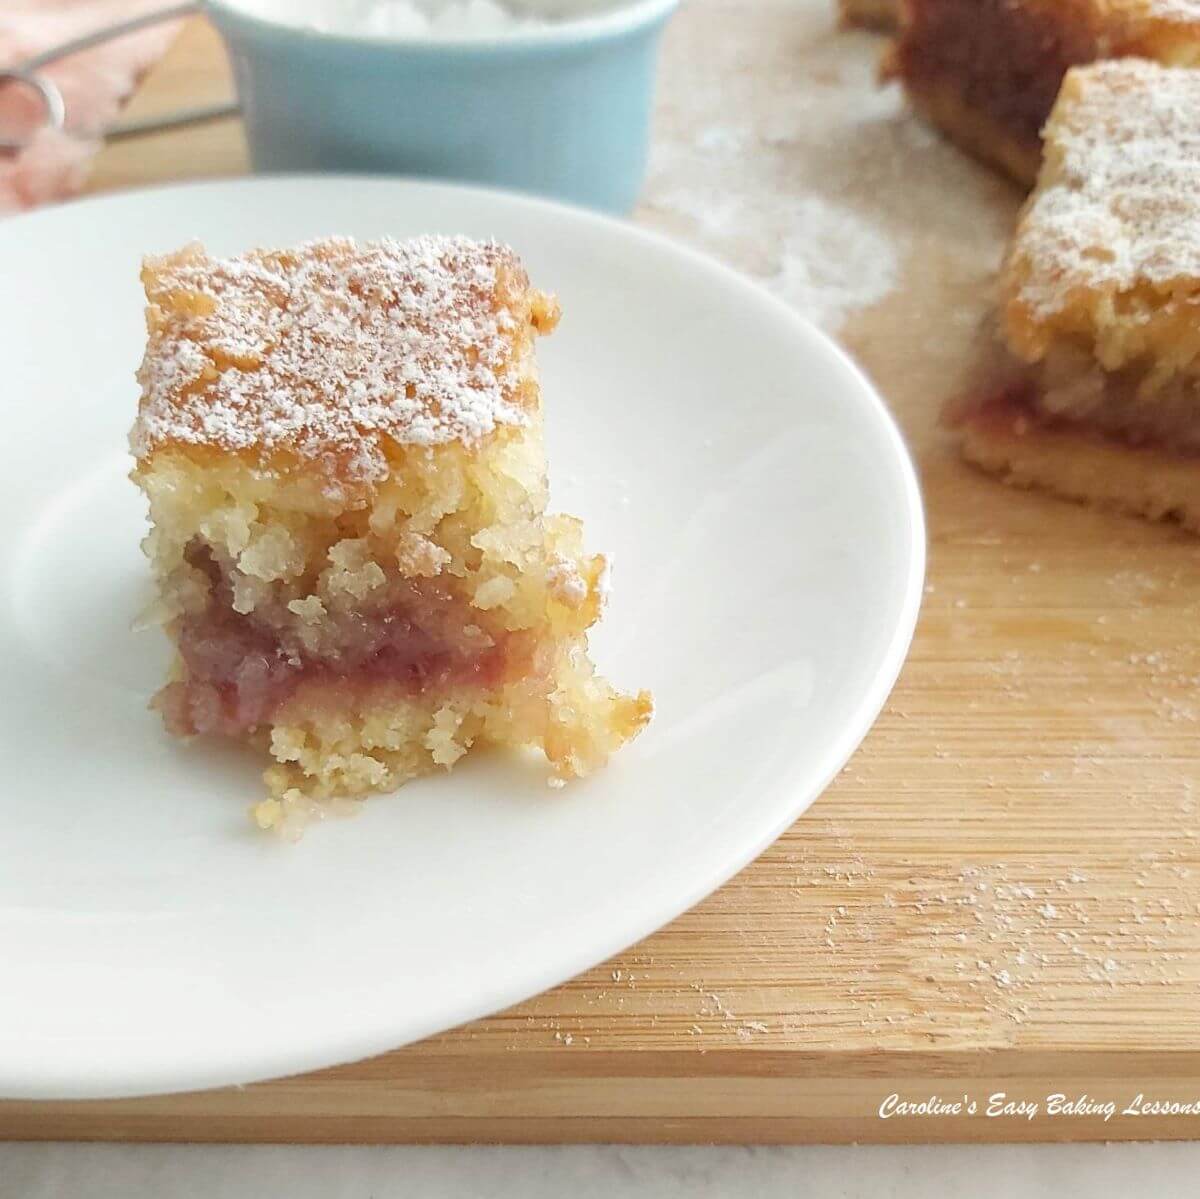
7. Leave to cool for at least 1 hour (see recipe card for cooling hacks), or more if possible. Cut very carefully into 16 squares. It is very delicate because of the ground almonds, so note it will crack, so don’t worry about that. Dust with plenty sieved icing/powdered sugar, (or caster or granulated), when ready to serve.
DIFFICULTY LEVEL: easy, beginner
Share The Love
Please see the sharing options or even printing, at the right/bottom of your screen (bottom of your screen for mobiles, and down the right-hand side on computers). You can even pin this to your own Pinterest page. Alternatively, you can share, print or save the Recipe Card below. You could also leave some feedback if you like (at very bottom of page).
Join My Facebook Group
Why not also join my Easy Online Baking Lessons Facebook group, dedicated to this baking lessons website, as well as providing one-on-one support with myself & my team? Be sure to answer all security questions when requesting to join.


Coconut Paradise Slices

Equipment
- Scales or measuring cups
- Measuring Spoons
- Food Processor (optional)
- Pastry Cutter (optional – alternative to Processor)
- Hand/stand mixer (optional – alternative to Processor)
- Baking tin/dish –23x23cm/ 9×9″ (see notes on alternative tins)
- Baking/parchment paper
- Cooking/Baking Spray for greasing (Frylight Cooking Spray recommended, alternative – butter & flour, Lining Paste/Cake Goop or Cake Release Spray)
- Fork
- Timer or Phone Timer
- Knife or baking palette knife
- Large spoon or spatula
- Cooling rack
Ingredients
For The Base:
- 151 grams Butter, unsalted (cubed & softened (⅔ cup, 5¼ oz)
- 64 grams Caster Sugar (⅓ cup, 2¼ oz Extra/Super Fine Sugar, *see notes)
- 130 grams Plain Flour (1 cup + 1 tsp, 4½ oz A.P. flour)
- 86 grams Ground Almonds (rounded ¾ cup, 3 oz Almond Meal, * see notes)
- Orange Zest (from 1 medium orange)
For The Filling:
- 250+ grams Raspberry Jam/Jelly/Preserve (At least ¾ cup, 9 oz depending on size of tin used)
For The Topping:
- 95 grams Butter, unsalted (cubed & softened, scant ½ cup, 3¼ oz)
- 130 grams Caster Sugar (⅔ cup, 4½ oz, *see notes)
- 3 Eggs (Medium sized, Large size USA)
- 130 grams Desiccated Coconut (1¼ cup, 4½ oz unsweetened shredded coconut, see notes first)
- 64 grams Ground Almonds (⅔ Cup, 2¼ oz Almond Meal, * see notes)
- 4 grams Baking Powder (sieved, ¾+⅛ tsp, or rounded ¾ tsp )
- 20 Drops Pineapple Extract (Foodie Flavours) (optional, alternative brand greater amount, see notes)
For Decoration:
- Icing/powdered Sugar to dust (optional, or caster/extra fine sugar)
Instructions
Prepare The Shortbread Base
- Begin by placing all the base ingredients (flour, butter, sugar, ground almonds/almond meal, zest & extract), into a food processor and blend until resembling breadcrumbs. Does not need to be all the same size of pieces, but is ready if, when you use your hands, you are able to bring it together into a large piece without it crumbling. You might need to knead ever so lightly with your hands to get it to come together. Using your hands is more gentle than using the processor, as by hand the ground almonds and butter will combine with the dry ingredients and give off moisture. You can also do this by using a pastry cutter/pastry blender, or 2 butter knives. See Photo 1 below.


- Now prepare your cake tin. I used Frylight 1cal cooking spray to hold the baking/parchment paper in place. (See Lining Cake Tins lesson on how to cut the paper into a cross shape to fit the tin nicely at the corners). You might want to also hold the paper in place with metal bulldog clips, as we will be baking twice. See Photo 2 below.

- Remove the shortbread dough and place on to the bottom of the prepared tin, spreading out as evenly as possible, until all covered. See Photo 2 above. (Make sure your tin is not too large, see above and how to increase a recipe). Now gently 'dock' the shortbread base like you would for pastry, by making holes with a fork, before placing in the fridge for 1 hour to chill. (If short on time you can also place in the freezer for 20 minutes, after initially being in the fridge for 10 minutes). **Take this time to chill yourself and have a break, or do the dishes/clear up and have a break later.
- Heat your oven to 160°c/140°c Fan Oven/ 325°f/Gas Mark 3 to coincide with the end of the chilling time. Then pop the shortbread base in the oven to bake for about 18 minutes until starting to colour (remember there will be more baking). (Photo 5 further down shows the part cooked base).


Prepare The Topping
- While the base is baking, prepare the topping by using the same food processor (no need to clean out). Begin by adding the softened butter cubes and sugar, and using the processor to 'cream' these together, like you would with a mixer. (See Photo 3 below). Will only take about 30 seconds max, provided your butter is soft enough (always cube your butter small when weighing out as this smaller surface area will soften and come to room temperature sooner. If short on time, see a video hack I reviewed for softening butter in 12 minutes.)

- Add in the eggs one at a time and blend just till combined, before adding in the baking powder, ground almonds & coconut. Blend briefly until mixed together. See Photo 4 below. (You can of course use a hand or stand-mixer to this in place of the processor).


Fill, Top & Bake
- Once you have the shortbread base removed from the oven, increase the oven temperature to – 190°c/170°c Fan Oven/375° f/Gas Mark 5 and spoon the jam/jelly on top of the part cooked base. Spread with a palette knife, right to the edge and corners, before spooning the coconut topping on top. See Photo 5 below.

- Spread carefully to cover the jam, before popping in the oven to bake for 25 – 30 minutes. (If your oven has hot spots, you can turn the tin around after about 15 minutes). Note that since the topping doesn't have flour in it, it will not be like regular cake. It will still appear a bit wobbly when moved but a cocktail stick will be clean of crumbs when ready. Don't be afraid to let it colour. See Photo 6 below.

- Leave to cool in the dish on the worktop/counter for 10 minutes, before placing on top of a cooling rack to cool down completely. (After 30 minutes on the cooling rack, you can also place the tin in the fridge, on top of something to let heat escape from the bottom, to cool and importantly set up better. Just note that as flour free in the topping, it is meant to crack. Chilling will help cut slices easier).


Serving, Storing & Freezing
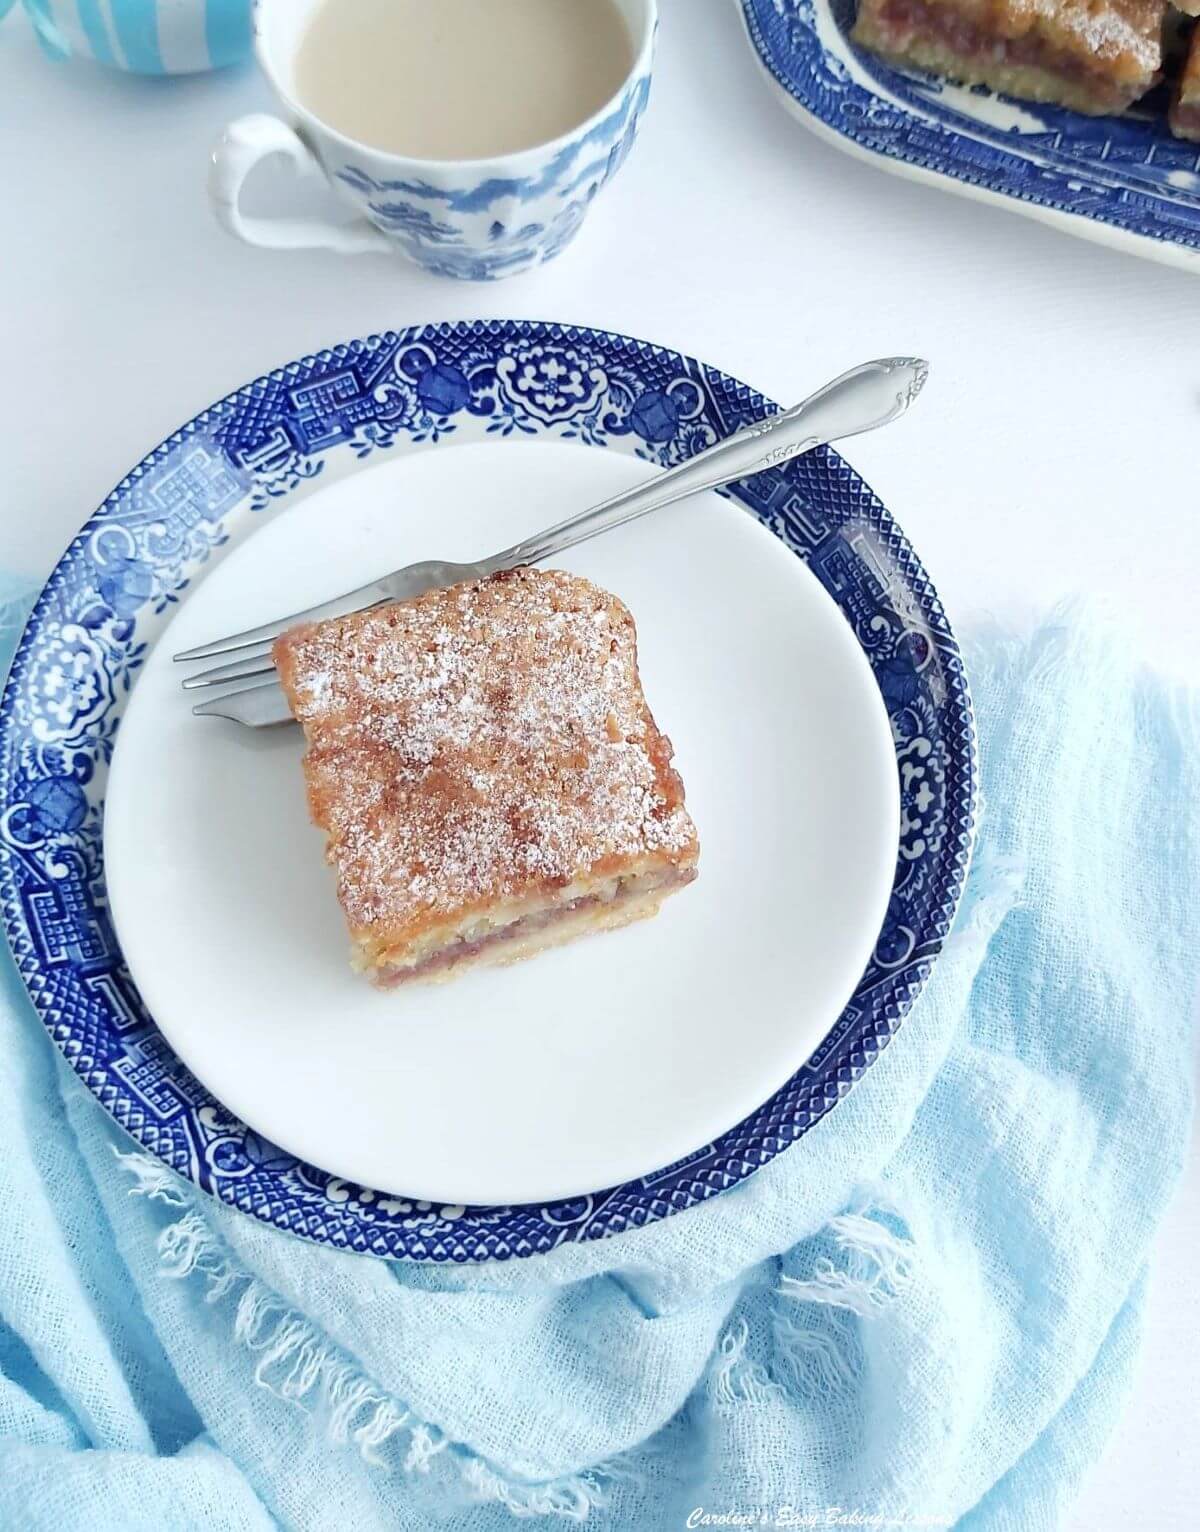
- Once completely cooled, cover with sieved icing/powdered sugar before cutting into slices/squares. Depending on shape of tin, you will get 15 to 16 squares, about 2"/5cm wide. Serve as they are with a nice cup of tea or coffee.
- Best stored in an airtight container, such as a cake or cookie tin. Will last 3 or 4 days at room temperature, and can be frozen, individually wrapped in paper, then foil and a food baggie and labelled (more layers of covering means less chances of freezer burn/taste). Can be frozen, well wrapped, (I have only frozen for 1 month so can't confirm if longer is still ok). Defrost at room temperature in wrapping and then leave uncovered for 30 minutes before serving.


Notes
Ground Almonds – closest substitute is Almond Meal. Grounds Almonds is not quite the same as almond flour. The Almond flour is much finer and flour would produce a different texture. See ingredient information before recipe card, for reference photos and how to make your own ground almonds.

 Desiccated Coconut – US/Canadian unsweetened shredded coconut is the nearest alternative. However, UK desiccated coconut is in smaller and finer pieces. See comparison photo before recipe card. So depending on what you are making, you might want to lightly chop the shredded coconut. In this recipe it is inside the topping & since you are using the processor, I recommend lightly processing the shredded coconut before starting the recipe.
Flavourings –Foodie Flavours Pineapple Extract is lovely, and I used 20 drops, which equates to 1ml of high strength flavouring. Nearerst equivalent would be approximately 1 to 2 tbsps of other brand pineapple extract/flavouring. You could also use pure pineapple juice & reduce down to concentrate it.
Desiccated Coconut – US/Canadian unsweetened shredded coconut is the nearest alternative. However, UK desiccated coconut is in smaller and finer pieces. See comparison photo before recipe card. So depending on what you are making, you might want to lightly chop the shredded coconut. In this recipe it is inside the topping & since you are using the processor, I recommend lightly processing the shredded coconut before starting the recipe.
Flavourings –Foodie Flavours Pineapple Extract is lovely, and I used 20 drops, which equates to 1ml of high strength flavouring. Nearerst equivalent would be approximately 1 to 2 tbsps of other brand pineapple extract/flavouring. You could also use pure pineapple juice & reduce down to concentrate it.

 Tools Required – all of the recipe can be made using a food processor. Alternatively you can use a pastry cutter/pastry blender or 2 butter knifes, and a hand or stand-mixer for the topping.
Tin/Pan To Use – I used a 9×9″ (23x23cm) square tin, but you can also use a square or rectangular dish, as long as the total of the length and width combined, does not exceed 18″/46cm. For how to increase a recipe to fit a bigger sized tin, see my Increase A Recipe article for tips. **Note a 12×6″ and a 10×8″ would work fine.
For a larger rectangular tin – such as 30x23cm (12×9″), or square 27x27cm 910.5 x 10.5″), increase the recipe ingredients by 16%, (ie. multiple by 1.16).
Tools Required – all of the recipe can be made using a food processor. Alternatively you can use a pastry cutter/pastry blender or 2 butter knifes, and a hand or stand-mixer for the topping.
Tin/Pan To Use – I used a 9×9″ (23x23cm) square tin, but you can also use a square or rectangular dish, as long as the total of the length and width combined, does not exceed 18″/46cm. For how to increase a recipe to fit a bigger sized tin, see my Increase A Recipe article for tips. **Note a 12×6″ and a 10×8″ would work fine.
For a larger rectangular tin – such as 30x23cm (12×9″), or square 27x27cm 910.5 x 10.5″), increase the recipe ingredients by 16%, (ie. multiple by 1.16).

 For further information and photos, please see the information sections before the recipe.
For more traybakes and cake squares, see my Cake Recipes Page.
Enjoy the combination of raspberry jam & coconut? Then see my coconut lovers page for more coconut and raspberry recipes.
For further information and photos, please see the information sections before the recipe.
For more traybakes and cake squares, see my Cake Recipes Page.
Enjoy the combination of raspberry jam & coconut? Then see my coconut lovers page for more coconut and raspberry recipes.

 Looking for a Mother’s Day food gift to make? Prepare a gift basket with some home made goodies from my Mother’s Day Recipes Page. No-bake, easy microwave chocolate fudge in the photos below.

***I am not a qualified nutritionist, and all nutritional values are based on a serving of 1 square of Coconut Paradise Slice (from a batch of 16 as per recipe above). Bigger or smaller serving size, & the nutritional values will change. All values from Whisk.com, and to 1 decimal place.


Follow me on social media:
Happy Learning & Baking!

Coconut Paradise Slices
Search For Something You Fancy!
Caroline’s Easy Baking Lessons
Old photos of the recipe – swipe or press the arrows to flip through the photos.


Coconut Paradise Slices served, by Mrs D. 
Coconut Paradise Slices baked & cut, by Mrs D. 
Coconut Paradise Slices served, by Mrs D. 
Coconut Paradise Slices served, by Mrs D. 
Coconut Paradise Slices baked & cooling, by Mrs D. 

Coconut Paradise Slices served, by Mrs D. 
Process of Coconut Paradise Slices, by Mrs D. 

Coconut Paradise Slices served, by Mrs D. 
2019 very bad old photo! 
2019 very bad old photo!


:


I have tried your recipe several times, and everyone enjoyed them. A true classic. Love the new photos and recipe card – have saved it and printed it off! **got error when I tried to post, so not sure if it worked
I have tried your recipe several times, and everyone enjoyed them. A true classic. Love the new photos and recipe card – have saved it and printed it off!