Lining Baking Tins/Pans – Theory Lesson 4

Theory Lesson 4 is a detailed look at lining baking tins/pans. Learn the proper way to grease & paper line cake tins, cookie sheets, bread pans, traybake tins & more.
Lining Baking Tins/Pans – Theory Lesson 4


***Click to jump to section***


Why Learn To Line & Grease Properly?
I am so often seeing people on YouTube for example baking something and never lining their cake pans properly. Proper greasing & lining is definitely something to be getting in the habit of doing every time you bake, especially if you want to become more advanced and maybe enter competitions or want to be doing some kind of baking professionally. Not only that, but if you use the techniques I will show you below, you will not waste paper, and it reduces the chances of the parchment paper cooking into your cake or that intricate bundt cake getting stuck in the pan after all your hard work. So take a second to stop, & grease & line in a more professional & accurate way that should start to become a habit.


Baking Paper/Parchment Paper
In my baking, whether it’s cakes or cookies, I always always always, use baking/parchment paper. I have found over the years that the cheap white kind or greaseproof paper you can get here in the UK, is not ideal if you don’t want the bake to stick. So I always pay a bit more and buy brown baking/parchment paper and use a brand called Bacofoil. Nothing has ever stuck to it and I re-use it. I also use it when making fondant decorations too.


Like everything else, the cost has gone up, but I find it less expensive in the likes of Savers, B&M etc, rather than the bigger supermarkets. As of Summer 2024 however, they started selling it in ‘sheet’ form, as in pre-cut rather than 5 or 10 metre rolls. These are less economical and the sheet size is bigger than the largest baking tray that came with my oven (the type that slides on instead of placing on a shelf). However, Savers started selling the rolls again so maybe they realised this was not so good for the UK market where our ovens are typically not as big as American style ranges.
In the photo, are 2 versions of the paper. I think over the years it changed from flat to embossed paper but either way works great and left-overs can be used in-between any bakes you might be stacking.
(**photo here of the paper in the cake tin**)


Greasing Cake Pans
As well as paper lining, you want to be greasing the cake tins too. Greasing will not just stop cake sticking but hold the parchment in place too.
Standard methods to grease including softened butter and dusting with a coat of flour on top, but less expensive methods are used in more recent times. You can easily hold parchment down with any cooking spray/spray oil you might have.
Some use cake release spray for the likes of bundt cakes but you still want to be paper lining your standard round or square cakes.
There is however, a more economical homemade cake release that is ideal for bundt pans or bread tins. More on that on the bundt cake section below.


Lining Cookie Trays/Sheets
Always paper line your cookie tray/cookie sheets. Even if a recipe does not mention it. Paper lining saves the bake/cookies from sticking, but also cuts back on the amount of washing and preserves the life of your bakeware.
Cut the paper to roughly fit the cookie tray/sheet, to save on that roll of parchment paper but also for the paper not to be moving about too much in the oven, particularly if you have a fan oven.
One tip for when using on an oven tray/sheet for cookies etc. If it doesn’t have a lip/edge, grease it before placing the paper in position, as you don’t want the cookies or cookie dough to slide off. That has happened – for real!!


Standard Shaped Tins/Pans
Round Cake Tins:
Most of us have round cake tins/cake pans. Some British cake tins are known as sandwich tins, that are round, usually about 1-1.5” (2.5 – 3.8cm) deep and the sides are slanted. Coming in different diameters and depths, round cake pans can also have a loose base or spring release for easy removal of the cake. Greasing and paper lining the tin is still advised however.
You can buy pre-cut parchment rounds of various diameters but you can cut your own at home & quite easily too. Most people trace around the base of their cake tin. I however, favour a technique I find easier and quicker and also more accurate. Tracing a circle gives you the size of the outside of the cake tin so it will always be a bit too big for the inside and you don’t want the excess paper baking into the cake. Better to be more accurate or a tiny bit smaller. Here is how:


1. Cut paper the width of the base of the round tin. No need to be bigger.
2.Next fold the paper in half, upwards as shown in Photo 1b.
3. Rotate the paper 90 degrees to the right, so the paper opens to the right like a book. (**Failing to do this, you will end up with 2 half circles).
4. Fold the paper again upwards to make a rectangular shape. See Photo 1d.


5. Fold the paper over in a diagonal to make a pointed triangle as shown in Photo 2a.
6. Next, fold the paper again at an angle to make a thin ‘dart’ shape. (Note, for cake pans smaller than 7″/8″ diameter, you will need to fold one more time to make thinner). See Photo 2b.
7. Turn the cake tin over and place the point of the ‘paper dart’ to the centre of the cake pan. (Photo2c). From there you can see where to cut off the excess paper. Use your finger to mark where to cut.
8.Trim off the excess, in a straight cut, not curved.


9.Open up & check the size of the paper round against the bottom of the tin. You want to fit or be a tiny bit smaller.
10. If too big, fold in half a few times and trim off a tiny amount till happy.
11. Grease the base and sides of the cake pan with spray oil or lining paste (cake goop) to hold the paper down.
12. To see how to make use of any excess or scrap paper for the sides, see my 4 Step parchment Rounds Article.


Rectangular & Square Tins
1. Open out your baking/parchment paper and place under the tin (Photo 4a). Pull the paper so there is plenty on the left and right side of the tin. Going up over the edge of the tin is ok. Cut to that width.
2. Position the tin so that the edge nearest and furthest away from you (horizontally), has enough paper to go up the sides of the tin too. You really want to centre the tin in the middle of the paper. (See Photo 4).
3. Take a pencil or marker & draw a square where the corners are – this is what will be cut out. Do for all the four corners. See Photo 4b.
4. You can lift the tin off & cut out the corner areas. I like to cut at an angle just so that the paper does not overlap once in the tin, as it can stick in the cake.


It will produce a thick cross shape. (See Photo 5b,c).
(I am used to doing this now that I no longer draw on it but do free-hand cutting, push down on the tin and pull the 4 squares off).
5. Check the paper fits in the tin first.
6. Then spray oil or grease your tin well, turn the paper over so the paper mark is face down, and position inside the tin. Apply more greasing to hold in place if need be. (See Photo 6 below).


7. Trim any excess paper off the edges or clip in place with metal bulldog clips, (see Photo 6c & d).
Not only is paper lining the tin beneficial in stopping the cake sticking, but you can lift the cake out with the help of the ends of the paper.
Also, for some cakes or traybakes, I keep them on the paper and store in a metal tin. I find it helps keep the moisture in.
The same method is used for square & rectangular pans/traybakes. (See the example photo collages 7 & 8 below).
Examples Using Square & Rectangular Traybake Pans


Other Shaped Tins
For awkward shaped cake tins (think bundts, half spherical tins), that you can’t easily paper line, most people use oil/butter & flour/powdered sugar or cocoa powder if it’s a dark cake like chocolate.
This process just involves rubbing or brushing softened butter on the tin, then dusting on the flour, shaking the tin to let it coat the butter & then tapping off any excess flour. Some people also find chilling the tin after this helps.

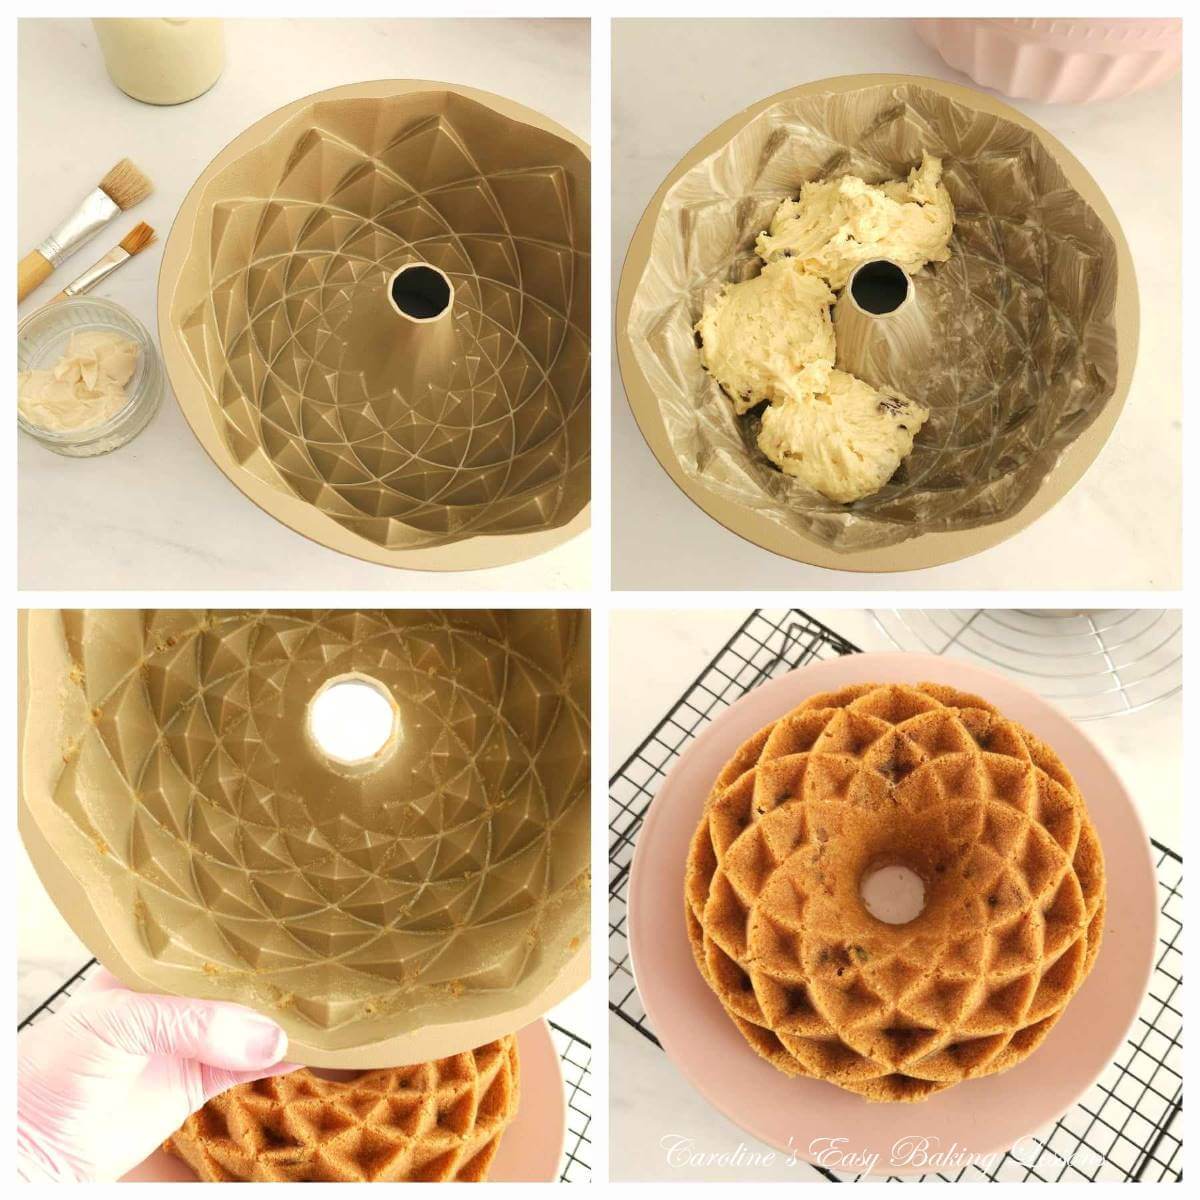
Bundt Pans/Tins
For bundt pans/tins, my go to greasing method is to use homemade lining paste/Cake goop (See photos above). Less expensive than cake release spray or using butter and flour, this works a treat every time, & is stored in the fridge ready to use directly when needed! So easy to make with just oil, vegetable shortening & flour. Can be made with gluten-free flour and is vegan. To see how to easily and quickly make it, go to Lining Paste/Cake Goop review.
Greasing a bundt pan with lining paste could not be easier too. You simply decant a few tsp’s worth and brush a generous coat or 2 on, being sure to get into all the nooks and crannies. (See the photo collage).


Top Tip: A good tip is to brush in upward strokes. Similar to if you were making souffle or lava cake, upward strokes help for a smooth release, since brushing across the way would create enough friction not only make the cake stick, but impede full rising.
For Dark Coloured Cakes
For the likes of chocolate cake, when using the lining paste, just take a few tsp of the paste out of the jar as normal, and add a little cocoa powder to colour the paste. Don’t make it dark brown, just give it a very light brown colour. This ensures no white residue is left on your bakes. And any residue is fine, but if it bothers you, you can simply brush it with a little milk.


Greasing Silicone Bundt & Bakeware
For silicone bundt cakes I don’t use the lining paste, but rather a spray oil. Being a spray, it helps to get into all the awkward areas in the fancy bundts. You can use any neutral tasting cooking oil but my go to is FrlyLight Onecal cooking spray. Just like the parchment paper, this is more expensive in the bigger supermarkets here in the UK. So I always buy in Lidl, B&M or Home Bargains and as at August 2024, is still under £2 a bottle and good for reducing your calories when cooking too.
Just spray the case(s) right before filling & don’t worry about any oil pooling at the bottom, will be fine. Check out my video on how to release mini silicone bundts.


Cupcakes & Muffins:
I see so many people on tv making their cupcakes and muffins directly in their trays without any paper cases. In reality, we need our baking equipment to last us and don’t have someone else to clean up the mess for us! So I always use paper cupcake or muffin cases.
Please please please avoid getting the metallic ones, as they are really bad and always cause the cakes to stick, especially if a butter-free cupcake. The cupcake cases make it easy to get out, you don’t need a plate to eat from it, and you can clean the cupcake tray/cupcake pan, really easily.
Paper Lining Video
Paper Lining Video
Watch the video of lining some of these cake pans.
Thanks for reading & I hope you find these tips useful. Please pass them onto others and let them know about my website – that would be great. Next step – proceed to Savoury Lesson 2 – Easy Peasy Cheezee Smokin’ Squares.
Subscribe For More Recipes
Want more great recipes, tips, baking information and newsletters? Then please consider subscribing by adding your email address below. Be sure to check for a confirmation email & respond back, so you can follow me & receive your free emails. Your personal information will not be shared with a third party.
Join My Facebook Group
Why not also join my – Facebook group Easy Online Baking Lessons, dedicated to this baking lessons website, as well as providing one-on-one support with myself & my team? Be sure to answer all security questions when requesting to join.
Follow me on social media:
Happy Learning & Baking!
Caro x
Lining Baking Tins/Pans – Theory lesson 4
Search For Something You Fancy!
Caroline’s Easy Baking Lessons


