SUMMER MERINGUES- Crown Layered Pavlova, Mini Pavlova Nest & Various Fillings

Summer meringues like crown layers pavlova, mini pavlova nest, filled with a choice of tasty homemade fillings. Perfect for a Summer dessert table.
Summer Meringues
Crown Layered Pavlova, Mini Pavlova Nest & Various Fillings
This post was created to go along-side the monthly competition, in Facebook group Great British Bake Off Fans for the month of July, 2021.
**Note competion now closed, but you can still use the post for ideas & recipes


Mrs D had reviewed a Crown Layered Pavlova recipe, from BBC Good Food website and we decided to use this meringue recipe as the basis for this competition. The idea is to make the meringue as a Pavlova, layered Pavlova, mini pavlova, nests etc, any style you like, but make sure it will work as a vessel for a filling.


Choice Of Fillings
The filling can be from the following – lemon curd, Créme Pâtissiére, Greek Yoghurt, cream, or even ice-cream. For the group competition, I have added my recipes for Lemon curd, Créme Pâtissiére Video, Creme Pat/Pastry Cream recipe or blueberry orange curd ,for you to use. I have also given some ideas on additional flavours and fruits you can add to finish off the dessert(s).
*Try some Fig Anise curd, Salted caramel Sauce, or even a Concentrated Strawberry Puree Reduction.


MERINGUE RECIPe
Crown Layered Pavlova
- Here’s the crown layered pavlova recipe for making the meringue. Diana used that and piped 3 large circles of varying sizes, on baking/parchment paper, before filling them in the centres. She then filled with freshly whipped cream (double/heavy or whipping cream), cut strawberries, and topped it all off with chocolate dipped strawberries. Here’s Diana’s meringue tips:


Mrs D’s Meringue Tips
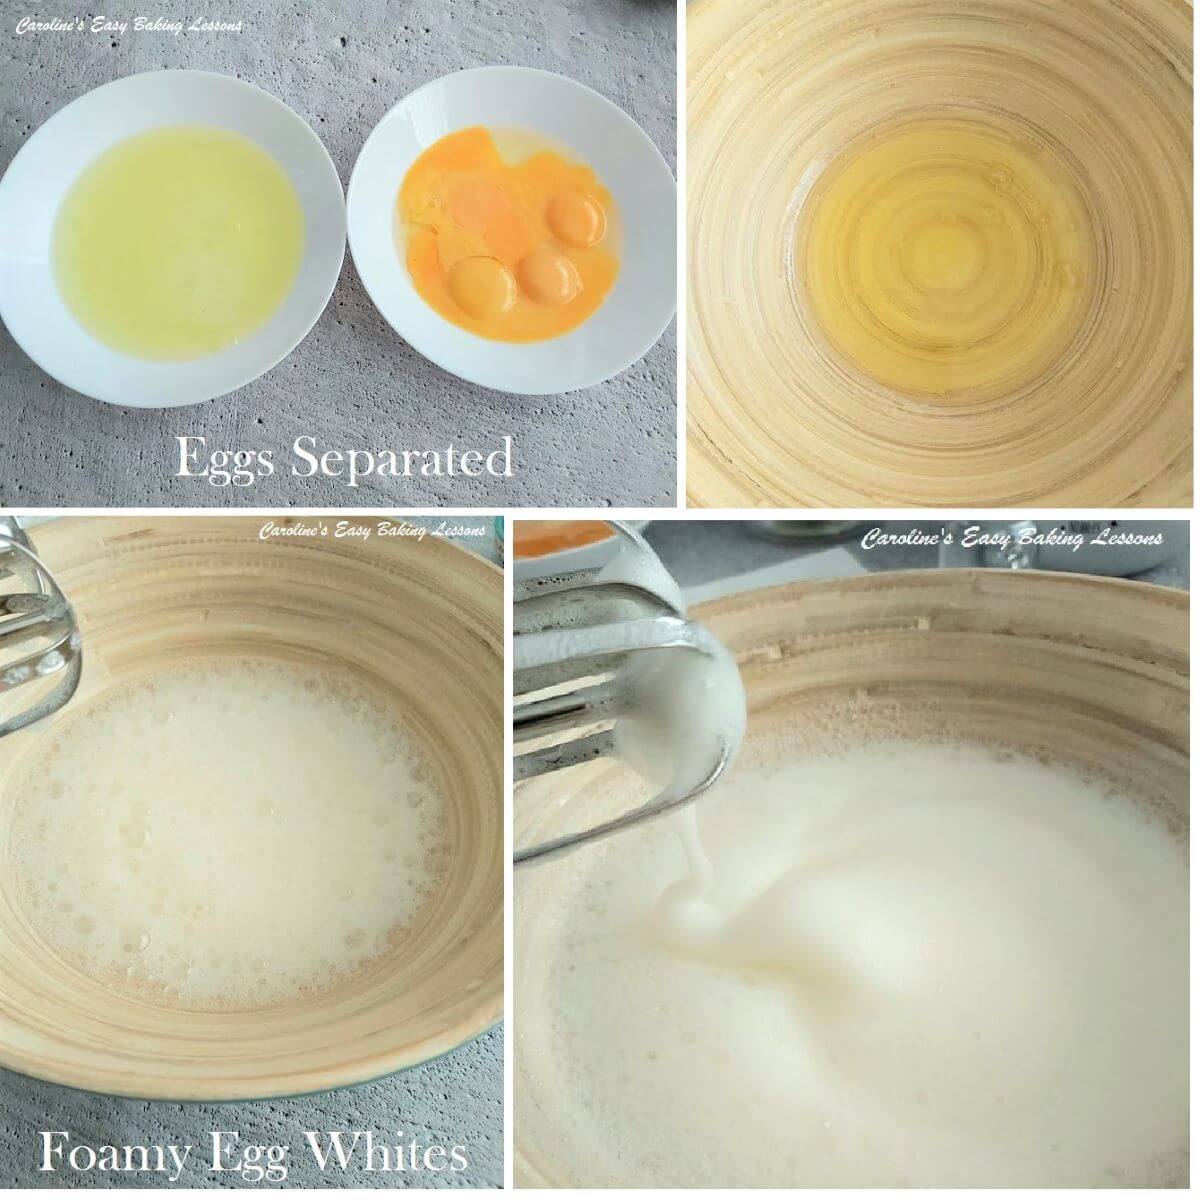
- To test if the egg wites are whisked enough, Diana likes to turn the bowl upside down and if the whites don’t move, they are done.
- She also advises that it is best to leave the meringues in the oven over night, as storing in the fridge will result in condensation and the meringues weeping. Leaving in the oven will produce a nice meringue with a crisp & chewy centre.
- Finally she advises that some cracks will inevitably result from pavlova and not to worry about it, just to be very gentle.
PREPARING THE MERINGUE

INGREDIENTS
- 6 Egg Whites -medium (UK), Large (US)
- Pinch Salt
- 350g/12oz Caster Sugar (1 3/4c Extra/Super Fine Sugar)
- 2 tsp Cornflour (cornstarch)
- 1 tsp White Wine Vinegar or Lemon Juice
FOR THE FILLING
- 600ml/20fl oz Double Cream, (2 1/2 cups Heavy/Whipping Cream)
- 500g/18oz Strawberries, hulled (Approx. 2 1/2 cups)
- Icing Sugar (powdered or confectioners’ sugar) for dusting
- OVEN: 180C/350F/Gas 4 (Fan Oven 160c)
- Reduce to 140C/275F/Gas 1 (Fan Oven 120c)
- FOR FULL RECIPE – go to the BBC Good Food Website’s Layered Pavlova recipe. Here we have just provided alternative measurements for convenience.


Mini Pavlova Nests
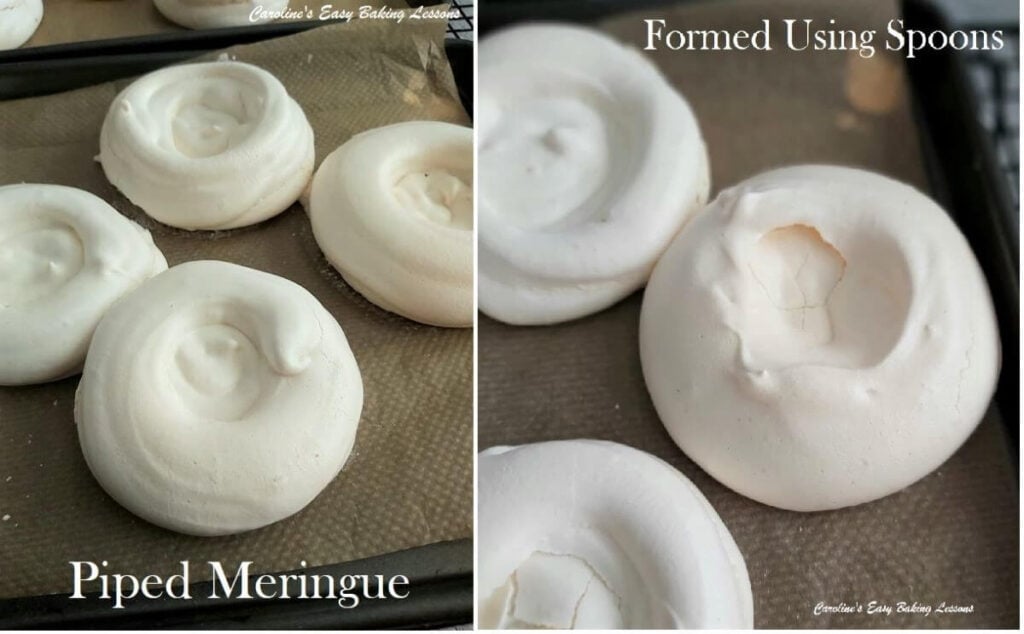
- I chose to make mini Pavlova nests (12 in all) and the first nest I used 2 spoons to form, but found it fiddly and time consuming, so was quicker and neater to fill a piping bag with the meringue mixture and just pipe 12 circles onto paper that I had marked circles on, used a cookie cutter (7cm/2.75″) – remember to turn the paper over before piping onto it.
- Top Tip – pipe a little of the meringue on the baking tray/sheet at the corners, to hold the paper in position.


- I piped 12 circles, then piped a border on each, filled the bottoms, and used the left overs to build higher borders for holding more filling once baked.
- These mini nests were baked for about 30 minutes and I then left for 30 minutes in the oven, with it turned off, before allowing to cool.
Below, are mini Pavlova nests baked, and on the right a comparison picture of the piped and spoon formed nests. The piping was much easier, and gives a deeper vessel. But, the spoon formed, is smoother looking.


FILLINGS
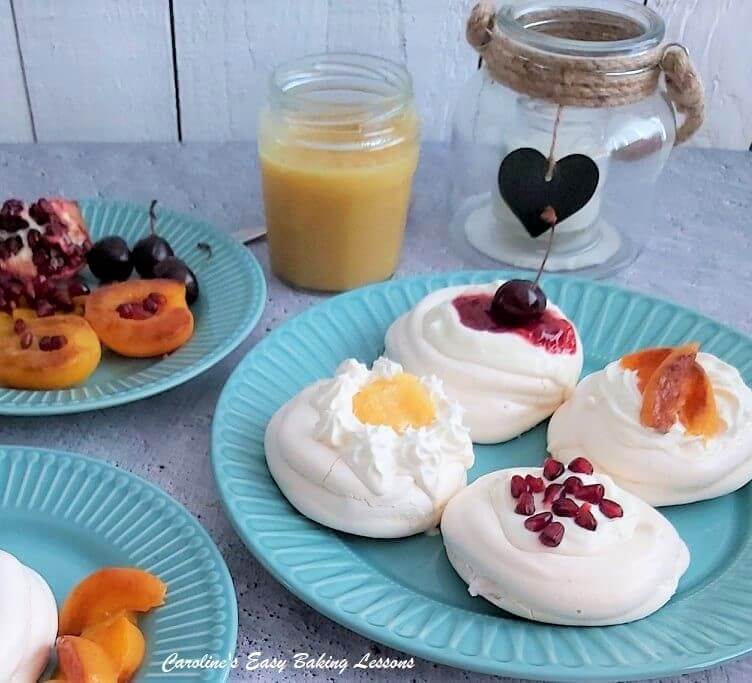
Ice-cream, Jam/Preserves & Whipped Cream
You can easily just whip fresh cream (double/whipping/heavy cream) to soft peaks and add some vanilla extract if you like. Ice-cream is also another nice addition to the meringue, so too is Greek Yoghurt. I paired it with pomegranate and one with raspberry jam and the flavour went really well with the sweet meringue. You can also add such things as jams/preserves, or even add to the cream or yoghurt.
Quick & Easy Créme Pâtissiére
Here’s my Easy Créme Pâtissiére recipe. Sometimes called Créme Pât, this is basically Pastry Cream, a thickened version of custard.
Watch the video, or go to the online recipe version – Creme Patissiere Pastry Cream.


HOME-MADE LEMON CURD
Why not use the left over egg yolks from the meringue, and make Lemon Curd. Try my easy lemon curd recipe, that also includes how to make different amounts of curd, as well as with varying amounts of eggs, just yolks, or a combination of both. Great way to use up left over yolks.
If you want to use just the 6 yolks left over form this meringue recipe, then that would make about enough for a 4 oz jar or 1/2 cup worth of curd. And if you use 2 tsp curd for each nest, that would be enough for all 12. For the crown layered pavlova, I would recommend either making 1 cup or 1 1/2 cup if you want left over curd.


My lemon curd recipe includes all the combinations of what you need to make each volume amount. But for this example, with 6 yolks left over, to make 1 cup of curd, I would also add 2 whole eggs. If in any doubt, just comment below or message me.
Or try Fig Anise Curd, concentrated Strawberry reduction, or rhubarb compote.
I didn’t have any fresh berries when I was making these nests and curd, so I used a can of peach halves to go with them. I simply drained the peaches and reserved the syrup. If you don’t want to throw the syrup away, you can use that and thicken it on the stove with about 1/4 tsp corn flour/starch, and bringing to a rolling boil. Once thickened you can brush onto the peaches.


For the peaches, I dry fried them on a good non-stick pan until coloured as in the photos. You can also grill on the bbq, and adding the thickened sugar syrup here will give it a nice caramelized coating. For the peach slices, I advise not cutting too thin. They give such a lovely bright summer like colour to the meringues. They were lovely too and just goes to show, you can use canned/tinned fruit too when you have to.
DIFFICULTY LEVEL: easy, beginner
Or how about some blueberry orange curd as a filling?


CHALLENGE RECAP
1. Use the meringue recipe provided to make any shaped/size meringue vessel you like.
2. Use one or more of the following fillings – my Lemon Curd recipe, Greek Yoghurt, Icecream, Whipped Cream, Jam/Preserve or my Pastry cream.


3. Add any fruit(s) you like for decoration but all decorations must be edible.
4. Take some clear photos, the more the better. Don’t be shy of sending lots.
5. Extra points for photo presentation – no special fancy camera required. Utilize the camera on your smart phone and think about your background.
***Tips for phone photos – don’t use the flash or a house light and be sure to clean your lens. Another good tip for a front on 90 degree shot, turn your phone upside down so the camera lens is at the bottom and not looking down on the bake.
6. Submit your photos to the July 2021 competition post in Facebook group, which will be saved in the ANNOUNCEMENTS section. More than one entry allowed. Submit by 31st July 2021, @midnight PDT.


If not in the Facebook group, then email me your entry to – easyonlinebakinglessons@gmail.com. If I have enough entries, I will also add a website winner too.
7. Winner in the Facebook group, will have their winning entry used as our group profile pic for the month of August 2021. Winning photo and all entries will be showcased on this website at a later date.
***On entering you give permission for me to use your photos for the website for feedback purposes. Any photos I use, will have your name and my website name printed over them for protection
Please see the sharing options or even printing, at the right/bottom of your screen (bottom of your screen for mobiles, and down the right-hand side on computers). You can even pin this to your own Pinterest page. Alternatively, you can download this article, see below. You could also leave some feedback if you like.
Click the ‘Download’ button below, to save to your phone or computer.

Follow me on social media:
Happy Learning & Baking!
Caro x
Summer meringues
Search For Something You Fancy!
Caroline’s Easy Baking Lessons


