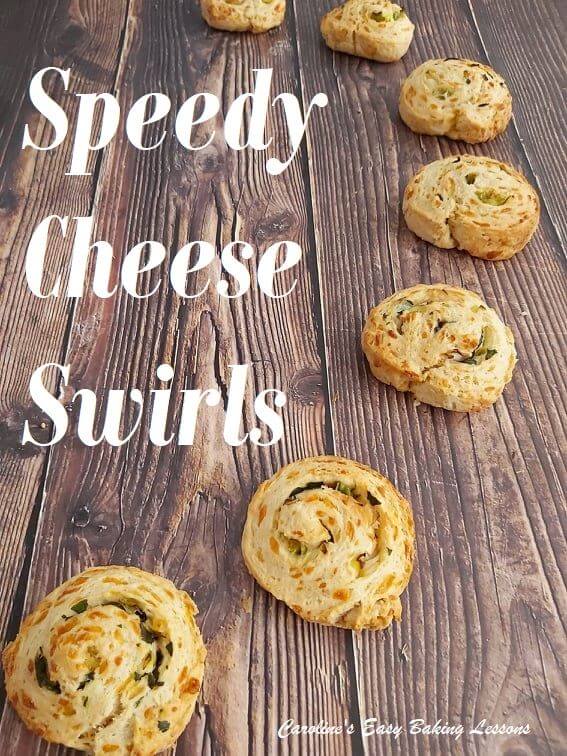
Speedy Cheese Swirls

Speedy Cheese Swirls
Yeast-Free Snacks In A Hurry
By Caro
Speedy Cheese Swirls, are an easy, yeast-free cheesy snack, that’s ideal for entertaining. No prior baking experience or special ingredients or tools required.


Recipe Origins & Adaptation
This is my adaptation of a recipe I reviewed about April or May 2020, (from ‘National Trust Teatime Baking Book – Good Old Fashioned Recipes’, by Jane Pettigrew (2014), when there were lockdowns, & shortages.
It’s a great beginner baker recipe and you could easily get the kiddies helping with them. It’s also a speedy recipe, when you want something cheesy, but have no time (or energy) to make a yeast dough or puff pastry and don’t have any shop bought puff pastry in the freezer 🙂
**If you do have some puff pastry in the freezer, try my Quick Cheese Puff Pastry Swirls using feta cheese & dill.


A Note On Ingredients
Cheese
For these Speedy Cheese Swirls, you can roll up with any cheese you like but in the dough it’s best to have cheddar and mature/sharp at that, just to give the dough a nice taste.
Flour
The dough is also made using UK self-raising flour. You can also use US Self-rising flour, but I have also tried them out using plain/ All Purpose flour, but just added some baking powder to help them rise a little. All details are given in the ingredient list below.


Mustard Powder
A great ingredient for any cheese bake is mustard powder. You can get this, by Coleman’s in the bigger supermarkets where the mustard and pickles are.
An alternative I have been known to use is Smoked Paprika. Not the spicy one, and the smoked one gives a nice flavour. If you want to try the spicy one, I would suggest trying with the non-spicy version first just to see how it is.


Fillings
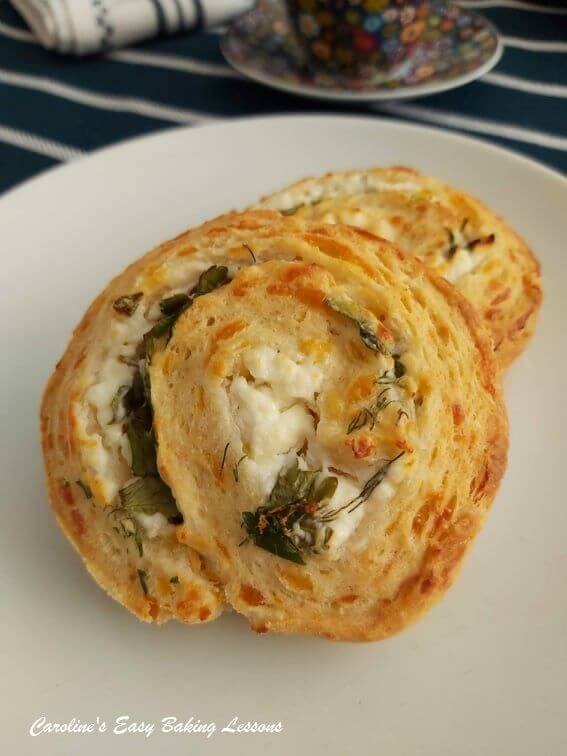
As mentioned you can roll up with any cheese fillings you like. I have used the extra mature Scottish Cheddar (extra sharp cheddar) and added some leeks before, (and I just left the ends with no leek so my youngest could have it). So you can make 2 different versions from the same roll. The cheddar with spring onion & basil is lovely. I also do with ones using Turkish soft creamy cheese (Peynir).
You could use Feta, but that’s not as soft. Any soft cheese, mozzarella etc will work. For these white cheese ones, I added flat leaf parsley and a little bit of dill. The possibilities are endless.
I made a sweet version – Speedy Mince Pie Swirls


Speedy Cheese Swirls
EQUIPMENT
- Scales or Measuring Cups
- Measuring spoons
- grater/shredder
- Chopping board
- Med-Large Mixing bowl
- Baking spatula or wooden spoon
- Measuring jug
- Fork
- Baking/Parchment paper
- Scissors
- Spare flour for rolling out
- Rolling pin
- Sharp knife
- Large or 2 medium baking trays/sheets
- Timer
- Cooling rack
OVEN: 220c/200c Fan oven/425f/Gas Mark 7
INGREDIENTS
- 350g Self Raising Flour
- (12 1/4 oz, 2 3/4 cups)
- (OR Plain/A.P. Flour,
- plus 4 tsp Baking Powder)
- 1 1/4 tsp Mustard Powder** (or Smoked Paprika)
- 1 1/2 tsp Salt
- 1 tsp Garlic Powder/granules OR 1 -2 Garlic cloves grated
- 3/4 tsp Onion powder/granules (optional)
- 50g Butter Cubed (Unsalted, for salted butter half salt added)
- (2 oz, 1/4 cup)
- 1 Egg, medium to large
- 150ml Milk approx.
- (5 fl oz, 2/3 cup)


FOR THE FILLING:
Sharp Cheddar, soft white cheese, about 100 – 150g (5.25 oz), spring onions (green onions), finely chopped onion, basil, dill, flat leaf parsley, choice is yours.

INSTRUCTIONS


1.Begin by washing and drying any herbs you might want to use.
2.Prepare a large baking tray/sheet or 2, by lining with baking/parchment paper (hold in position with some oil if there is no lip on this or your baking can go flying onto the floor).
3.Also prepare your area that your will roll out the dough on. I like to use baking/parchment paper to save on the mess. I buy quality paper, and often keep it and re-use it. Cut out a piece 35cm at it’s longest (14″). Have some additional flour handy for rolling out & place with the paper, to one side while you prepare the dough.
4. Heat the oven to: 220c/200c Fan Oven/ 425f/Gas Mark 7.


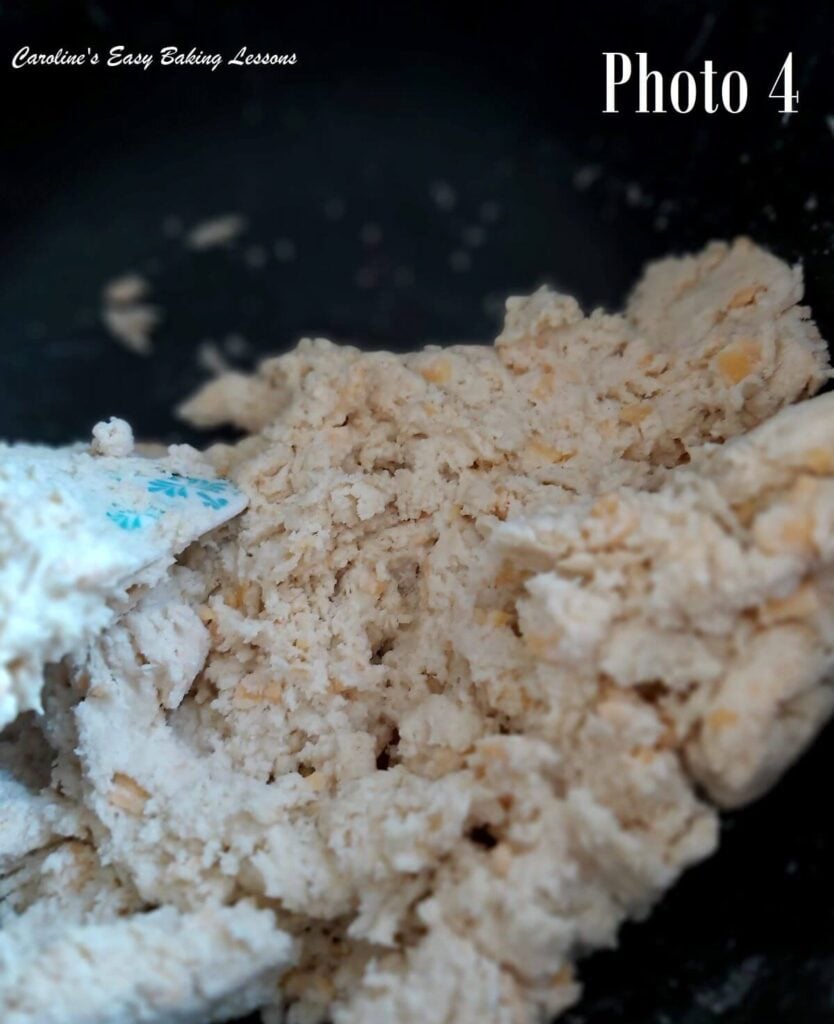
5. Start by adding the flour to a medium-large mixing bowl, and adding in all the dry ingredients – salt, (baking powder if using Plain/A.P. flour only), mustard powder (or smoked paprika), garlic & onion powder/granules. See Photo 1 above. Mix till combined.
6.Now add in the cubed butter and by hand or using a pastry blender, ‘rub in’ the butter to the dry ingredients. This is like in pastry and scone making, where you are blending it to a ‘breadcrumb’ like consistency. However, there isn’t much butter in this recipe, so only a light rubbing of the flour and butter between your finger tips is required.
Lift up between your finger tips, rub and let fall back into the bowl, before moving onto the next area and repeating. ( See my video 5 minutes, in if you want to learn this method more). You can also use a pastry blender/cutter to do this.
Just push down on the bottom of the bowl, and perform a twisting left and right motion. Then lift up and repeat on another area. This is great if you have hands/fingers that tire easily like me. But as said, there’s not much butter in this recipe, and so only maybe 20-30 seconds is required. See Photo 2.


7. Now add in the grated/shredded cheddar cheese and mix through. **Note – if you want melted cheese on top of your swirls, only about 3/4 of the cheese at this stage and reserve the rest for later).
8. Make a well in the middle and add in the egg. Give it a whisk in this hole, and then add in half of the milk, & mix just the milk & egg together.
9. Now use a baking spatula or wooden spoon to mix the milk and egg with the dry ingredients. Keep pushing down on the flour, and let it take on as much of the liquid as possible, before any in any more small drops of the milk. You want the mixture to come together into a very rough ball that will be just a little sticky. So very gradually add the milk. You might not need all the milk, or might need a little more.


10. Place your ready-cut piece of baking/parchment paper down & dust that and your rolling pin with some flour.
11. Next gather the dough together into a rough ball and then place onto the centre of the paper and form into a square or rectangle. See Photo 5.
12. Roll out the dough to a rectangle of about size 22.5 x 30cm (9×12″). See Photo 5.


13. Next sprinkle on top of the dough, all your prepared fillings. Note in Photos 6 & 7, I left the ends bare and that was just so my son, who doesn’t like all of the ingredients, could have some too. You can of course spread all your fillings to the ends. (For the soft cheese though leave just a little gap at the ends just in case). See Photos 6 & 7 below.
14. Now very carefully bend over the end nearest you and begin to roll up the dough. (Make sure you have the dough with the widest length running across the way, as in the photos, so you can cut more pieces). Squeeze a little once at the end and press down the seam to make it stick together, and leave seam side down.


15. Using a long sharp knife, cut the roll of dough into slices about 1.5cm (2/3″) wide. This will make about 15 slices. See Photo 8.
16. Carefully re-shape any that have got a little squashed and lost their shape on cutting, before you place onto the prepared baking trays/sheets. See Photo 9 below.


SIGN UP FOR MY NEWSLETTER – I would love it so much if you could sign up for my newsletter. I will send out monthly emails, showing the latest recipes and articles, and latest info. Being a site without ads, building a following, is even more important and will keep it up and running and for free to everyone. Occasionally there will be the odd seasonal emails, but is really a means of reaching you, if you are not already in one of the Facebook groups I admin. Please note too, that these email addresses are not shared or sold onto another party. Thanks so much Caro xxx


17. Leave at least 2.5cm/1″ gaps between the slices, (see Photo 10 above), and then pop in the oven to bake for 14-20 minutes.
**Note if you want to add a little cheese to the top of the slices, only set your timer to bake for 10 minutes. Then add the grated/shredded cheese on the top of the part-baked swirls, before putting back in the oven and baking till done. See Photo 11 of the 2 different types of fillings, part baked. The swirls are ready when golden and the undersides are set and firmed up.


18. Remove from the oven, and place the baking sheet/tray on top of the cooling rack for 5 mins, before transferring, paper and all to the rack to cool down almost completely. See Photo 12.
19. Can be eaten just a little warm, cold or even re-heated in a moderate oven for 5-10 minutes. Freeze great too, just wrap individually in paper and then with some cling film/plastic wrap or foil and a food bag. Defrost at room temperature. Will last at least 2 days if in a sealed container.


Join My Facebook Group
Why not also join my Facebook group – Easy Online Baking Lessons, dedicated to this baking lessons website, as well as providing one-on-one support with myself & my team? Be sure to answer all security questions when requesting to join. Click to join the group.
Share The Love
Please see the sharing options or even printing, at the right/bottom of your screen (bottom of your screen for mobiles, and down the right-hand side on computers). You can even pin this to your own Pinterest page. Alternatively, you can download this article, see below. You could also leave some feedback if you like.
Click the ‘Download‘ button below, to save to your phone or computer.
DIFFICULTY LEVEL: easy, beginner
Try one of two sweet versions of the speedy, yeast-free & pastry-free swirls. Mincemeat filled swirls for Christmas and pumpkin spiced filling for Autumn. Click the image below to jump to the recipe.


Speedy Cheese Swirls
Follow me on social media:


Thanks for reading
Happy Baking & Making
Happy Tummies & Memories!
Caro xx

Leave some feedback if you like 🙂


Caroline’s Easy Baking Lessons
Speedy Cheese Swirls


