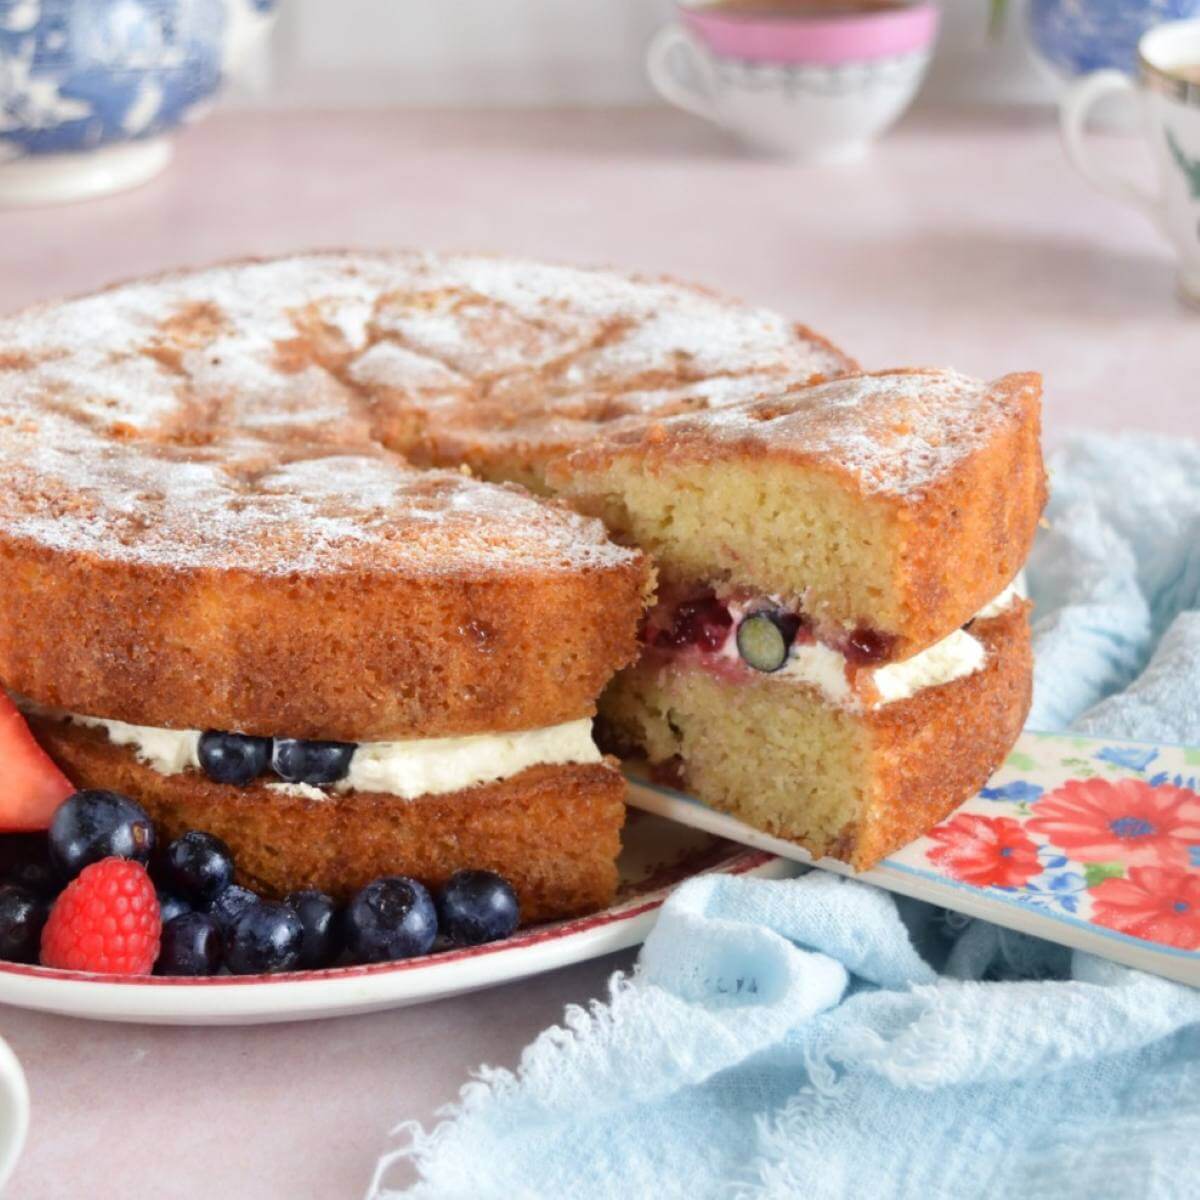
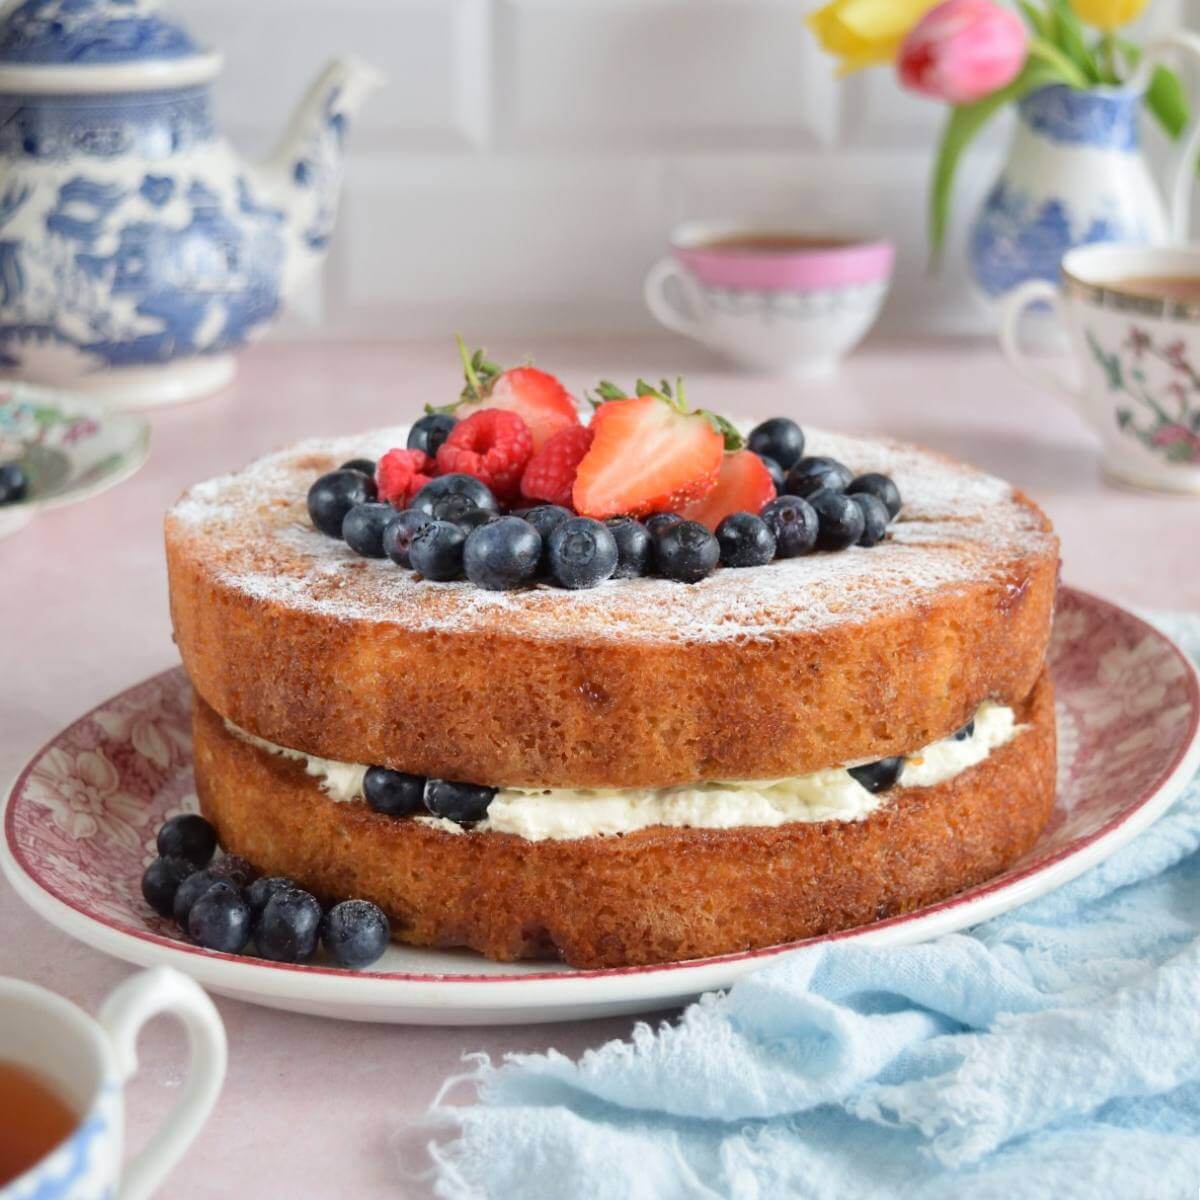
Raspberry Ripple Victoria Sandwich Cake

Raspberry Ripple Victoria Sandwich Cake - my take on British Classic – Victoria Sandwich Cake, but with a raspberry twist!
Raspberry Ripple Victoria Sandwich Cake
Original recipe 14/03/19, new photos & video 17/05/25

**Click to jump to section**


What Is A Raspberry Ripple Victoria sandwich cake?
A raspberry ripple Victoria Sandwich cake is a twist on a British classic – Victoria Sandwich cake. Made up of 2 layers of vanilla cake, sandwiching a jam & cream filling. This particular version, includes the raspberry jam also in the cake batter, for a raspberry ripple.
What Is A Victoria Sandwich Cake?
A British Victoria Sandwich cake is a light layer cake, with high proportion of eggs and butter. Not quite the same as a US Pound cake, this Victoria Sandwich cake has this airy texture because of how it is made.
The traditional version is undecorated on top and sandwiching a raspberry jam filling and sometimes whipped cream too. The inclusion of buttercream is a more recent trend.
(*See photo here of a Victoria Sandwich cake).


The cake is a very basic, uncomplicated one, that requires minimal decorating. Its beauty comes from the light airy texture the sponge provides, that pairs perfectly with the simple but oh so tasty, jam and whipped cream. It really is so light and not heavy to eat, you will go back for a second slice! (For our US readers, we Brits use the word sponge for some of our cakes. You might also hear or read the cake being called a Victoria Sponge Cake, but the real name is Victoria Sandwich Cake.
Why Is It Called A Victoria Sandwich?
This popular tea-time cake, goes back to the time of Queen Victoria. It is said that Queen Victoria enjoyed a slice of Victoria Sandwich cake with her afternoon-tea. But it pre-dates even when Queen Victoria enjoyed it. To read more on its history, visit – Grant’s Bakery – History Of Victoria Sponge Cake.


Why Make This Cake?
- Easy & straightforward
- Make in the oven or larger, open-front air fryer
- Tastes amazing!
- Full step-by-step instructions
- Video tutorial
- Minimal decoration required
- Enjoy with your favourite berries
- Used in a Facebook Bake Off group competition


Facebook Group Baking Competition
My recipe for this raspberry ripple Victoria Sandwich cake was used in Facebook group The Great British Bake Off Fans. I now run the group, but at the time had the privilege of running a group weekend bake-along, where we all used the same recipe. Both UK Self-raising flour & Plain flour (A.P. flour) were used, as well as a choice of fillings and decoration. Many cakes were made that weekend, including bakers from across the world, who had never enjoyed a Victoria Sandwich cake before.
In the photos, are examples of the bakes produced, as well as the winning entry by Anita in the centre. I think they all did a marvellous job. (Cakes by (left to right, row 1 to 3) – Cindy R, Fozia A, Meghan P, Karen J, Anita J, Laura H, Jamie M, Sally P & Tracy H. Well done bakers!!!


And here below is a lovely photo by my good friend Diana, who also recipe tests for me, as well as regular editing of the recipes.


Other Tin Sizes?
Want to use a different sized cake tin/pan? Then try my calculator and instructions on how to increase a recipe for a bigger tin, or how to reduce a recipe for a smaller tin, so you can accurately adjust the recipe without any fails.


Ingredients & Alternatives


This raspberry jam ripple Victoria Sandwich is made from the following ingredients:
- Unsalted Butter
- Caster Sugar
- Eggs
- Vanilla Extract
- Milk
- Flour
- Baking Powder
- Raspberry Jam
For Filling & Decoration:
- Whipped Cream
- Raspberry Jam
- Fresh berries (optional)
- Icing/Powdered Sugar
*See notes below
Eggs
UK medium or large-sized eggs are used and the US equivalent is large to extra large sized. Make sure at room temperature too.


Unsalted Butter
The use of unsalted butter is always advised for sweet or savoury baking, to ensure best & consistent results. You can even make your own butter & buttermilk easily too with cream about to expire.
I always advise to cube the butter small, to about 1cm, ⅓” size, and the smaller surface area results in the butter softening & coming to room temperature quicker.


Sugar
Caster Sugar is used a lot in British baking, but not just for sweetness but to help build structure for a lighter cake. This finer sugar, creates friction when ‘creamed together’ with the butter, introducing more air into the batter. The US equivalent is Extra/Super Fine Sugar & you can even make your own by blitzing granulated sugar. See my sugar comparison photo for reference.


Vanilla Extract
Never use vanilla essence or flavouring, nothing compares to extract. You can save money in the long-run by making your own homemade vanilla extract.
Or, even try my alcohol-free vanilla, that you can also use for other extracts too.
Milk
A little milk is used in this raspberry Victoria sandwich cake, and any kind is fine. You can also use warm water as a substitute. Lactose-free milk or plant-based milk should be fine too.
Flour
Plain (All Purpose) or UK Self-raising flour can be used. If using the Self-raising, omit the baking powder. The recipe has been tested by myself and others using both kinds of flour.
Raspberry Jam
I love using Lidl’s raspberry jam (well they call it a preserve). it is so tasty and thick too.
You could use another favourite jam flavour if you like. Apricot or cherry would be nice. The jam is added to the cake batter as well as a layer sandwiching the cake layers.


So if possible, hold off with adding fruit to the top till near the time to serve to share. Any fresh berries you have will be nice. Strawberries, blueberries, raspberries, anything you like. Kiwi would have given a nice pop of green colour.
Equipment
Not much in the way of equipment needed for making this cake. All items listed in the recipe card below. An electric mixer is ideal, as is two 8″ (20cm) round cake tins.
You can make in a smaller or larger round tin, just see my link above for how to increase or reduce a recipe.
Recipe Yield
This recipe makes one 8″/20cm, 2 layer cake, that can serve 10-12 slices.
Step-By-Step Instructions


Prepare The Batter
1. Start by cubing your butter in small pieces (about 1cm, ⅓″) and this smaller surface areas means that the butter softens quicker. (See Photo collage 1).
2. If you forget to take out the butter in time, watch this hack I tried – Soften Butter In About 12 Minutes.
3. Add the sugar and softened butter to a mixing bowl & briefly mix by hand. Then move onto using an electric mixer and ‘cream together’ the butter and sugar until creamy, soft, paler in colour & spreadable. See Photo collage 1 & the video for reference. This method, rather than the ‘all-in-one’ is better for this kind of cake.

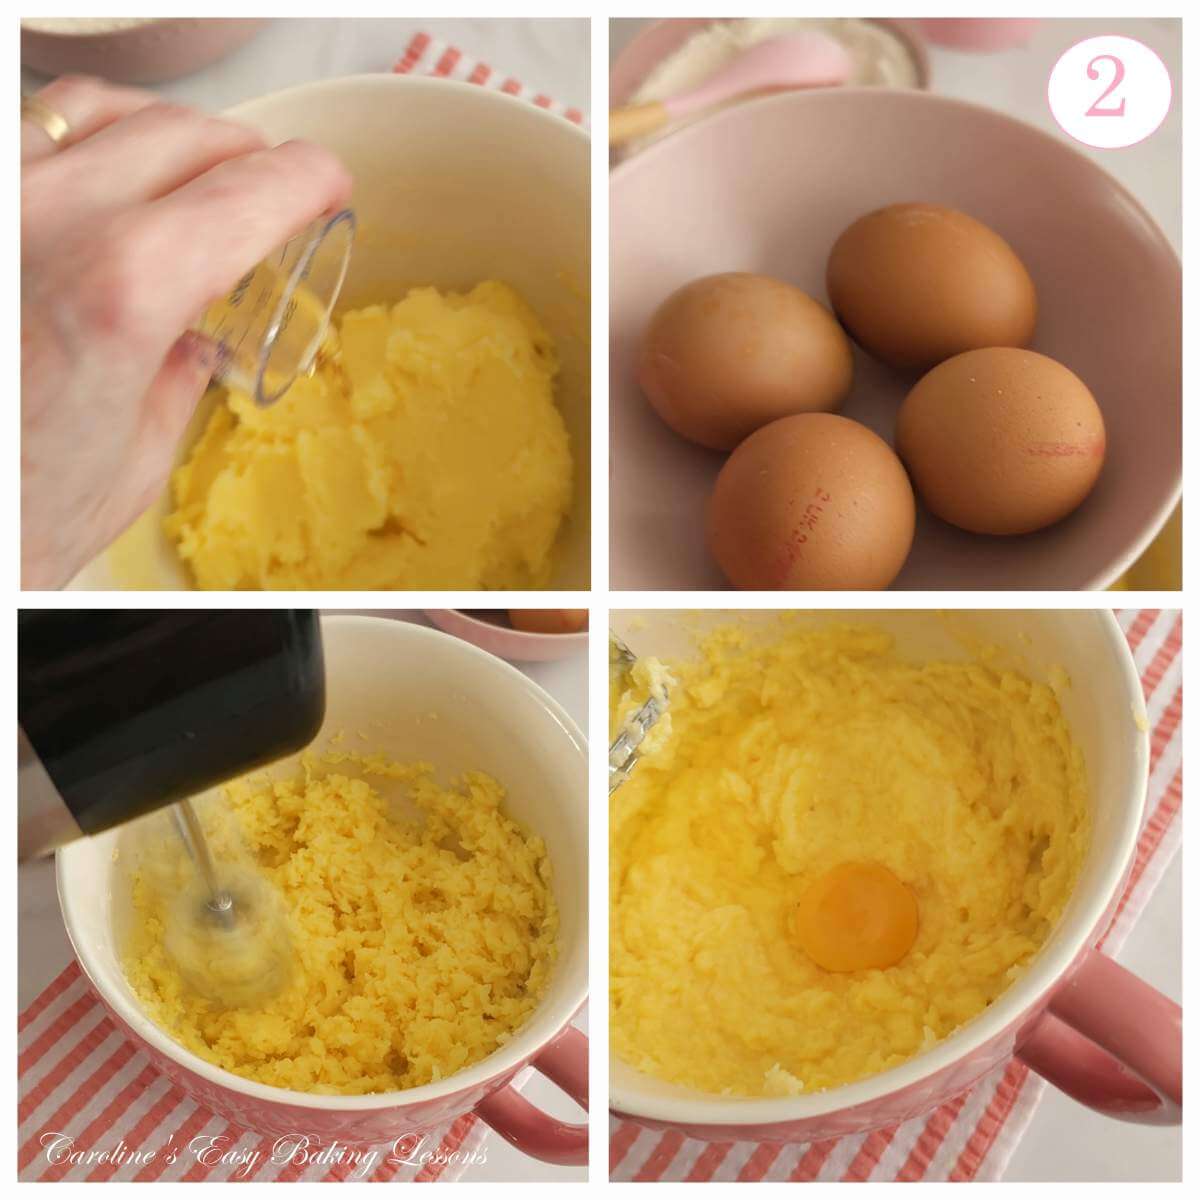
4. Next add in the vanilla extract & mix to combine.
(Learn how to make your own homemade vanilla extract, or even try alcohol-free vanilla and other extracts.
5. Add in one egg at a time, mixing in-between each addition. Never add eggs all at the same time, for a better emulsification into the batter and make sure the eggs are at room temperature, if you store them in your fridge in your particular country. See photo collage 2.
6. Pre-heat your oven to: 180c/160c Fan oven/350f/Gas Mark 4.


7. Now sieve over the flour and baking powder (omit the baking powder if using UK self-raising flour). Mix them together while in the sieve. Then push through the sieve.
**Top tip – for lighter batter and to incorporate more air into the batter, hold the sieve as high above the bowl as possible (without making a mess of course). See photo collage 3.
8.Add the milk to the batter & mix with your electric mixer, on medium speed, until all combined and no dry patches remain at the bottom. Remember to not over-mix as it can deflate the batter.


Grease The Cake Tins
1. Prepare the cake tins by well greasing and paper lining the bottom. I like to use either FryLight cooking spray or homemade lining paste (cake goop). Alternatives are cake release spray or coating with butter and flour.
2. Apply the spray/paste well to the bottom or up the sides of the inside of the tins. (For the paste, brush in upward strokes).
3 Cut a paper round to fit the bottom of the cake. Cutting just a tiny bit smaller to fit nicely and for no paper to bake into the cake. See my cutting parchment circles lesson & video

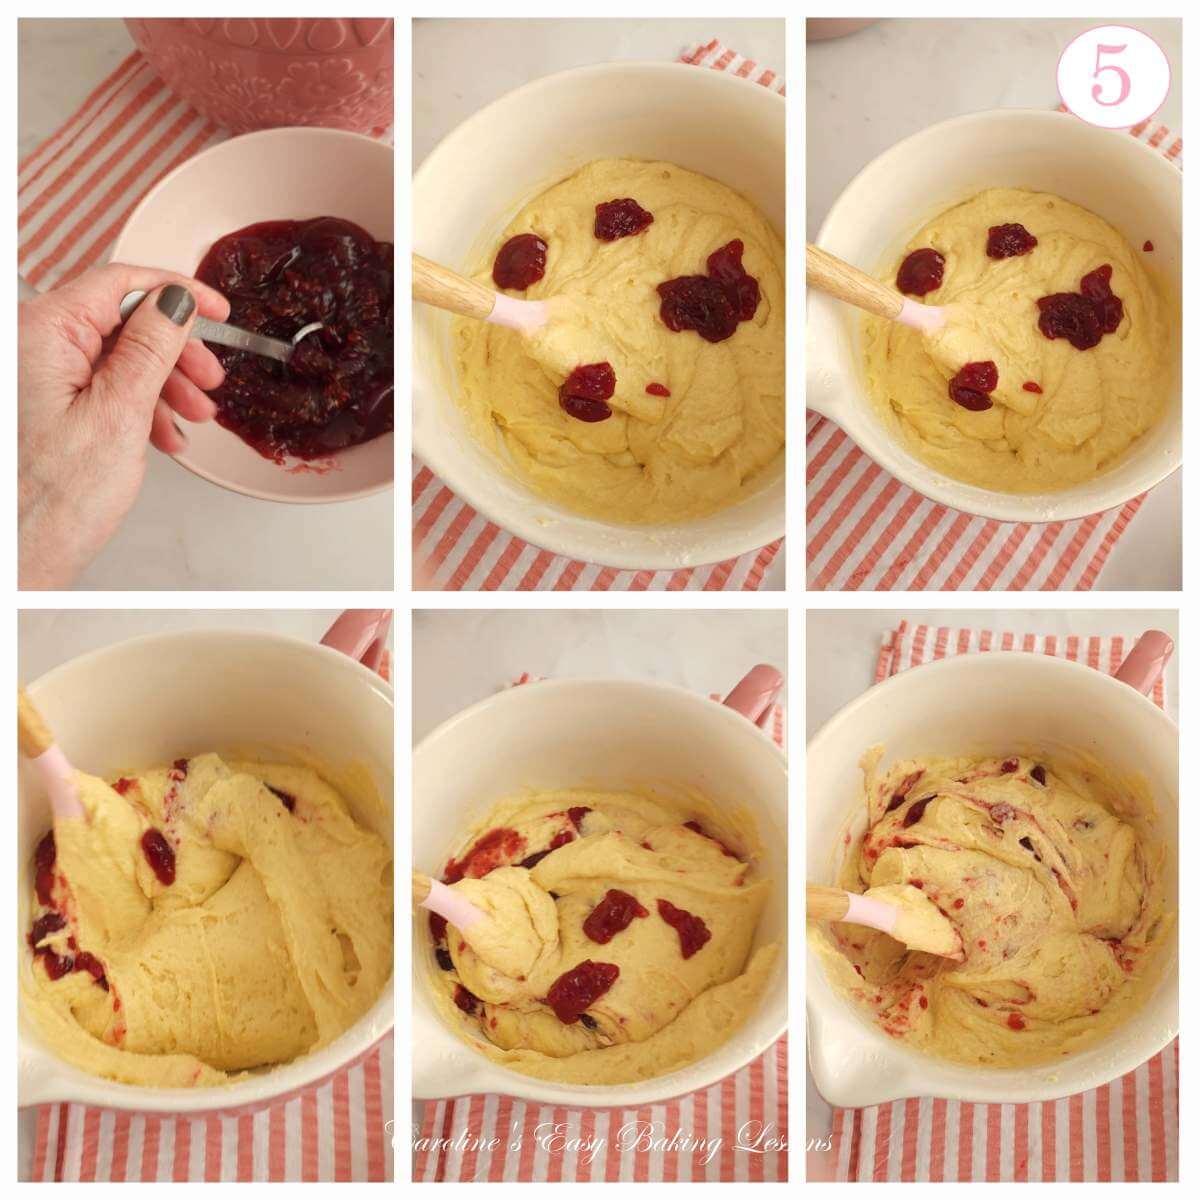
4 Add 4 teaspoons (tsps) of the jam/preserve spread over the top of the batter, (you can thin it down a little if needed but make sure not it is not too liquidy).
5. Very gently and briefly ‘fold’ the jam in. (Think of the spatula as your pen and the batter the paper. Image writing a number 8. See the video below for how to do this important baking technique.)
6. Then add 3 teaspoons more jam to bare areas of batter, fold in again & repeat with another 2 teaspoons of jam. The batter should have swirls or jam through it and not be completely mixed through. See photo collage 5.


7. Add the batter into the prepared cake tins, dividing equally between the two tins, as best you can. Smooth and level the batter.
8. Add the remaining 6 teaspoons of jam/preserve to the top of the batter between the 2 tins, in drops. Then use a wooden cocktail stick to draw the jam lightly through the top layer of batter. See Photo collage 6 where it is not mixed into the cake batter.
9 Gently tap the cake tins on the counter/worktop a few times, and then pop in the centre of the pre-heated oven.


Baking The Cakes
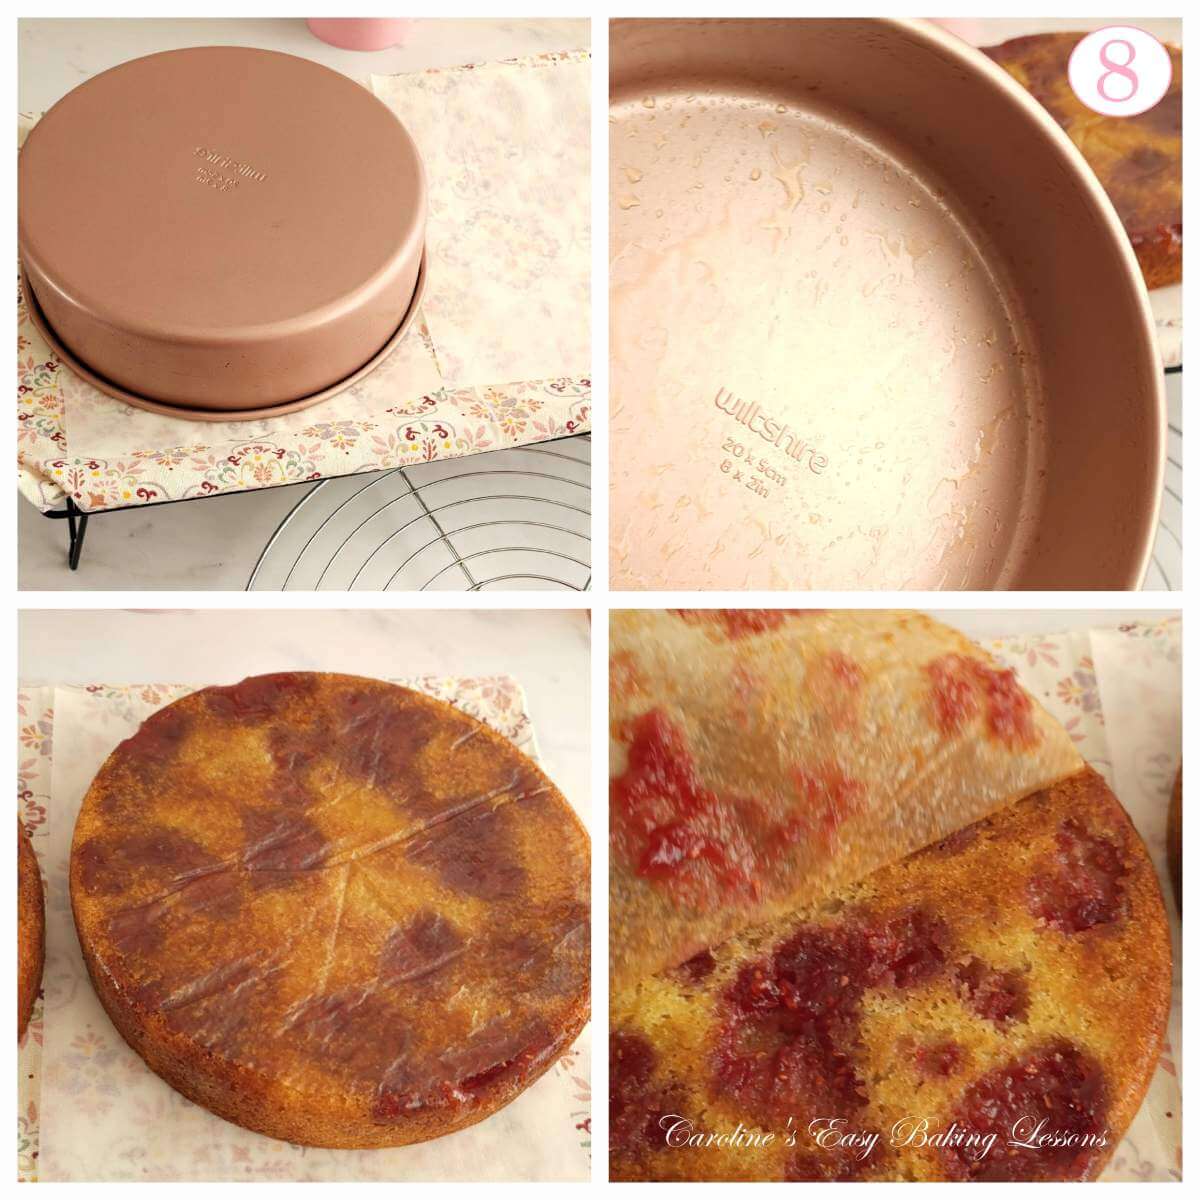
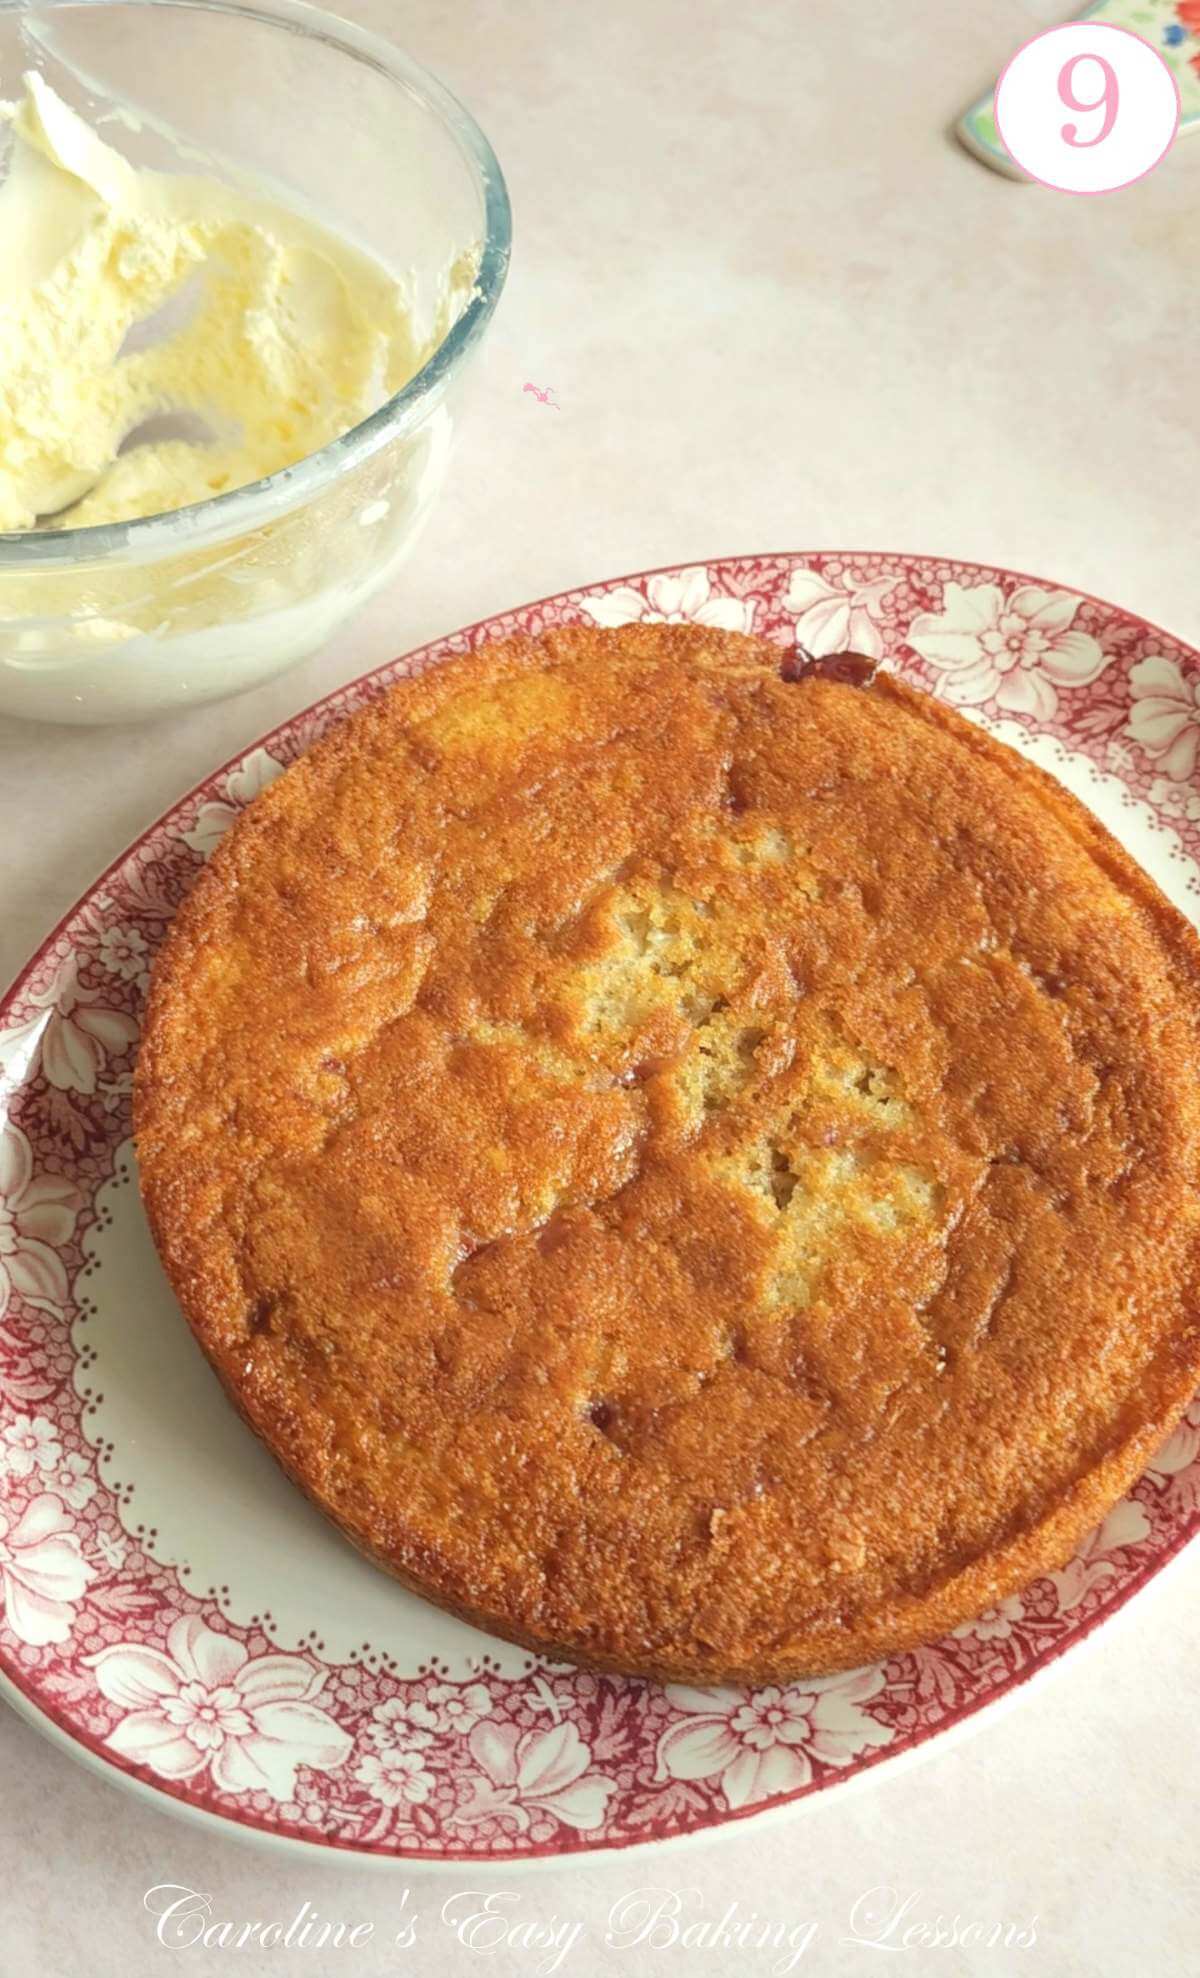
1. Bake the cake sponges until risen, a deep golden colour and a wooden cocktail stick comes out clean of crumbs. See Photo 7. This can take between 20 – 30 minutes. My bake off at about 25 minutes. You can turn the tins for an even bake if needed, but wait till at least 15 minutes before opening the oven.
2 Remove from the oven and place on top of a cooling rack for 15 minutes.
3. Then move the tins to the side while you place a folded tea-towel & parchment/baking paper on top of the cooling rack. Next, turn the cakes over, onto the lined cooling rack & lift off the tins. . (If sticking at all, run a cocktail stick around the edges of the cake.)
**Top Tip – the lined cooling rack stops those tell-tale lines that sometimes home bakers have on the top of their sponge cakes. Reduces the chances of the cake breaking too.
4. Leave for 5 minutes before carefully peeling back the paper circle, peeling around the edges first & then working your way into the centre. If the paper doesn’t want to come off easily, then leave to cool longer.

5. Leave the upside-down cake layers on top of the cooling rack for at least 30 minutes to cool completely before filling.
**Top Tip – you can make cake layers ahead of time, (up to 3 days before). Simply let them cool completely as instructed, then wrap individually with cling film/plastic wrap. Then stack them, (ideally the way you want them later, and this also helps flatten/level them), and leave out at room temperature. No need to put in the fridge, where the cakes can sweat.

Filling & Decorating The Cake
1.Start by whipping some double/heavy/whipping cream with an electric mixer, until you have medium to firm peaks. You can add a splash of vanilla if you like but we like as it is. (The cream can be made earlier in the day too)
2. Place your flattest cake layer on a cake stand, large plate or platter for serving. If your cake is domed, just place down flat side down.
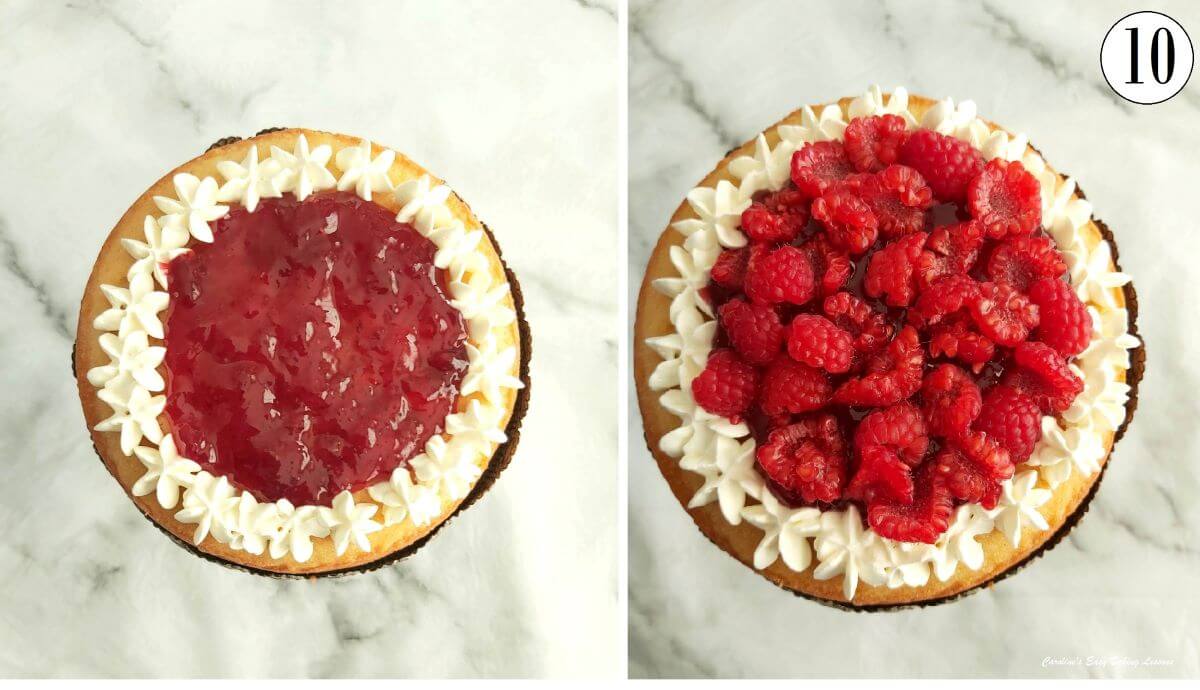
3. Add spoons of the whipped cream near the edge of the cake, forming a border. Go for a nice thick layer & then add some to the centre. Use a spatula (an off-set one is good), and spread the cream to make a flat layer. To keep the edges a bit neater, try to not go too near to the end.
4. Alternatively, you can pipe the cream, using a nozzle such as a closed star-tipped nozzle like a 2D. (Read all about piping bags & assembly in my beginners’ guide to piping bags.)


See my Classic Victoria Sandwich Cake Recipe For Beginners, where I piped a tall layer of cream rosettes in Photo collage 10. The photo also shows a comparison of a great tip I came up with. To reduce the chances of the cream completely buckling when the top cake layer is added, I always recommend chilling the cake with the cream layer alone, for at least 30 minutes. This gives the cream a chance to set a little before adding the top cake layer. **See my comparison in photo 10.


5. Once the cream is added, drop about 4 teaspoons (tsps) of the jam on top of the cream in the centre & spread as best you can. Alternatively, you can just have the cream as a border and the jam as a single layer in the centre. (See Photo collage 11 below for some other filling ideas).
6. Slice some fresh berries, strawberries, raspberries, blueberries for example and place a few on top of the jam. Try not to add too many as the added moisture from the fruit, does make the cake not last as long as if it was just cream and jam.
Ideas For Filling Your Cake


7. Then carefully place the 2nd cake layer on top. Flat or rounded side up, Victoria Sandwich cakes tend to have a slight dome, but the inclusion of jam, reduces this.
8. Dust the top with a fine layer of icing/powdered sugar and some more of the berries if you like.
**It is advised to not add the sugar or fruit, too early as again the moisture from the fruit can start to seep into the cake. The icing sugar, tends to be absorbed over time too. Same day as serving would be ok. No longer than that if selling the cake, otherwise, it does not really take away from the taste of the cake.

Serving & Storing
1. Serve the cake by slicing into 10-12 triangle portions and serve with your favourite tea.
2. You can omit the fruit. Just a layer of jam (usually raspberry) & fresh whipped cream (not buttercream), is very traditional and last longer.
3. Store the cake at room temperature if not too hot, or if all is going to be eaten same day. Cover with a cake dome or upturned large container.
4. Only store in the fridge if really needed. The fridge can cause condensation and for the cake to weep. Slicing from the fridge will make it easier to cut, but over time, the light texture of the cake will change from being in the fridge.
5. The cake will be fine for at least 3 days stored this way.
6. Undecorated and fully cooled Victoria Sandwich cake layers, can be frozen. Freezing an assembled and filled cake is not recommended, Wrap individually in cling film/plastic wrap then foil or paper & place inside a labelled food bag or air-tight container. Place away from the front of the freezer door and this will be fine for up to 3 months1.
7. Website Freezeit.co.uk recommend defrosting Victoria Sandwich cake layers in the fridge overnight, as thawing at room temperature can dry the cake out2.
DIFFICULTY LEVEL: easy, beginner
Other Cake Recipes
Like some more Victoria Sandwich cake recipes, or other layer cakes? Then look no further. Here is the classic Victoria Sandwich cake below, my Chocolate Victoria Sandwich, or how about a Funfetti Layer cake, or an air fryer Black Forest Gateau cake from scratch.


Recipe Card
Raspberry Ripple Victoria Sandwich Cake

Equipment
- 7" or 8” (17½-20cm) Cake Tin x 2 (Also known as Sandwich tins. See notes for bigger/smaller tin sizes)
- Baking/parchment paper
- Baking spray, lining paste, or butter to grease (see note in instructions, or make Lining Paste)
- Scales or measuring cups
- Measuring Spoons
- Hand/stand mixer
- Sieve
- Large Metal spoon
- Small bowl for jam/jelly swirl
- Timer or Phone Timer
- Cocktail sticks
- Cooling rack
- Baking Palette knife or butter knife
- Clean Soft Tea-towel (optional)
- Small measuring jug (optional, if piping cream)
- Bowl for whipping cream
- Small sieve (optional), for icing sugar
- Piping bag & nozzle (optional, or food bag)
Ingredients
- 225 grams Butter (8 oz, 1 cup/ 2 sticks, unsalted, soft & cubed)
- 225 grams Castor Sugar (8 oz, 1 cup of super/extra fine sugar, Domino’s etc. *See note above)
- 4 Eggs (Medium to large, US Large – XLarge eggs)
- 225 grams Plain Flour (8 oz, 1¾ cups All Purpose Flour, OR UK Self-raising, less the baking powder)
- 4 tsp Baking Powder (omit if using UK Self-raising Flour)
- 1 tsp Vanilla Extract (read about Homemade Vanilla Extract)
- 1 tbsp Milk
- 5 tbsp Raspberry jam (100g, 3.5oz, jelly/preserve)
For Filling & Topping
- 180+ ml Double Cream (Minimum 6 fl oz, ¾ cup Heavy/Whipping cream unwhipped, up to 9½ fl oz, 1⅛ cup if using on top too)
- 3 tbsp Raspberry Jam (60g, 2oz, or own choice, sour/black cherry is nice too)
- Few Tbsp Icing/Powdered sugar
- Fresh Berries (optional), see notes*
- OVEN: 180c/160c Fan Oven/350f/Gas Mark 4
Instructions
Prepare The Batter:
- Cube and weigh out your 225 grams Butter and leave to soften. A smaller surface area will soften quicker and be easier to mix with. I like to cut them about 1cm, ⅓″ size. If youare in a hurry, or forget to take it out on time, here’s a hack I tried. Soften Butter In About 12 Minutes.
- Add the 225 grams Castor Sugar & soft butter to a mixing bowl & ‘cream’ together till combined, lighter in colour and texture, and spreadable.
- Next add in the 4 Eggs , one at a time, mixing in-between eachaddition. Don’t worry if the batter looks curdled, it will bake fine. Now mix in the 1 tsp Vanilla Extract just till combined.
- Sieve over the 225 grams Plain Flour (and 4 tsp Baking Powder if using Plain/A.P.flour), on top of the batter. Start to mix by hand, then proceed to mix on low to start. Add the 1 tbsp Milk, increase speed & mix just until everything is combined. Do not over-mix.
- Heat up the oven to 180°c/160c° Fan oven/350°f/Gas Mark 4.
- Now in a small bowl add about 1 tsp water to the jam/jelly and mix to combine. Just enough to thin slightly, but will depend on how thick and jelly-like your jam is. See the video for the consistency.
- Add about 4 individual teaspoons of the jam to the top ofthe batter in separate drops over the top. Then use a baking spatula to gently lift the batter from the bottom of the bowl, and fold over the top of the jam. No beating of the batter, but rather a brief gentle folding over motion. Then add in 3 more drops of the jam to the batter and fold in gently again. Add 2 more drops and hold back the remaining jam.
- Oil or grease your baking tins well, paying particular attention to the sides. Place a circular piece of baking/parchment paper on the bottom of the tin. I recommend homemade lining paste/cake goop or FryLight cooking spray to grease. See my video for how to cut the paper circles.
- Now spoon the batter evenly between the two tins and smooth out. Using a small spoon, drop spoonful’s of the reserved jam/jelly over the top of the cake batter. See video or step-by-step photos above. You can use a cocktail stick/tooth pick to make gentle swirls in the top of the batter if you like. Tap the tins a few times on the counter/worktop to expel any trapped air.
Baking & Cooling:
- Place the 2 tins in the middle shelf of the oven and bake for about 20 – 30 minutes. If your oven doesn't bake evenly, you can turn the tins, after the half-way mark. So wait till at least 15 minutes. Check they are done with a cocktail stick, they will have risen, be golden and starting to come away from the sides of the tins. Leave to cool in the tins, on a cooling rack for 15 minutes.
- Run a cocktail stick around the edges of the cake tin if needed, and turn the cakes out onto the cooling rack (after you have tea-towel and paper-lined the rack). Leave for 5 minutes before you try to carefully peel the paper off the cakes. If it isn’t coming off easily, leave it to cool more.
Assembling & Decorating:
- While the cakes are cooling, using an electric mixer, whip up the 180+ ml Double Cream until very thick & stands tall with stiff peaks. You can add a little vanilla and icing/powdered sugar to the cream if you like at this stage but is optional & added to taste.
- Once the cakes are cooled, place the layer of sponge you want to be on the bottom, onto a cake stand or nice large plate. If this base layer of cake is domed (rounded) too much, turn upside-down.
- Pipe or spread a thick layer of cream on the cake & add 3 tbsp Raspberry Jam on top in the centre. Other options are shown in the step-by-step instructions above.
- TOP TIP FOR PHOTO READY CAKE – for the cream to hold its shape better once the top layer is on, and not buckle from the weight, pop the cream topped bottom layer in the fridge for at least 30 minutes. (10-15 mins in the freezer). Add some fruit slices (not too many) & optional. Then place the 2nd cake layer on. Don't be tempted to push down or squeeze the cake. Chilling also helps with cleaner slices, so you can even chill again after decorating. Just note that the longer it is in the fridge the more chances of condensation.
- You can leave it like this, or dust with sieved Few Tbsp Icing/Powdered sugar as is the classic way. Alternatively, you can pipe more of the cream to the top of the cake, and decorate with more Fresh Berries. Ideally add the decoration to the top beforeserving as the moisture from the fruit can start to seep into the cake.
Serving & Storing:
- Serve straight away or store in a cake stand preferably somewhere not warm and eat within 3 days. Just like before, you can chill the cake shortly before slicing it to get nicely cut slices.
- The baked, cooled and undecorated cake layers can be made ahead. Just wrap in cling film/plastic wrap, stack on top of each other & leave out at room temperature for up to 3 days before assembling.


- Alternatively, freeze the undecorated cake layers. Wrap individually in cling film/plastic wrap, then paper or foil and place in a labelled food bag or air-tight container, for up to 3 months1. Defrost in the fridge overnight.
- Top Tip – you can also store in large, deep airtight container. Just place it on the under-side of the lid and stored with the box upside down so it’s easy to get out later.
Video
Notes

 Yield – 1 large 8″/20cm layer cake, with average yileld 10-12 slices.
For more ingredient information, please see before the step-by-step instructions. **As well as reader’s photos of this cake, from a Facebook group competition.
Yield – 1 large 8″/20cm layer cake, with average yileld 10-12 slices.
For more ingredient information, please see before the step-by-step instructions. **As well as reader’s photos of this cake, from a Facebook group competition.

 Raspberry Swirl Victoria Sandwich Cake
Want to use a bigger or smaller cake tin? Check out my How to increase a recipe for a bigger tin size article. Or the How to reduce a recipe for a smaller tin size version.
Raspberry Swirl Victoria Sandwich Cake
Want to use a bigger or smaller cake tin? Check out my How to increase a recipe for a bigger tin size article. Or the How to reduce a recipe for a smaller tin size version.
 Classic vanilla version of Victoria Sandwich cake above. See also my Chocolate Victoria Sandwich recipe.
Or why not try my popular British Scones Tutorial, with almost real-time video? Or even check out my Tea Party & Coronation Ideas Page.
Classic vanilla version of Victoria Sandwich cake above. See also my Chocolate Victoria Sandwich recipe.
Or why not try my popular British Scones Tutorial, with almost real-time video? Or even check out my Tea Party & Coronation Ideas Page.


Nutritional Information – I am not a qualified nutritionist and all values are approximate. These are based on using ingredients as listed in the recipe card, with 8 medium strawberries, 60g blueberries & where 1 serving is 1 slice from a yield of 12 slices (from using two 8”/20cm cake tins). Make bigger or smaller slices, and these values will change. Values are calculated via MyFitnessPal.com.


Subscribe For More Recipes
Want more great recipes, tips, baking information and newsletters? Then please consider subscribing by adding your email address below. Be sure to check for a confirmation email & respond back, so you can follow me & receive your free emails. Your personal information will not be shared with a third party.
Join My Facebook Group
Why not also join my – Facebook group Easy Online Baking Lessons, dedicated to this baking lessons website, as well as providing one-on-one support with myself & my team? Be sure to answer all security questions when requesting to join.
Follow me on social media:
Happy Learning & Baking!
Caro x
Raspberry Ripple Victoria Sandwich Cake
Search For Something You Fancy!
Caroline’s Easy Baking Lessons
Reference:
- Freezing Victoria Sandwich cakes information from https://www.freezeit.co.uk/can-you-freeze-victoria-sponge/ ↩︎


Love this recipe. It’s a nice variation on victoria sandwich. The instructions are excellent with each step explained with photos. Thanks again for another delicious recipe.