SIMPLE FALL FONDANT PUMPKIN & LEAVES TUTORIAL

Learn how to easily make little fondant pumpkins and Autumn/Fall leaves, to use with your cakes, like this pumpkin Swiss roll!
SIMPLE FALL FONDANT PUMPKIN & LEAVES TUTORIAL


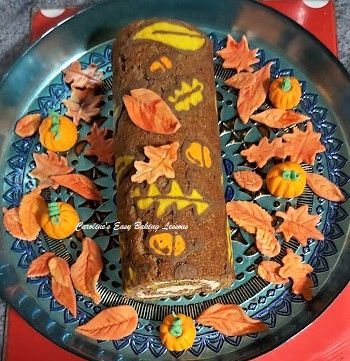
I recently made a patterned pumpkin role for two Facebook competitions and since I didn’t have any Autumnal decorations (and believe me I collected leaves from the garden, but they were all a yucky yellow colour), I decided to make some from fondant. I opted for little pumpkins and some Fall leaves, since I had recently purchased a mini leaf cutter that would fit the bill. In the end I won one of the competitions.
*Here’s the recipe I used for the Patterned Pumpkin Roll, made using my own Roasted Pumpkin Puree recipe.


Now I have written up a photo tutorial on how I made these fondant Pumpkin & Fall Leaf decorations. I have no training in this field, but lots of practice and will explain how to make it as clearly as possible, with lots of photos to guide you.
After the photo tutorial below, I have added Tips For Working With Fondant. Make sure to read that first before attempting any fondant work, and you will be in good stead.
I hope you benefit from this photo tutorial, and please see my other fondant tutorials on my website – go to other fondant photo tutorials.
Equipment For Making Fondant Leaves & Pumpkins


- White fondant, or lemon, orange & green fondant
- Food colouring – orange, brown, red, (yellow – optional)
- Wooden Cocktail sticks
- Baking/parchment paper
- Latex gloves
- Fondant Rolling mat (optional)
- Fondant Rolling Pin, or regular one
- Leaf cookie cutters
- Sugar craft tools, or a very thin paint brush, bbq skewer or toothpick
- A small paint brush (craft size)
- Alcohol for glazing (optional)
- Cling film/plastic wrap
- Small knife or craft blade
Instructions For Fondant Leaves


Step 1: Colouring The Fondant
1. Start with a pale yellow fondant, (I coloured white with some yellow food colouring). Add dots or scrape little bits of the orange food colouring on top of the flattened yellow fondant, spreading it apart and not clumping the colouring in one spot (see Photo 1, middle pic). Then fold the fondant into the centre and squeeze it together into one flat piece like in Photo 2 below (left pic). Don’t knead the colour in as you don’t want it just to be a solid orange colour. It should be streaked.


2. Now make some burnt red/orange colouring by mixing red and brown colouring (see Photo 2 above, middle & right). Mix them together with a wooden cocktail stick and I did this on some baking/parchment paper and used gloves as it stains your hands.
3. Add the ‘burnt orange’ colour you just mixed, onto the yellow fondant. Colouring in streaks and folding the fondant like before. Flatten a little and add more streaks of colour. (See photo 3).


4. Continue adding more streaks of colour and flattening, and add to the back of the fondant too, until you get a kind of marbled fondant the right shades you are aiming for. Think burnt orange/brown, orange and yellow shades. (See Photo 4 above and Photo 5).
5. I then rolled my fondant out between a fondant mat that comes in 2 pieces, that allow you to roll out without using any sugar/flour and it has measurements on it in cm & inches. It is made by Iced Jem, who also have an online shop – View The Large Fondant Rolling Matts At Iced Jem. Alternatively use 2 sheets of baking/parchment paper. See Photo 5. Be sure to roll very thin to make the leaves look more realistic.


Step 2 – Cutting Out The Fondant Leaves
1. Cut out your leaves with the cookie or fondant cutters, or make some free-hand with a sharp knife or craft blade, (I made some leaves by free-hand in the middle pic). You can dip the cutters in some icing/powdered sugar if needed. When picking up the scrap pieces of fondant, do not knead it, or form into a ball. Just squash it together roughly (see right pic in Photo 6 above) as kneading it will remove any marbling. Then roll out again, cutting out more leaves until you finish the fondant or have enough leaves.
Top Tip – always make more than you need with fondant. Good to have spares in case any break or you aren’t happy with them.


Step 3 – Adding Detail To Your Fondant Fall Leaves
1. Let the leaves dry a little on baking/parchment paper while you are making them. Then proceed to making them detailed by adding veins. Use a sugar craft veining tool (like in Photo 7 above, centre pic). I also used a pastry roller to get the effect down the middle. You can also use a small knife, the end of very thin artist brushes, cocktail sticks or even bbq skewers, to create this indent effect on the leaves.


2. Gently curve the fondant Autumn leaves to make them look almost 3d & more realistic. If they won’t stay in position, just use something small to support it till it dries and sets in position. Bend at random areas so they are not all identical.
3. Once completely touch dry, you can choose to glaze them with alcohol (I used whiskey instead of clear alcohol just to give them a tinge of colour to go with these Autumnal themed leaves. Alternatively use Vodka/Gin, or water. But note the water will evaporate quicker. If not going to eat them, you can use egg white for the same effect). You don’t need to glaze them, but I like the effect as if they were wet from rain on an Autumn day. Leave till touch dry and then you can cover well on a tray or plate, with cling film/plastic wrap until ready to use.
How To make Fondant Mini Pumpkins
Step 1 – Colouring The Fondant
1. Colour white fondant bright orange, as before in colouring for the fondant leaves above only with no streaking, and knead the colour through. You want a bright vibrant orange like in Photo 9 below. Add the colour gradually and let it develop before adding anymore. Alternatively buy orange fondant already coloured.


Step 2 – Forming The Fondant Pumpkins
1. Roll some little balls of orange fondant – they don’t all need to be the same size but mine were about 3cm (1 1/5 inch). (See Photo 9).
2. Make a hole in the centre of the top of the pumpkin ball (you can use the end of a small fine paint -brush, fondant tool or toothpick). See Photo 9, middle pic where I used a star tipped sugar craft tool and widened the hole.
3. Then hold above the hole and underneath the pumpkin, with your thumb and index finger. Take the veining tool (or something similar – see photo 9, right pic), and press lines on the pumpkin to give it that characteristic look to its skin. Press and curve down to indent to just under the bottom edge of the pumpkin. Be very careful to keep your fingers off the sides. (See Photo 9, right pic).
SIGN UP FOR MY NEWSLETTER – I would love it so much if you could sign up for my newsletter. I will send out monthly emails, showing the latest recipes and articles, and latest info. Being a site without ads, building a following, is even more important and will keep it up and running and for free to everyone. Occasionally there will be the odd seasonal emails, but is really a means of reaching you, if you are not already in one of the Facebook groups I admin. Please note too, that these email addresses are not shared or sold onto another party. Thanks so much, Caro xxx


4. Then apply a small amount of food glue or water to the hole in the top of the fondant pumpkin. (See Photo 10, left pic).
5. You can either roll out the green fondant and cut thin strips for the pumpkins greens or, as I preferred, rolling very thin long sausage shapes/strands, as they didn’t break as much.
6. Wrap the green strands very gently around the end of a bbq skewer or end of a very thin paint brush and then carefully pull off and rest gently on some baking/parchment paper. Make lots as they do break easily. See Photo 10, middle & right pic. (But don’t worry, as not all pumpkins are perfect and identical, so don’t throw them away just yet).


7. Carefully position the green or greens into the hole in the pumpkin and leave them to set. See Photo 11. If any of the pumpkin skin detailing is fading, re-do very carefully.
Step 3 – Finishing Touches
1. Continue making some more pumpkins, and then leave to dry and harden a little, for about 30 minutes.
2. You can then glaze with some alcohol if you want (there are other options on the internet) and leave to set and dry to the touch. Drying time will depend on the ambient temperature.
3.Then cover with cling film/plastic wrap until ready to use. .


TIPS FOR WORKING WITH FONDANT
- ALWAYS use gloves when using food colouring & new ones for each colour – it stains really badly.
- Use colouring paste or gel – less moisture makes working with fondant easier & a paste is best.
- For natural colourings use things like beetroot.
- Practice with any colour or technique you want to try out as you will learn from practice.
- Baking/Parchment paper is good for working on – also means no staining to worry about.
- Leave to dry a little if too soft to work with – expose to air & it will harden a little. Too hard, knead till soft.
- Always roll the fondant very thin to make the decorations look more realistic.
- Use household objects in place of fondant tools – knife and wooden cocktail stick as examples.
- Give a 3d look to your decorations by bending them.
- Add edible glitter/lustre dust for details and shading – adds more realism.
- Give a shine with clear alcohol – this also helps preserve the fondant a little longer too.
- Store in room temperature and covered well with cling film/plastic wrap.
- Store coloured fondant & decorations away from direct sunlight as it will fade the colouring over time.
- Do not store in the fridge as it will sweat and weep – so best to add to cakes at the last minute rather than put on top of a cake and place in the fridge, for the fondant to weep into the cake/buttercream.
- You can make fondant decorations ahead of time. You can make, days or even weeks before. Just well wrap in cling film/plastic wrap.


Please see the sharing options or even printing, at the right/bottom of your screen (bottom of your screen for mobiles, and down the right-hand side on computers). You can even pin this to your own Pinterest page. Alternatively, you can download this article, see below. You could also leave some feedback if you like.
Click the ‘Download’ button below, to save to your phone or computer.
DIFFICULTY LEVEL: beginner, easy with guidance


Follow me on social media:
Thanks for reading
Happy Baking & Learning!
Caro xx
Caroline’s Easy Baking Lessons


